
Horizontal Timeline Widget Overview
This tutorial explains what steps you need to take in order to add a horizontal timeline to your website using the JetElements plugin.
With the Horizontal Timeline widget from JetElements, you can let the visitors know about events and projects showcased on your website. It is a great tool for organizing your events in an appealing way. You can add any content, icons, images, and description to the timeline.
From this tutorial, you will learn how to create a really neat and easy-to-follow timeline for your website. Now, let’s dive into this process!
1 Step — Enable Horizontal Timeline
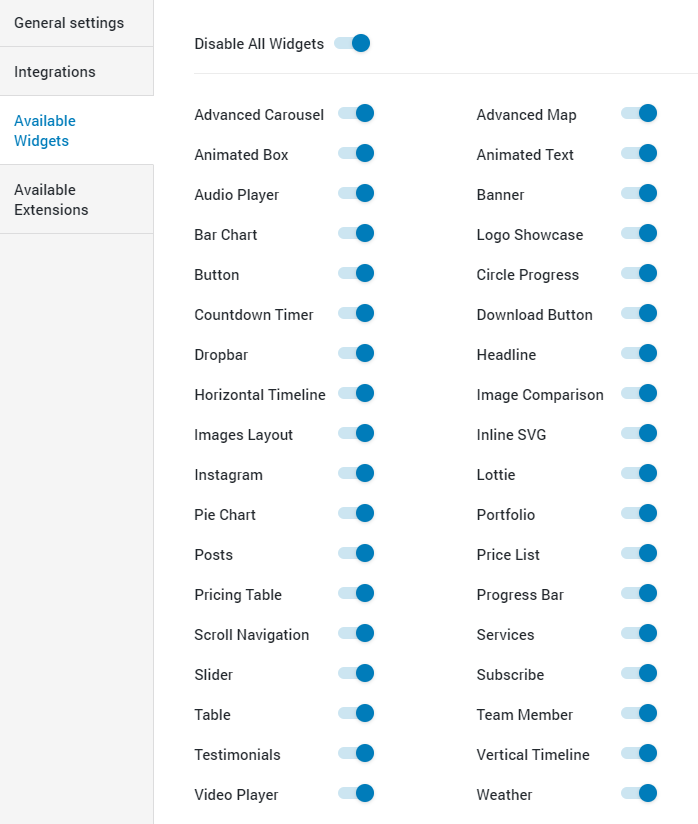
Navigate to the JetPlugins > JetElements Settings > Available Widgets and turn on the Horizontal Timeline widget.
2 Step — Add the Horizontal Timeline Widget to the page
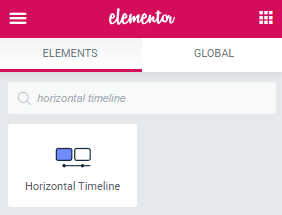
Open the page where you want to add a horizontal timeline element and click on the “Edit with Elementor” button. Find the Horizontal Timeline widget and drag it to the section where you want to place it.
3 Step — Define the Settings
You’ll see the basic preset of the timeline, but you can change it according to your preferences. Let’s take a closer look at each of the settings blocks.
Items Settings Block
As you can see, the timeline consists of cards. You can freely delete and duplicate the cards. And if you need some more, it is easy to add them by clicking the “Add Item” button. In every card, there are options to customize both the content of the card and the appearance of the point.
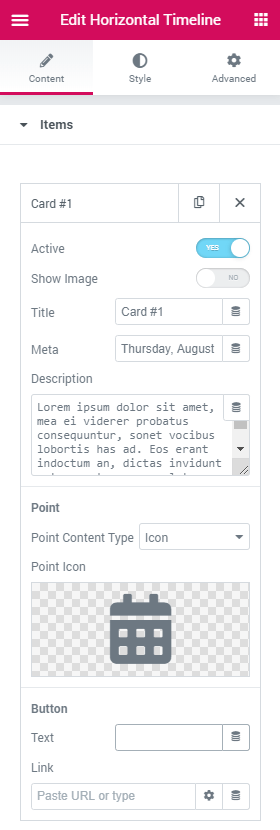
- Active. By turning this toggle on you can make card visible to users;
- Show Image. If you want to make the timeline more attractive and add some pictures – turn on this toggle. In this case, you will be able to choose the Image and its size;
- Title. Here you can type in the name of the card;
- Meta. In this field you can add different additional information, such as date, time or location;
- Description. All the text that has to be displayed on the card has to bu written in this text area;
- Point Content Type. The point can be shown as an icon and as a text. When you decide what variant fits you best, it will be possible to choose the icon or type in the text;
- Button Text. If you want to add a button to the card, type in its title here;
- Button Link. This is where the user who clicks the button will be led.
Dynamic Settings Block
If you want the horizontal timeline to automatically show some events you create separately, you can use this settings block. Just be aware that it is only the dynamic repeater that can be used for a horizontal timeline.
Layout Settings Block
As it is obvious from the title, this submenu helps you to create a layout.
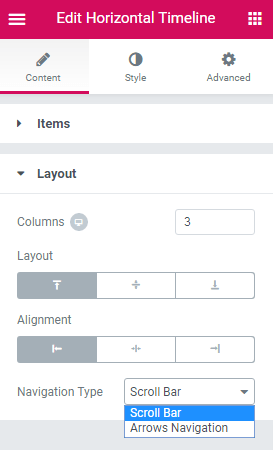
- Columns. Here you can set the number of columns that will be visible for users at the same time;
- Layout. With the help of those three buttons, you can define the vertical alignment of each card;
- Alignment. Here are three variants of horizontal alignment;
- Navigation Type. The horizontal timeline can be navigated by a scroll or arrows and here you can choose what variant is better for you.
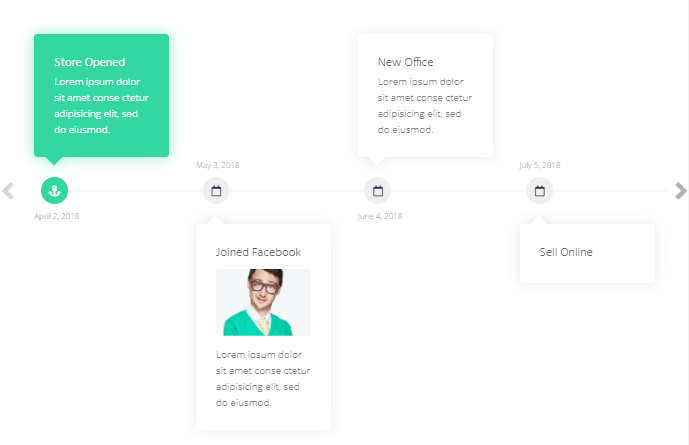
When you are done with settings, you can change the appearance of your horizontal timeline using different options in the Style settings section. For example, you can create something like that:
The last step here is to click on the “Publish” button and see the result.
Well done! Now you know how to create a horizontal timeline and make your website even more attractive.