
Custom Content Type (CCT) Overview
This overview provides all information about the Custom Content Type: what is that and what it can be used for. Besides, it explains the settings for creating a CCT with the help of the JetEngine WordPress plugin functionalities.
The Custom Content Type functionality can help you organize the data on the website efficiently. However, you may wonder about the difference between Custom Content Types and Custom Post Types. This overview will also provide an answer to that question.
Why Do You Need a CCT?
When you create a Custom Post Type, the items of that type are stored as “posts.” That means they are stored in the same SQL table where all posts are gathered. When the user seeks a post, WordPress will have to go through the whole SQL table containing posts. The delay will be unnoticeable if you do not have many posts on your website. However, the more CPTs you create – the larger the table and the lower the page download speed.
However, when creating a Custom Content Type, you actually create a new SQL table in your website database. When the user searches for an item of that content type, WordPress will seek it in a separate table. The items you create will not clutter the SQL table with posts, and the requests will be performed noticeably faster. Especially if that content type is for data that the user will not have access to. For example, you can create a Custom Content Type for orders. You do not need to display that data on the website, and you need it for internal use only. That data will be stored in a separate table and will not slow down the search as it would if you created a Custom Post Type for orders.
By default, custom content items do not have personal single pages and can not be shown on the website otherwise than in the Listing Grid. However, if you need to display the items of the content type on single pages, the Content Type can be linked with the Post Type. For example, you are selling books, have created a Books Content Type, and want every book to have a single page for the user to visit.
In this case, every custom content item will have a corresponding post linked to it. But even now, it will not encumber the SQL table with posts because all the item metadata will be stored in the SQL table for Custom Content Types. Either way, the speed of the website will not be harmed badly.
To sum up, you will need the Custom Content Type functionality if you are going to add a big number of items to your website. A created CCT will keep your website fast and convenient for users.
Custom Content Type Settings Overview
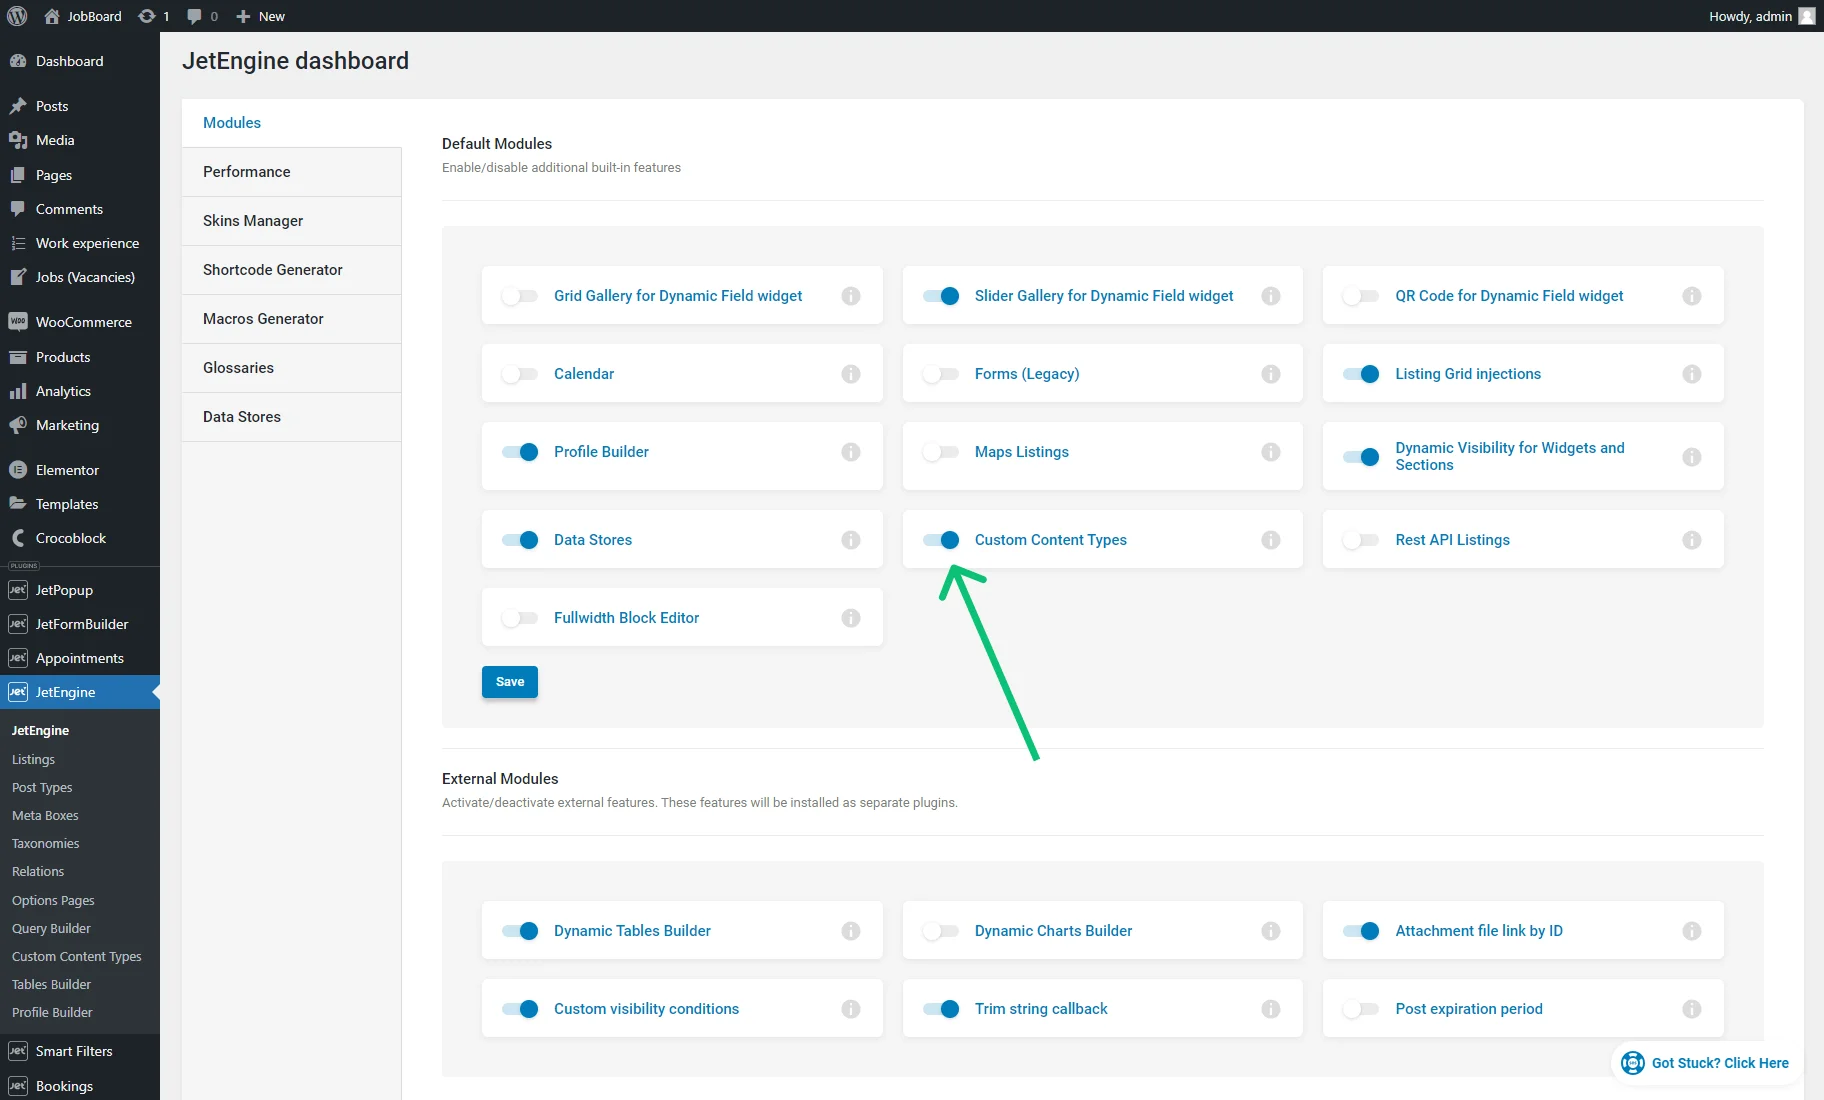
The Custom Content Type is a module of the JetEngine plugin. Therefore, it can be enabled by activating a relevant toggle in the JetEngine > JetEngine > Modules > Default Modules section.
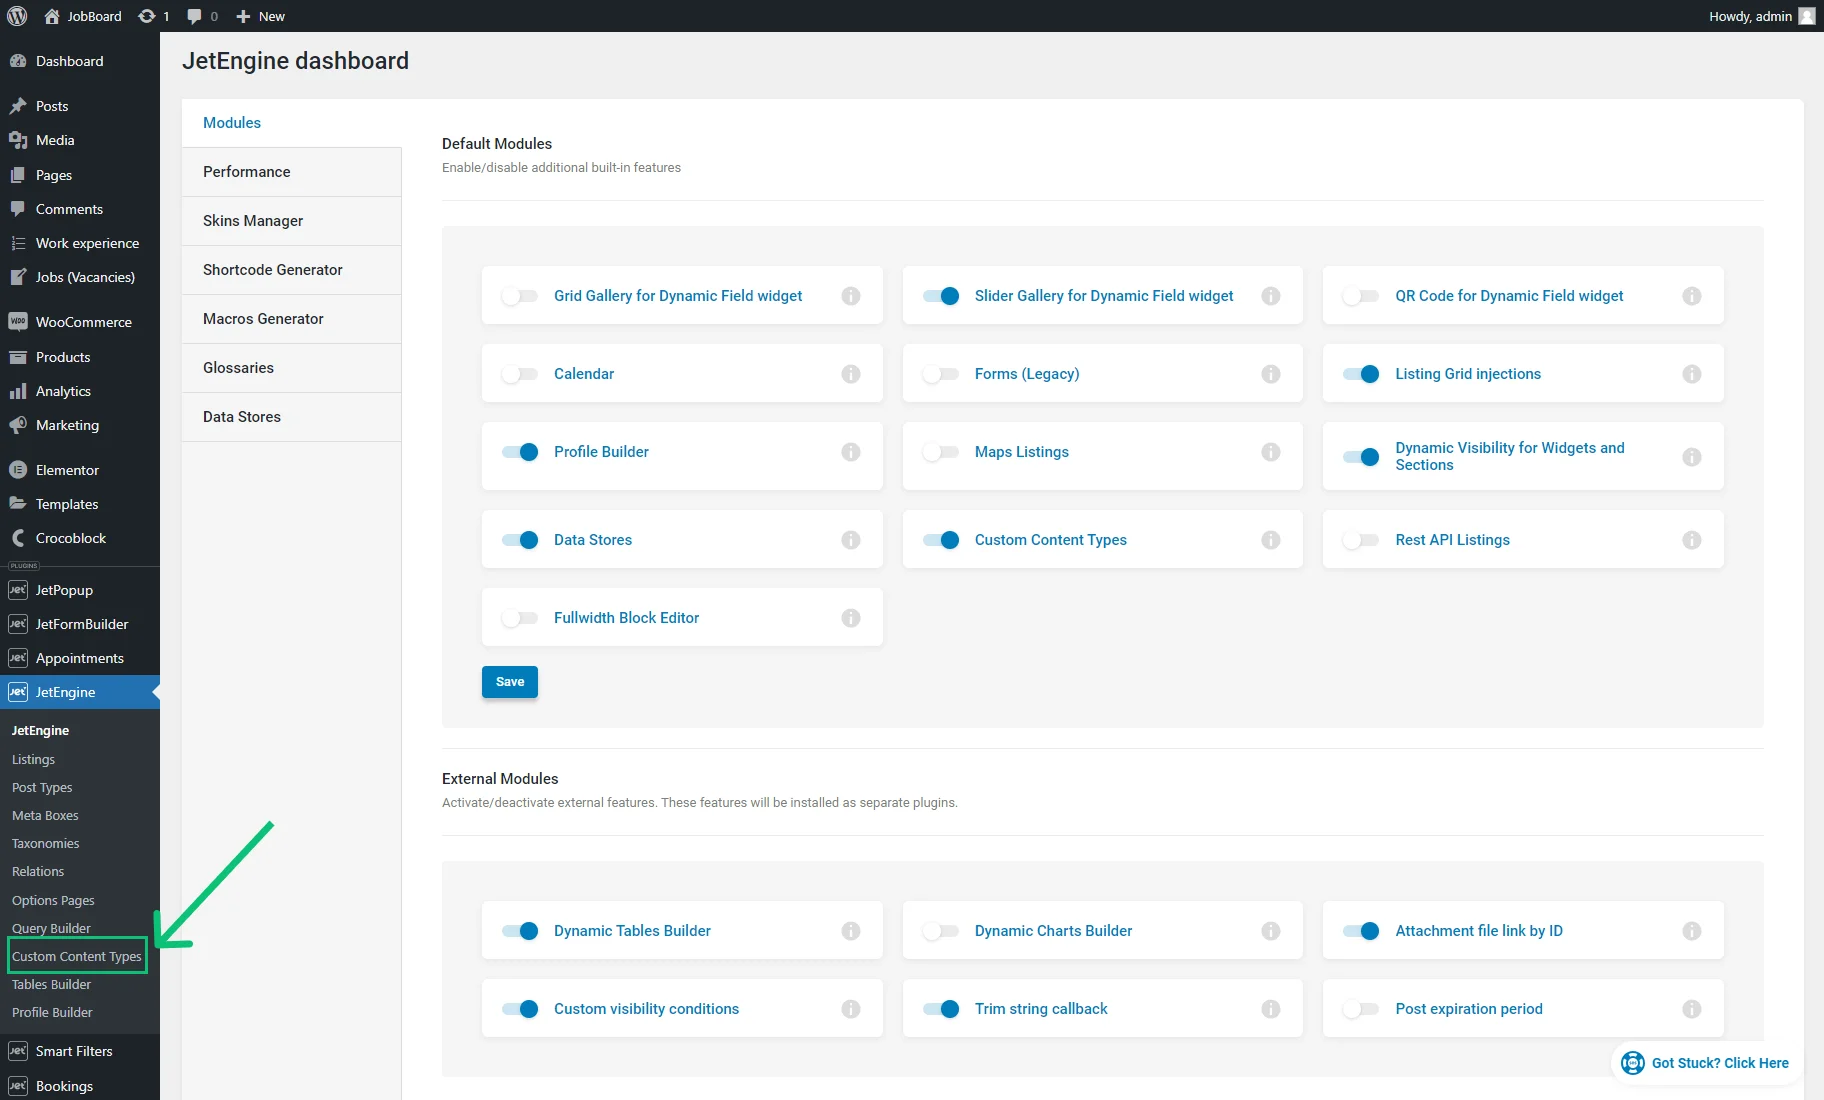
After the page is reloaded, the Custom Content Types tab is available in the admin area.
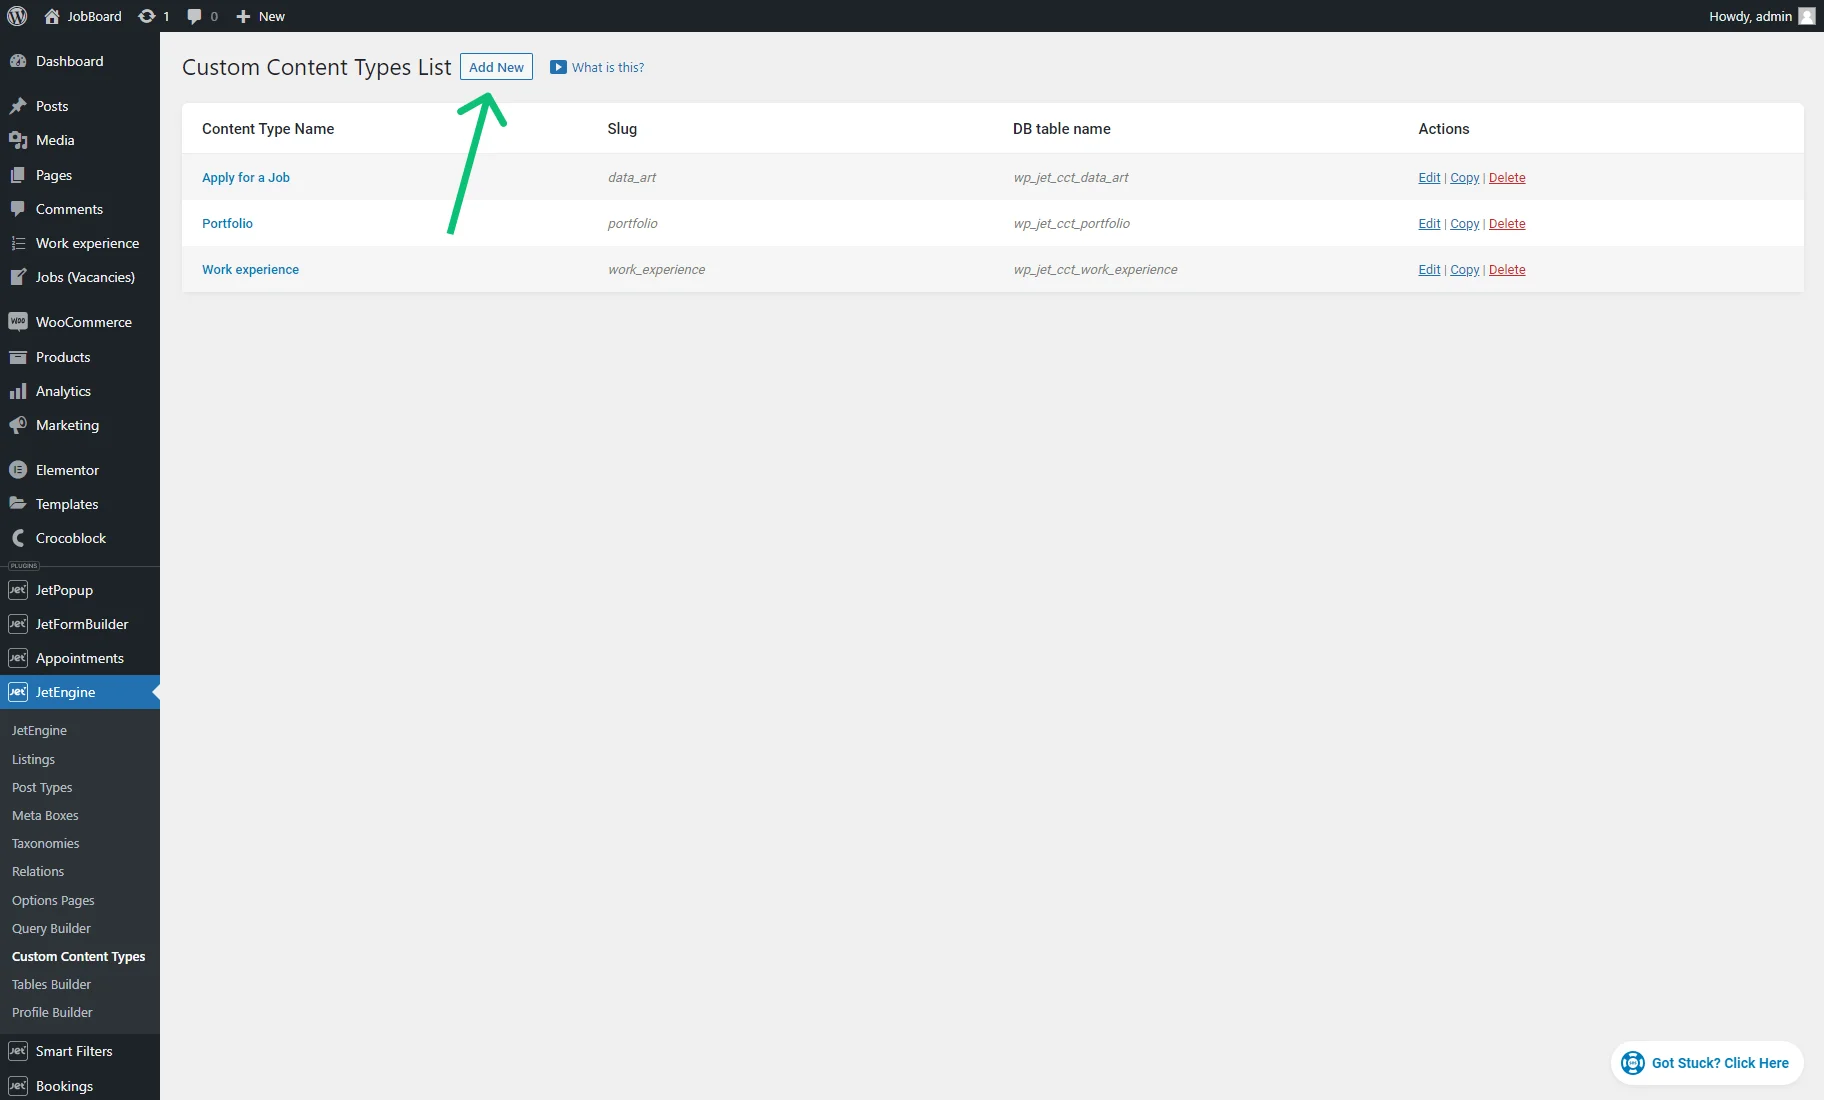
Proceed to the JetEngine > Custom Content Types tab and create a new CCT by clicking the “Add New” button.
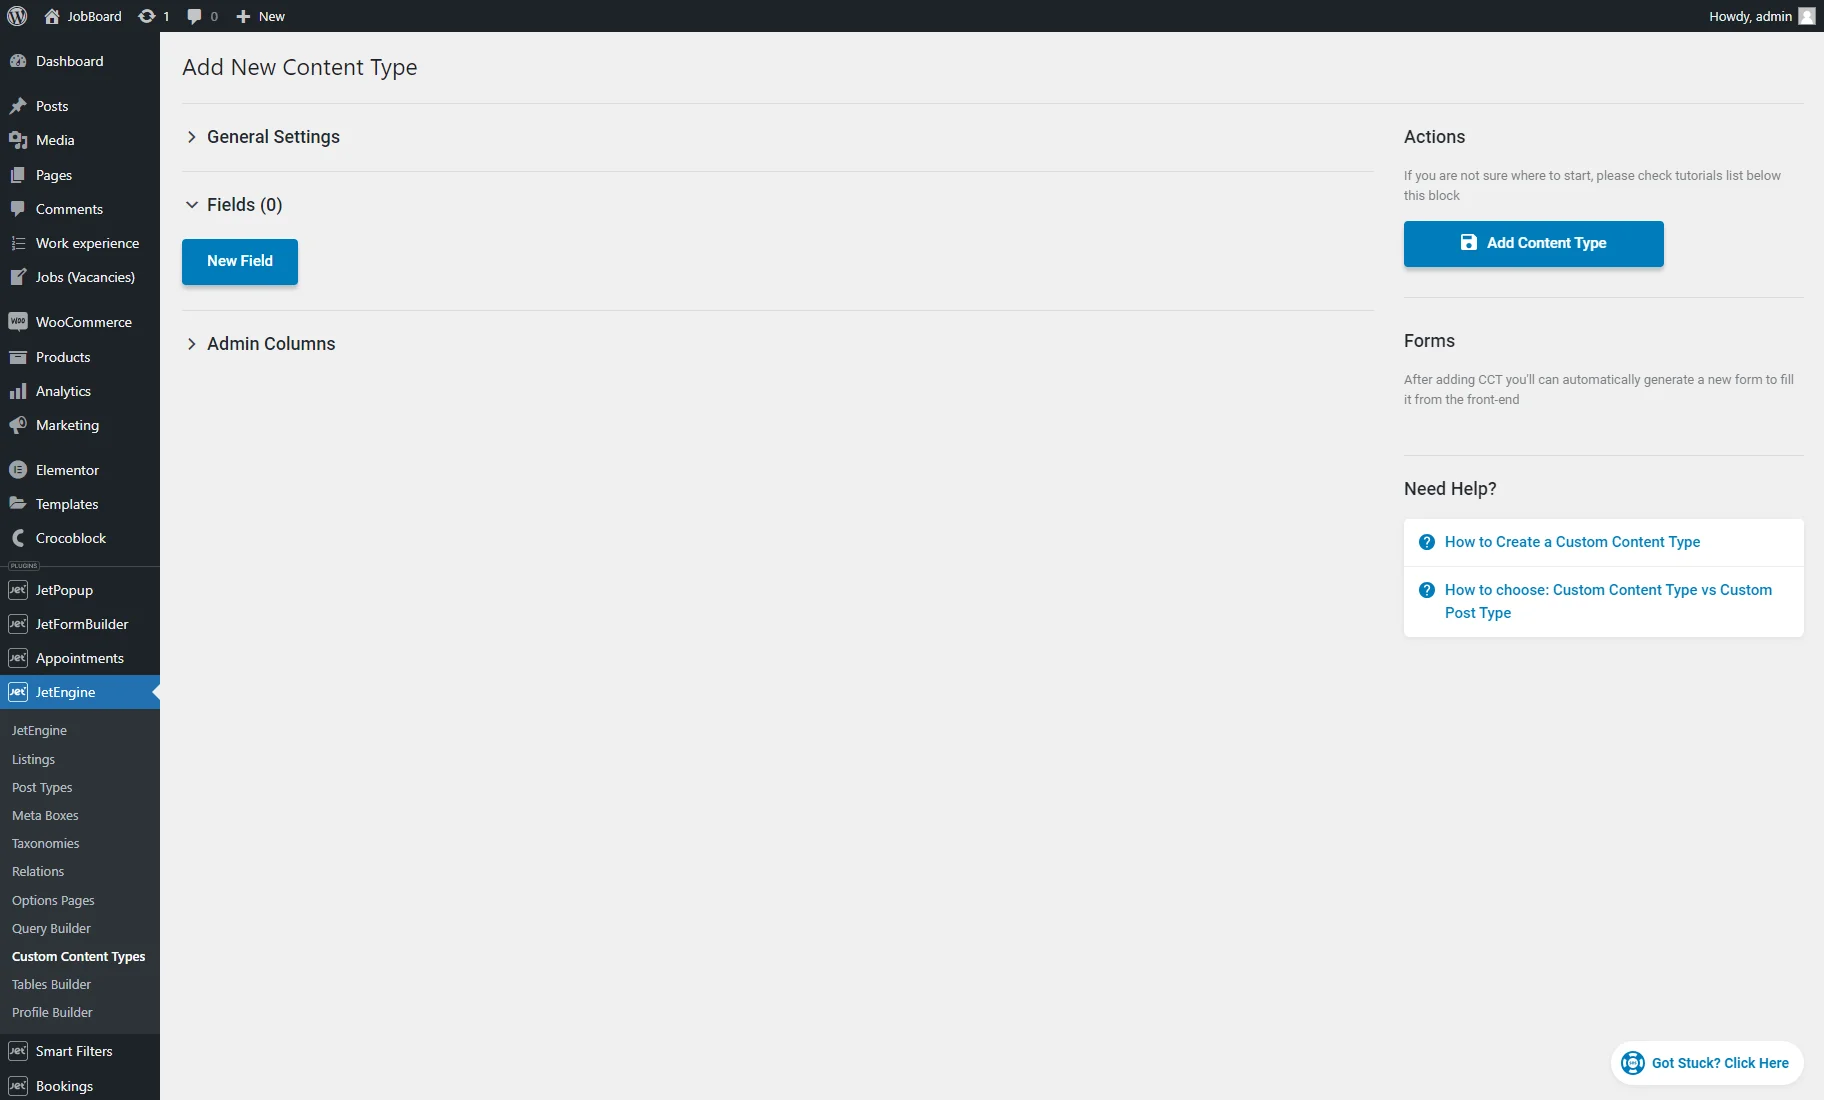
Once you open the Add New Content Type page, you can see three blocks of settings: General Settings, Fields, and Admin Columns.
General Settings
In the General Settings, the following fields are available to fill in:
- Name. Allows you to write the title of the Custom Content Type;
- Slug. It is filled automatically from the Name field. Slug is a kind of ID you need to use for some of JetEngine’s dynamic functionalities. You can use only Latin letters here and ensure there are no spaces: use hyphens or underscores instead;
- DB Table Name. It is how the newly created SQL table will be named in the database. This option is auto-filled by adding a slug to the “wp_jet_cct_” ID. You can change it only by editing the Slug;
- Has Single Page. This toggle allows choosing a Custom Post Type to be used as a single CCT page. When this toggle is enabled, further settings appear;
- Related Post Type. Lets you choose a Custom Post Type to be connected with your CCT from the drop-down menu;
- Title field. In the Fields settings section, you will create meta fields for your content type. The data from the field you choose in this drop-down menu will be automatically placed in the post’s Title. That is why you should select only the text and number-related fields for this option;
- Content field. The information from the field you choose in this drop-down menu will be automatically placed in the Content field of the post. Be aware that only fields filled with text or numbers will be displayed correctly in the post. The changes you make in the post’s Content area will not affect the data in the Custom Content Type item field;
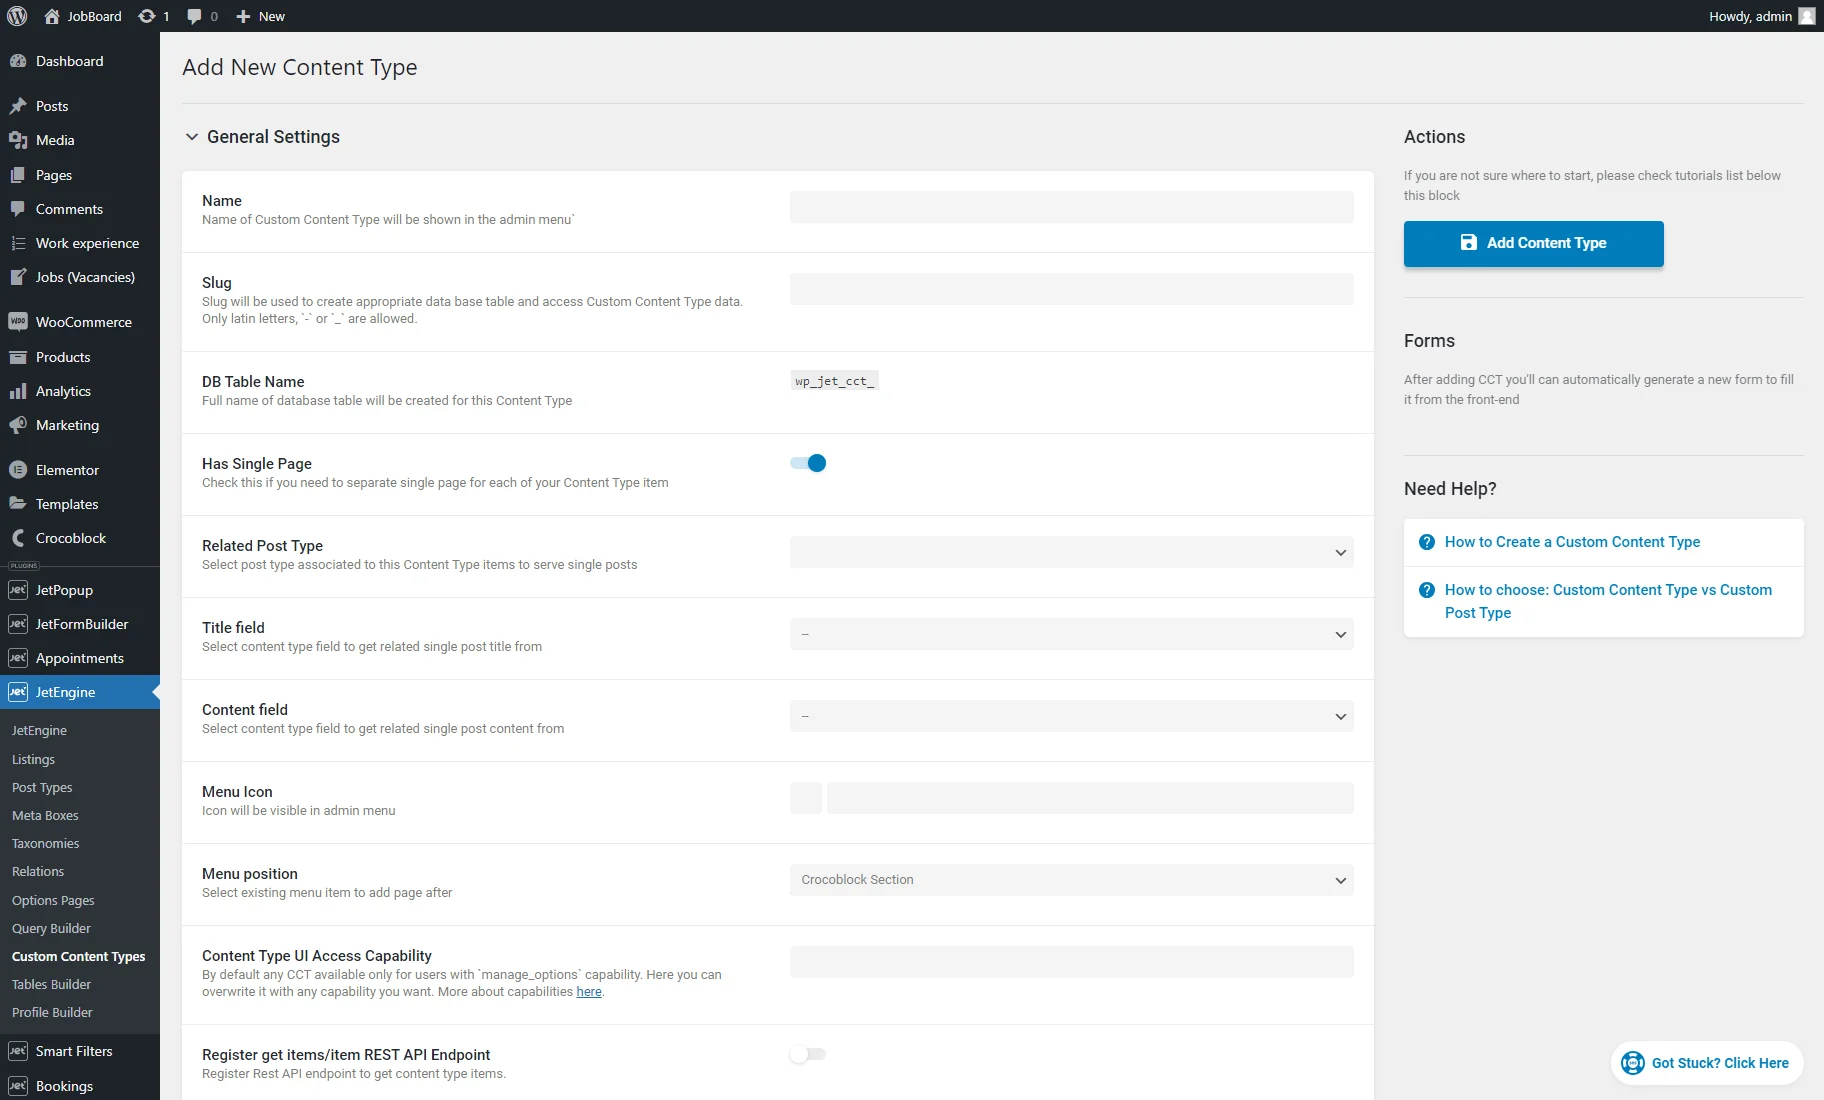
- Menu Icon. Lets you select an icon that will be displayed near the CCT name in the admin area;
- Menu position. Allows you to choose a section in the WordPress admin menu where the CCT should be displayed. By default, the “Crocoblock Section” is picked, but you can choose any other available option;
- Content Type UI Access Capability. This field lets you write a user capability that is allowed to enter the Custom Content Type in the admin area. Each user has capabilities defined by their user role. You can check the full list of WordPress roles and capabilities by this link.
- Register get/create/update/delete item REST API Endpoint. When enabled, each toggle creates an endpoint by which an item can be got/created/updated/deleted accordingly. When turned on, the Endpoint URL and Access Capability options appear. You can learn more about these options from the How to Display Custom Content Type Items Using REST API and How to Add and Edit Custom Content Type Items Remotely Using REST API tutorials;
- Access Capability. Here, you can specify a user capability allowed to access data by the generated endpoint;
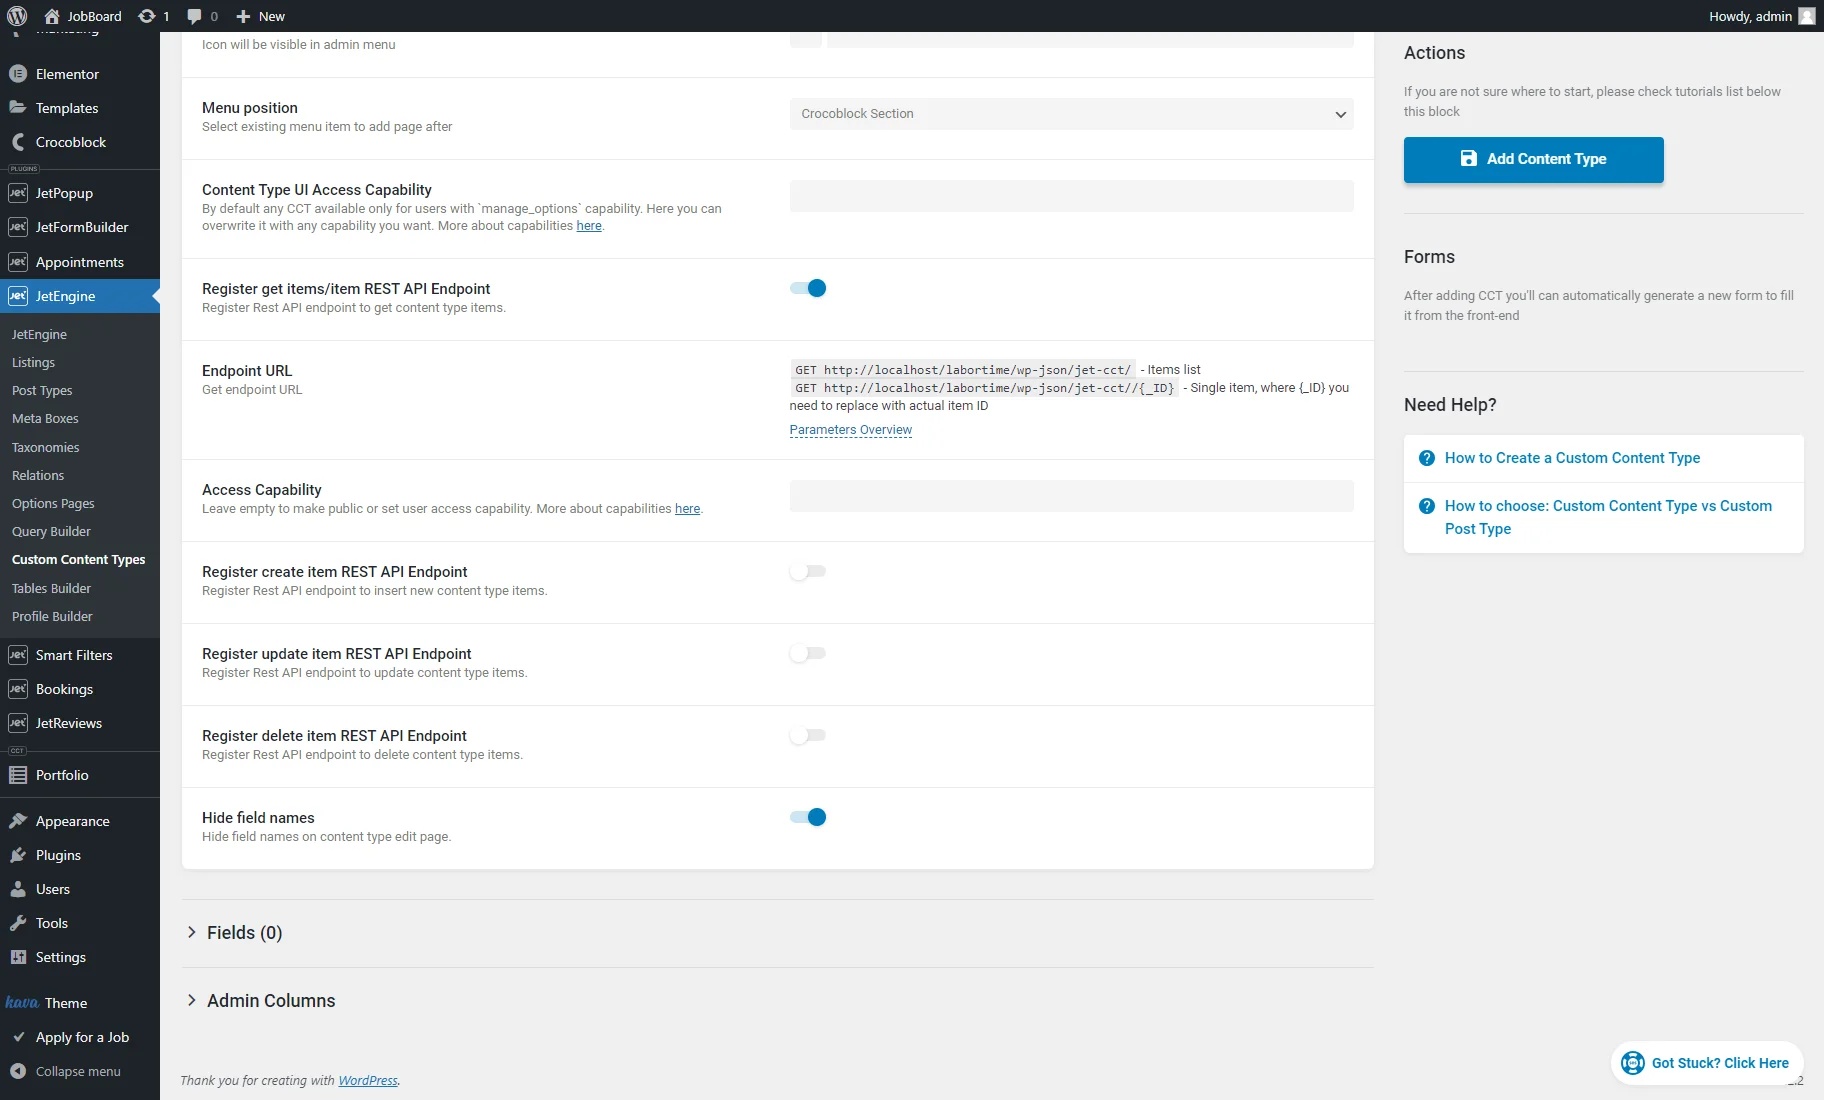
The last toggle is the Hide field names. If it’s disabled, the field Names are visible in the add/edit CCT item page on the backend.
When you turn this toggle on, the field Names will be hidden, and only field Labels will be displayed.
Fields
In the Fields tab, you can add the custom fields to your CCT, which will store the needed data.
Each custom field has these settings:
- Label. It is the meta field label that is displayed on the add/edit CCT item page;
- Name/ID. It is the name of the custom field that is stored in the database. Therefore, only Latin lowercase letters and numbers are allowed. Hyphens and underscores are also accepted instead of spaces;
- Object type. Defines a custom field or layout element. If you want to group custom fields in tabs or accordions, you can select such options respectively;
- Field Type. Allows selecting a custom field type. Learn more about meta field types from the Custom Field Types Overview;
- Description. It is displayed on the add/edit CCT page and provides additional information about this custom field;
- Field Width. Is for specifying the width of the custom field on the add/edit CCT page.
- Characters limit. Allows limiting the number of characters entered into the field;
- Default value. It is a default input for the meta field;
- Is required. A toggle for marking a field as obligatory to fill;
- Quick edit support. If activated, adds the custom field to the Quick Edit section;
- Conditional Logic. Allows showing this custom field if a value in another custom field matches the condition.
Note that the list of settings varies according to the selected field type. Check the full list of field types and their settings in this tutorial.

Admin Columns
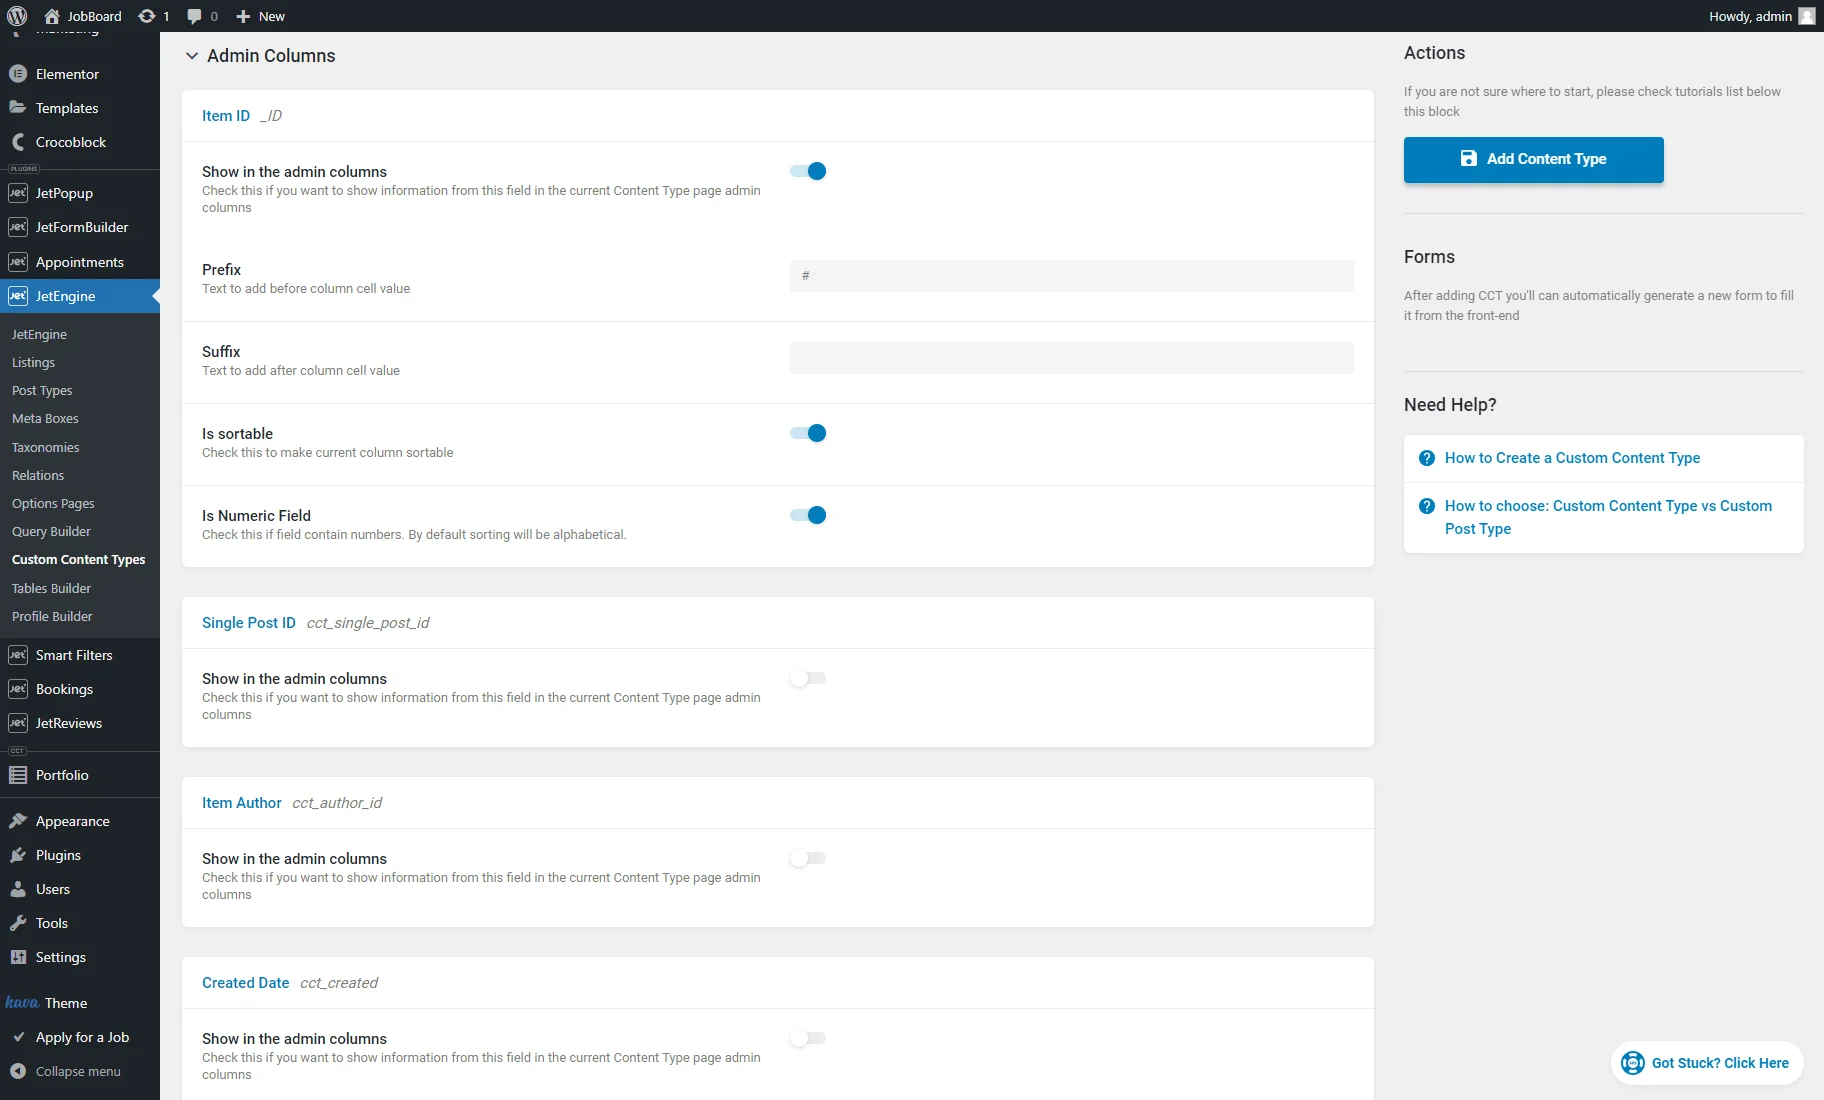
The Admin Columns are the columns on the CCT page on the backend that can show data from custom fields of the CCT.
In the screenshot below, you can see the admin columns in green outline. Under each admin column name, some data is shown from this column per each CCT item.
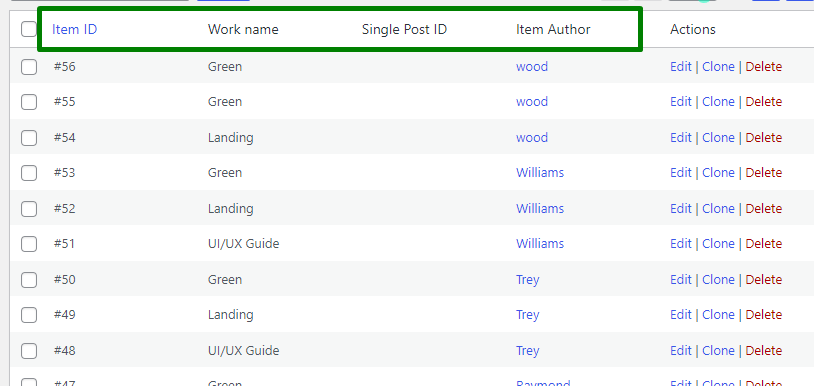
The Admin Columns can be added to the CCT page on the backend by enabling the Show in the admin columns toggle on the add/edit Custom Content Type page.
There are also the Prefix and Suffix fields which allow adding some text before/after the actual field value.
The Is sortable toggle enables sorting for a specific column.
The Is numeric field toggle needs to be enabled if the value of a column is a number. This way, sorting by numbers is possible.
That’s all. Now you know all about the settings for creating a CCT with the help of the JetEngine WordPress plugin functionalities.