
Dropbar Widget Overview
Reading this tutorial will help you to add a dropbar with any content you need to the page of your website using the Dropbar widget from the JetElements plugin.
With the Dropbar widget of JetElements, you can add a compact dropbar which is very useful when you want to hide content and save some space on your website’s page. You can add a dropbar wherever you want on your site and customize it according to your vision just in a few clicks.
From this tutorial, you will learn how to add a Dropbar to your website easily. So, let’s have a closer look at this process.
1 Step — Add a Dropbar widget to the page
First of all, open a page to which you want to add a dropbar with Elementor editor and drag-n-drop the Dropbar widget to the needed section.
2 Step — Choose the dropbar content
Navigate to the dropbar Content menu tab. The first section here contains features that define the dropbar’s content. let’s take a look at them:
- Button Type. The button can be marked with the text and with the image. Here you can choose the type of marking. If you choose Text, you can then type it into a corresponding field. And if you have chosen an Image option, you will be able to choose it from the Library and set its size;
- Before Icon, After Icon. You can place icons before and after the text or image on the button. Here you can choose to upload them as an SVG file or pick it from the Icon Library;
- Alignment. Here you can choose the position of the button within the section;
- Content Type. There are two types of dropbar – a simple text notification and a more complex form. If you want just a notification, you can choose the “Simple Text” option and write it down in the Simple Text text area. Otherwise, you should choose the “Template” option. In that case, you will be able to select a pre-made template. The templates are created in the Template > Add New dashboard tab. For example, you can add a contact form to the dropbar. To learn how to create a custom contact form, check out our Contact Form 7 tutorial.

3 Step — Go through the settings
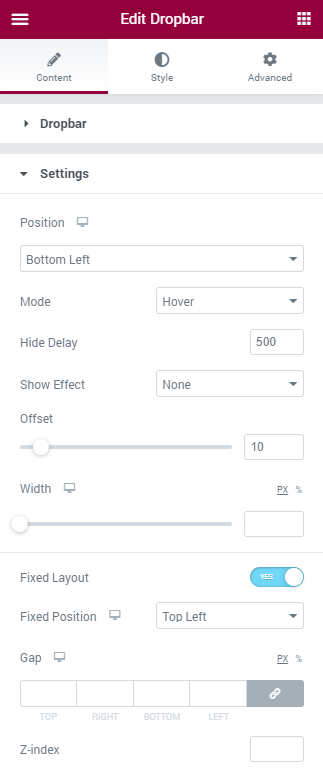
The Settings section of the Content menu tab contains features that affect the dropbar itself and the layout of the button.
- Position. In this drop-down menu, you can choose the position of the appearing dropbar. There are 12 variants, so play with them to define where it will fit the best;
- Mode. This drop-down allows you to choose what action will make the dropbar appear. it can happen on Hover or on Click;
- Hide Delay. If you have chosen the “Hover” option in the Mode feature, the value in ms you type in here will define how more time the dropbar will stay after the user stops hovering the pointer over the button;
- Show Effect. The dropbar appears with some simple animation effect. There are 14 variants for you to choose from;
- Offset. This is the gap between the button and the dropbar. You can select it by moving the slider or type the value into the field;
- Width. here you can choose the width of the dropbar. If you don’t touch this future, the width will be set automatically according to the content;
- Fixed Layout. You can make the dropbar button stay fixed on one position by enabling this toggle. The button will stay in the same place even when the user will scroll the page. The position can be changed in the Fixed Position drop-down and the distance to the screen borders is set in the Gap field. The Z-index feature allows you to define what parts of the page will be overlayed by the dropbar button, the smaller the number – the more priority will the dropbar have over the other elements.
The Dropbar widget has a lot of different Style settings, so you can change its appearance to make your website’s look really amazing.
Don’t forget to click on the “Publish” button after you’re done with the customization and enjoy the results.
As you can see, the Dropbar widget from JetElements is a great tool for any type of website, and now you know how to use it. Great job!