If you’ve ever tried to customize header and footer templates for any WordPress theme without touching theme files, you know the usual options: a dedicated plugin that does one thing, or a page builder add-on that works until the theme update breaks it. JetThemeCore takes a different approach; it gives you a full theme builder inside WordPress, so headers, footers, and every other template type live in one place and follow the same conditional logic.
This guide walks through creating header and footer templates using Elementor header and footer builder JetThemeCore, its Theme Builder, and how to handle the conflicts and display issues that come up in real projects.
Before you start: make sure JetThemeCore is installed and activated, and that you’re comfortable with either Elementor or the Block Editor. If you’ve used a standalone Elementor header and footer builder plugin before, the workflow here is similar, just more centralized.
What’s New in JetThemeCore?
The 2025 update to JetThemeCore introduced game-changing improvements. Now, we have a unified dashboard (to access it, follow the path: WordPress Dashboard > Crocoblock > Theme Builder) that acts as a command center, allowing us to manage all site templates through an intuitive interface.
Everything is organized logically, which minimizes the learning curve for new users while ensuring efficiency for power users.
Grid View turns template management into a visual experience. Each template is displayed as a tile that shows:
- title;
- availability of header/body/footer, and a set of action buttons for each;
- condition summaries.
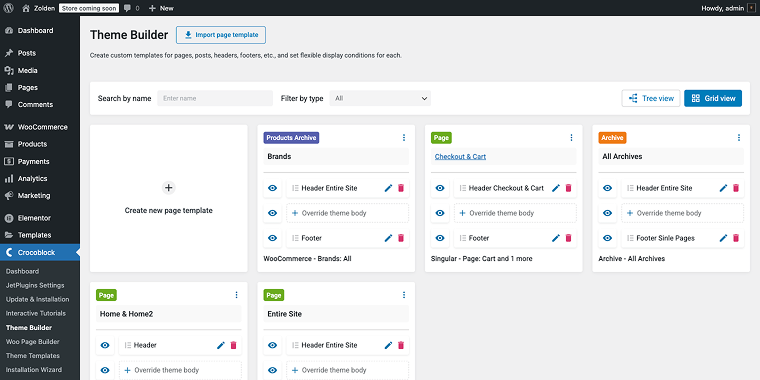
This layout allows you to quickly scan your templates and easily identify which ones require updates or modifications.
Tree View provides a unique perspective by mapping your entire site structure hierarchically. You can:
- see how pages relate to each other;
- identify gaps in template coverage;
- understand the user journey through your website.

Visual structure recognition helps you understand exactly how your website is organized. The system automatically detects your:
- post types;
- taxonomies and page hierarchies, presenting them in an intuitive format.
One-click template creation simplifies the setup process by automatically assigning the correct conditions based on the chosen template. To learn more about JetThemeCore conditions, refer to this article.
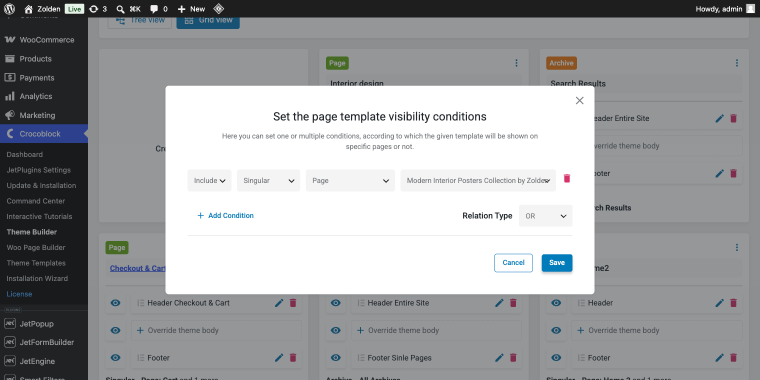
Suppose we select the option to create a template for the 404 page by clicking on the “plus” icon next to the 404 Page title, a Create page template pop-up window will appear with a set of corresponding visibility conditions.
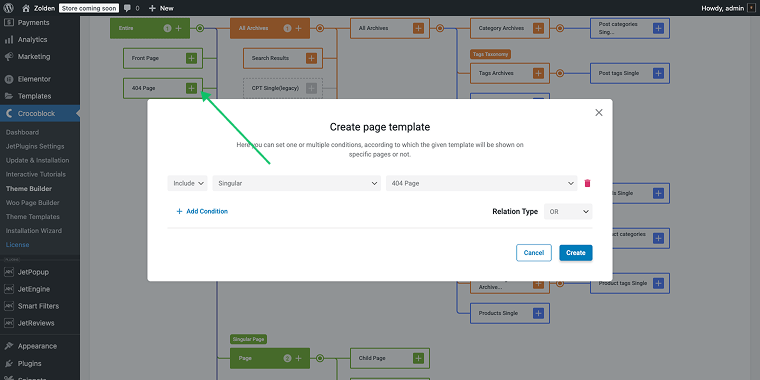
- Conditions: Include > Singular > 404 page.
Unlike standalone header and footer builder Elementor solutions, JetThemeCore integrates directly into your workflow, eliminating the need for multiple plugins while offering exceptional functionality.
Template Creation Workflow
Now, let’s walk through creating templates for the header and footer (follow the same path: WordPress Dashboard > Crocoblock > Theme Builder). Since I’ve already used a 404 page as an example, let’s assign a header and footer for it.
To create a new template from scratch, we can go to the:
- Grid view and click on the “Create new page template” button;
- Tree view and click on the “+” button, selecting the necessary part of the website (single page, archive, etc).
This will trigger the Create page template pop-up with the necessary conditions if in Tree view; otherwise, you will need to set them manually when in Grid view.
After clicking the “Create” button, we are redirected to the next step, where we can add a header, footer, and body for our new template.
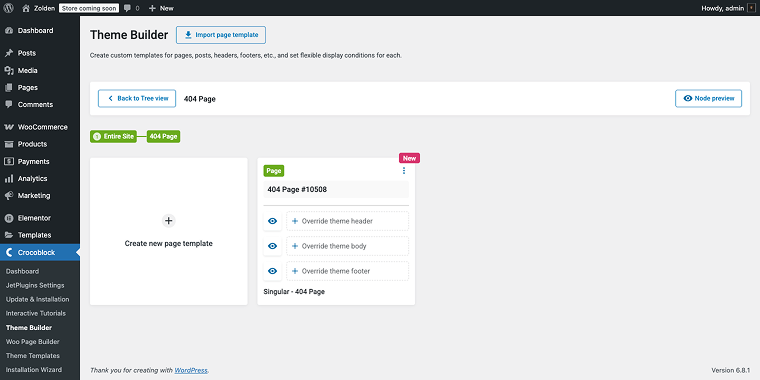
Override theme header
Adding the header to the template is as simple as clicking on the “+ Override theme header” link, which opens a dropdown with two options: “Create template” and “Add from library.”

“Create template” option
When clicked, the “Create template” option reveals a Create a template pop-up where you can choose between Elementor and the Block Editor. Both editors provide full access to JetThemeCore’s features, so your choice depends solely on personal workflow preferences.
Whether you’re used to working with Elementor header and footer builder tutorial methods or prefer the WordPress Block Editor, the process remains streamlined.
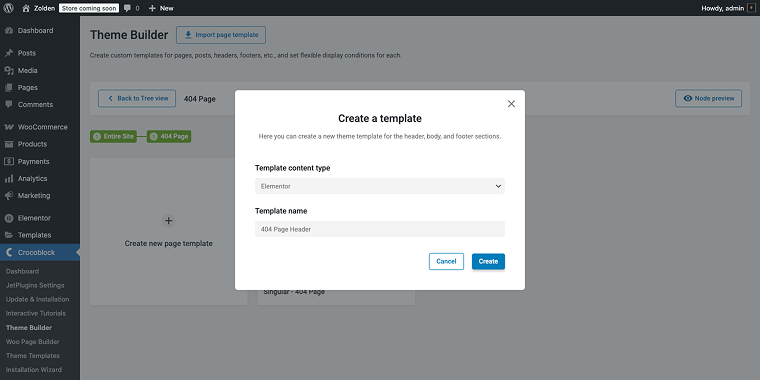
The “Create” button will do the job, and the pop-up will notify you with a Template created success message.
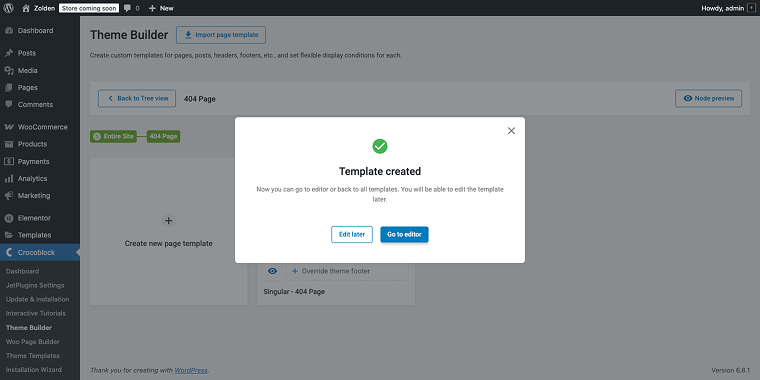
The Template created pop-up now contains two buttons:
- “Edit later” button will close the pop-up;
- “Go to editor” button will redirect you to the previously selected editor.
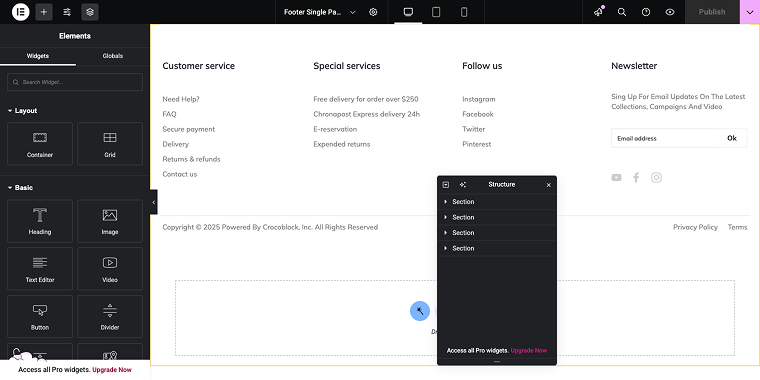
“Add from library” option
The “Add from library” option reveals a Template Library pop-up that displays existing templates. Since I’ve already created the 404 page header, you can see it in the pop-up below:
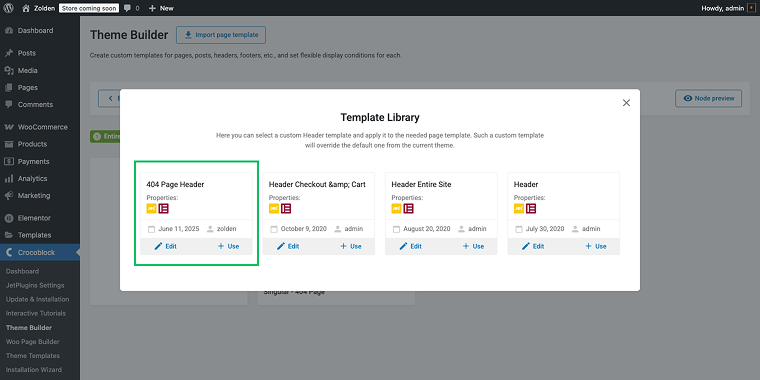
Now, I can safely select it as a header template for my 404 page. To do so, I need to click on the “+ Use” link (also, we can edit this header template from this state by clicking on the “Edit” link).
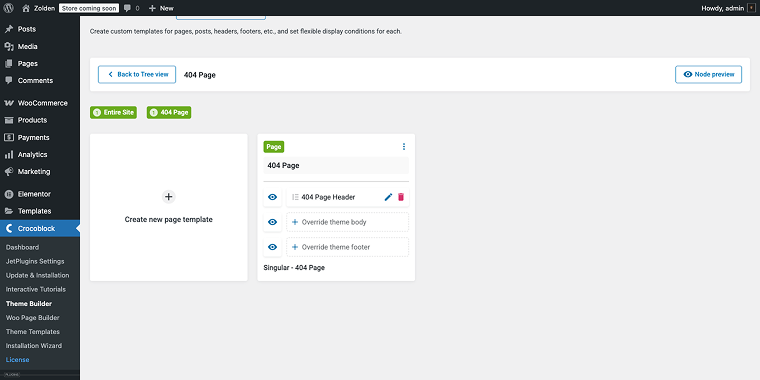
After adding the template, a set of controls is displayed, including an “eye” icon to enable or disable the header/body/footer, as well as a “pencil” for editing and a “trash bin” for removing.
Now we can edit the header, click on the “pencil” icon to open the header in Elementor (or Block Editor, if you selected that when creating the template).
For the 404 page, I’m not going to create a complicated header; it will have only two widgets: SiteLogo and Navigation Menu.
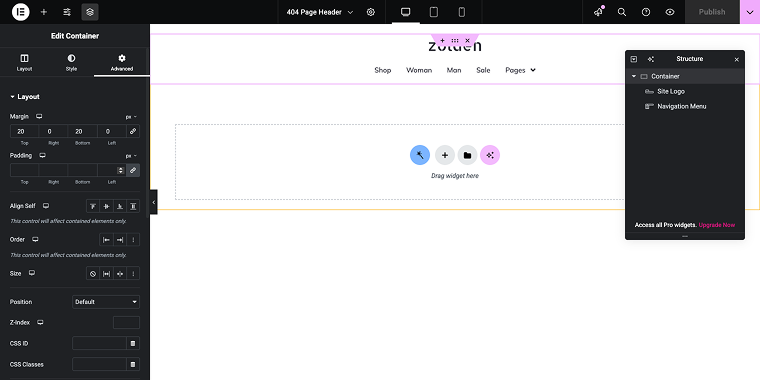
Don’t forget to click the “Publish” button to save progress. Now, let’s move on to the footer.
Override theme footer
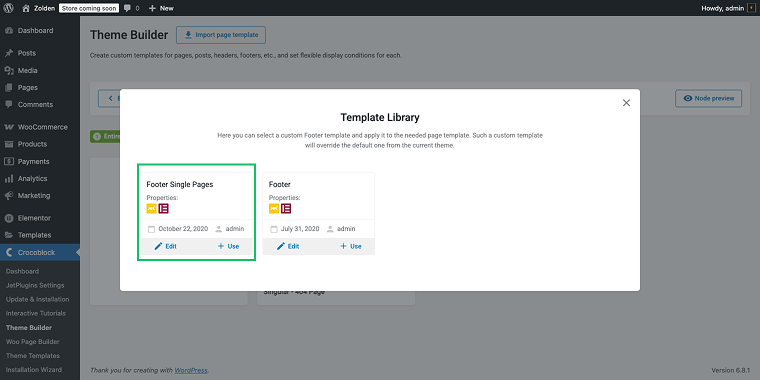
Creating a footer template follows a similar workflow to that of headers; however, there are unique considerations for the type of content typically displayed at the bottom of pages. Since I already have a set of footer templates, I will use one from the Template Library.
It’s a basic eCommerce footer with four columns that have links to major sections of the store.
On the necessary page (in my case, it’s still the 404 page), I’ll click the “+ Override theme footer” link and then select “Add from library.” In the Template Library pop-up, I’ll click the “+ Use” button on the Footer Single Pages template.
Right after that, the pop-up will be automatically closed, and we’ll get a success message at the top of the page.

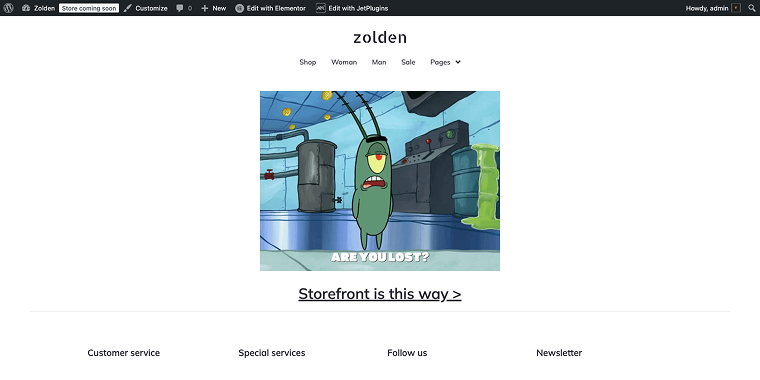
Since creating a theme body isn’t the focus in this article, I’ll make something for the 404 page body to allow us to preview the page on the front end. After entering the invalid URL, the website shows a 404 page featuring a header and footer I’ve assigned in previous steps.
Common Issues and How to Fix Them
These are the four problem patterns that most often arise with JetThemeCore headers and footers in real projects.
Header or footer is not showing on the front end
Symptom: You’ve assigned a header template, but the front end still shows the theme’s default header, or nothing at all.
Most likely cause: A missing or too-broad display condition. The most common setup mistake is setting a “Singular” page template condition to “All” instead of a specific post type or page. When you do that, the template applies everywhere, including the homepage, which then gets overridden unexpectedly.Fix: Go to the template’s conditions and change Singular > All to Singular > Page > Specific Page (or whichever page type you actually want to target). Use Tree View to verify coverage before publishing.
Secondary cause: If you’re running Elementor Pro with its own Theme Builder active, JetThemeCore templates won’t appear on the front end because Elementor Pro takes priority. To resolve this, go to JetThemeCore settings and enable “Jet Override,” then disable the conflicting Elementor Pro templates.
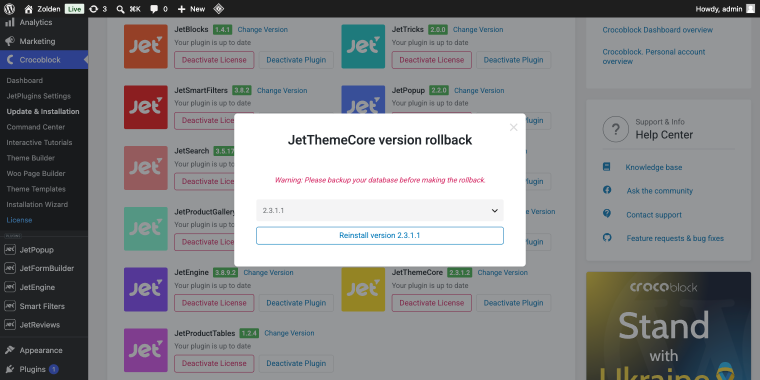
Header layout broken after updating JetThemeCore
Symptom: After updating to a new JetThemeCore version (ex. 2.3.1), the header layout breaks, the admin bar disappears, or the Elementor editor becomes inaccessible.
Cause: The 2.3.1 release introduced a regression affecting header rendering in certain configurations.
Fix: Roll back to version 2.3.0.3 while waiting for a patch. To do this, go to WordPress Dashboard > Crocoblock > Update & Installation section and install the previous version by clicking on the “Change version” link.
Header or footer only shows with Elementor Full Width, not the Default Template
Symptom: The JetThemeCore header appears when the page template is set to Elementor Full Width, but disappears when switching to the Default Template.
Cause: The Default Template renders the active theme’s own header and footer, bypassing JetThemeCore’s overrides. Full Width strips the theme wrapper entirely, which is why JetThemeCore templates display correctly in that mode.
Fix: For pages where you want JetThemeCore to control the header and footer, set the Elementor page template to Elementor Full Width or Elementor Canvas, depending on how much of the theme wrapper you want to remove. If you need the theme’s body layout but want a custom header, check whether your theme has a “blank header” option in its settings. Some themes (Astra, OceanWP) offer this without requiring Full Width.
Site crashes or goes blank after activating JetThemeCore
Symptom: Activating JetThemeCore triggers a critical error or white screen.
Most likely cause: A plugin conflict, typically with security or caching plugins like Wordfence or W3 Total Cache.
Fix: Use Health Check & Troubleshooting to activate troubleshooting mode. This lets you test with all other plugins disabled without affecting visitors. Re-enable plugins one by one to identify the conflict. If the crash persists with all other plugins disabled, check your PHP version. JetThemeCore is compatible with PHP 8.3, but there are known conflicts with MobileDetect in certain configurations.
FAQ
WooCommerce pages, including Shop, Cart, Checkout, and Single Product, are standard WordPress post types and pages, so you can target them directly with JetThemeCore’s display conditions. For the Shop page, use Include > WooCommerce > Shop Page. For Single Product pages, use Include > WooCommerce > Single Product. If you need separate headers for the Cart and Checkout, create individual templates for each and assign them using the Include > WooCommerce > Products Checkout/Product Cart condition, pointing to those specific pages.
Yes, both are common troublemakers. If Elementor Pro’s Theme Builder has any header or footer template active, it takes precedence over JetThemeCore. Try switching to a default WordPress theme, then enable “Jet Override” in JetThemeCore settings. For caching: W3 Total Cache, WP Rocket, and similar plugins can serve a cached version of the page that doesn’t reflect your template changes. After making changes to template conditions, clear all cache layers and test in an incognito window to rule out browser cache.
This is the most frequent condition-setting mistake. If your Single Service template is set to Include > Singular > Posts > All, it applies to every singular post type. Change the condition to Include > Singular > Specific Post Type > Service (or however your CPT is registered).
This usually appears as a “content not found” error when opening a saved template in Elementor. It’s caused by a permissions or post-type conflict between JetThemeCore and Elementor’s template system. First, temporarily deactivate JetThemeCore to confirm it’s the source. If confirmed, check whether any JetThemeCore template conditions apply to the Elementor library post type. Remove those conditions, or add an explicit exclude rule for these templates.
Not strictly required, but recommended. JetSmartFilters can work with theme-level archive templates, but if you need granular control over the archive page layout, including a separate header, custom body, and specific footer, JetThemeCore is the reliable way to manage that. Without it, you’re depending on the active theme’s archive template, which may not provide the layout flexibility JetSmartFilters expects.
Conclusion
JetThemeCore’s Elementor header and footer builder tutorial is straightforward once you understand the two things that cause most problems: display conditions and plugin conflicts. Getting conditions right at the start, using Tree View to map coverage, and targeting specific post types instead of broad “All” selections, prevents the majority of issues before they reach the front end.
The 2025 dashboard update made it easier to see gaps in your template coverage and create templates without manually configuring conditions from scratch. If you run into a header or footer that isn’t showing, the troubleshooting steps above cover the four most common causes in order of likelihood.
For more on what JetThemeCore can do beyond headers and footers, see the full plugin overview.


