There are many options for building forms, and most WordPress devs probably have their favorite plugins already. But that doesn’t mean newer tools can’t offer something good or even better than old ones.
The two plugins we’ll be looking at in this article offer quite a few innovative features and have a chance to surpass the competition thanks to their versatility. The plugins in question are free versions of JetFormBuilder and WS Form Lite.
Table of Contents
- Building Forms with WS Form Lite and JetFormBuilder
- Comparing Essential Features
- Unique WS Form Features
- Unique JetFormBuilder Features
- FAQ
- Summary
Building Forms with WS Form Lite and JetFormBuilder
Both plugins are relatively new (WS Form was launched in mid-2020, and JetFormBuilder was released in January 2021). Both teams of developers attempt to follow the best examples and are eager to offer easy-to-use solutions for building complex forms. Before comparing their essential features, let me outline building forms with each of the plugins.
Intro to creating forms with WS Form
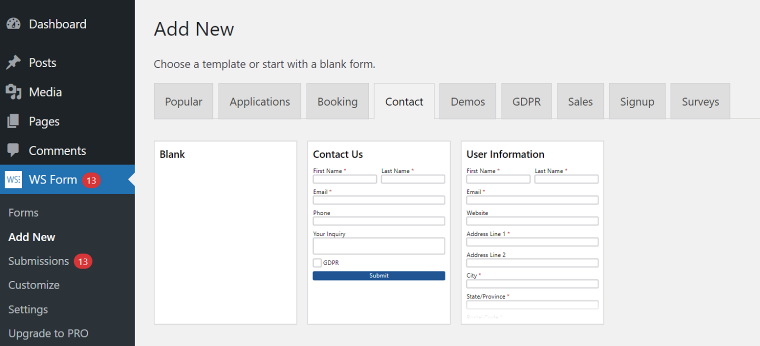
After activating WS Form on your site, the plugin’s menu will appear in the admin dashboard. Click the “Add New” button to start with a blank form or with one of the pre-built templates. WS Form Lite offers 19 templates, such as Contact Us, Order, and Request Quote form templates, that you can modify. Furthermore, you can upgrade to WS Form Pro edition, if you need more features and integrations..
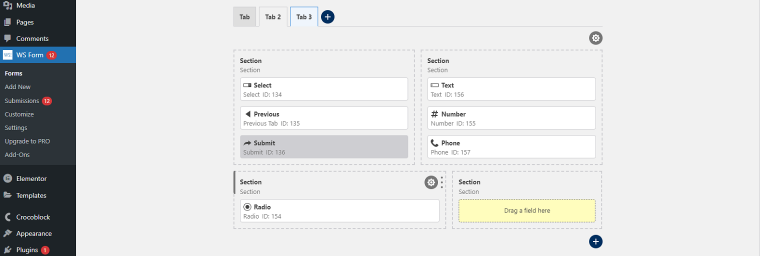
Upon creating a form, you can access a drag-and-drop form editor, which allows adding, modifying, and deleting fields. On the left, you can see a preview of the form on a grid layout. You can rearrange the existing fields with a simple drag-and-drop motion or customize them by clicking the Gear icon and opening the settings window on the right.
Creating multi-step forms is done by clicking the Add Tab icon at the top of the window. Similarly, use Add Section icon at the bottom of the form layout to create a new section. You can move fields freely between form sections and tabs.
To add new fields, open a Toolbox in the sidebar on the right and drag field types to the desired location in the form. If you’ve made a mistake while editing the form, click on the Undo tab and go back to any past stage of your form development.
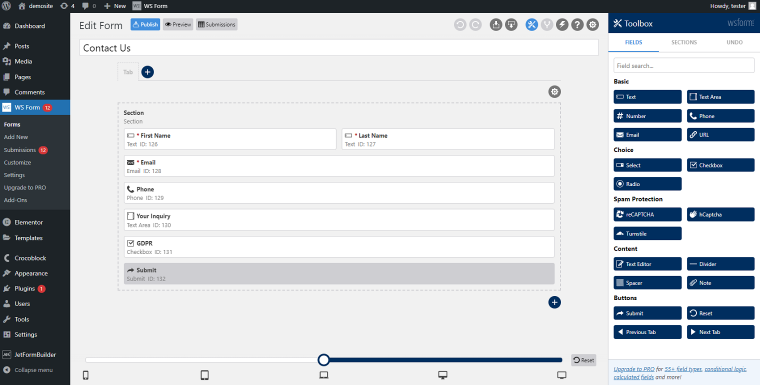
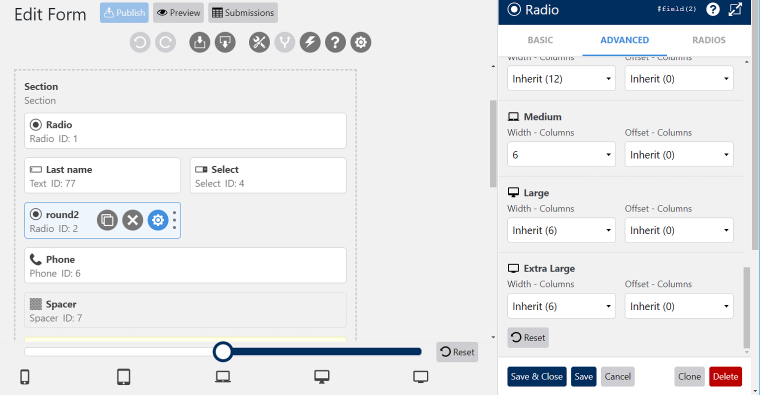
At the bottom of the editor, you’ll notice a drag-and-drop tool called “breakpoint selector.” It allows previewing the form on devices with five predetermined screen sizes and making changes to field layouts if necessary.
By default, all templates and a blank form are set to prompt three post-submit actions: save submission, send email to page admin, and show a message to applicants (different messages for different form types). You can open the tab for modifying the actions by clicking the flash icon in the top right corner of the form editor. Remember to save your progress by clicking the “Save” button. Click the “Publish” button to change the status of the form from “Draft” to “Published” and make it available for embedding on your website.
Intro to creating forms with JetFormBuilder
To start creating forms with JetFormBuilder, go to JetFormBuilder > Add New. You will then open a page that looks much like any other Gutenberg editing window with tabs for inserting form title and post ID, one empty text field, and a “Submit” button. The toggle block inserter is in the top left corner of the editor, presented as a plus-shaped button, and it opens up a sidebar on the left that contains all the available JetForm blocks. You can insert blocks by dragging them from the sidebar and dropping them onto the form layout.
Another way to insert form fields and other elements is by clicking the smaller “Add Block” buttons that appear on the form when hovering over it. In such a case, find the needed block type by typing its name in a search pop-up.
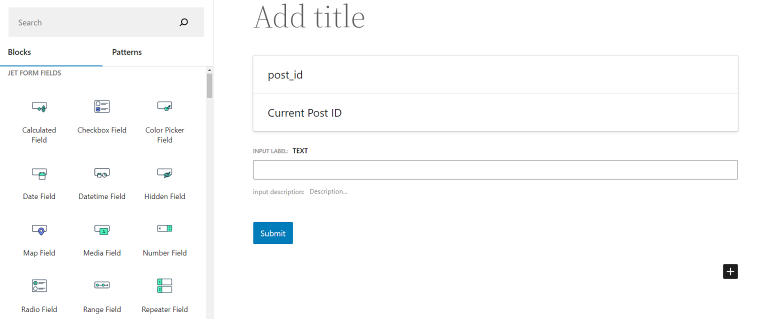
When editing forms, you will see another sidebar on the right. This one provides access to individual block properties under the Blocks tab, which are different for every block type, and general form settings under the JetForm tab. The general form settings allow choosing field labels layout, submit type (AJAX or page reload), post-submit actions options, PayPal checkout and CAPTCHA settings, and more.
If you click on the inserted block, you’ll get access to more settings, such as adding and modifying radio and checkbox fields. You’ll also see a six-dotted icon that you can use to grab and move the block around the form. However, you cannot create complex multi-column layouts by stacking block fields next to each other. To do this, you must first insert dedicated Gutenberg design blocks to make the necessary layout template and create fields inside or move the existing fields.
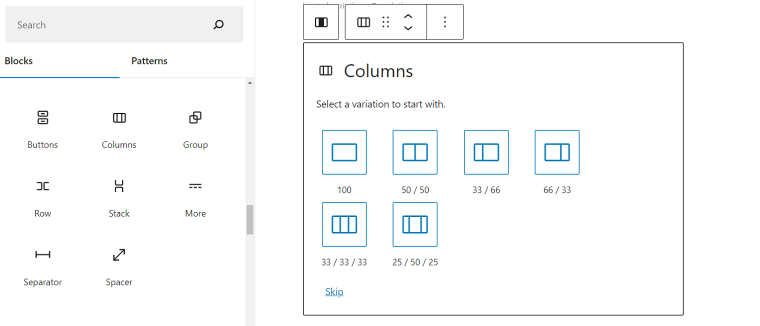
As you can see, JetFormBuilder uses blocks for everything. You need a Page Break block for the multi-step forms and a Group Break Field for creating different sections.
You can edit the form on three preview screens: desktop, tablet, and mobile. When you’re done editing, press the “Publish” button in the top right corner.
Comparing Essential Features
Both plugins allow users to build forms by inserting input fields and functional elements.
WS Form input fields
The free version of the WS Form plugin comes with 21 elements for building forms. This set of elements includes nine input fields, three spam protection elements, four buttons (Submit, Reset, Previous, and Next Tab), and four content elements (Text Editor, Divider, Spacer, and Note).
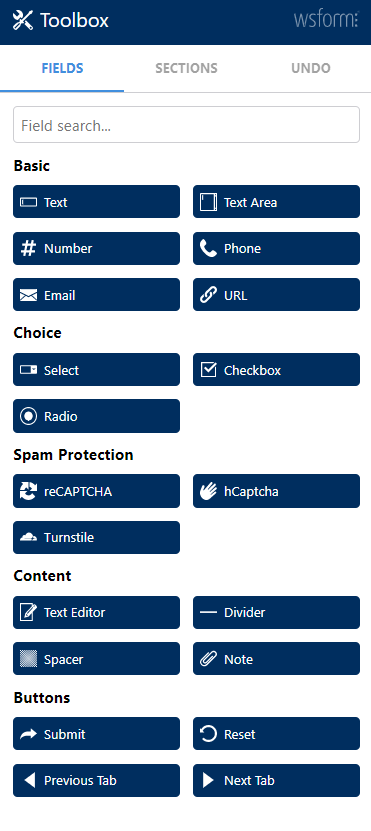
The input fields, which users will see on the front end, include basics like Text, Textarea, Radio, Checkbox, and Select fields, while missing many advanced functionalities that other plugins have.
JetFormBuilder has 24 blocks, most of which are for creating input fields covering pretty much any functionalities one would need for building any forms. Moreover, as a plugin based on Gutenberg, it allows using Gutenberg native blocks to embed any content into the form. As I mentioned earlier, some Gutenberg blocks are vital for building complex form layouts.

When comparing the fields supported by both plugins, you could think JetFormBuilder misses some basic input fields and buttons that WS Form has: Next, Previous, Email, and Link. Crocoblock devs went a different way, and instead of creating multiple blocks with similar functionalities, they allowed users to add such features to basic blocks themselves. For example, you can tune up the Action Button block to do what WS Form’s buttons do.
After-submit actions
The ability to perform various actions after form submission is another essential feature of form plugins. WS Form Lite allows four basic actions (Redirect, Save Submission, Send Email, Show Message) and two advanced options (Data Erasure Request and Data Export Request). You can order more than one action to be executed upon form submission.
JetFormBuilder, on the other hand, allows all the same basic actions plus Insert/Update Post, Register/Update User, Call Hook, Call Webhook and GetResponse, Mailchimp, and ActiveCampaign (to link the form with these services).
User Interface and ease of use
Though both plugins employ drag-and-drop form editors, they offer different user experiences because of how they manage building forms.
Since JetFormBuilder is based on Gutenberg, it relies on blocks for every aspect of building forms. This includes dragging blocks from the sidebar for creating input fields, organizing the elements in columns and sections, and splitting complex forms into multiple pages. For someone who’s used to the block editor with all the building tools stacked in one place, JetFormBuilder is easy to learn.
With WS Form Lite, you don’t need extra blocks for modifying form layout – you just drag and drop everything on a 12-column grid. Pull the right side of the fields to extend or shorten them, click and drag the left side to stack elements next to each other or offset them, manipulate whole sections – you can do everything in just a few clicks, and the entire process is really intuitive.
Such an approach eliminates the extra step of building a layout template before creating a unique design and speeds up the working process.
Responsive forms
JetFormBuilder allows previewing the form in three modes – Desktop, Tablet, and Mobile. This way, you know how your form will appear on the front end. You can also modify each Columns block individually to present form elements in different layouts for mobile and full-screen devices.

Now, WS Form enables previewing the form at five breakpoints. You can move around elements of the form so it will have different layouts on devices depending on their screen width. Modifying fields to match the needed designs can be done by physically manipulating them or setting width and offset parameters in the Advanced tab in the right sidebar.
Styling forms
To access WS Form stylization tool, go to WS Form > Customize in the admin panel.
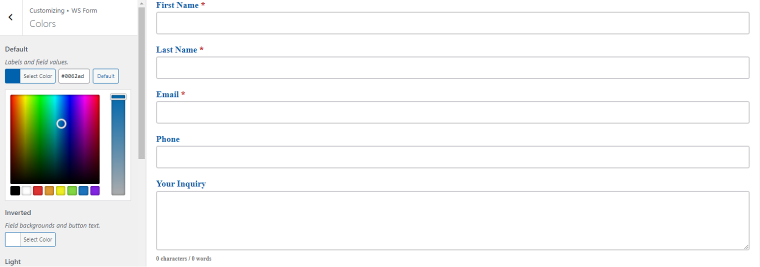
The stylization tool controls the appearance of all forms created with WS Form, including color settings for all elements, typography, fields and forms borders, distances between the elements, and more. Remember, the styling options you apply to one form will also be used for all WS Form forms on your site.
Since the Gutenberg editor doesn’t have its own style tools, it requires a dedicated block styles plugin. JetStyleManager is a free plugin that adds a Block Style button in the top right corner of your JetFormBuilder editor.

This button unfolds a menu that contains multiple styling options for content, label, field, required mark, and description elements of the form. You can create unique forms for your sites and stylize each field on the same form differently.
Unique WS Form Lite Features
We compared the basic functionalities of the two plugins, so let’s now turn to depict their unique features. WS Form has tools I wish I could see in other form builders.
Templates
WS Form Lite offers 19 basic templates. Even if the template isn’t exactly what you need, it’s easy to add extra fields or modify the existing ones to fit your needs. Offering a few templates in a free form plugin can also make the learning experience for beginners more enjoyable: new users can open up ready-to-use templates and learn how different types of fields are set up correctly.
Submissions management
To locate the submissions administration page, go to WS Forms > Submissions. This page provides access to all forms submitted on your site.
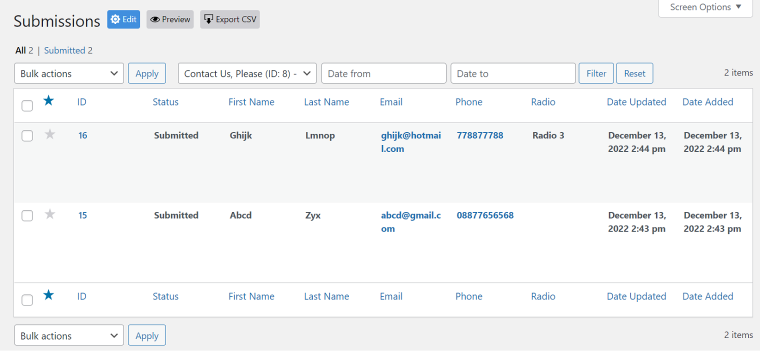
You can choose which form fields must be visible on the report, filter submissions by date, and order them by any of the field values. Finally, you can export all or selected submissions in CSV format.
Undo history
WS Form plugin retains the history of changes as you build a form. You can access the edit history in the Undo tab, which is visible when the Toolbox window is open in the right sidebar. The edit history looks like a vertical timeline, with each change to the form tied to a specific step with time and description.
Hover over the steps to see how the form changed over time, then click on the version of the form you want and continue editing from there.
NOTE:
WS Form recently built integration with JetEngine plugin.
Unique JetFormBuilder Features
Some vital features are missing from WS Form free plugin. Indeed, most free plugins don’t offer advanced functionalities available in JetFormBuilder.
Conditional logic
Build smart forms that react to user choice by opening conditional fields. Create excellent UX by customizing user journeys through your forms. You can also set a condition for the post-submit action. Conditions are set using a Conditional block containing one or many fields, so the entire sections of forms can possess conditional logic qualities.
Calculated content
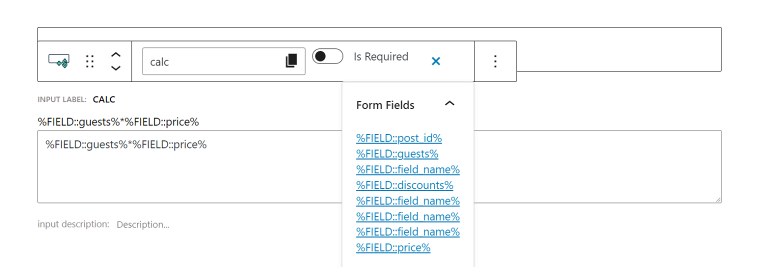
JetFormBuilder plugin allows the creation of calculator forms that use basic and complex formulas. Such forms may include fields invisible to users with additional information like tax pay.
To create fields with calculated content, insert the Calculated Field block and set the math formula to calculate field value. Fill the formula with meta keys with dynamic values that appear when you click on the field.
Third-party integrations
Integrations with payment and mailing services significantly increase the plugin’s functionalities. JetFormBuilder allows building forms with PayPal checkout enabling you to accept payments safely. Other free integrations help you subscribe applicants to mailing lists: ActiveCampaign, Mailchimp, and GetResponse. To get more integrations and premium features, find out more about JetFormBuilder Pro plans available.
FAQ
WordPress doesn’t provide the ability to embed forms without third-party solutions. The easiest way to create a form on a WordPress site is by downloading and activating a form plugin, creating a form, and embedding it into a webpage with a shortcode or a widget.
Gutenberg is a built-in block-based editor introduced in WordPress 5.
WS Form Lite provides the best visual form editor with advanced features like breakpoint selectors, free templates, and undo history.
JetFormBuilder provides more free advanced features and third-party integrations for building complex forms than any other free form builder plugin.
Summary
JetFormBuilder and WS Form Lite are some of the best WordPress form plugins that deliver more free features than competitors. Both solutions can create versatile forms for many purposes with a visual drag-and-drop editor, and each has its strong sides.
JetFormBuilder is a dynamic form builder that employs WordPress native block editor. Unlike other free plugins, it provides multiple advanced features, such as field blocks to build forms with conditional logic and calculated content, multiple post-submit actions, and the ability to fine-tune every form element.
WS Form Lite has a limited assortment of input fields for building complex forms. However, it offers an unmatched editor that makes building forms as joyful and easy as possible. It is also the best solution for building responsive forms.

