How to Create a Vertical Scrollbar Within a Column
With the help of this tutorial, you will be able to add a Vertical Scroll to any column of the website.
When the content on your website is divided into columns, it will look visually appealing, with all of them having the same height. The Vertical Scroll option of the JetElements plugin will help you put all the content you want into the column without stepping out of the block borders.
Follow the next few simple steps to add a Vertical Scroll to a column that is way too high.

1 Step — Start with Elementor
Go to the page you want to edit and click the “Edit with Elementor” button to start. Search the page for the section with multiple columns. When one of them is much higher than the other, it looks like that:

2 Step — Proceed to editing
Hover the pointer over the column and hit the Edit Column button.

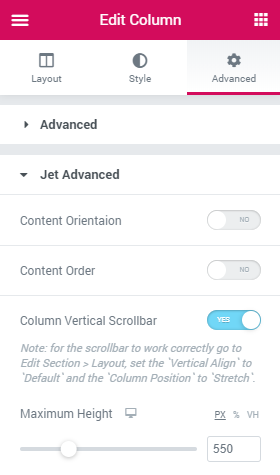
Go to Advanced > JetAdvanced. Switch on the Column Vertical Scrollbar.

3 Step — Define the height
Now you can choose the height of the column. Scale it manually or type in the precise height. There are three types of measure:
- PX – pixels;
- % – percent;
- VH – 1/100 of the height of the viewport (this means that if the height of the browser is 1000px, VH will be equal to 10px).
4 Step — Pay attention to the note
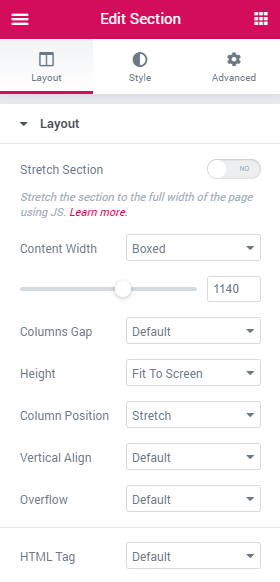
The scroll will work more accurately if you follow the advice given in the note. In the Section editing mode, go to Layout and choose the “Fit to Screen” option for the Height. The Column Position row will appear immediately – set it to “Stretch” and the Vertical Align to “Default.”

When you finish defining the optimal height of the column – that’s it! A good-looking and convenient Vertical Scroll is now on your page. Congrats!
You don’t need to set the same height for all the columns in your layout. If you want to make the layout a little asymmetrical – it is up to you. Play with the general look until it completely pleases your taste. And good luck with that!