Indexer Does Not Work and Shows 0
Why does the Indexer show 0 in my filters?
The JetSmartFilters indexer stops working when there is a mismatch between filter settings, meta field configuration, or query setup that prevents the plugin from building correct filter data.
This issue typically appears after changing a filter source, switching meta field types, or adding new queries to a page without assigning unique Query IDs. It can also occur when using filters with a plain query, as such queries are not supported by the Indexer.
This issue can affect WordPress sites using JetSmartFilters with Elementor, Gutenberg, or Bricks Builder and often appears as a JetSmartFilters Indexer shows 0 problem.
Check the possible causes of why the Indexer may show zeros instead of the actual count of items per filter option, and solutions in this indexer troubleshoot tutorial.
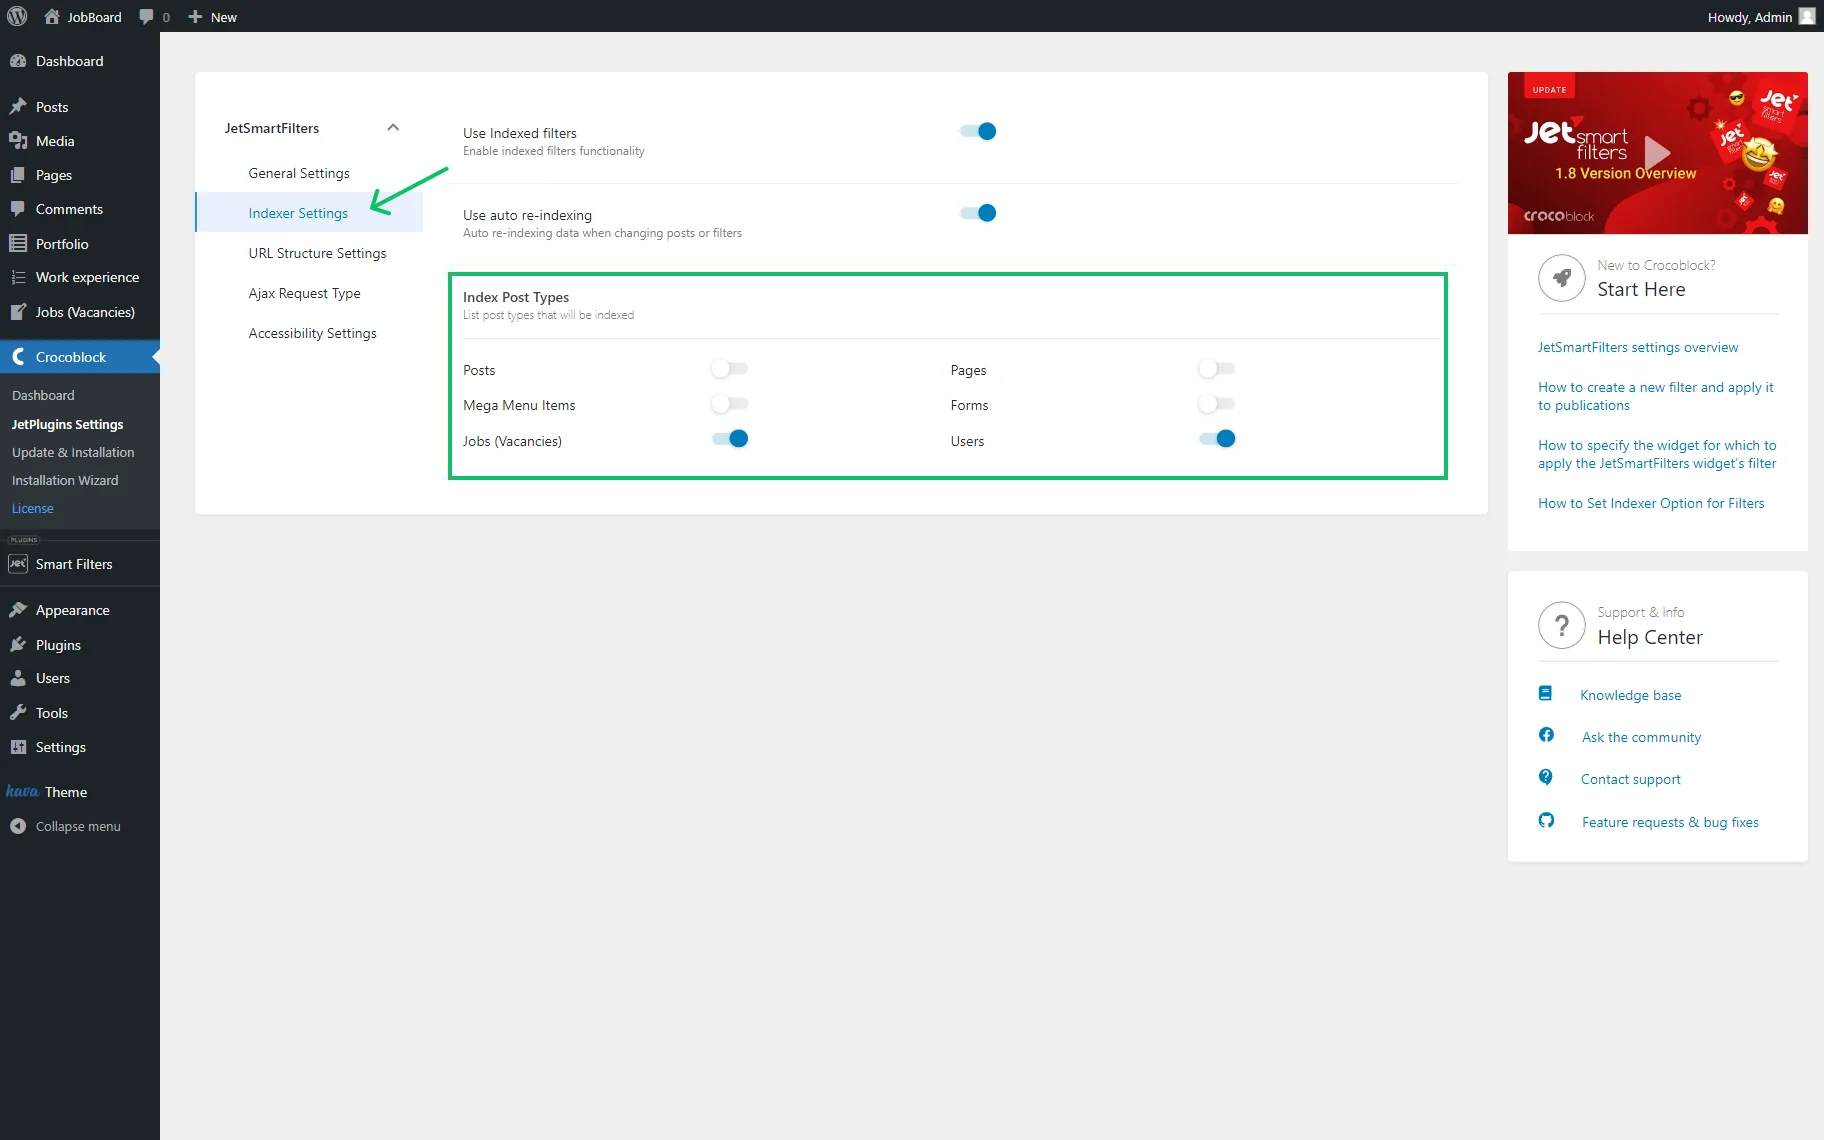
Check Whether the Indexer Is Enabled for Filtered Object
Go to WordPress Dashboard > Crocoblock > JetPlugins Settings > JetSmartFilters > Indexer Settings and enable the toggles for all objects that should be filtered and indexed.
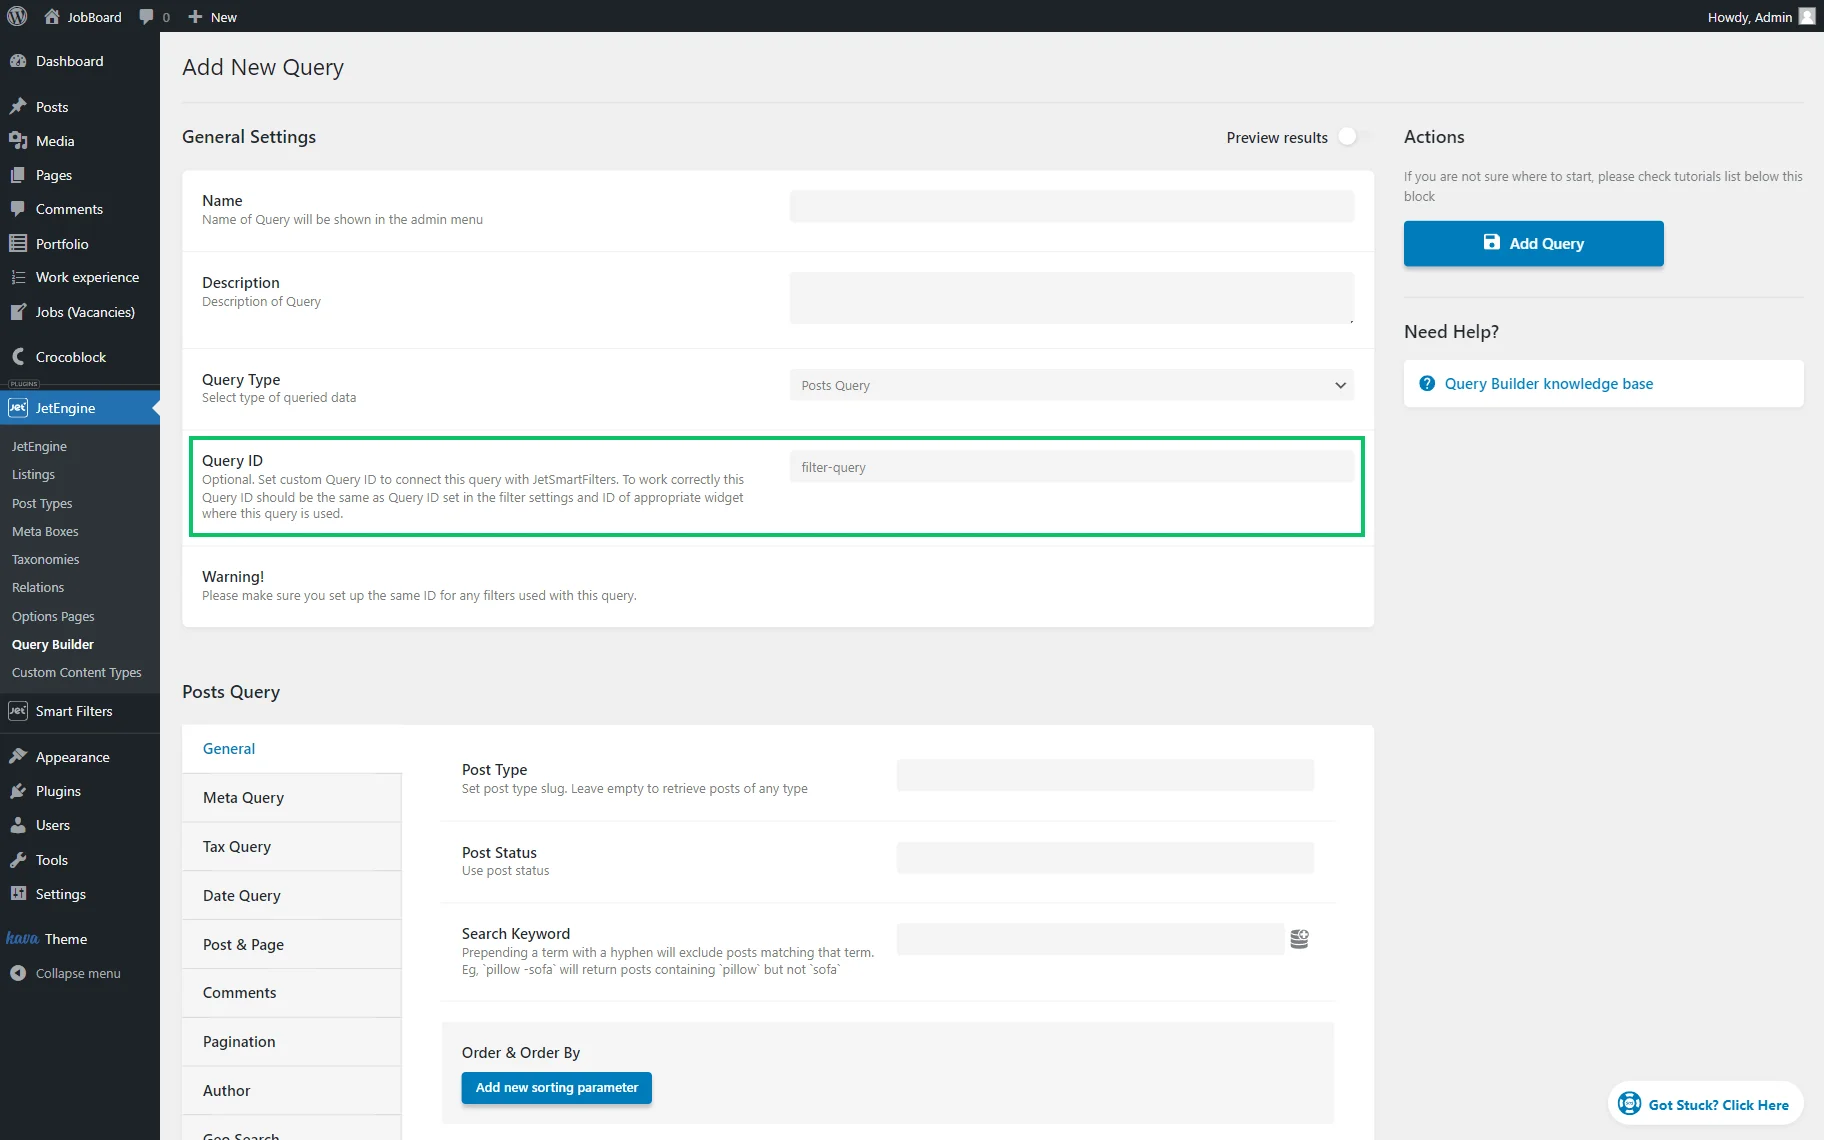
Check if the Query IDs in the Settings Are Identical
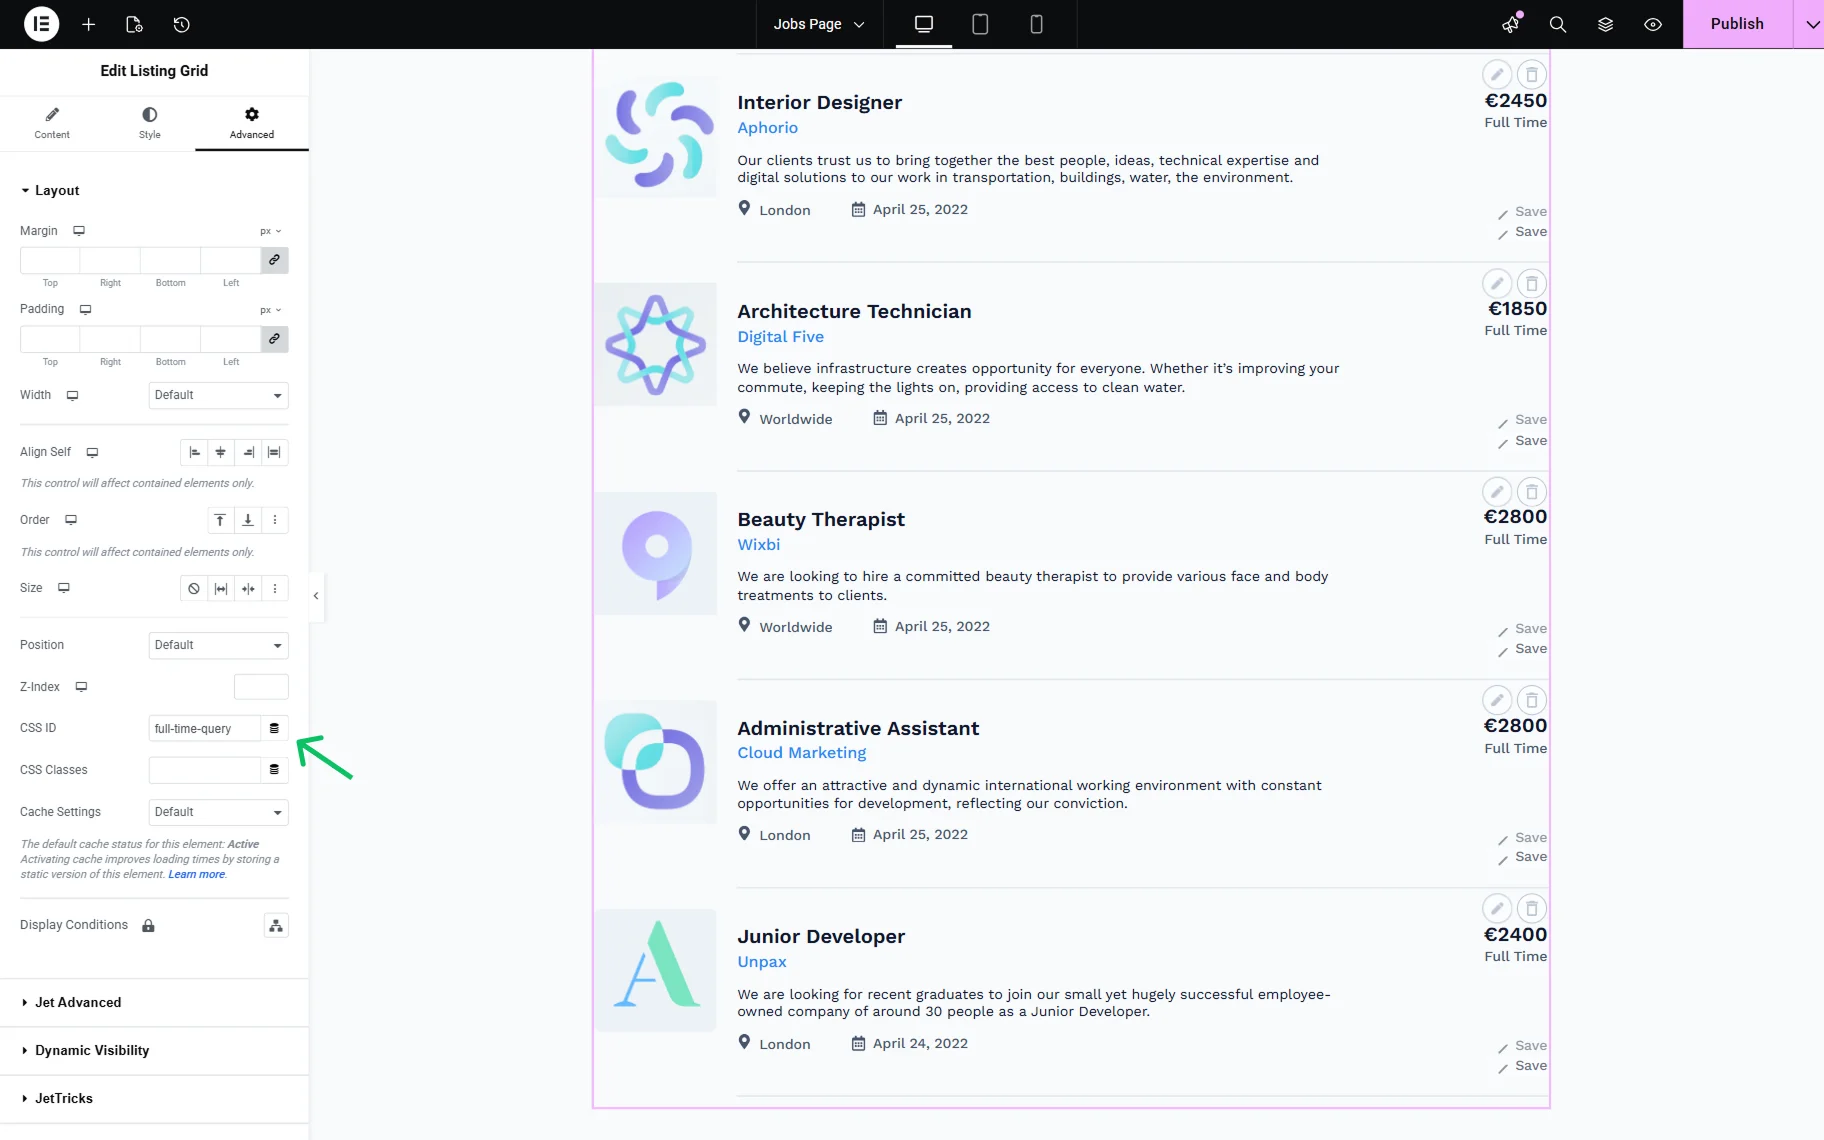
If Query Builder functionality is used, ensure that the Query ID set in the Query Builder matches the values used in the filter and the listing.
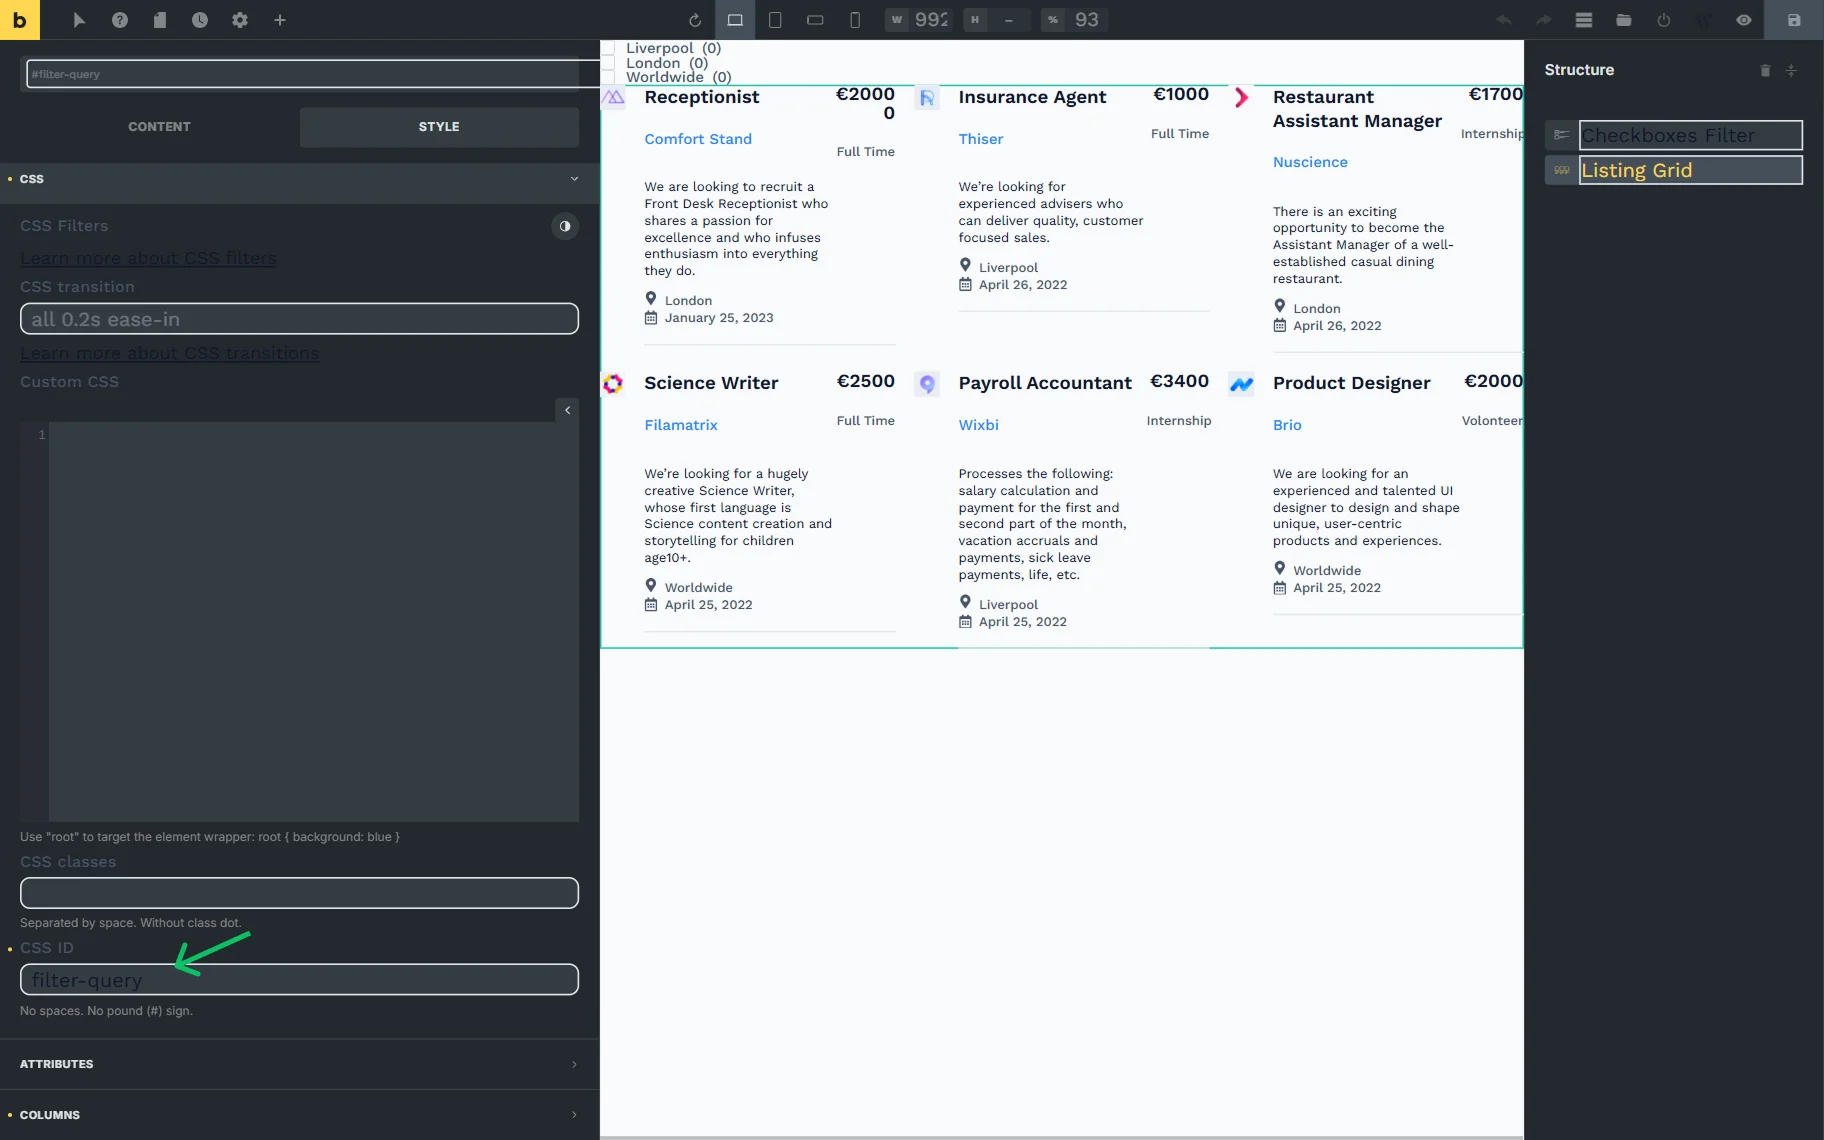
For instance, the Query Builder includes the “filter-query” Query ID in the Query Builder settings.
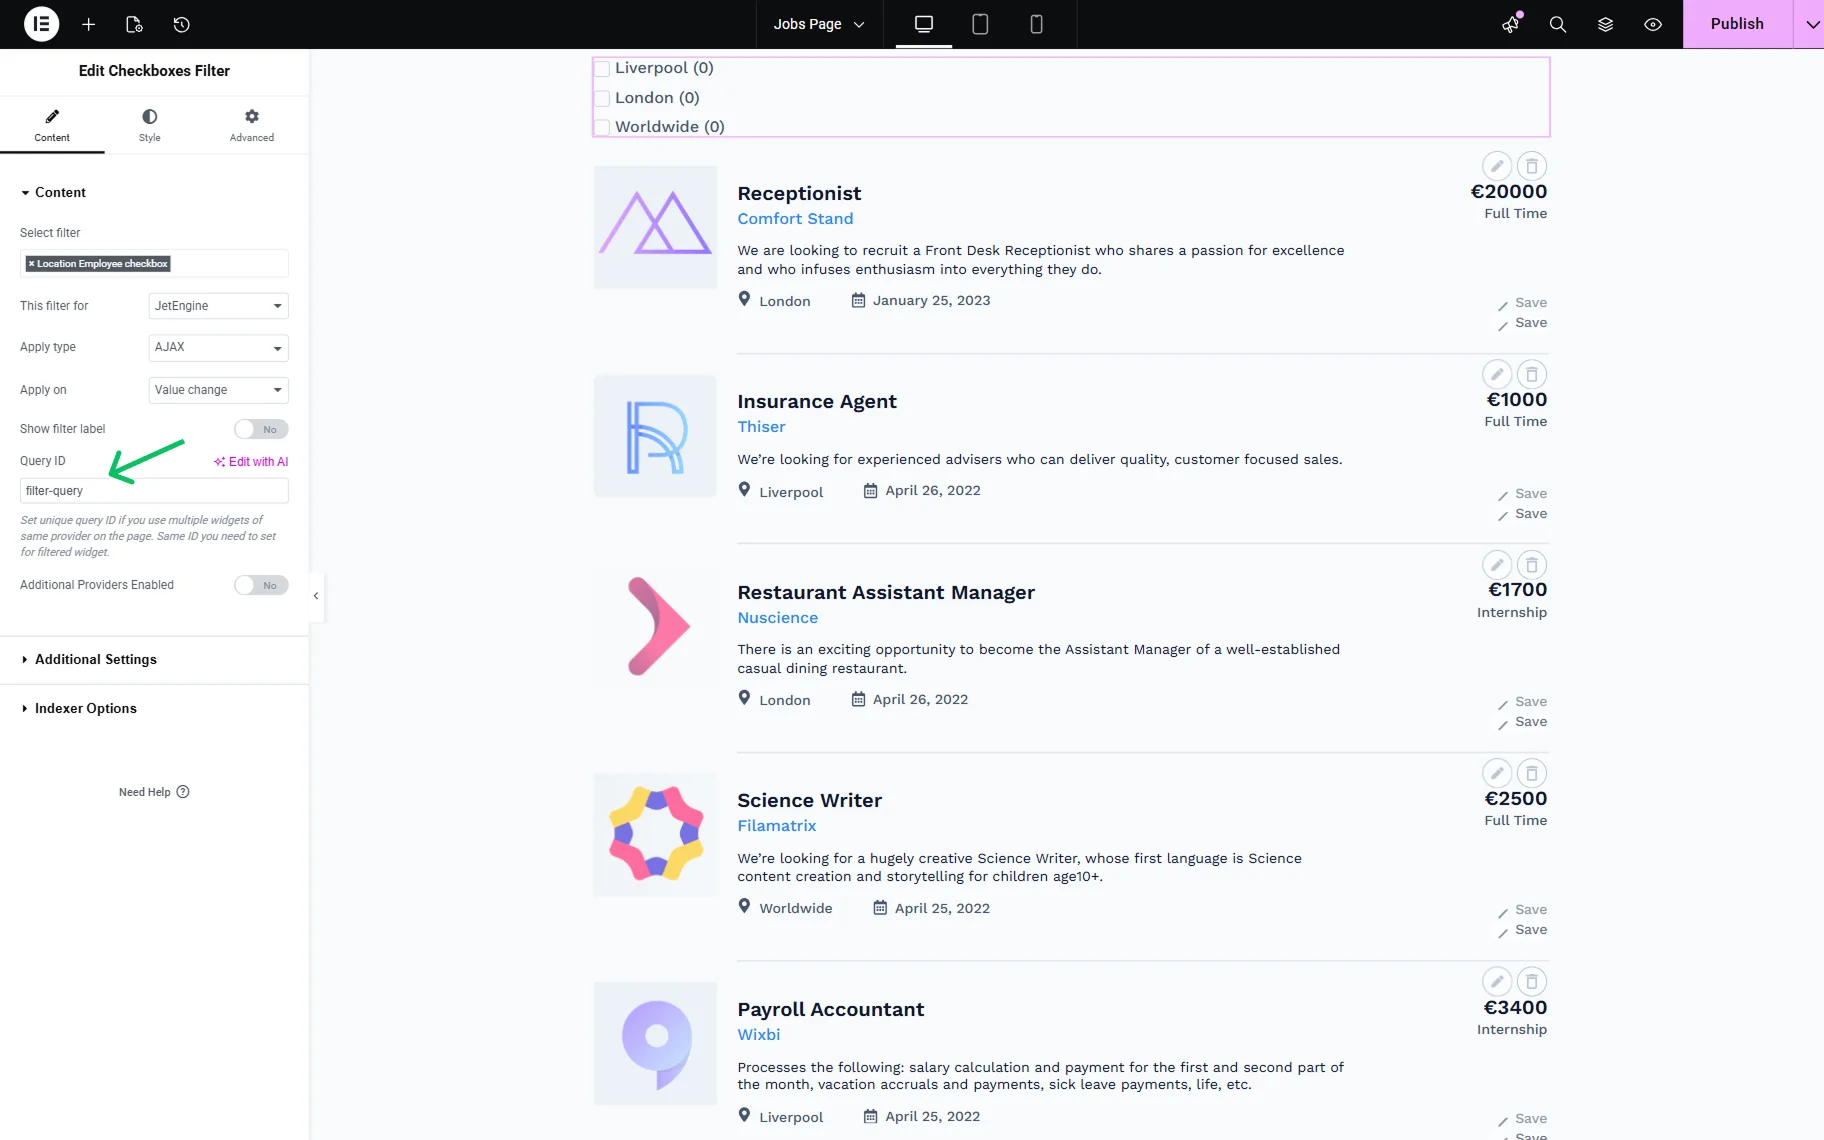
The same “filter-query” value should be pasted in the Query ID field of the filter widget’s Content tab.
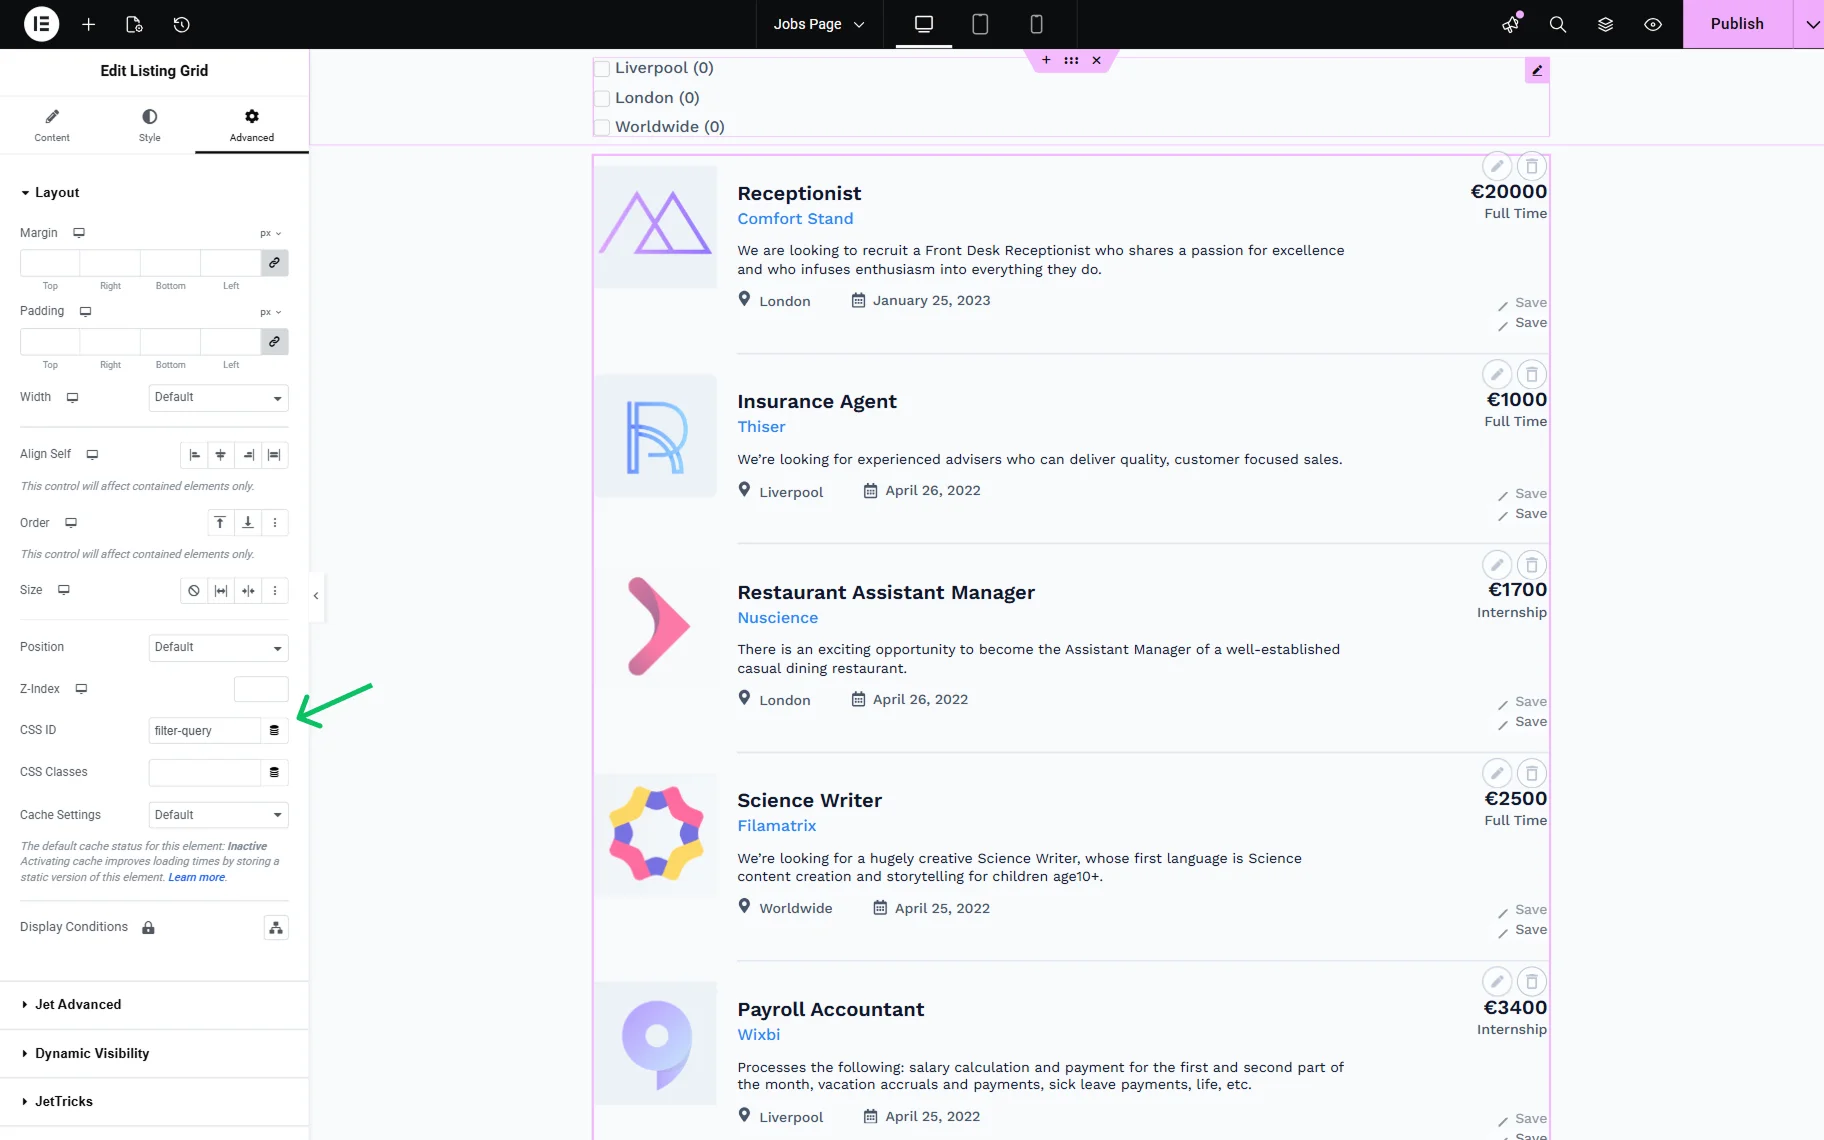
Also, use the same value in the CSS ID field of the Advanced settings of the posts widget (in the Listing Grid, for instance).
Learn more about How to Connect Filters with Providers Using Custom IDs in our guide.
If you work with the Bricks builder, the CSS ID field of the provider can be found in the CSS section of the STYLE tab.
At the same time, the filter settings remain similar to Elementor.
Check Other Queries on the Page
If you have used other queries on the page that are not related to the filtering, they should also have their unique IDs. It can be a random ID that is not the same as the one used in the filter and its provider.
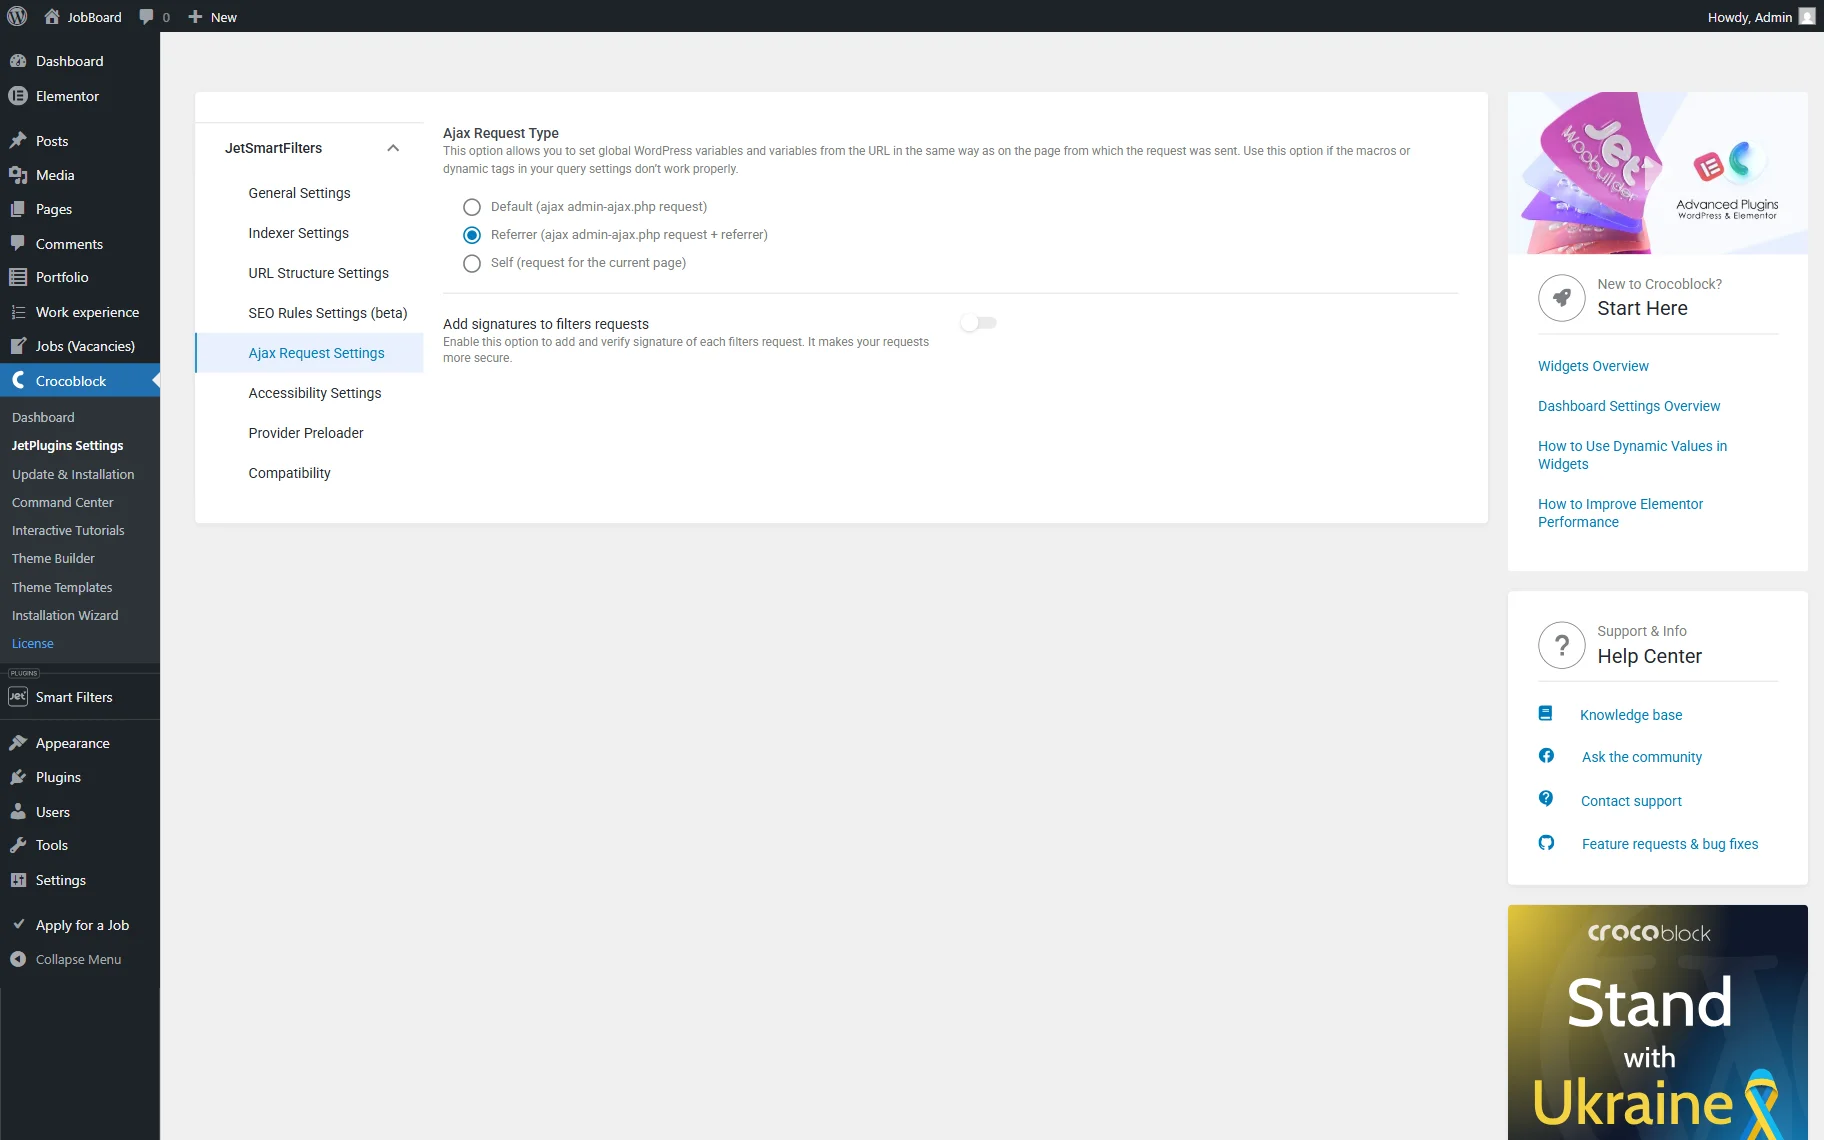
Check AJAX Request Type
Another way to fix the problem with the indexer is to set the “Referrer” request type. It can be done in the Ajax Request Settings tab of the WordPress Dashboard > Crocoblock > JetPlugins Settings > JetSmartFilters directory.
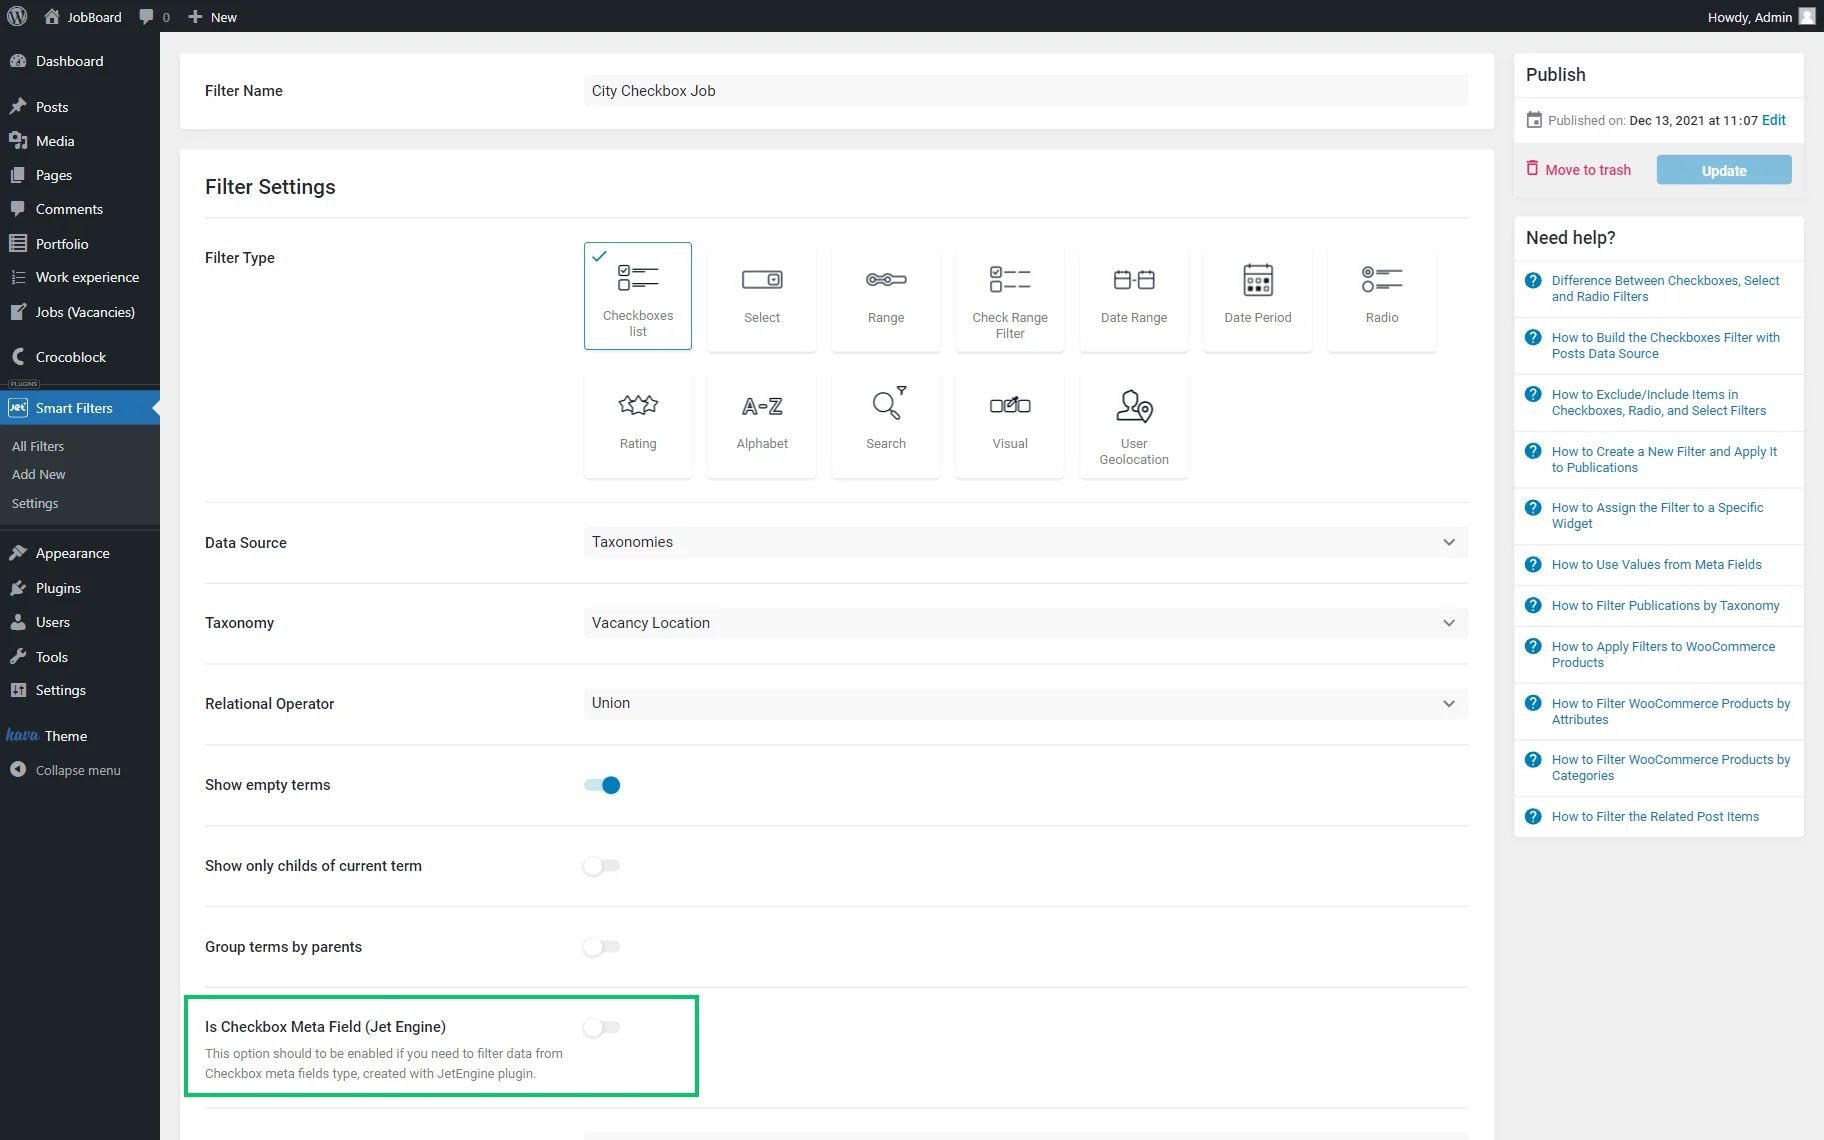
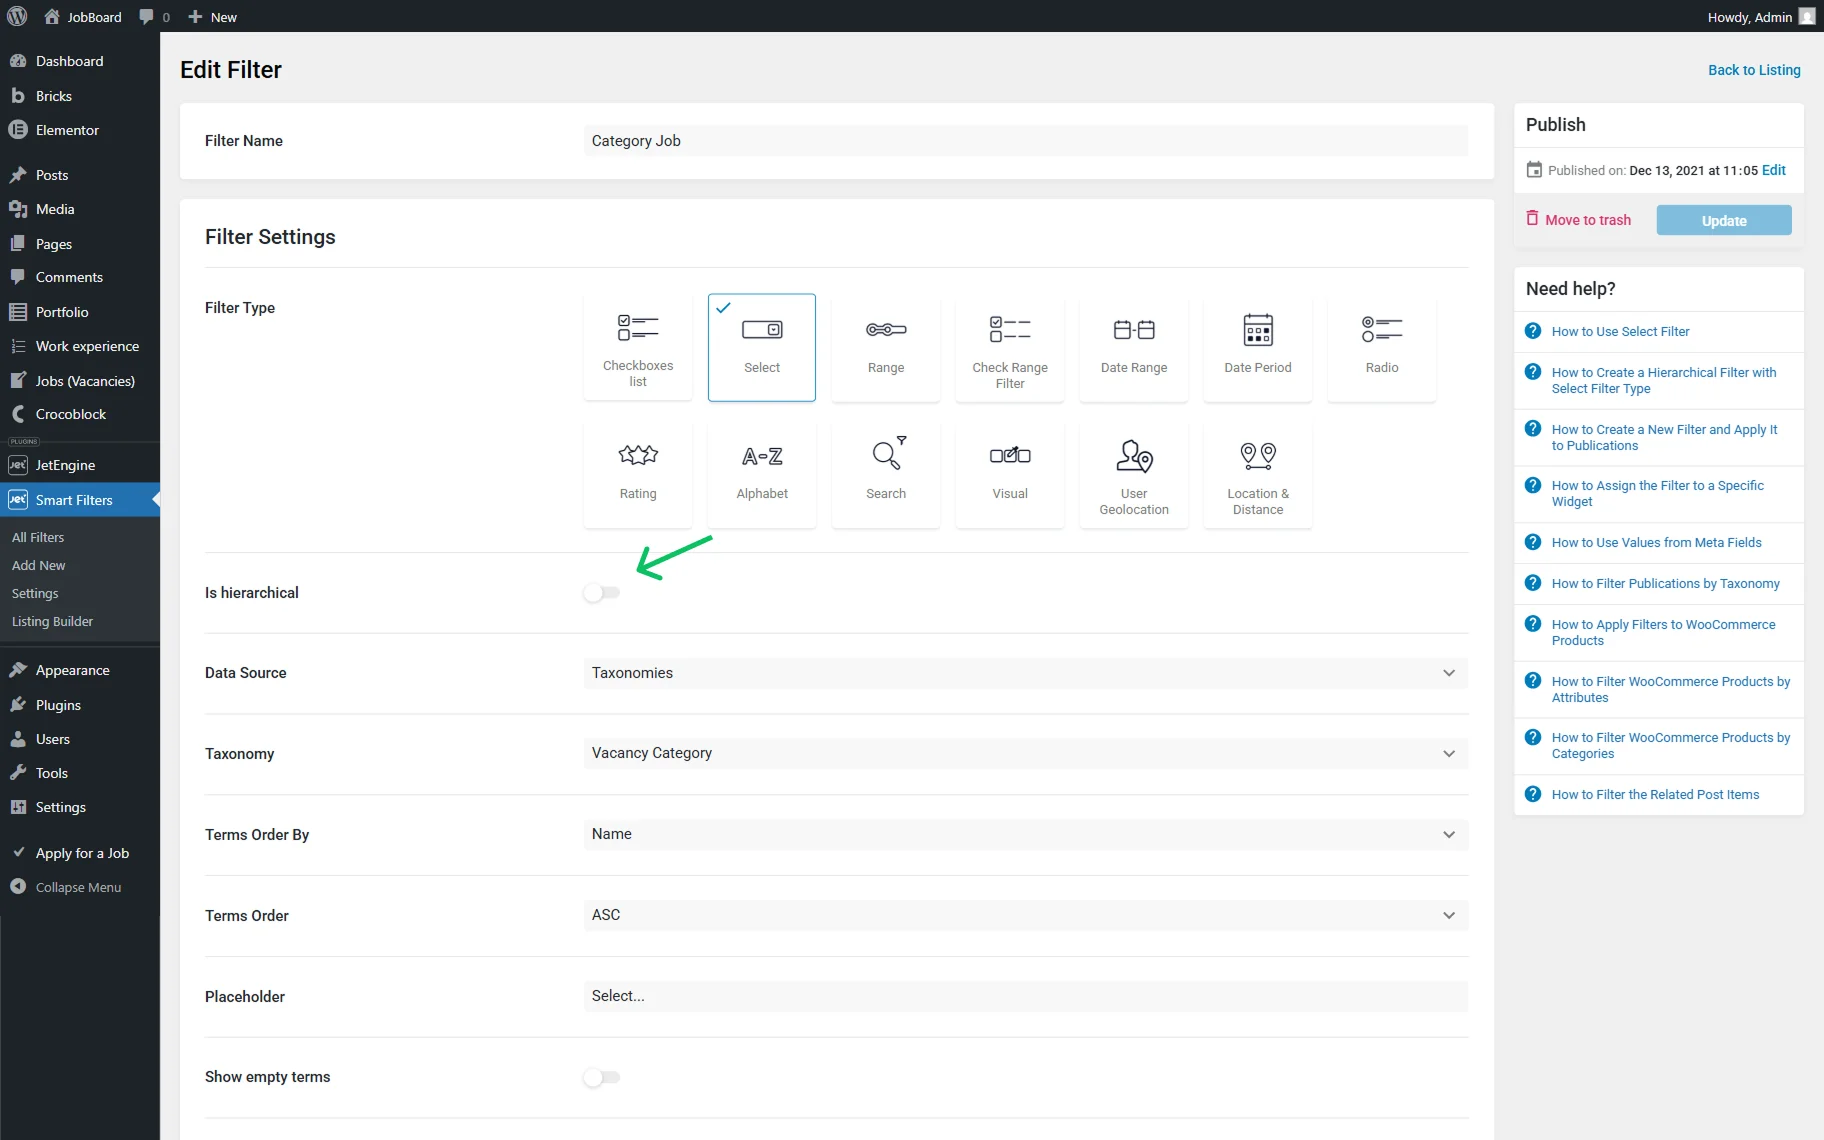
Check Filter Settings
If the “Taxonomies” option is set as a Data Source, ensure the Is Checkbox Meta Field toggle is disabled. Otherwise, it can be the reason why the indexer is not working. Although this toggle can be applied to the filter with a “Custom Fields” source.
If the filter was previously set to be hierarchical and the type was changed, ensure that the Is hierarchical feature is disabled.
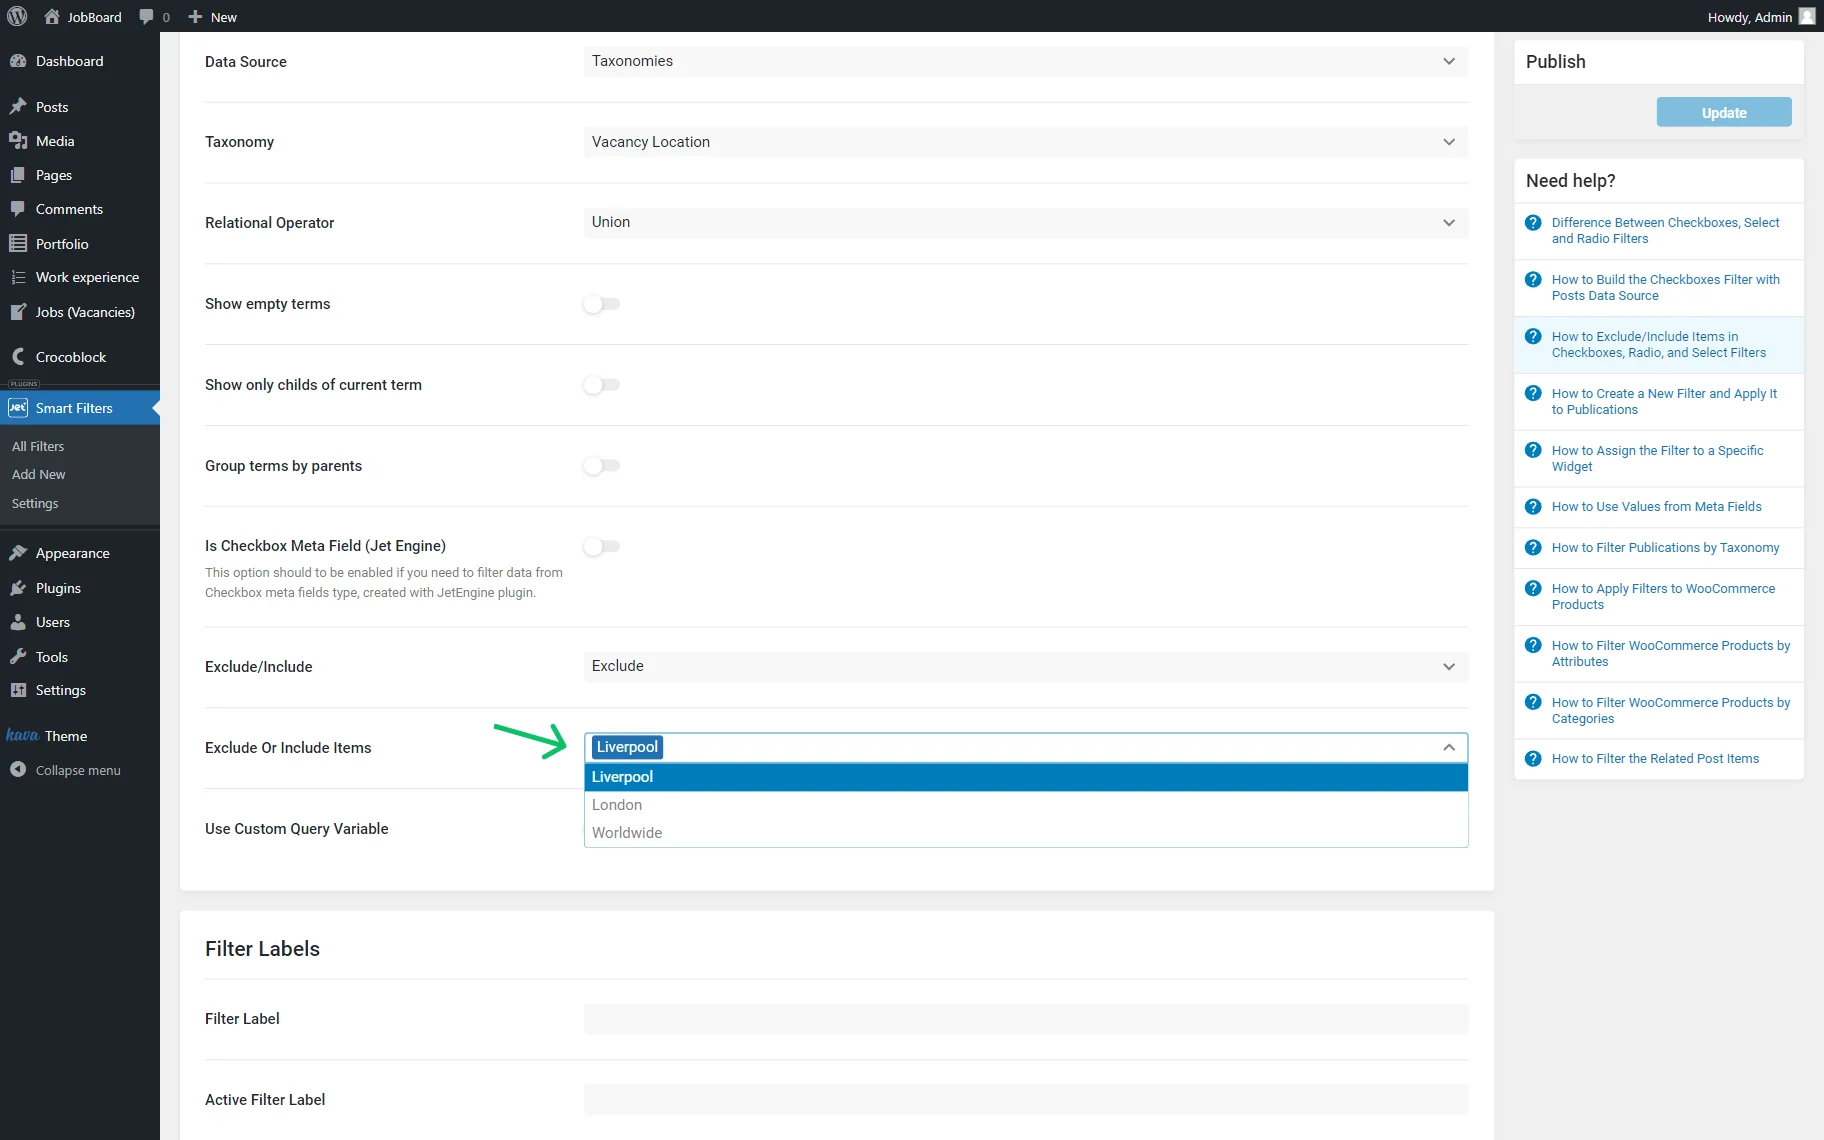
One more thing to check is the Exclude/Include field if you work with “Checkboxes list,” “Select,” or “Radio” Filter Types. If either the “Include” or “Exclude” options are selected (not “None”), the following Exclude or Include Items field should not be empty. Otherwise, set it to “None.”
Check Meta Field Configuration
If the filter source is a meta field, verify its settings and ensure that the correct meta field key is specified in the filter configuration. Also, avoid using meta field keys within plain queries, as such queries are not supported by the Indexer.
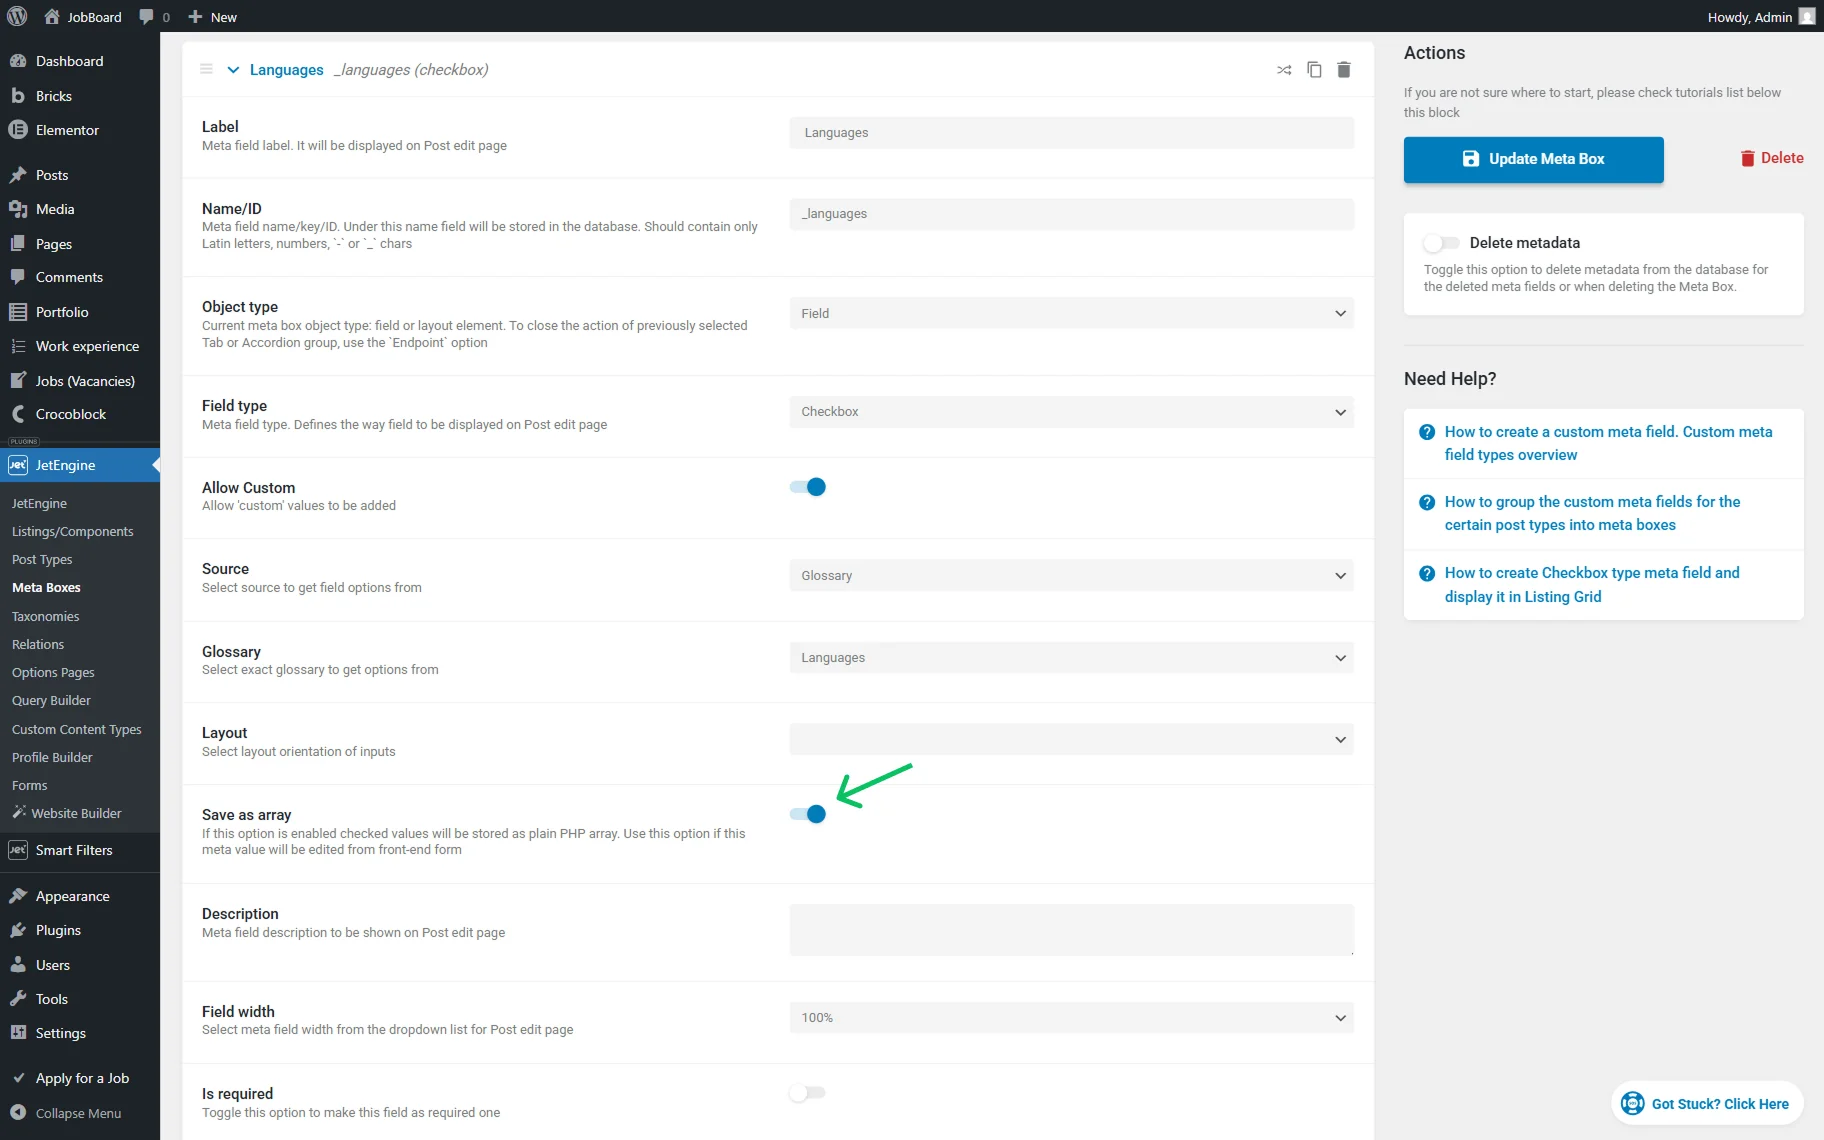
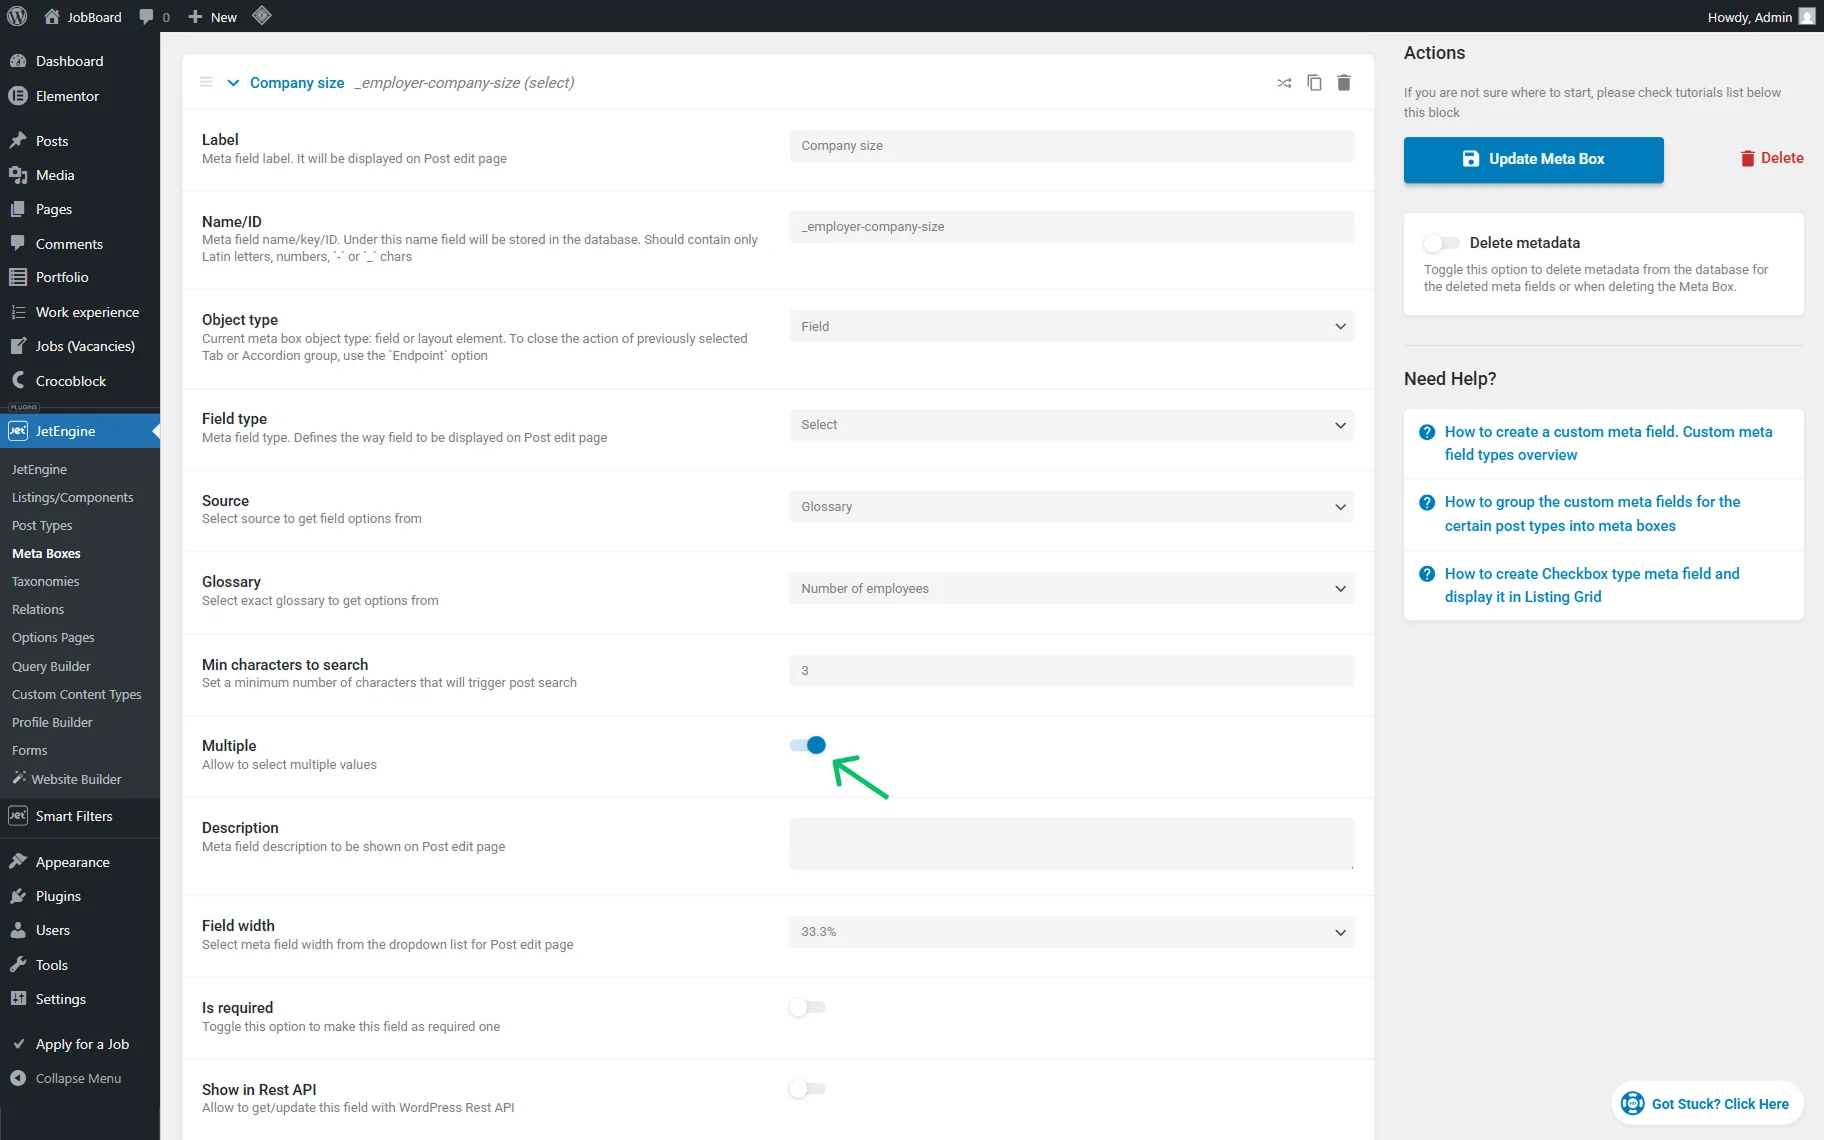
“Checkbox” and “Select” meta fields with multiple option
Make sure to activate the Save as array feature for the “Checkbox” meta field type.
Then, enable the Is Checkbox Meta Field in the filter settings.

Similarly, make sure to activate the Is Checkbox Meta Field toggle for filters based on “Select” meta fields that have the Multiple option enabled.
“Date” meta field
If working with the “Date” meta field, activate the Save as timestamp toggle.
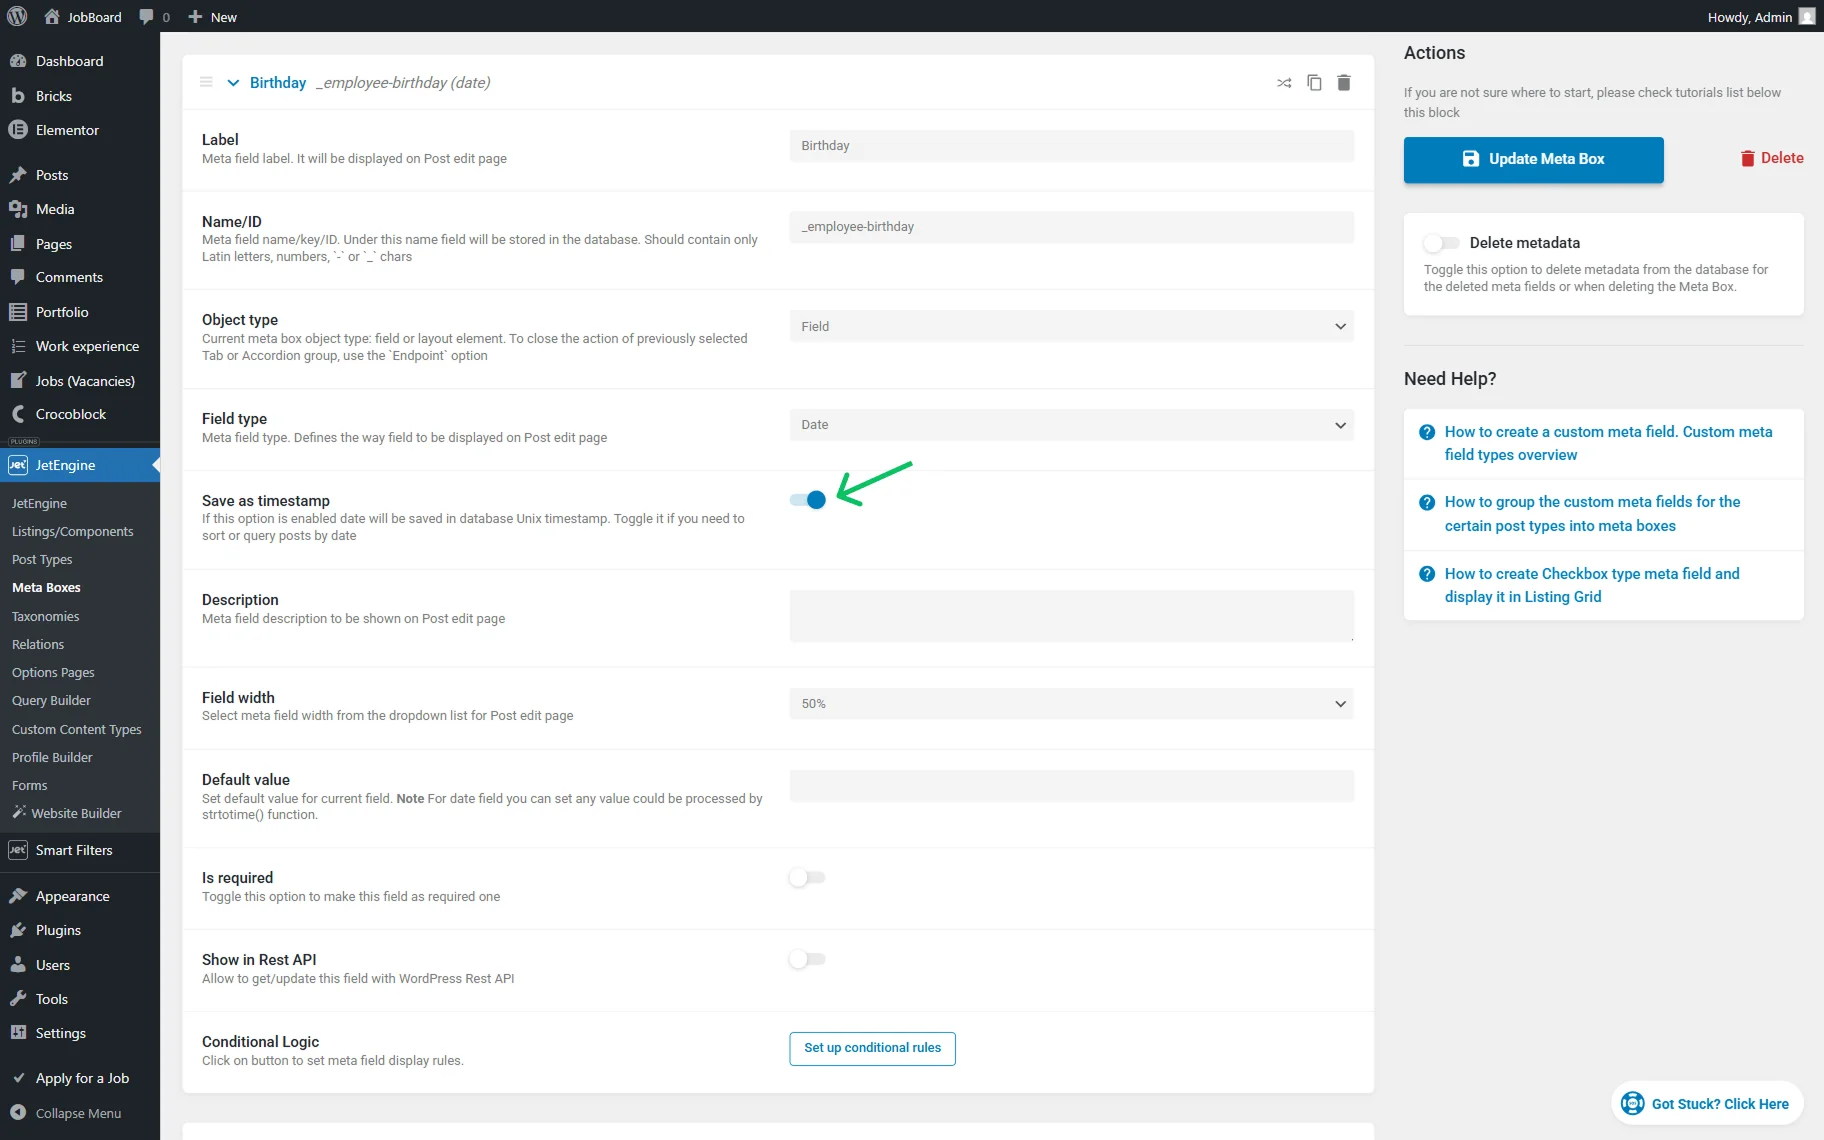
The process of resaving the values also needs to be done following these steps:
- Go to the edit page of an object (post, CCT item, user, etc.) on the backend and uncheck the option or multiple options in the meta field;
- Save the object with an empty meta field;
- Reselect the needed options in the meta field and save the object again;
Repeat the steps for all other objects.
ACF meta field
In case you work with ACF meta fields instead of the JetEngine ones, it must be converted to a timestamp; otherwise, the Indexer will not work correctly.
Add the following code to your theme’s functions.php file or any code snippets plugin to automatically convert ACF date values into timestamps when posts are saved:
add_filter('acf/update_value/type=date_time_picker', 'my_update_value_date_time_picker', 10, 3);
add_filter('acf/update_value/type=date_picker', 'my_update_value_date_time_picker', 10, 3);
function my_update_value_date_time_picker( $value, $post_id, $field ) {
  //field keys to convert, comma separated, you can use multiple fields
  $fields = array(
    'closing_date',
    'some_field_key',
    'some_other_key',
    //add as many lines with keys as you need
  );
  if ( ! in_array( $field[ 'name' ], $fields ) ) {
    return $value;
  }
  return strtotime( $value );
}
If the posts already contain date values, adding the code is not enough. You need to update existing values in the database.
Add the following code:
if ( ! empty( $_GET['date_from'] ?? '' ) && ! empty( $_GET['timestamp_to'] ?? '' ) ) {


  add_action( 'init', function() {


    if ( ! current_user_can( 'manage_options' ) ) {
      return;
    }


    $copy_from = esc_attr( $_GET['date_from'] ?? '' );


    $copy_to = esc_attr( $_GET['timestamp_to'] ?? '' );


    if ( ! $copy_from || ! $copy_to ) {
      return;
    }


    global $wpdb;


    $convert = 0;


    $data = $wpdb->get_results( "SELECT * FROM $wpdb->postmeta WHERE `meta_key` = '$copy_from';" );


    foreach ( $data as $raw ) {


      $date_raw = $raw->meta_value;


      $date_int = (int) $date_raw;


      if ( ( strlen( $date_raw ) === strlen( $date_int ) ) && ( strlen( $date_raw ) !== 8 ) && false === strpos( $date_raw, '-' ) ) {
        continue;
      }


      $date_timestamp = strtotime( $raw->meta_value );


      if ( false !== $date_timestamp ) {


        update_post_meta ( $raw->post_id, $copy_to, $date_timestamp );


        $convert++;


      }


    }


    echo $convert;


    die();


  } );


}
Then open the following URL in your browser: https://YOUR_SITE_ADDRESS/?date_from=field_key_to_convert×tamp_to=field_key_to_store_converted, where “YOUR_SITE_ADDRESS” should be replaced with your actual site address and “field_key_to_convert” and “field_key_to_store_converted” with real field keys.
Check Filter Source Values
We used the Checkbox Filter as an example of a filter setup. The Checkbox Filter is based on a meta field that has the manual options displayed.
This issue occurs because the Indexer cannot correctly perform database queries when values do not follow the required format. However, the Labels can be formatted freely.
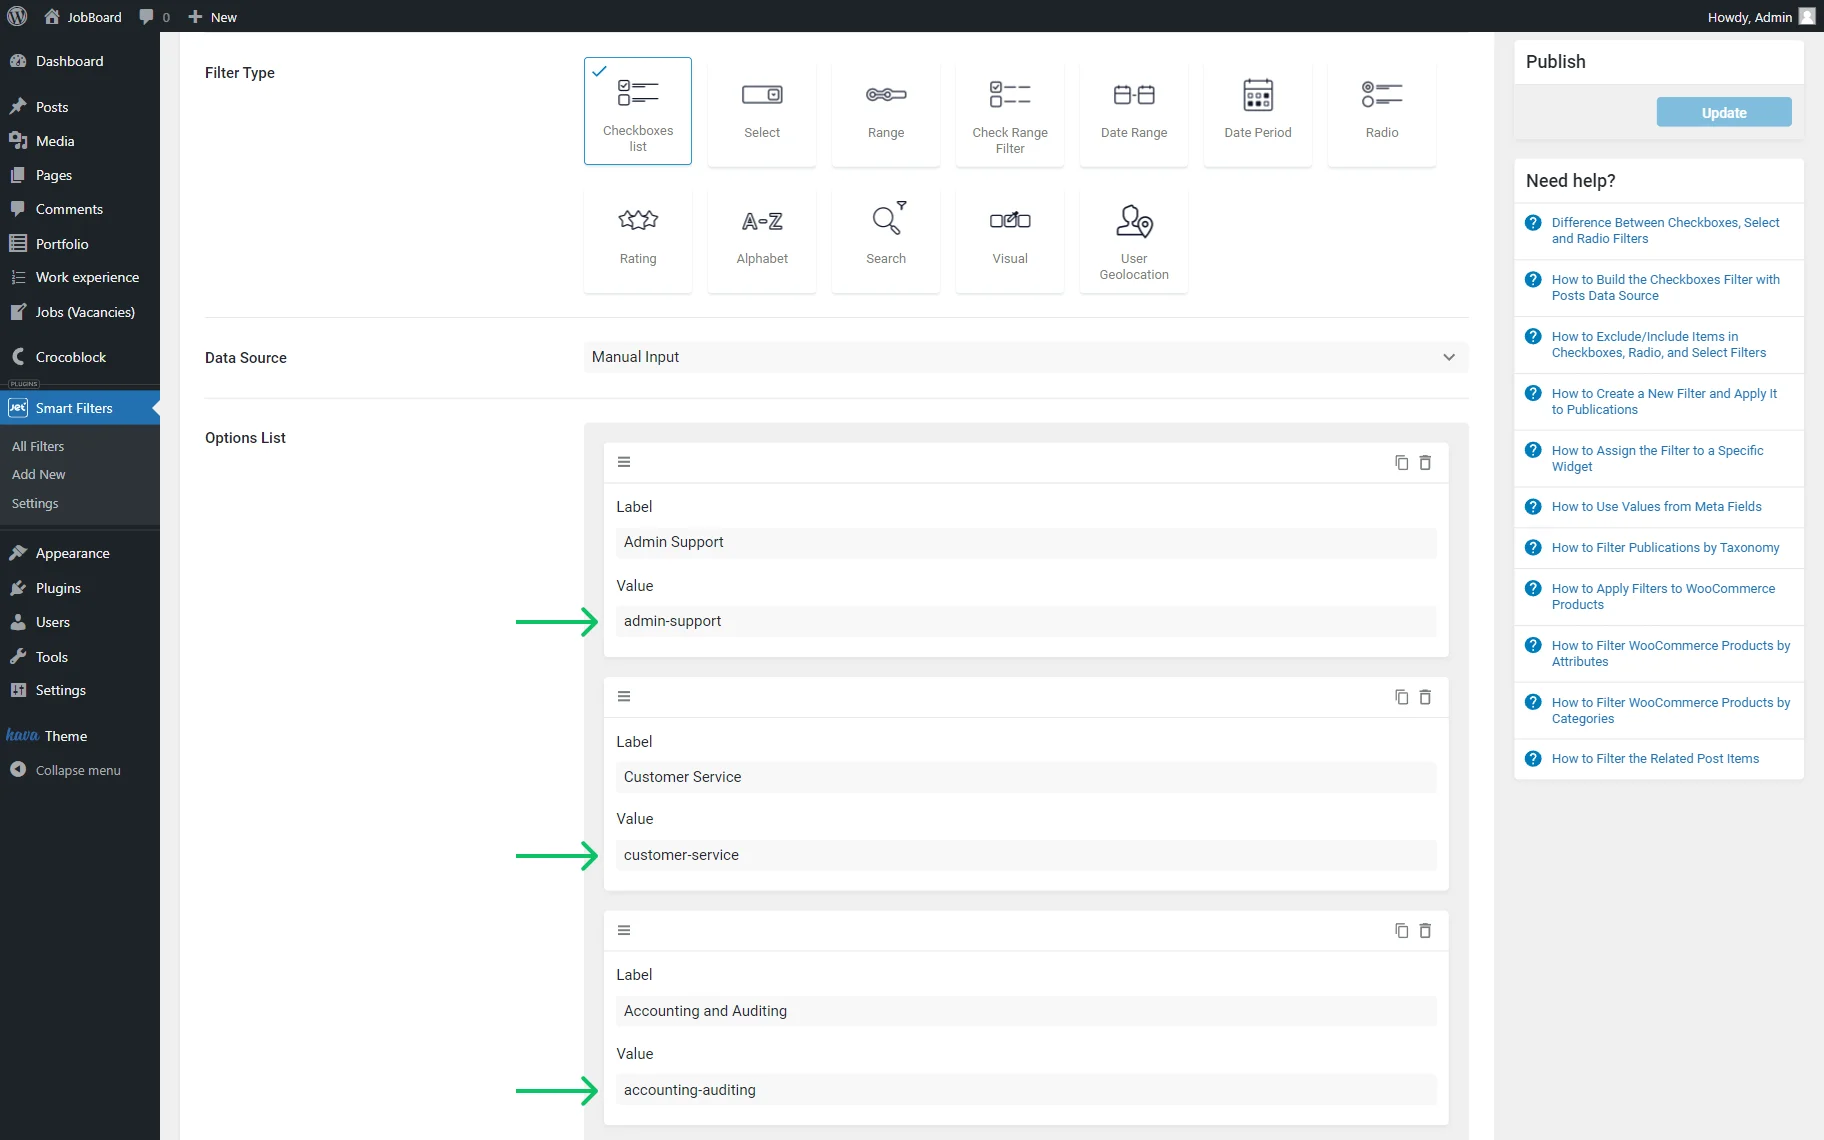
The same applies to the options in a Glossary. If you use a JetEngine Glossary as a filter source, the values in the options must be lowercase, with no spaces, to be indexed by the Indexer.
If you use an incorrect glossary as a filter source, you should edit the values to lowercase and remove spaces.
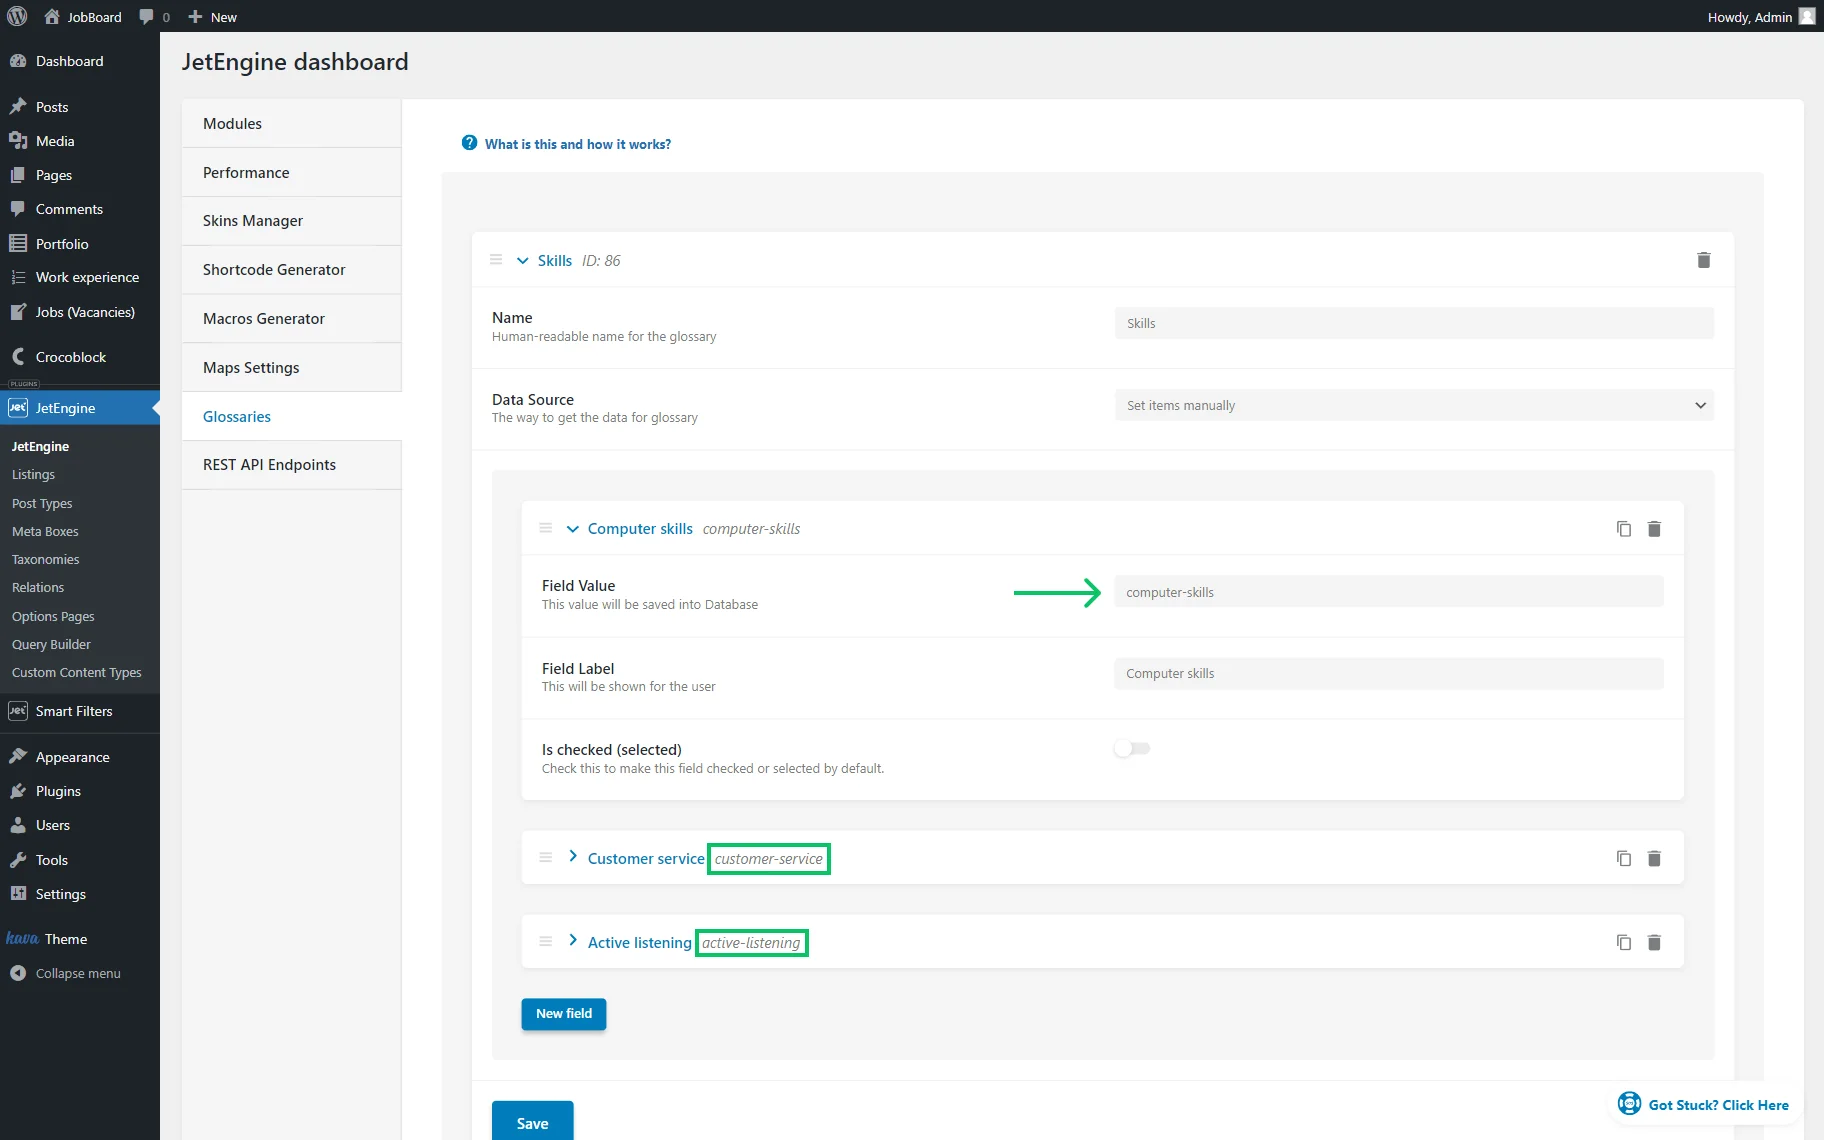
However, additional actions are required to fix the Indexer after editing the values in the meta field options or the glossary.
Resaving each post/CCT item, user, etc., containing a meta field with edited values is crucial.
To ensure the new values are successfully saved in the database after resaving them, you can check the values in the meta fields of the objects via the following two tools.
Via JetEngine Query Builder
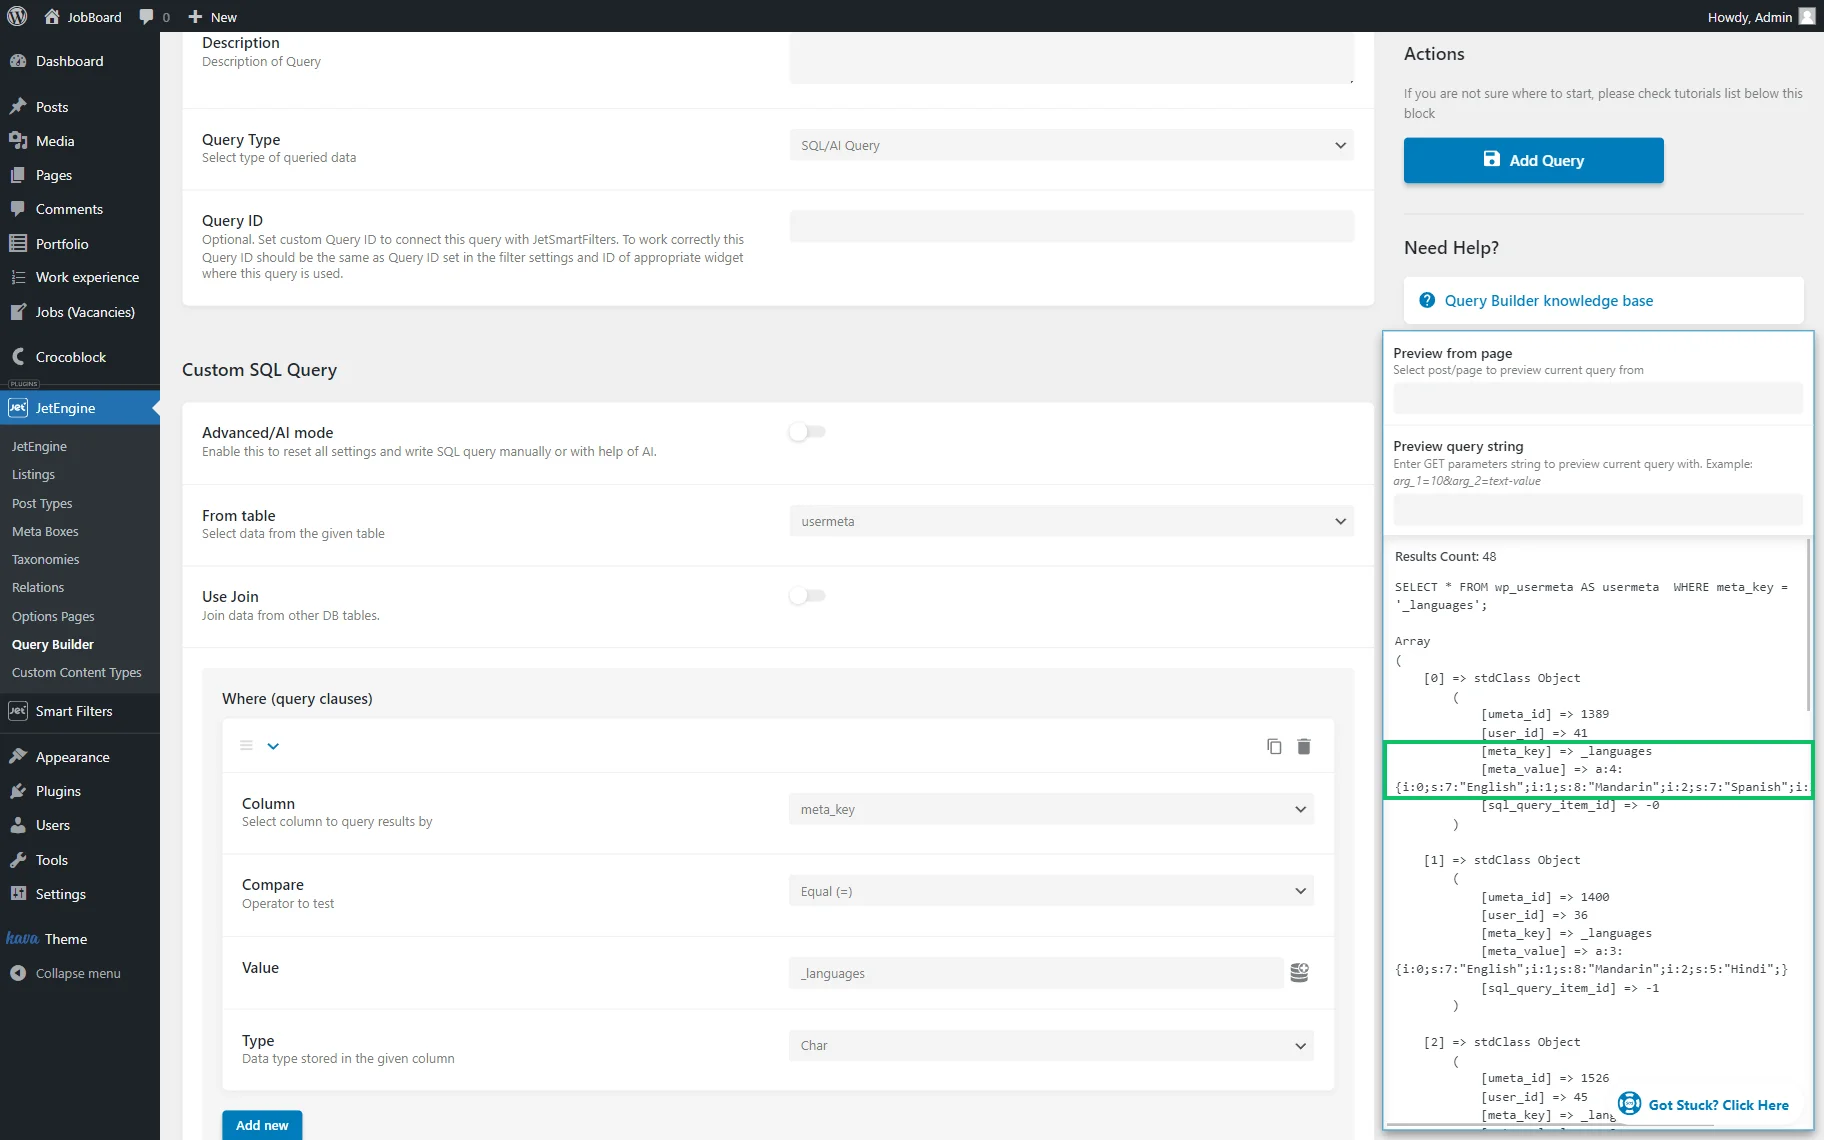
In the Query Builder, you can create a query of an “SQL/AI” Query Type and select a relevant table in which the meta field is saved. It can be postmeta, usermeta, or CCT table.
Add the following query clause to see the values of the needed meta field in the “meta_value” column.
Complete the Column field with the “meta_key” value, set the Compare operator to “Equal,” and fill in the Value field with your field name.
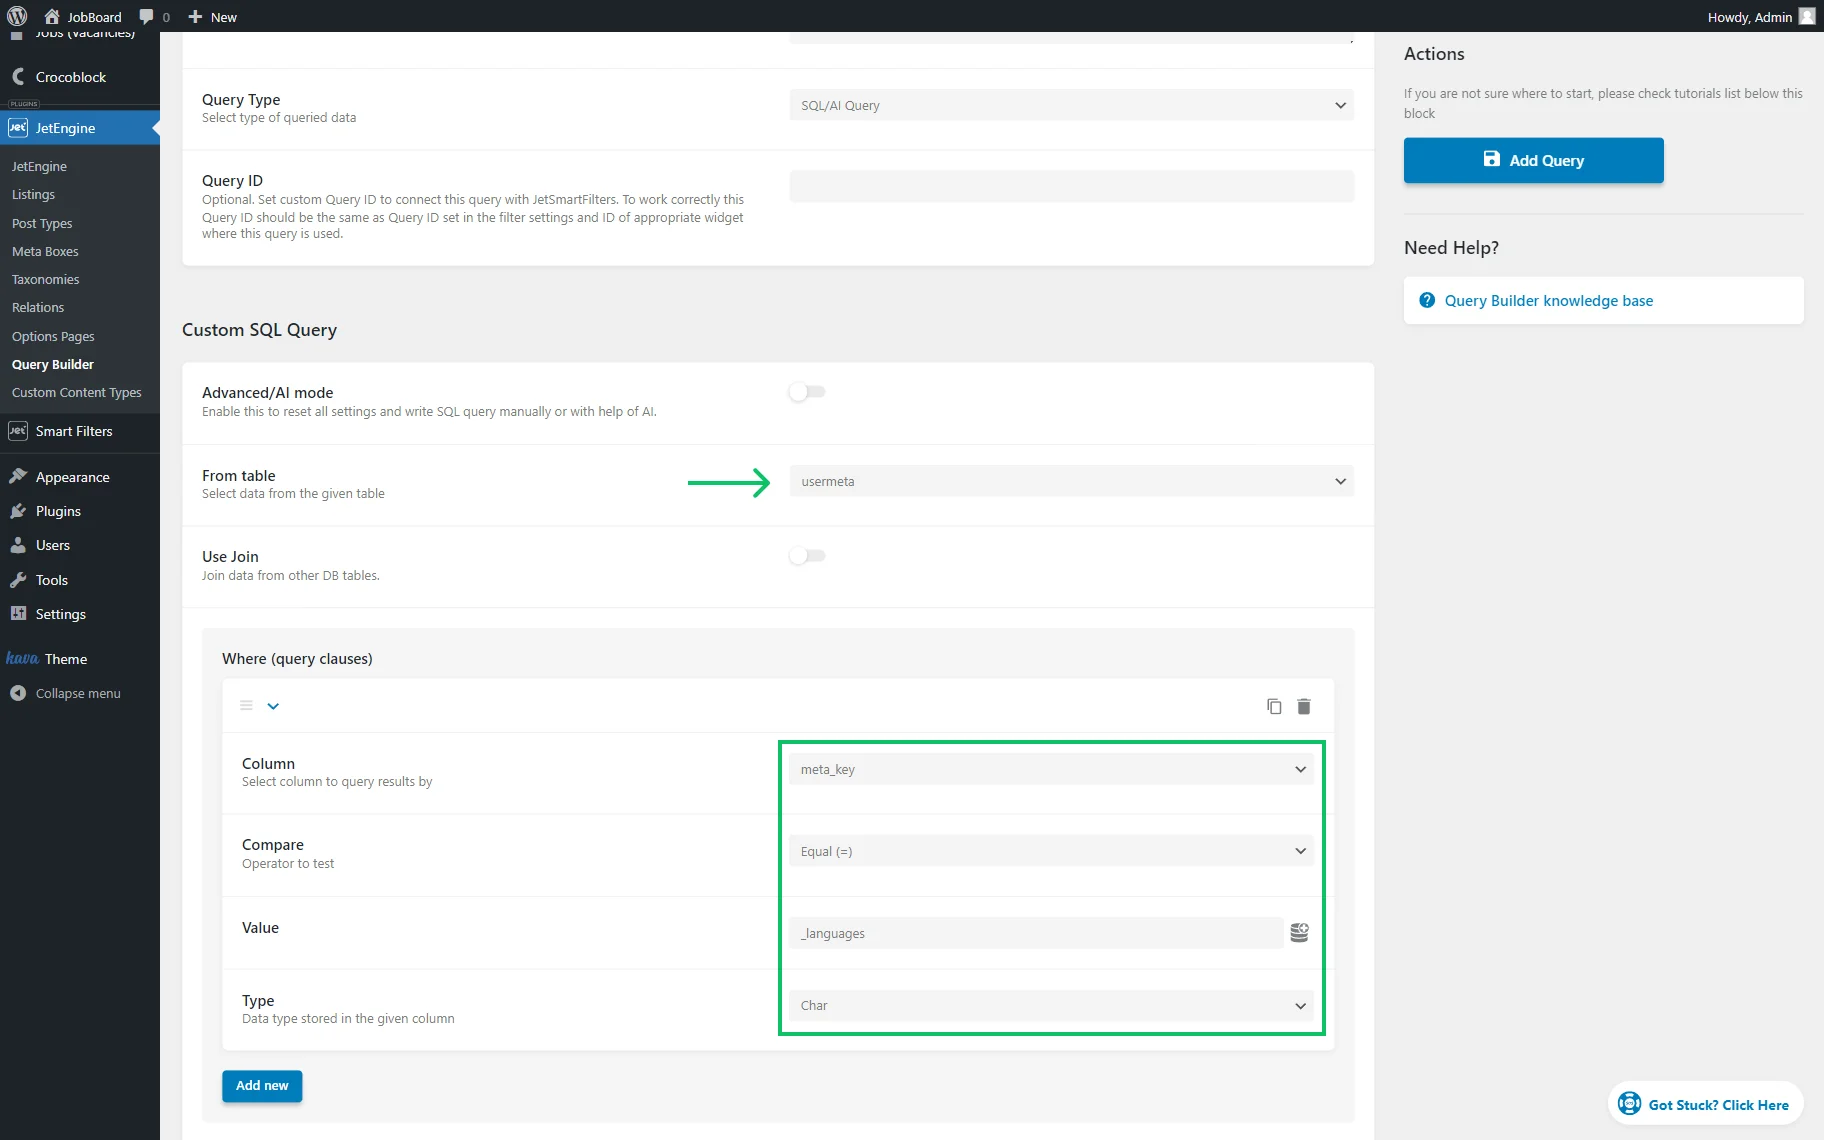
Activate the Preview results toggle at the top of the page. If you still see incorrect values in the “meta_value” column, go back to the edit page of the relevant object, reselect, and resave the options in the meta field.
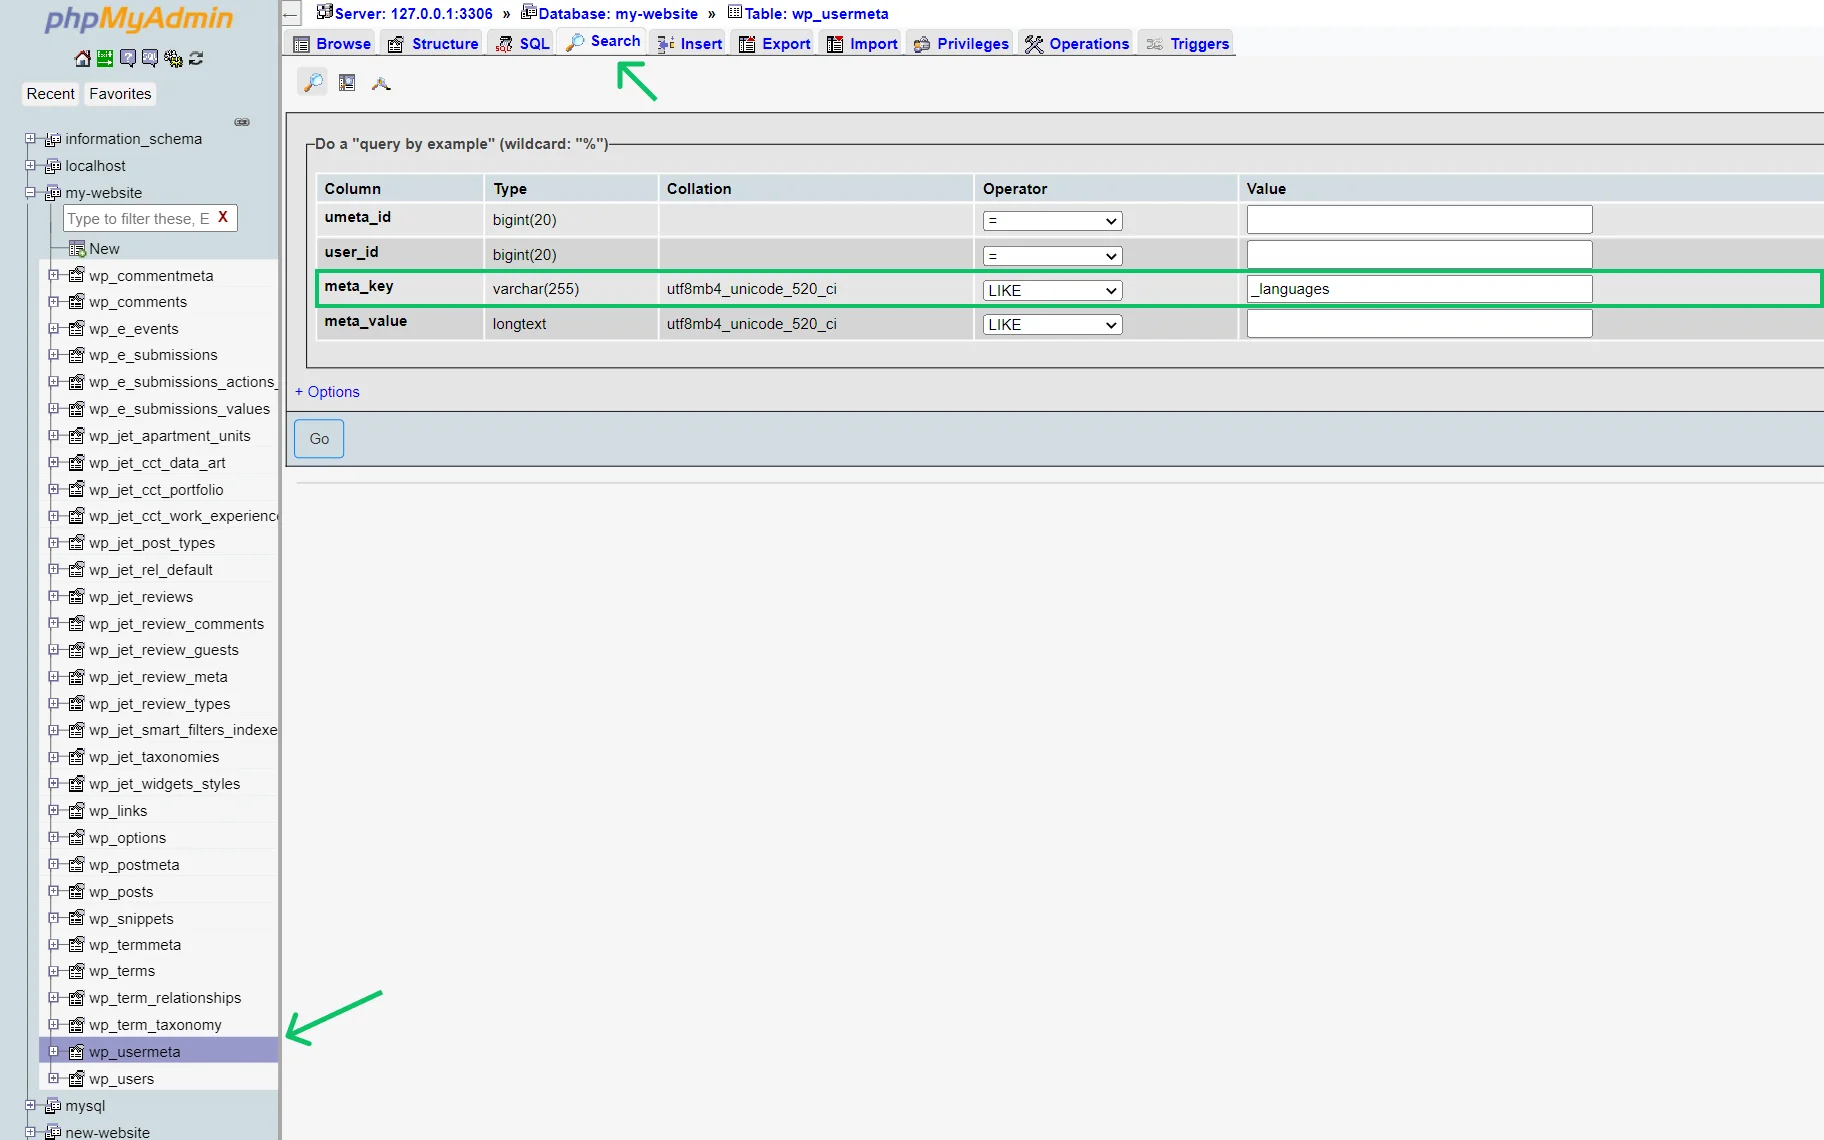
Via phpMyAdmin
You can use the same approach as in the Query Builder in phpMyAdmin.
Go to a table where the meta field is stored. Click on the table, go to the Search tab, and insert the meta field name into “meta_key” to find users with values in this meta field.
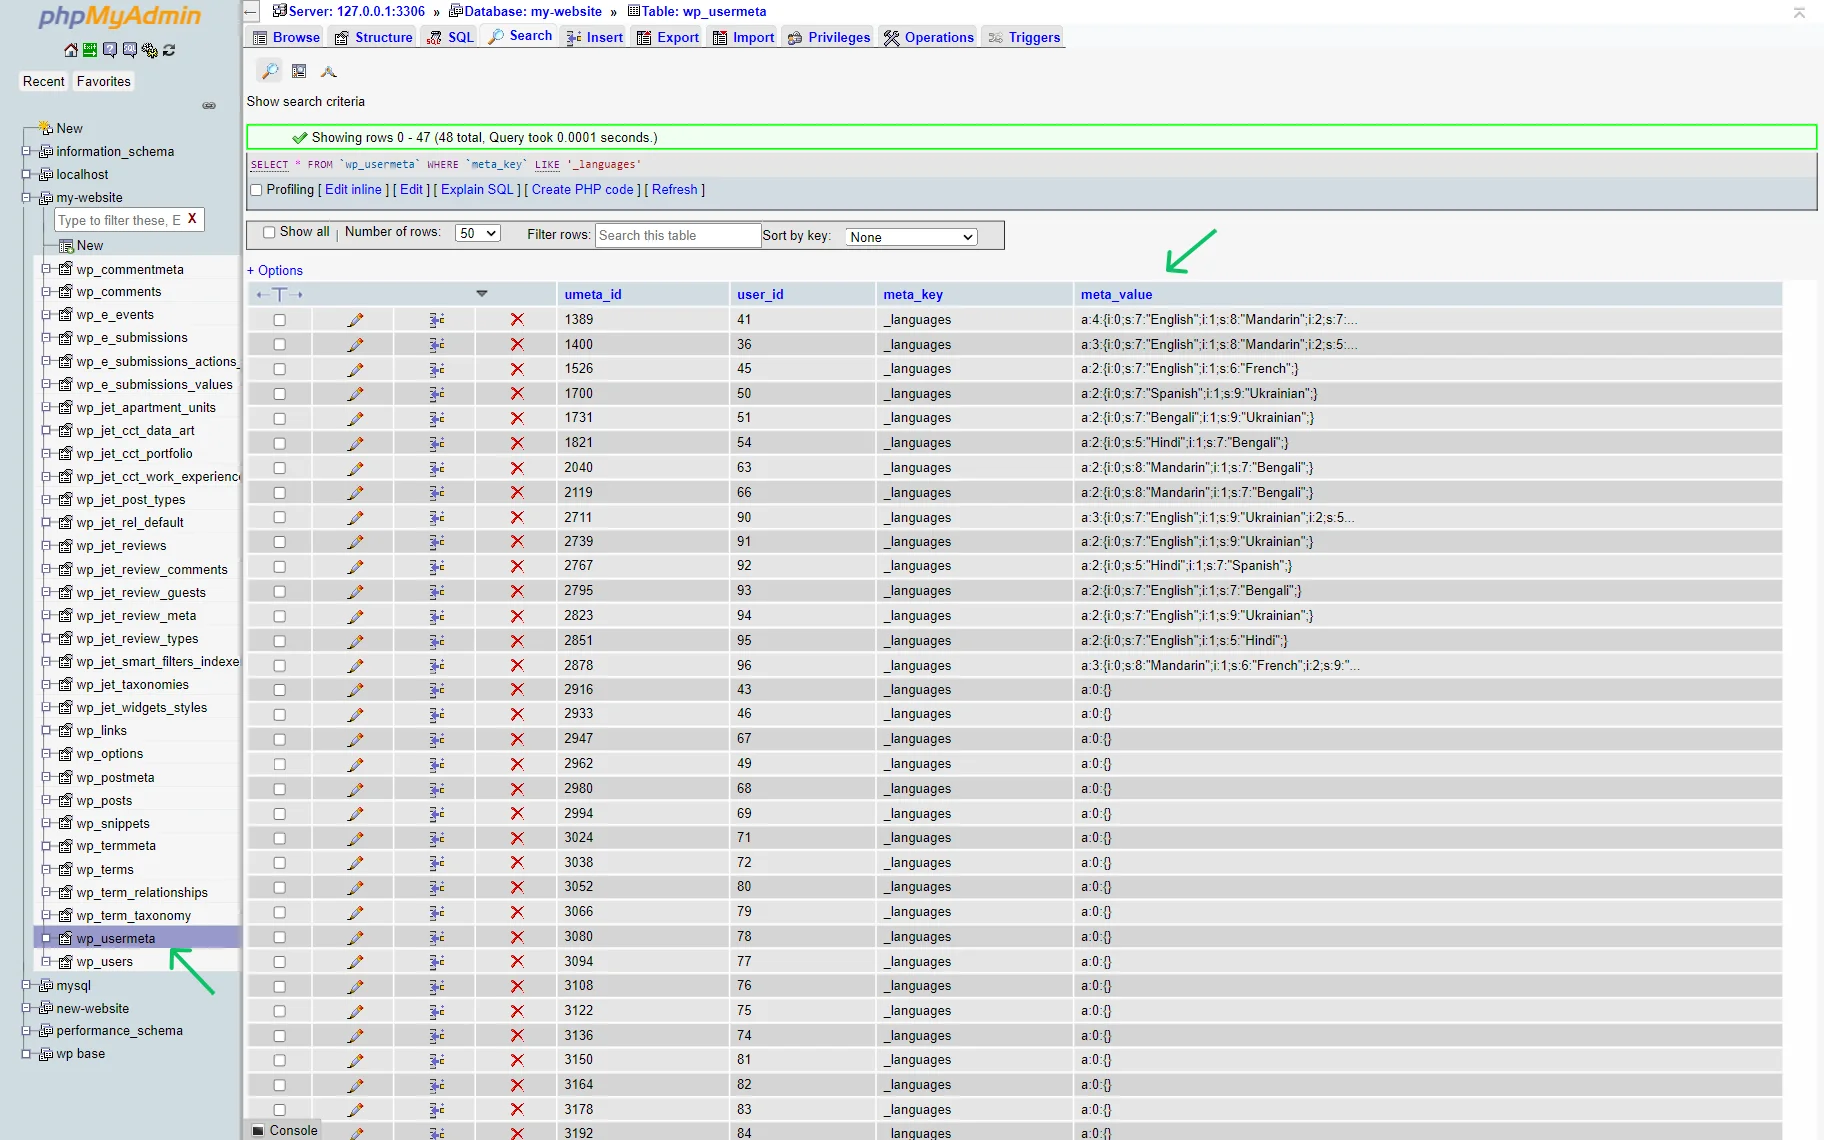
After pressing the “Go” button, you should see the values of the meta field in the “meta_value” column, which helps to understand whether the values have been updated after resaving the objects.
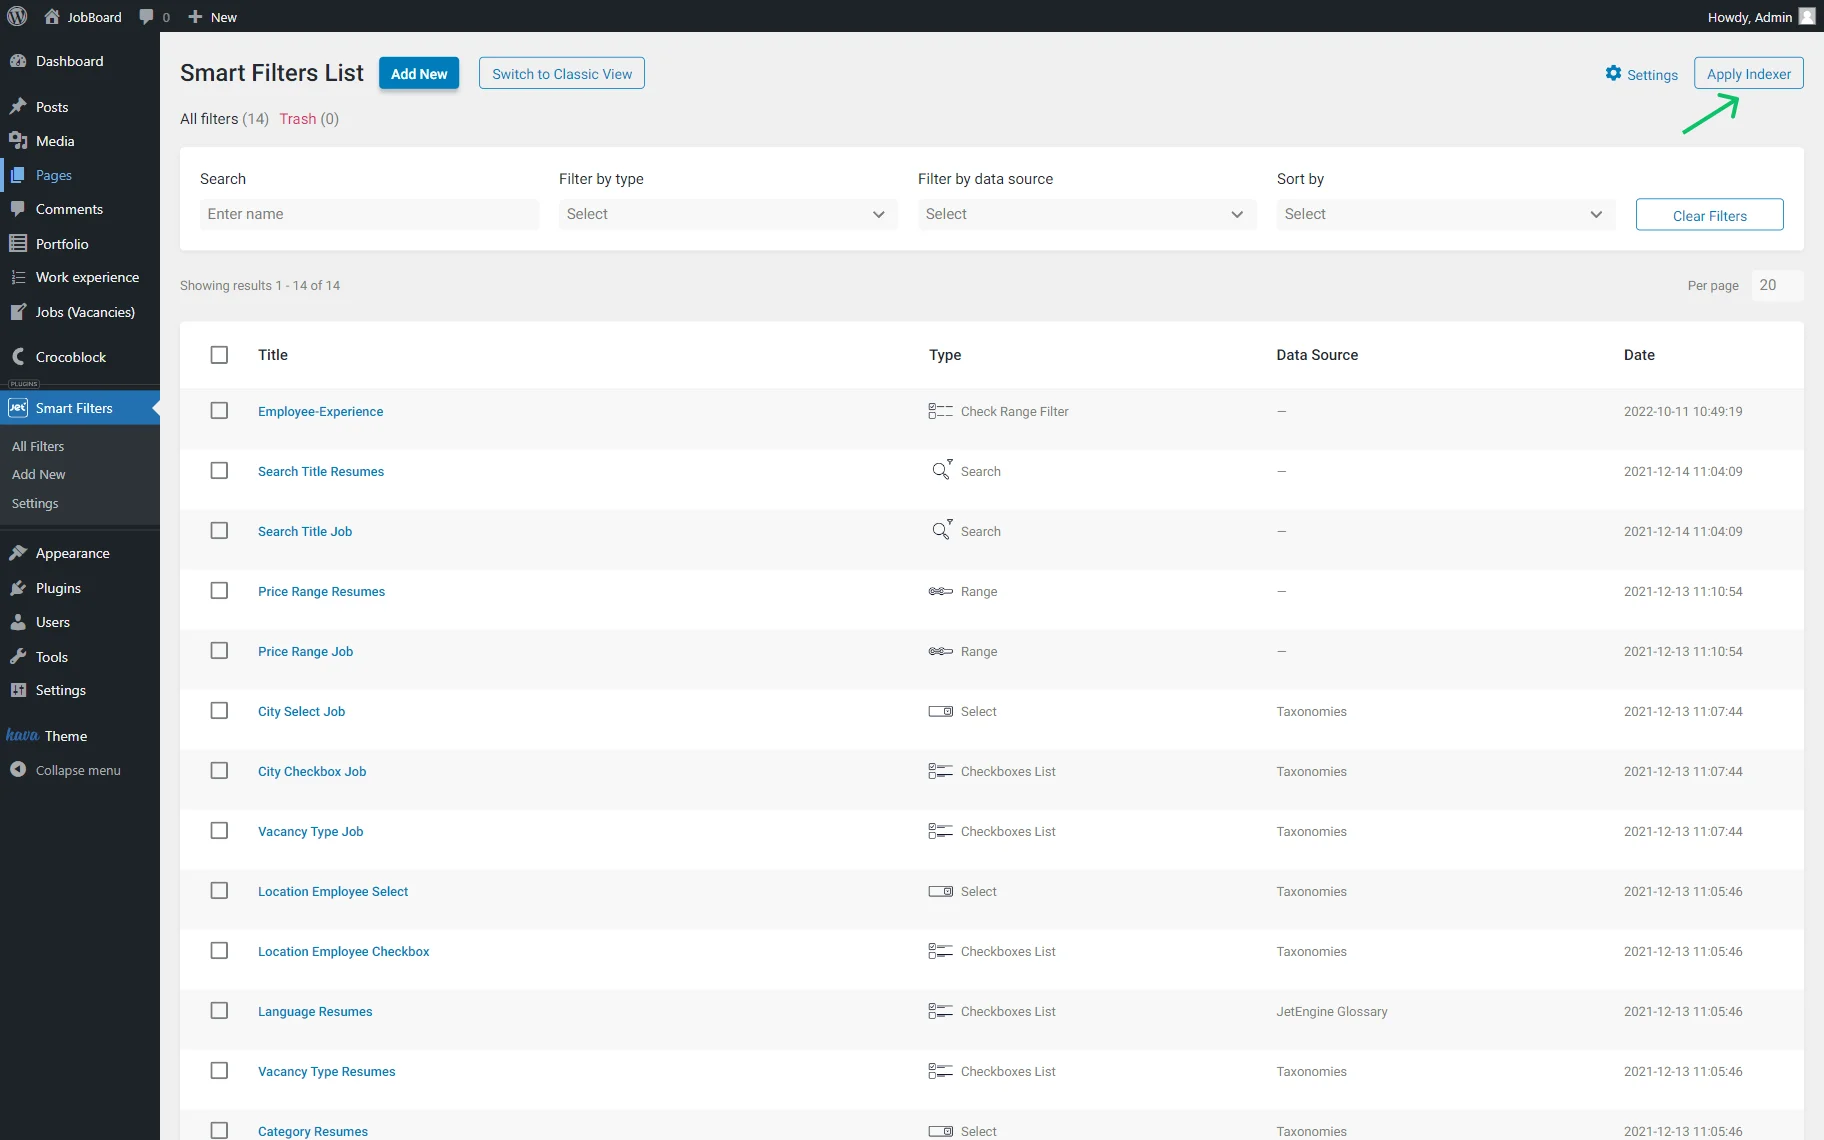
Re-Index Filters With a Button
If the values in meta fields are written correctly, and the Indexer is enabled for a needed object, it may be helpful to reindex the filters. To do so, go to WordPress Dashboard > Smart Filters and press the “Apply Indexer” button.
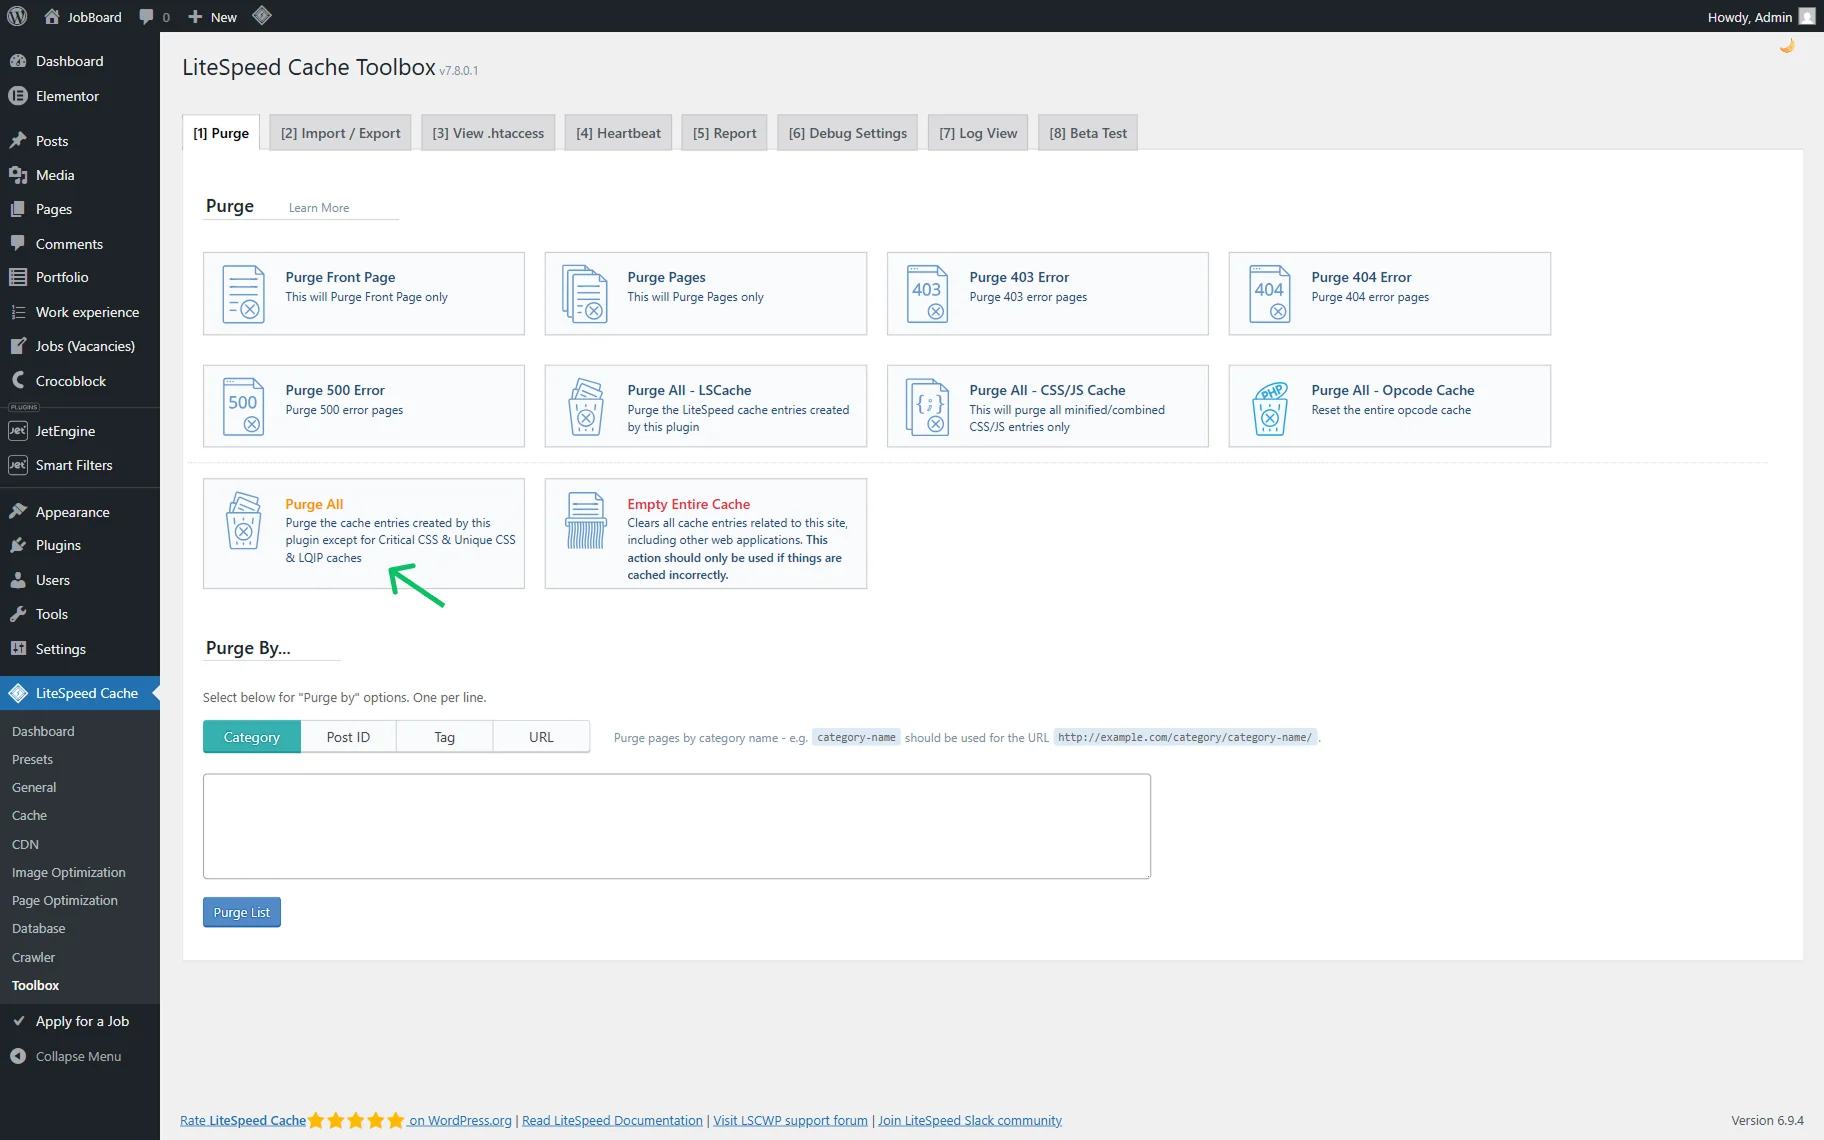
Check Cache
If filters don’t react after all settings are correct, the issue can be caused by caching. You can check and clear the website cache.
If you work with any caching plugin (like WP Rocket, LiteSpeed Cache, or W3 Total Cache), use it to clear the website cache. For example, we use the LiteSpeed Cache plugin.
We go to WordPress Dashboard > LiteSpeed Cache > Toolbox settings and press the “Purge All” button.
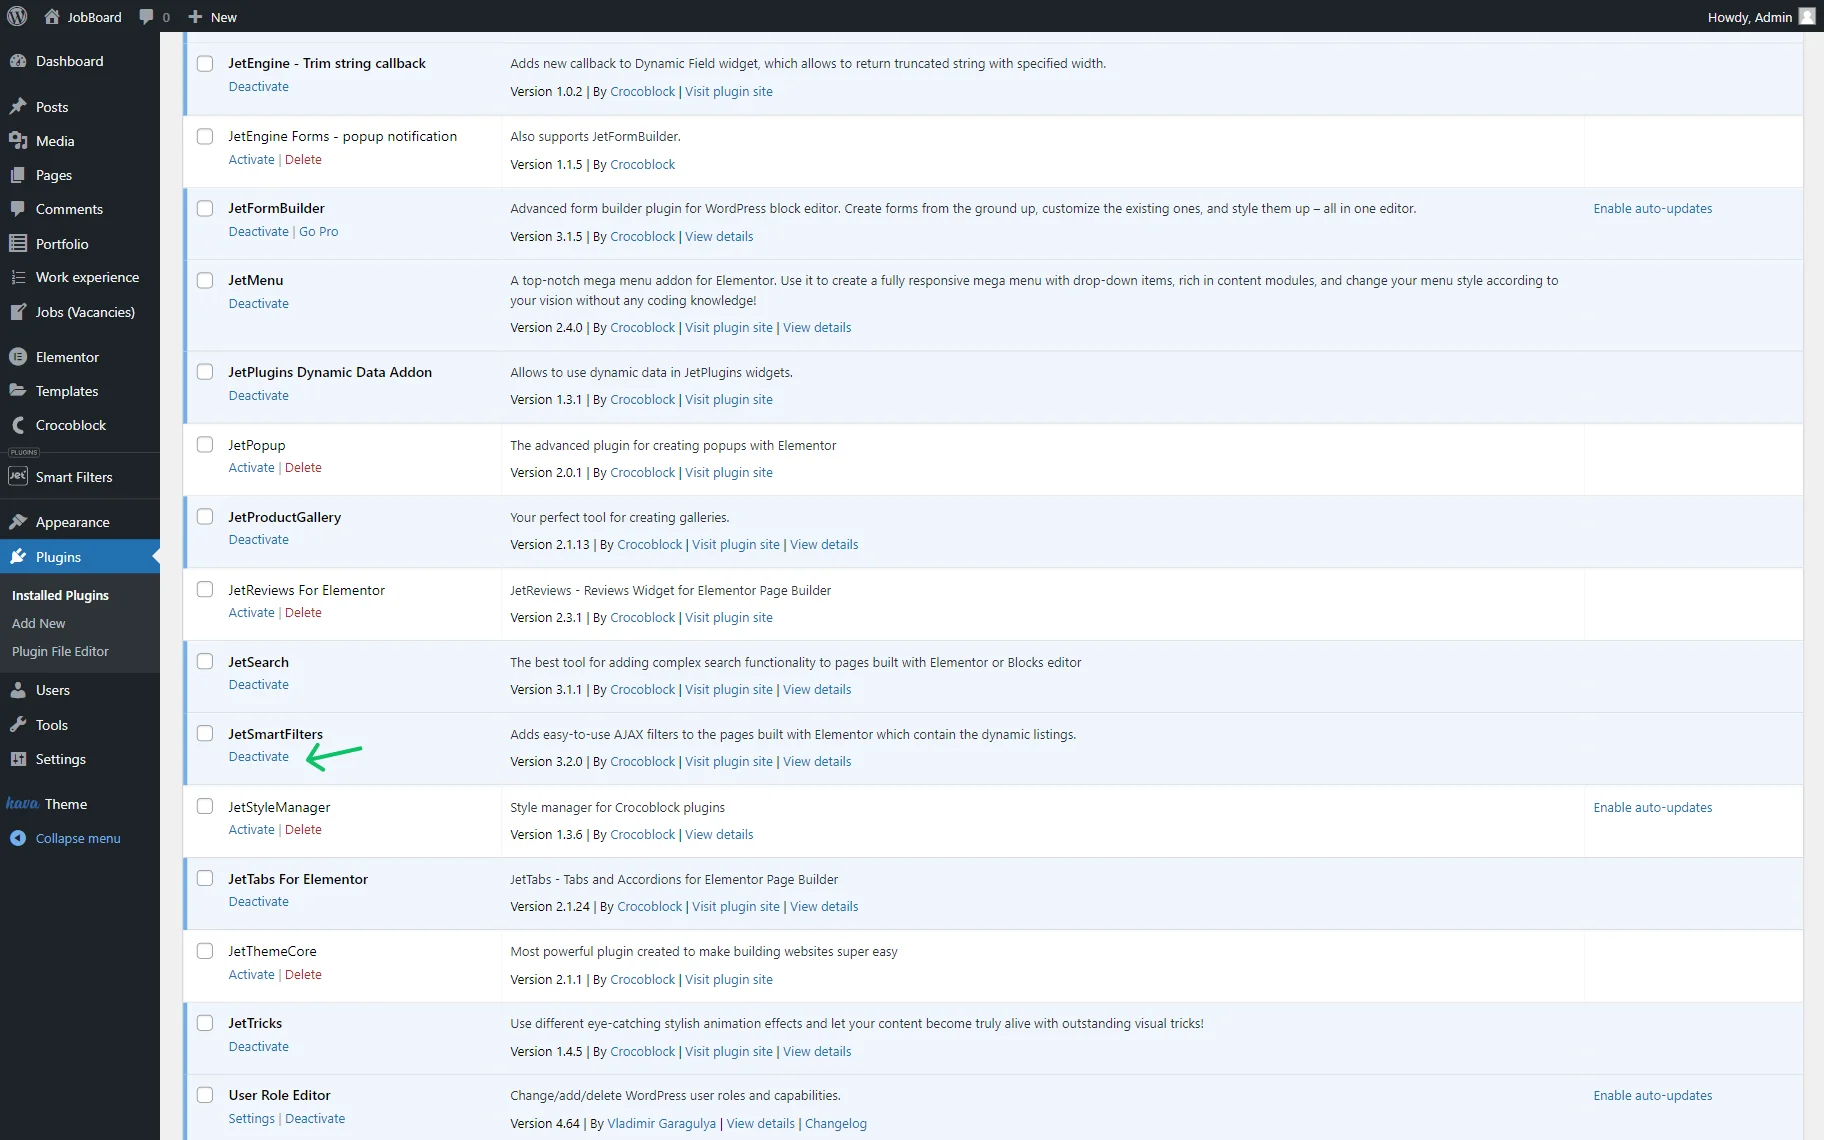
Re-Activate the JetSmartFilters Plugin
We also recommend deactivating and activating the JetSmartFilters plugin in the WordPress Dashboard > Plugins tab.
Check for Conflicting Plugins
Sometimes, third-party plugins can interfere with the Indexer.
Temporarily deactivate all third-party plugins except JetSmartFilters (and JetEngine if some of its data is used as a data source).
Re-index your filters by clicking the “Apply Indexer” button.
If the problem is fixed, reactivate the plugins one by one to identify which plugin caused the conflict.
If you followed the suggestions above and still experience issues, this likely means the JetSmartFilters Indexer is not working because of a deeper configuration or plugin conflict. In that case, we recommend contacting our support team for further assistance.