How to Сreate and Set Up a Product Table
This tutorial explains how to create and set up the Product Table, configure columns, customize the style settings, add navigation filters, footer, and sticky header, and adjust the mobile layout with JetProductTables for WooCommerce.
Before you start, check the tutorial requirements:
- WooCommerce plugin installed and activated
- JetProductTables plugin installed and activated
The Product Table settings can be reached in such ways:
- In the WordPress Dashboard > Plugins tab, hit the “Product Tables Settings” link under the Jet WooCommerce Product Table plugin;
- Proceed to the WordPress Dashboard > WooCommerce > Settings > Product Table tab.
You can check the JetProductTable Dashboard Settings Overview to learn about the Product Table adjustments in more detail.
Also, watch our video tutorial about the JetProductTables WordPress Plugin to learn about Columns Setup.
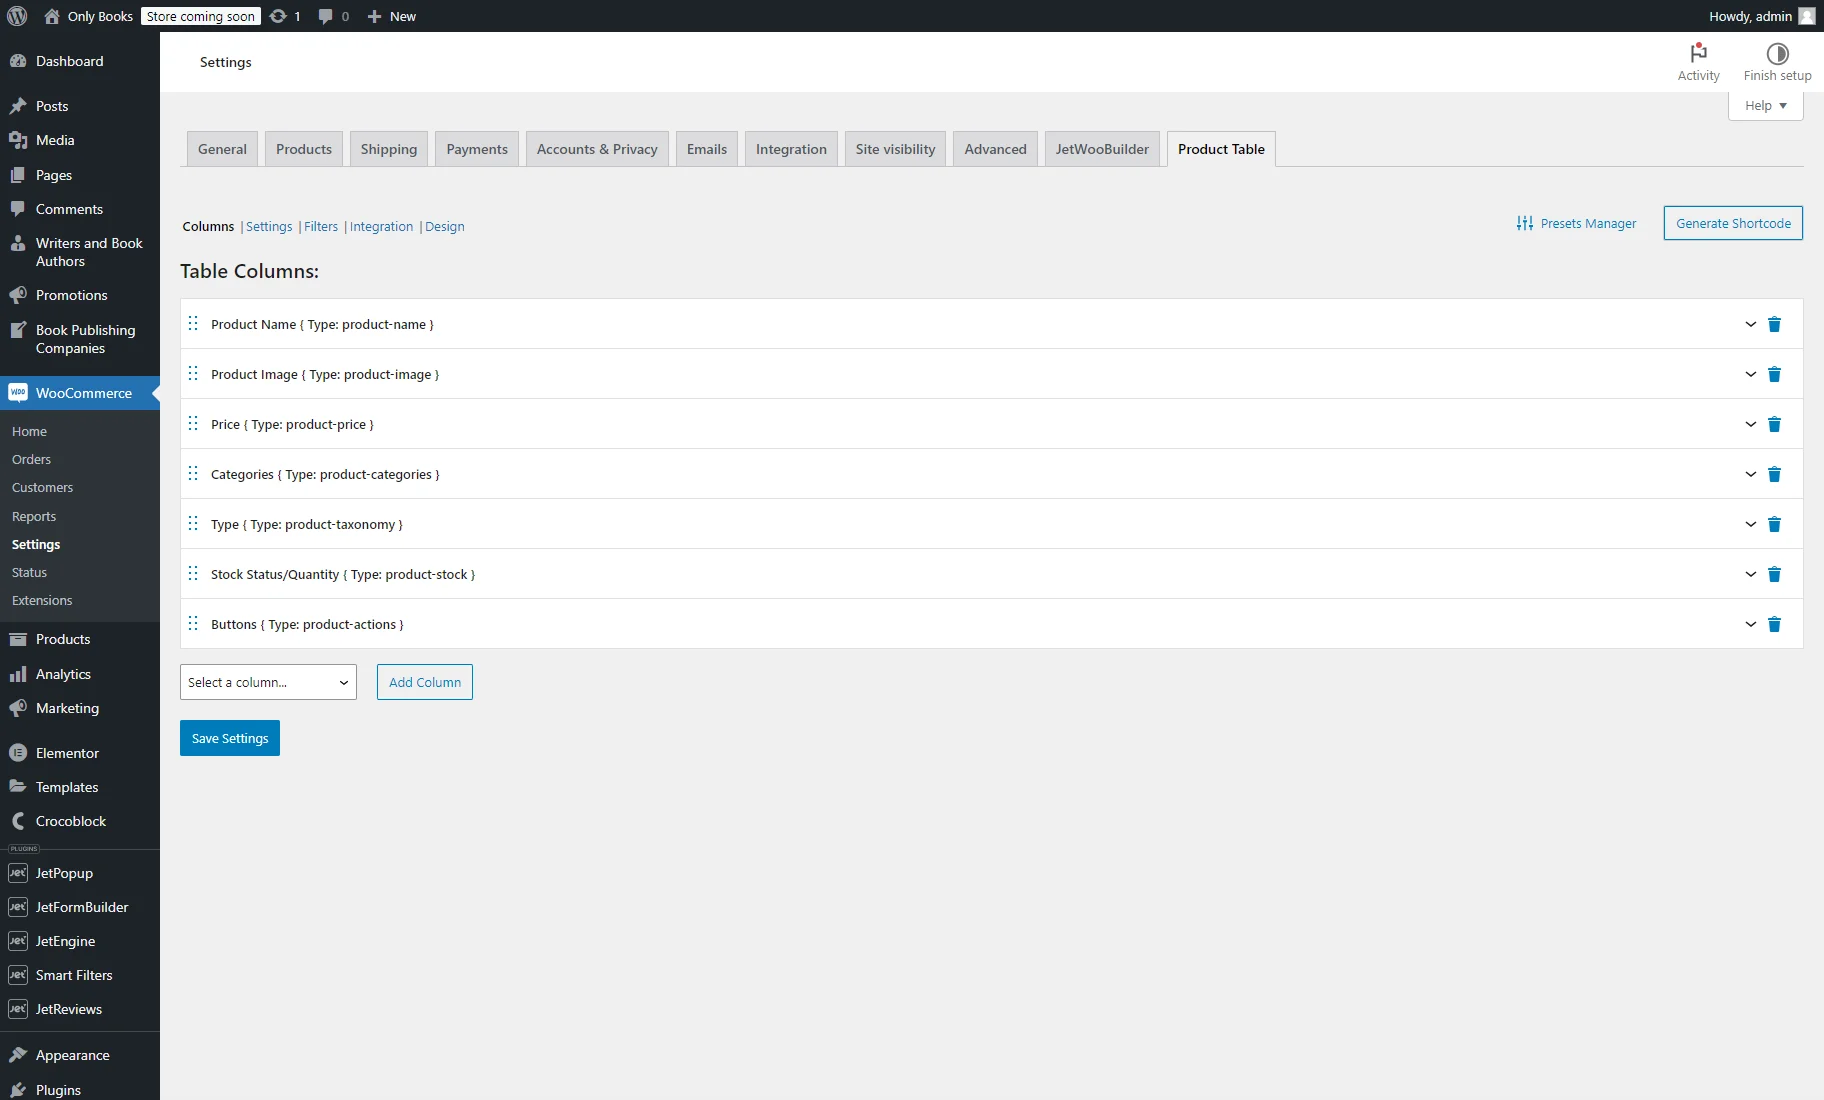
Setting the Table Columns
In the Columns section, you can add or delete columns, change their order, and adjust their settings. By default, there are “Product ID,” “Product Name,” “Product Image,” “SKU,” “Price,” and “Button” columns.
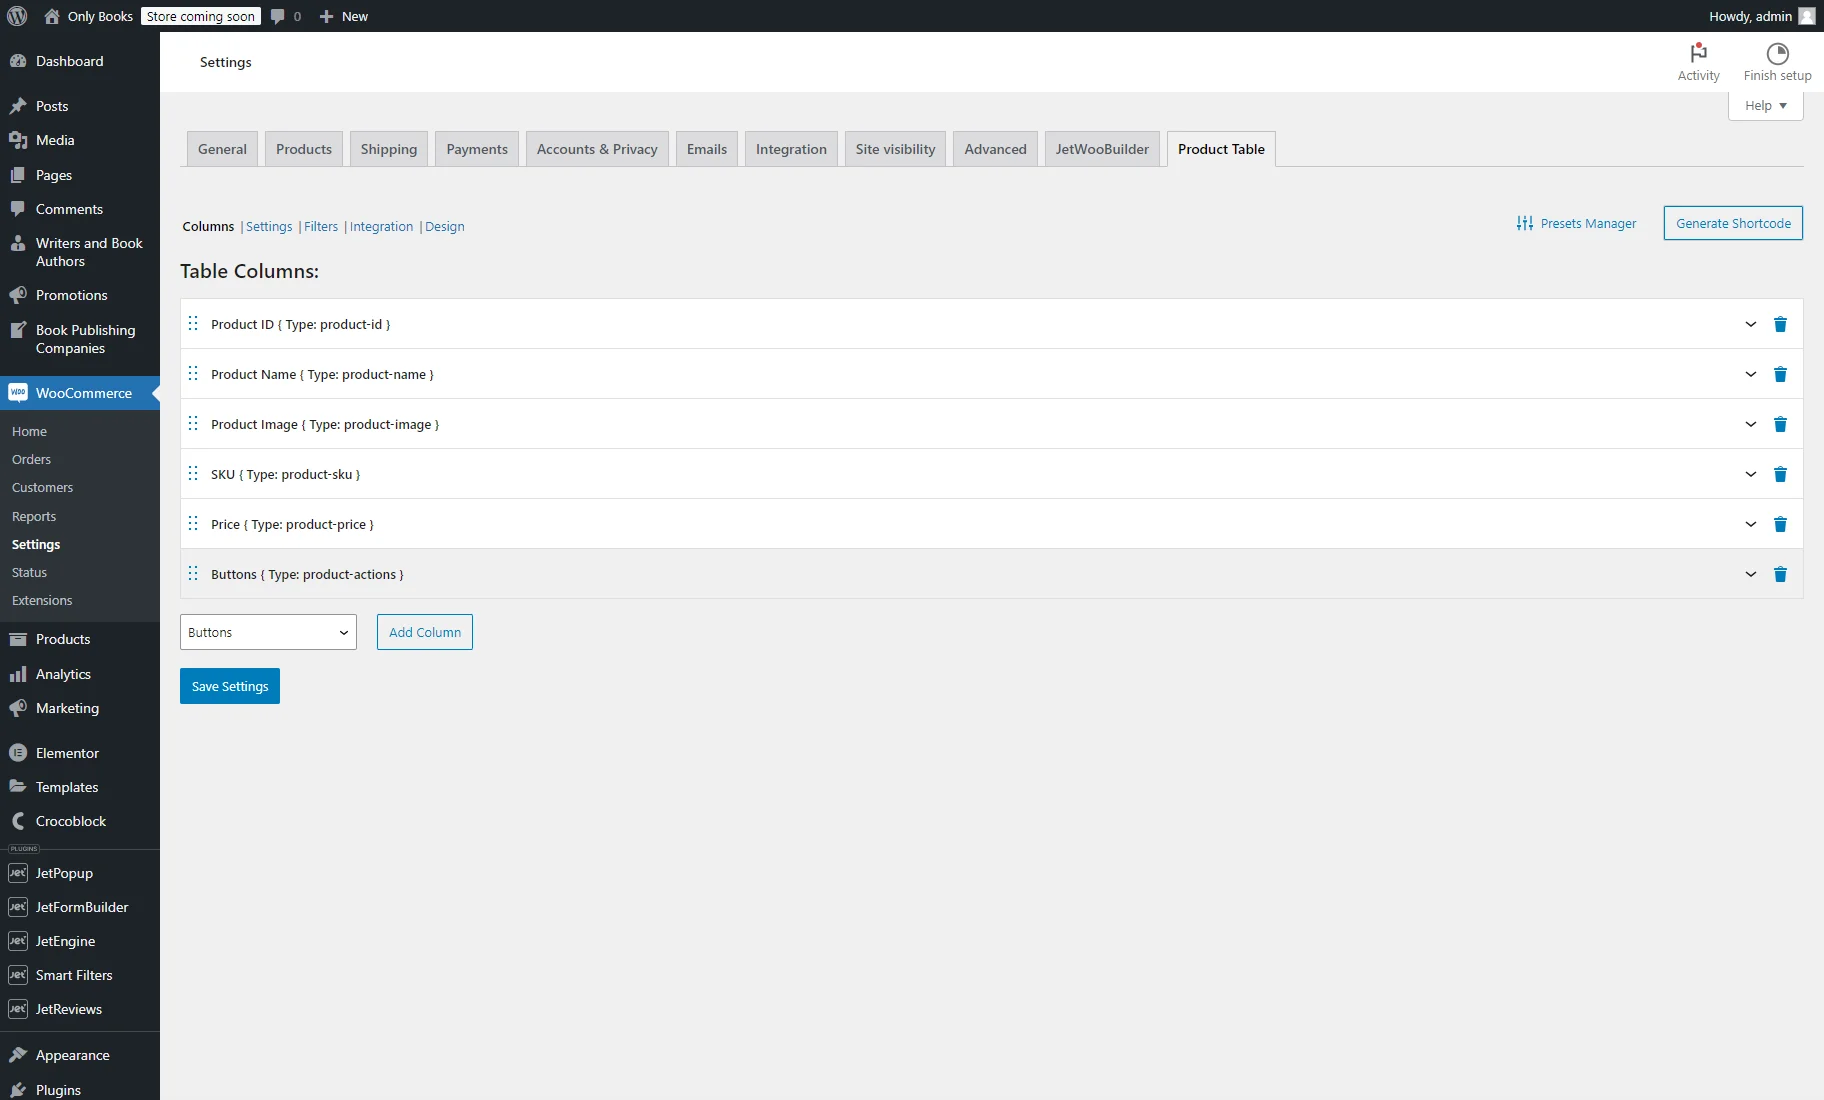
For our case, we delete the “Product ID” and “SKU” columns and add such columns by choosing them from the Select a column drop-down menu and pressing the “Add Column” button:
- “Categories” to display the product categories;
- “Custom Taxonomy Terms” to display the “Product Type” TAXONOMY. Also, we change the LABEL to “Type”;
- “Stock Status/Quantity.”
After that, we moved the “Button” column to the end.
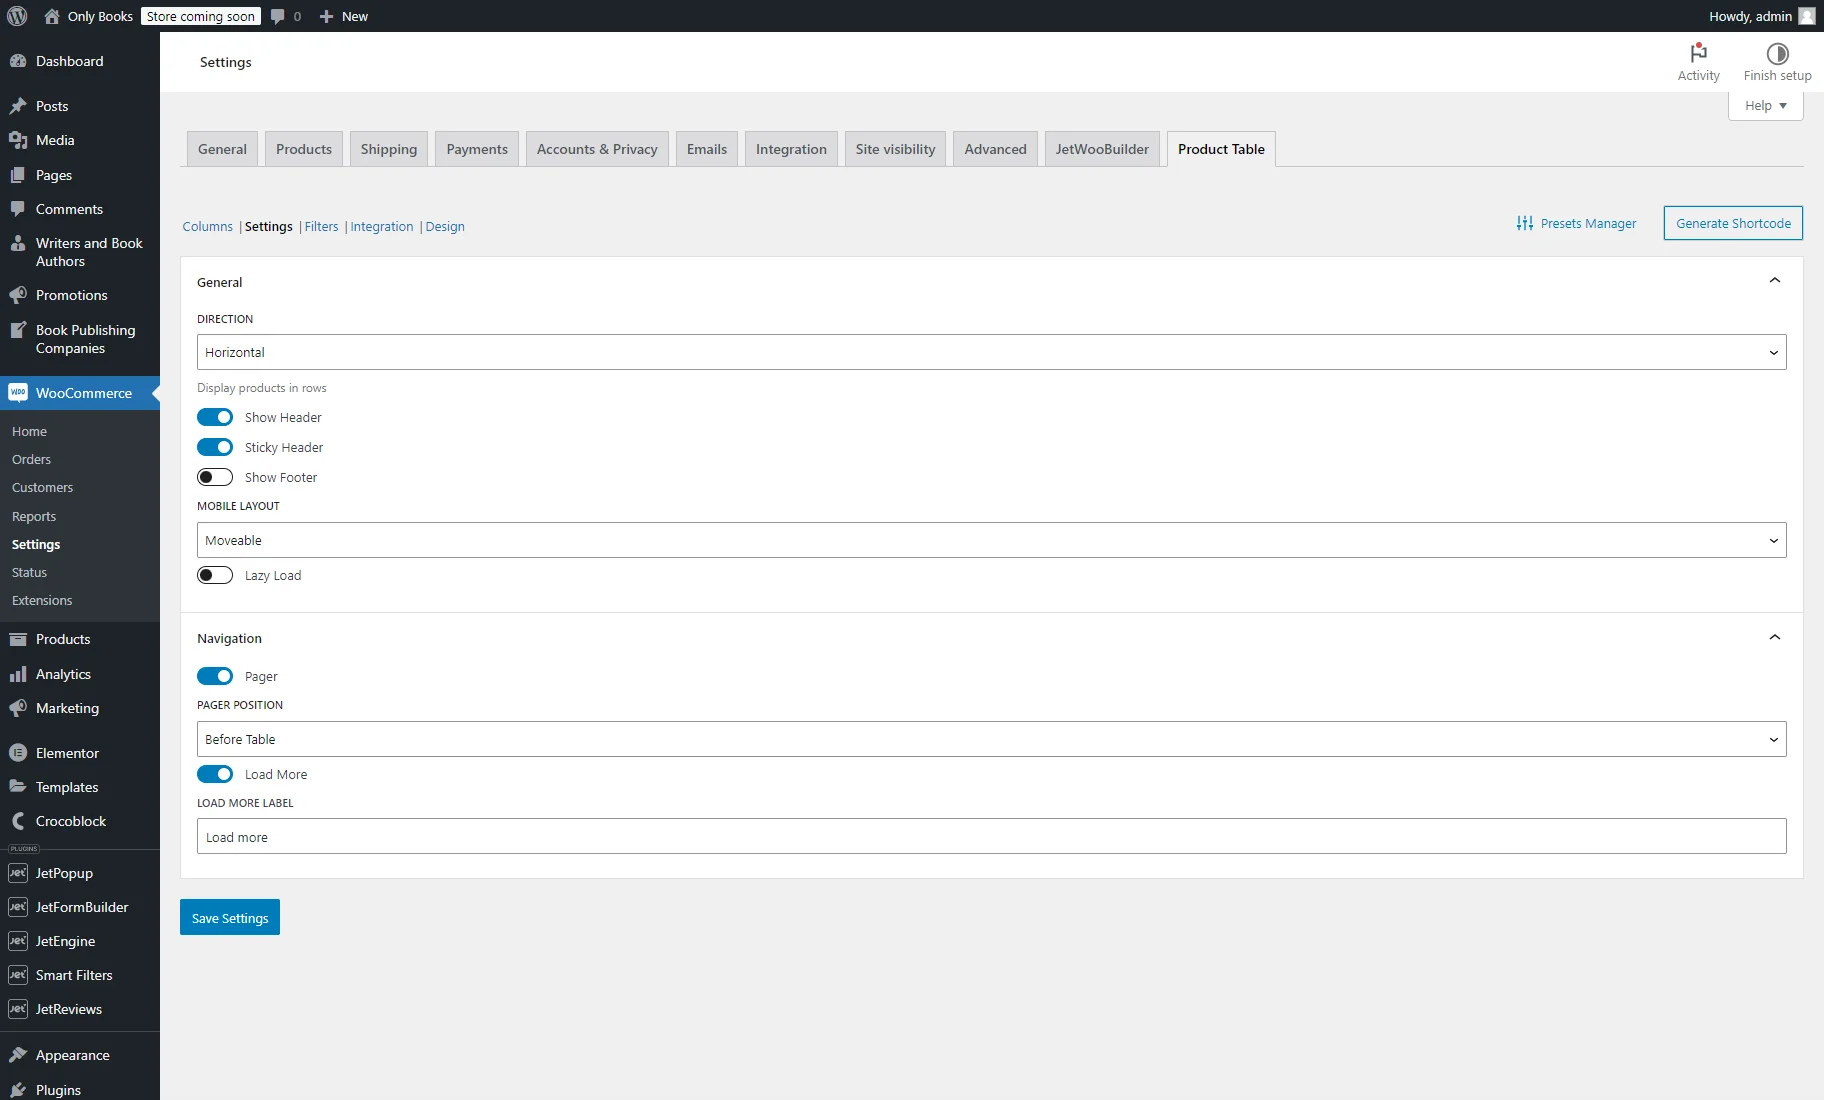
Adjusting the Product Table Settings
The Settings section determines how the table is displayed on the front end.

In our case, aside from the Show Header option, which is enabled by default, we also turn on the Sticky Header toggle. This keeps the table header fixed at the top when users scroll down.
The Show Footer toggle adds a footer at the bottom of the table that repeats the header content, including the column names. For now, we leave this option disabled.
In the MOBILE LAYOUT selector, you can choose how to display the table on mobile devices: “Moveable,” “Shorten,” “Transform,” or “Collapse.”
Keep the Lazy Load option turned off if you want to load the table content immediately, or turn it on to load the content when the table appears in the viewport.
After that, you can unroll the Navigation tab. In our case, we activate the Pager option to display the page navigation, set the PAGER POSITION to “Before Table,” and enable the Load More toggle to show the namesake button.
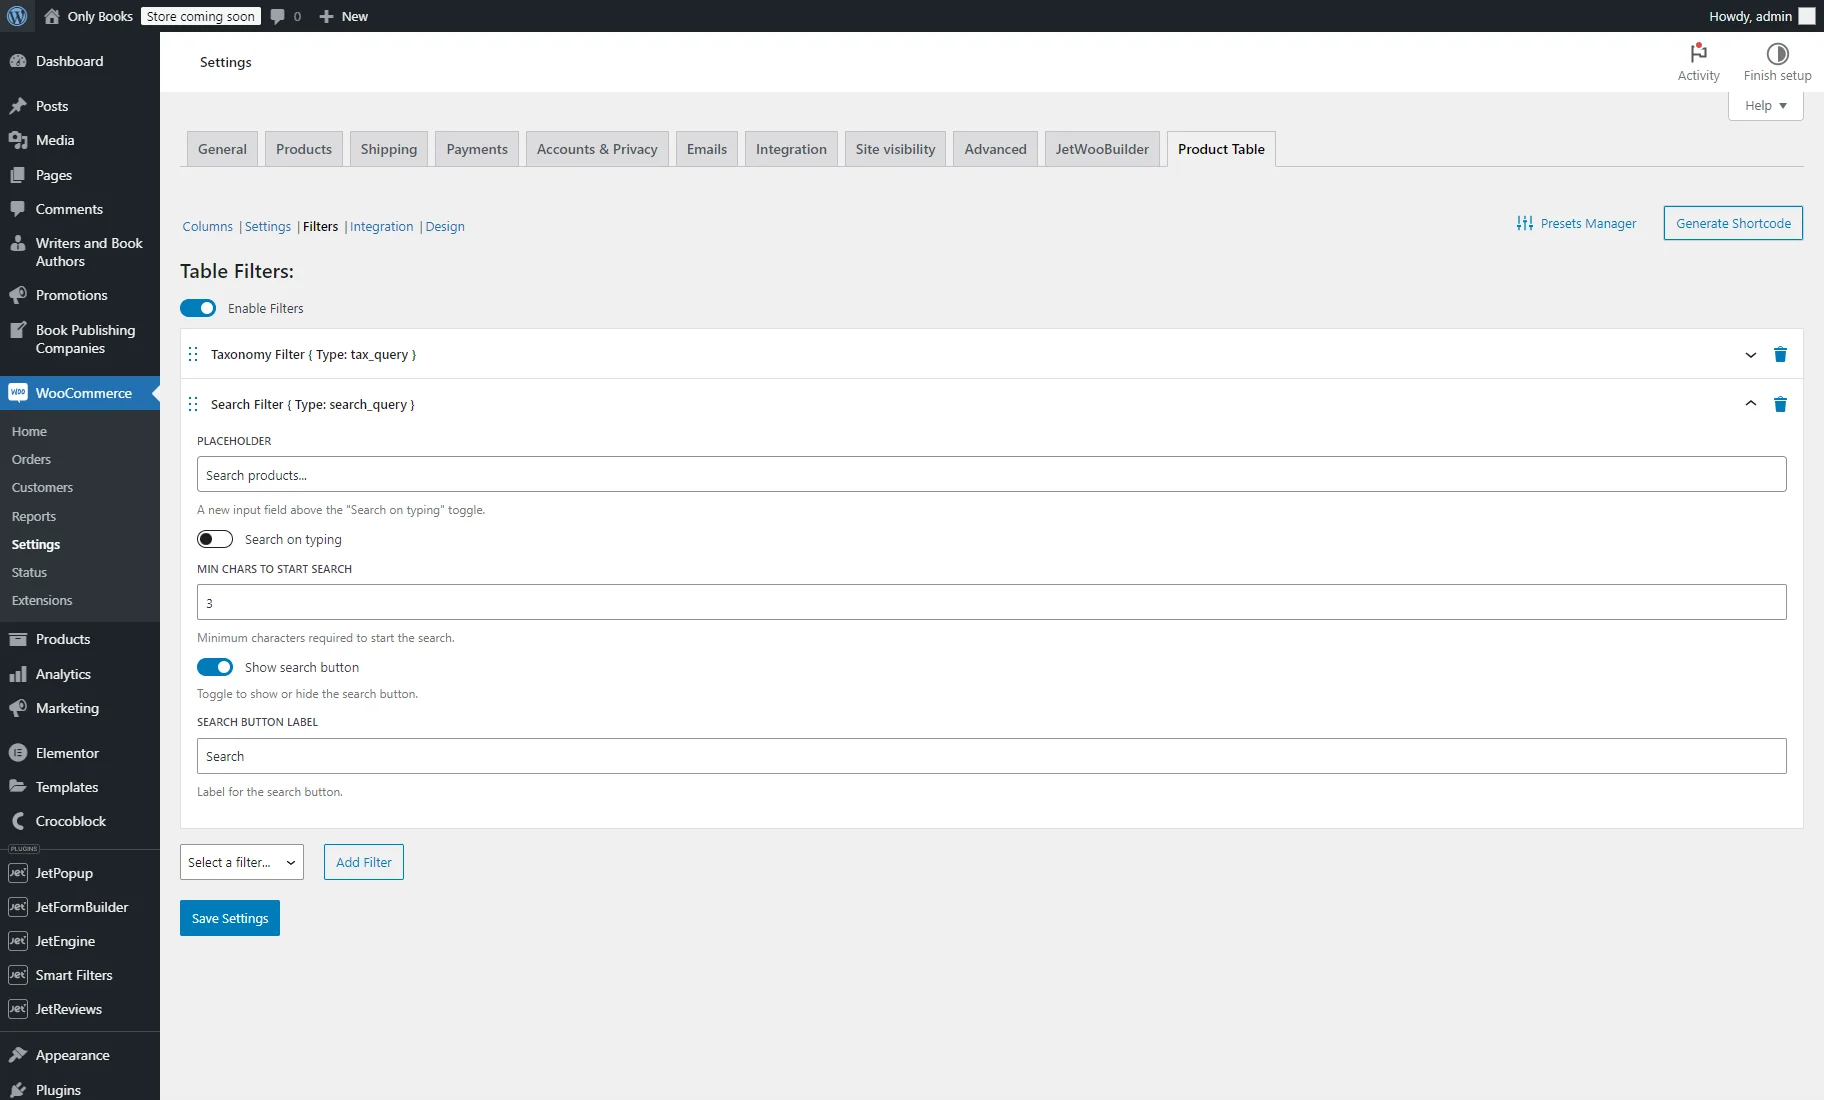
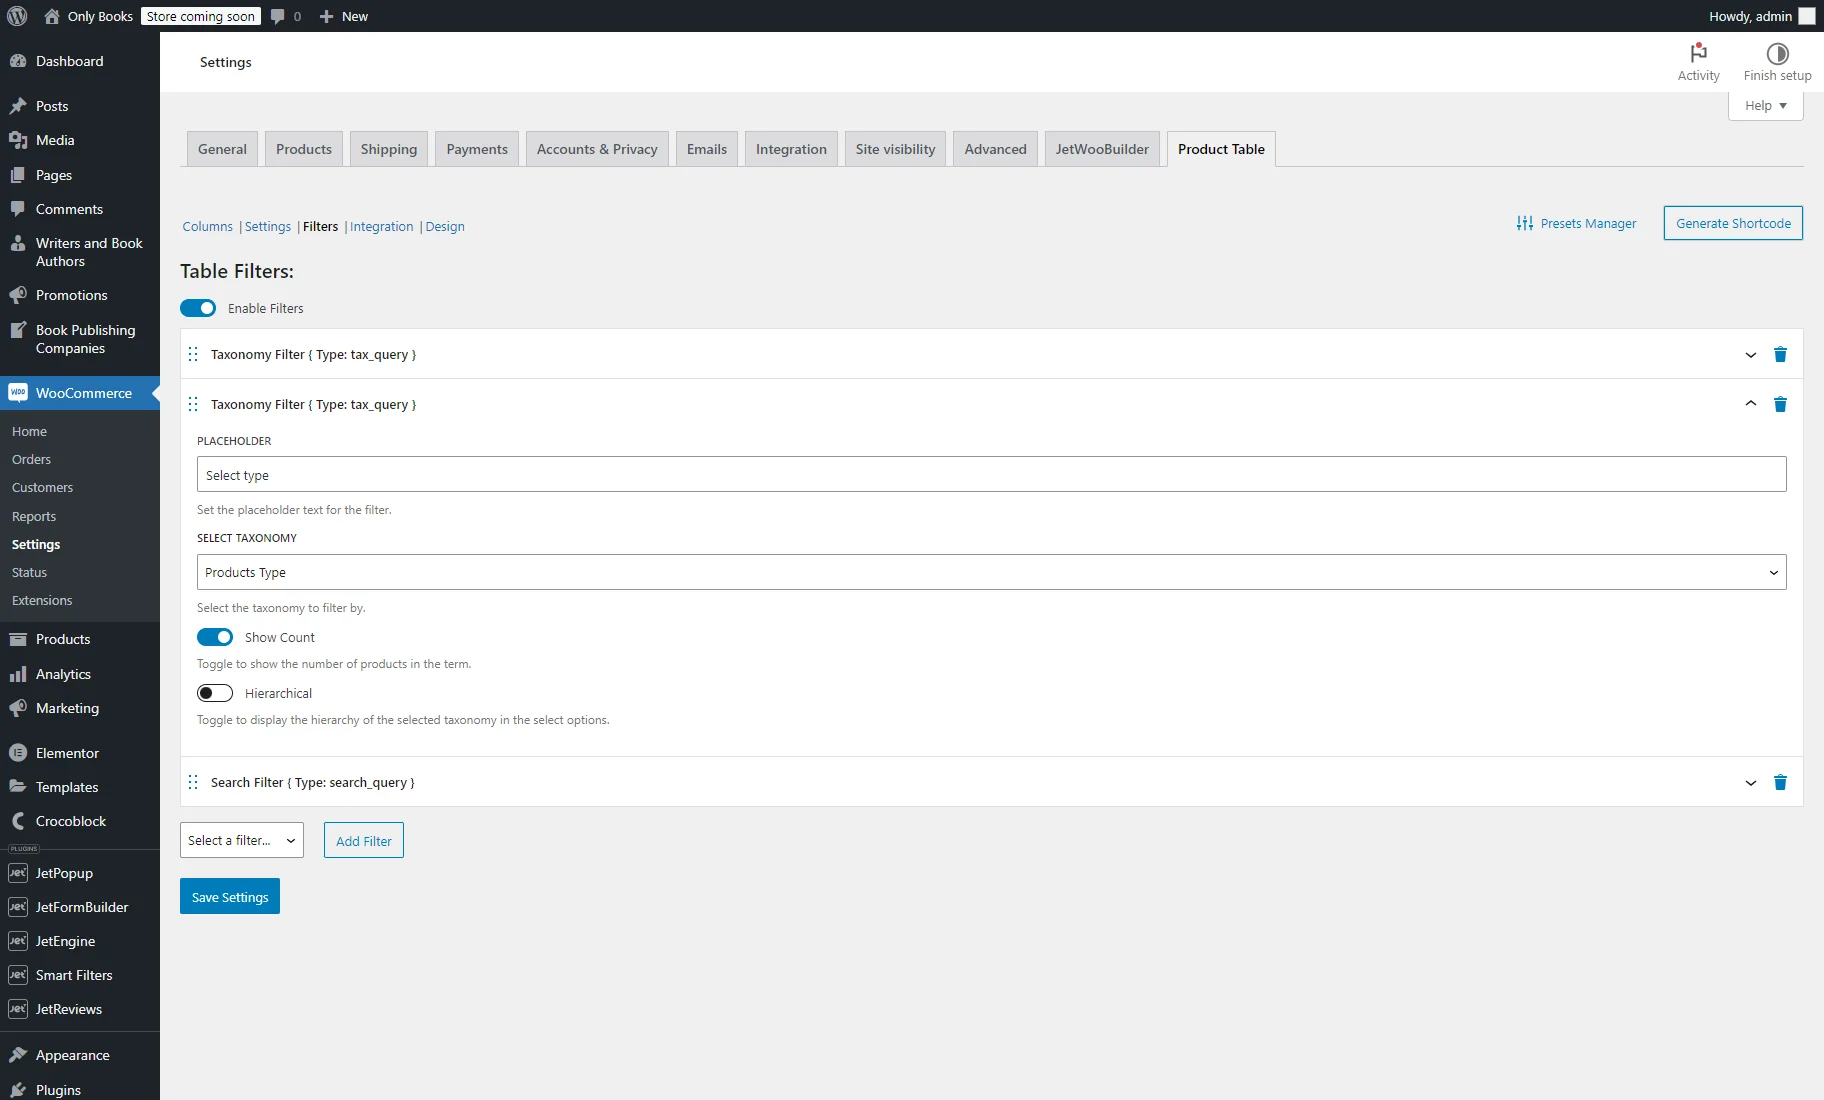
Enabling the Product Table Filters
In the Filters section, if the Enable Filters toggle is activated, filters for products are added. At the moment, three types of filters are available: by taxonomies, by attributes, and search by text.
In your case, we set two taxonomy filters and one search filter.
We unfold the first Taxonomy Filter tab. We set the PLACEHOLDER to “Select category” and set the “Product categories” in the SELECT TAXONOMY drop-down. Also, we turn on the Show Count toggle to show the number of products associated with the term.

For the Search Filter tab, we keep the default settings.
Then, we choose the “Taxonomy Filter” from the Select a filter drop-down, hit the “Add Filter” button, move the filter tab to the second place, and unfold its settings.
We set the PLACEHOLDER to “Select type,” set the “Products Type” in the SELECT TAXONOMY drop-down, and turn on the Show Count toggle.
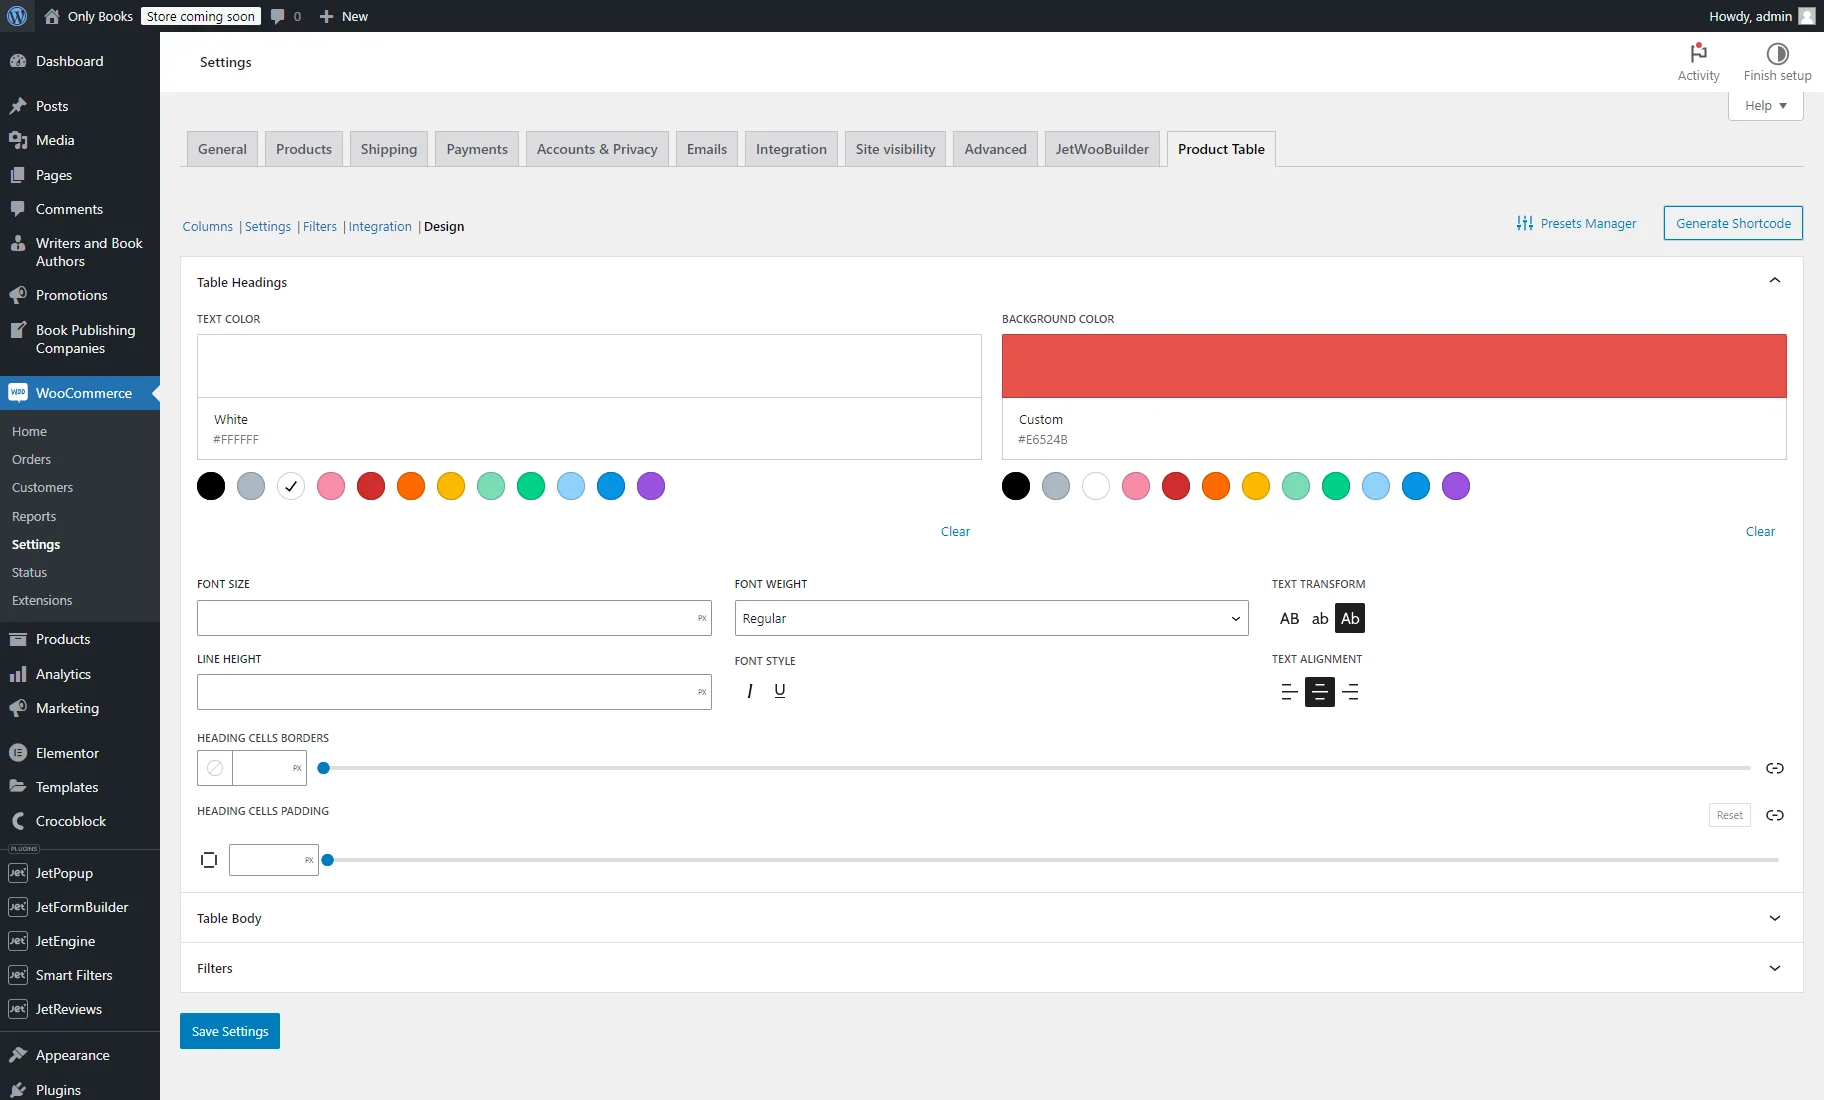
Customizing the Product Table Style Settings
In the Design section, you can adjust the Table Headings, Table Body, and Filters style settings.
For example, in the Table Headings tab, we set the TEXT COLOR to “White (#FFFFFF),” BACKGROUND COLOR to “Custom (#E6524B),” TEXT TRANSFORM to “Ab,” and TEXT ALIGNMENT to “Center.”
After customizing the Product Table, press the “Save Settings” button.
To create different designs, you can manage the Product Table presets. For more details, proceed to the How to Create a Preset for Product Table tutorial.
That’s all. Now you know how to create and set up a Product Table with the JetProductTables plugin for WooCommerce. Now, you can proceed to the How to Showcase Product Table on the Front End tutorial.