How to Build Product Comparison Tables for Different Use Cases
Building a product comparison table can be a powerful way to enhance the shopping experience in your WooCommerce store. Whether you run a fashion store or any other type of eCommerce site, comparison tables help visitors make informed choices quickly and efficiently.
Before you start, check the tutorial requirements:
- WooCommerce plugin installed and activated
- JetProductTables plugin installed and activated
In this guide, we’ll walk you through how to create product comparison tables for different use cases on a fashion store website. But first of all, we’ll start by building a table preset.
Create JetProductTables Table
With the JetProductTables plugin, you can build and customize a product table in three different ways. It can be done with the help of:
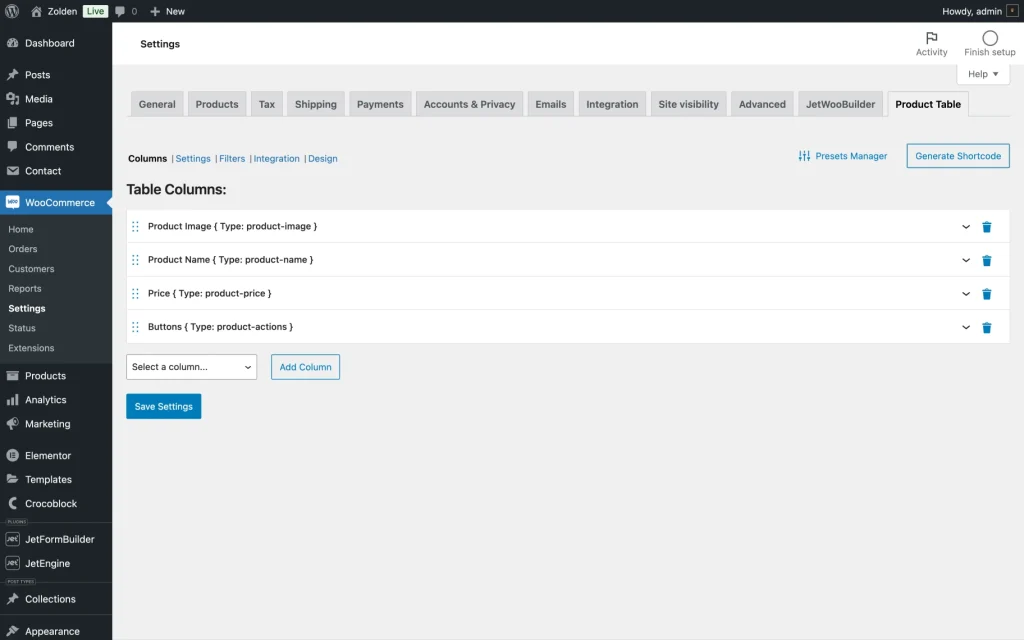
To access the Preset Manager, go to the WordPress Dashboard > WooCommerce > Settings tab, and go to the Product Table tab.
Alternatively, you can press the “Product Tables Settings” link under the JetProductTables plugin’s name in the WordPress Dashboard > Plugins to be redirected to this tab.
For starters, we’ll create a basic table that includes four columns:
- Product Image;
- Product Name;
- Price;
- Buttons.
Since we’re building the comparison table for a fashion store, we’ll focus on building the following tables:
- Product styles comparison table, we’ll create it with the Product Table block;
- Product price comparison table, which we’ll create with the Shortcode Generator;
- Product seasonality comparison table, which we’ll create with the Product Table block.
In this tutorial, you can learn more about how to create a product table. When you have a basic set of columns, you can use them as a starting point for developing various presets for all kinds of occasions. Currently, a preset can be applied when:
- configuring integrations;
- generating a shortcode;
- adding a Product Table block to a page.
The main advantage of presets compared to global settings or configuring a table through an individual block or shortcode:
- With presets, users can create multiple layout options for displaying the table, whereas global settings allow for only one;
- When using presets with a shortcode or block, if changes need to be made, there’s no need to search for all the places where the shortcode or block was added — the changes made to the preset are automatically applied to every table where the preset is used.
Create a Comparison Table Preset
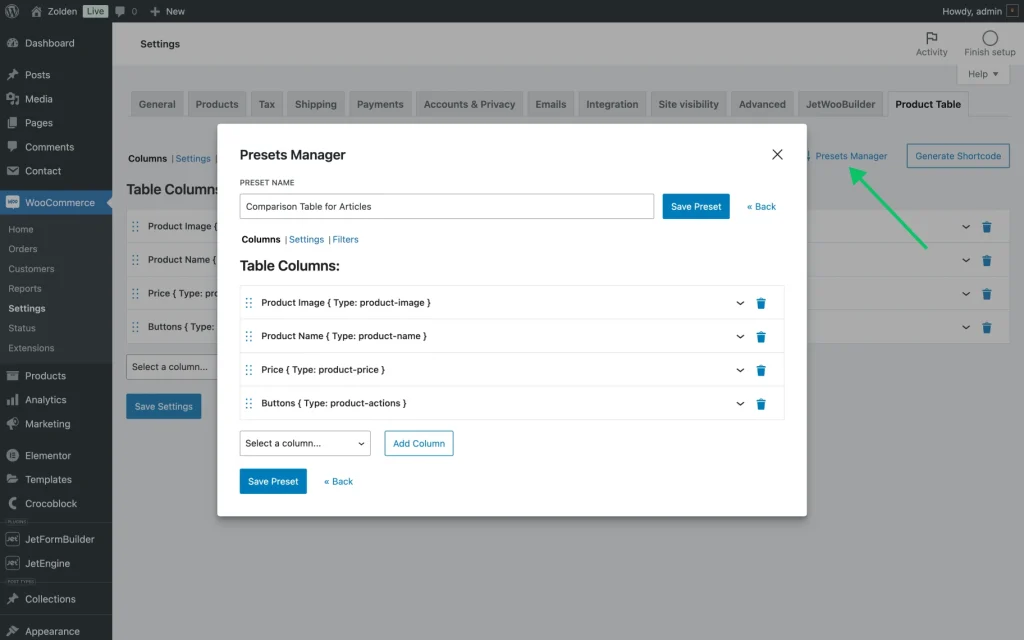
For our use case, we’ll create a new preset — “Comparison Table for Articles”; it will include four columns as specified in the global settings.
Click on the “Present Manager” button to open the Presets Manager popup.
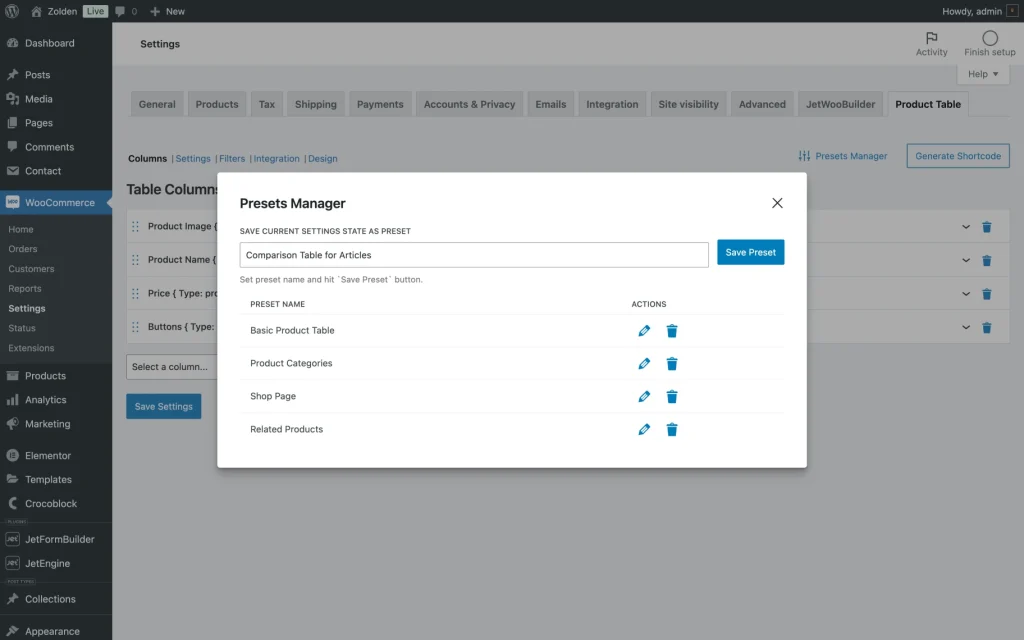
Enter the name and click “Save Preset”. When saved, the new preset will appear below. To edit it, click on the “pencil” icon.
Columns section
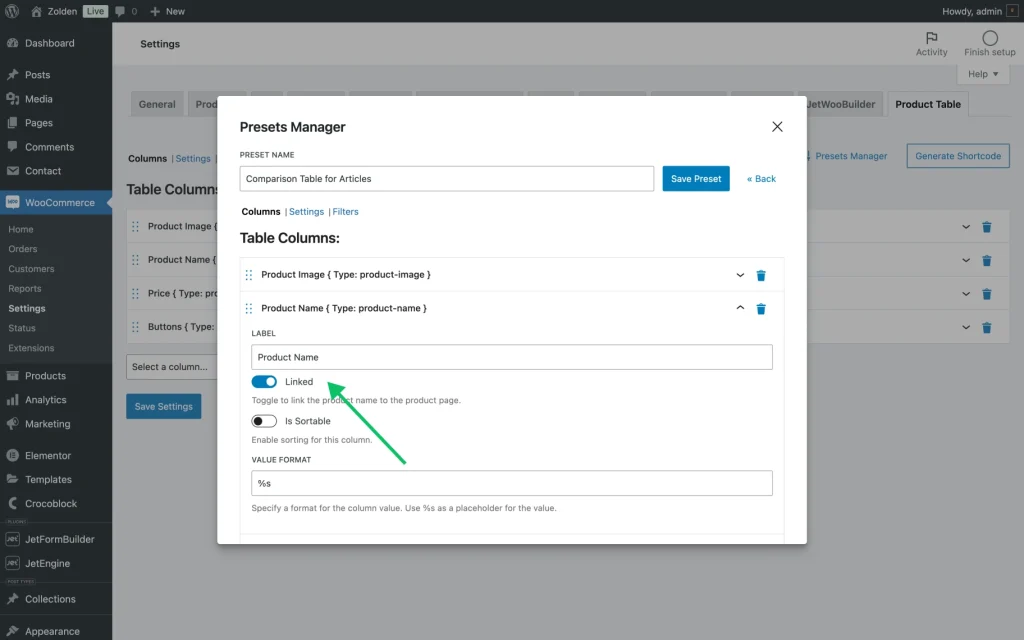
Upon default, the preset contains the columns from the global settings. For both the Product Image and Product Name columns, we’re going to toggle on the Linked switcher; it will link the product name and image to the product page.
The rest of the settings we’ll leave as is.
Settings section
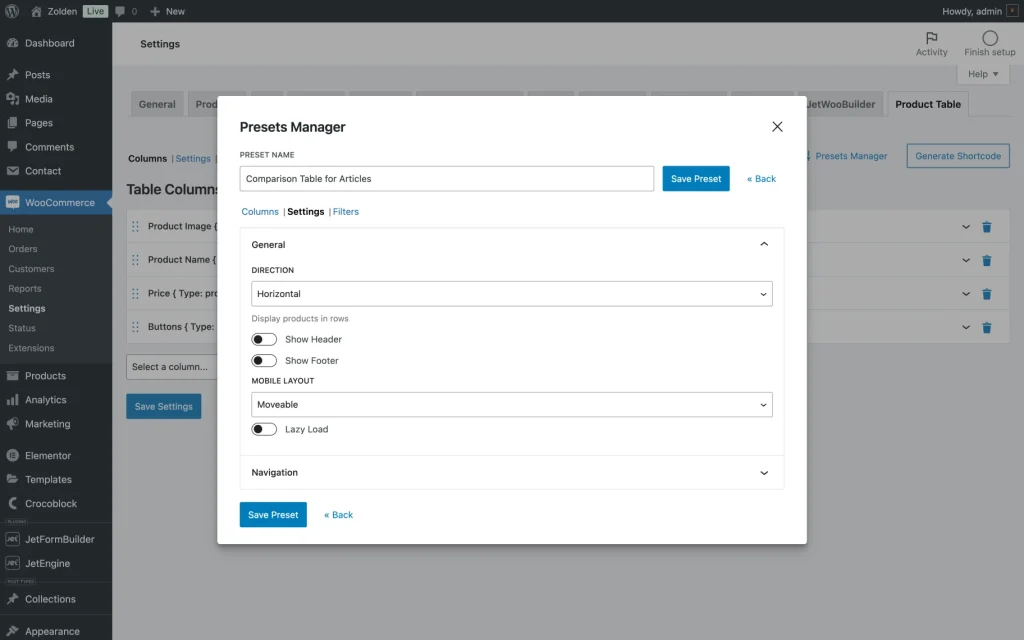
In General settings, we’ll choose “Horizontal” DIRECTION to display products in rows.
The rest of the settings we’ll leave as is. In this tutorial, you can find more information on all the features from the Settings tab.
Filters section
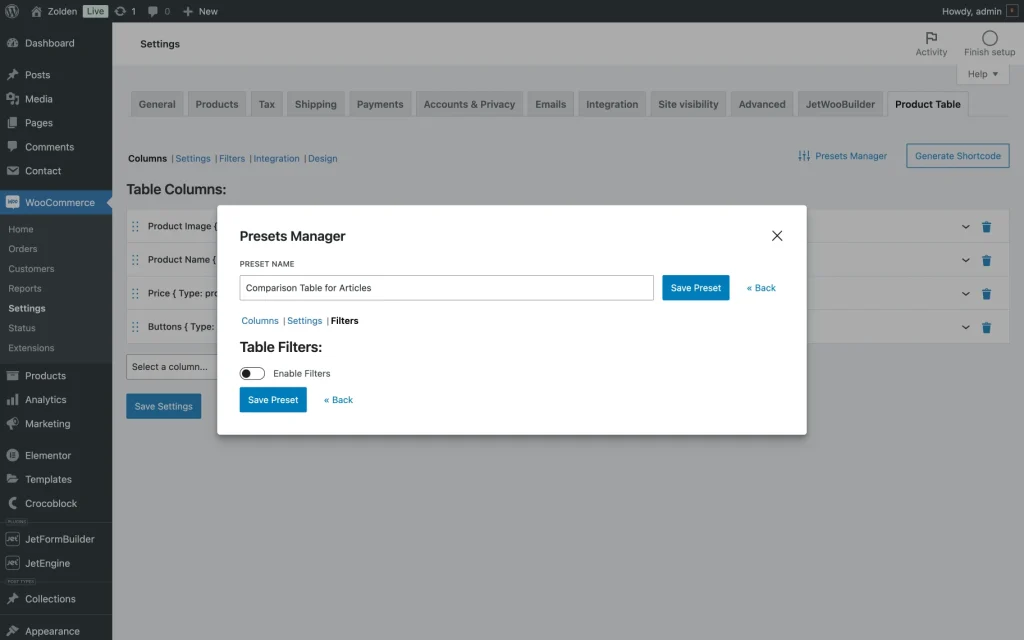
On the Filters settings tab, we’ll turn off the filters because we don’t need them in this preset.
Click on the “Save Preset” to save the changes.
Build Custom Comparison Tables for Various Use Cases
Now, let’s figure out a set of use cases that will display various products.
Products style comparison table
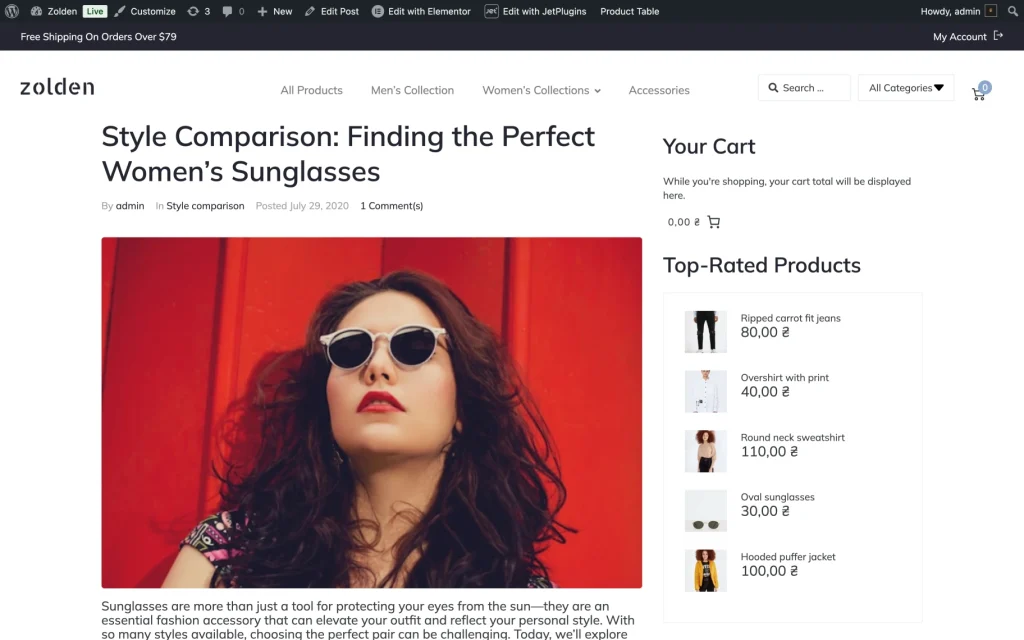
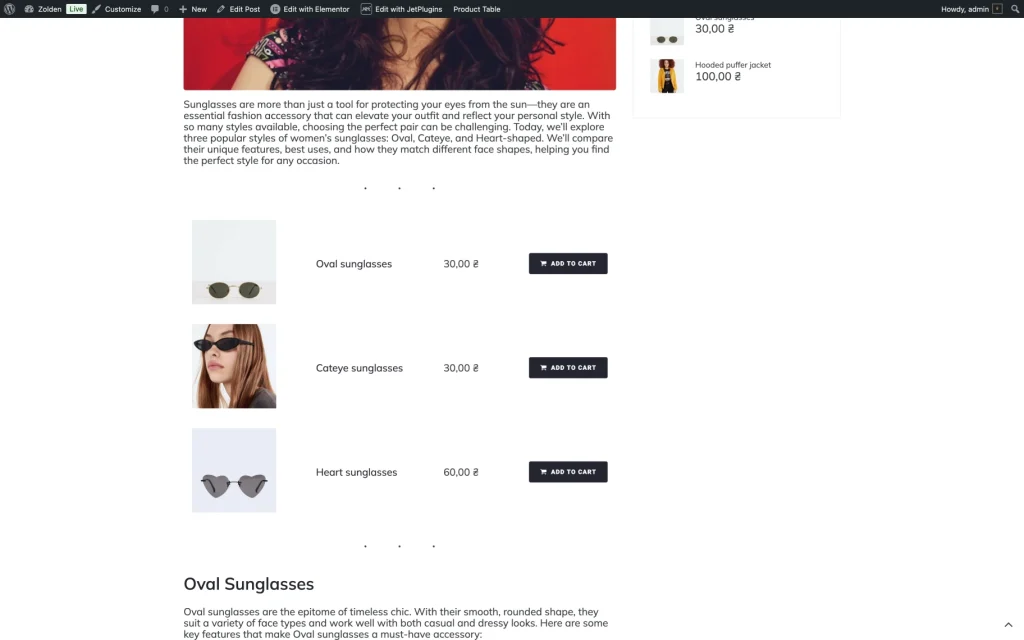
As a demonstration of this use case, we’ll create an article called “Style Comparison: Finding the Perfect Women’s Sunglasses” with a product comparison table. It will present three different styles (“Oval”, “Cateye”, and “Heart-shaped”) of women’s glasses.
The table will have the following columns: Product Image, Product Name, Product Price, and Buttons. To build it, we need to get the product IDs of items that represent these styles.
Go to WordPress Dashboard > WooCommerce > Products > All Products.
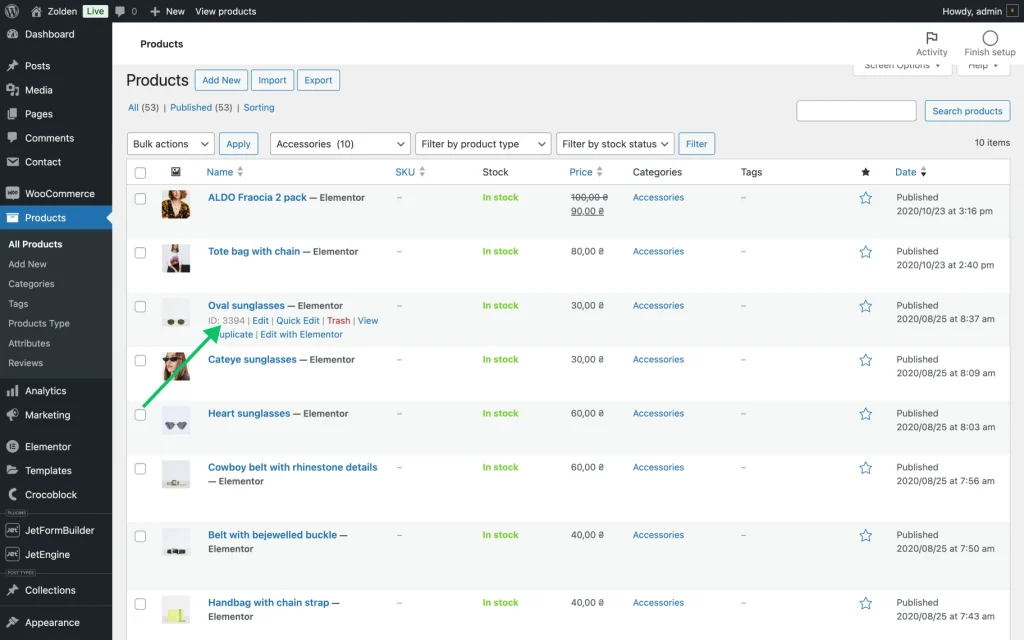
In our store, glasses belong to the Accessories product category; we’ll filter the products by this category to obtain the IDs. In your specific case, you’ll need to pick some other category for which you want to build a table.
In the Select a category dropdown, we’ll pick the Accessories category, and we’ll filter the necessary items by clicking the “Filter” button.
To get the product ID, hover over the corresponding product and copy the “ID:XXXX” numerical value. In our example, those values are: “3394”, “3378”, and “3368”. Now, we should go back to the article and add those values to the product table.
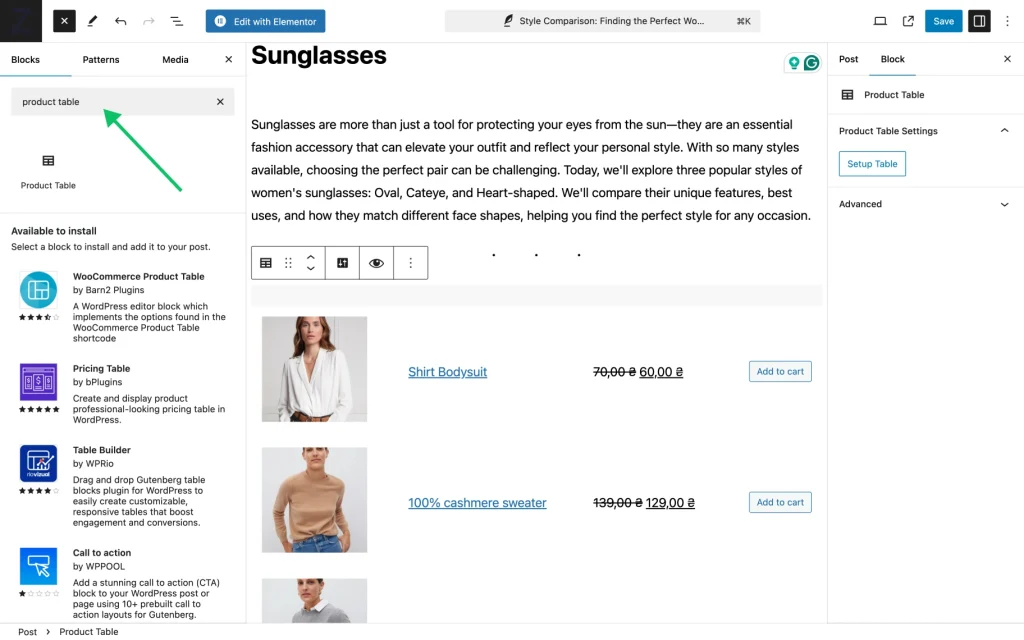
To add a Product Table block to the article body, type “product table” in the Blocks search and click on the block to add it to the page.
In the block’s settings, you’ll find the “Setup Table” button (within Product Table Settings); click it to open the Setup Table popup.
Query section
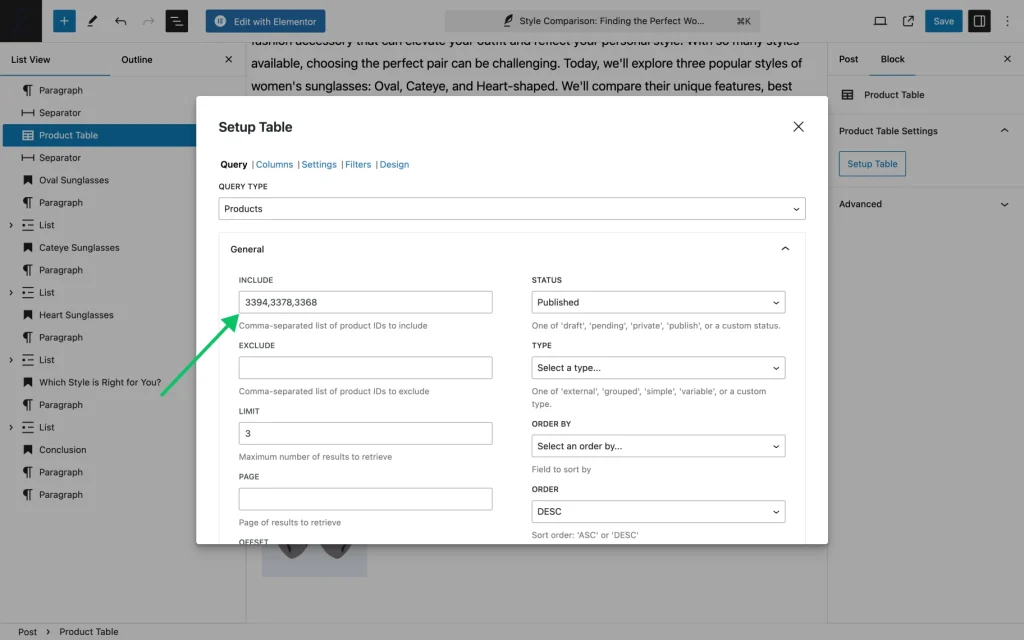
Since we’re going to display individual products, choose the “Products” option in the QUERY TYPE field and enter product IDs (separated by commas) into the INCLUDE field in the General settings tab.
Settings section
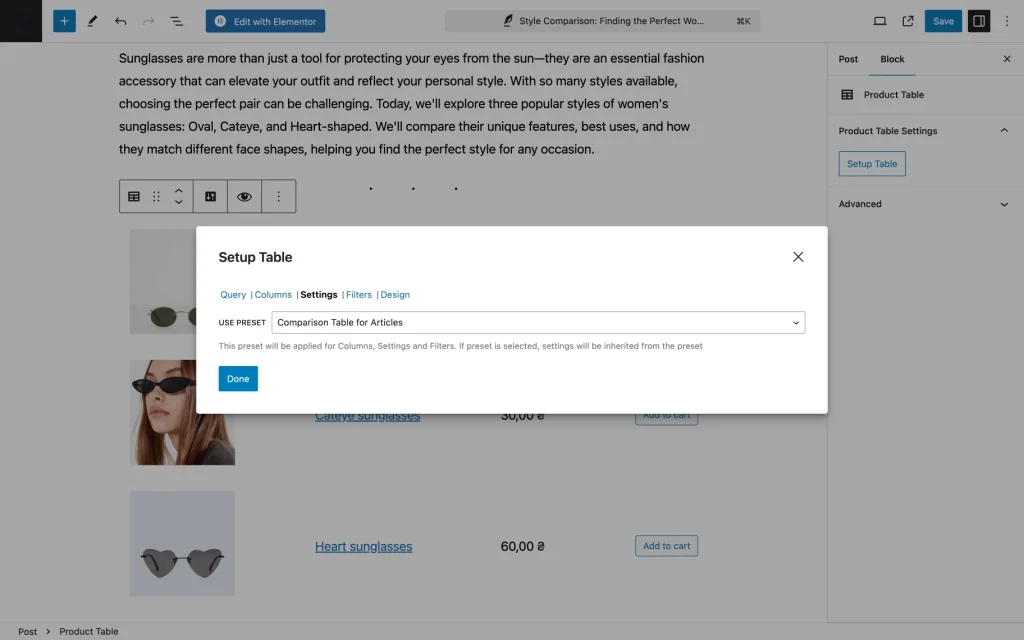
Then, go to the Settings tab and apply the preset created for these comparison use cases.
Finally, click “Done” to save the changes.
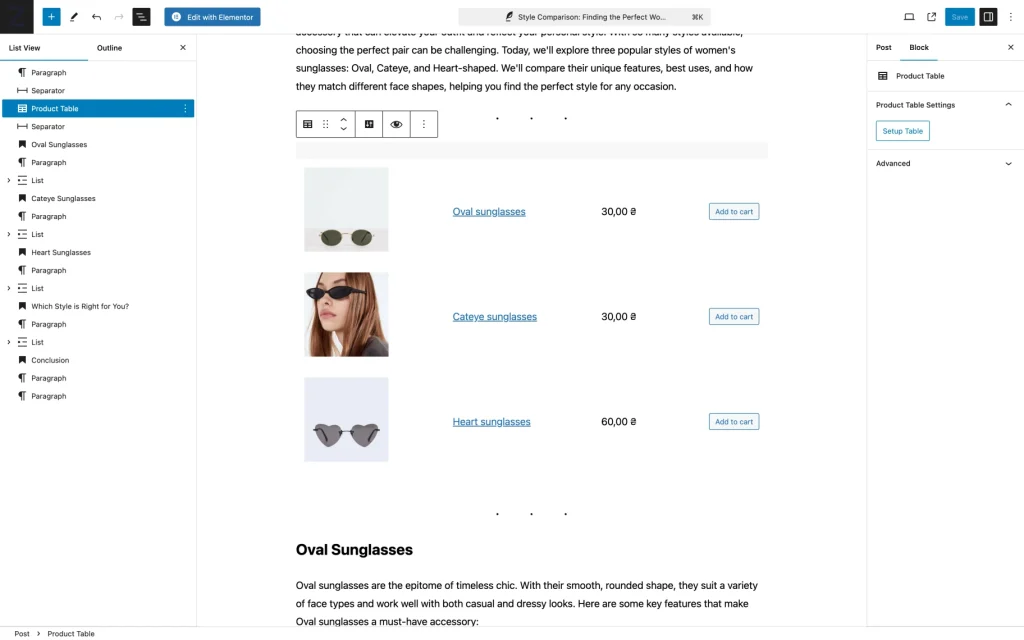
After adding the IDs and the Preset, check the table’s updated look.
Compare it with the way it looks on the front end.
Both the image and product name are clickable and are linked to the product pages of these featured items (as specified in the preset).
Size comparison table
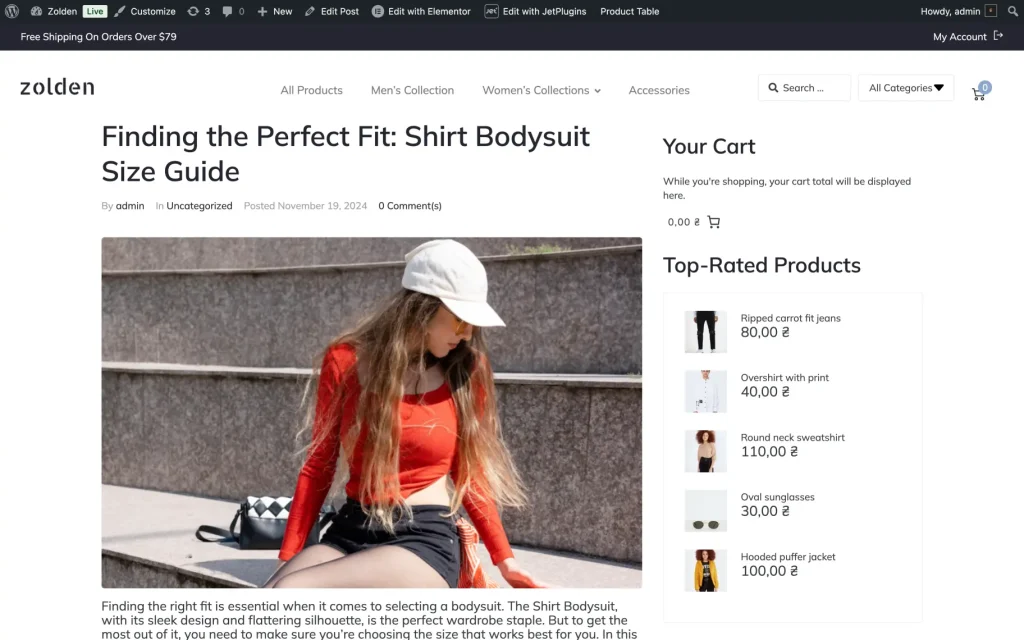
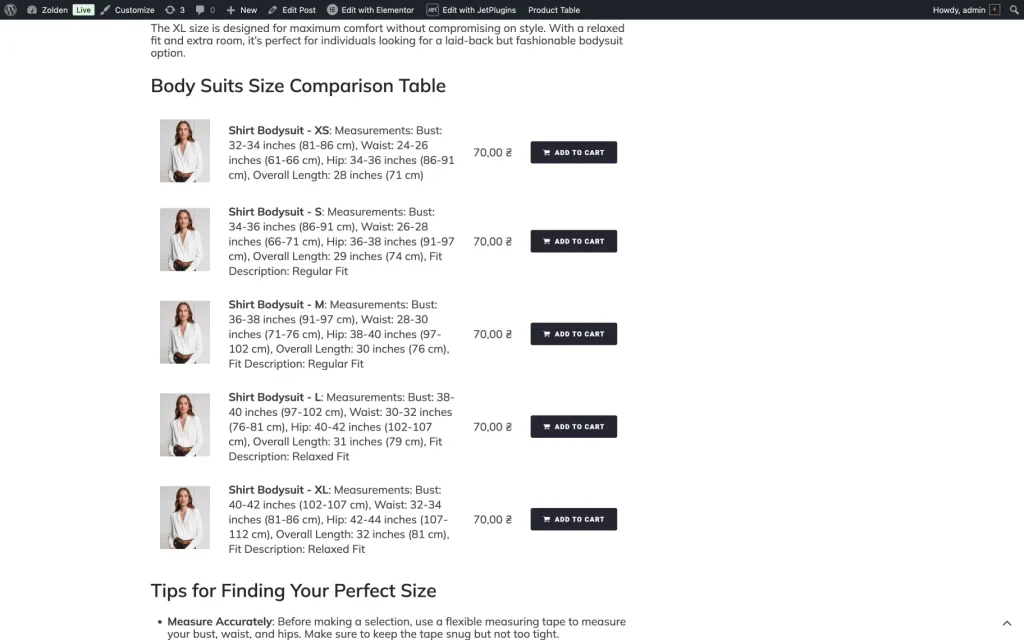
As a demonstration of this use case, we’ll create an article with the “Finding the Perfect Fit: Shirt Bodysuit Size Guide” title. It will present product variations of a single product, “Shirt Bodysuit,” and an explainer guide to make the correct measurements and choose the right size.
The table will have the following columns: “Product Image”, “Product Description”, “Price”, and “Action Button”.
To build a table like that, we need to get the product ID of the item which variations we’re going to display in the comparison table.
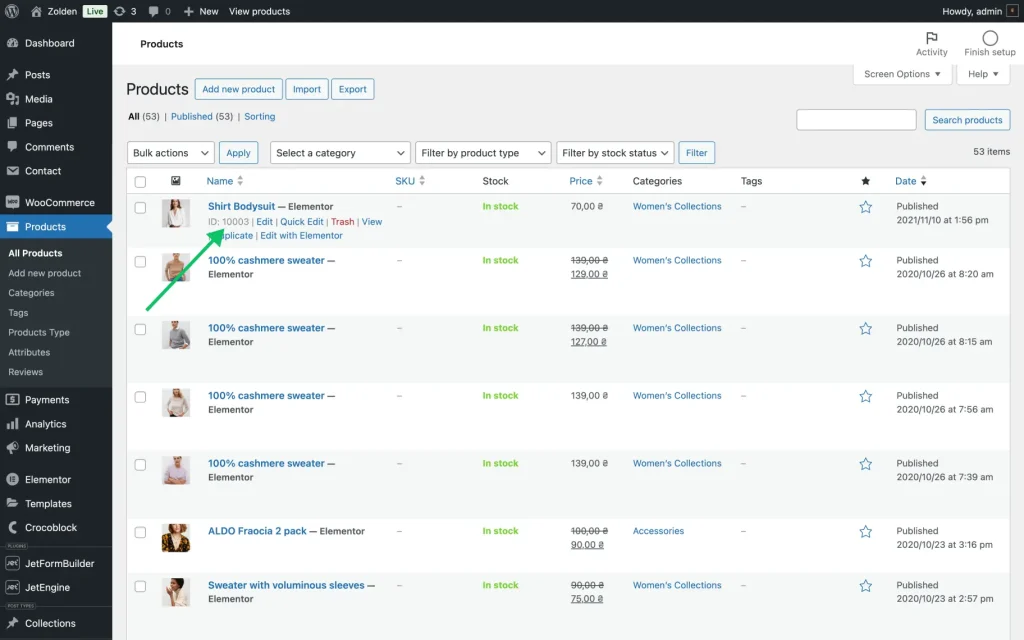
Go to WordPress Dashboard > WooCommerce > Products > All Products to obtain the IDs.
To get the product ID, hover over the corresponding product and copy the “ID:XXXX” numerical value. In our example, this value is: “10003”. Now, we need to go back to the shortcode editor and add this value to the product table.
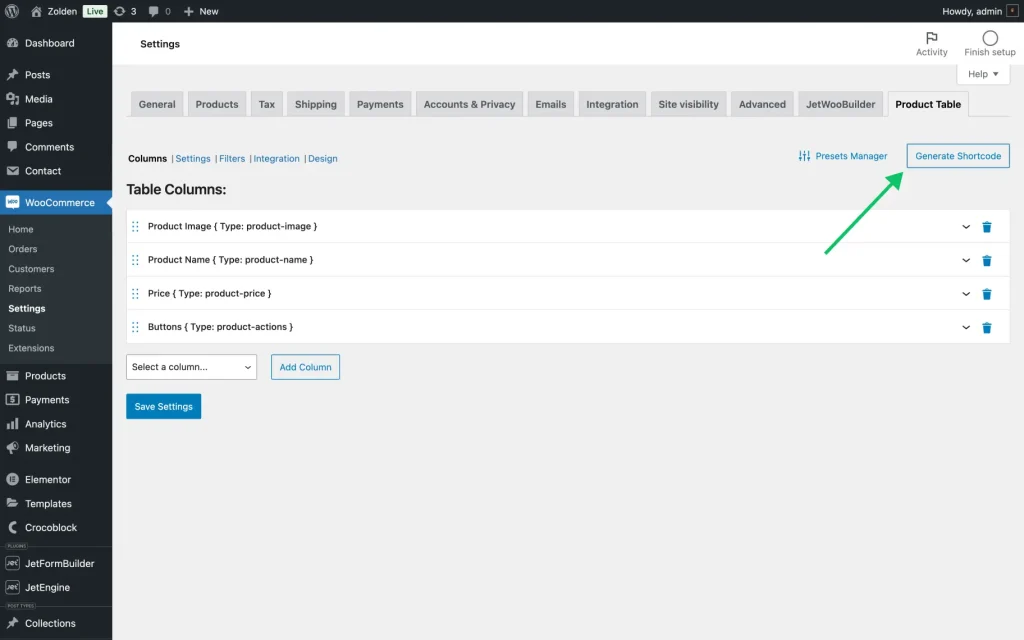
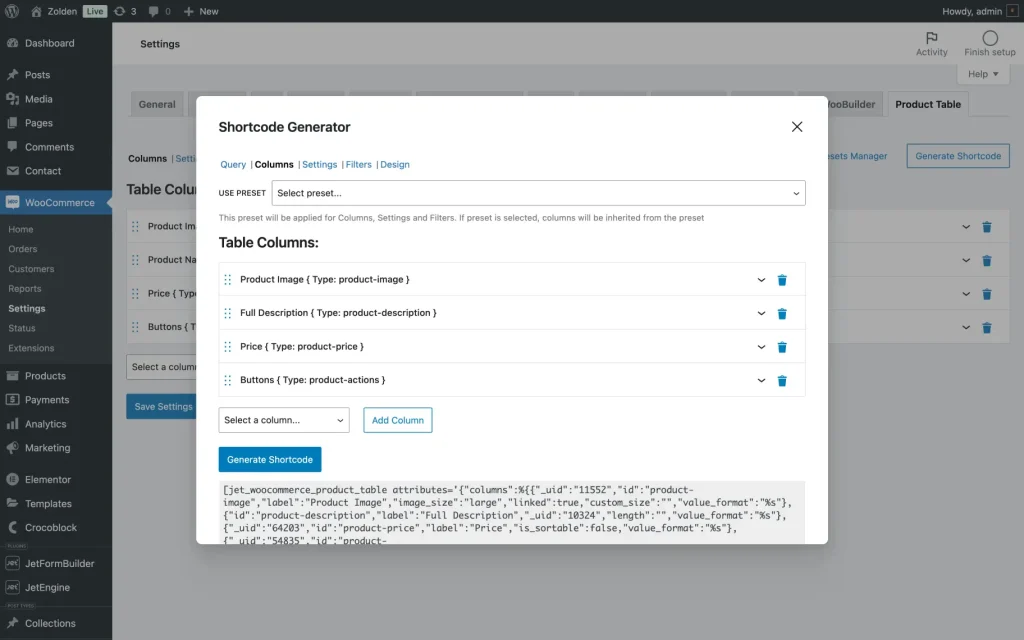
Go to WordPress Dashboard > WooCommerce > Settings > Product Table and click on the “Generate Shortcode” button.
As it was mentioned previously, our starter table includes four columns: Product Image, Product Name, Price, and Buttons.
However, we’re going to alter them to get the following set of columns: Product Image, Full Description, Price, and Buttons.
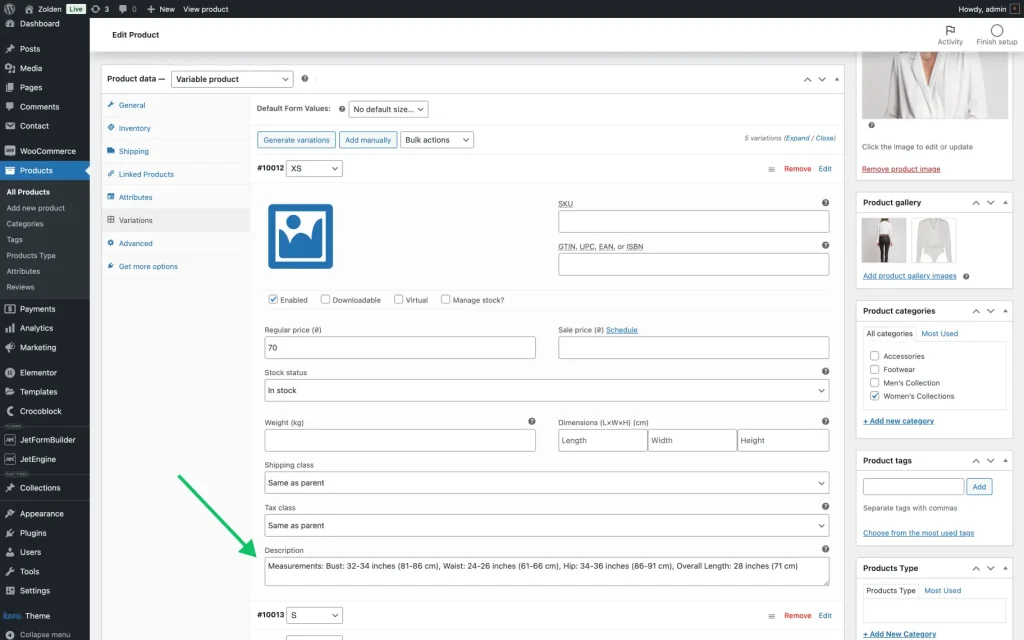
The Full Description column will display the contents of the Description field, which is available in the variable product settings.
To add this description, go to WordPress Dashboard > Products > Your Product in the Product data section:
- choose “Variable product” in the Product data dropdown;
- click on the Variations in the side menu;
- scroll down to the bottom of the product variation you want to edit, and fill in the Description field.
For our use case, we’ll add the corresponding measurements for each size variation, which will be displayed in our table.
Now, let’s get back to the Shortcode Editor.
Query section
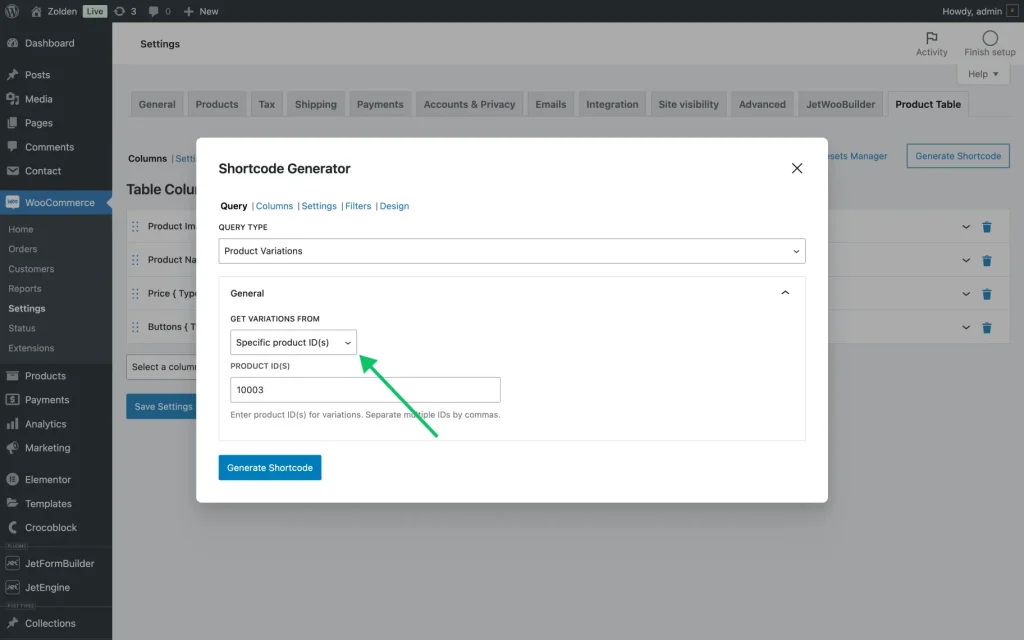
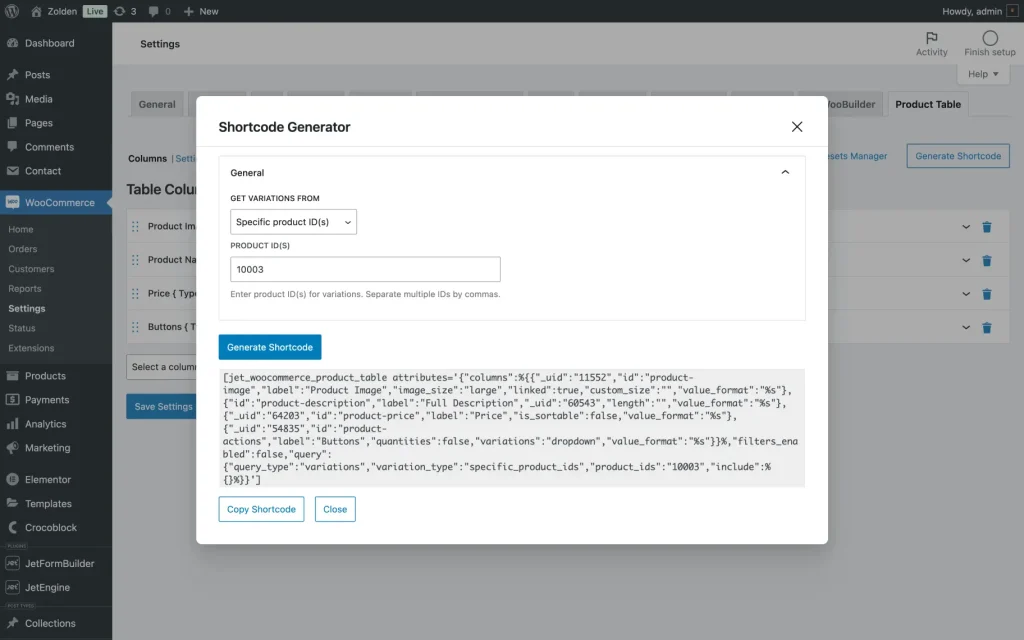
We’ll apply the following settings in the Query section:
- QUERY TYPE — choose “Product Variations”;
- GET VARIATIONS FROM — choose “Specific product IDs”;
- PRODUCT ID(s) — paste the ID of our chosen product.
Columns section
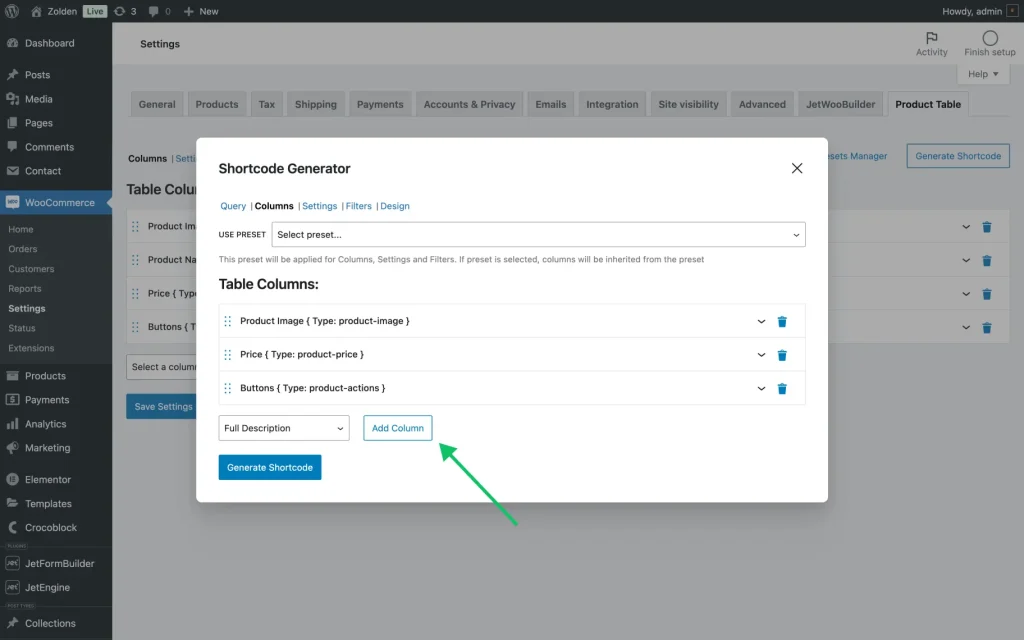
In our basic set of columns, we’re going to remove the Product Name column and replace it with Full Description. To add a new column, click on the dropdown, select the “Full Description” column type, and click on the “Add Column” button.
Settings section
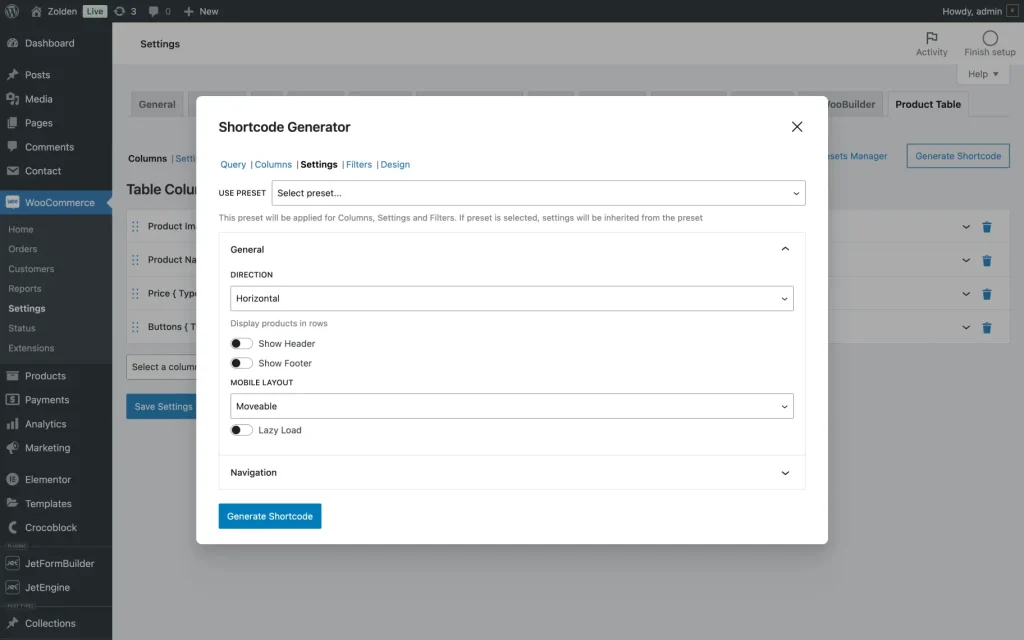
For this type of table, we don’t need a header/footer. As for the DIRECTION, we’ll choose the “Horizontal” type.
Filter section
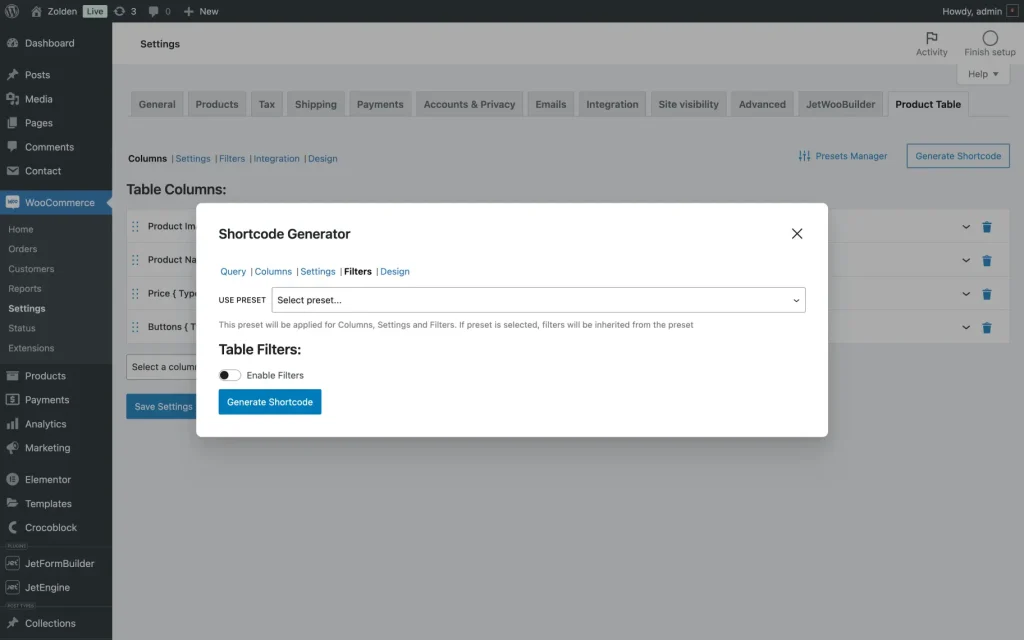
In the filter section, we’ll disable the Enable Filters toggle under the Table Filters section.
Since all the customizations are completed, it’s time to click the “Generate Shortcode” button to get the shortcode.
To copy the shortcode, click the corresponding button.
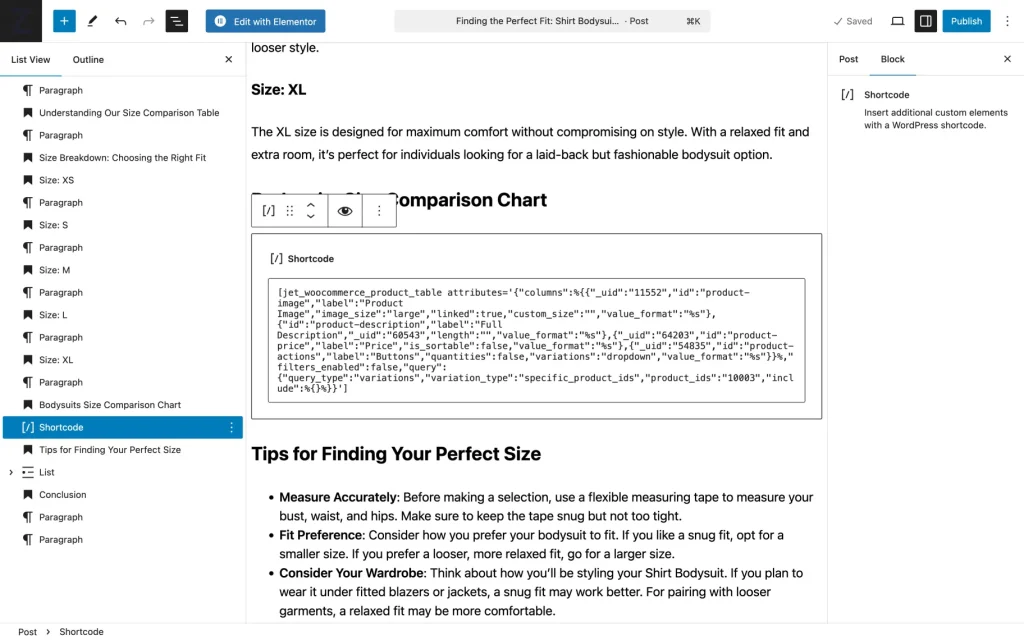
Now, let’s go to our article to apply the product table shortcode. To do so, we need to add the Shortcode block to the article body. Or just paste the shortcode, and it will be automatically transformed into a corresponding block.
Click “Save draft” and preview the article draft.
Seasonal comparison table
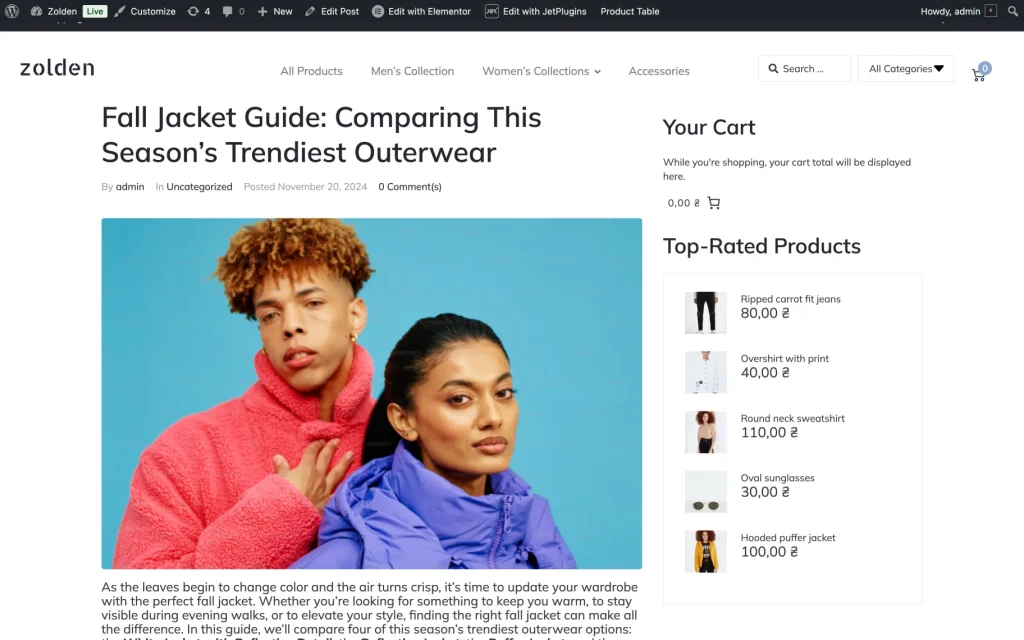
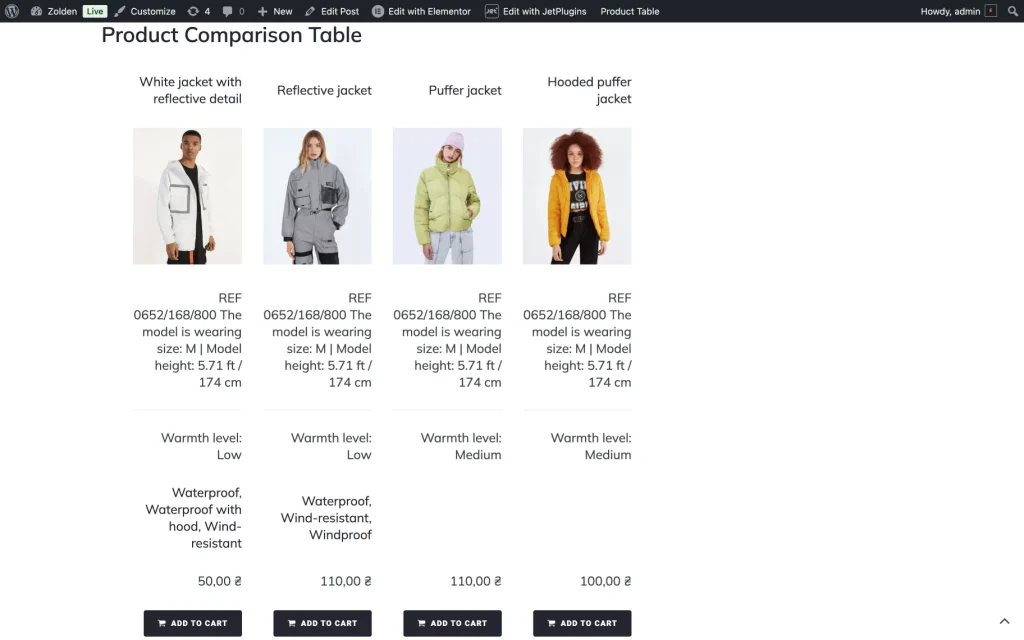
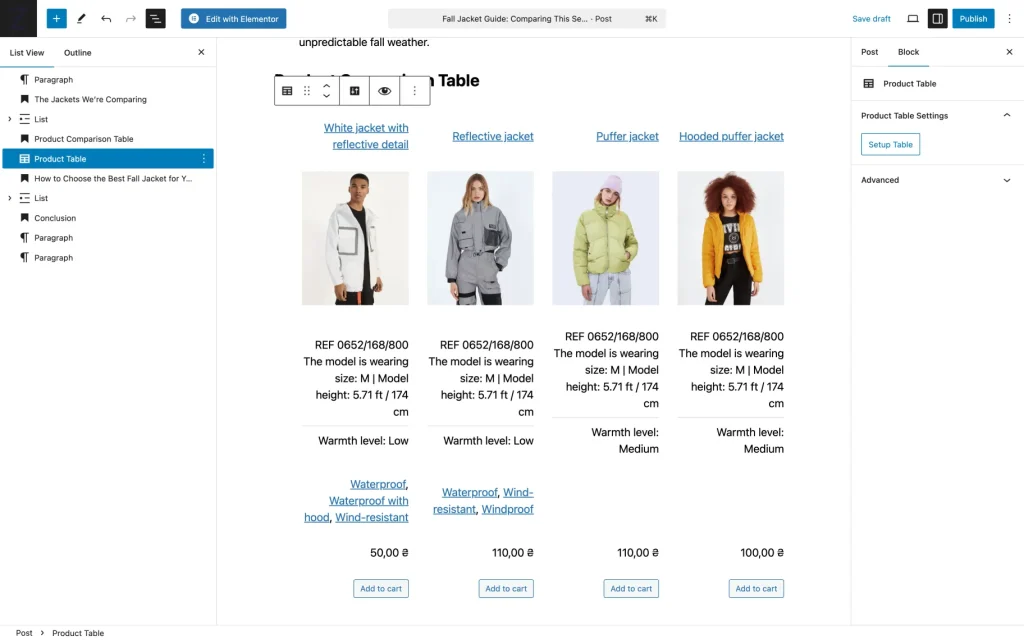
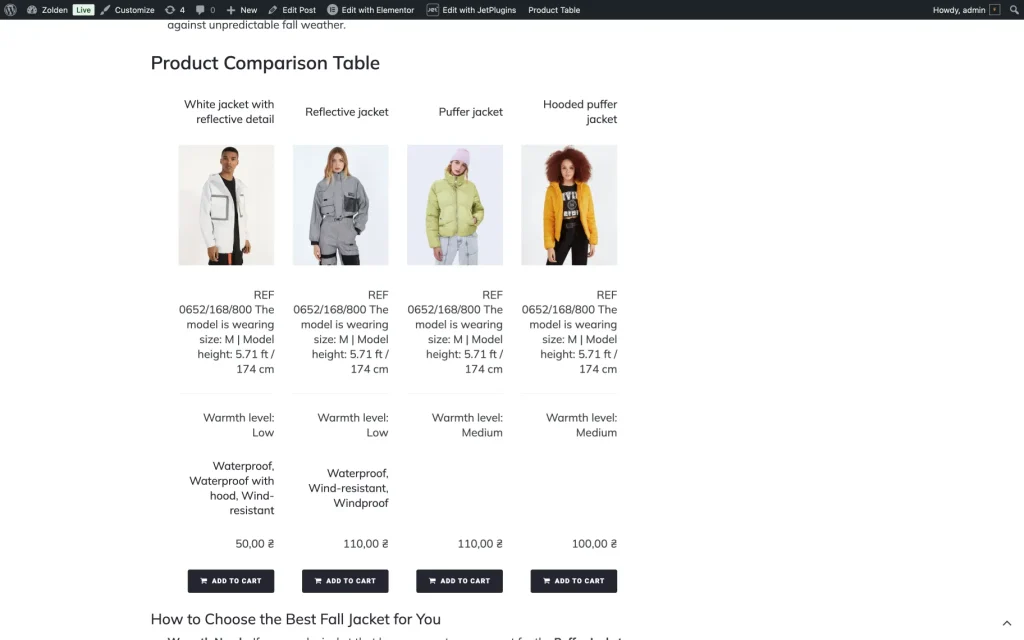
As a demonstration of this use case, we’ll create an article with the “Fall Jacket Guide: Comparing This Season’s Trendiest Outerwear” title. It will present four autumn jackets with an explanation of features.
The table will have the following columns: Product Name, Product Image, Product Summary, Product Tags, Product Price, and Buttons.
To build a table like that, we need to get the product IDs of corresponding items.
Go to WordPress Dashboard > WooCommerce > Products > All Products to obtain the IDs.
We’ll build this table with the Product Table block and will present it in a “Vertical” format.
So you pick the IDs of products you want to include in the table; let’s move to creating a post.
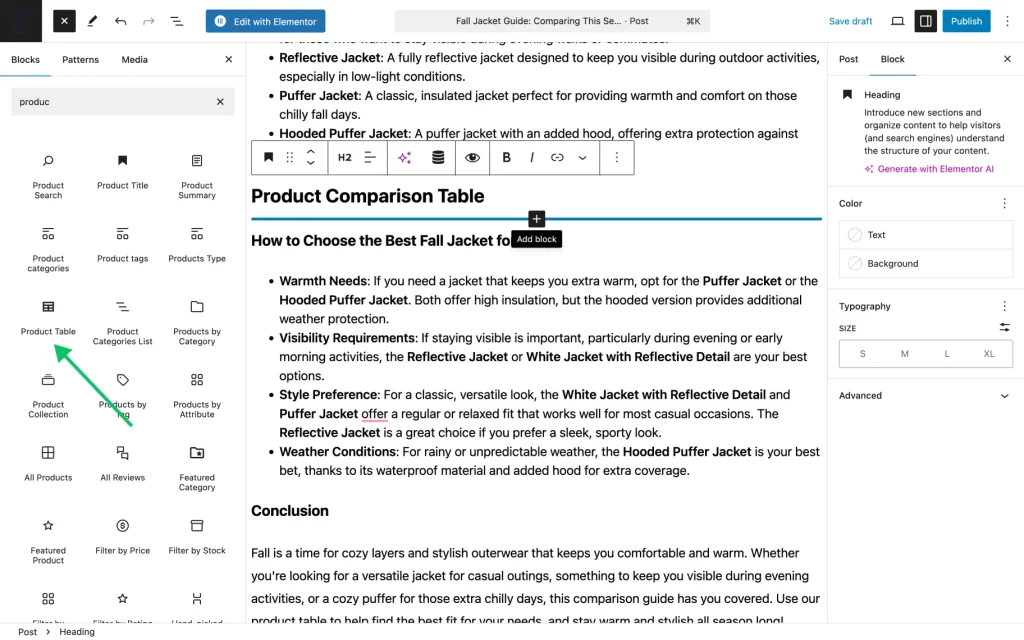
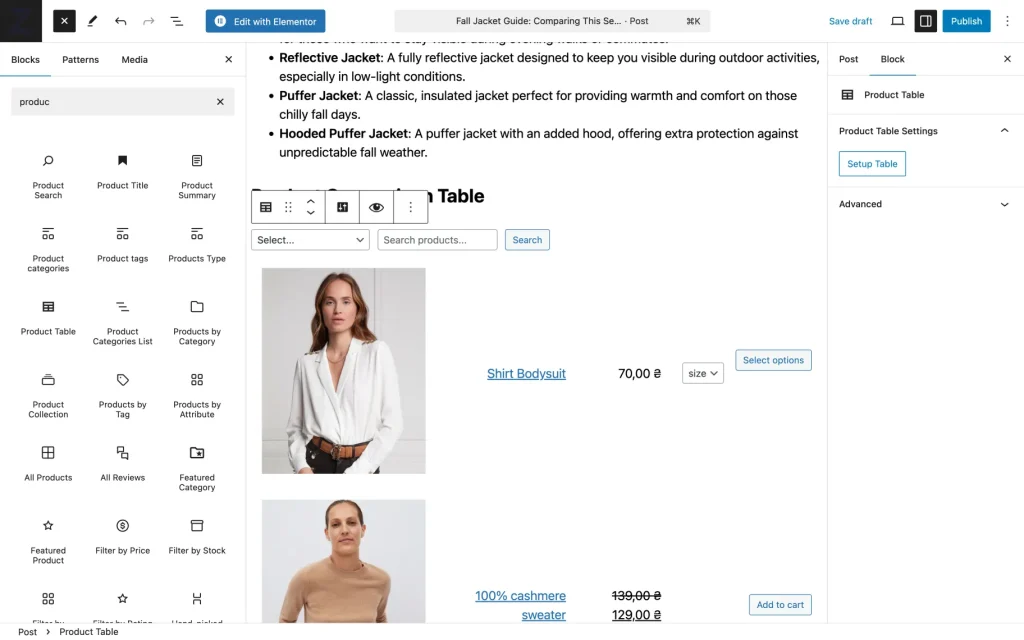
To add a Product Table block to the article body, type “product table” in the Blocks search and click on the block to add it to the page.
When you add a block, it will display all products in a basic set of columns. Now, let’s modify the layout and display of the products.
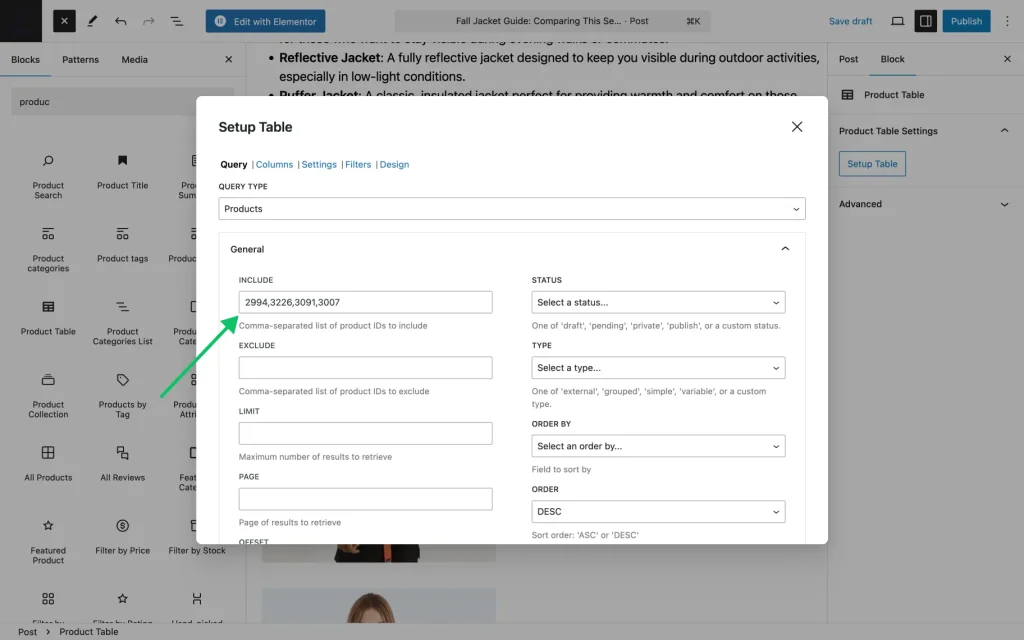
Click on the “Setup Table” button to open the table editor.
Query section
Since we’re going to display individual products, choose the “Products” option in the QUERY TYPE field and enter product IDs (separated by commas) into the INCLUDE field in the General settings tab.
The rest of the settings we’ll leave as is.
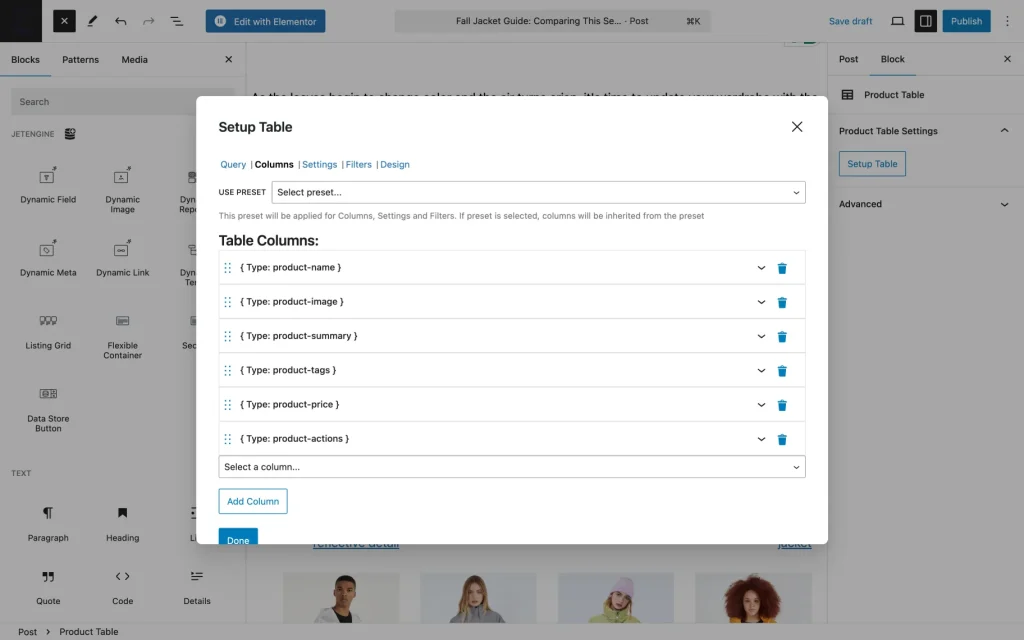
Column section
In our basic set of columns, we’re going to remove and rearrange the columns a bit in the following way.
- Product Name;
- Product Image;
- Summary;
- Tags;
- Price;
- Buttons.
Settings section
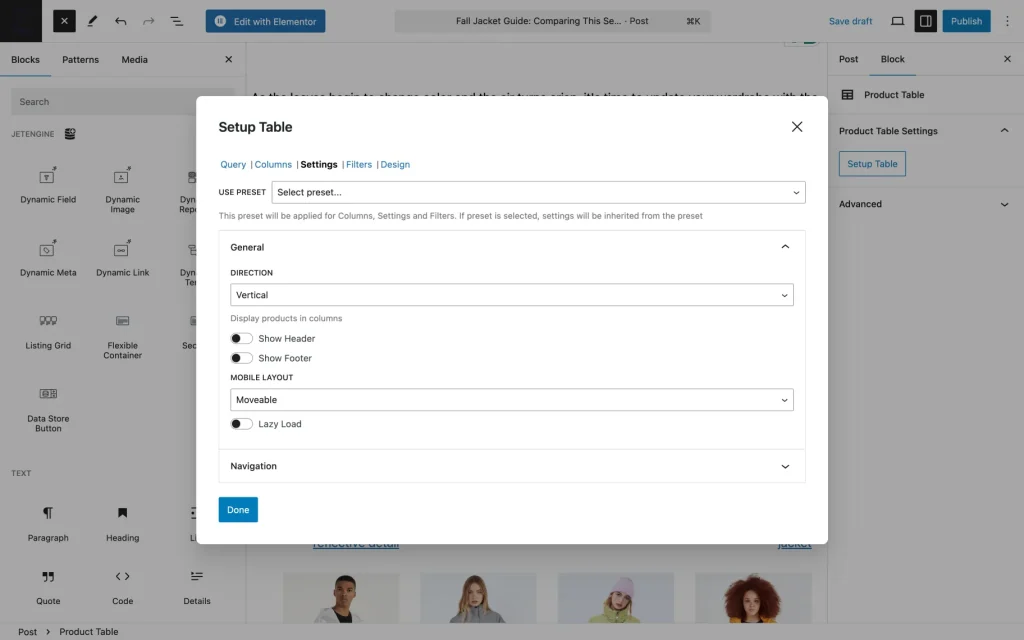
For this type of table, we don’t need a header/footer. As for the DIRECTION, we’ll choose the “Vertical” type.
Filter section
In the filter section, we’ll disable the Enable Filters toggle under the Table Filter section.
When you’ve done all the necessary customizations, click on the “Done” button.
After applying all the necessary settings, preview the changes.
Compare it with the way it looks on the front end.
Style the Table
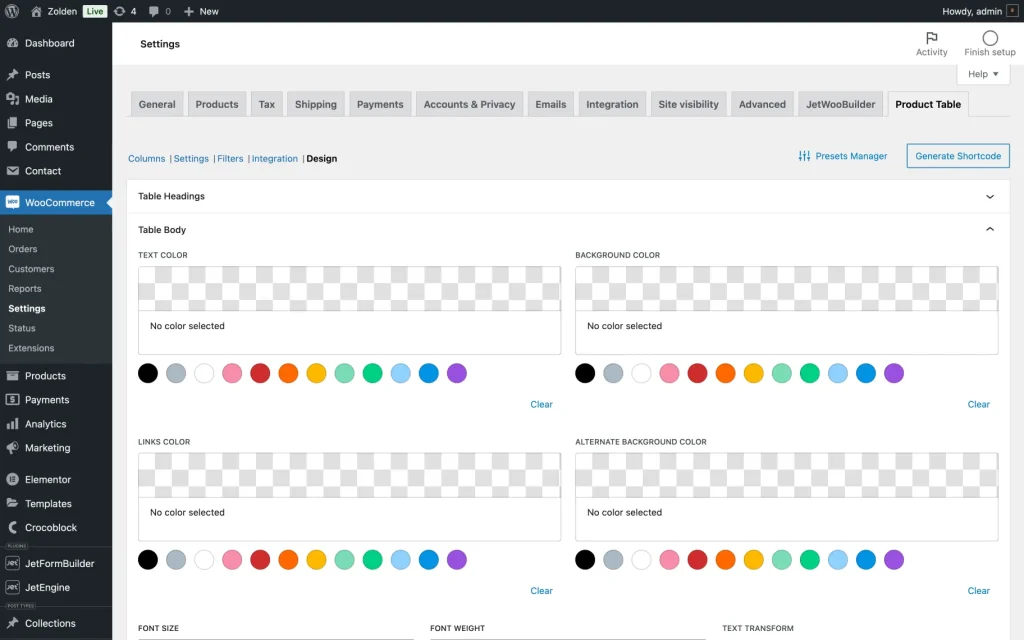
Make sure your comparison tables match your website’s overall design. The JetProductTables plugin allows you to adjust the table’s colors, fonts, and borders to fit your brand’s aesthetic. Consistent styling ensures that the tables don’t feel out of place and enhances the overall user experience.
To customize the table, go to WordPress Dashboard > WooCommerce > Settings > Product Table > Design.
Once you’ve customized the table, embed it in relevant articles or product pages. By doing so, you’re adding value to your content, allowing readers to get all the information they need without jumping from page to page.
That’s it. Now you know how to create, customize, and manage the presets available with the JetProductTables plugin on your WordPress store powered by WooCommerce.
