JetWooBuilder Dashboard Overview
This overview will teach everything one needs to know about JetWooBuilder settings, which are stored in the WooCommerce and Crocoblock dashboard menu sections.
The JetWooBuilder plugin has many additional features that can be enabled or disabled in the settings menu. However, those settings are stored in both the Crocoblock menu tab and the JetWooBuilder tab WooCommerce Settings section. This guide will walk you through all the features of the JetWooBuilder plugin and help you understand its options.
WooCommerce JetWooBuilder Settings
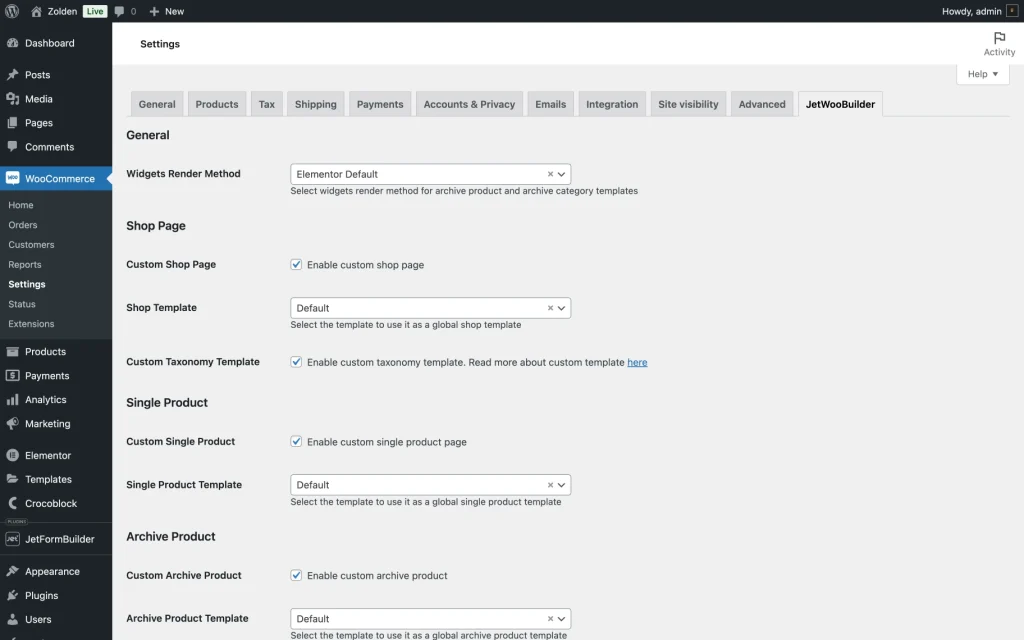
To find this list of settings, one needs to follow the WordPress Dashboard > WooCommerce > Settings path and then proceed to the JetWooBuilder tab.
General
In this section, one can choose the widget render method:
- Widget’s Render Method — a drop-down that allows one to choose how the JetWooBuilder widgets are rendered. The following options are available:
- “Macros” — when selected, this option guarantees unobtrusive work of all WooCommerce widgets;
- “Elementor Default” — when selected, this option allows rendering the widgets with Elementor’s tools but demands more resources for its work, which could result in lower page download speed.
Shop Page
In this section, one can enable custom templates for the shop page and taxonomy pages, with options to select the desired templates from drop-down menus:
- Custom Shop Page — a checkbox that enables the use of a custom shop page template;
- Shop Template — a drop-down that allows selecting the custom shop page template;
- Custom Taxonomy Template — a checkbox that enables the use of a custom taxonomy template.
Single Product
In this section, one can enable a custom shop page template and select it from a drop-down menu:
- Custom Single Product — a checkbox that enables the use of a custom single product template;
- Single Product Template — a drop-down that allows the selection of the custom single product template.
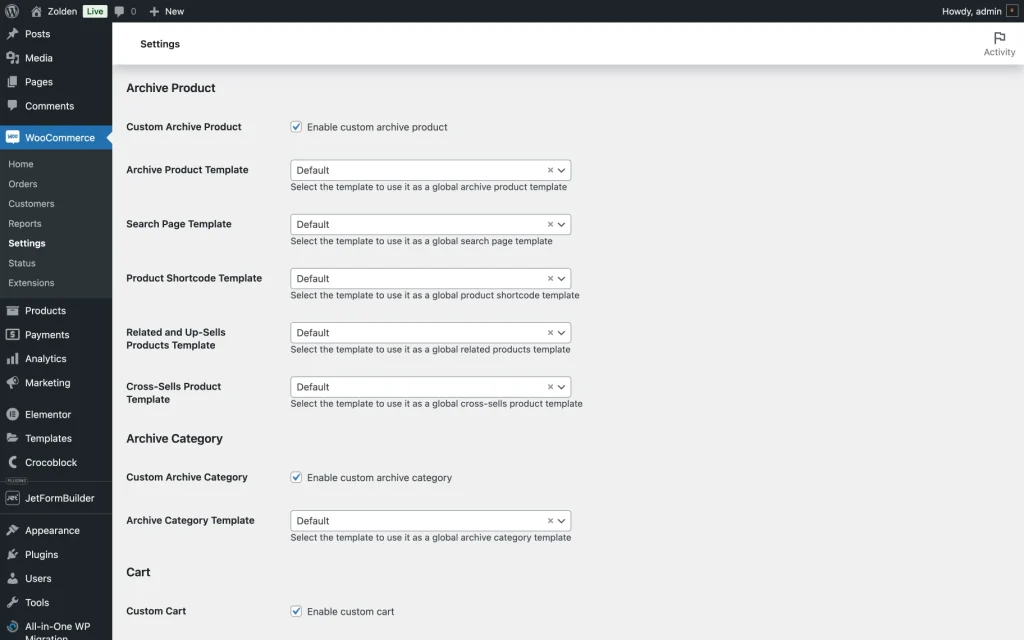
Archive Product
In this section, one can enable custom templates for archive products, search pages, product shortcodes, related and up-sell products, and cross-sell products – all selectable from drop-down menus.
- Custom Archive Product — a checkbox that enables the use of a custom archive product template;
- Archive Product Template — a drop-down that allows selecting a global archive product template;
- Search Page Template — a drop-down that allows selecting a global search page template;
- Product Shortcode Template — a drop-down that allows selecting a global product shortcode template;
- Related and Up-Sells Products Template — a drop-down that allows selecting a global related products template;
- Cross-Sells Product Template — a drop-down that allows selecting a global cross-sells product template.
Archive Category
In this section, one can select custom archive category templates:
- Custom Archive Category — a checkbox that enables the use of a custom archive category template;
- Archive Category Template — a drop-down that allows selecting a global archive category template.
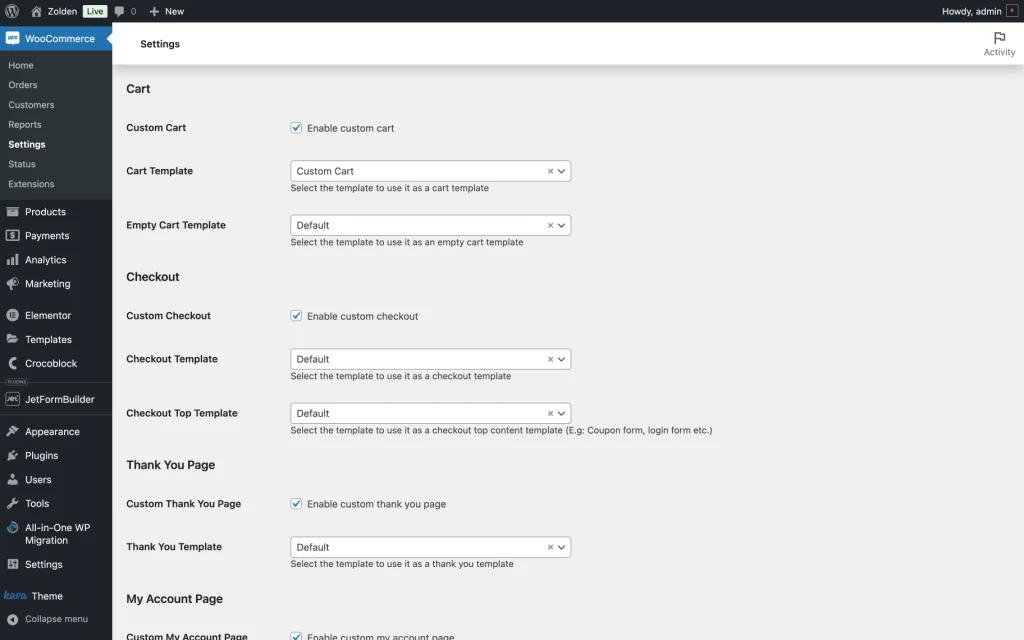
Cart
In this section, one can select custom templates for the cart and empty cart pages:
- Custom Cart — a checkbox that enables the use of a custom cart template;
- Cart Template — a drop-down that allows selecting a custom template for the cart;
- Empty Cart Template — a drop-down that allows selecting a custom template for the empty cart.
Checkout
In this section, one can choose a template to be used for the checkout:
- Custom Checkout — a checkbox that enables the use of a custom checkout template;
- Custom Template — a drop-down that allows selecting a custom template for the checkout;
- Custom Top Template — a drop-down that allows selecting a custom template for the checkout top content.
Thank You Page
In this section, one can enable a custom Thank You page and choose its template:
- Custom Thank You Page — a checkbox that enables the use of a custom Thank You page;
- Thank You Template — a drop-down that allows selecting a custom template for the Thank You page.
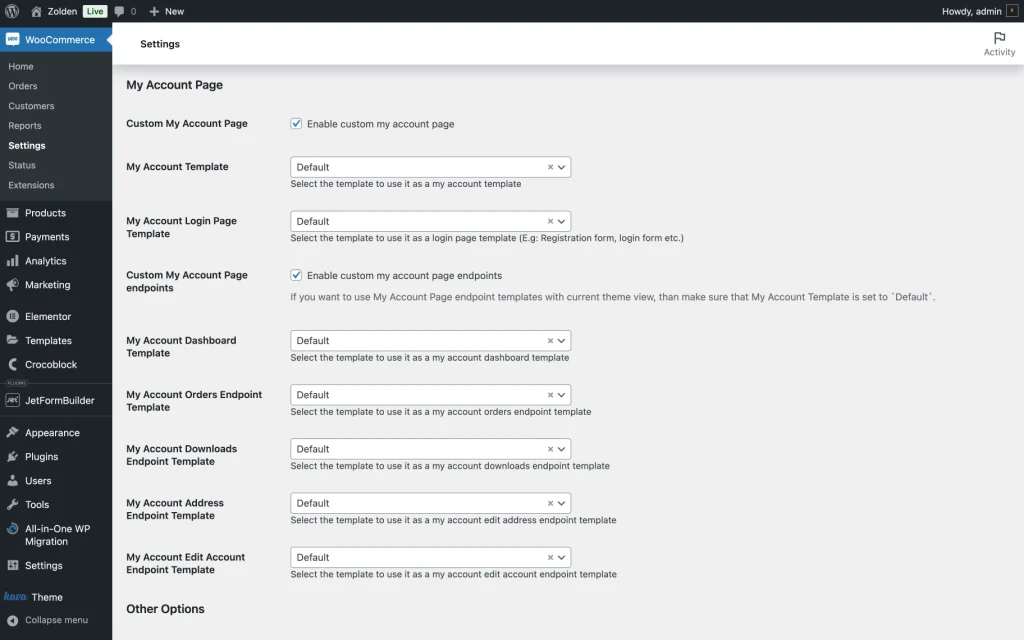
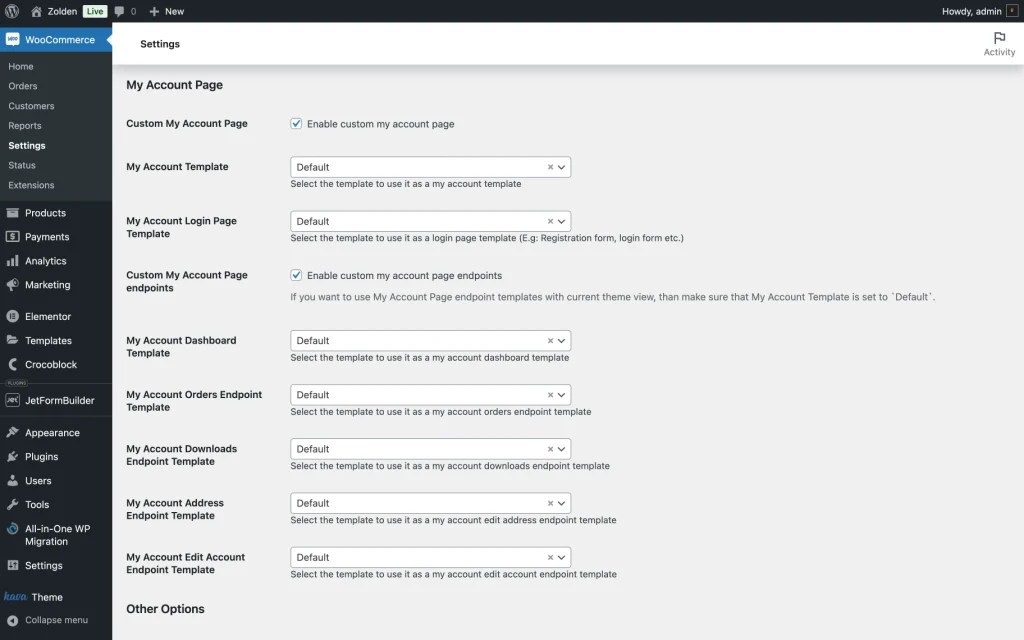
My Account Page
In this section, one can enable the custom account page template usage and choose templates for the Account page and Account Login page:
- Custom My Account Page — a checkbox that enables the use of custom templates for the My Account page;
- My Account Template — a drop-down that allows selecting a custom template for the My Account page;
- My Account Login Page Template — a drop-down that allows selecting a custom template for the login page;
- Custom My Account Page Endpoints — a checkbox that enables the use of custom templates for My Account page endpoints;
- My Account Dashboard Template — a drop-down that allows selecting a custom template for the My Account dashboard;
- My Account Orders Endpoint Template — a drop-down that allows selecting a custom template for the My Account orders endpoint;
- My Account Downloads Endpoint Template — a drop-down that allows selecting a custom template for the My Account downloads endpoint;
- My Account Address Endpoint Template — a drop-down that allows selecting a custom template for the My Account address edit endpoint;
- My Account Edit Account Endpoint Template — a drop-down that allows selecting a custom template for the My Account edit account endpoint.
Other Options
This section includes settings for enabling AJAX Add to Cart, forcing native WooCommerce templates, and specifying the number of related, up-sell and cross-sell products to display.
- Use AJAX Add to Cart — a checkbox that enables adding products to the cart without reloading the page;
- Use Native Templates — a checkbox that forces the use of native WooCommerce templates instead of theme-rewritten ones;
- Number of Related Products to Show — a field that allows setting the number of related products to display;
- Number of Up-Sells Products to Show — a field that allows setting the number of up-sells products to display;
- Number of Cross-Sells Products to Show — a field that allows setting the number of cross-sell products to display.
Crocoblock JetWooBuilder Settings
To access these settings, open the WordPress Dashboard > Crocoblock > JetWooBuilder Settings submenu. Two tabs with additional settings are available.
General Settings
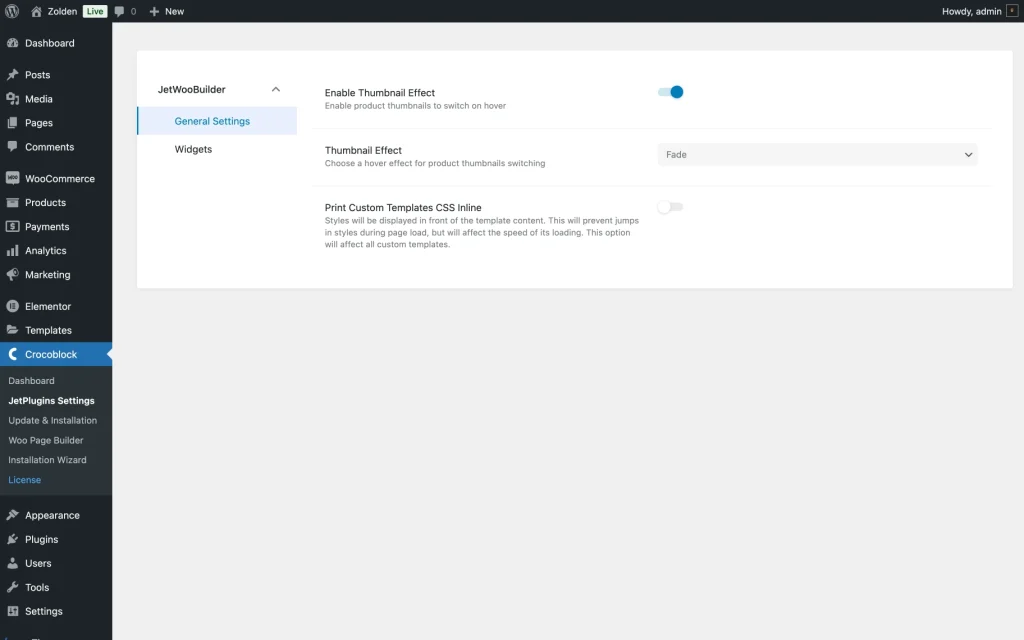
In this tab, one can configure thumbnail effects and manage CSS inline printing for custom templates:
- Enable Thumbnail Effect — a toggle switch (enabled by default) that activates visual effects for product thumbnails;
- Thumbnail Effect — a drop-down menu offering animation styles for thumbnails, including “Slide Left,” “Right,” “Top,” “Bottom,” “Fade,” and “Fade with Zoom”;
- Print Custom Templates CSS Inline — a toggle switch (disabled by default) that embeds custom template styles directly into the page content to prevent style jumps during loading, though it may reduce page loading speed.
Widgets
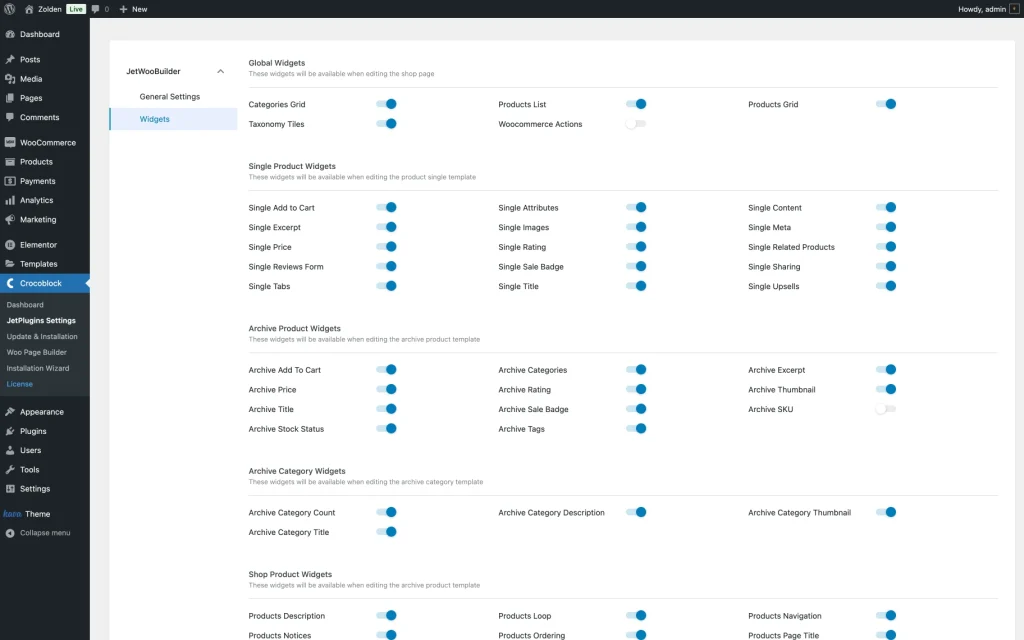
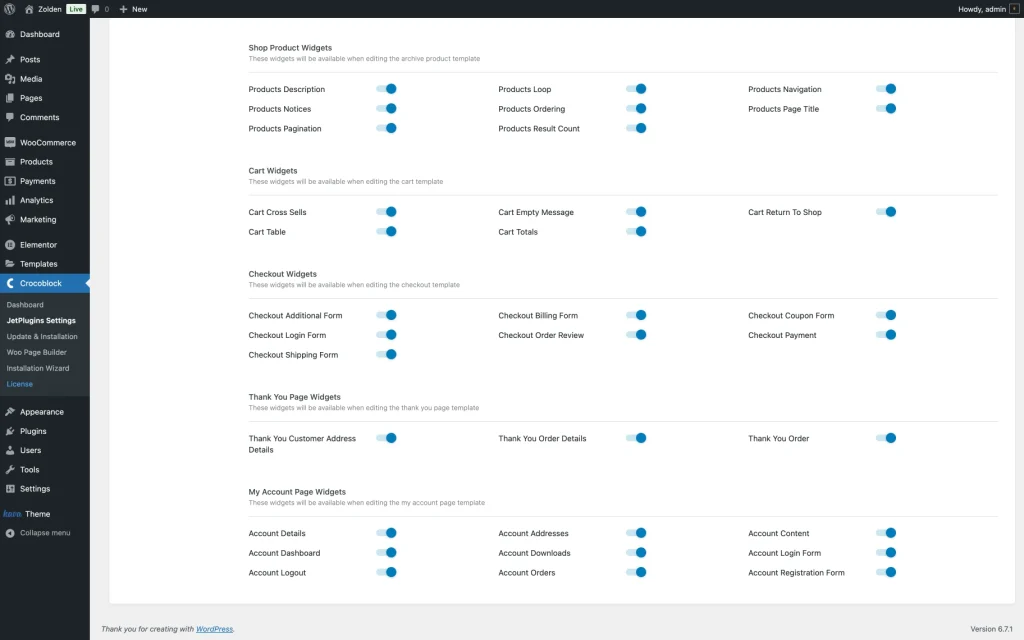
In this tab, one can enable or disable widgets offered by the JetWooBuilder plugin. All the widget toggles are sorted into blocks and turned on by default. The extensions of every block will be visible only in the appropriate part builder.
For example, the widgets from the Cart Available block are visible only when a cart template is created. The only exception is the widgets from the Global Available Widgets block, which become visible in every JetWooBuilder Elementor submenu.
Widgets can be turned on/off at any time; the changes are saved automatically.
- Global Widgets — a group of widgets that are designed for customizing the shop page layout, including category grids, product lists, taxonomy tiles, and WooCommerce actions;
- Single Product Widgets — a group of widgets that allow one to build and customize single product templates, covering elements like add-to-cart buttons, product images, price, rating, reviews, upsells, and more;
- Archive Product Widgets — a group of widgets that are used to design archive product templates featuring tools for displaying product thumbnails, titles, prices, stock status, and other details;
- Archive Category Widgets — a group of widgets that enhance archive category templates, offering options to display category titles, thumbnails, descriptions, and product counts;
- Shop Product Widgets — a group of widgets for archive product templates, offering tools like product descriptions, navigation, ordering, pagination, and result counts;
- Cart Widgets — a group of widgets for customization of cart templates with features like cross-sells, empty cart messages, return-to-shop buttons, and cart totals;
- Checkout Widgets — a group of widgets are used to enhance checkout templates, including forms for billing, shipping, coupons, and payment, as well as order reviews;
- Thank You Page Widgets — a group of widgets that are used to personalize Thank You page templates with customer address details, order summaries, and order details;
- My Account Page Widgets — a group of widgets that are used to build custom account page templates and provide account details, addresses, orders, downloads, login, logout, and registration forms.
JetWooBuilder Templates
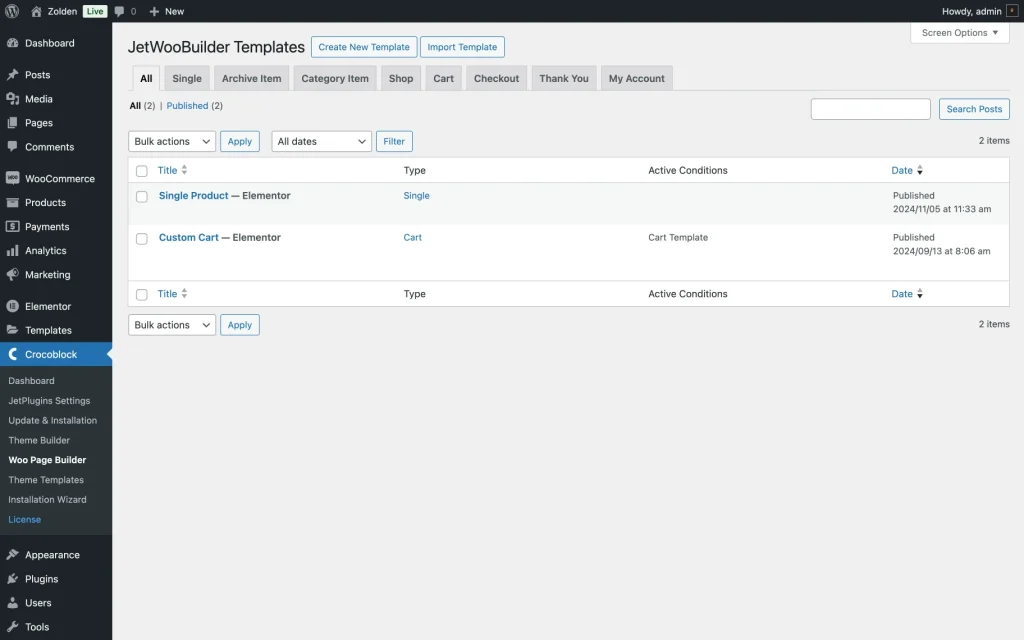
This is not a settings tab but a table where the created templates are stored. To open it, one should go to WordPress Dashboard > Crocoblock > Woo Page Builder. The Type column matches the type of the created template, which could be one of eight: Single, Archive Item, Category Item, Shop, Cart, Checkout, Thank You, or My Account.
The Active Conditions column shows whether it is assigned to the products or not.
This section allows one to create new page templates, edit existing ones, and delete them.
That is all about the JetWooBuilder plugin’s settings available for WordPress websites.
