There are several main steps of website development aimed to deliver a product without bugs and to work perfectly, even if we are talking about WordPress, with all the beginner-friendliness and the abundance of ready themes and plugins which don’t need to be developed from scratch. But suppose WordPress plugin and theme development are involved.
In that case, it’s even more obvious that additional layers for testing and refinement are essential before handing off the whole project to the clients or making it live and listed in SERP.
Table of Contents
- Development Environment and Website Deployment Process
- Staging Environment: a Closer Look
- How to Create a Staging Site for WordPress
- FAQ
- Final Thoughts
Development Environment and Website Deployment Process
Depending on the website or application development phase, there are several virtual environments for effective work on each phase and ensuring no errors in the production (live website for clients). If the project is massive and complex, there can be extra steps, like a separate QA. But, as a rule, there are three main layers in the website deployment process: Development, Staging, and Production environments (or sites). Let’s have a closer look at each of them.
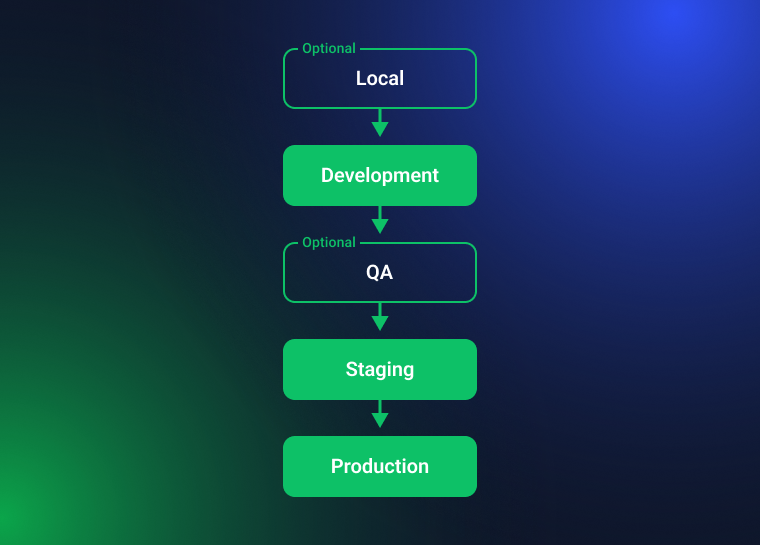
Local site
It is a place to which only one developer has access, so this is a sandbox where any experiments and ideas can be implemented and tested. It’s not a compulsory step, but every developer has their own local site to write the first scratches of code, even without the context of the components and code planned to be present on the actual website. The great thing about a local environment is that you don’t have to push and deploy the changes and waste your time on them.
The local site is the same as a painter’s notebook with sketches and drafts.
Development site
The development site is similar to the previous one, but it’s an online environment where the team of developers collaborates and can see how their pieces of code work together. But it’s still not the same as the live website the final user will see because the most important thing here is to be able to test everything promptly, without all the non-essential stuff. If several teams work on the same projects and each team works on different tasks, there can be several development sites for them, which in the end get merged.
QA site
QA stands for “quality assurance.” And big companies with huge projects used to have a separate environment for testing (instead of doing it in other steps). This step exists for separating the development site, where code is changing all the time, and the staging environment, which looks more like a final version and is not the optimal place for testing just some individual components.
So, testers can perform their time-consuming tests without messing up with the development process (if they do it on a development site) and without dealing with the whole project (if they do it on a staging site).
If tests fail, the QA team can delete them from their site until the bugs are fixed and then have the updated version to check again. And if it works well, it can be moved to the next deployment step.
Staging site
A staging website is a release candidate and basically a mirror of production. It already has all the things put together, and the final tests and refinements of all the components, from code to design and content, can be performed here. The main goal here is to test the project as a whole, simulate real cases and traffic peaks, and see what can be improved.
This website version can be demonstrated to a client or manager to get the final amends from their side.
Production site
This is the website the users actually see and deal with. So, if the work was done right in all the previous steps, the production doesn’t need any urgent edits and bug fixes. It doesn’t change except for the scheduled releases and updates. Some tests can and should be performed even on the production: different feature flags and A/B testings.
Staging Environment: a Closer Look
A staging website is the closest version to the Production, and it’s a place not only to deploy everything you want to have in the final version but also to connect all the 3rd party services if they are specified for the live website. So, any out-of-scope situations can be tested here, for example, categories of clients with unique features (e.g., names with unusual letters).
Such cases are material for user acceptance testing – the type of tests that look at the website from the users’ perspective and ensure that all the business requirements and goals are met. It cannot be performed on Development, for example, because there we can’t see the whole picture yet. And it cannot be performed on Production either, because it would be too late.
Smoke testing and load testing are other types of tests that should be done in a staging environment to ensure everything works well.
Problems you might face
There are two main drawbacks of staging websites:
- If it’s not deployed right, the staging website can appear in SERP, which is not only confusing for clients but bad for the SEO of the production website. Such errors can happen mostly when the staging environment is done manually or if the plugin is not so good.
- Usually, caching is disabled on staging websites; that’s why you don’t see the whole picture because it is caching (set up wrong) that often causes bugs and some performance issues. For some hostings, if we talk about WordPress managed hostings, it’s an even more frequent practice to offer a staging environment with caching. And it’s also important to pay attention to this when setting up a staging site.
How to Create a Staging Site for WordPress
Staging feature by the hosting provider
It is the most convenient way of creating a WordPress staging site, and many hostings offer this service; it can be included in all the plans or be on higher pricing plans. Normally, WordPress managed hostings have this feature. And it’s a 1-click staging process, so you simply press a button, something like “Create a Staging Site,” and it’s ready almost immediately. As soon as all the tests and changes are done, you can also deploy this website version to production in one click. And users will not notice any changes or downtimes.
As a rule, creating a staging site with a hosting staging tool is the best practice: it makes a subdomain, a copy of the database (not to mess up with the production one), and often uses a separate server. And also, hosting creates a backup of a production website by default, so, in case of emergency, you can revert the changes.
Using WordPress staging plugins
It is also quite a convenient way of creating a staging environment but takes more time and effort than doing it on the hosting panel. Also, no free plugin can do all the jobs for you; free versions are limited. Let’s look at the two popular examples.
WP Staging
It actually has a free version, but it doesn’t allow us to push changes to production. So, if you don’t want to pay, you can create a staging site, test your changes, and if everything works well, manually implement the same changes to the production website. Also, it fully uses the resources of the main website – its disk space and database (it doesn’t create a separate one but changes a database prefix). So, it’s not the most secure solution, and if your website is huge, this plugin might not work.
Yet, it works fine if you need to make some minor changes and if the website is small.
WP StageCoach
It’s a paid plugin that creates and stores a staging site on its own server, meaning that anything you do on your staging environment doesn’t interfere with the live site in any way. Also, there’s a great functionality of merging a database instead of rewriting it.
It’s very useful if, during the time you were making changes, there were clients’ activities on a live site (products added to the cart, etc.). You can select only separate files to be pushed to production if there is no need to copy the whole project.
Manual staging
It is the most time-consuming way to make a WordPress staging website. Also, there are more chances for errors than if using other methods. So, you need to create a new website on the subdomain and copy your site there, not forgetting to close it from indexing. And the best way to do it is to use the .htaccess file and set a password for accessing a website. (Of course, you can copy it to the local host, but then you will not be able to collaborate with others on your project). Also, it’s important not to get lost in the changes made if you don’t want to rewrite the entire site with the database.
This method is absolutely not recommended for beginners.
FAQ
Deployment in web development means deploying code from the source control (e.g., Git) to the hosting. And the deployment process is the process of transitions from one deployment environment to another.
Staging website a testing website hidden from end users and extremely similar to the live website, but with the recent updates and changes applied there. The purpose of it is to create a safe environment where all the changes and updates can be tested first without crashing the live website or delivering, even for a short period of time, a bad user experience to the end users.
Smoke testing a test that takes place after new releases are deployed to ensure that all the basic functions and components work well.
Final Thoughts
For an effective workflow, even if the project is not complicated, it’s very important to stick to the clear deployment process and complete all the necessary steps. One of them is website staging, and it’s essential to have it even before updating plugins. There are several ways to create it, but the best and most convenient is using a hosting provider’s staging tool. It’s an extremely fast and safe way to always have your website perform well. And this step should not be overlooked.