How to Add Multiple Appointments to Google Calendar and Gmail via Make
Discover how to send multiple booking appointments from WordPress to Google Calendar and Gmail automatically using Make integration.
Before you start, check the tutorial requirements:
- Make account
- JetAppointment plugin installed and activated
- JetFormBuilder plugin installed and activated
When users book appointments, it’s helpful to sync them with Google Calendar and send email notifications automatically. You can connect the JetAppointment plugin to Google Calendar and Gmail using Make (formerly Integromat) to fully automate this workflow.
In the How to Add Appointments to Google Calendar and Gmail tutorial, you can learn how to add appointments to Google Calendar and Gmail. However, with the Multi-booking option, you need to set up Make differently.
Set up Make
Make is a no-code automation platform that lets you connect apps and build visual workflows to automate tasks and data between services.
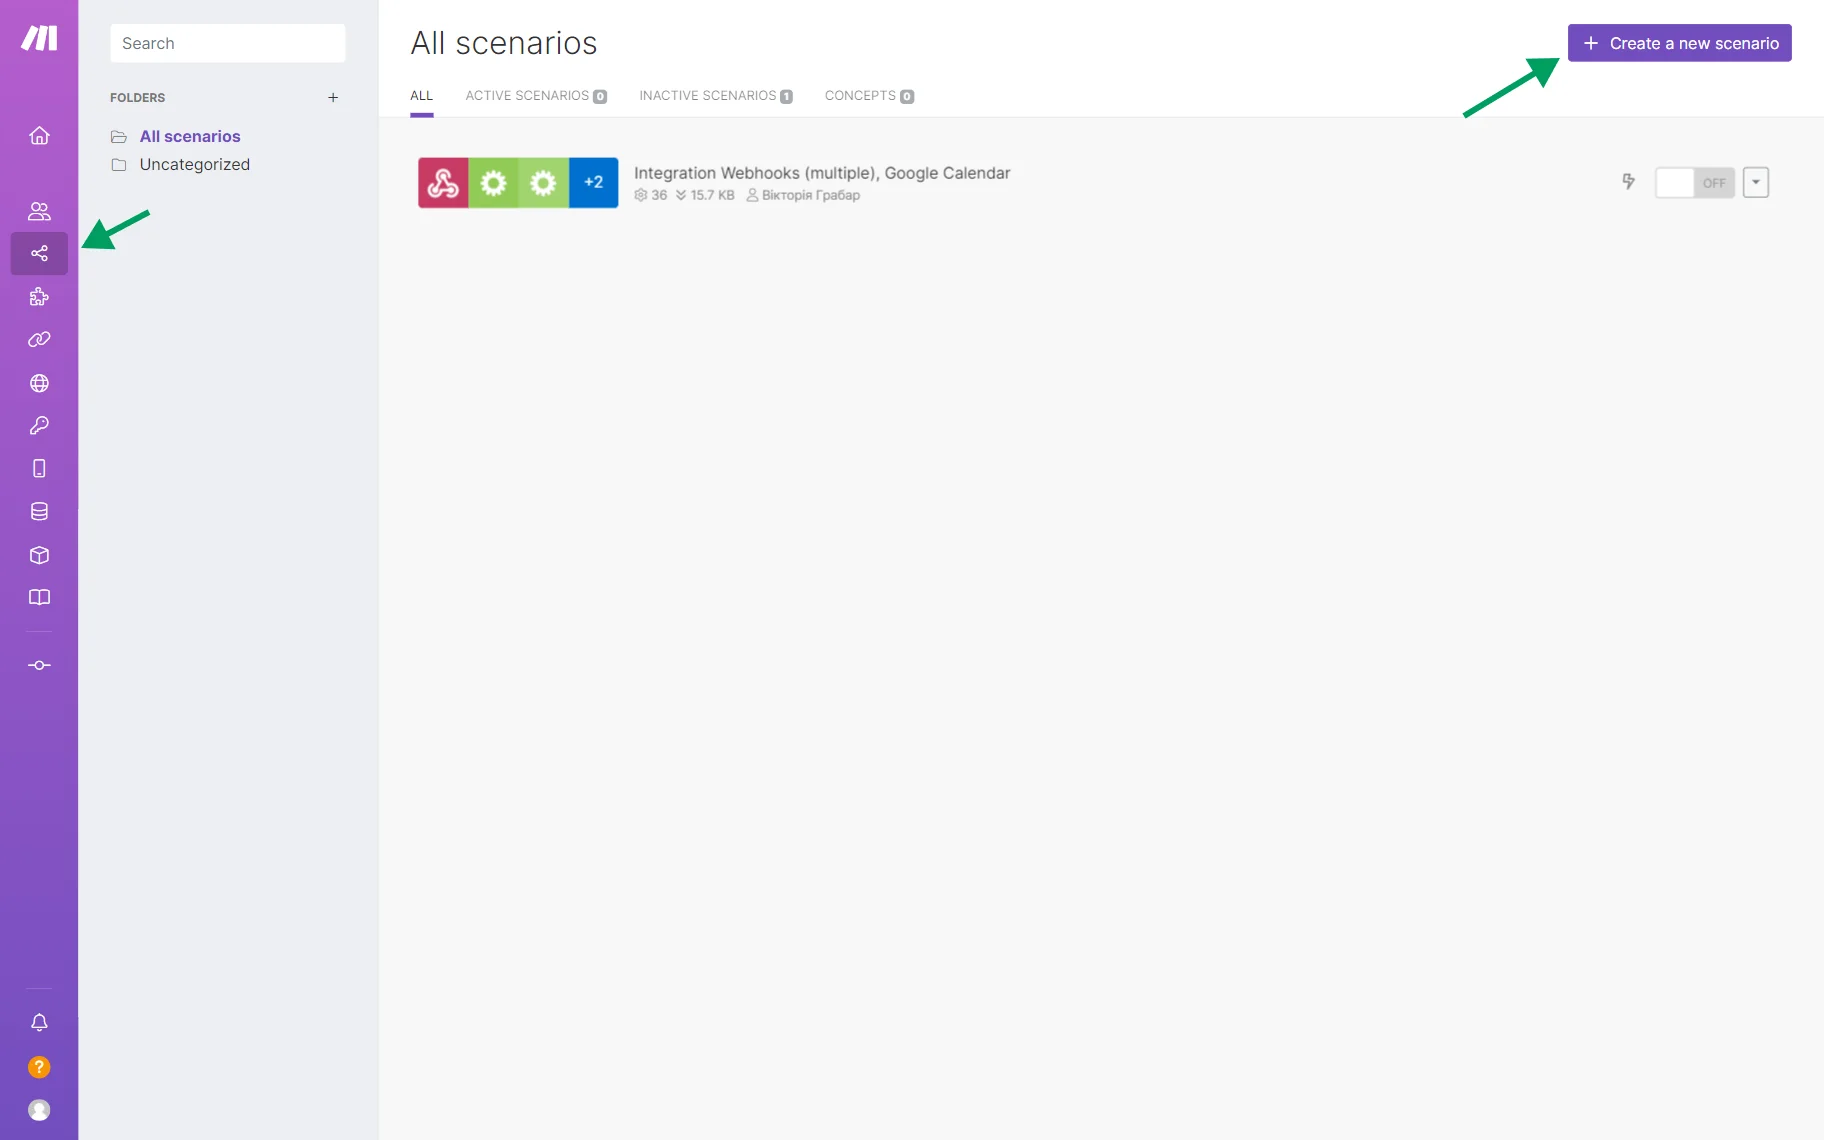
Sign in or create an account on the Make platform. Once you’re on the My Lab page, open the Scenarios tab from the left-side menu and click the “Create a new scenario” button in the upper-right corner.
Hit the big “+” button and choose the “Webhooks” module from the list of tools.
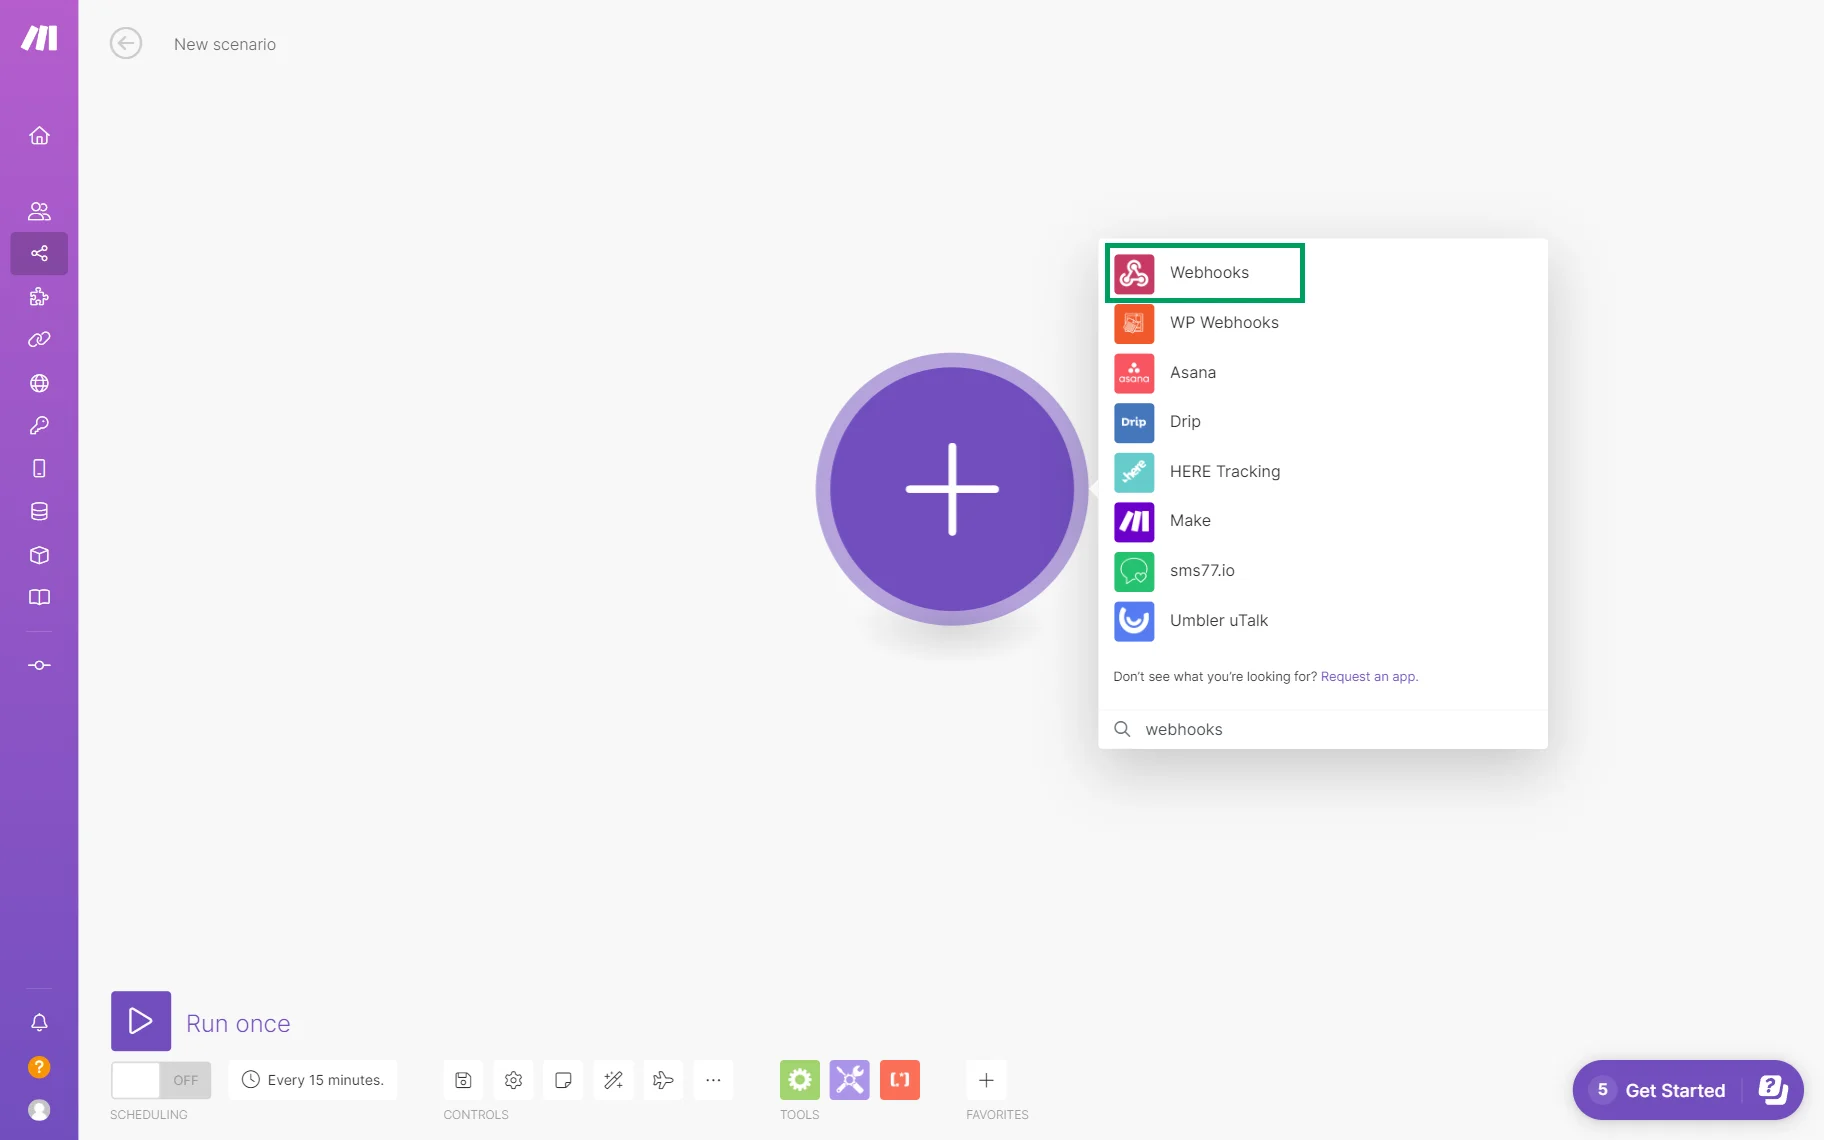
Then, choose the “Custom webhook” from the list of triggers and actions.
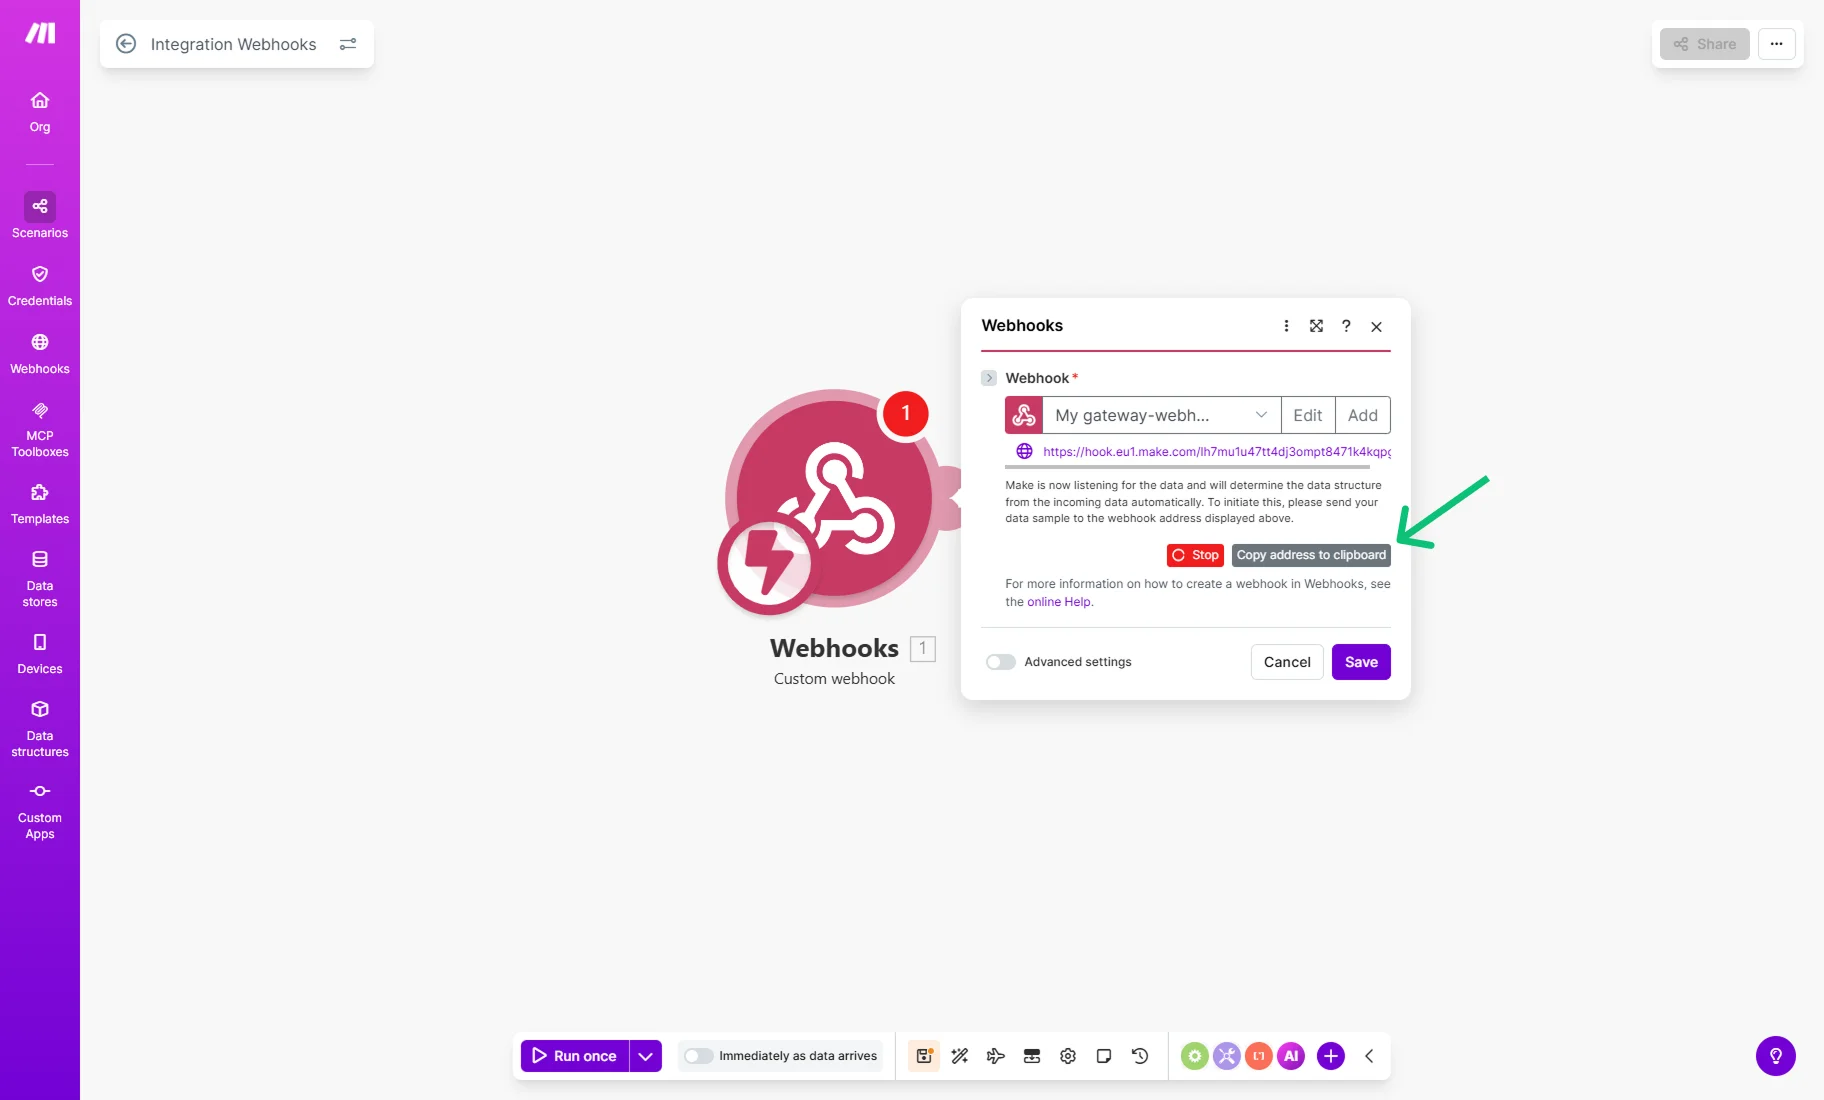
In the Webhook dropdown, select a “My gateway-webhook webhook” option (or add a new one) and press the “Copy address to clipboard” link. Then, proceed to your WordPress website without closing the Make window.
Set up the Appointment Form
A detailed guide on creating JetAppointment forms from scratch can be found in our How to Set Appointment Booking Forms guide.
If you already have such a form, edit the one you want to connect with Make in the WordPress Dashboard > JetFormBuilder > Forms tab.
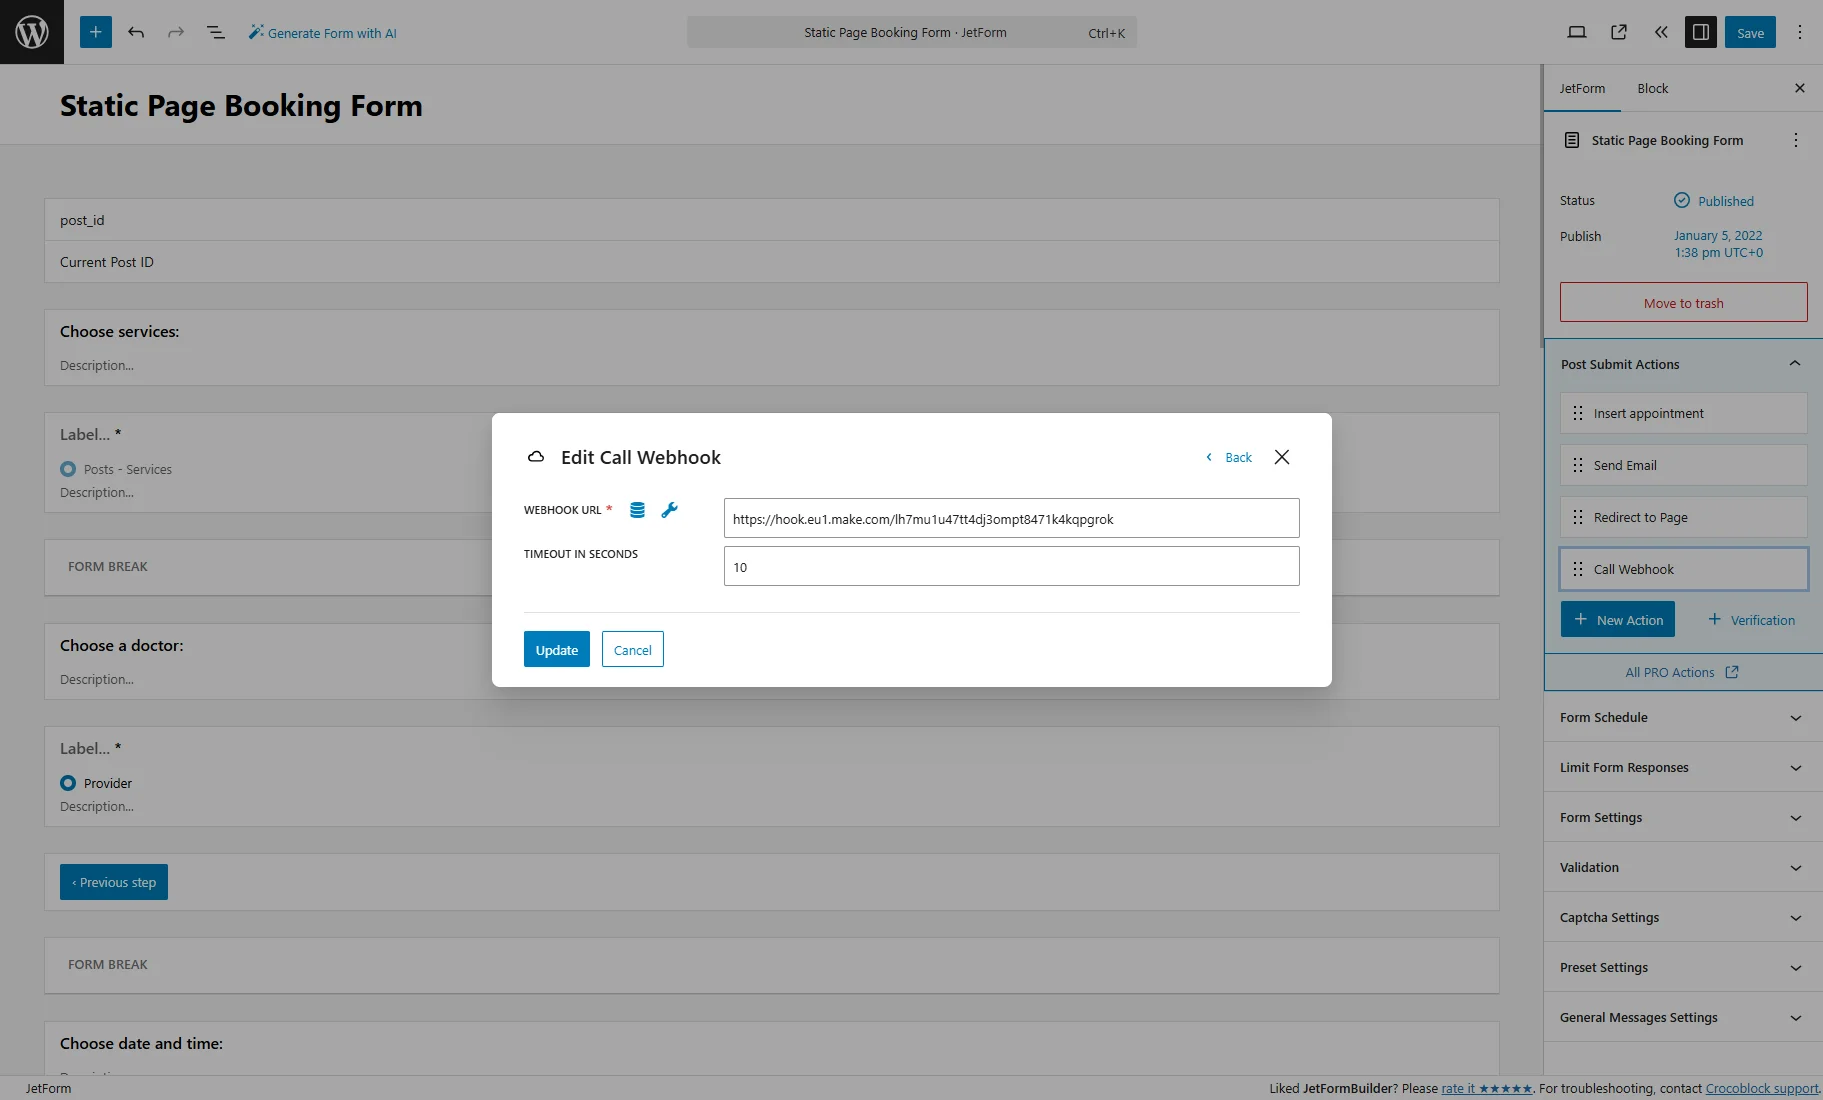
In the Post Submit Actions block, click the “+ New Action” button and choose the “Call Webhook” Type.
Paste the link to the Webhook URL field and hit the “Update” button to save the changes.
Navigate to the front-end page with that form and submit it. After that, you should see the “Successfully determined.” note in the Webhooks. Hit the “Save button.

Adding the Google Calendar Module
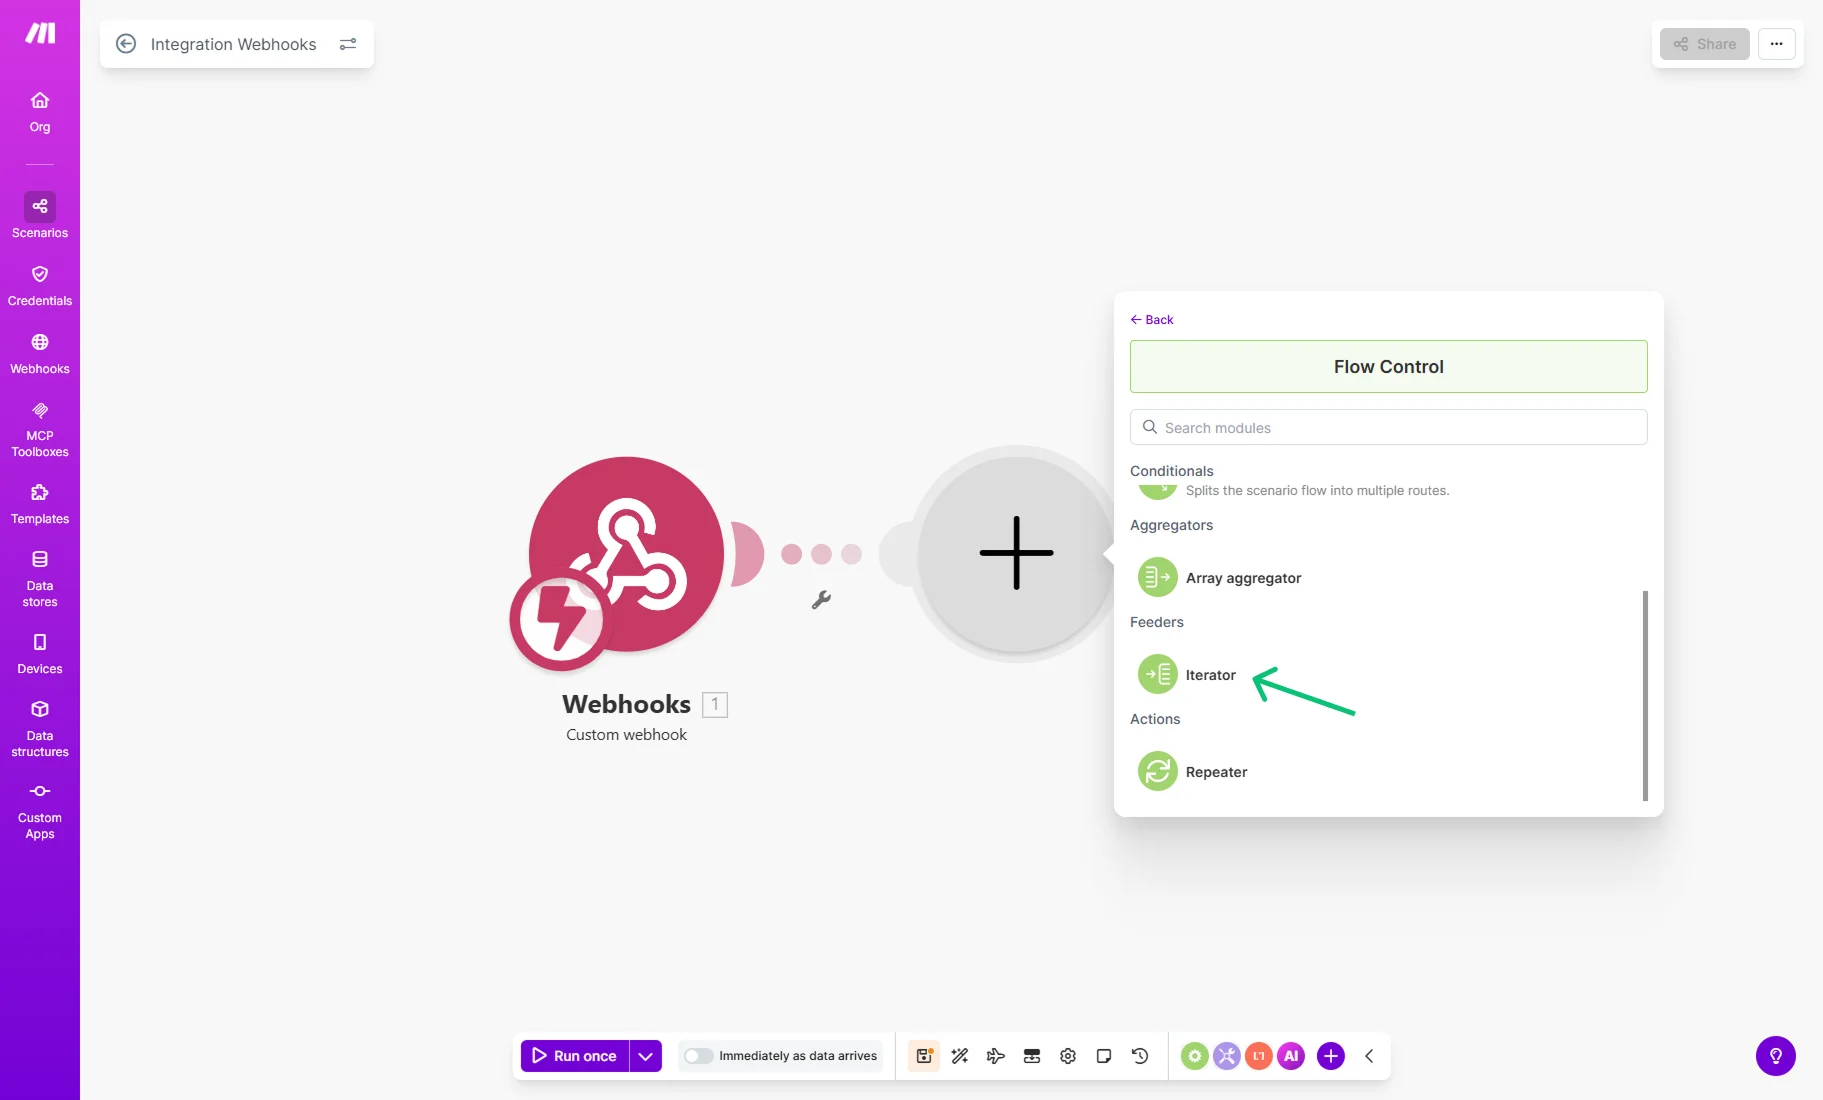
Next, click the “Flow Control” button in the Tools panel and drag and drop the Iterator module or add the Iterator via the “Add another module” button.
The Iterator is an interface that provides access to the elements of a collection (array or container) and navigation through them.
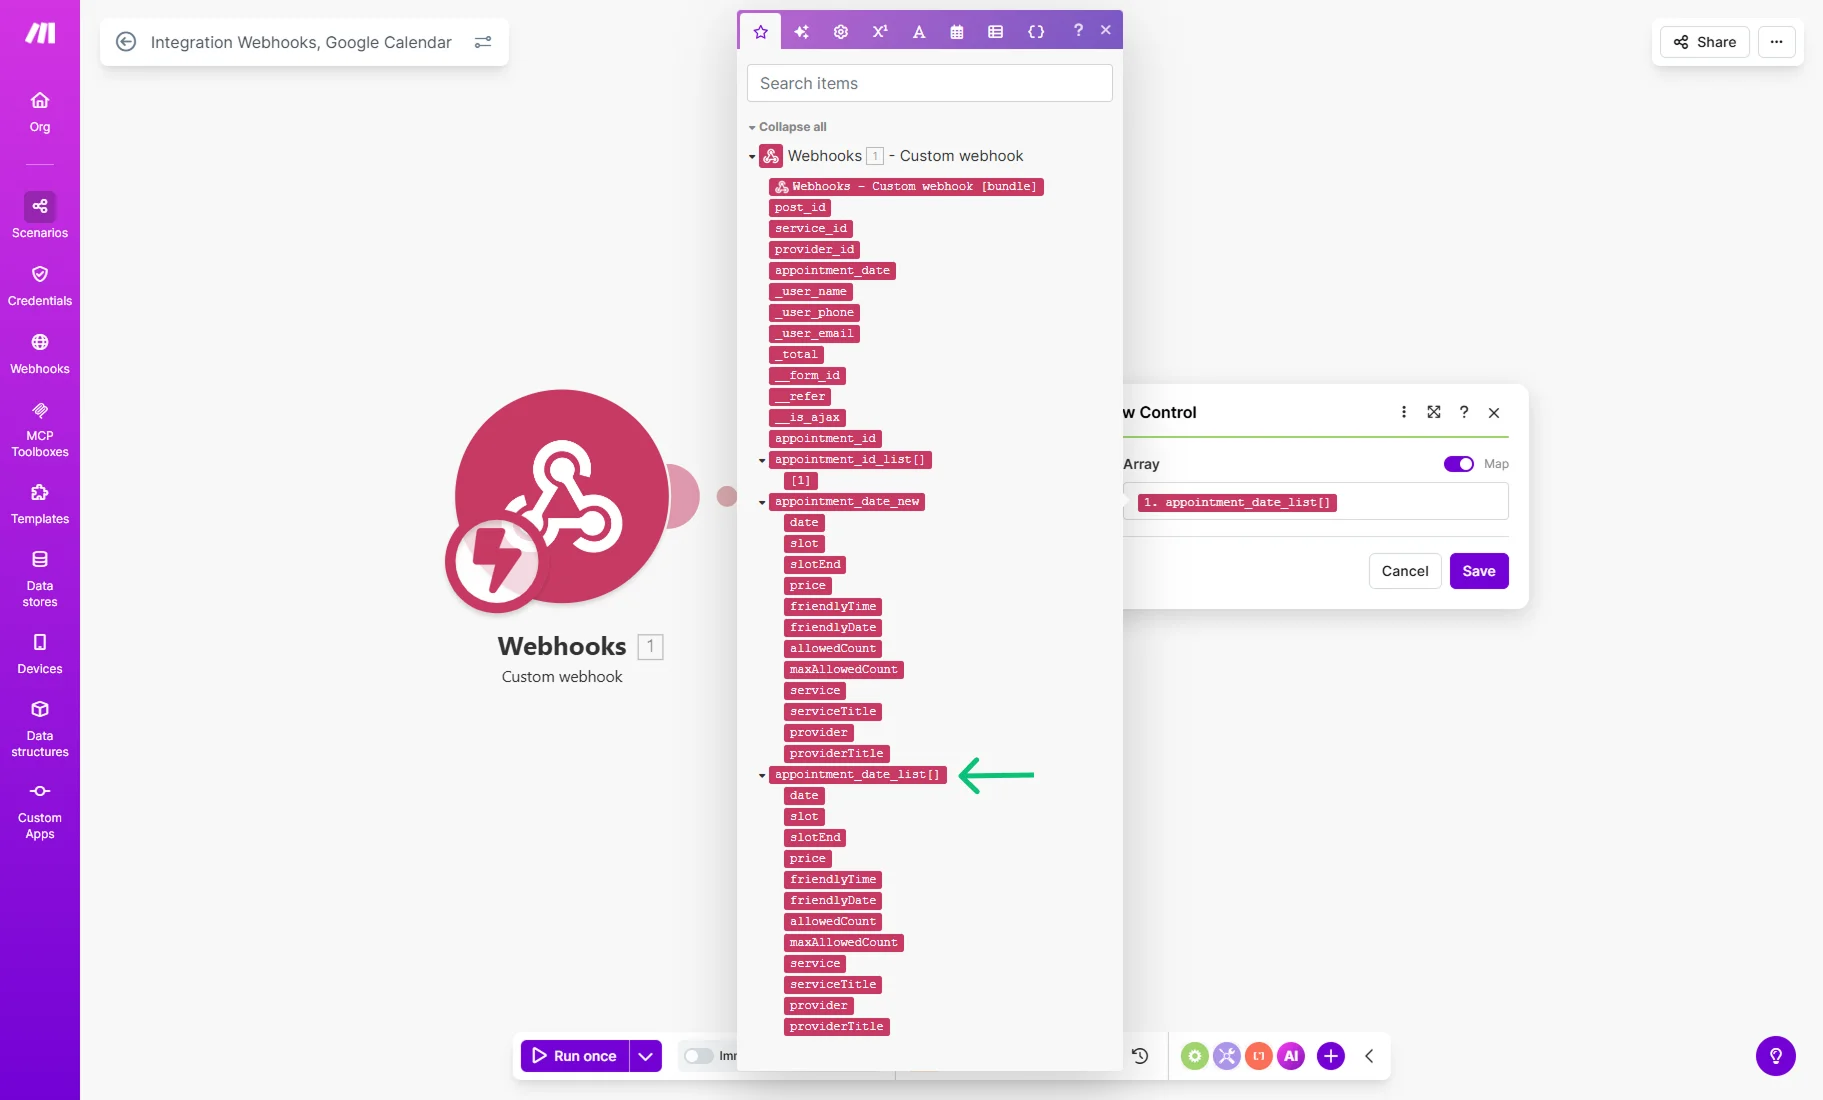
In the Array dropdown, select “appointment_date_list” — this value corresponds to the appointment date field in your form. Then click the “Save” button.
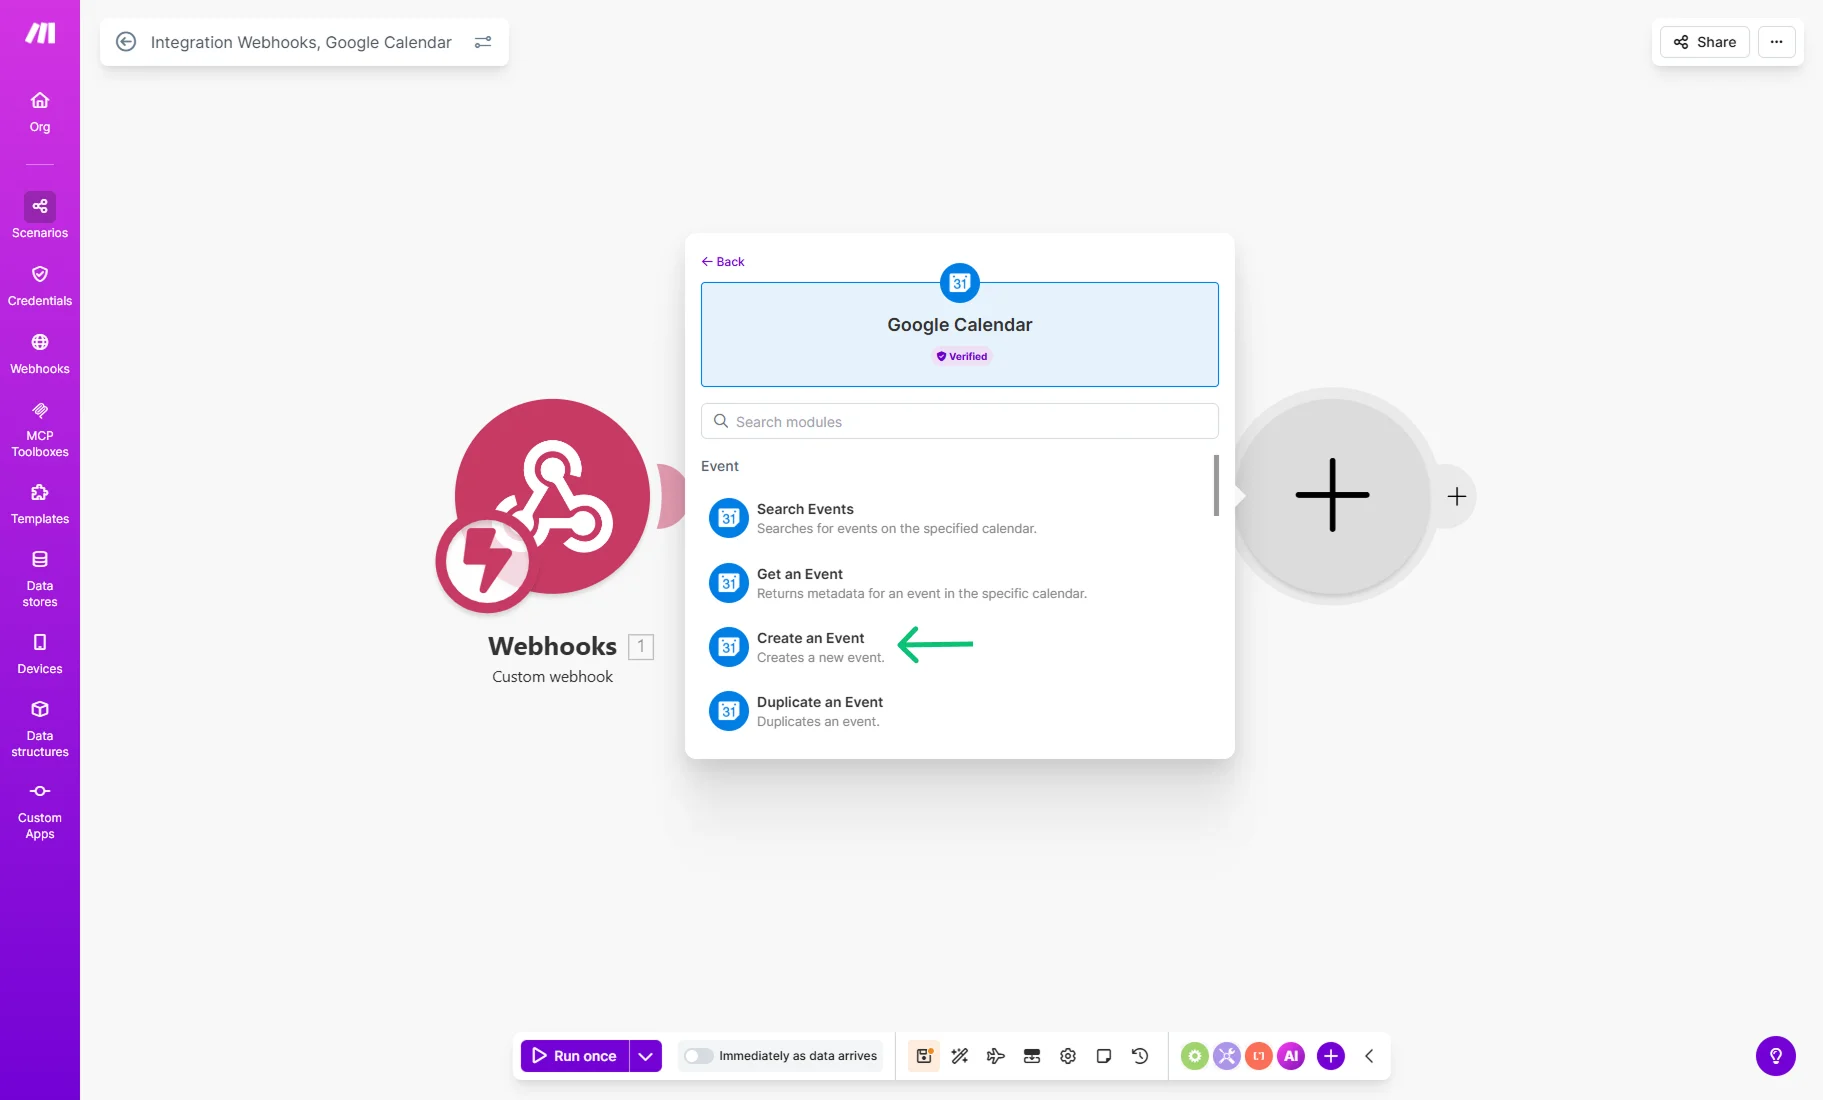
Click the “Add another module” button, insert “Google Calendar,” and choose the “Create an Event” action.
Click the “Add” button near the Connection bar and connect Make to the Google account.
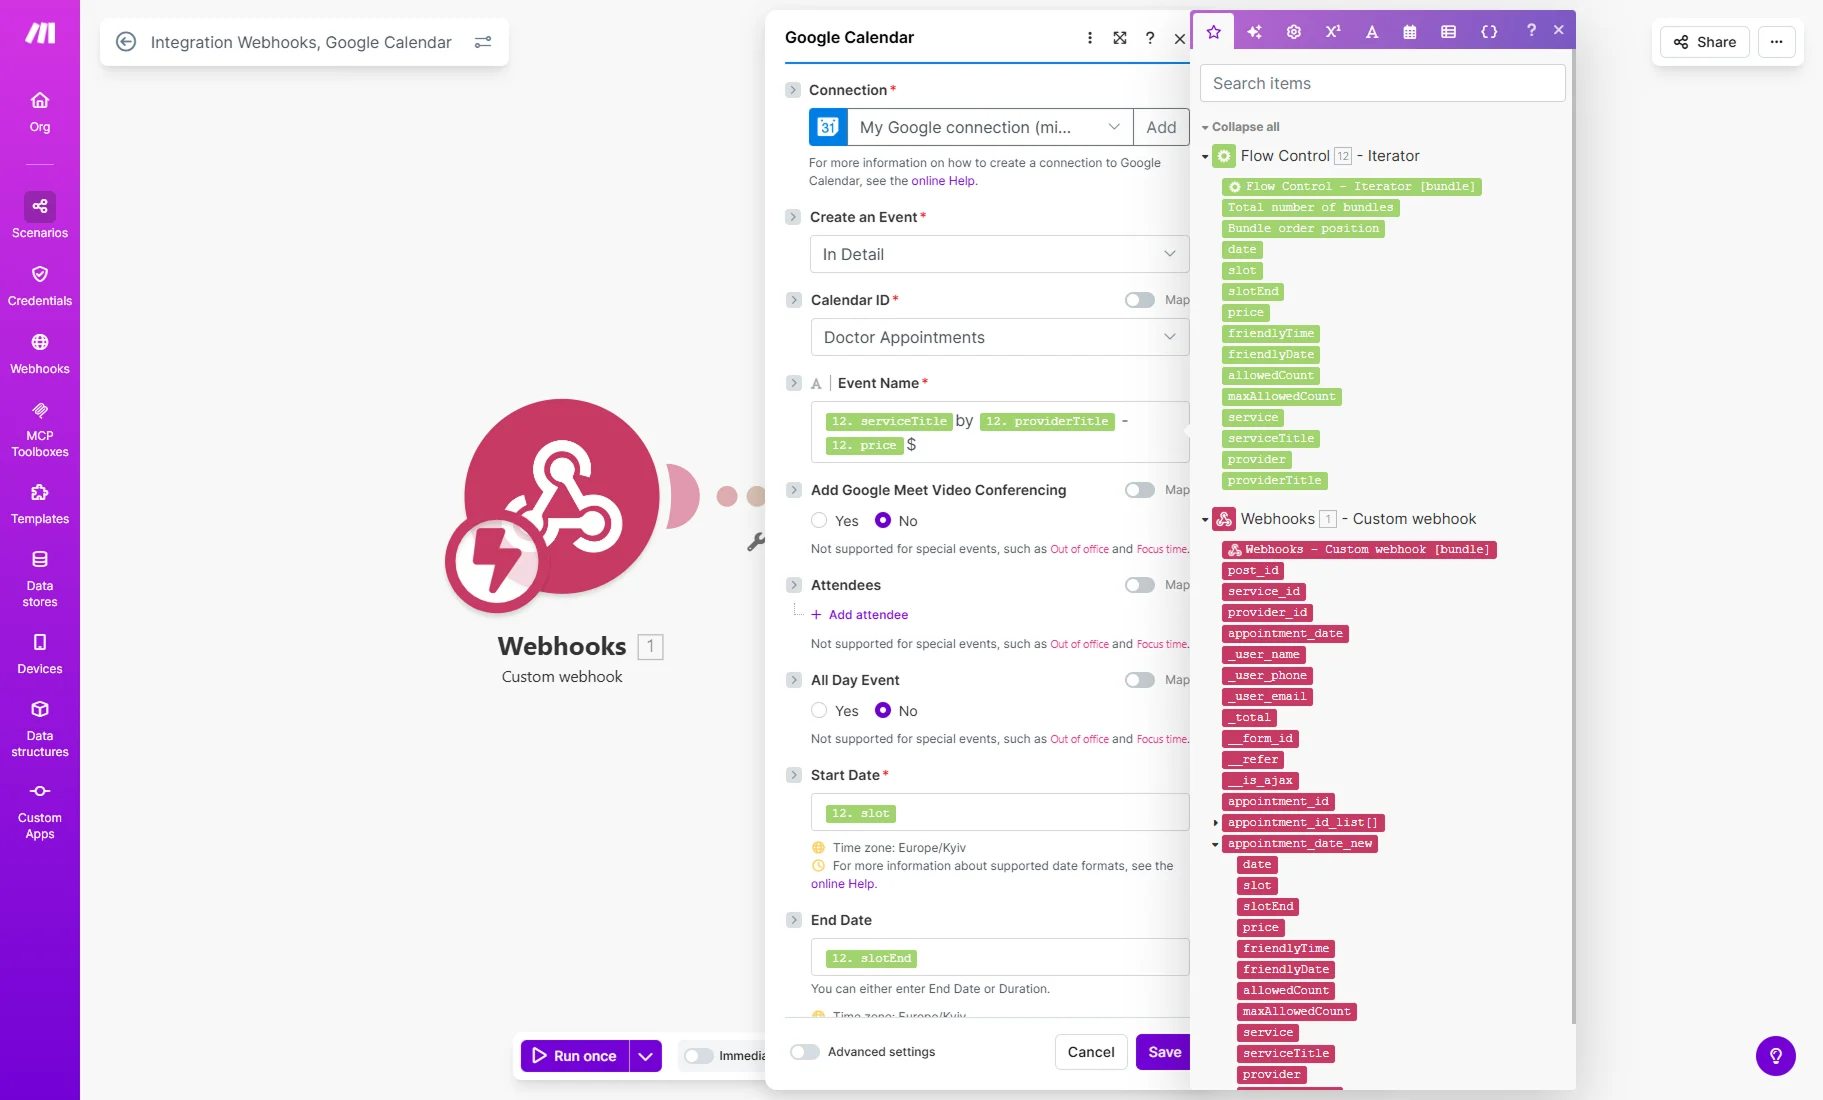
In the Create an Event dropdown, select the “In Detail” option.
In the Calendar ID dropdown, pick the required calendar from your Google Calendar account (“Doctor Appointments” in this example).
As the Event Name, choose as many items from the “Flow Control – Iterator” section from the pop-up as you want, like service and provider titles, price, user name and surname, user email, and so on. They will be shown in the Google Calendar slots as additional information about appointments. Note that you need to separate items with spaces, and you can add plain text to customize the slot. The item names are assimilated with the field names from the form that is connected with the Webhook.
For example, it can be: ”serviceTitle by providerTitle — price$”
Drag and drop the “slot” item to the Start Date field and the “slotEnd” item to the End Date field. The “slot” and “slotEnd” items work for appointments with the time frames, but if you need to book an event only by days (not by hours), you need to drag and drop the “date” item.
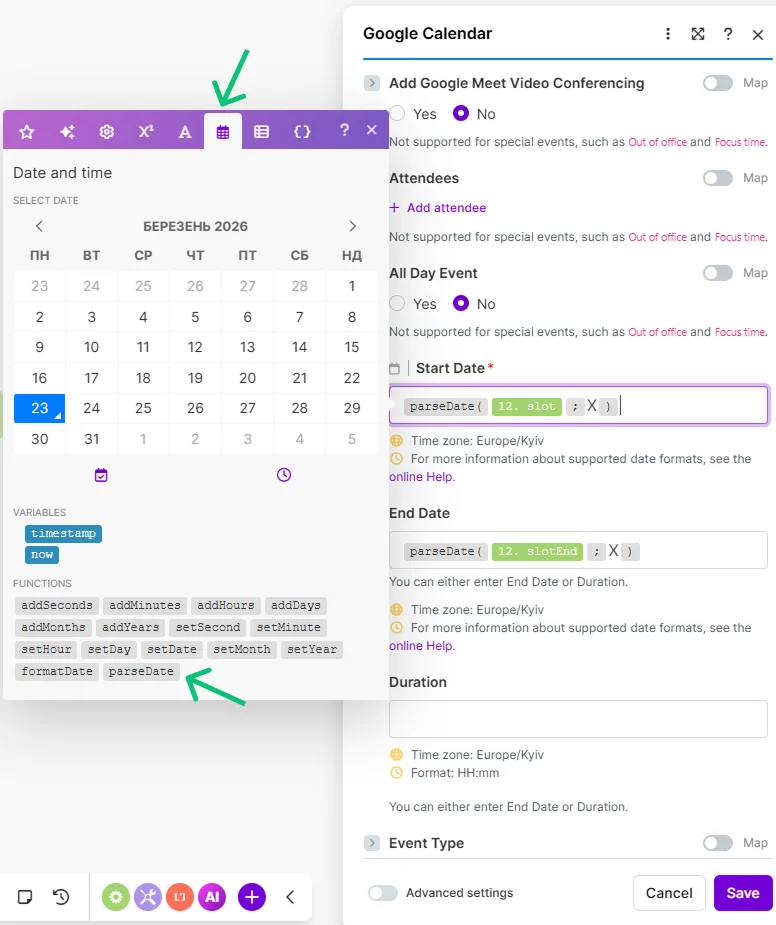
Since the date and time are saved in the timestamp, they need to be parsed. Click on the “Date and time” icon in the pop-up and drag and drop the “parseDate” function to the Start Date and End Date fields.
Prescribe the dates in such a way: “parseDate ( slot ; X )” and “parseDate ( slotEnd ; X )”.
“X” is the Unix timestamp (the date format of the input). More information can be found in the Tokens for date/time parsing article.
Click the “Save” button in the Google Calendar module when you finish. Also, save and run the scenario by setting up the schedule.
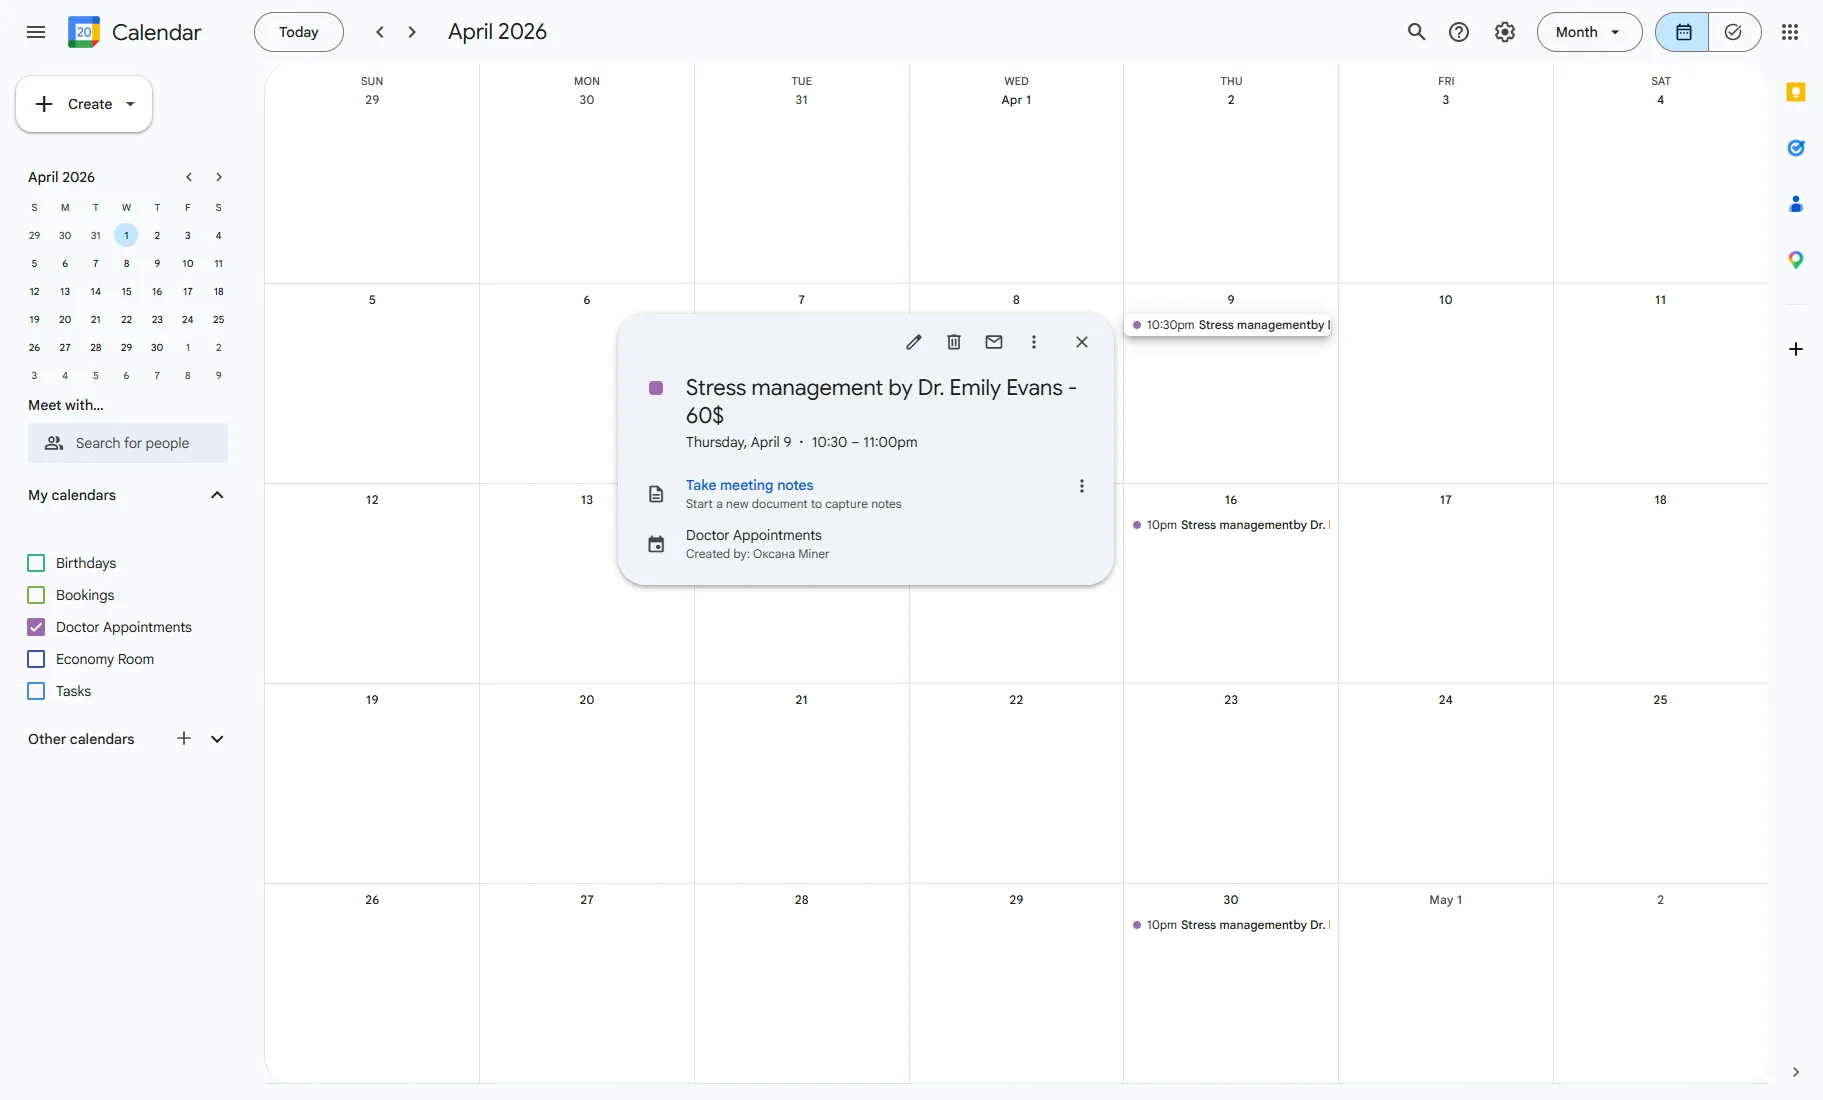
Now, go to the Google Calendar service. After you run a new scenario, the multi-booking appointments will appear in the schedule.
Adding the Gmail Module
To send multiple appointment information via email, you can set a “Send Email” post-submit action in the JetFormBuilder form. Additionally, check the Macros Guide for JetAppointment.
Alternatively, you can add a Gmail module.
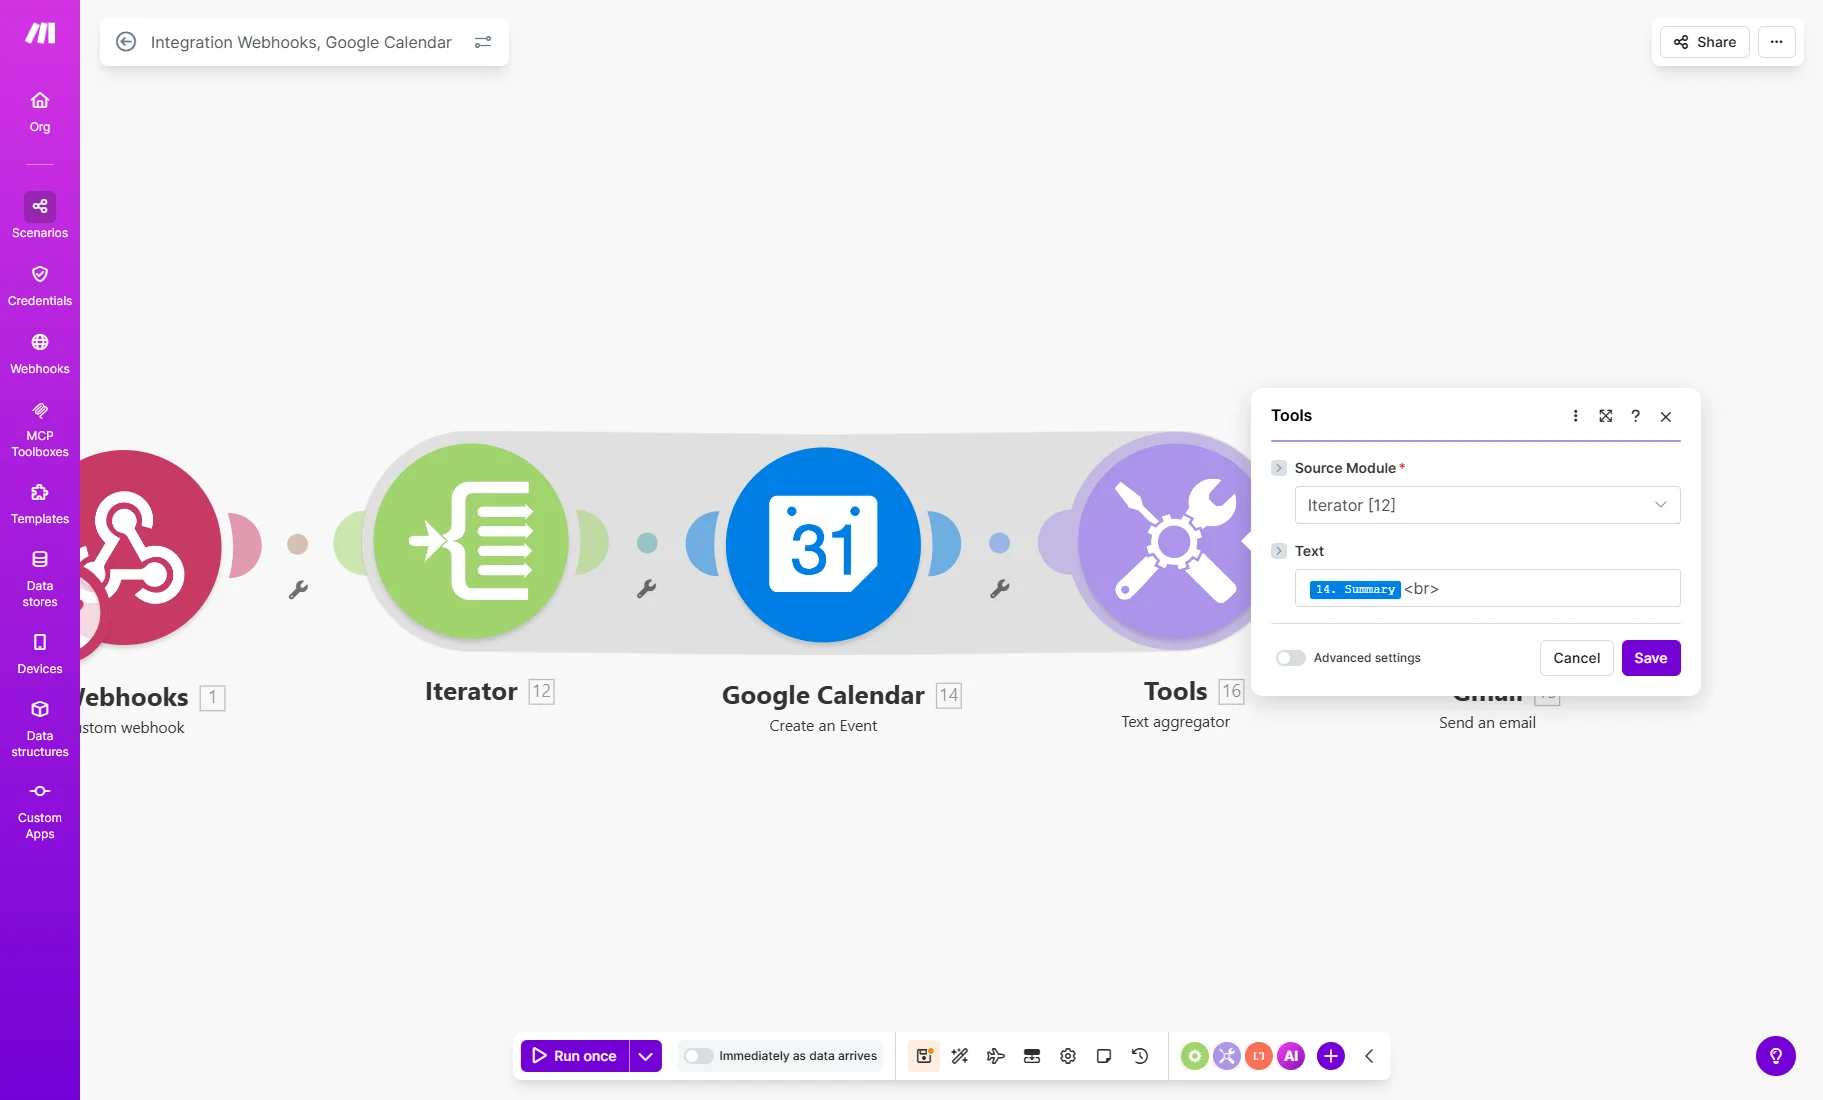
For that, first, press the “Add another module” button and add the Text aggregator tool. It collects the individual items from the Iterator and merges them into a single block of text. This ensures the user receives one summary email with a full appointments list instead of multiple separate messages.
In its settings, select “Iterator” as the Source Module. In the Text field, add the “Summary” item from the Google Calendar module. You can also add the <br> tag after the item to list appointment details rather than put them on one line.
Press the “Save” button.
Then, push the “Add another module” button again, select “Gmail” and “Send an email” action.
Click the “Add” button near the Connection bar to connect Make to the Gmail account.
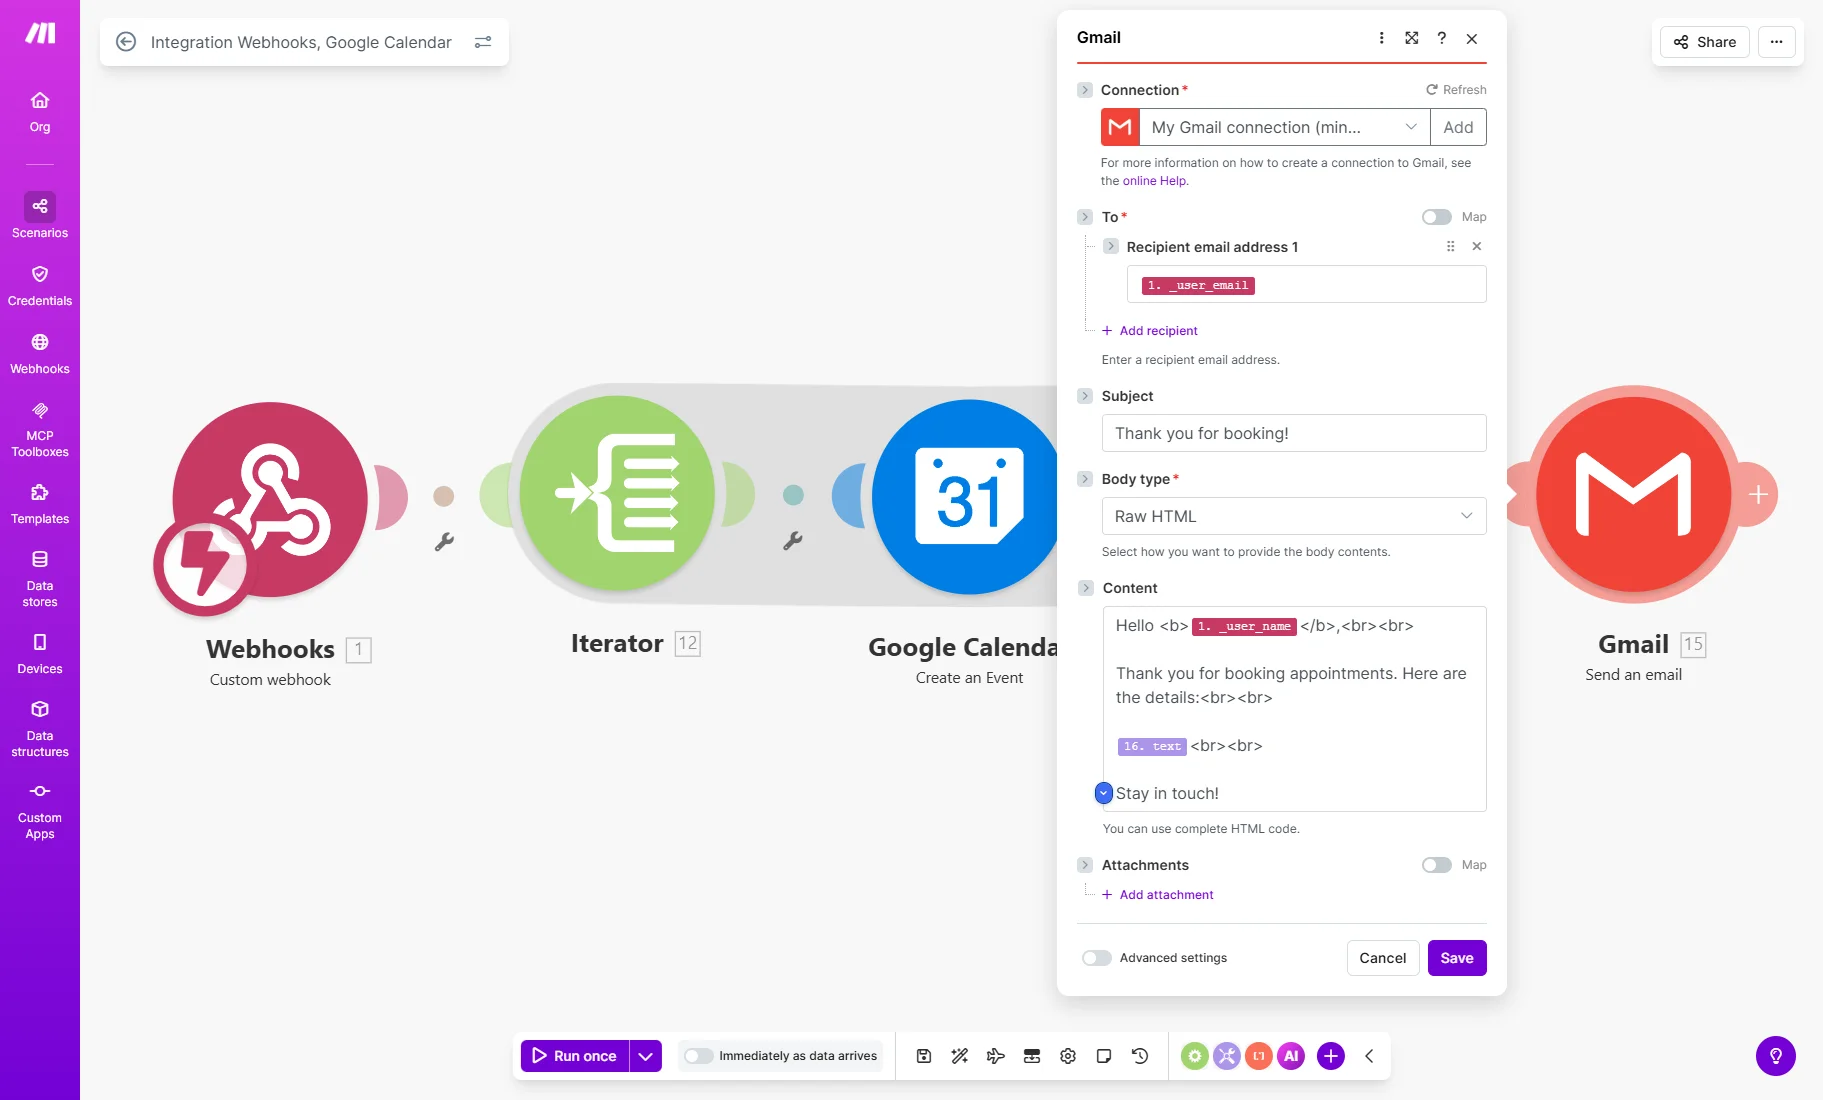
In the To field, press the “+ Add recepient” button to add the Recipient email address. In the first field, insert the “user_email” item that is connected to the form field where the user enters their email address, and in the second field, you can enter the admin email if needed.
Customize the Subject as desired.
In the Body type dropdown, select the “Raw HTML” option.
In the Content field, adjust the email body using plain text, HTML tags, and items. The “text” item from the Text aggregator will show multiple appointment details.
We customize the Content like this:
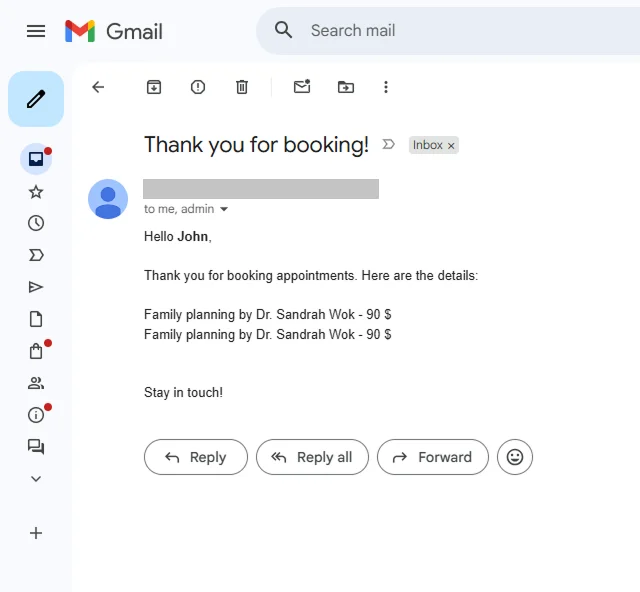
Hello <b> ‘_user_name’ </b>,<br><br>
Thank you for booking appointments. Here are the details:<br><br>
‘text’ <br><br>
Stay in touch!
Hit the “Save” button to save the Gmail module settings, save the scenario, and run it.
After the form submission, the user will get an email with all details, even if they book multiple appointments.
FAQ
The Iterator processes each booked appointment separately, allowing Make to create individual Google Calendar events for every selected time slot.
JetAppointment sends appointment dates as Unix timestamps. The “parseDate” function converts them into a readable date and time format that Google Calendar can recognize correctly.
The Text Aggregator combines all booked appointment details into a single message, so users receive one summary email instead of multiple separate emails.
Yes, each selected appointment slot is created as an individual Google Calendar event automatically through the Make scenario.
No, this setup supports only one-way synchronization from the WordPress website to Google Calendar and Gmail, because the Make scenario only sends data from the WordPress website to external services.
That’s it. Multiple appointments created on your WordPress website with the JetFormBuilder form will now be saved in separate Google Calendar time slots. Both you and your users can receive email notifications for each booking.