How to Create a Countdown Timer
This tutorial explains what steps you have to take to create a Countdown Timer with the help of the JetElements plugin.
Countdown Timer widget of JetElements is a perfect tool for adding a timer with a countdown to your website. Due date countdown shows both you and your users exactly how much time it is left to the specific event or to finish some task or project. A website countdown timer can increase sales of an online store or improve the user experience of a blog. You can use the Countdown Timer widget for different purposes, everything depends on your needs.
From this tutorial, you will learn how to create a countdown timer for your website in a few clicks. Let’s start.
1 Step — Activate Countdown Timer widget
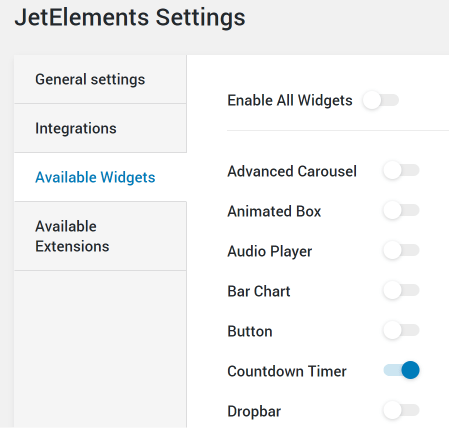
First of all, make sure that you’ve activated the Countdown Timer widget. To check this, open your WordPress Dashboard and navigate to the JetPlugins > JetElements Settings > Available Widgets and turn on the Countdown Timer widget.
2 Step — Add and customize a Countdown Timer widget
After that, open the needed page in Elementor and drag-n-drop the widget to the section where you want to place it.

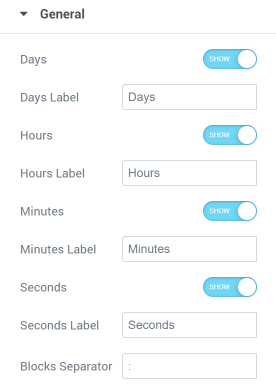
In the General settings block, you can enable or disable Days, Hours, Minutes, and Seconds in your widget, and choose Labels for them. That’s a great option because you can remove every single element in the countdown timer. Moreover, you can add a Blocks Separator option if you want to see any.
Actions After Expire drop-down menu allows you to choose what happens when the timer stops. Redirect means that the user will be sent to another page. You also can choose to Show Message or Hide Timer.

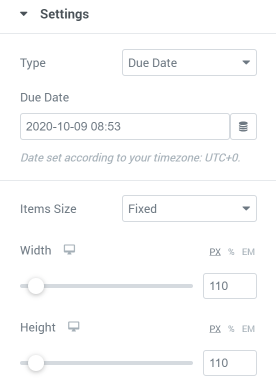
In the Settings menu block, there are options to customize the countdown timer even further.
- Type. Here you can choose one of three types of countdown timers. Due Date will make the timer count time from the moment user opens it to the date you type into the Due Date bar. Using Dynamic Tags, you can choose not a static date but the one filled in by the user. Evergreen Timer will show every user the set number of Hours and Minutes left, no matter when he opens it. Endless Timer allows you to set the date and time of the Start Timer and then will reset it every defined number of Hours and Minutes.
- Item Size. Here you can choose how big will the days/hours/minutes/seconds blocks be. Auto will automatically make the blocks fit the content. Fixed will allow you to choose Width and Height.
3 Step — Do Countdown Timer designing
The last thing here is Style settings. You’re able to style up your website countdown timer according to your needs and taste with the help of different options.
When you’re done with all settings, click on the “Publish” button and preview the results.
That’s all you have to do. Now you know how to create a Countdown Timer using JetElements plugin. Enjoy!