How to Create a Posts Grid
From this tutorial, you will learn how to create and customize the posts grid with the help of the Posts Grid Builder widget of JetGridBuilder plugin and Elementor page builder.
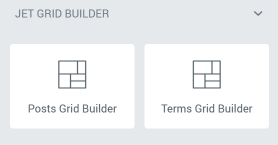
JetGridBuilder has two widgets – Posts Grid Builder and Terms Grid Builder. The process of creating an attractive grid is similar for both of these widgets. The difference is only in the grid items – posts in one case, and terms in another. In this tutorial, we will show all the steps of creating a nice grid using the Posts Grid Builder widget.
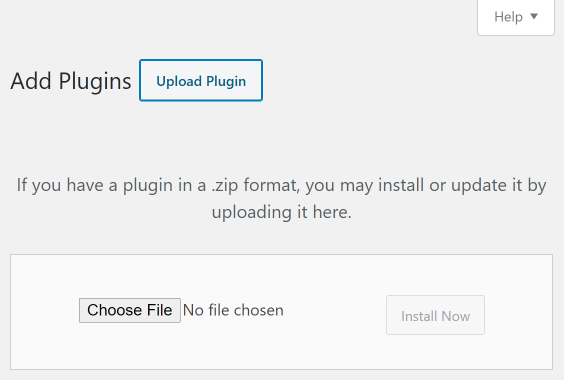
1 Step — Install the JetGridBuilder plugin
After downloading the JetGridBuilder plugin from WordPress.org, go to your website’s WP dashboard and open Plugins > Add New. Click the “Upload Plugin” button and choose the downloaded file from your computer. Be aware that you have to choose the whole ZIP archive, don’t extract files from it. After that hit the “Install Now” button.
When the installation is over, activate the plugin. The grid builder widgets are already added to the Elementor widget menu.
2 Step — Add the Posts Grid Builder widget to the page
Go to the Pages menu tab and find the page where you would like to place a posts grid. Open it in the Elementor editor. In the left-side widget menu, find the Posts Grid Builder widget.
Drop it to the page. If there are other elements on this page, then it would be wise to add a separate section for the grid. As you can see, the grid is empty now.
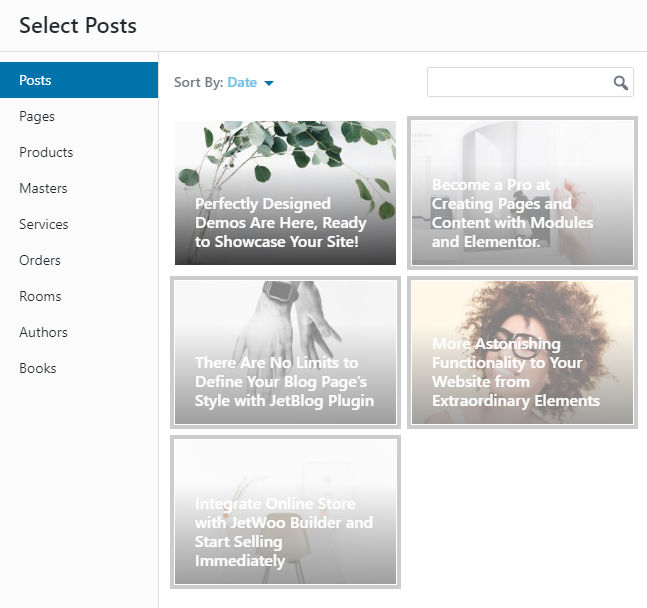
Click the “Add Posts” button and in the opened window choose the posts you want to place to the grid. Click the “Select” button. Now the posts are placed to the grid.
You can easily change the shape and size of posts tile by grabbing its right bottom corner. The grid itself can also be re-sized by dragging the post tiles up or down. That is why you can create any layout you want and add as many posts as you need. Play a little with the number of posts and its dimensions to create a layout that will completely satisfy you.
3 Step — Define the settings
Go to the Content menu tab and open the Grid submenu. If you don’t have any special pre-made listings, you can leave most of the settings here as they are by default. A more detailed guide to all the settings of grid builder widgets can be found here.
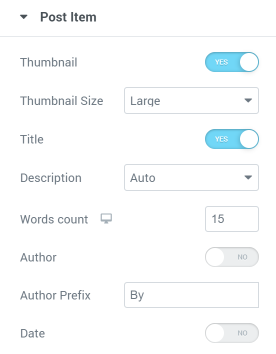
Unfold the Post Item submenu and go through the features. It would be best if you try and play with the switches, including and excluding different parts of the post tile until they match your needs and taste. In our case, we leave only thumbnails and titles on the tiles.
In our example, we’re also going to include a few WooCommerce products to the posts grid. If you also need some, you can choose what to show on the tile in the WooCommerce Product submenu. If you turn all the toggles off, there will be only a thumbnail, a title of the product, and its description on the tile.
4 Step — Create a nice design
In the Style menu tab, you will find the tools to customize each detail of the post tile. The settings for products are all in the WooCommerce Product submenu. Change the fonts, borders, backgrounds, and colors, so the appearance of the grid will match the design of your website. Here’s an example of what you can create after about 10 minutes of work:
When you are done with creating the grid, hit the “Publish” or “Update” button on the bottom of the menu.
Congrats, you’ve successfully created a good-looking posts grid with the help of Elementor and JetGridBuilder. If you need to create a terms grid, the steps will be the same.