Nowadays, the issue of website protection is a necessity. For example, 390,000 WordPress sites are hacked each month, and your website could be one of them, too. Unfortunately, many website owners do not care about website security and face the consequences.
It is important to recognize that today’s cyber threats are evolving and becoming more sophisticated and difficult to detect. This makes the use of advanced security techniques not just desirable but mandatory. Investing in robust security systems, regular updates, and user education can significantly reduce the risk of compromise.
Table of Contents
- Understanding WordPress Site Security
- Benefits of Using Password Protection on WordPress
- How to Protect Your WordPress Site With a Password
- Additional Tips for Strengthening Your WordPress Site’s Security with Password
- FAQ
- Conclusion
Understanding WordPress Site Security
If you do not understand the essence of WordPress security, then your site is bound to fail. It’s not for nothing that we’re talking about security now because WordPress, being the most popular content management system, attracts not only developers and site owners but also hackers.
It is crucial to understand that your site’s security depends on many factors, including the complexity of the passwords used, the frequency of system updates, and the use of specialized security tools.
Above all, the foundation of security is strong passwords and proper user rights management. This is the first and easiest step to strengthening your defense. Next comes regular updates to WordPress versions, themes, and plugins. Updates not only add new features but also fix known vulnerabilities.
Benefits of Using Password Protection on WordPress
Password protection is a simple yet incredibly effective method of protecting your site. If you choose this method, you won’t need to spend much time, money, or effort. However, if you properly implement password protection on your website, you can significantly increase its security level. Even though many people are eager to use password protection, not everyone is fully aware of its deep benefits and subtleties of application. Let’s look at the real reasons to implement password protection on your website:
- Enhanced security: implementing passwords on your website will be like a powerful, impenetrable barrier against unauthorized access. It will effectively neutralize hackers’ attempts and protect your website from all kinds of attacks.
- Precise access control: you will directly choose who will have access and where, you will be able to create exclusive content for selected users or simply hide confidential information. If you come to completely radical methods, you can show content to authorized users only.
- Increased trust and reliability: a strong password protection system will minimize the risk of security breaches and ensure your site runs smoothly without interruptions. Users will notice this and appreciate the ongoing reliability of your platform, which will significantly increase their trust.
How to Protect Your WordPress Site With a Password
If we are talking about securing a WordPress site, then one of the best methods is password protection. We have given its benefits above, and now let’s get down to business – how do you protect your WordPress site with a password?
Method 1: Using WordPress’s built-in password protection for posts and pages
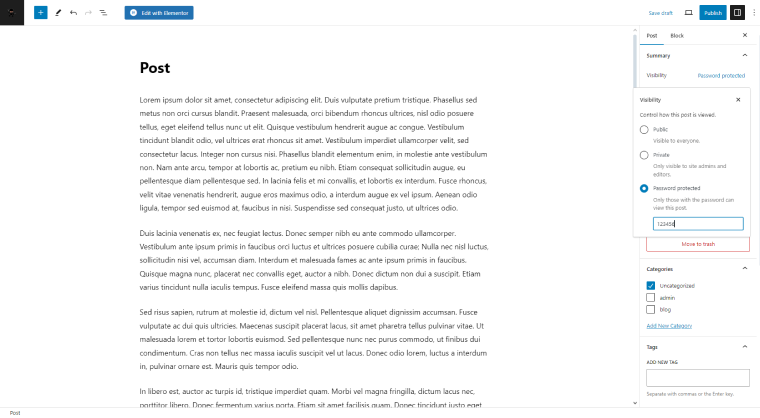
So, let’s move on to the first method, which will help protect individual pages, posts, and WooCommerce products, although it is not objectively suitable for everyone. To activate this method, you need to select the Visibility option on the left sidebar in the WordPress editor and set it to “Password protected.” After entering and saving the password, the content will be accessible only after it is entered on the page. On the one hand, the method is truly reliable and workable, but on the other hand, it is a little rough and not adaptive. Unfortunately, adding a password does not affect the indexing of content by search engines, since they simply will not be able to bypass password protection, which can significantly reduce your site’s visibility in search results.
Method 2: Plugins (role access)
Now, let’s explore the Role-Based Access Control (RBAC) method. Although it presents some complexity, its effectiveness is unparalleled. Essentially, it operates on a principle where access to specific content sections is dependent on whether the user is logged in with the right permissions. By defining user roles and delineating access rights, you can instantly thwart potential hacking attempts. The standout benefit of employing RBAC for security lies in its access management capabilities, offering a nuanced and fortified strategy for overseeing web application assets. RBAC plays a pivotal role in diminishing the vulnerabilities to hacking by implementing several critical safeguards.
- Narrowing of the attacked surface. Fewer pages of the website will be subject to hacker attacks, making it more difficult to cause significant damage to it.
- Protection of key system components. You will be able to hide the most important parts of your site from hackers.
- Preventing the spread of malware. If you have allowed a certain type of user to access the admin panel, you can make sure that they are limited in downloading and activating plugins, which will result in a lower chance of downloading malware.
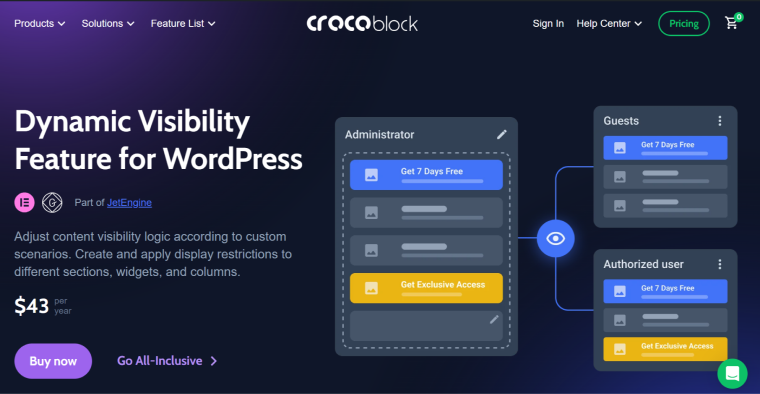
So, let’s figure out how to install and configure this method. First, you need two plugins – JetEngine and User Role Editor. If you go to Users > User Role Editor, then in the drop-down list, you will see a tab – “Admin,” “Customer,” and others. You can add any roles here and then manually add them to users by providing their unique content.
After that, go to Elementor and select the page you need. I would like to note that with the help of this method, you will be able to close only the CONTENT but not the entire page, but even in this way, you will significantly increase security. Click on the element that you want to hide from unwanted eyes (for example, product grid or other content) and go to Advanced > Dynamic Visibility > Enable. After that, you will need to set a condition – go to “Show element if condition met” and select User logged in / User not logged in. Then select what content will be shown to those logged in and those not registered; it is best to show the second party the inscription “Log in to your account.”
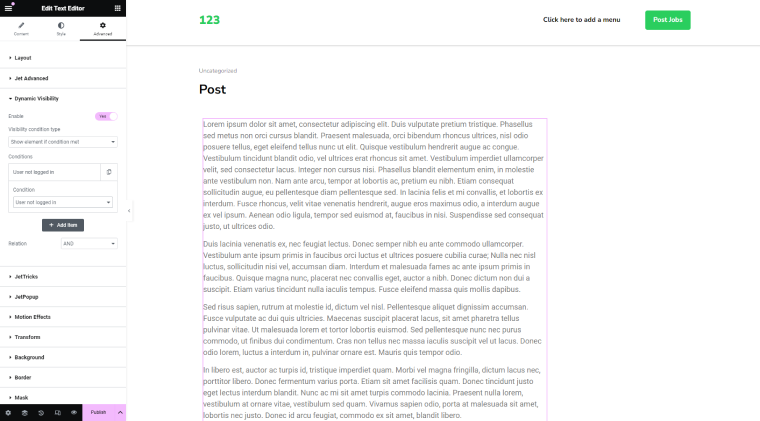
If you want to customize access to different parts of the content, configure the condition as follows – Show element if condition met > User Role is – and then select the role you need to whom you want to show the content.
Method 3: Using a website firewall for enhanced security
We present to you one of the most reliable protection methods – a firewall with additional authentication. Such a web firewall will protect your site from threats such as SQL injections, cross-site scripting (XSS), cross-site request forgery (CSRF), DDoS attacks, and many others. Also, thanks to this method, users will be required to enter an additional password to access certain parts of the site, making it more difficult for hackers to launch an attack.
The main steps include:
- Choosing a web firewall: determine which web firewall fits your needs and your site. Among the popular ones, we can highlight Sucuri, Wordfence, and Cloudflare.
- Configuring traffic filtering: set up the web firewall to filter suspicious traffic and block any kind of threats. Usually, firewalls offer you a direct automatic setup.
- Enabling password authentication: configure the web firewall to require password authentication to access certain sections of your site. Ideally, this should be the admin panel or pages with confidential information; if you want to be more cautious, you can close the entire site to unauthorized users.
- Regularly updating passwords: ensure that passwords are complex and regularly updated to minimize the risk of them being hacked.
- Monitoring and security audit: we advise regularly conducting audits and checking the security logs and firewall settings to respond as quickly as possible in case of any threats.
As you see, using a web firewall with a password authentication feature not only helps protect your WordPress site from a wide range of threats but also adds a level of security. This method suits websites containing confidential data or important corporate information.
Method 4: Two-factor authentication (2FA)
Now, let’s move on to the fourth method – two-factor authentication (2FA), which requires users not only to enter a password but also to confirm through a response to a question, SMS, or a second password. This will strengthen your defense and create an additional barrier for potential breaches.
To enable 2FA on a WordPress site, you can use various plugins, such as Google Authenticator, Duo Two-Factor Authentication, or Jetpack. Download the plugin, activate it, and configure 2FA settings so that when you log into the admin area, you will need to go through another authentication step.
Method 5: Manual coding
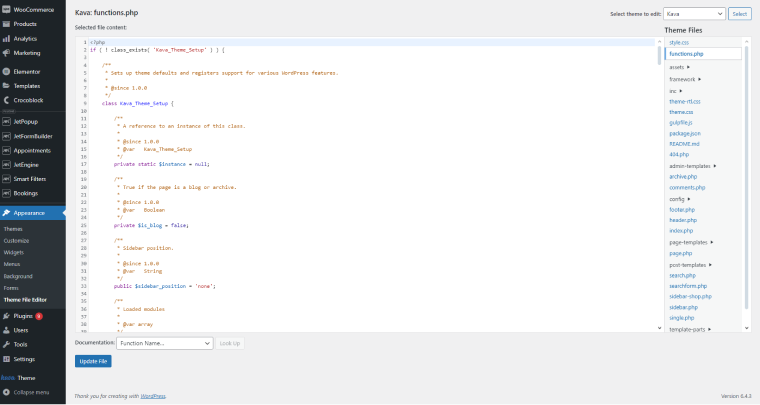
If you’re wary of plugins and prefer to have full control, this approach is tailor-made for you. It involves hand-picking content to display, reserved only for those with the proper access. This method delves into coding, yet there’s no need for concern—we’ve got you covered. Just go to the WordPress admin panel > Appearance > Theme File Editor. In the opened tab, open the functions.php file and paste the following code into it:
add_action('template_redirect,' function () {
    // Define the restricted role
    $restricted_role = 'basic_role';

    // Define other permitted roles
    $permitted_roles = array('administrator', 'advancedlevel');  // Add other permitted roles as needed

    // Get the current post ID and post type
    $post_id = get_queried_object_id();
    $post_type = get_post_type($post_id);

    // Check if the post is of type "post" and belongs to the "Adv" category,
    // The user has the restricted role and does not have any other permitted roles
    $user_roles = wp_get_current_user()->roles;
    if ($post_type === 'post' && has_category('advanced_category', $post_id) && in_array($restricted_role, $user_roles) && empty(array_intersect($permitted_roles, $user_roles))) {
        // Display a message and exit
        echo '<p style="margin: 30px; font-family: Roboto, sans-serif; font-size: 20px;"><b>Sorry, your role has expired </b></p><p style="margin:30px; font-family: Roboto, sans-serif; font-size: 15px;"><a href="/">Back to Home page</a></p>';
        exit;
    }
});
What does this code do?
- It closes the “advanced_category” category for users with the “basic_level” role.
- At the same time, it checks if the basic_level user has any other roles, particularly administrator and advanced level; if so, it does not close (since these roles allow them to have access).
- If someone does not have access, it shows them a message.
Additional Tips for Strengthening Your WordPress Site’s Security with Password
We’ve analyzed the five best methods for protecting a WordPress site with a password, but now a perfectly logical question arises: can the protection be further enhanced, and what should be done to do so? Here are a few suggestions:
- Customize standard links: to prevent hacking, you can customize regular links, for example, domain.com/wp-admin, to make it more difficult for an attacker to understand how to enter the admin area.
- Use strong passwords: only create strong passwords using generators so that they cannot be cracked by password-guessing programs.
- Change passwords regularly: update passwords periodically for greater security, ideally every 3-6 months.
- Conduct security audits: you should regularly perform security audits to immediately identify any vulnerabilities and eliminate them at once.
- Delete the unnecessary: we advise you to delete plugins and widgets that you do not trust and that do not have a sufficient reputation. Unfortunately, many unpopular plugins often use malware to attack WordPress sites.
FAQ
Yes, adding a password directly affects your SEO, as search engines will not see your protected content. However, this does not apply to the entire site; it only applies to the parts that are password-protected.
It is recommended to regularly change your password every 3-6 months or immediately after a data leak is suspected.
First, you must change all passwords, reinstall all systems and plugins, and check the site for malicious code.
Conclusion
Password-protecting your WordPress site can be a tangible defense measure against hacker attacks and break-ins. The most important thing is to choose a method that will be effective and integrate well with your website’s concept.
