Quizzes are so involving and even addictive, aren’t they? But it’s such a big question whether your customers will be involved in all of your creative ideas, even the most amazing ones. I don’t know, and no one can guarantee the perfect involvement rate and a perfect outcome.
So, in this article, I’m going to demonstrate to you how you can create a nice and efficient lead-generating form using one of the most powerful free form builders you can find in WordPress – the JetFormBuilder plugin.
BuzzFeed-Style Quizzes: Why They’re Popular & Lead-Generating Ideas to Try
BuzzFeed quizzes come in all shapes and sizes, but let’s be honest – it’s the personality ones with oddly specific titles that really grab you. “Which breakfast cereal are you?” or “Where should your hipster coffee shop be located?” – once you see those, there’s no turning back. Suddenly, it feels like life won’t be complete until you know whether you’re a Frosted Flakes kind of person or destined to brew artisanal espresso in Brooklyn. That’s why they’re so engaging.
But let’s not give all the credit to quirky self-discovery. Quizzes can do more than just entertain – they can also be powerful tools for lead generation. You don’t have to rely only on “Which Disney villain matches your vibe?” to attract visitors to your site. There are plenty of ways to create interactive content that’s both fun and useful for your business.
Here are some quiz ideas that don’t just spark curiosity but also bring in potential leads:
- Estimate cost – perfect for businesses whose pricing depends on multiple factors, such as home renovations, wedding planning, or digital marketing services. A quiz that helps users get a rough estimate based on their specific needs can be both engaging and an easy way to collect leads.
- Find your perfect match – not in the dating sense (unless that’s your industry), but in a way that helps users choose the right product or service. Think “Which skincare routine is best for your skin type?” or “What type of insurance plan fits your lifestyle?”
- How much do you really know? (Trivia quizzes) – they aren’t just fun but can position your brand as an authority. A cybersecurity company could create a “How hackable are you?” quiz, and a fitness brand might do “Are you training smart or just sweating?” The key is making users feel like they need to improve their score (and conveniently, your product can help).
- What’s your style/personality type? – works great for fashion brands, interior designers, and even SaaS companies. “What’s your home office vibe?” or “Which project management style suits you?” keeps users engaged while subtly introducing them to relevant products.
The trick isn’t just coming up with a quiz but making sure it seamlessly leads users to your services. A well-placed email signup at the results page or a personalized recommendation can turn a casual click into an actual lead. Because if someone just spent five minutes figuring out their ideal workout plan, chances are they’ll want to see what comes next.
How to Create BuzzFeed-Style Quiz with JetFormBuilder: Guide
Let’s get down to business. In this section, I will demonstrate how easily you can create an engaging quiz using the powerful JetFormBuilder plugin. It has a free version and comes with over a dozen premium add-ons that extend its functionality. When combined with JetEngine, this form builder turns into a real powerhouse for creating the most complex forms and front-end dashboards.
💡 We also have a smart-looking BuzzFeed quiz form template for those who wish to simply unpack and get going. Check it out!
Adding quiz content
In this example, I will use only JetFormBuilder (without JetEngine) and its free version. For the topic, I chose the very popular “Which Harry Potter house do you belong to?” one.
For demonstration purposes, I will have only four questions and different field types.
Here are my questions and answers; each answer is associated with a certain house (in brackets, but not published, so users will not see the associated houses):
1. What would you see yourself doing at Hogwarts?
(Radio field)
- Leading a group of friends on an exciting adventure. (Gryffindor)
- Helping out in the greenhouse or making treats for everyone. (Hufflepuff)
- Studying ancient spells in the library. (Ravenclaw)
- Secretly mastering powerful magic to get ahead. (Slytherin)
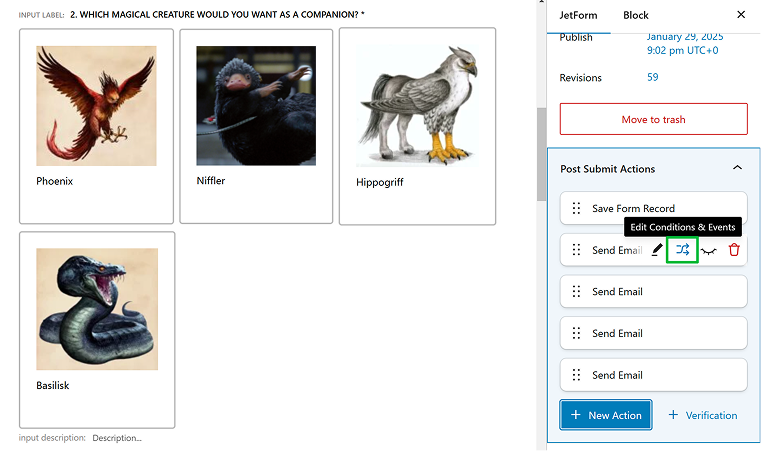
2. Which magical creature would you want as a companion?
(Advanced Choice field, “Images with description” type)
- Phoenix (Gryffindor)
- Niffler (Hufflepuff)
- Hippogriff (Ravenclaw)
- Basilisk (Slytherin)
3. Pick a door that is most appealing to you
(Advanced Choice field, “Images” type)
Here, I will show four pictures of different doors; each door is associated with a certain house.
4. Which magical artifact would you choose?
(Select field)
- A Sword (Gryffindor)
- A Cup (Hufflepuff)
- A Diadem (Ravenclaw)
- A Locket (Slytherin)
As you can see, I used the Advanced Choice field twice, as it has several layouts:
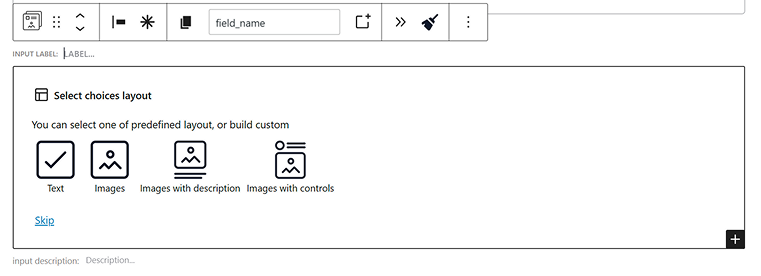
If you choose the “Images with description” type, the process will be the following:
Similarly, I’ve created the “Images” type – it’s even easier, as no text is needed.
After creating these fields, it’s very important to style their Checked states. You can do it by selecting the whole input field section and clicking on the Styling tab on the right panel.
Calculating the results
After adding all the questions, the interesting part comes – as we will need to calculate the result using the points system, we need to assign a particular number of points to each answer. If the user selects this answer, the corresponding number of points will be added to the total score.
At this stage, it’s important to plan how you will calculate the outcome. In my case, I have four Hogwarts houses, and this is the logic I use:
- any answer associated with Gryffindor gets 10 points;
- any answer associated with Hufflepuff receives 20 points;
- any answer associated with Ravenclaw gets 30 points;
- any answer associated with Slytherin receives 40 points.
In total, there are four questions. So, the maximum total numbers will be:
- for those who choose all Gryffindor-associated answers, it is 4×10=40;
- for those who choose all Hufflepuff-associated answers, it is 4×20=80;
- for those who choose all Ravenclaw-associated answers, it is 4×30=120;
- for those who choose all Slytherin-associated answers, it is 4×40=160.
(Later, we will use these total numbers in the Conditional field that displays the final result.)
All of the fields (Radio, Advanced Choices, Select) have an input called “Calculated” that can be used by the Calculated field in the future. Thus, I added points to each answer following the logic I mentioned above and a Calculated field. Don’t forget to make it Hidden (in the settings tab on the right panel).
Calculating and displaying the final result
Let’s create four Conditional Blocks. Each of them will contain a Heading block with the result: “You belong to Gryffindor/Hufflepuff/Ravenclaw/Slytherin.” You can add more (as many as you want) blocks inside the Conditional Block, e.g., images, icons, etc. – any block by JetFormBuilder or Block Editor.
You can use any Block Editor block within any JetFormBuilder form. But you have to style such blocks in Block Editor (unlike JetFormBuilder native blocks that can be easily styled using a JetForm widget for Elementor and Bricks).
That’s why I recommend using third-party block add-ons that not only have prettier blocks than the native Gutenberg ones but also offer more flexibility in styling them, e.g., Kadence Blocks, Ultimate Blocks, Stackable, etc. This list will help to find a good and free one.
Now, let’s set up conditions for the Conditional Block.
Calculating
According to the logic I’ve mentioned above in the “Calculating the result” section, there will be four ranges.
If a user is “pure” Gryffindor, they will get 40 points; if “pure” Hufflepuff – 80; “pure” Ravenclaw gets 120; and “pure” Slytherin – 160.
But what if a user selects mixed answers (not being a “pure” fan of one particular house)? To get it covered, we need to extend ranges. But how do we do this?
This is my solution, which is quite simple, and you can use other formulas depending on your specific quiz.
So, the minimum possible score (all Gryffindor answers) is 10×4=40. The maximum possible score (all Slytherin answers) is 40×4=160. The possible total scores range from 40 to 160, so we divide them into four equal intervals.
| Total score | Assigned house |
| 40-69 | Gryffindor |
| 70-99 | Hufflepuff |
| 100-129 | Ravenclaw |
| 130-160 | Slytherin |
To assign these points to Conditional Blocks, click on the block. On the right panel, open the pop-up to set up conditions. There will be two for each block.
This is an example for Griffindor:
Show if:
First condition: the value of the Total Score field is “Greater or equal” to “40.”
Second condition: the value of the Total Score field is “Less or equal” to “69.”
NOTE
Remember to make all the questions (fields) required by clicking on the asterisk icon over the field – otherwise, any result calculation will not make sense.
Displaying
For now, I placed the conditional field right in the quiz for the sake of convenience when editing the blocks, but it should not be displayed like this to final users.
There are two main scenarios for displaying the results of any quiz:
- on the next page;
- on a page where the user was redirected to;
- in email.
Let’s see how to implement each of the scenarios.
- Displaying results on the next page
‼️ This method is without sending a form – it will work well if you just need some user-engaging content or it’s just a part of the form, or, for example, you can add a Submit button on the results page and call it “Get my bonus” (and offer coupon code or other bonus), perform user registration based on the quiz, take the user to a certain page, etc., – in other words, make the user click the form submission button.
🟢 However, if this will not work for you, use the ♾️ Redirect to Page or ✉️ Send Email actions (described in next paragraphs).
Add the “Form Page Break” block and keep the “Show Next button” toggle activated. Modify the button text, and you can also add a validation message that will be shown if a user doesn’t fill all the required fields or doesn’t fulfill any other validation rules.
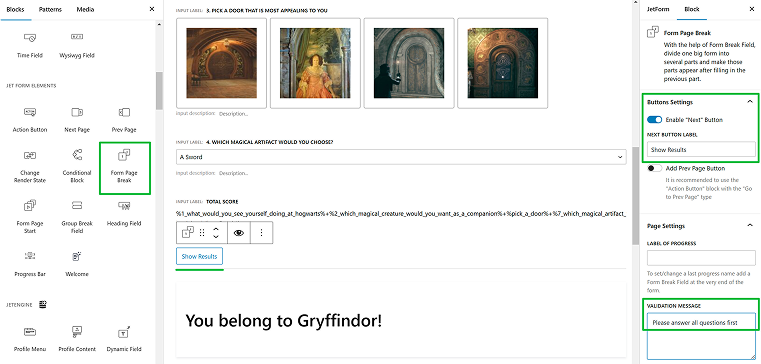
You can make the whole quiz multi-page. This way, you can make the design of each form page more entertaining and add the Progress Bar block.
This is the final result (of course, you can properly style the outcome block and add more content):
- Displaying results on a dedicated page
Create four different pages, as we have four possible outcomes in our demonstration quiz: Gryffindor, Hufflepuff, Ravenclaw, and Slytherin. Add content (e.g., Congratulations, you belong to Ravenclaw!)
Add four Redirect to Page post-submit actions and set up a redirect to each of the pages you’ve just created.
If you display results on a dedicated page, you don’t need Conditional Blocks. Instead, move the conditions to the corresponding Redirect to Page actions – they also have the Conditions functionality, which you can find when hovering over the email action, the crossed arrows icon:

There, set up the conditions just like we did for Conditional Blocks. After that, delete the Conditional Blocks.
Delete the “Next Page” button and add the Submit Button instead (change the button text, e.g., “Show my results”).
Now, the Redirect to Page action will work. You can easily combine it with the Send Email action, which I have described below.
This is a perfect method for lead generation: first, collect email addresses by making this field required and then redirect to the results.
- Sending the results by email
This method suits quizzes involving calculating an estimated cost or finding the perfect product based on the client’s requirements.
The email field is compulsory, obviously.
Then, add four Send Email post-submit actions in the JetForm tab on the right panel. We need four because there are four possible outcomes (Gryffindor, Hufflepuff, Ravenclaw, and Slytherin). Map the “Mail to” field with the email field the user should fill out, and create content for each of the outcomes (e.g., You belong to Ravenclaw!).
If you send results by email, you don’t need Conditional Blocks. Instead, move the conditions to the corresponding email actions – they also have the Conditions functionality, which you can find when hovering over the email action, the crossed arrows icon:
Set up the conditions there, just like we did for Conditional Blocks. Then, delete the Conditional Blocks.
Delete the “Next Page” button and add the Submit Button instead (change the button text, e.g., “Show my results”).
Bonus Quiz Implementation Ideas
Custom PDFs
If you use email to send users quiz results, you can also add attachments, including PDFs, with the help of JetFormBuilder’s PDF attachment add-on. You can generate custom PDFs that have users’ data (perfect for professional estimates and offers).
Connecting third-party services
You can add HubSpot, MailerLite, ConvertKit, and other marketing tools in a post-submit action, as JetFormBuilder has direct integrations with them.
If there is no direct integration, use the Call Webhook post-submit action and connect it with any of the integrators, such as Make, ApiX-Drive, Zapier, or another tool like this.
Registering a user or updating their user role
Users can register right after a quiz, which is perfect if you want to know more about the customers. The user registration form can be set up in a few minutes; you can add email verification and assign the role you choose. Follow this guide to learn how to do it.
If the user is already registered, you might want to change their role after they take certain quizzes. This can also be done using JetFormBuilder.
Of course, there are more options, depending on your needs. And, as I’ve already mentioned earlier, when combined with JetEngine, it gets a whole lot more options.
FAQ
You can create a BuzzFeed-style quiz using JetFormBuilder to design your quiz, set questions and answer types, assign scoring, and customize the results page.
Sure, if you create a quiz with JetFormBuilder, you get responsive quizzes, meaning they adjust to different screen sizes for a smooth mobile experience.
Yes. To do so, you should add a required email field and motivate users to leave their details. Add lead capture forms before showing results, and grow your email list.
A BuzzFeed-style personality quiz is an engaging, often humorous quiz typically used for entertainment or personality assessments.
Final Thoughts
Creating quizzes is fun, but you should think carefully about the overall logic before making them so that they are engaging and efficient if you use them for lead generation.
In this article, I have demonstrated to you how to create a BuzzFeed-style quiz using a powerful JetFormBuilder plugin for WordPress and a few options for displaying details or sending them via email.

