If you didn’t know, now you know: Crocoblock has plenty of free products. And there’s a whole directory of them to add extra functionality to Crocoblock plugins. These add-ons are small plugins that do something particular but are not included in the main build of JetPlugins.
Check the page with all 40+ free Crocoblock DevTools (plugins) here. (You can always find a link to it in the footer menu of the Crocoblock website, it’s called DevTools).
In this article, I will not write about all of them in detail and show what they do but will highlight only some of them.
Also, check out our free standalone resources (theme and plugins) on this page.
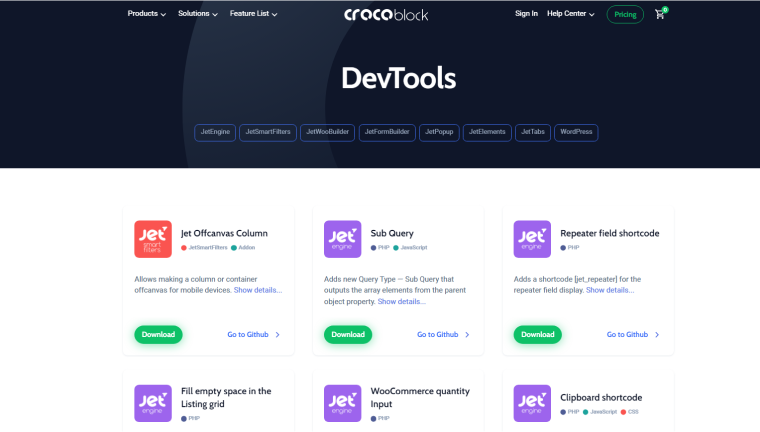
Table of Contents
- Free Add-Ons for Improved Layouts and Functionality
- Crocoblock Dev Tools for JetEngine
- Free Add-Ons for JetWooBuilder
- Free Add-Ons for JetFormBuilder
- FAQ
- Bottom Line
Free Add-Ons for Improved Layouts and Functionality
Off-canvas column in Elementor for mobile
This little plugin will help you keep the website interface nice and compact on mobile and turn a normal column or container into an off-canvas one. It’s very easy:
- Install the add-on (Plugins > Add New > Upload Plugin) and activate it.
- Open your page in Elementor, select the column you want to put off-canvas on mobile, go to the Advanced tab and activate Offcanvas Settings toggle. Now, on mobile, you will get the Expand/Collapse labels.
- Edit styling, Expand/Collapse labels, the icon, paddings, margins, and whatever you need to match your design.
Enjoy!
Also, you can make any element work as a Collapse button by adding the “offcanvas-collapse” class to this element. This class will work if you click directly on the element with this class or the button inside the element with this class.
For example, you want the off-canvas column to close automatically after the user applies filters, submits a form, etc. For a video guide on using it with JetSmartFilters, check this video.
NOTE
If you want the same functionality on a desktop, use either the Hamburger panel widget or the JetPopup plugin.
🔗 Download the add-on
🔑 Go to the GitHub page
Clipboard shortcode
This add-on adds a shortcode for JetEngine’s Dynamic Field that allows copying content into the buffer with a click on the text block. There are two ways to use it:
- Add a Shortcode widget/block and insert the text that should be copied in the body of the shortcode.
- Use it dynamically for copying the content of existing meta field or content object by using the Do Shortcode callback in the Filters of JetEngine Dynamic Field widget/block.
After installation of the add-on, the shortcode
[jet_clipboard copy_text=“Some text to be copied“ label=“Your label“ icon=“1“]
starts working.
It has three arguments:
- copy_text=”Some text” – the string that will be copied to the clipboard. Insert your text inside the quotation marks.
- label=”A label for the text you want to copy” – just add a label you want. Basically, it’s the visible part of the block; that’s why it’s better to duplicate the text you want to copy.
- icon, which can be 0 or 1, where “0” means no icon, and “1” means there is. It’s all about whether you want to see an icon (copy and tick one on success) or not.
Using as a shortcode
Simply use this shortcode, change your text and label, and set whether you want to have an icon:
[jet_clipboard copy_text=”Copy me” label=”Just Click here to copy” icon=”1″]
Using as a shortcode with a callback
In this case, you can fetch the text for copying dynamically. To do it, use the Dynamic Field widget/block and choose the content object or meta field you want the text to be fetched from. Then, activate the Filter field output toggle and choose the Do Shortcodes callback.
Then, activate the Customize field output and insert a shortcode like this:
[jet_clipboard copy_text="%s" label="%1$s <span style='font-size:10px; color:blue;'>click to copy</span>" icon="1"]In this shortcode, I use custom formatting for the label, but you don’t have to do it. Also, pay attention that if you want to use the text from the meta field, just set copy_text=”%s” (which means that you fetch it from the dynamic field) and label=”%1$s” that uses a bit different format because it uses the sprintf PHP function.
Don’t forget to use single quotation marks inside the double or vice versa to avoid syntax errors.
🔗 Download the add-on
🔑 Go to the GitHub page
Crocoblock Dev Tools for JetEngine
To make these add-ons work, you should have the JetEngine plugin installed and activated.
Query Results Count – Plain Number
This add-on adds a new Dynamic Tag to the widgets/blocks that support them, so you can display a number of items in a selected query created by Query Builder. It can be shown in any place or page.
- Install the add-on (Plugins > Add New > Upload Plugin) and activate it.
- Go to JetEngine > Query Builder and create a new query, where you choose items that should be fetched from the database. Or, you can work with the existing query.
- Add any widget that supports dynamic tags, and select Query Result Count: Return Plain Number. In the dialog window, select the query from which you want to get the number of items.
That’s it!
In my example, I’ve used a query of this dynamic rental website demo and the existing query of properties marked as Hot Deals (this query fetches the properties with the “Hot Deal” custom field checked). There are six existing properties with this badge. The process is very straightforward:
🔗 Download the add-on
🔑 Go to the GitHub page
Split listing by months
You can split listings by months, and any Date field can be used, be it a custom field or a default “publishing date” meta. It works very well with JetSmartFilters. To learn how to use it, read this detailed instruction or watch the video:
🔗 Download the add-on
🔑 Go to the GitHub page
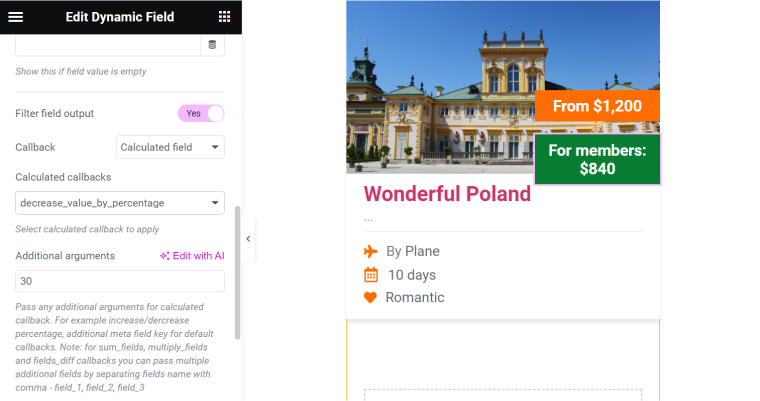
Calculated callback for Elementor and Gutenberg
This add-on is a gem for sites that work with prices and other numeric values. It allows you to increase/decrease field values, add, subtract, or multiply the given field’s value by the values of other fields.
The add-on adds a custom callback (to use which, activate the Filter field output toggle) and uses the Dynamic Field widget/block. It works both with Elementor and Block Editor.
Please find detailed instructions on how to use it in this article.
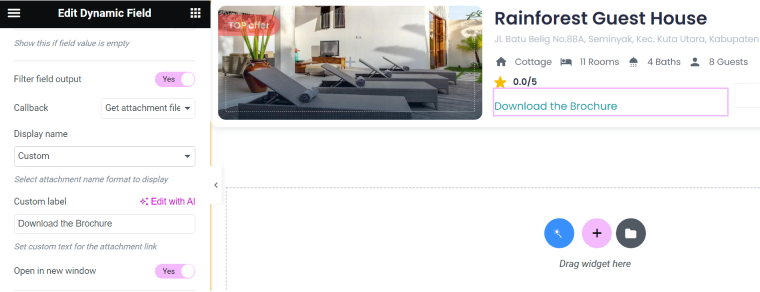
Attachment link callback
With this add-on, you can easily display download links to files uploaded via custom fields. After installing and activating the plugin, the new callback “Get attachment file link by ID” will become available.
To use it, add the Dynamic Field widget/block by JetEngine, choose the meta field you want to get the attachment from, activate the Filter field output toggle, and choose the “Get attachment file link by ID” callback from the list.
That’s it; now you can edit the display name for the link (it can be the file name, parent post title, current post title, attachment post title, or custom text). Also, you can choose whether it opens in the current or new tab.
It works with Elementor and Block Editor.
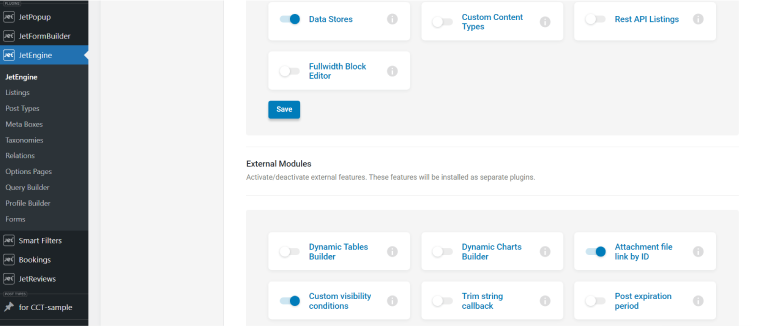
💡 Note that this and some other popular free add-ons have been added to the JetEngine > JetEngine dashboard and can be easily activated from there.
Free Add-Ons for JetWooBuilder
JetWooBuilder is a really powerful plugin for building WooCommerce layouts in Elementor. And we have many free add-ons for it. Let’s have a look at a couple of them.
Products Grid Load More/Infinite Scroll
This little plugin adds a very simple yet effective functionality: the Load More button or Infinite Scroll. Before using it, make sure you have the JetWooBuilder plugin activated. It comes with a lot of great widgets for WooCommerce.
- Install the add-on (Plugins > Add New > Upload Plugin) and activate it.
- Go to the Elementor page where you have a Product Grid widget (the add-on works with this widget, not something else).
- In the Content section of the Elementor panel, choose the Product number you want to display (and the same number will be added with each Load More button click or on scroll).
- Below, find the Load More section and activate the toggle. Select either the Load More button or Infinite Scroll.
- If you’ve chosen the Load More button, create a unique ID for the button/element that will activate the loading process. Then, add a button and assign this ID to it in the Content section. If you use an icon, image, or text instead of a button, assign this ID in the Advanced tab.
- If you prefer the Infinite Scroll, no IDs are required.
Enjoy the result!
For more detailed instructions on how to use the add-on, you can check this article.
🔗 Download the add-on
🔑 Go to the GitHub page
Custom Products Badges
This add-on enables custom product labels in the Products Grid and Archive Sale Badge widgets. The first one is available globally, and the second one – on Archive pages.
After the add-on activation, you can add as many custom badges as you need and style them for each product grid section or each archive.
It’s very intuitive, like all the JetWooBuilder tools, and it’s made to attract more customers’ attention to particular products.
- Make sure you have WooCommerce, Elementor Free or Pro (because JetWooBuilder is a plugin for Elementor), and JetWooBuilder installed and activated. You can create your shop page templates at this stage.
- Install the Custom Product Badges add-on (Plugins > Add New > Upload Plugin) and activate it.
- Having too many badges is not a very good idea, so it’s better if you can see the list of all of them in one place. Go to Crocoblock > JetPlugins Settings > JetWooBuilder > Custom Badges tab and add all the badges you want to have.
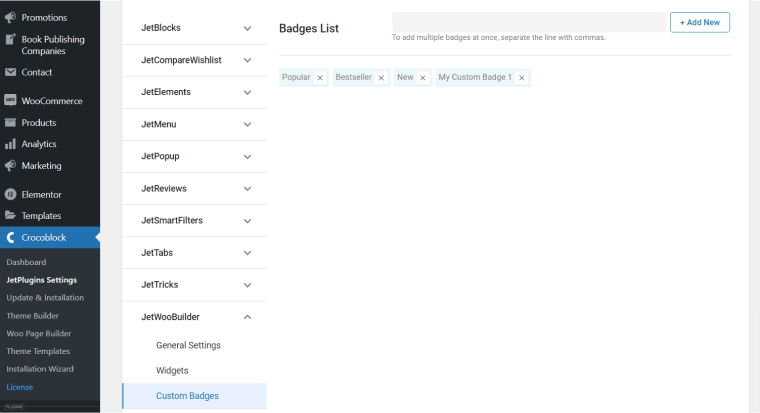
- Go to the products you want to mark with badges, and on the sidebar, you will see a “Custom Product Badges” dialog window for adding them. Add those you want.
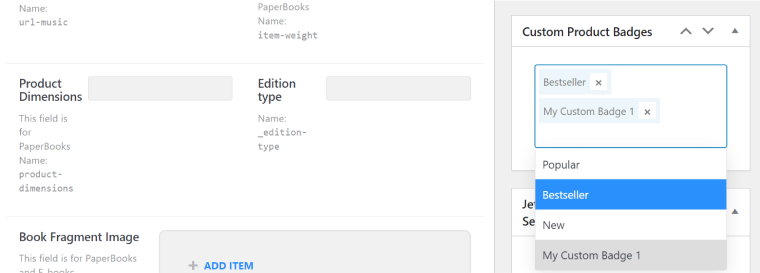
- Now, go to any of the ready templates (Crocoblock > Woo Page Builder) where the Product Grid widget is used, add a new one, or edit the page where you want to put it. You will find a Custom Badges section, activate the toggle, and the badges will appear over the products you’ve added them to.
- Style the colors and backgrounds of the badges.
- You can keep or hide the default “Sale!” badge and control it by switching on/off the “Enable Default Badge” toggle.
That’s it.
To add badges to the archive item, click “Edit with Elementor,” and add the Archive Sale Badge widget. You will see the Custom Badges section there, and the logic of action is the same here as in the instruction above.
🔗 Download the add-on
🔑 Go to the GitHub page
Free Add-Ons for JetFormBuilder
Forms popup notification
This is a very simple yet handy add-on; it adds a Show Popup post-submit action and works both with JetPopup and Elementor Pro pop-ups.
- Make sure you have JetPopup (or Elementor Pro) and free JetFormBuilder plugins installed.
- Install the add-on (Plugins > Add New > Upload Plugin).
- Create a new form or work with the existing one. On the right panel, open the list of post-submit actions, and choose “Show Popup.” Select the provider and a pop-up that will be shown after the form submission.
Enjoy the result!
🔗 Download the add-on
🔑 Go to the GitHub page
💡 There are much more tools for you; check them out here.
FAQ
Yes, there are eight standalone free plugins, plus over 40 add-ons for existing paid and free plugins.
They are very small and lightweight plugins that extend the functionality of the main plugin.
Thanks to this approach, the dashboard of each particular plugin is not overwhelming with functionality that is made for specific cases, so the website developer is not confused. Instead, they can download and use these tools only if they need them.
The Bottom Line
With JetPlugins, you can build WordPress websites of any complexity, including branchy dynamic sites. There are 20 plugins that you get in the All-Inclusive subscription. But in some cases, you might need very particular functionality. That’s why our developers created another 40+ free add-ons requested by users. A few of them are shown in this article, but the full list you can see on the DevTools page; the link to it you can find in the footer menu of this site.


