Simon van Oordt from hppynsmrt agency shares how he revamped the e-commerce website of Mineral Skin Cosmetics. In this case study, you can read how JetEngine allowed him to build dynamic product/category/landing pages and create an internal link structure for SEO.
Who doesn’t love new clients that have ancient websites? As a web designer, this makes my heart beat faster because I can really help a business to succeed in the online world. Last December, I got lucky as I was approached by a skincare company that had a website that looked like it was from the dark ages.
Unlike good wine, time was not kind to the website of the beauty company. It didn’t exactly look beautiful, to put it politely. In a nutshell, these were the main problems of the former website: not responsive, plus a horrible UI/UX that confused even millennials.
In this post, I will explain how I created a quite advanced e-commerce website with WooCommerce, JetEngine, and other Crocoblock plugins.
I hope you will learn new strategies and tips on how you can use JetEngine to power up e-commerce websites and SEO.
Before Picture
Before we dive into the process and the result, let me share a screenshot of the old website.
This is how it looked like…
E-commerce Website Revamping Steps
Let me quickly share my design/build process. After that, I will share how I powered up the product and category pages and why I needed JetEngine.
- Step 1: Business meeting with the client to discuss their business objectives and business identity.
- Step 2: Create wireframes of homepage/category page /product page
- Step 3: Design the pages in Figma
- Step 4: Recreate the pages and listings in Elementor
- Step 5: Done
Why I Needed JetEngine for E-commerce Website
For this webshop I needed to create fully custom category and product pages. It includes:
- Product/category sliders on mobile devices
- Custom meta fields
- Custom taxonomies (or categories)
- Custom product grids
- Repeater fields
There are two ways of achieving this: 1) develop custom PHP templates [complicated] and use ACF for the meta fields, or 2) use Elementor and JetEngine [easy].
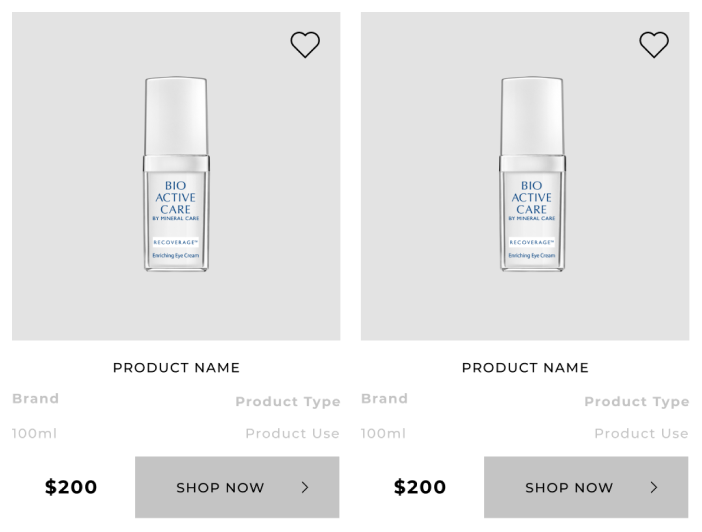
But before I talk too much, I’ll share an example of what I had to achieve. It is a product tile that is looped on product category pages.
With JetEngine, it is peanuts to achieve after a bit of practice (it was actually the first time I used the plugin).
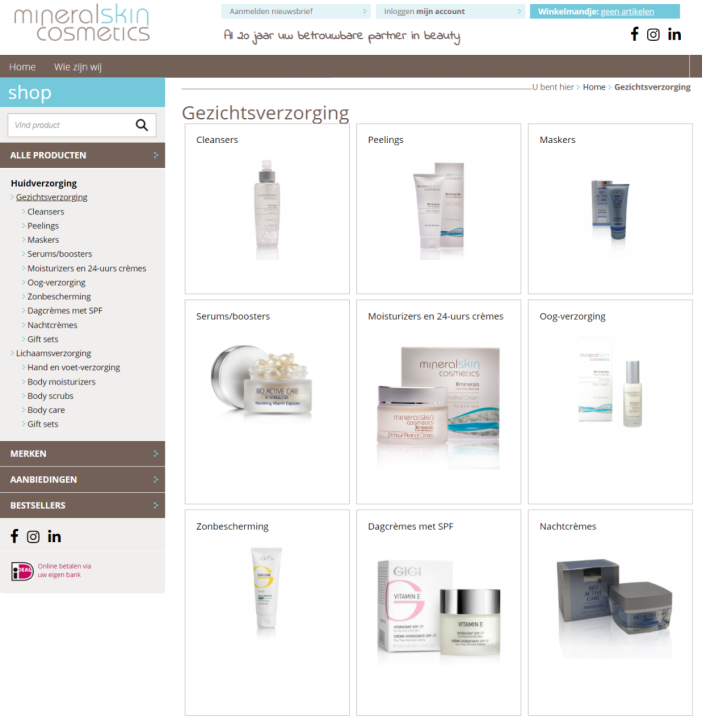
Designing Product Category Template
Usually, a product category page consists of a grid with cards. And each card consists of a product image, price, product name, Add to Cart button.
For example, this is what a category page on Storefront (the official WooCommerce theme) looks like.
As you can see in the example, this is a very straightforward layout, but most clients need more than an out-of-box WooCommerce experience.
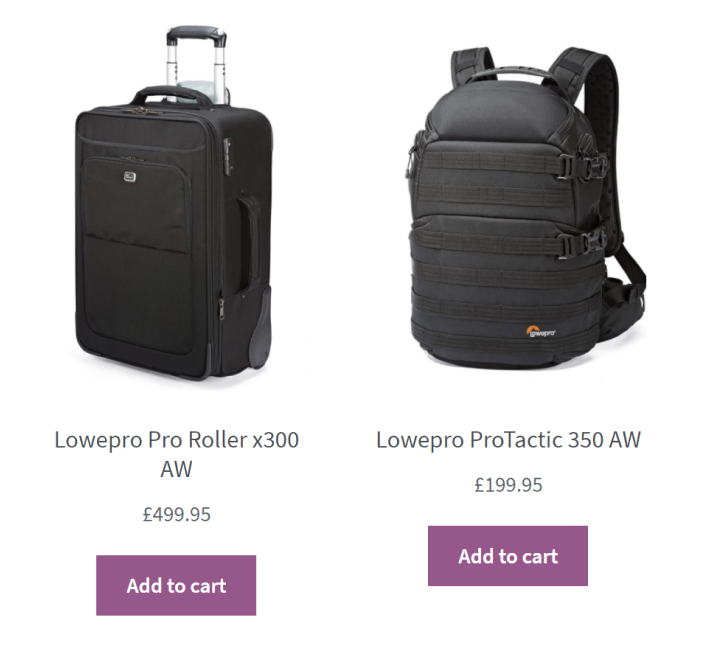
For example, it could be handy to show the suitcase volume or have a label that would show if the suitcase is suitable for hand luggage.
Normally, this would have to be coded manually, but not with JetEngine. With the “listings” feature, you can design a “tile” in Elementor and pull in (and style) all the metadata that you need. Then you can loop this tile on the Elementor archive template.
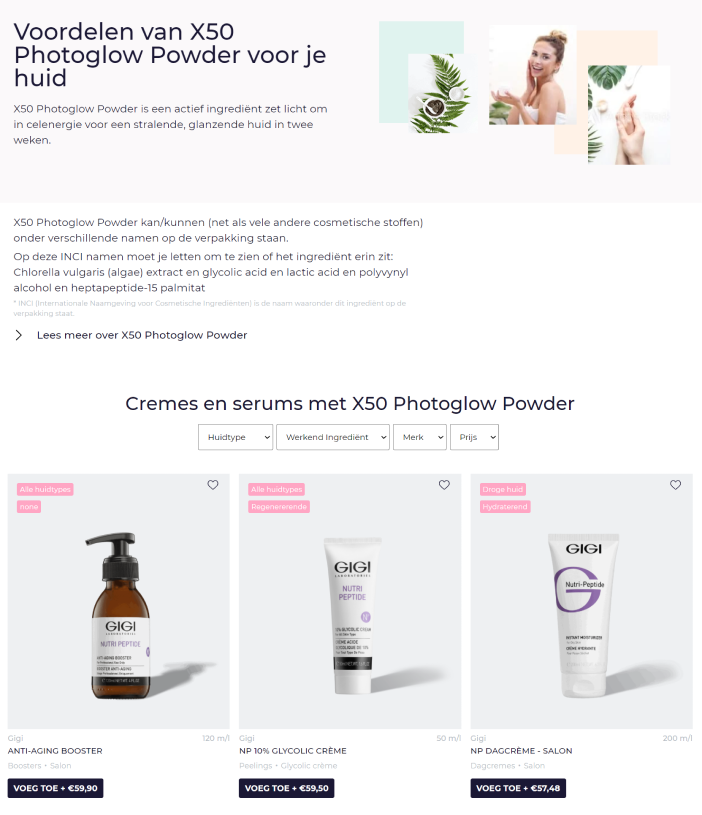
Creating the beauty e-commerce website’s product category pages
Picking beauty products is not easy. You have specialized products for each skin type and products tailored to a specific skin request.
My job was to find out how customers can find the products they need the quickest.
It is difficult because the product packaging (in this niche) typically looks very identical. For a consumer, it is impossible to find the product they need by looking at a product image and title. Besides that, it is also difficult to estimate how big a product is in real life.
To come up with a solution, I started wireframing.
Design Solutions
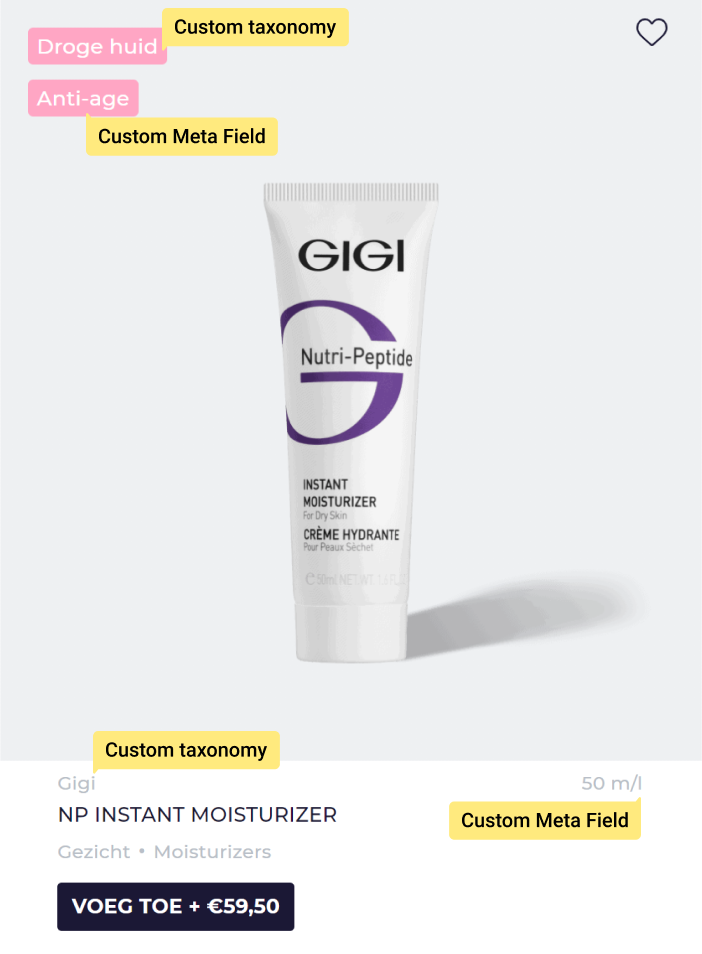
To make it easy for consumers to find the needed product, I decided to show the following information on the product category page.
- Product Use: I wanted to include a meta field that describes in one word what the product does. For example “anti-aging” or “hydrating.”
- Volume in ml: I decided to show the package volume on the category page, so people can judge how big the package is.
- Product type: I wanted to show the product category, so people know what they are buying, e.g., moisturizer.
- Brand: I wanted customers to know what brand they are looking at.
- [EXTRA] Skin type: after wireframing, I realized it would be handy for the skin type so people can confidently click on a product.
Although this is quite a lot of information, the design is not cognitively overloading.
The result is as follows:
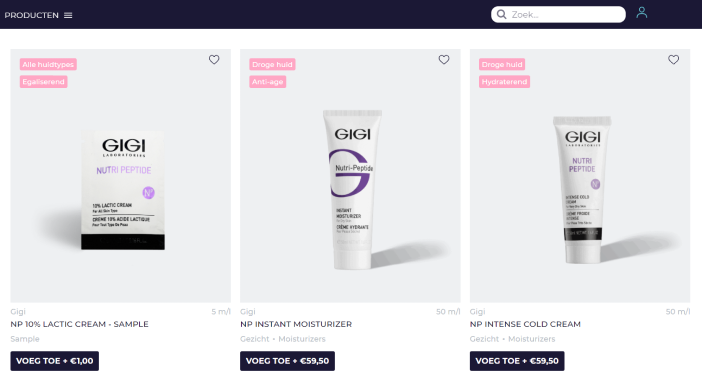
I made all this with JetEngine. You can use JetEngine to create the “tiles” and loop them in an archive template. Also, apply it to add meta fields and custom taxonomies as well.
The question is: why use JetEngine to create a grid for the product category page?
- Designers freedom: create it visually without custom CSS.
- Ability to include meta fields/custom taxonomies without coding,
At the same time, there’s no AJAX Add to Cart button widget that you can use when you create the “tile.”
Creating the Add to Cart button for e-commerce website
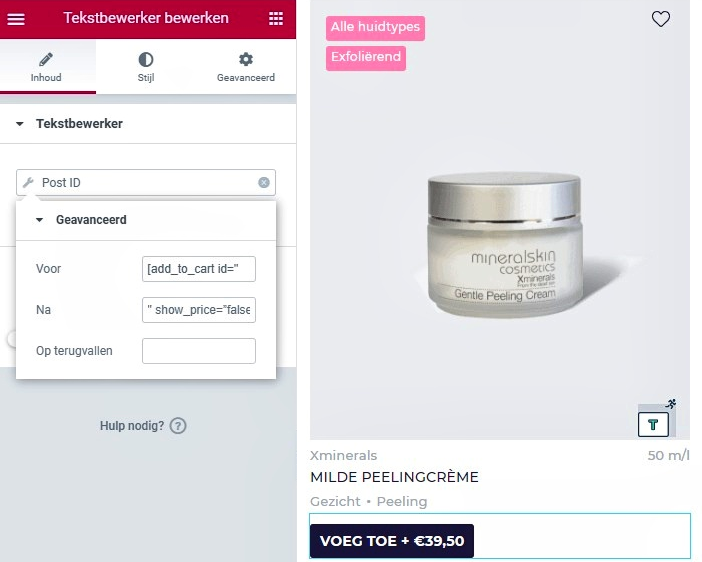
I broke my head over adding an AJAX Add to Cart button to the product tile, but luckily I came up with a simple solution… This is how to do it.
Woocommerce allows you to add an Add to Cart button with this shortcode:[add_to_cart id=”2″show_price=”false”]
To create this shortcode for every product dynamically, you have to use Elementors dynamic value.
- Step 1: Drag the text editor widget in the tile (listing).
- Step 2: Select the dynamic value option, choose post ID.
- Step 3: Then click on Advanced, and put the beginning of the shortcode in “Before”: [add_to_cart id=”
- Step 4: Put the end in the shortcode in “After’: “show_price=”false”]
- Now Elementor and JetEngine will automatically create a dynamic Add to Cart button for each product. Use CSS to style the button to your liking.
Product Template with Elementor and JetEngine
To create the fold design of the product page, I had to think about two things:
- How can we best inform the customers about the product?
- How can we convince the customer to buy the product?
To achieve these goals, I came up with several meta fields and custom taxonomies (see image).
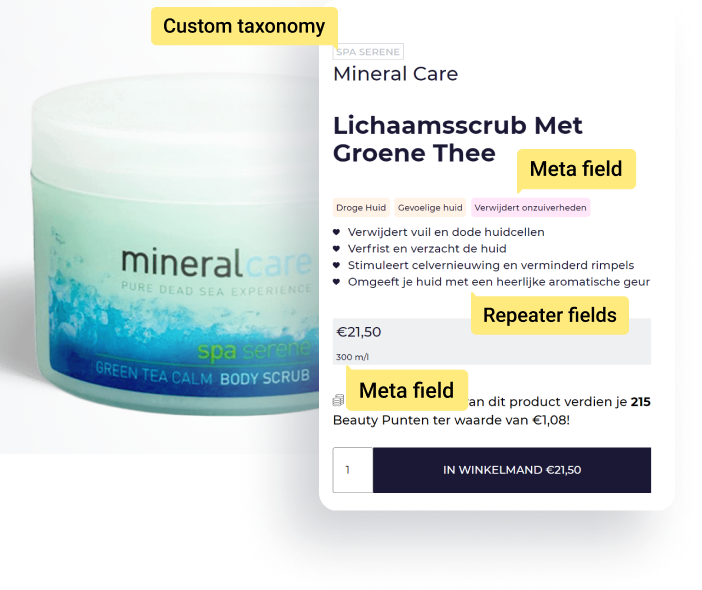
For example, I created a bullet point list with heart icons.
This list emphasizes the product benefits and can be used to describe the look and scent. The list can hold a different number of items for each product because we used JetEngine’s repeater meta field. You can easily add 2-5 benefits for each product.
Dynamic listing grid on the product page
Each product has a list of properties. Because my client sells cosmetics, every product has one or more “active ingredients.” Each ingredient has one or more products.
Therefore, I used JetEngine to create a custom taxonomy called “ingredients.” After adding active ingredients to each product, I included them in the Elementor single product template. Like so:

Limiting the number of active ingredients on the frontend is easy, in this case I added a limit of 10.
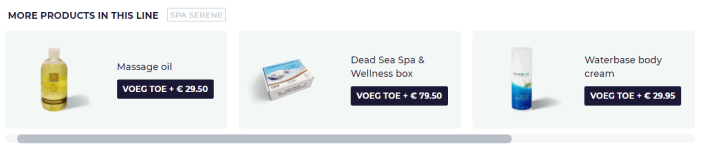
Related products with JetEngine
What I really like about implementing the related products with JetEngine is that you can add them in a slider. Especially on mobile devices, it is a lifesaver.
For increasing sales, it is great to add related products close to the top of the page. The downside is that you push the rest of the content further down, especially on mobile devices.
However, JetEngine allows you to add related products in a slider to save a lot of space.
How JetEngine Improved SEO Drastically
JetEngine offers awesome possibilities for e-commerce SEO. With minimal effort, you can design landing pages automatically and interlink them with each other. Let me give you an example from the beauty website I created.
So each product that was sold had several properties:
- Skin type
- Active ingredients
- Related skin problems (if a product is for a specific skin request, like wrinkles)
- Related skin treatments (if a product is used in a specific treatment, like acne)
- Brand
Each of these properties is the thing that people search for. Like, “creams to treat wrinkles” or “moisturizers with vitamin C.”
It would be perfect to have landing pages for these queries.
It turns out that creating them with JetEngine and Elementor is very easy.
Creating landing pages in bulk
You can create custom landing pages in bulk by adding custom taxonomies (or CPTs with custom relationships). In five steps, I’ll explain what I’ve done.
- Step 1: Create custom taxonomies (e.g., “ingredients”).
- Step 2: Create meta fields for the custom taxonomies, e.g., “long description.”
- Step 3: Categorize products/posts/CPTs with the taxonomies that you created.
- Step 4: Use Elementor to add an archive template and use JetEngine Listing widget to loop the products. (Tip: With Rank Math SEO, you can create custom meta tags for every taxonomy that you have.)
- Step 5: Use JetEngine Listing widget to show the taxonomies on the product/post archive page (internal link structure).

Internal link structure
JetEngine is awesome for internal linking. For this project, I added links on every product page to the custom taxonomies. It has two benefits:
- It allows users to navigate products for a specific skin type or products with a special ingredient.
- It creates a good internal link structure. And that is crucial to make the new landing pages (taxonomy archives) rank.
For this project, it’s too early to determine the exact impact it will have on organic traffic, but the fact is that I created hundreds of very useful landing pages with very little effort.
Wrapping Up
I hope this case study was helpful for you. Feel free to ask me more questions about the project in the comments below.
