Compressing images is essential for website optimization. There are several ways of doing it and a few things to consider when preparing the images. In this article, we will cover all these important points.
Table of Contents
- Why Is Image Optimization Essential?
- Image Sizes and Types
- Compressing Images Without Losing Quality
- Image Optimization Best Practices
- Free Web Services for Compressing Images
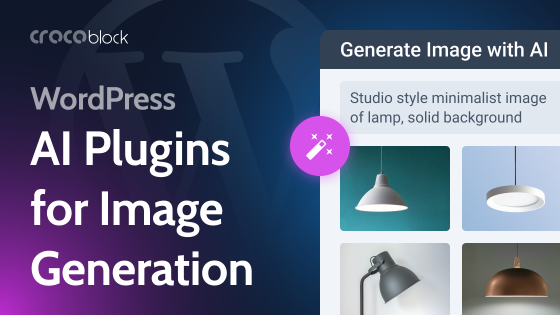
- WordPress Plugins for Image Compressing
- Conclusion
Why Is Image Optimization Essential?
As a rule, images take up to 30% of the page size; sometimes, the number is much higher. It means that the page loading speed is directly dependent on image optimization. If the page size is more than 2-3MB, it’s not a good sign. So, the smaller the file size of your images, the better, but, for sure, the quality can’t be compromised.
Page loading speed directly influences SEO ranking and user experience.
Images optimization is all about keeping the smallest possible image file size while delivering the right image size and resolution with the best quality possible.
Image Sizes and Types
Images can be defined using these categories:
- File size (or image weight) – the amount of space (kilobytes, megabytes) the image file takes on a storage medium.
- Image size – the physical size of the image, represented by its height and weight in pixels, as well as its resolution.
- File type – file format represented by the filename extension (JPG, PNG, etc.). Every file type has its specific features for storing and preserving graphic information.
The bigger the image size, the bigger the file size, but it’s not that straightforward. There are a lot of additional properties that make it possible to compress images without losing quality.
But, first of all, it’s important to understand some basics:
- The standard screen resolution is 72 PPI (and Retina can be 2x or even 4x due to the higher pixel density for creating more crisp colors). It means that there’s no point in using bigger image resolution for displaying on screens (the difference will simply not be visible), and Retina images can be stored separately and be fetched only on Retina displays.
- The initial image size (height and weight in pixels) should not be huge because it doesn’t make much sense. The maximum screen width for many laptops is 1366px and 1920px for high-resolution laptops and desktops (2x for Retina, respectively). Also, most websites are not full-width but have their width limited to 1200-1500px. That’s why uploading photos that are several times bigger than this width will only reduce a page loading speed without improving anything. The best way is to set the image width according to the website’s physical width and add additional Retina images for a better user experience if needed.
Compressing Images Without Losing Quality
To make a file size as small as possible but keep the quality as high as possible – this is what literally everyone wants to gain from image optimization for the web.
Just changing a resolution and setting smaller width and height is not the optimal way of doing it in most cases, especially if we deal with complex pictures with many colors, shapes, and fine lines. Most likely, the quality will be low.
Except for the professional graphic software that uses certain plugins for doing that, there are a variety of free and paid web services that use special lossy compression algorithms and filters to keep the high quality but reduce the file size dramatically. Using them, you will get what you want and will be able to adjust the quality and file size. We will talk about them further.
Lossy compression algorithms eliminate all the unnecessary data from the image, so you can reduce up to 75% of file size without losing the quality that the human eye can notice.
PNG file format allows you to keep great image quality but quite a small file size, and it works well with images without many small details.
WordPress adaptive images
Since the WordPress 4.4 release, WordPress can automatically create five copies of each image uploaded to the media library:
- Full size – the original size of the image;
- Large;
- Medium Large;
- Medium;
- Thumbnail – usually 150x150px.
Those sizes can be modified, and additional ones can be added manually. It uses the srcset attribute; many theme developers use this WordPress core functionality, but it’s not a default one.
Thanks to this functionality, a browser loads only the necessary image version, depending on the viewport. It helps to optimize the loading speed and not use unnecessary image sizes, which is especially important for mobile devices.
However, it only reduces the image size, and if the initial image (and file size) is huge, its adaptive versions will also be too big. So, using lossy image compression is very important even if WordPress adaptive image functionality is applied.
Image Optimization Best Practices
There are two ways of image optimization for WordPress sites:
- optimizing images before uploading to the site;
- using a plugin that compresses images that are already uploaded.
The first method is the best for several reasons.
First of all, you have complete control over each image and its size, dimensions, proportions, and quality. The result is always much better than if you use a plugin that does it automatically.
Optimizing images on-site using WordPress image optimization plugins can be a way to do it if you are trying to speed up an existing site or if there are frequent bulk uploads of images done by different users, so you actually can’t have control over them. Also, it’s a great way to speed up the process.
SVG (stands for “scalable vector graphic”) is a great image format for displaying vector images. Because pixels are not involved there, only coordinates for points and lines, as well as mathematical formulas to define their position, shape, and size, such images can be stretched to any size with absolutely no loss of quality.
The SVG file size is extremely small – normally, it’s just a few kilobytes. SVG is perfect for logos, illustrations, and icons – any kind of vector graphic. That’s why this format (not PNG) should be used for such images, granting a crisp look without blurriness on any display and without adding extra weight to the page.
NOTE
Many WordPress themes don’t support SVG for safety reasons. It’s easy to fix by adding a code snippet to functions.php or using a plugin like SVG support. Elementor doesn’t support SVG file upload by default. To fix it, go to the website dashboard, Elementor > Settings > Advanced tab > Enable Unfiltered File Options and switch to “Enabled.”
WebP is the new web file format from Google; they are around 25-35% smaller than PNG or JPG files of the same quality. The only problem is that WebP is not supported by around 5% of browsers (primarily because it requires macOS 11 Big Sur).
Some image formats are even lighter than WebP, yet they await browser support.
Free Web Services for Compressing Images
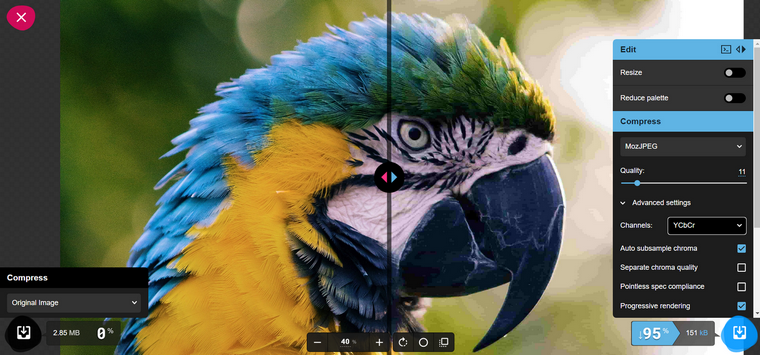
We can choose the compression level using web image compression services and make all the adjustments, see the “before-and-after” result right in the browser window. Below you can see an example of it, when the file size was reduced more than 20 times, from 2,85MB to 151KB.
There are also services like Image Compressor or TinyPNG that let you upload up to 20 images at once and perform bulk compression.
There is a bunch of different software that can help you with optimizing images. But the important thing to remember is that there must be advanced algorithms involved, not only file size minimization; it makes the whole difference.
WordPress Plugins for Image Compressing
There are a huge number of different WordPress image compression plugins for every taste. Most of them work under the freemium model and have some limitations. To use a plugin, you must register an account that generates an API key. As a rule, such plugins have side products to offer you, such as additional optimization options for images and scripts, more file formats, CDNs, etc.
Imagify, ShortPixel, reSmush.it, TinyPNG, and EWWW Image Optimizer are among the most popular in this category. Let’s look at how to use them using TinyPNG as an example.
How to compress images with TinyPNG plugin:
- Installing, activating, and setting up the plugin
After the plugin installation, it will ask you to register a free account, giving you access to the dashboard where you can choose additional paid services, such as removing a monthly limit of 500 photos or using CDN.
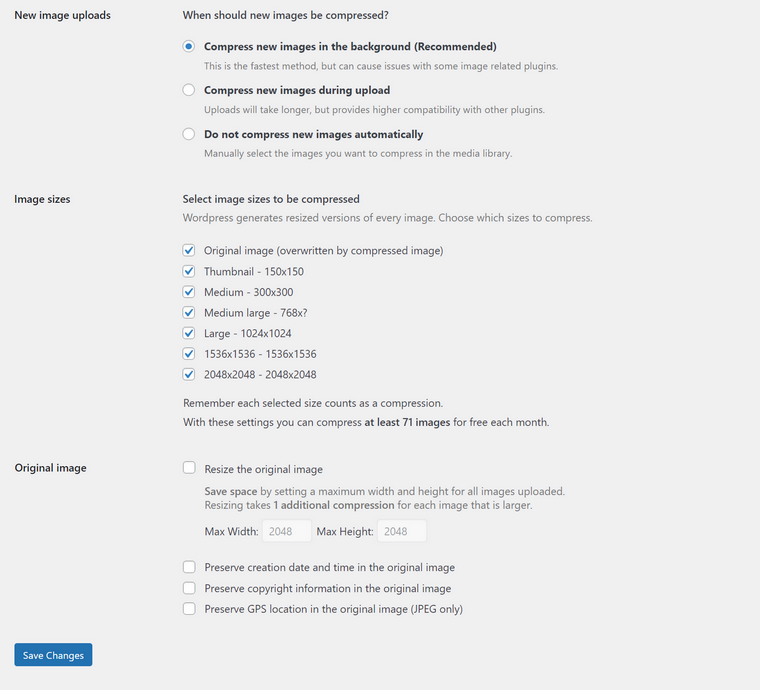
Based on this screenshot, there are seven adaptive image sizes on my website. So I can compress only 71 images for free each month if I want to optimize all of the sizes – because the plugin counts each image size as an individual compression. To save some points, I can choose not to process certain sizes, e.g., thumbnails. - Bulk image optimization
After that, go to Media > Library > Bulk Optimization and start the process.
After the process is finished, the optimization statistics will be displayed, and it will be clear how much space was saved: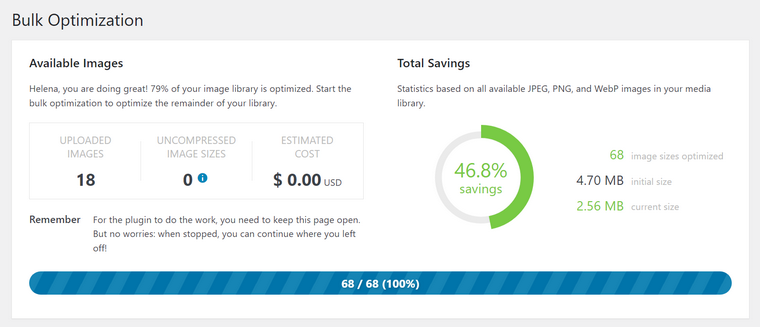

As you can see, it’s very easy. But, as a rule, you might need a premium account (or pay per compression) if you want to optimize many images every month.
Conclusion
Now you know the essentials of image optimization for a WordPress website. So, I hope it helps to speed up your WordPress website.