For aspiring entrepreneurs and web developers, launching a site is similar to launching a rocket into space, especially if it’s their first experience. Does everything work? Do people see the website in the search? Does it display correctly on the phone? Thousands of questions to make sure everything works correctly.
In such a bustle, one can accidentally miss some critical moments. To prevent this, I have prepared a helpful checklist you can use every time while launching a new website. So read, save and check.
Table of Contents
- 25 Do’s Before Launching the Website
- 1. Check the text for errors
- 2. Choose hosting and the domain name
- 3. Check the SSL certificate
- 4. Check the favicon and logo
- 5. Check if you have a company contact page
- 6. Make sure you have a 404 page
- 7. Check the SEO
- 8. Remove all unnecessary
- 9. Check the plugin compatibility
- 10. Take care of the website backup
- 11. Check the analytics connection
- 12. Check the availability of all pages and their loading speed
- 13. Choose the way links look
- 14. Check the timezone and location
- 15. Add the business to Google Maps
- 16. Check how the site displays on different devices
- 17. Walk the customer journey and make test orders
- 18. Check how the website is displayed in different browsers
- 19. Check redirects if needed
- 20. Set up email reception
- 21. Check the availability of documents on the site
- 22. Keep themes and plugins updated
- 23. Clear cache
- 24. Submit the XML sitemap to Search Engines
- 25. Test and fix bugs
- FAQ
- Bottom Line
25 Do’s Before Launching the Website
Before taking the first step, we suggest you analyze your previous sites (if any) and check what was successful in them and what was not.
It will help you with the new site. Then follow the checklist below.
1. Check the text for errors
The first things that catch the eye of visitors to the new website are errors and strange fragments of “lorem ipsum” text. Therefore, the first thing to check is the presence of these errors and eliminate them.
Sometimes it is difficult to find errors and typos in the texts, so we offer two ways to help you deal with them:
- Ask a familiar editor to proofread the text and dot the i’s.
- Reread the text aloud several times, with a break after each reading. This method will help to find inaccuracies even if you have rewritten the text repeatedly and know every word by heart.
2. Choose hosting and the domain name
Hosting is the website’s home, and the domain name is the address where users will find you. Today, tens of thousands of hosting companies have different payment policies and prices. Choose the one that suits you.
The domain name is also an essential item to pay attention to. It should be short, memorable, and associated with your activity.
Ensure that the selected name is free and the chosen hosting is secure.
3. Check the SSL certificate
Users will see a non-secure navigation warning if the site does not have an SSL certificate. For example, if you sell something on a website, no one will want to buy anything on a poorly protected site because it’s risky to leave contact details.
Most hosts provide security services and create SSL certificates for the website for free.
If the hosting does not have this option, install a plugin to ensure data protection on the resource.
4. Check the favicon and logo
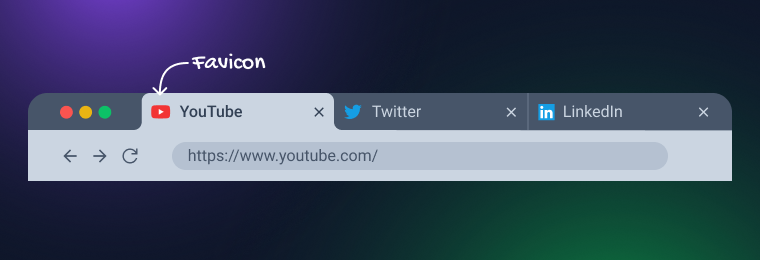
Before publishing a site, it is essential to have a company logo and a favicon next to the name.
A favicon is a small picture next to the website name. It helps users quickly find your website among dozens of open tabs. Therefore, do not neglect this point.
The logo works for the brand’s recognition and the company, so it should be on the site.
5. Check if you have a company contact page
The contact page does two things at once:
- increases the credibility of the company;
- allows visitors to contact and order a product or solve a problem.
Ultimately, you create a website to communicate with the audience. Give people a chance to answer you.
6. Make sure you have a 404 page
The website may fail at any time. Therefore, the 404 page is necessary. Give it some time, and think about the design and text. It can become your assistant, helping to find needed information and drive potential customers to the site.
Write, for example, that you are very sorry for the error. Add a search bar so people can quickly find needed blog posts/other information. Or, leave a link to helpful content that can only be found on this page.
7. Check the SEO
This item includes several components at once. First, you must follow your SEO strategy and use the right keywords. Next, ensure your XML map is set up correctly so that search engines will not lose you in the search results. Also, check images’ meta descriptions, page titles, tags, and alt texts.
There are a lot of different useful SEO plugins. Choose one and install it.
8. Remove all unnecessary
Extra plugins, information, and pages slow down the site. Therefore, remove everything that you do not plan to use. To get started, find the Plugins tab in your control panel and deactivate everything you don’t need.
Perhaps you wanted to use some videos or images, uploaded them to the site, and then changed your mind. Unfortunately, these media files are left in storage. Therefore, go through its contents and delete what’s unnecessary.
Review the pages and posts you’ve created. If there is something in there that you don’t intend to use, delete it. It’s incredible how quickly the site accumulates too much without having time to earn at full strength.
9. Check the plugin compatibility
Sometimes there are situations when one plugin does not work with others. It can affect the speed of the website and cause errors and crashes. To prevent this from happening, check plugins for compatibility.
10. Take care of the website backup
This step will save your web spot if something suddenly goes wrong. Therefore, do not neglect the creation of backups.
There are several ways you can do this:
- Download all files and information from the website to the computer manually. This method will require more time and memory in the computer. This method is suitable when you have a small website with little information.
- Download information using third-party services. This method is suitable if you do not have time but have space on your PC.
- Create a copy of the website using hosting. Many hosting companies offer an additional service—website backup. It is stored in the cloud and will help restore the website in case of a breakdown.
It’s best to use hosting. It automatically creates a copy of your site, and you can restore it with a few mouse clicks if necessary.
11. Check the analytics connection
Analytics lets you get information about the website visitors and analyze their behavior. For example, how long have they been on the resource? What pages did they open? What items have been ordered? What city are they from, and how old are they?
All this information is collected using analytics tools and helps you build the marketing strategy. Most entrepreneurs choose Google Analytics for this purpose. Firstly, it is free, and secondly, it provides a large amount of necessary data.
12. Check the availability of all pages and their loading speed
The days you could click on a link and make tea are long gone. No one will wait if your page takes less than five seconds to load. Most likely, the person who wants to see your website will close it and go about their business.
To prevent this from happening, check the pages’ loading speed. Also, ensure that all pages are in their place and everything is displayed correctly on them. Broken links, forms, and buttons can significantly affect the user experience and desire of customers to buy from you because such little things show that either you are no longer working or have not yet started.
13. Choose the way links look
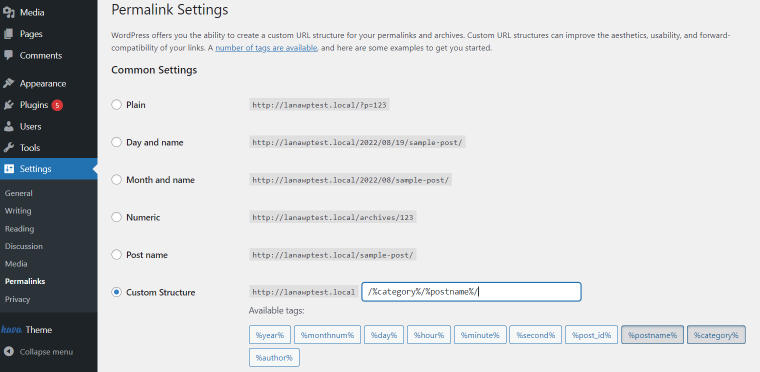
By default, the WordPress website builder offers several types of links. A link to a website page might look like this:
- mysite.com/1;
- mysite.com/2022/post-title;
- mysite.com/post-title.
To set a specific look, go to your site’s dashboard, “Settings,” and select “Permalinks.” And choose the type of links your users will see.
14. Check the timezone and location
Another non-obvious little thing that is worth paying attention to is the timezone. If you set the correct time zone, it’s easier for you to schedule posts and manage the website.
Your posts and comments display the time and date. And this little thing also affects the credibility of the website and the desire to communicate with you. For example, imagine you go to the site and see that the last post was published in the previous year. Would you like to write your comment or place an order on such a site? Or do you decide that no one is engaged in the website?
15. Add the business to Google Maps
This step is essential if you have an offline business. Add the store or restaurant to the map along with the address, phone number, website address, and email. Give potential customers more opportunities to contact you.
16. Check how the site displays on different devices
Many people will not be accessing the website from a computer. You must ensure it works equally well on phones, tablets, and laptops.
Therefore, before you get genuine traffic to the site, check its operation on different devices. For example, view all pages, and click all buttons, contact forms, and links.
17. Walk the customer journey and make test orders
If you spend money on the advertising sales department, but orders are not recorded on the site, you will only waste money. Instead, try placing an order and seeing how it appears on the dashboard.
Also, please pay attention to how convenient it is for customers to place an order. For example, do they see your products, and how to pay for them? What do they get after payment, and how can they track the order?
18. Check how the website is displayed in different browsers
Visitors to your website will access it from other browsers. Therefore, all pages must be shown correctly. You can check this with various free services like Browsershots.
19. Check redirects if needed
Perhaps a situation will arise when you change the address of a page with some publication or essential information. Then a redirect is necessary. To prevent a person from leaving your website, set up a 301 redirect by editing the .htaccess file or use a free plugin. It is crucial if you are restarting your site and doing a lot of updates.
20. Set up email reception
The website will send you messages from time to time:
- about transactions;
- about changing the password;
- about mistakes.
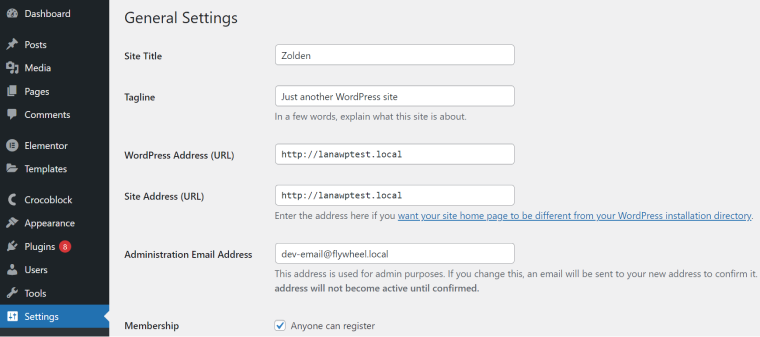
By default, it will try to do this through hosting. However, receiving messages in this way is very awkward. Therefore, set up an alternative way to receive notifications. You can do this in “Settings.”
21. Check the availability of documents on the site
“Privacy Policy” and “Terms of Use/Services” are two documents that should be on almost every website. These are legal documents where you prescribe the conditions for working with your resource, how to use your goods or services, and what guarantees you give. These documents can save you a lot of nerves, money, and hours if a person has some difficulty with your site or product.
If you’re looking for a way to create your documents without the hassle of hiring a lawyer, there are several online privacy policy generators that you can use. These tools allow you to customize your privacy policy and Terms and Conditions to your needs, so to avoid legal risks and liabilities.
22. Keep themes and plugins updated
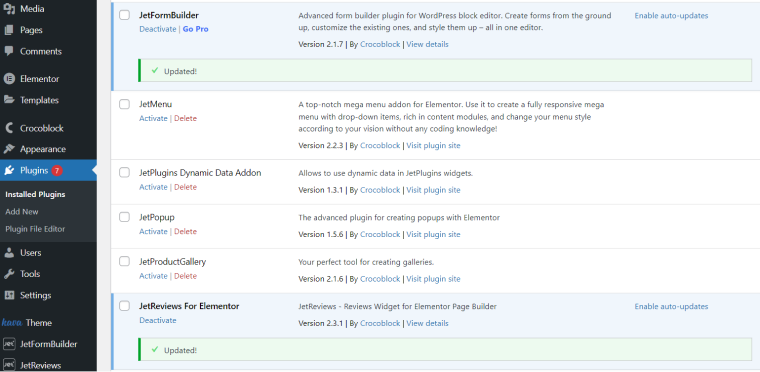
Plugins are updated very frequently. As a result, new features appear, and old ones stop working. If you don’t want these updates to affect your site, keep your plugins and themes updated.
23. Clear cache
During website creation, you make many edits. For example, to ensure that site visitors see only the latest version of the site, delete all old data and clear the cache.
24. Submit the XML sitemap to Search Engines
You have done a lot of work during the launch of the site. Logically, you want it to be visible in search engines. To submit an XML sitemap, go to Google Search Console. Then click “Add New” and paste your site name + wp-sitemap.xml into the field. The link will look like this: www.mysite.com/wp-sitemap.xml.
25. Test and fix bugs
Even if you check the entire site for errors 150 times, something can break when traffic starts coming to it. For example, buttons stop working or display crookedly on mobile devices. You need to find vulnerabilities and fix them quickly to minimize such situations. To do this, you need to test the website.
Check every link, button, form, and pop-up. Check several times from different browsers and devices. Then, even if you have already tested many times, do it again.
FAQ
To launch a site, you need to choose a hosting provider and a domain name, develop pages, fill them with content and publish. Everything is simple. But the devil is in the details. Before launching a site, you must check many components: metadata, work on different devices, errors, etc. To make it easier, use the website launch checklist.
After the site launch, looking behind the analytics data is essential. It will help you see that something is not working, and the task is to troubleshoot quickly.
You can do this in several ways:
– tell on social media;
– ads;
– launch an email campaign (if you already have an email database).
Bottom Line
Launching a website is a large and complicated task in which you must keep in mind many details. I hope this checklist will help you not to miss anything important. The main thing is to be careful and consistent and fulfill as many (and preferably all) requirements from the checklist as possible.
Remember, every detail is important when you launch a website. It impacts conversions, the number of visitors, and customers. Of course, if you find some mistakes after launching, you can fix them at any time. But it would be better to avoid them.
