Building a website that classifies, sells, and promotes books is not so challenging if you have all the tools. I will give you a quick tour of how our Only Books dynamic website has been constructed and which role JetPlugins played there.
Table of Contents
- Creating the Structure
- Preparing the Tools: Getting All the Plugins Needed
- Building the Bookstore Website
- To Wrap It Up
Creating the Structure
First of all, our bookstore website is a shop. So, it will have the following type of pages (post types):
- single book page;
- author’s page;
- publishing company page;
- promotion page template (so we can create several of them using the same template).
Also, we need to show book listings with filters (for the shop page and the main page).
I will also add the functionality of users’ wishlists and show the recently viewed products.
And some additional pages, such as:
- custom checkout page;
- custom login and user’s dashboard page;
- blog page;
- mega menu.
Preparing the Tools: Getting All Required Plugins
For your convenience, I will list the required plugins split into two categories and explain how they will be used.
Plugins to run the website’s functionality
- WooCommerce – for obvious reasons, because we create a store.
- Elementor – I will use this visual builder to create beautiful pages easily. You can also do it with a Gutenberg builder.
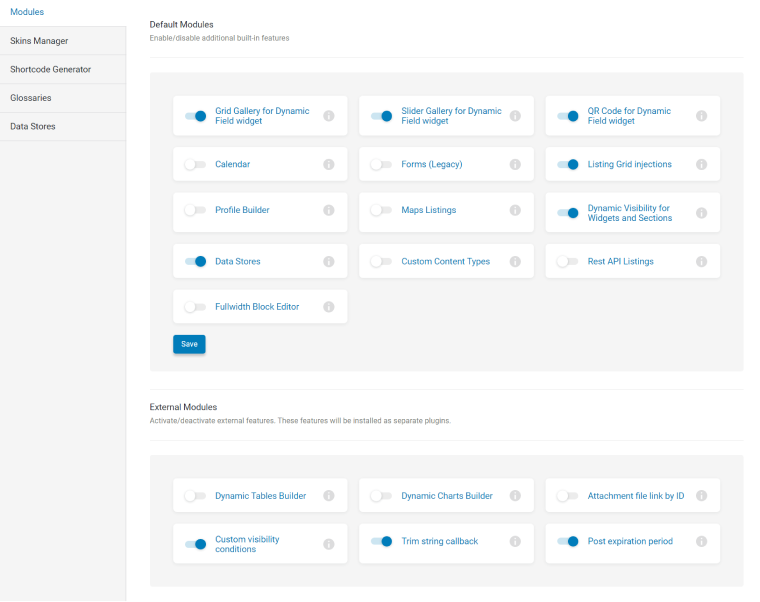
- JetEngine– to create custom post types, taxonomies, product listings, custom queries, and add related products. There’s a list of JetEngine modules we will need to be activated for creating a WordPress bookstore website:
- JetSmartFilters – to add awesome filters to the shop page.
- JetSearch – for an AJAX search everywhere on the website, arranging the results by relevance, beautifully displaying them as a list, grid, or masonry.
- JetMenu – for making a mega menu easily.
- JetReviews – for getting verified reviews and showing them where needed.
- JetCompareWishlist – for creating wishlists, comparing goods, and even showing users how many times they have been added to others’ lists.
Plugins to display things beautifully
- JetThemeCore – for designing custom templates for any post type, taxonomy, headers, footers, and anything you want. 100% visually.
- JetWooBuilder – to edit WooCommerce templates quickly and visually. But not only; this plugin allows displaying dynamic data generated by JetEngine.
- JetElements – a collection of 45 widgets for Elementor to design beautiful pages (also using dynamic data from WooCommerce) and add cool interactive effects.
- JetTricks – to make things look even more beautiful.
- JetPopup – to build stylish pop-ups visually and easily.
- JetTabs – the coolest and most functional tabs and accordions imaginable. You can display dynamic data there or even add templates inside their containers.
- JetBlocks – a set of widgets for adding even more cool elements to your headers and footers.
All of those plugins have seamless mutual compatibility. Moreover, they enhance each other’s functionality. Thirteen of the abovementioned are part of the plugins included in the Crocoblock Subscription. It consists of 20 plugins, 14 premade dynamic websites (Only Books is one of them), more than 40 static website templates, and many other perks. So it’s definitely a great offer to have an all-inclusive subscription rather than getting plugins separately.
Building the Bookstore Website
It’s time to roll up the sleeves and get down to work! I will show you how to build the website structure step-by-step using JetPlugins in conjunction with WooCommerce and Elementor. But don’t forget that all the most powerful Crocoblock plugins also work perfectly with Gutenberg.
Adding extra meta boxes
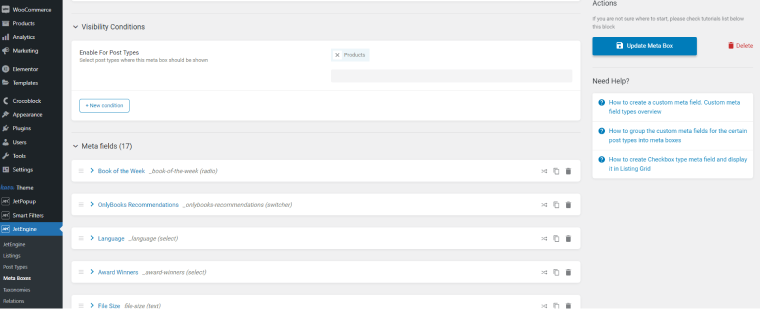
Each product type requires custom meta fields if we want to build a website that looks attractive and its goods can be quickly sorted and found. That’s why it’s time to add meta boxes – sets of meta fields – and assign them to the post or taxonomy type I want them to be. I go to JetEngine > Meta Boxes and create two of them: one for the Single Product page (containing meta fields to add more details about books, e.g., release date, language, file size (for audiobooks), pages preview (for paper and e-books), etc.):
And one meta box with just one extra field for Product Categories to show the categories’ icons.
Creating product categories and adding products
Now it’s time to create product categories and add products. We will have many of them, like every book library website, such as Comics, Business, Psychology, Health, etc.
But also, there will be three types of books: Paper books, E-Books, and Audiobooks. Often, the same book will be presented in all three forms. That’s why it would be a terrible idea to add those types of books as standard categories. That’s why we need a custom taxonomy for this. JetEngine > Taxonomies > Add New, and I will add a Product Type taxonomy for WooCommerce products.
Now we are ready to add products (books), fill all the fields we have, and assign the right category and product type.
NOTE
At this step, add only several test products manually because we still need to create templates for displaying them. And after doing that and testing everything, we can add (import) the rest.
Building custom layouts for WooCommerce pages
When we add products, the data goes to the database. But we need to see and display it correctly: all those meta fields must be placed according to the initial design idea.
To do it with WooCommerce, without any extra plugins, you have to dive deeply into code and use action hooks with a lot of HTML/CSS to create blocks for the meta fields and display them appropriately.
I have good news for you: you don’t have to go through all this because we have a JetWooBuilder plugin to do it visually and with no hassle.
It allows users to modify each WooCommerce template visually. It has premade templates and a bunch of widgets to modify them precisely the way you want. And, of course, you can assign dynamic values to the fields; plus, there’s an option to use a context. For example, to show specific fields or blocks only to the particular category of users or pages.
NOTE
I will add the basic fields, just to see and test how things are displayed on the front end. After creating Listings and Relations, I will be back to edit the template to add them and enrich their appearance and functionality.
Creating CPTs for Author, Company, and Promo pages and their templates
My next step is creating custom post types for the Author, Company, and Promo pages and adding custom fields I want to have there. It’s incredibly easy with JetEngine. I go to JetEngine > Post Types > Add New, and voila, ready!
But now it’s time to create templates for each page and place their custom fields where they should be. Well, it’s time to use another amazing plugin – JetThemeCore. It helps build page templates exactly how I want them to look. There’s a user-friendly dashboard for this:
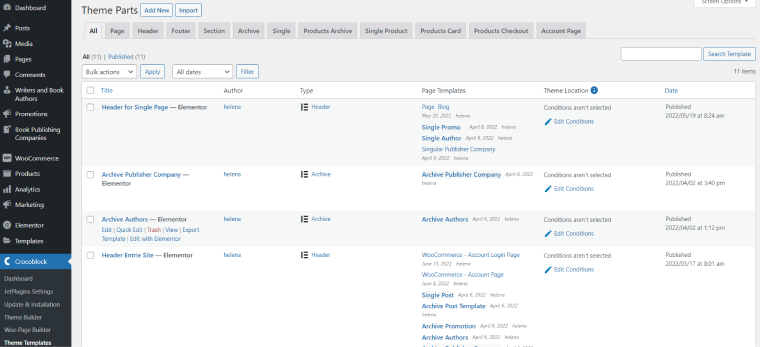
But that’s not all because, with the help of JetThemeCore, you can also assign various combinations of those templates (theme parts) conditionally:
Now pages are ready and look good.
It’s time to move on to the next very crucial step: creating dynamic queries and listings. Later on, we can go back to the page and WooCommerce theme parts templates and add some blocks generated dynamically with the help of those listings.
Adding Authors, Promos, and Publishers and connecting them to books
The Author of the book could be just a meta field, and, frankly speaking, it would be easier. But on this website, I want each Author to have a page with their biography information and photo. As you remember, we’ve already created the Author custom post type. Of course, it’s possible to link the Author somewhere in the book description. But it would be a workaround. The same story with Publishers and Promotions.
JetEngine makes it possible to link books and authors with the help of the Relations feature. Basically, we take two independent entities and link them together, setting up a certain logic and idea of their relationships and their type (one-to-one, one-to-many, many-to-many). This feature is simply essential for showing related posts, for example.
So, what we do is to create those relations. Let’s see how it’s done for Books-Authors one and what other options JetEngine offers to be used in its settings:
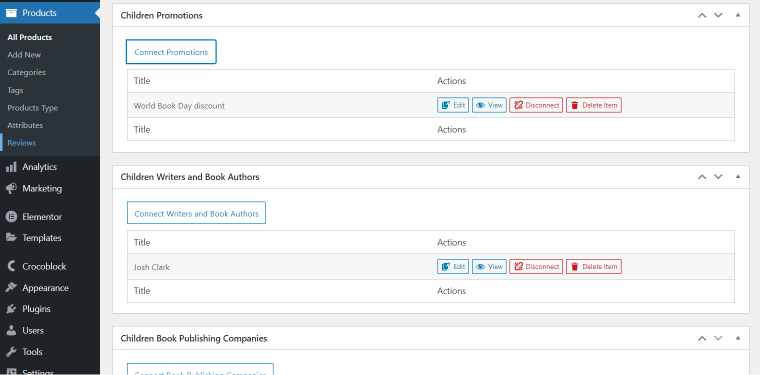
After doing this, we will get a new set of fields on the Product edit page – for connecting children Writers, Promotions, and Publishers. “Children” because in this relationship hierarchy, they are child objects to Products.
What we have to do here is simply select the connected objects from the list.
Generating blocks dynamically using Listings and Custom Queries
Listing is one of the central features of JetEngine, and it’s truthfully amazing if you know how to use it. But to learn it is very easy; you only need to understand the principle of how they work.
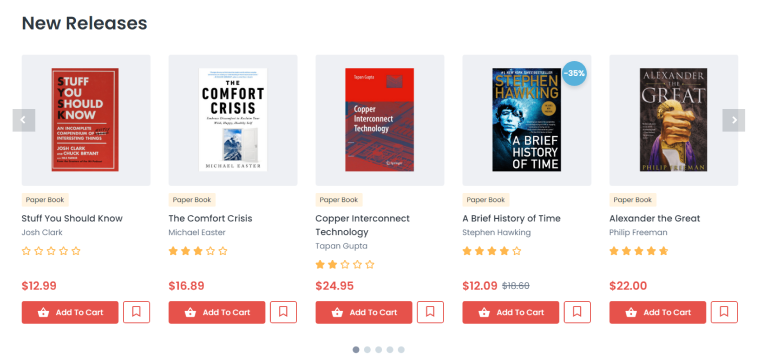
So, on the dynamic website, a lot of blocks are being generated dynamically. It means that the data shown in those blocks can change depending on the many factors. The most basic example is the product grid: you select a category and see products, information about which has been fetched from the database in the order, and the design you assigned for that grid.
The same logic can be applied almost anywhere on the website, from showing the discounts depending on the period, user’s type, and other conditions, to showing particular banners on specific pages.
Dynamic listings and their templates are created for displaying data dynamically from the meta fields in the order and under conditions you set for them, with the styling you want them to have. You create them for one item, which later will become a building block for the loop. And this loop will be generated with the help of the Listing Grid widget/block.
Essentially, Listing Grids fetch data and create custom queries made of entities presented on the website (such as taxonomies, posts, meta fields, etc.). But the Crocoblock developers wanted to find a way to make those listings even more flexible, where a lot of settings, conditions, and fields would be adjustable by users. However, there were three issues with this fantastic idea:
- If you show all those settings on the front end (adding it to the regular Listing creation interface, which already has many fields), any of the editors/builders wouldn’t handle it.
- There will be a problem with a DOM structure, which would slow down the website.
- The settings for a Listing Grid would work only for that specific listing grid. What if you want to change something? You would have to edit every grid on every page.
That’s why they created a Query Builder. With the help of it, you can query basically anything on the website, from posts and taxonomies to the data from the SQL tables or REST APIs. You can create custom queries and use them as a base (source) for listings. Listings will add their own fine adjustments to get exactly what you want without coding.
I’ve created several listings for the website we build, some to be shown inside the mega menu, some to be a building block of the promo and other pages.
Also, a bunch of custom queries have been created with a Query Builder. Have a look at the settings of one of them:
Adjusting filters
Working with JetSmartFilters is a straightforward and intuitive process; just set up which widgets will be available for filtering, and then just add all the filters needed.
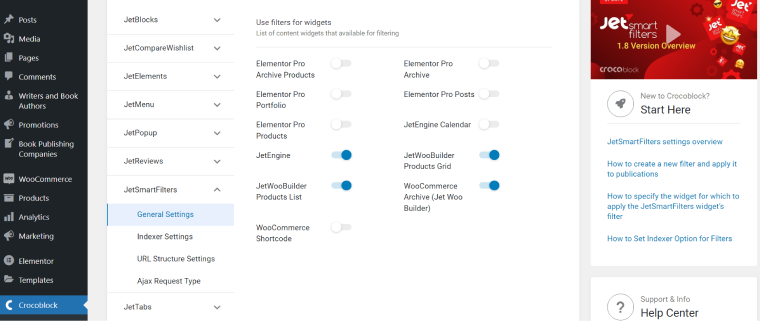
I go to JetSmartFilters > Add New and adjust the filter, which later will be pulled out on the front end with the help of JetSmartFilters widgets.
This is what the settings for the filter for choosing the book category look like:
Designing a beautiful mega menu
The mega menu is an integral element of an eCommerce website to display items the way users can find them easily. JetMenu is the plugin for creating such menus effortlessly and quickly.
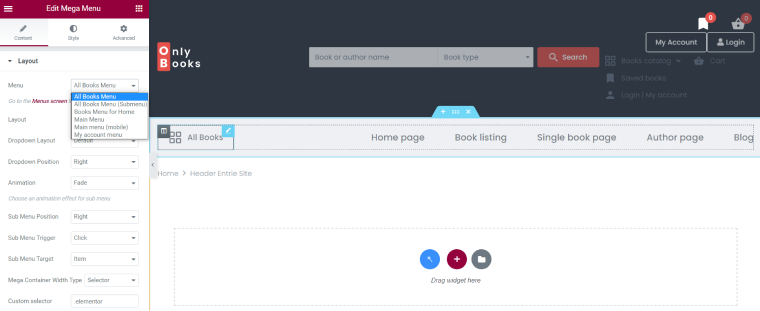
The key to understanding the main principle of how the JetMenu plugin works is the idea of a nested structure. Imagine that each mega menu block appearing on hover/click is simply another menu. Well, congrats, now you know how to work with JetMenu.
So, for starters, you create a menu with the top-level items and the menus you want to have as submenus in a mega container. Use a default WordPress menu interface Appearance > Menus > Create New for this. And then add the mega menu functionality to the blocks you want to be parents, clicking the button in front of it. Each mega menu block can be edited with Elementor or Gutenberg as any other container on the page.
The amazing thing about it is that listing grids and custom queries can be added to the menu. We will form the paper books mega submenu using listing grids only on our book library website. Have a look at the structure:
We use two menus for our website, placed on the same flex container. It’s easy to do via Crocoblock > Theme Templates, then create and edit the header with everything needed there, including menus, and assign the pages (or the whole website) where this particular header with all the elements will be displayed. (This is a functionality of the JetThemeCore plugin).
The search line (JetSearch plugin widget), Logo, My account, Cart, and Login buttons (JetBlocks plugin widgets) are also added while editing the header, as well as the Wishlist icon (we will set it up in the following steps).
Making custom user’s dashboard & login, and cart pages
As you have already guessed, the custom templates for the user’s dashboard are also created using the JetWooBuilder and JetThemeCore plugins, using the same logic and visual interface as we did in the previous steps.

Adding the wishlists functionality
Now it’s a turn of the JetCompareWishlist plugin to show off in all its glory. We will use only the Wishlist functionality. I will go to Crocoblock > JetPlugins Settings > JetCompareWishlist and set it up:
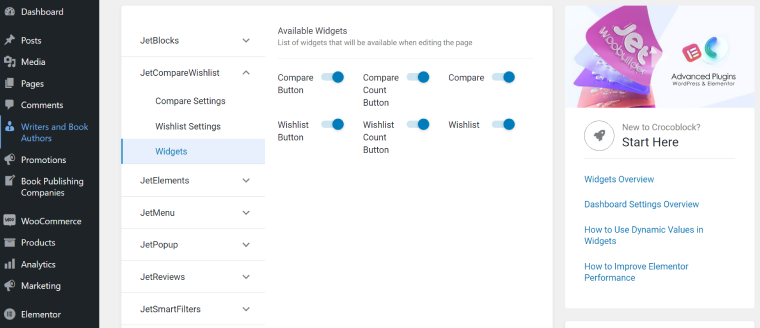
After doing that, it’s important to activate all the widgets, and we are ready to add those widgets to the templates where we want to see such buttons.
Adding JetReviews functionality
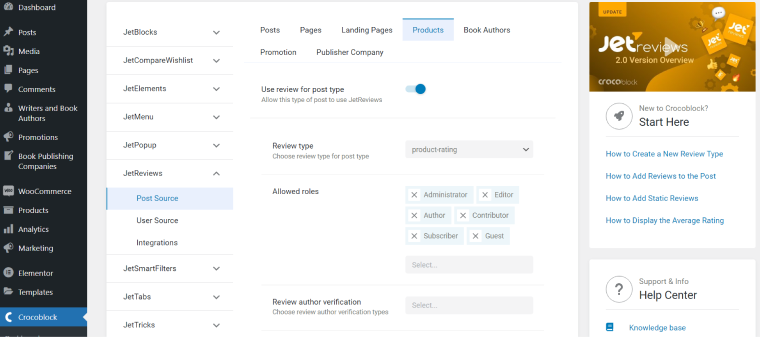
JetReviews plugin gives all the functionality for creating rating+comment reviews and displaying them whenever you want. Users can also interact with already existing reviews and upvote/downvote them. First, I made the Review Type called product-rating to give the books 1-5 stars.
Then, I will assign it to a WooCommerce product and select user roles qualified for leaving such reviews. For this, I go JetReviews > Settings, add the rules and assign the meta field.
Now, we will add the Write review block to the product front-end. They are placed on the bottom of the single book page inside tabs (JetTabs functionality). Go to Crocoblock > Woo Page Builder and add the widget with all the settings you want.
But there’s one more case about using JetReviews: to show the book’s average rating. We will need it to display on the Home and Category pages inside the listing grid. Of course, we will use dynamic fields for this. Finally, we have a beautifully placed average star rating for each product in the grid.
To Wrap It Up
It was a brief guide on building a book library/eCommerce website using JetPlugins (the Crocoblock Subscription). If you need more information and details about features and particular plugins used for the website, follow the links given in the text or check out the Crocoblock Knowledge base, Blog, and YouTube channel.
Also, you can get this website already premade for you and dig deeper into all the elements and methods used here. For this, you need an All-Inclusive Crocoblock Subscription, which comes with all 20 plugins and 14 dynamic templates (basically premade websites, like the one we analyzed here).
