Adding Custom Tooltips Within JetElement’s Table, Tabs, and Accordion Widgets
Learn how to add custom tooltips inside widgets, blocks, and tables, where you can't do it with the JetTricks plugin, as it adds them to widgets, not inline.
Before you start, check the tutorial requirements:
- Elementor (Free version)
- JetElements or JetTabs or JetFormBuilder plugin(s) installed and activated with the required widget(s) enabled
Use HTML Attribute (for Desktops Only)
Using an HTML attribute is the simplest way to add WordPress tooltips; however, in this case, the tooltip will be visible on desktops on hover, but not on mobiles.
In this case, we add the Tabs widget to the page, unroll the Items settings, and insert the following HTML directly into the Label field.
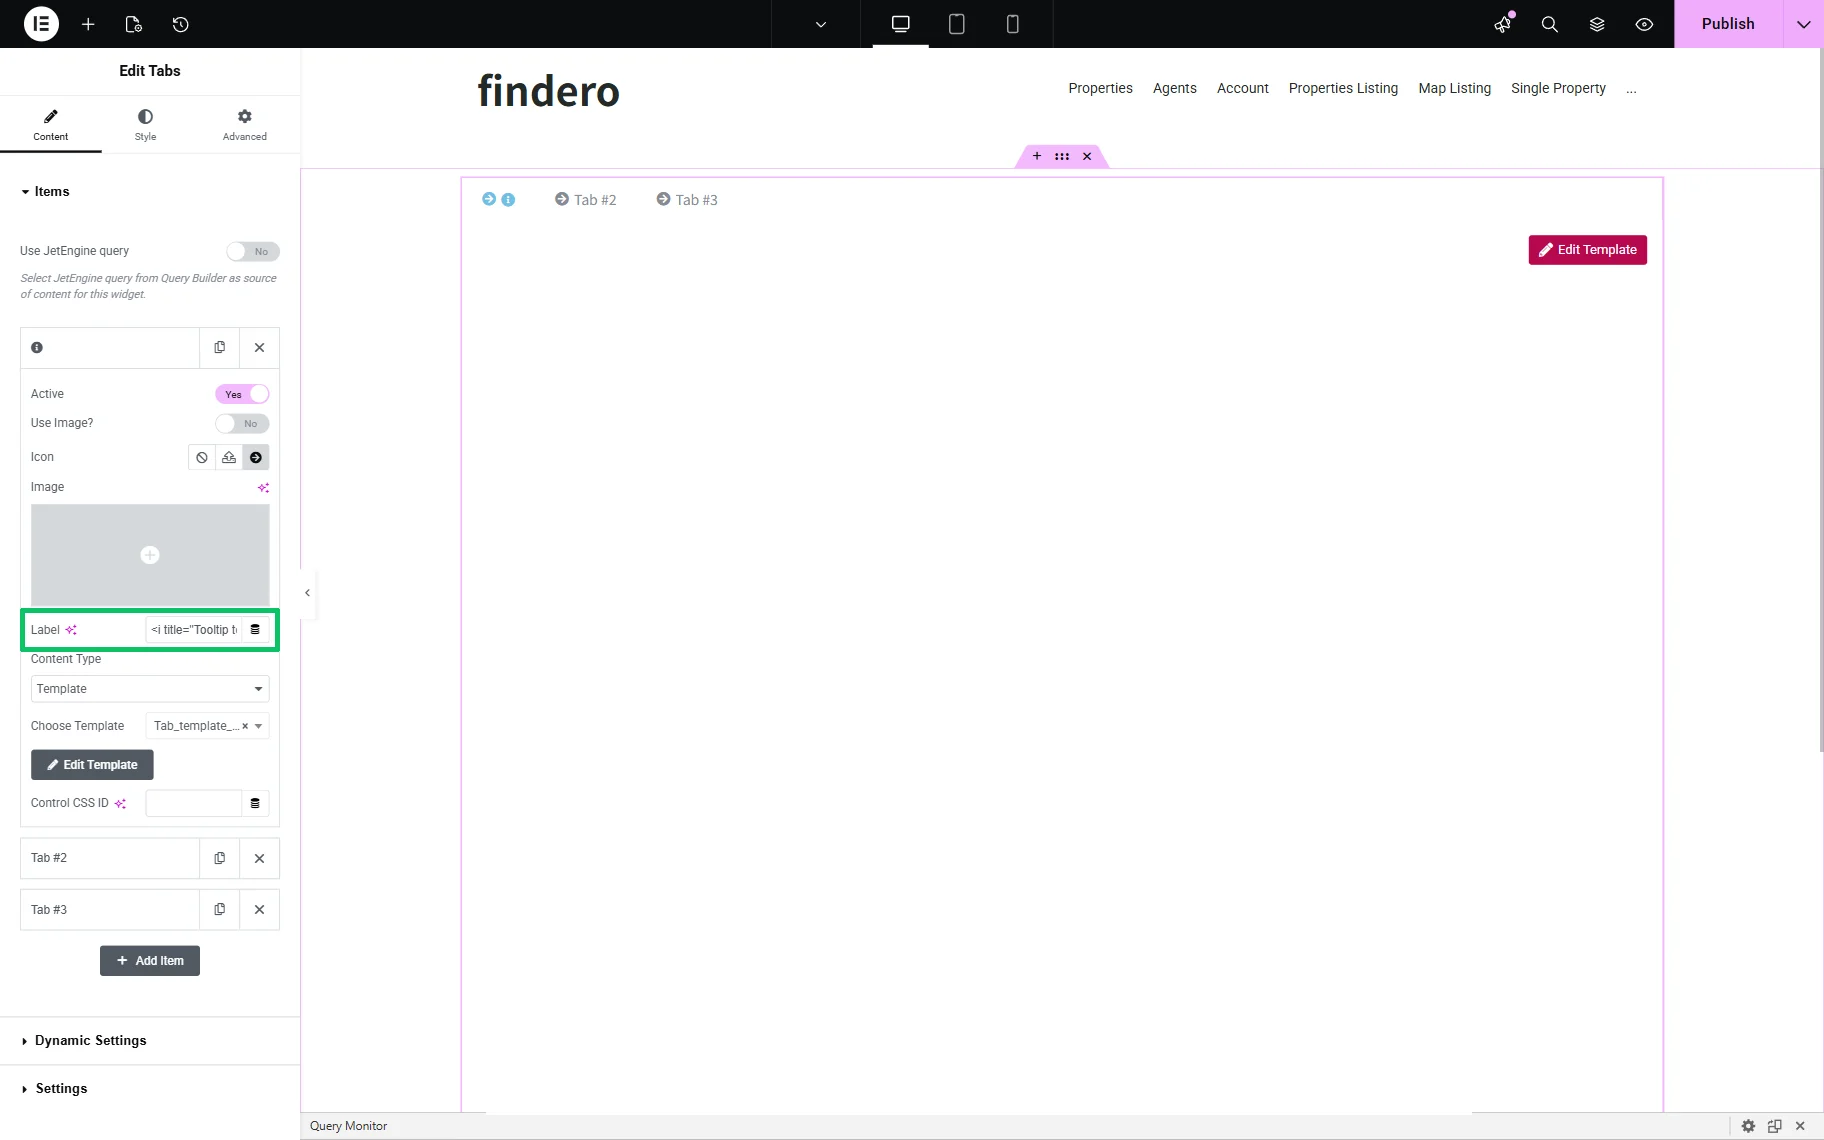
<i title="Tooltip text" class="fas fa-info-circle"></i>where the “Tooltip text” is the text to be displayed in the corresponding tab.
In this case, the text in the Label field looks as follows:
<i title="Just read it!" class="fas fa-info-circle"></i>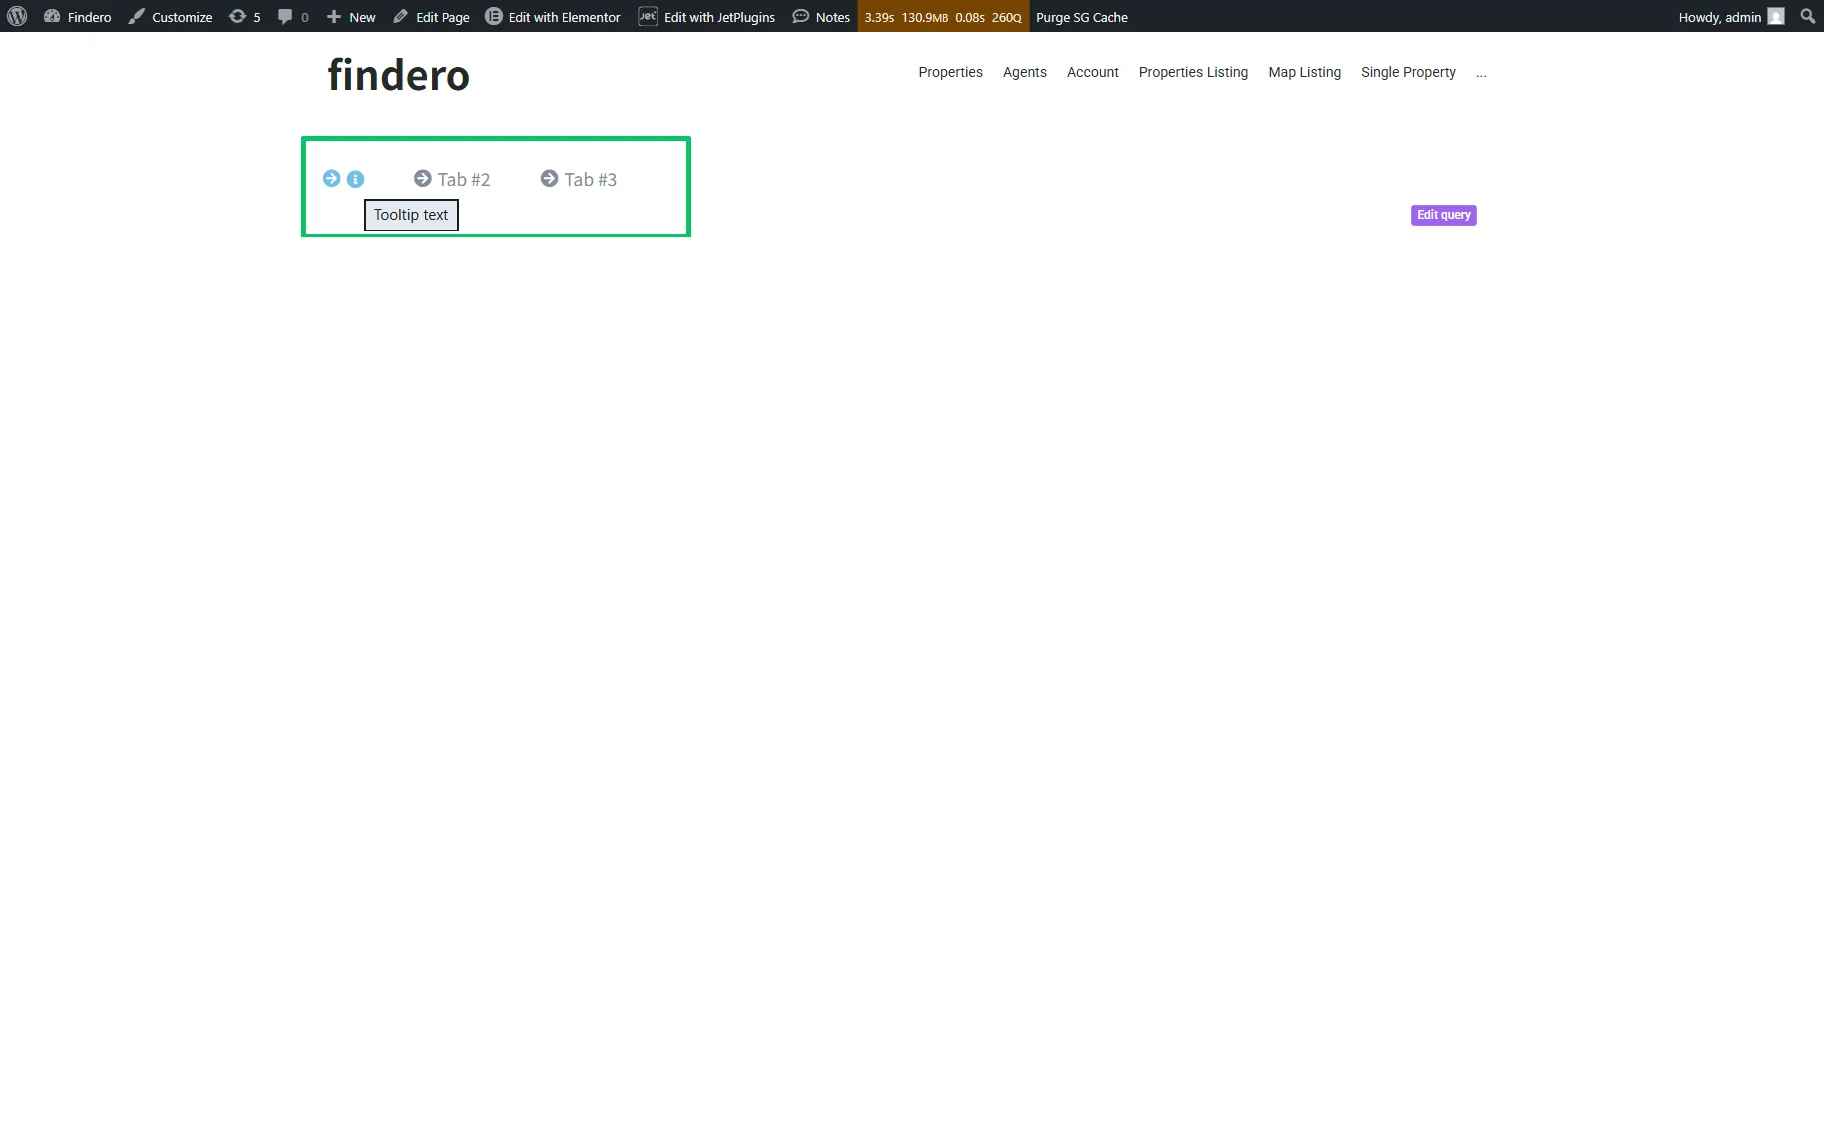
Add HTML (for Desktops and Mobiles)
The cases described herein display the needed tooltip texts on mobiles and on desktops while hovering or clicking.
Add inline HTML to a widget title
The following HTML element can be added to the Title element of the Tabs widget or the Classic Accordion widget.
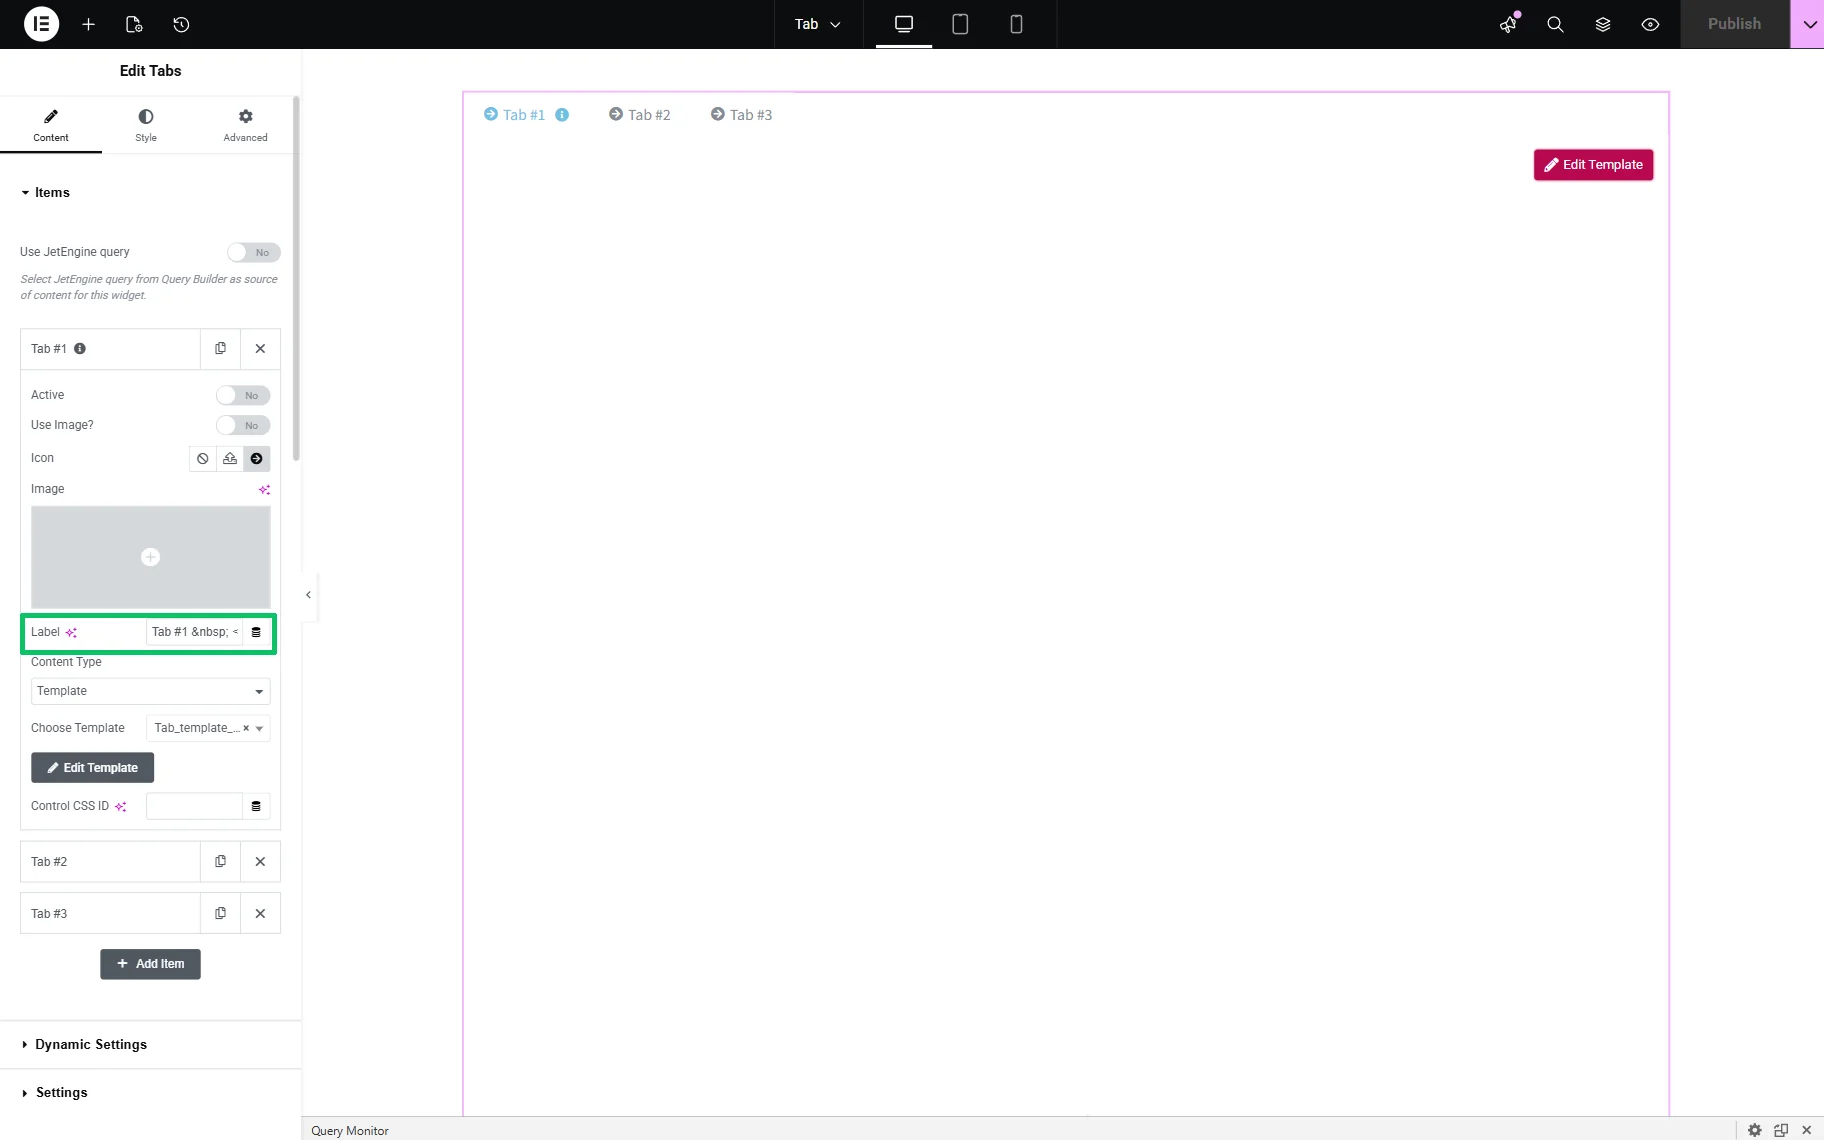
Tab#1: <span class="tooltip" data-tip="Your tooltip text here"> <i class="fas fa-info-circle"></i> </span>where:
- Tab#1 一 the name of the particular tab;
- 一 the space sign, can be inserted as many times as needed;
- “Your tooltip text here” 一 the tooltip text to be displayed;
- <i class=”fas fa-info-circle”></i> 一 a specific “Info” icon from the Font Awesome4.
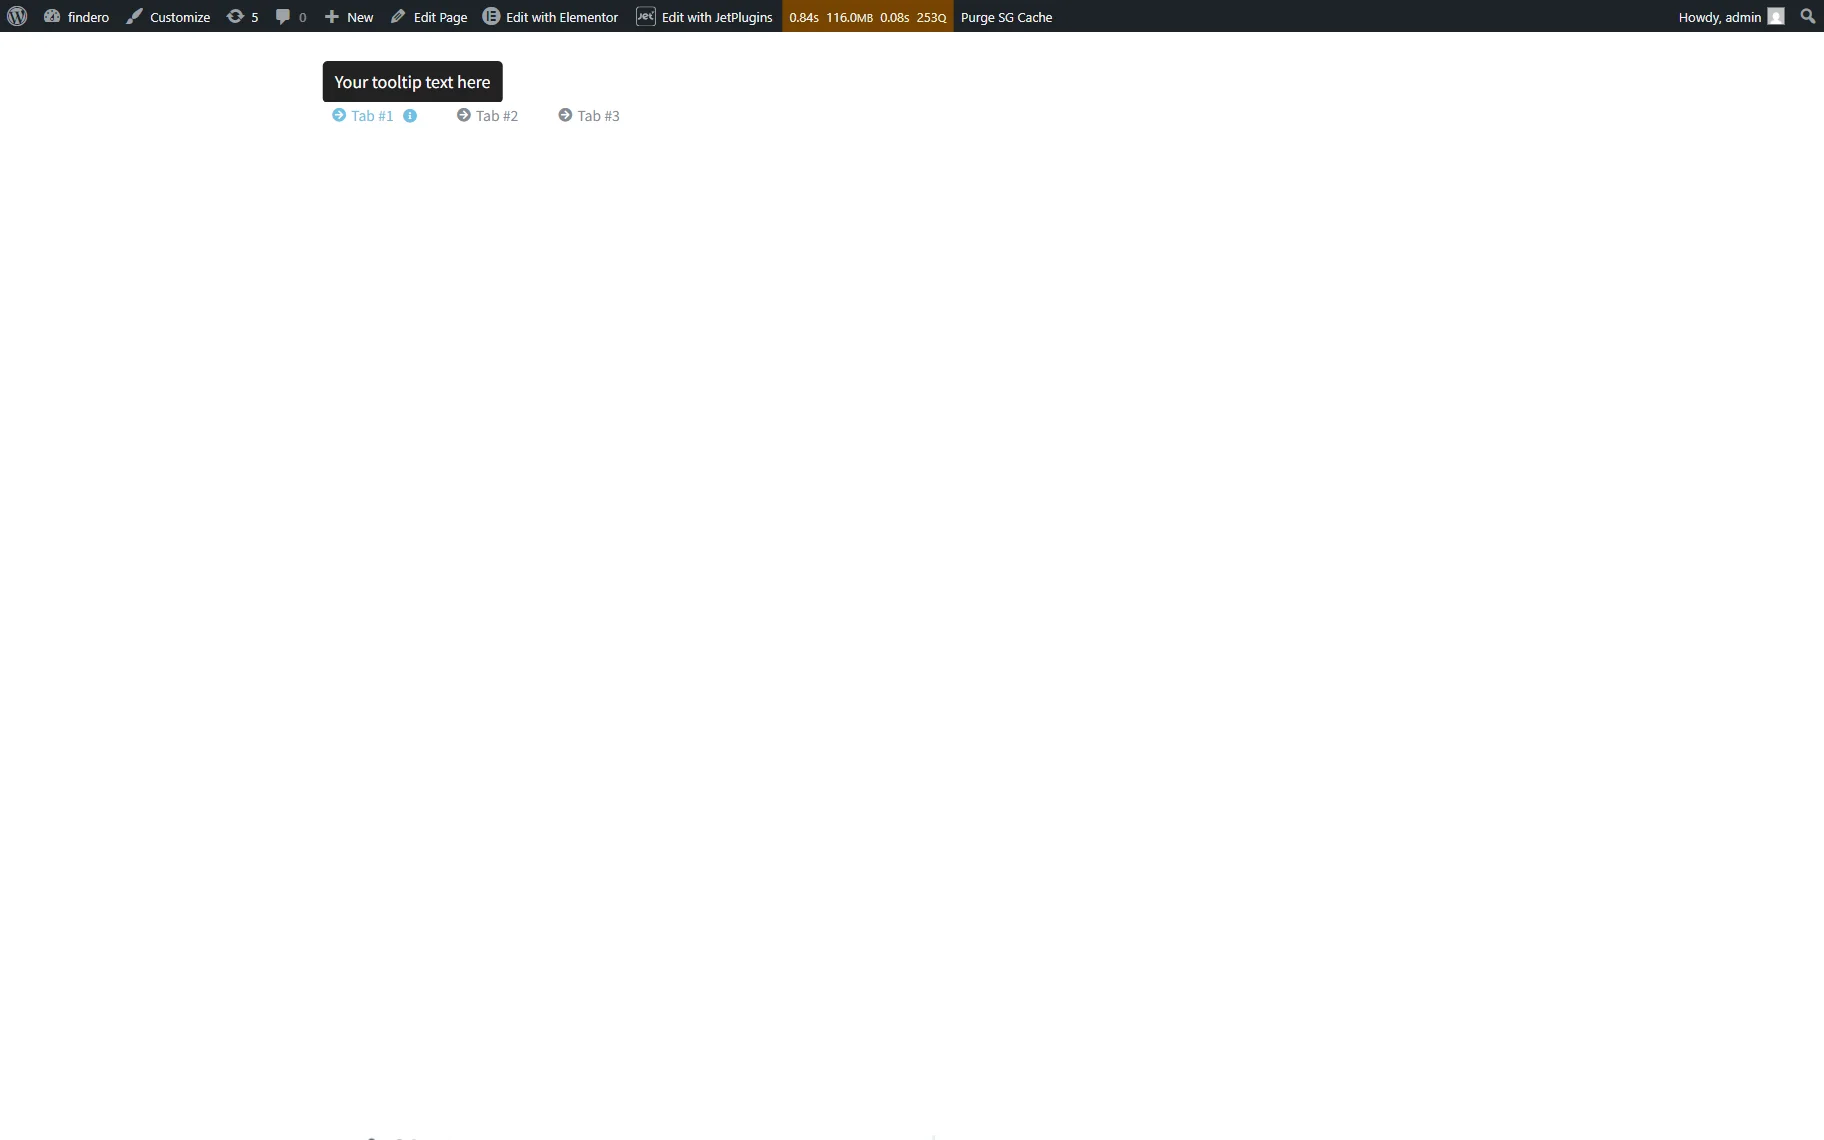
On the front end, the widget displays the “Your tooltip text here” text after hovering.
If you don’t want to display icons, you can use any text sign instead. You can also place the icon or text slightly above the line by wrapping it in a <sup></sup> tag as follows:
Tab #1 <span class="tooltip" data-tip="Your tooltip text here"> <sup><i class="fas fa-info-circle"></i></sup> </span>Add СSS and JavaScript
For this method, you will need to insert custom CSS and JavaScript either by using Elementor Pro or another plugin for custom snippets.
We will show a method that uses Elementor Pro.
First, go ahead to the WordPress Dashboard > Elementor > Editor > Custom Elements > Code tab and insert the code into the corresponding field.
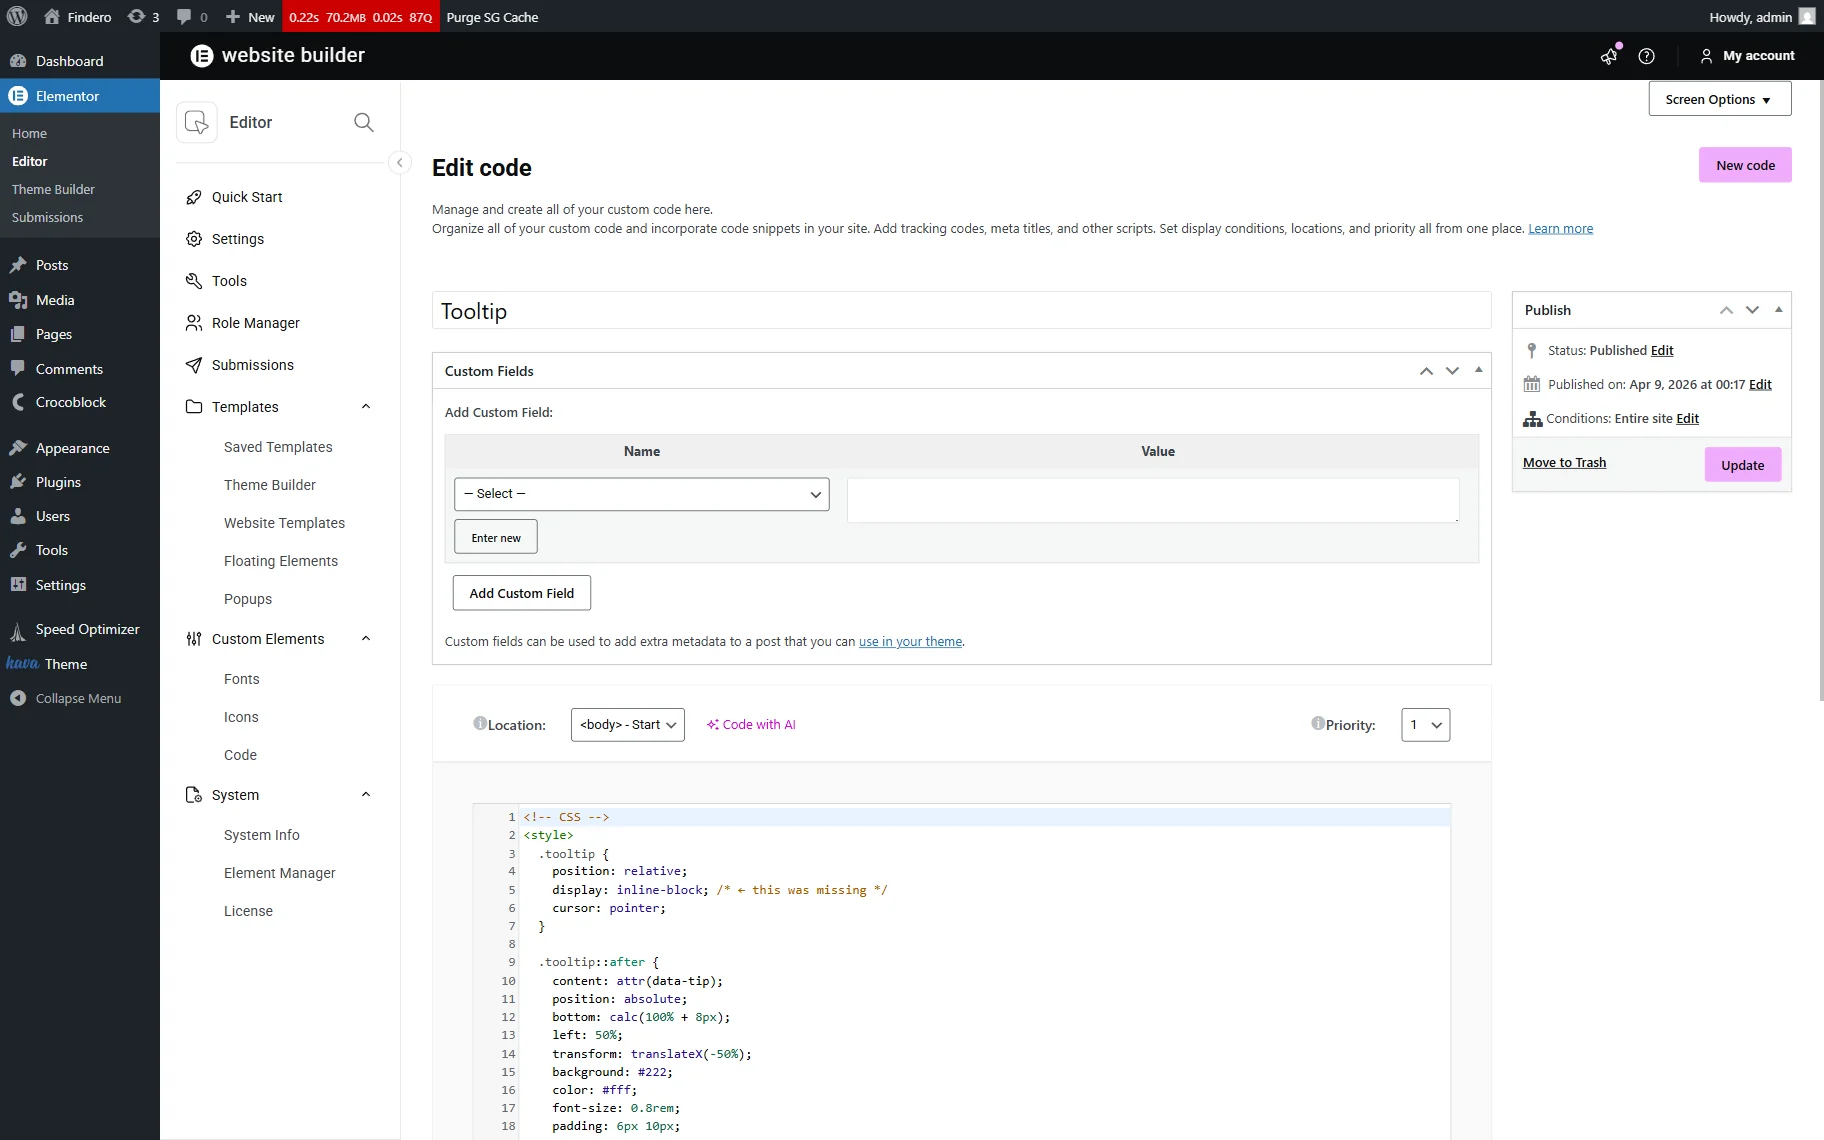
Once completed, press the “Update” field to save the snippet.
If you have no Elementor Pro, you can use any custom snippet plugin, for example, Post Snippets (since it supports JavaScript in the free version), and insert JavaScript and CSS separately.
If there are elements that can overlap this tooltip because they overlap parent containers, then you should either change the Z-index of the parent containers, or use the following approach 一 it will always be on top of other elements, but slightly more complex. First, insert these CSS and JavaScript:
<style>

#tooltip-global {

  position: fixed;

  transform: translate(-50%, -100%);

  z-index: 999999;

  background: #222;

  color: #fff;

  font-size: 12px;

  padding: 6px 10px;

  border-radius: 4px;

  white-space: nowrap;

  pointer-events: none;

  display: none;

}

</style>

<!-- JS (mobile tap) -->

<script>

(function(){

  let tooltip;

  function getTooltip() {

    if (!tooltip) {

      tooltip = document.createElement('div');

      tooltip.style.position = 'fixed';

      tooltip.style.zIndex = '999999';

      tooltip.style.background = '#222';

      tooltip.style.color = '#fff';

      tooltip.style.padding = '6px 10px';

      tooltip.style.borderRadius = '4px';

      tooltip.style.fontSize = '12px';

      tooltip.style.whiteSpace = 'nowrap';

      tooltip.style.pointerEvents = 'none';

      tooltip.style.display = 'none';

      document.body.appendChild(tooltip);

    }

    return tooltip;

  }

  document.addEventListener('mousemove', function(e){

    const el = e.target.closest('.tooltip');

    const t = getTooltip();

    if (el) {

      t.textContent = el.getAttribute('data-tip');

const rect = el.getBoundingClientRect();

t.style.left = (rect.left + rect.width / 2) + 'px';

t.style.top = (rect.top - 3) + 'px';

t.style.transform = 'translate(-50%, -100%)';

      t.style.display = 'block';

    } else {

      t.style.display = 'none';

    }

  });

})();

</script>
Add the following HTML directly to the Table widget from the JetElements plugin in the Text field of the heading:
Tab #1 <span class="tooltip" data-tip="Your tooltip text here"> <i class="fas fa-info-circle"></i> </span>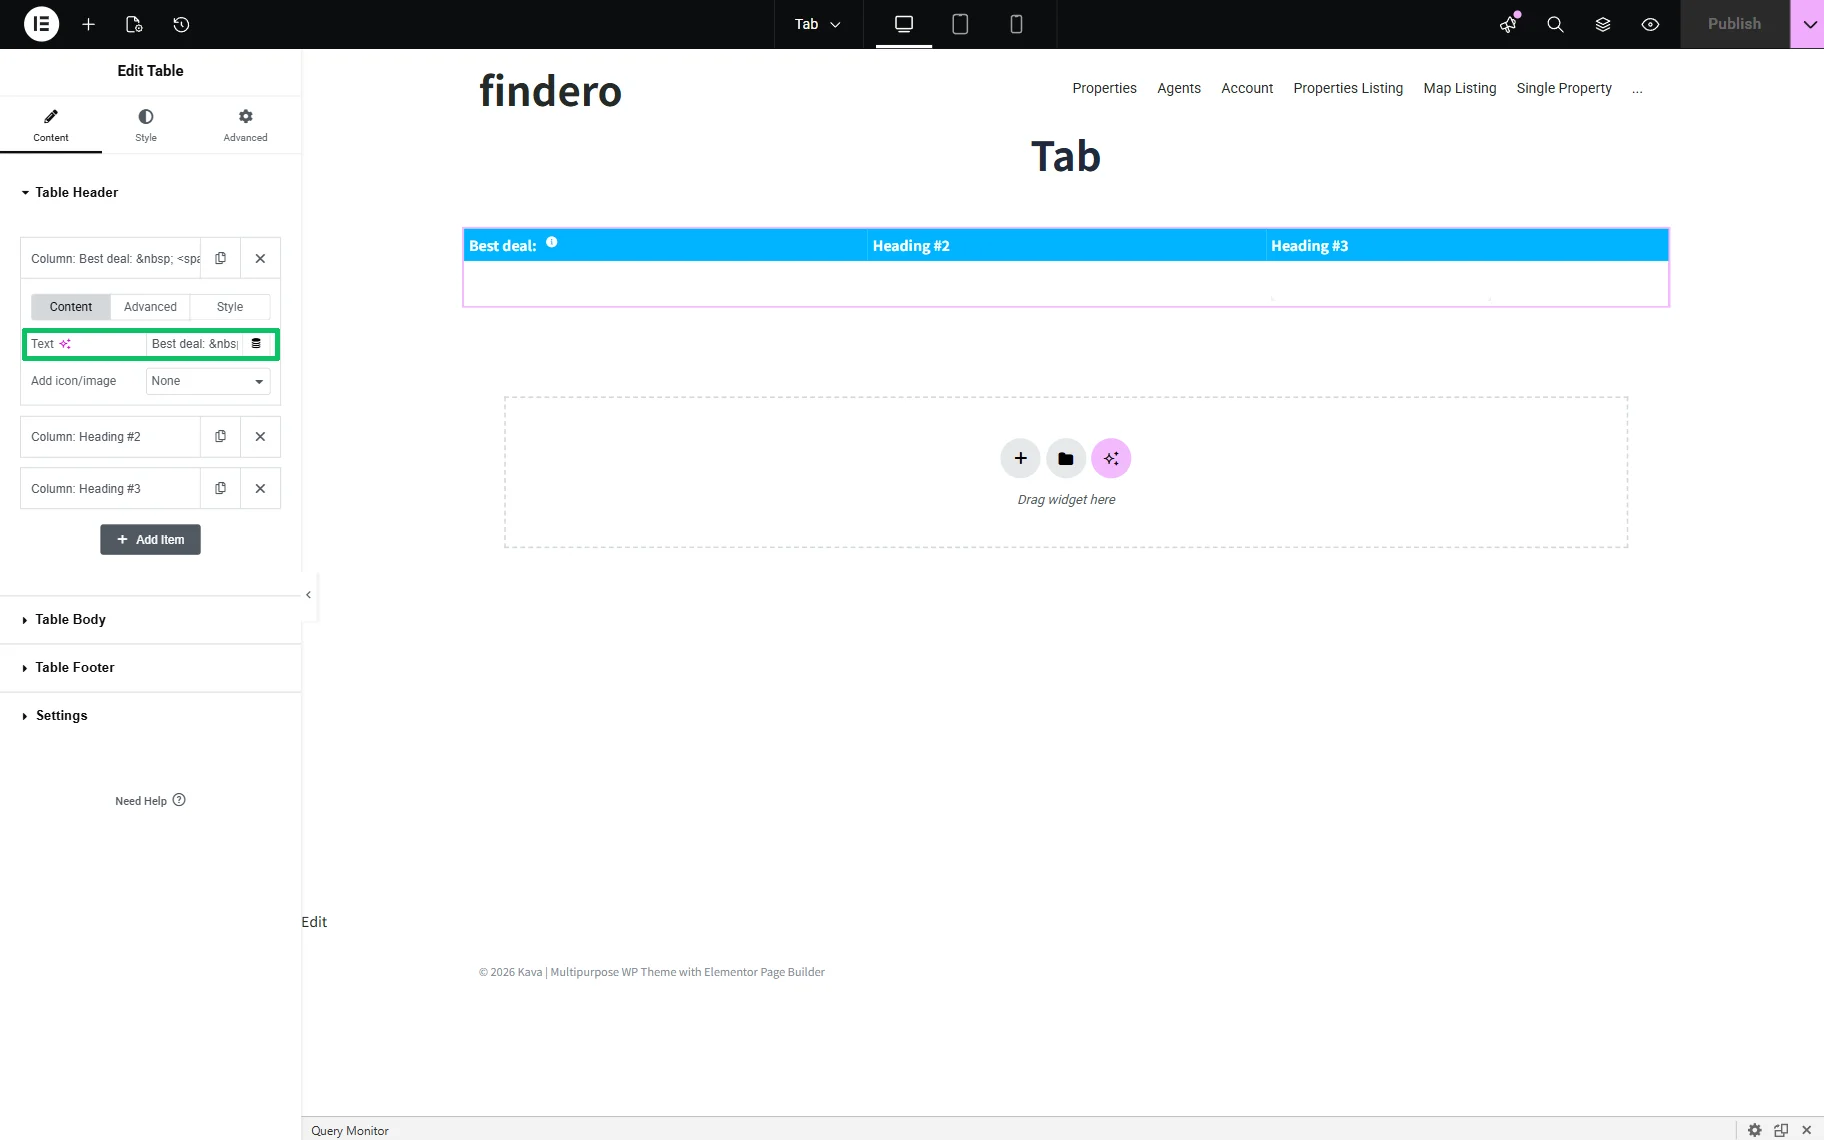
Then, move to the front end and check the result.
You can use this method for any inline element. For block elements (templates, widgets), tooltips can be easily added using the JetTricks plugin. It allows you to add flexible tooltips, control their positioning, and animation.
Add the Tooltip to a Form
The JetFormBuilder plugin allows inserting text to be shown in the field, and in this way, it covers the tooltip functionality. To add the needed text into a particular field, move to the particular field’s setting block, unroll the Advanced settings, and insert the needed text into the PLACEHOLDER field.
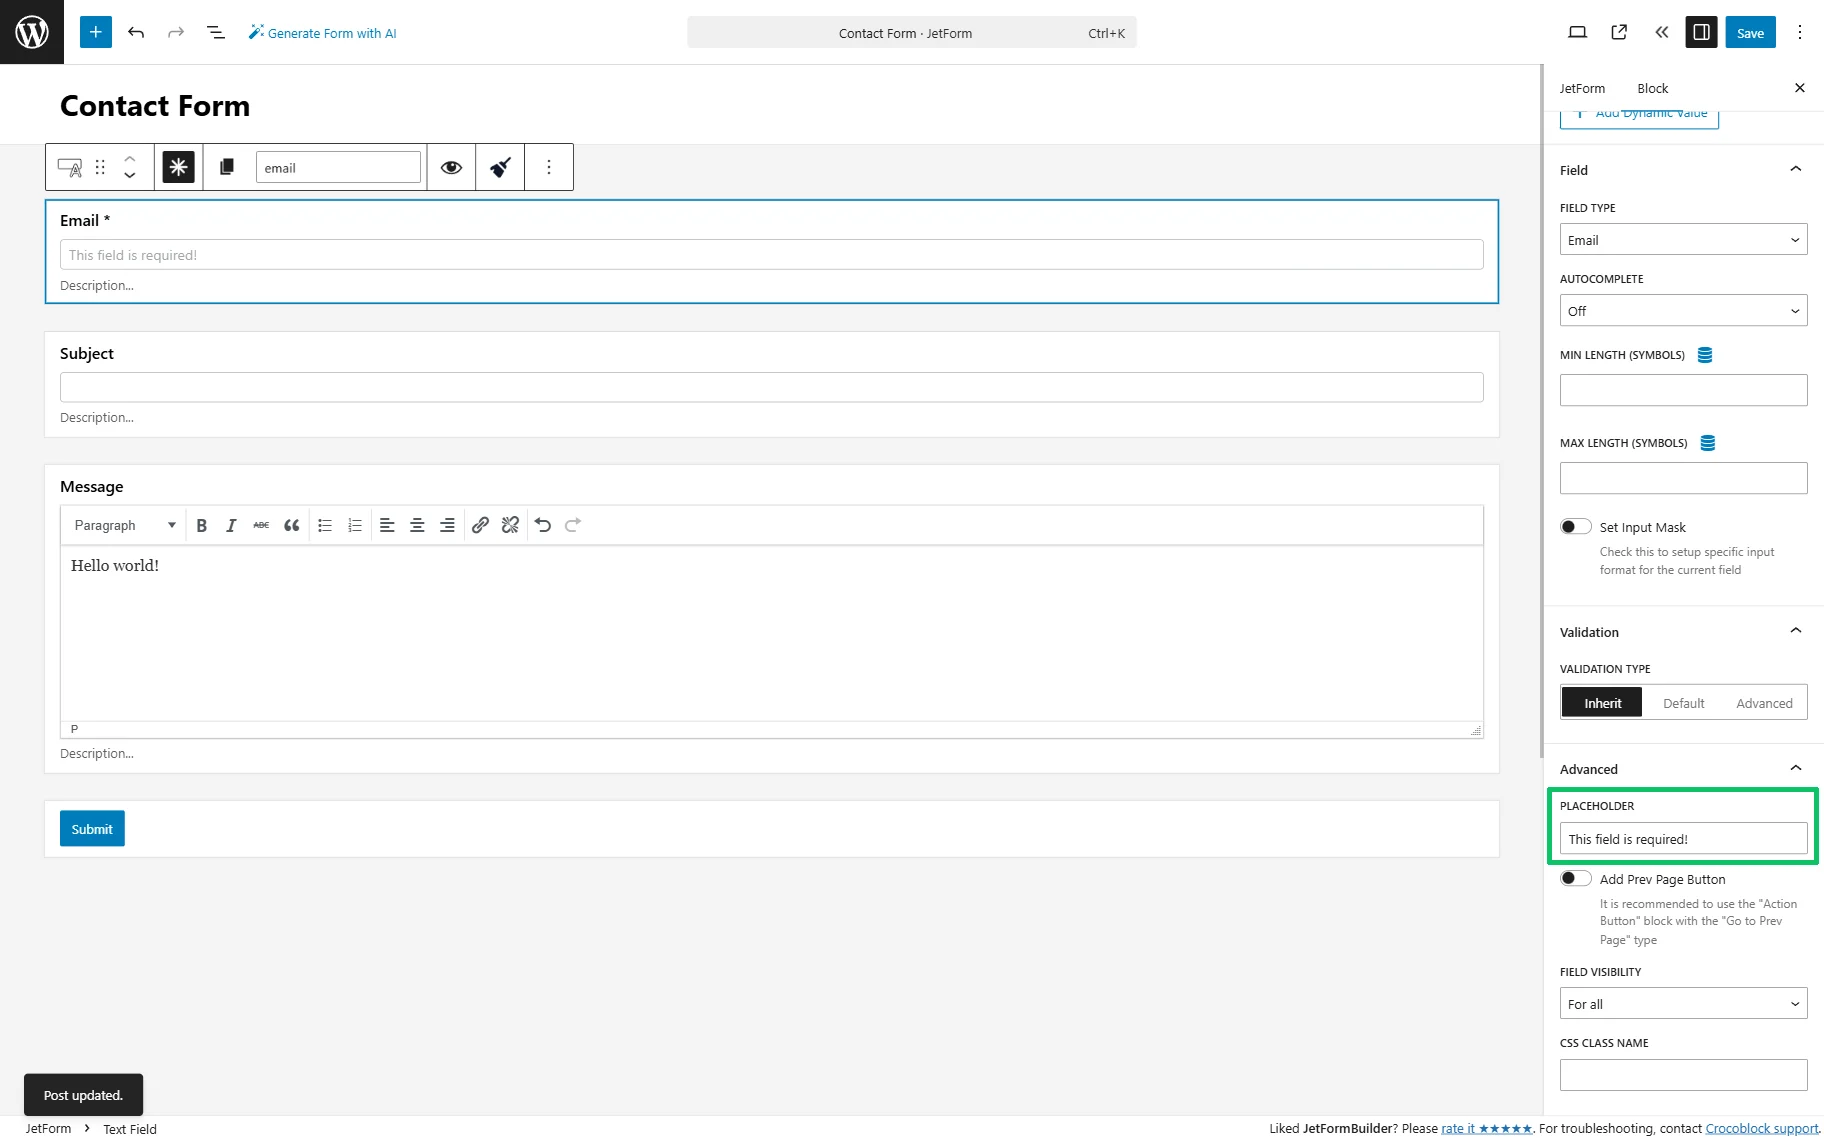
However, if you need to add the tooltip, use the same method described above and add the HTML to a LABEL field.
FAQ
You can add text, images, icons, and links.
To customize the tooltip, unroll the Style tab and configure the tooltip’s colors, typography, spacing, borders, and more.
No, currently this functionality is unavailable.
Yes, both are possible.
No, currently this functionality is unavailable.
That’s it. Now you know how to add a custom tooltip to an inline element inside a table, tab, or form label on your WordPress site.