How to Manage Units via the WordPress Dashboard
Learn how to create and edit apartment units as CPT posts and WooCommerce products using different JetBooking modes and how to manage the collected booking orders via the JetBooking dashboard.
Before you start, check the tutorial requirements:
- JetBooking plugin installed and activated
The JetBooking plugin offers two booking modes: “Plain” and “WooCommerce-based.” These modes allow you to enter apartment unit data in CPT posts and as WooCommerce products, respectively. Furthermore, these data can be displayed on the front end, and users can select the needed unit via booking forms or without forms.
For more details about the “Plain” Booking mode usage forms, refer to the How to Create a Booking Form and How to Create a Booking Form with WooCommerce Integration tutorials. Also, read the How to Use Booking with WooCommerce Based Mode tutorial for more features of the “WooCommerce based” Booking mode, creating WooCommerce products, and the order workflow.
Insert and Edit Units via the WordPress Dashboards
To enter the apartment units, install and activate the corresponding additional plugins: the JetEngine plugin to save data in CPT posts and the WooCommerce plugin to save data as WooCommerce products.
Configure units in CPT posts
To specify apartment unit options, first, set the “Plain” Booking mode in the WordPress Dashboard > Bookings > Settings > General tab.
Select the Custom Post Type (CPT) that will be used for recording and storing the booking orders in the Booking orders post type field (“Ad_orders”, in this tutorial) and the CPT that will be used as booking instances in the Booking instance post type field (“Apartment”, in this case), respectively.

Second, to allow change booking status from the “On hold” default status, move to the Advanced tab and enable the Automatically switch bookings statuses toggle to automatically change the “on hold” status of the unpaid orders. Here, we select the “Once Daily (1 day)” Switch interval to change the default “On hold” Target Status(es) to the “Cancelled” New Status. Therefore, if users do not pay for the order within a day, it will be canceled automatically, and the date will become available for another booking by another user.

The settings will be saved automatically.
Finally, head to WordPress Dashboard > JetEngine > Post Types. Press the “Add New” button on the Custom Post Types List page to create a new post type (the “Apartment”, in this case).
Read the How to Create Custom Post Types in WordPress tutorial to learn how to configure the needed CPT settings.
Scroll down to the Units manager section and click the “Manage Units” button to add the unit’s data.
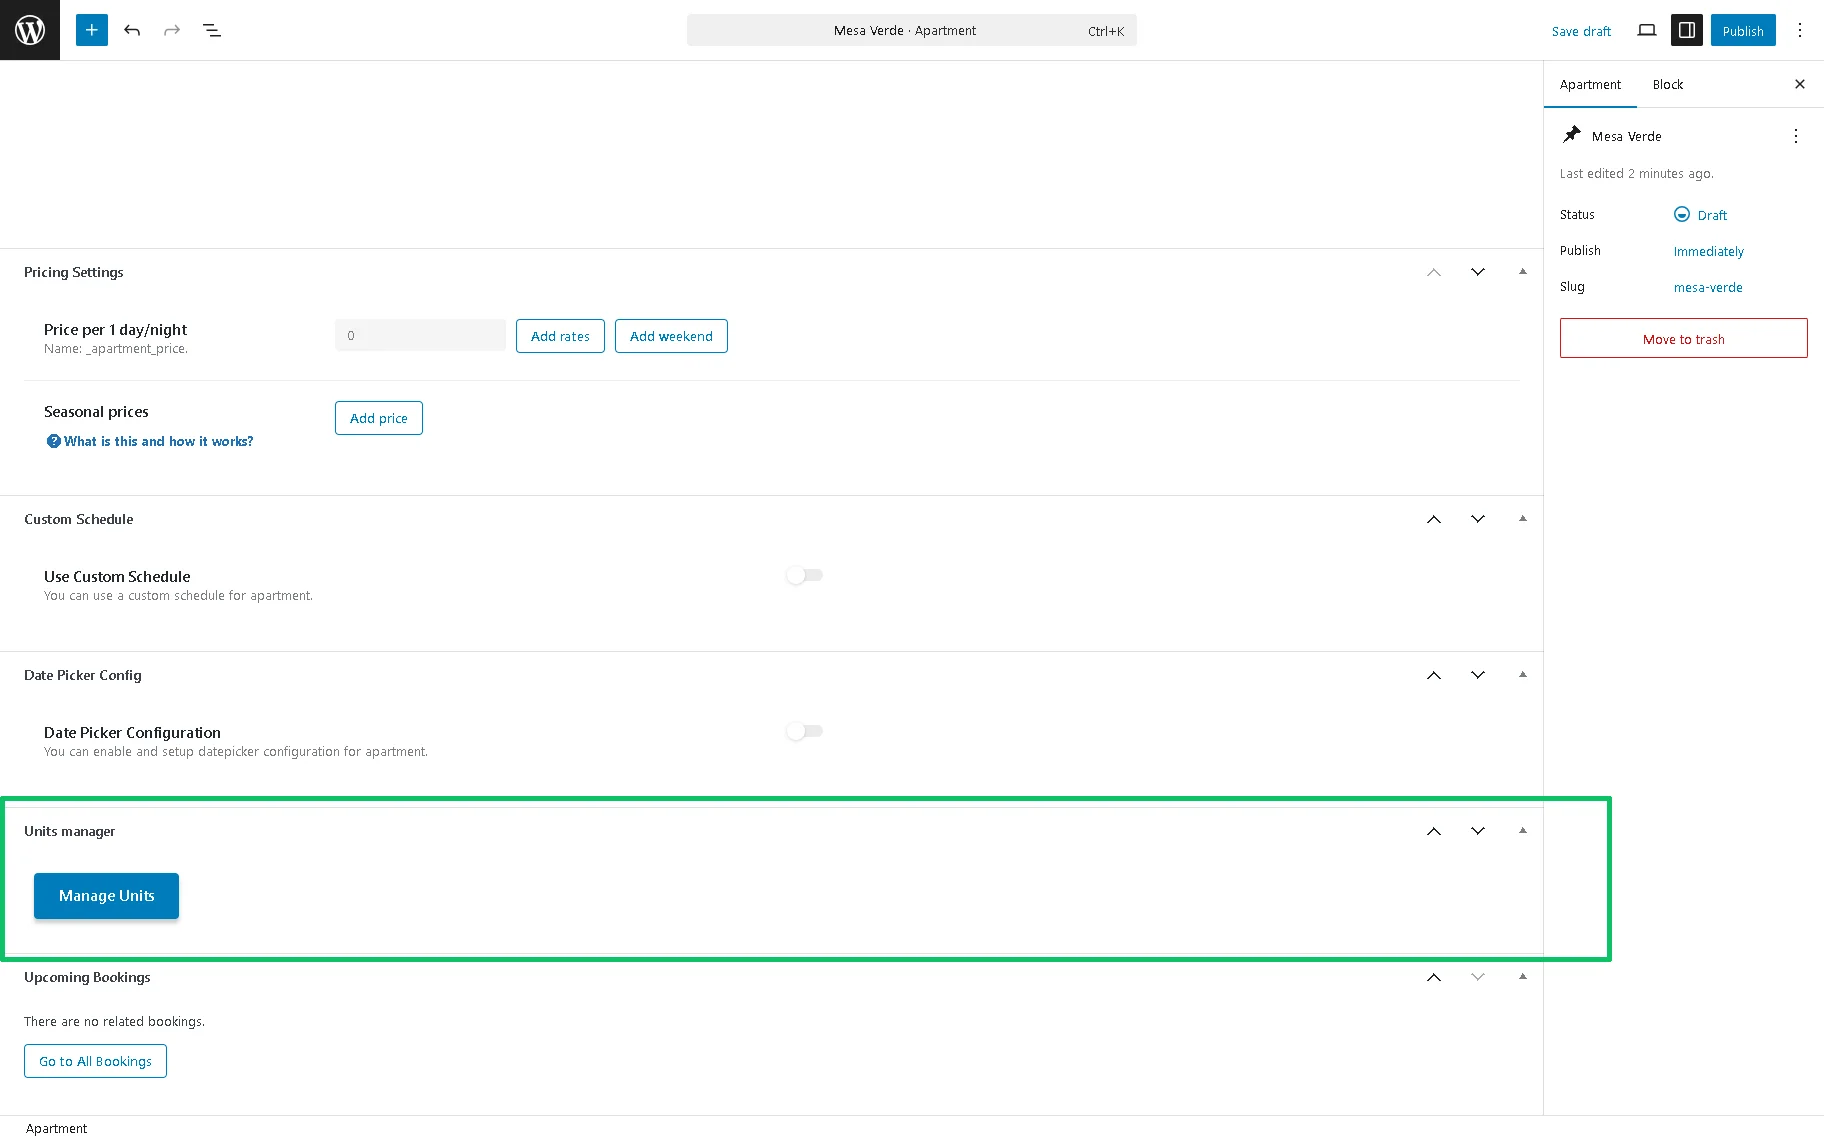
After that, the Available Units block will be unrolled. To create a new unit, click the “Add Units” button. Fill out the “Number” and “Title” fields. If the Title field is empty, the room’s title will be used.
After that, click the “Add Units” button, and the units will appear in the Available Units list. The created unit will appear in the list.
Here, you can change the name of the unit or delete it all by clicking the corresponding option next to it (“Edit” or “Delete” action).

Once completed, publish the post.
Configure units in WooCommerce products
First, navigate to WordPress Dashboard > Bookings > Settings. Unroll the Booking mode drop-down menu of the General tab and select the “WooCommerce based” option.

To learn more about configuring the booking settings in the JetBooking Dashboard Overview.
Next, create a WooCommerce product by navigating to the WordPress Dashboard > Products > Add New path and changing the default “Simple product” to the “JetBooking” option in the Product data drop-down list. Then, tick the Unit Selection or Allows the user to select the number of units to book checkbox fields depending on your intention to allow users to choose the needed unit from the drop-down list or to select the required number of available units, correspondingly.
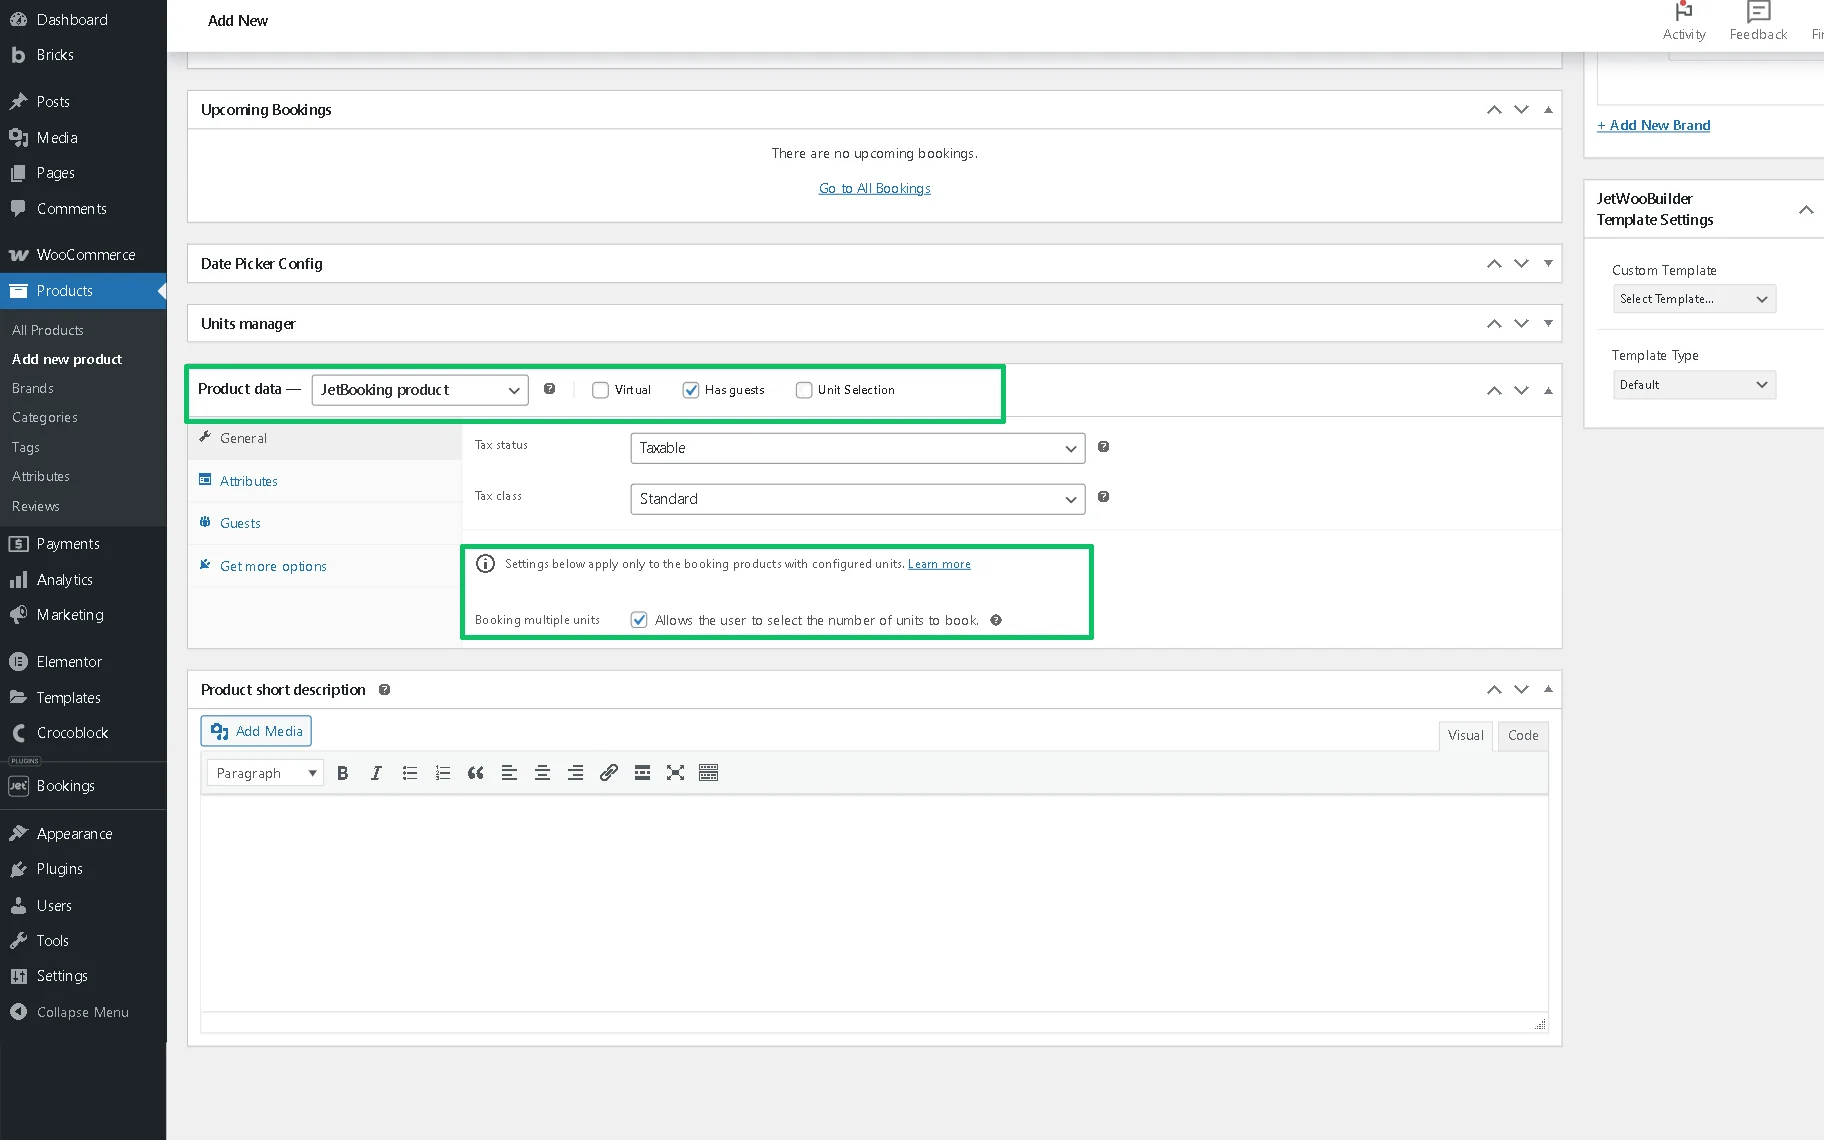
Finally, proceed to the Units manager section, press the “Manage Units” button, and add the units for the apartment. Fill out the required fields and publish the product.

The features of the “WooCommerce based” Booking mode, creating WooCommerce products, and the order workflow are presented in the How to Use Booking with WooCommerce Based Mode.
Manage Units via the JetBooking Dashboard
Navigate to the WordPress Dashboard > Bookings > Bookings path, where all orders are displayed. Here, all orders have the “On hold” status, but this will be changed to the required status after the interval set in the Advanced tab has passed.

You can also view the ordered booking instance in the calendar or timeline by pressing the “Calendar” or “Timeline” button in the top right corner of the page.
To learn more about JetBooking dashboard settings and learn how to create, edit, filter, and export bookings from the WordPress Dashboard, browse the JetBooking Dashboard Overview.
To edit the booking record via the Booking dashboard (e.g., to change its status), click the “Edit” button. The pop-up allows you to change the Status, Booking Item, Check-In, and Check-Out dates and Time range (if set), choose the Guests, select the Booking Services, and enter the email. Additionally, you can choose an alternative booking unit from the Booking Units drop-down list.
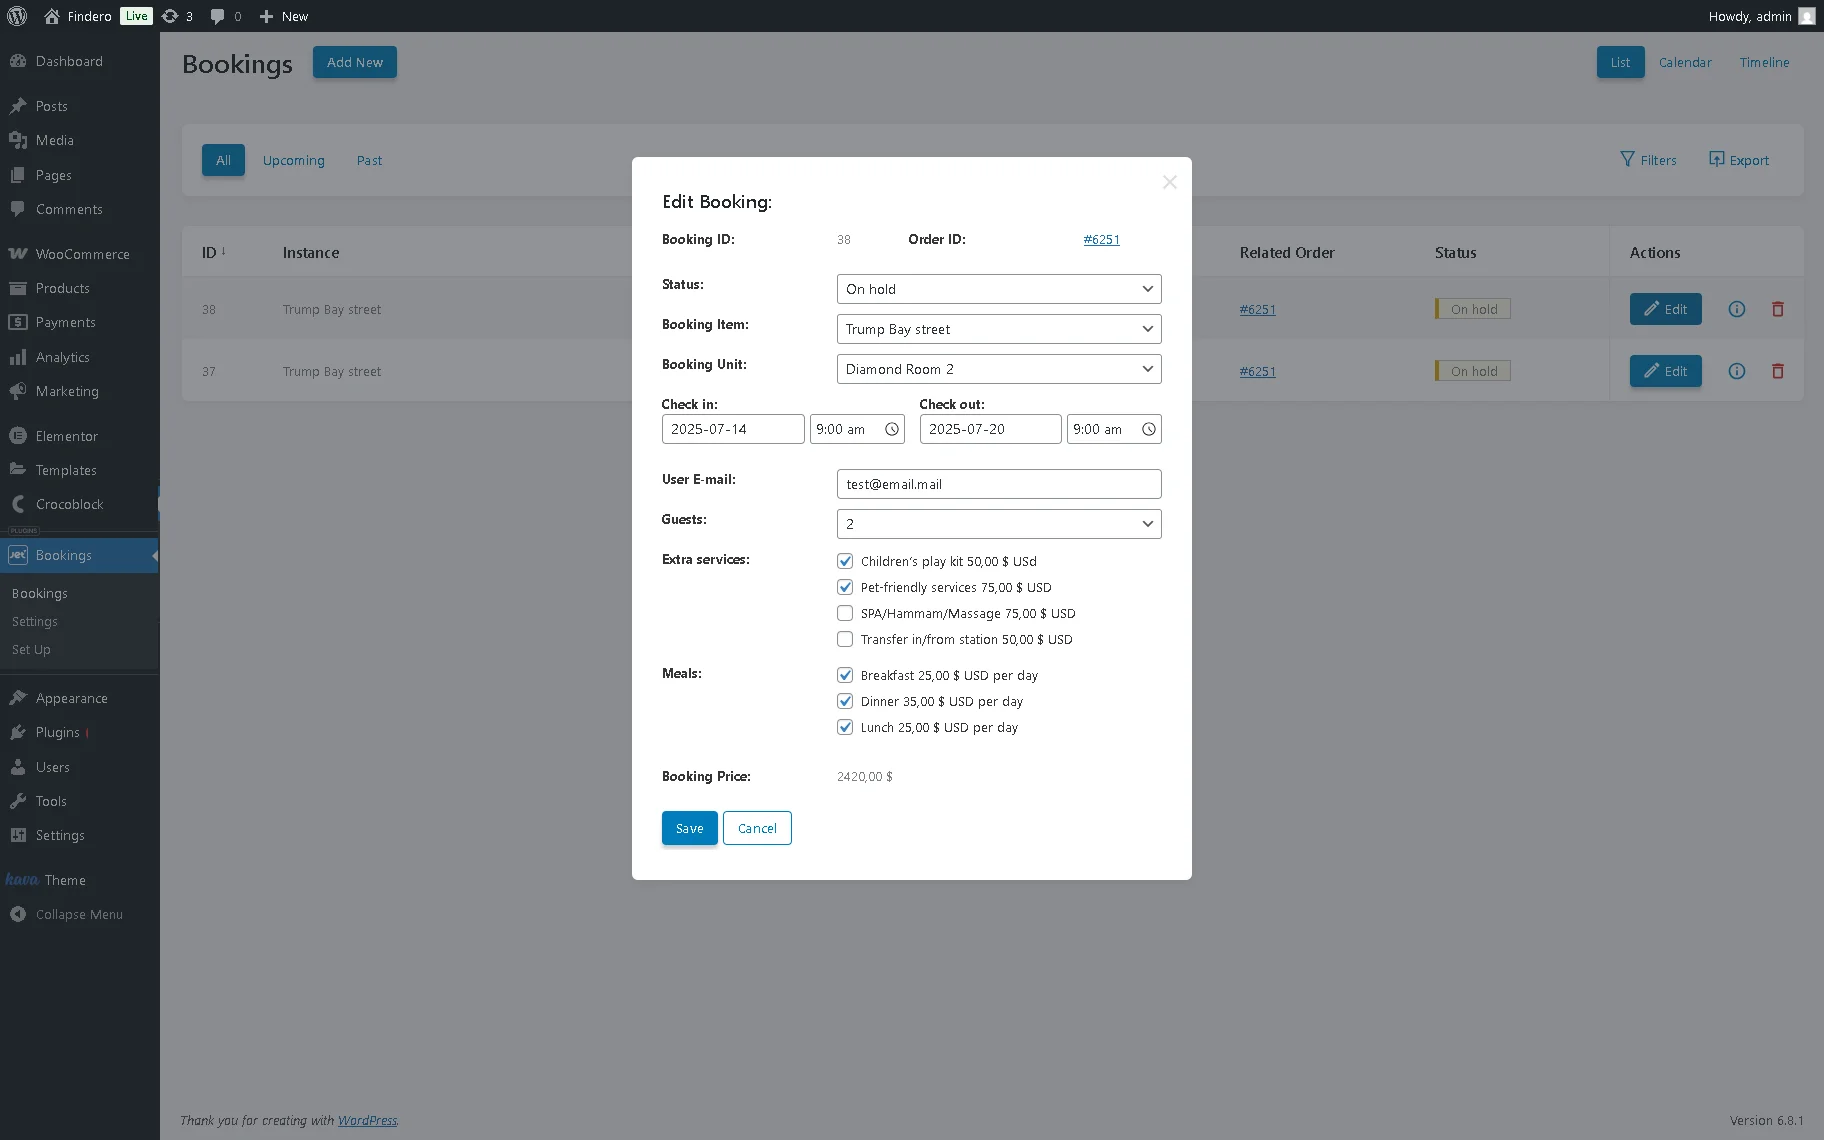
To save the changes, press the “Save” button.
That’s it. Now, you know how to manage the units using the JetBooking plugin.