How to Create a Booking Form
Learn how to build booking forms using the JetFormBuilder plugin and the "Plain" Booking mode of the JetBooking plugin and manage the form’s Post Submit Actions to add CPT posts for recording the order data, sending emails, and providing payment via a gateway.
Before you start, check the tutorial requirements:
- Elementor (Free version) and Block editor (Gutenberg)
- JetBooking plugin installed and activated
- JetFormBuilder plugin installed and activated
- any Custom Post Type plugin (e.g., JetEngine) installed and activated with Custom Post Types (CPT) for booking instances and orders created
Also, you can apply the “WooCommerce based” Booking mode to expand the WooCommerce functionality (e.g., apply seasonal/weekly prices, rates, additional products, and range prices; to allow selecting predefined additional booking services; to calculate total price considering the input number of guests and ordered services, as well as to manage orders via the JetBooking and WooCommerce dashboards). More details are available in the How to Use Booking with WooCommerce Based Mode tutorial.
Enable the JetFormBuilder’s Gateway Settings
Navigate to the PayPal developer’s site, log in to your account, and copy the Client ID and Secret Key data.
For an in-depth understanding of how to obtain the Client ID and Secret Key data, read the How to Enable and Set Up Payment Gateways tutorial.
Then, log in to your WordPress website and go to the WordPress Dashboard > JetFormBuilder > Settings > Payments Gateways tab.
Activate the Enable Gateways and Enable Test Mode toggles. The second action sets the sandbox mode to simulate transactions during payment processing.
Once activated, these toggles enable the PayPal Gateway API section, which includes two fields: Client ID and Secret Key. Paste the copied data here.
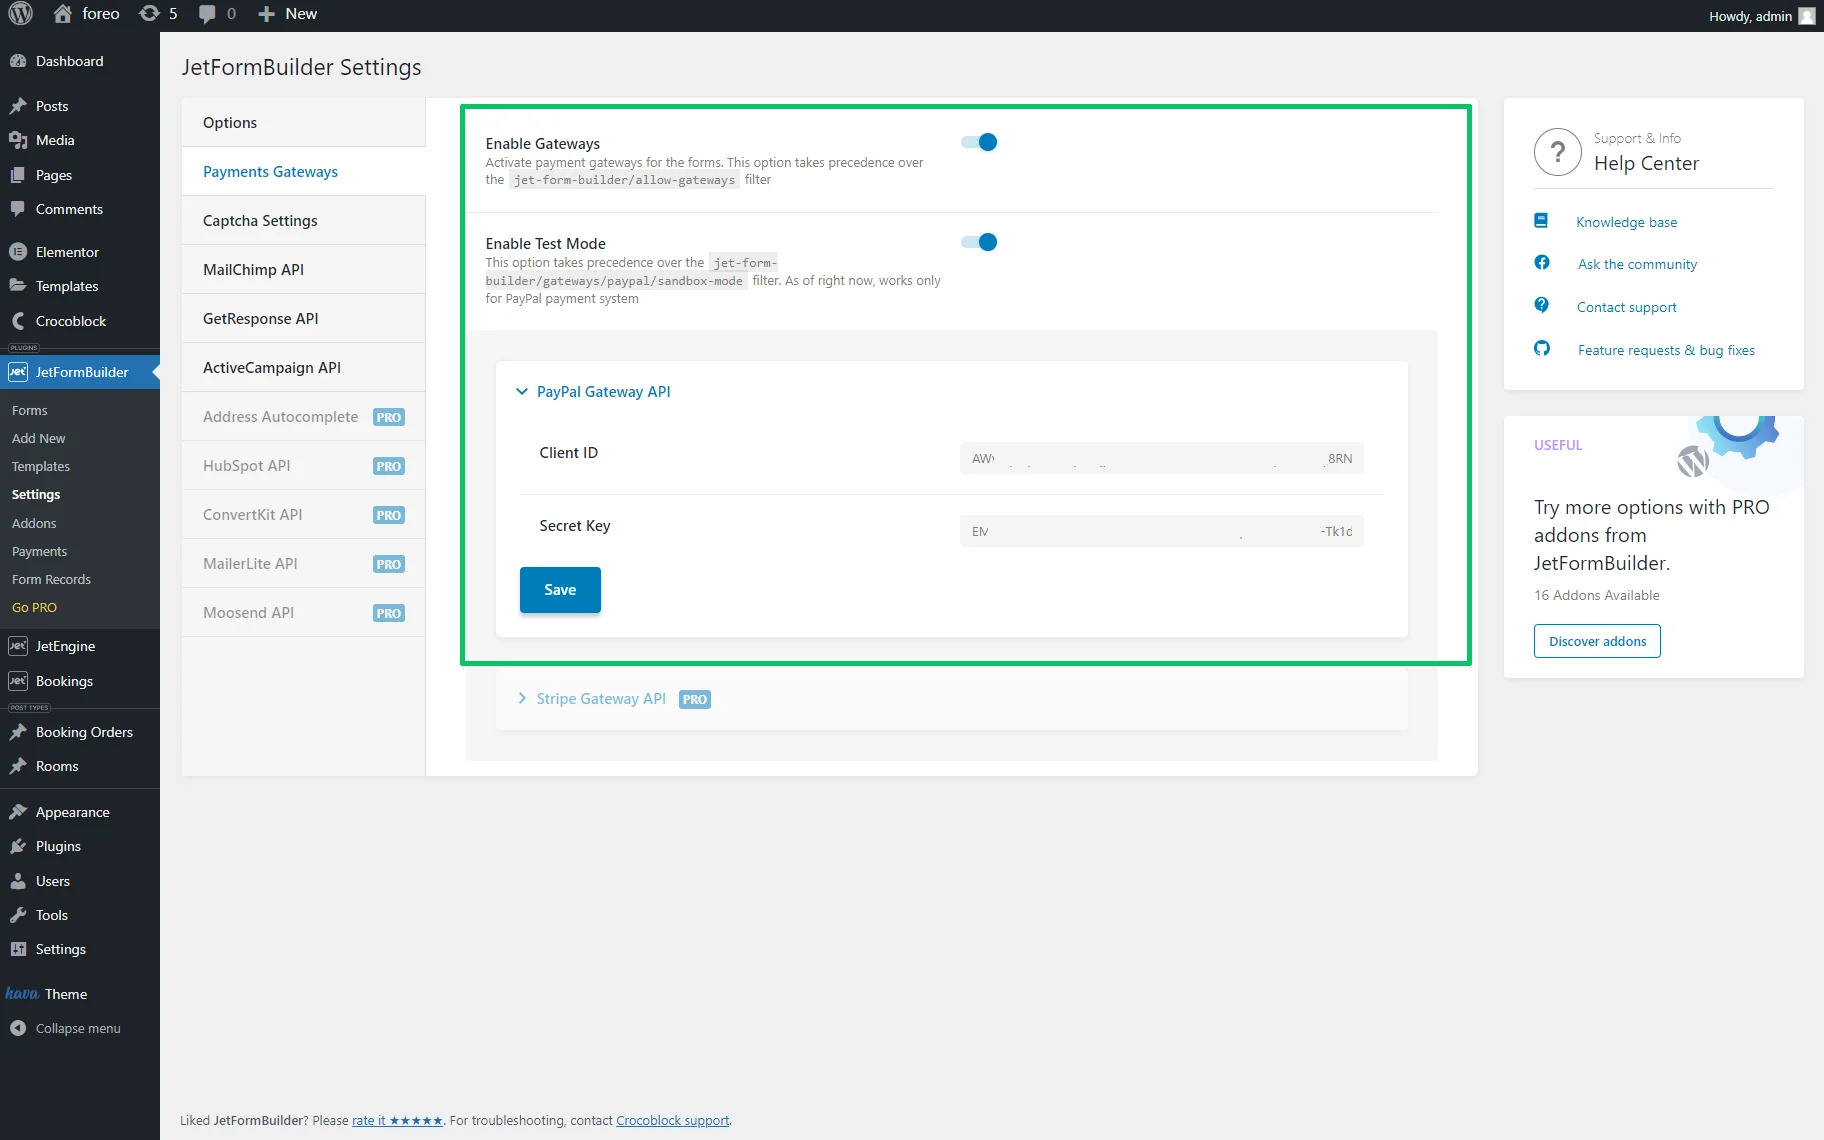
Once completed, press the “Save” button.
Enable the JetBooking Settings
Navigate to the WordPress Dashboard > Bookings > Settings > General tab.
The “Plain” Booking mode is set by default.
Select the CPT that will be used for recording and storing the booking orders in the Booking orders post type and the CPT that will be used as booking instances in the Booking instance post type drop-down lists, respectively.
Such settings can also be adjusted during the booking setup.
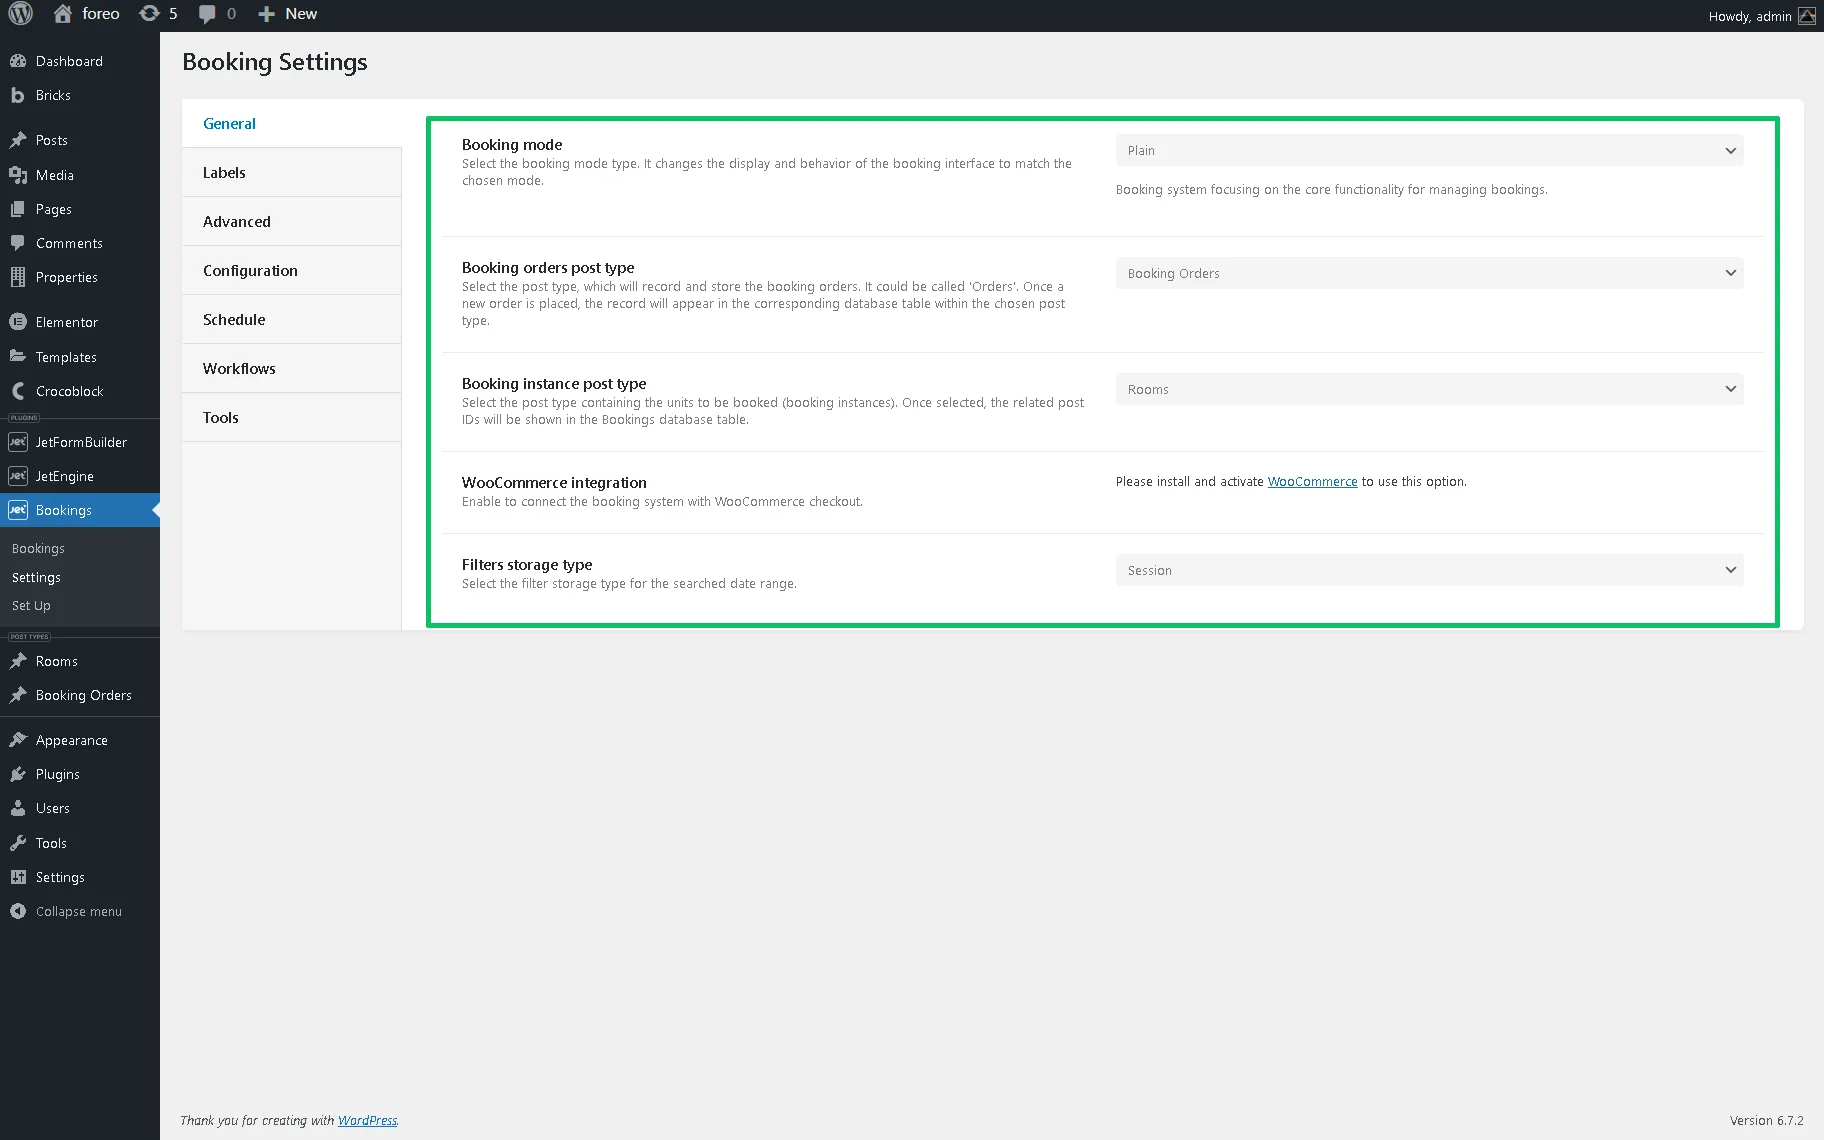
In this case, we use the previously created “Booking Orders” and “Rooms” CPTs, built by the JetEngine plugin, to store the booking orders and as the booking instances.
The “Booking Orders” CPT includes the same fields as the booking form (i.e., First Name, Last Name, Guests, and more), except for the Check-in/Check-out dates field.
To learn more about the main CPT features, read the How to Create Custom Post Types in WordPress tutorial.
Create a Booking Form
In this chapter, we explain how to insert the needed fields, manage their settings, and set Post Submit Actions.
For more details on the main fields and settings of the form-building process, read the Form Creation tutorial.
Configure the form’s field settings
First, navigate to WordPress Dashboard > JetFormBuilder > Add New to create a new form. The form will be open in the Gutenberg editor.
Initially, the form includes the Welcome block, which allows the application of the pre-created or AI-generated forms.
Press the “Start from scratch” button to build a custom form.
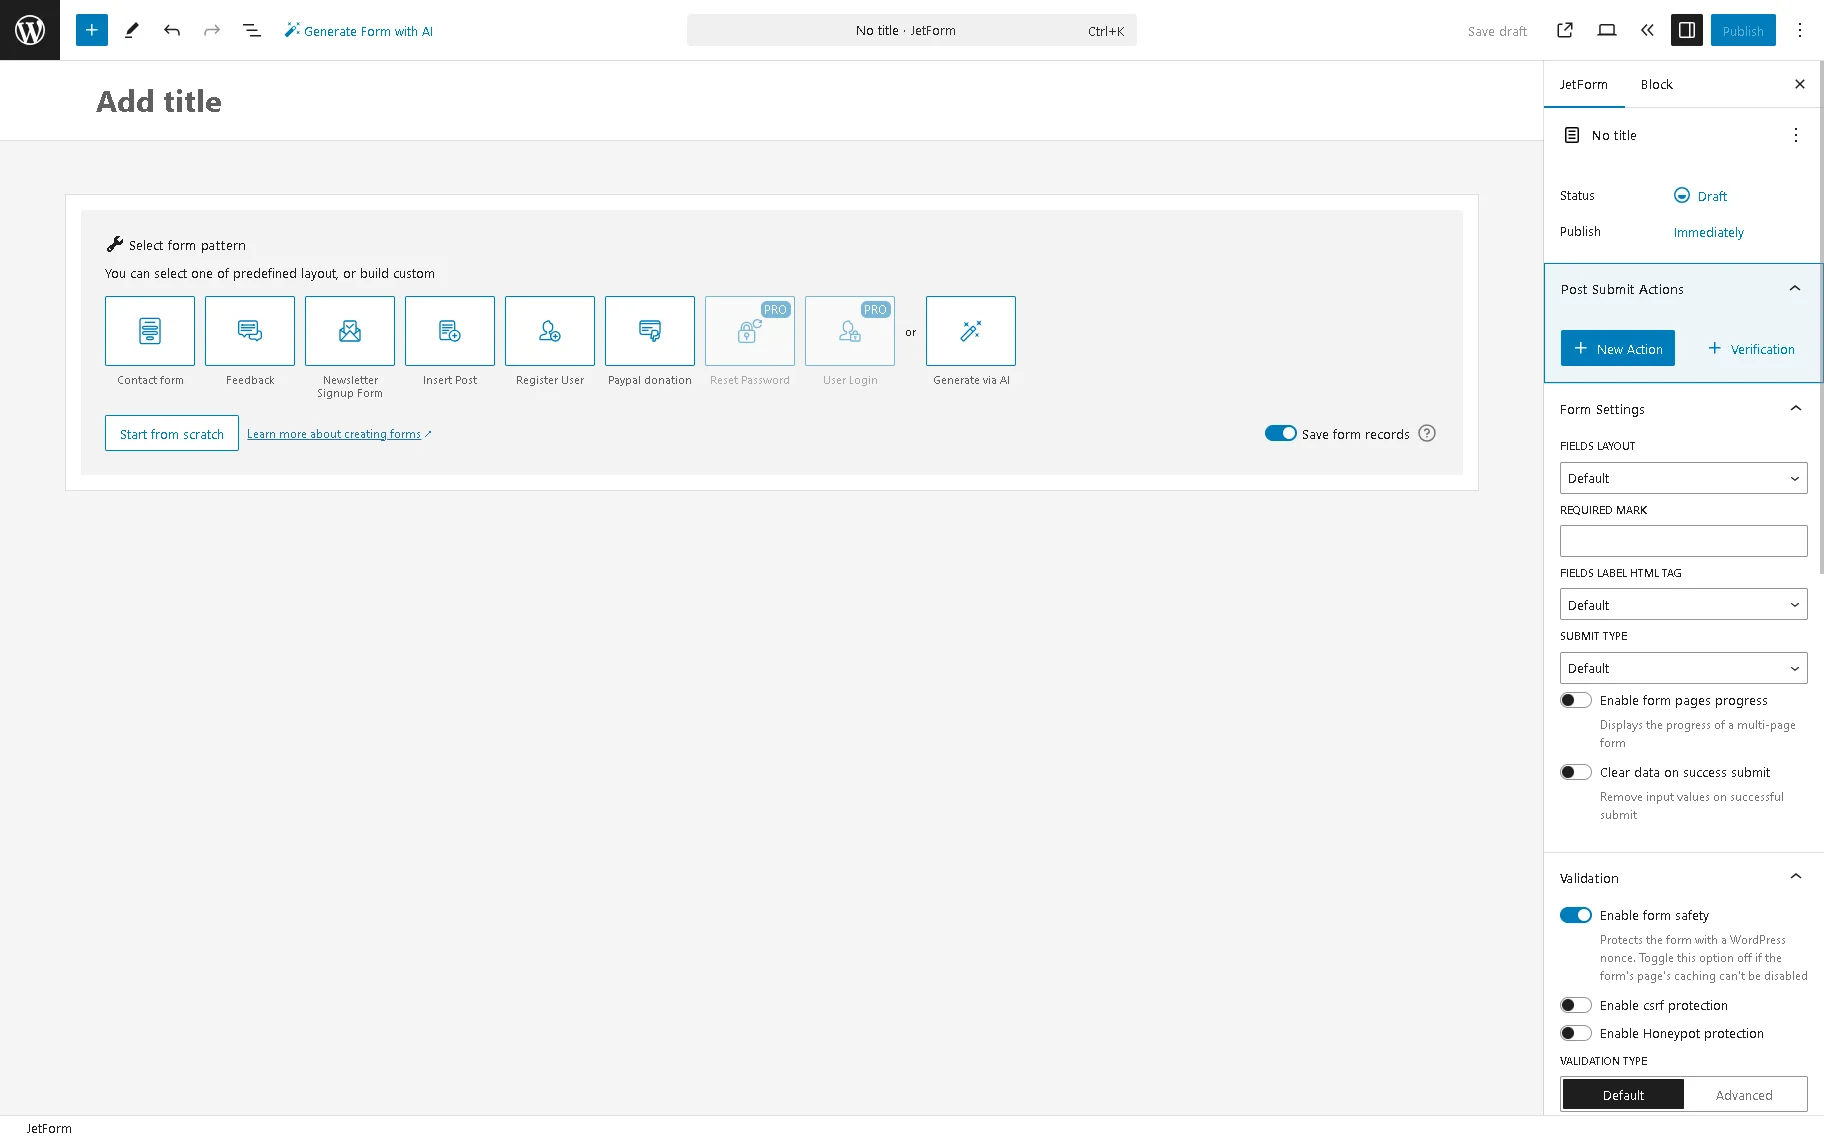
The Welcome block will be closed, and the Hidden Field, the Text Field, and the Action Button will be added by default.
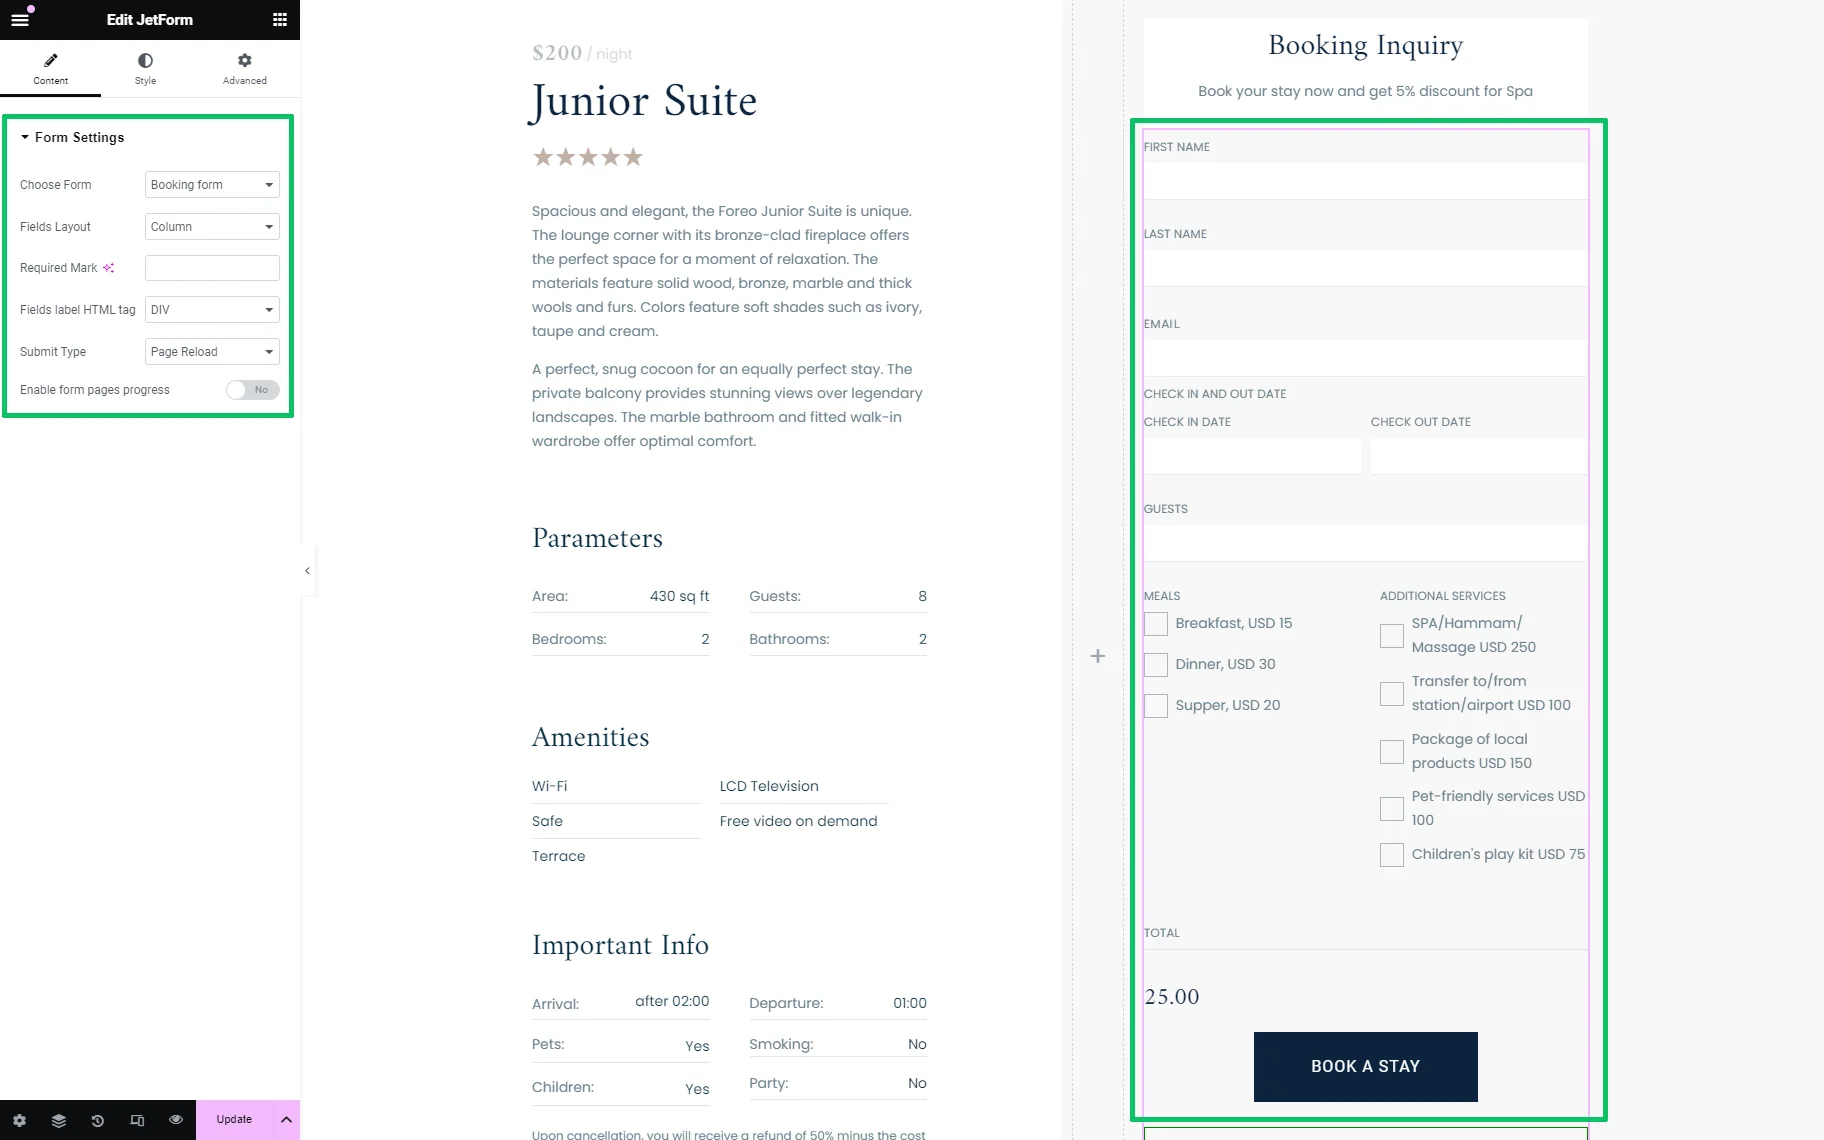
Add the form’s title (“Booking form” in the given tutorial).
In this case, the booking form will contain the Text Field to enter the client’s name, the Check-in/Check-out dates field to select the booking period, the Number Field to input the number of guests, the Checkbox Fields to tick the needed services, and the Calculated Field to calculate the total price.
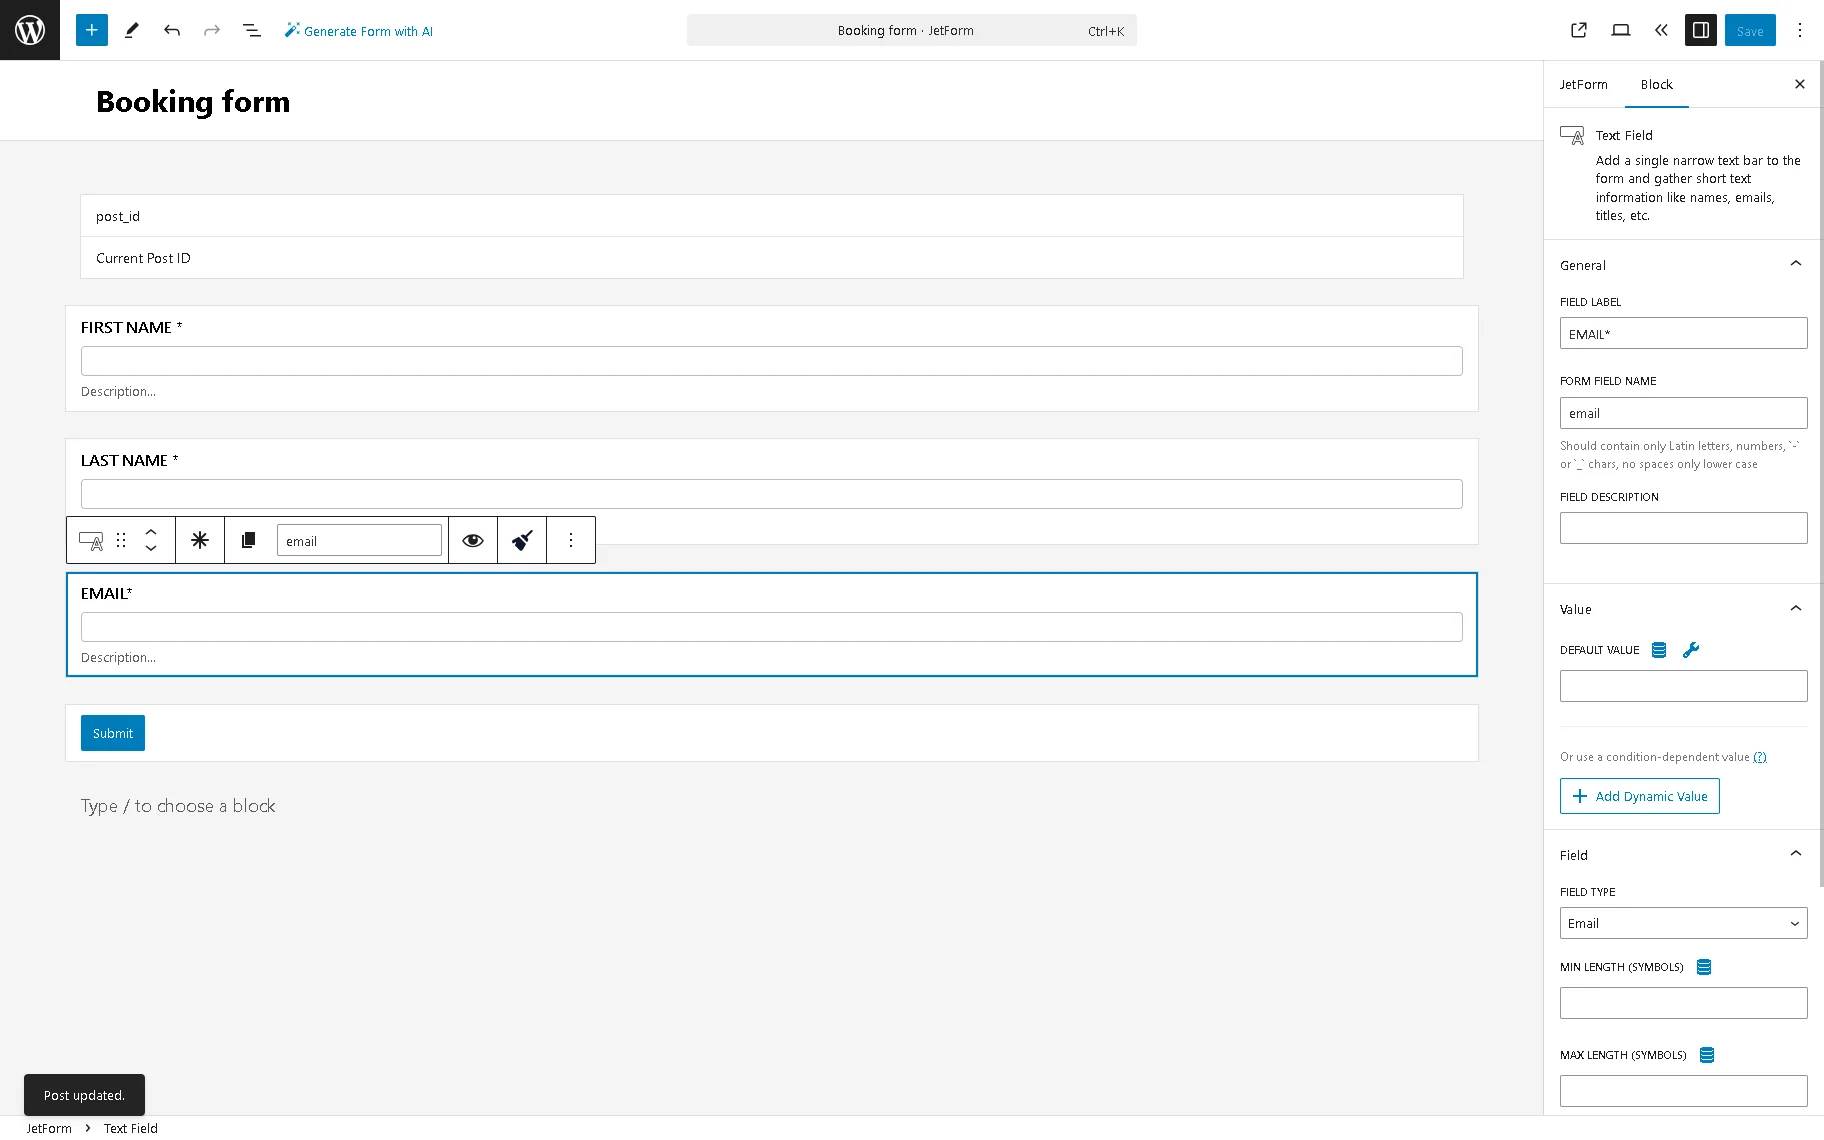
Next, we customize the default Text Field block to get the client’s first name. Then we add the Text Field twice to collect the clients’ last names and email addresses.
Finally, we navigate to the Settings block of the Text Field and specify the necessary settings for the Text Fields. In the given case, we:
- Unroll the General tab of the Text Field settings and add the FIELD LABELS (the FORM FIELD NAME fields are filled automatically).
- Select the “Text” and “Email” options from the Field > FIELD TYPE drop-down menu for the appropriate text fields.
- Click the “asterisk” icon on the field’s toolbar to make it required.
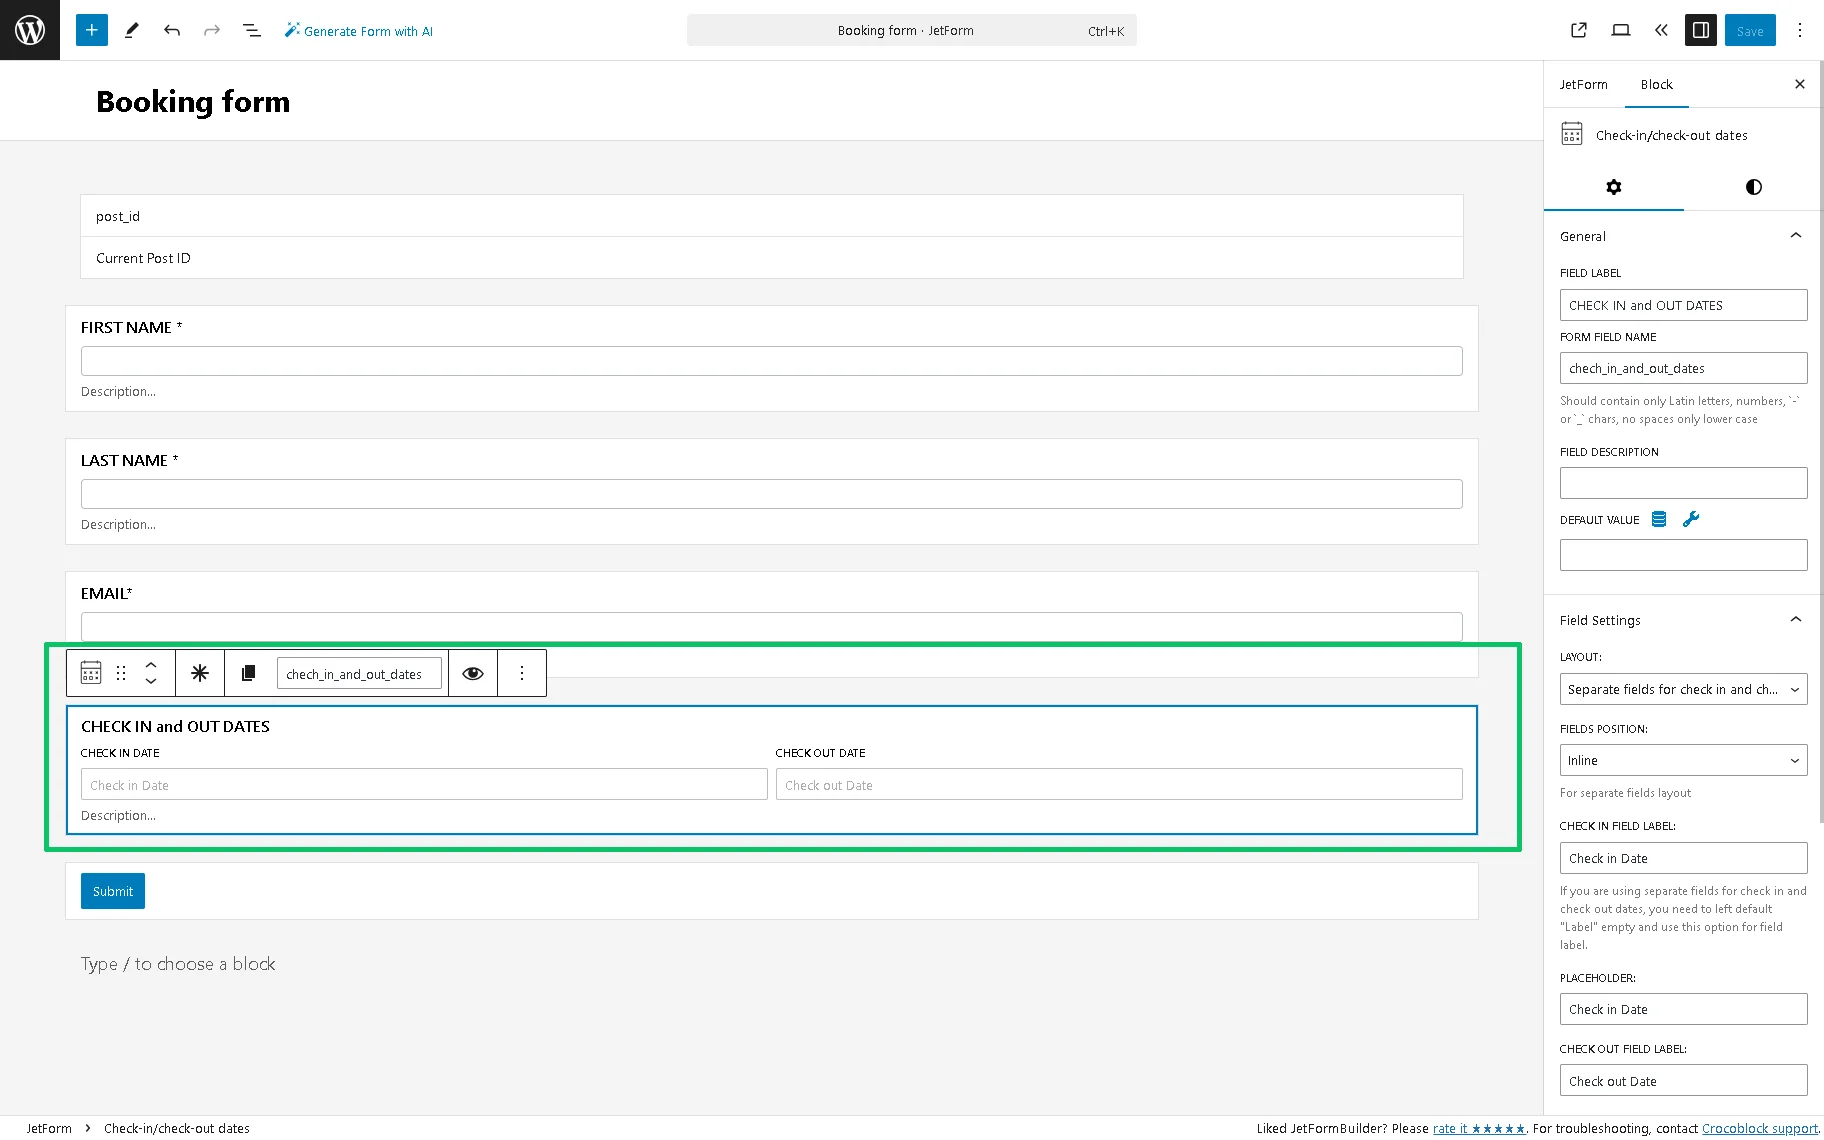
In the next step, find the Check-in/Check-out dates field and drag and drop it where needed. Then navigate to the field settings and adjust options such as layout and position, labels, placeholders, and more. In particular, we set the following:
- Type the field’s label (“Check In and Out Dates” in this case) in the General > FIELD LABEL field.
- Pick the “Inline” FIELDS POSITION.
- Select the “Separate fields for check in and check out dates layouts” option in the Field Settings > LAYOUT drop-down list.
- Set the date format, date separator, and the first day of the week in the Field Settings > DATE FORMAT, Field Settings > DATE FIELD SEPARATOR, and Field Settings > FIRST DAY OF THE WEEK drop-down lists.
- Click the “asterisk” icon on the field’s toolbar to make it required.
After that, we add the Number Field to allow users to input the number of guests manually. Then, we specify its name, the Min/Max Values, and the Step settings.

If needed, add the Column block and divide the layout into parts of the same or different widths.
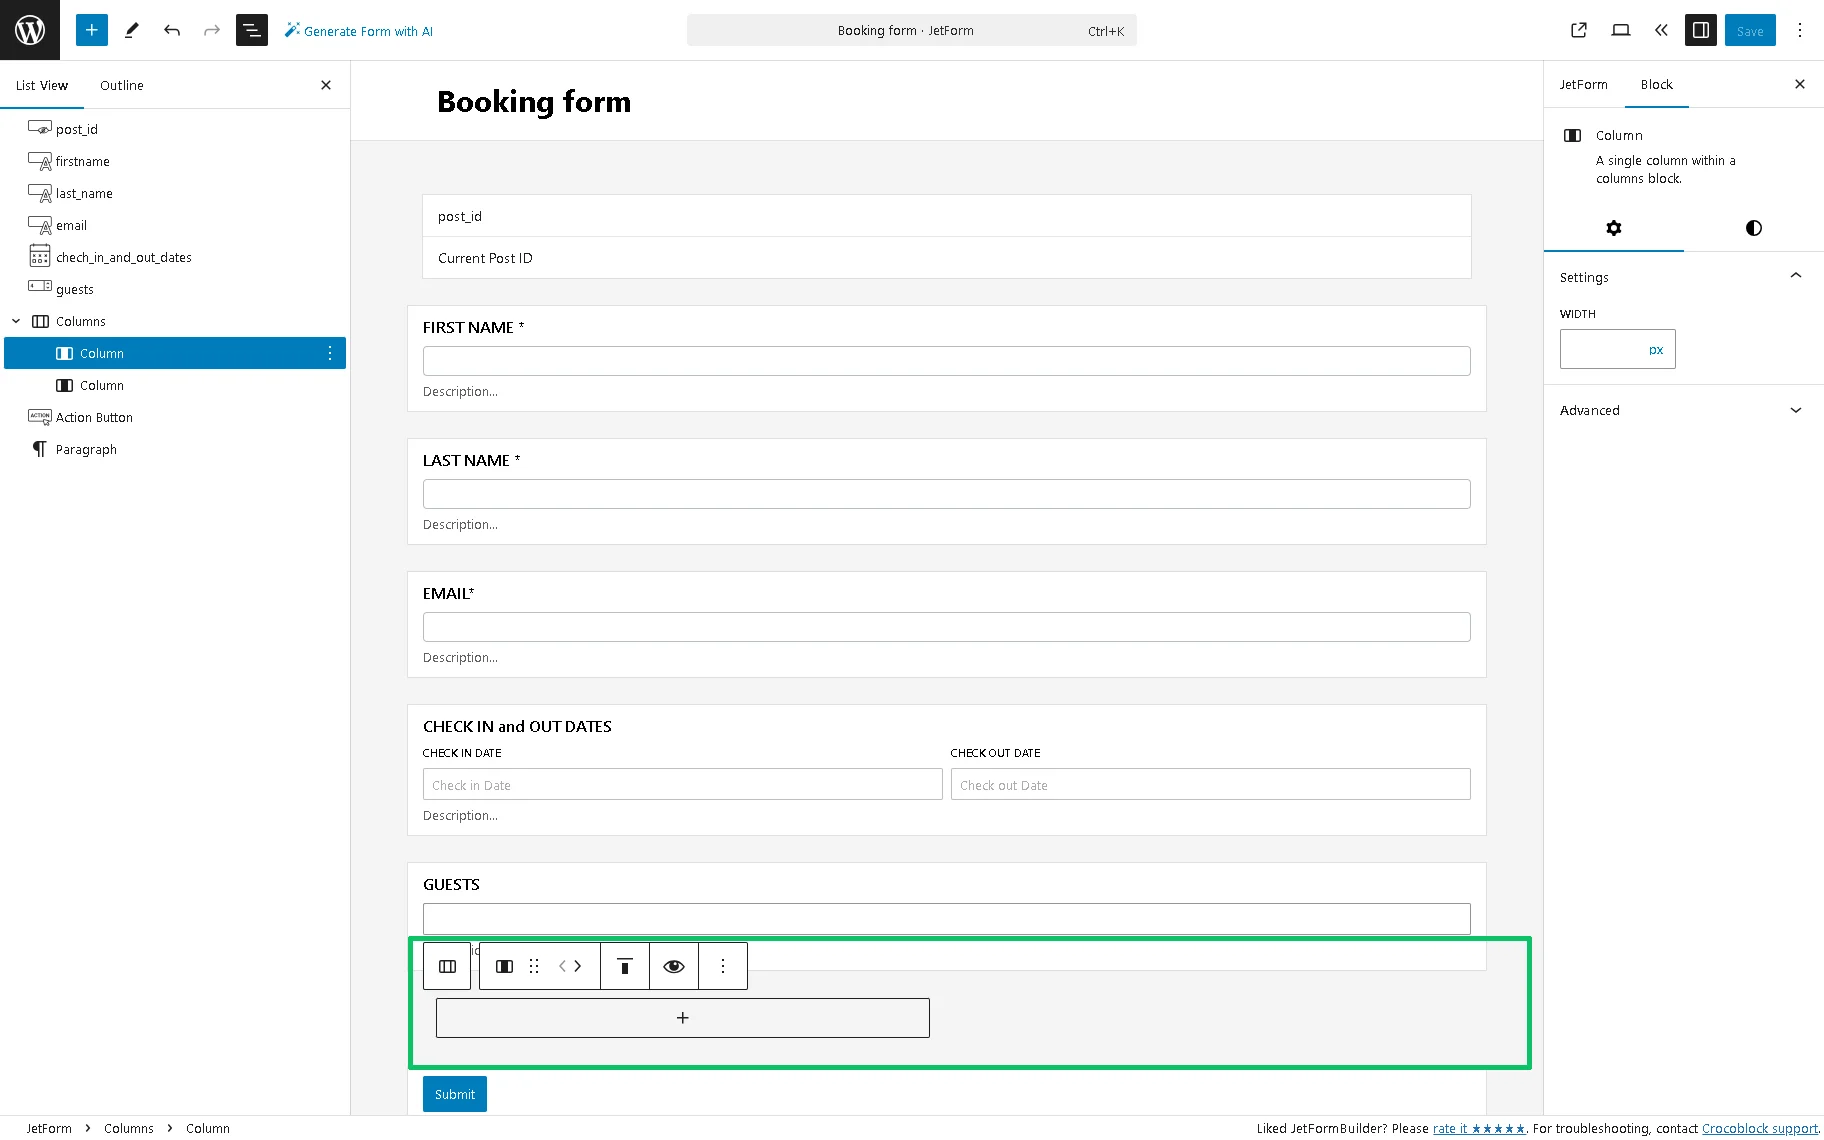
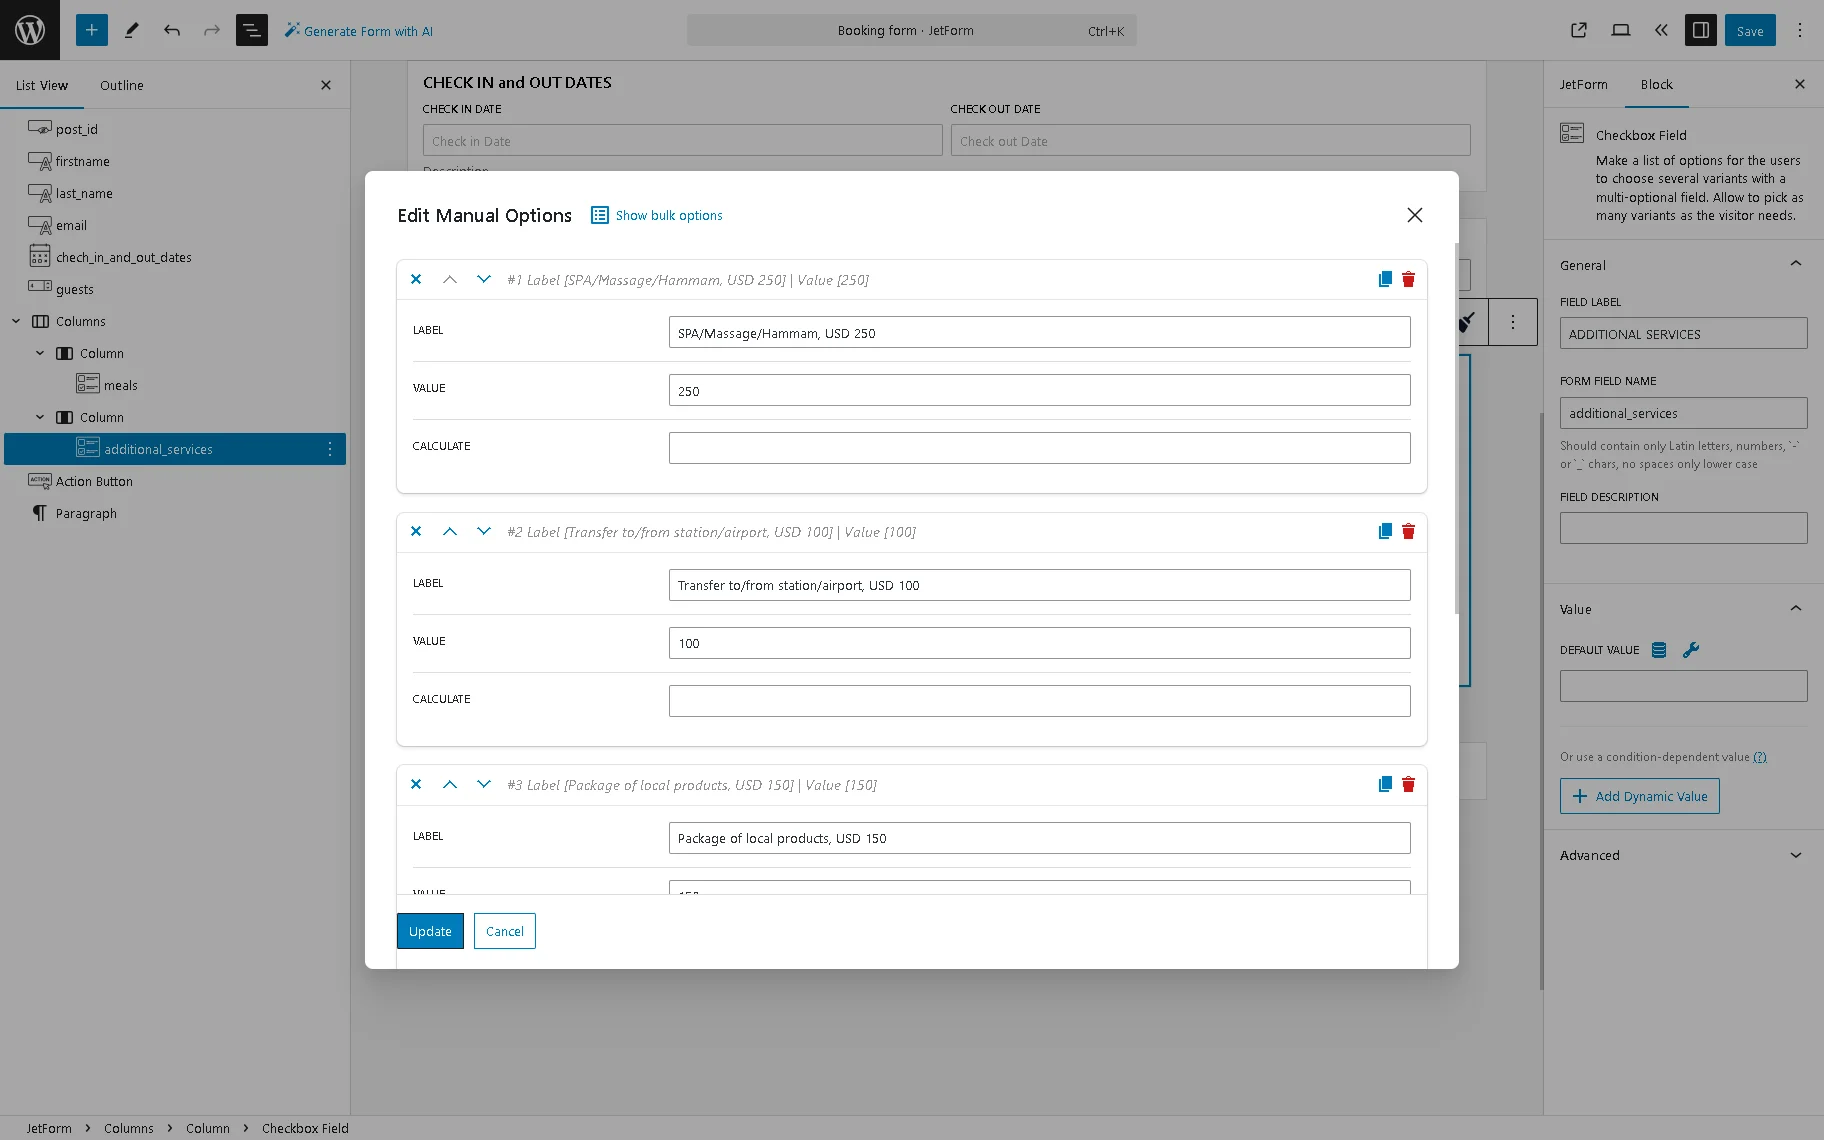
Next, we add the Checkbox Fields to allow users to select some of the needed options. The “Manual Input” setting from the Fill Options from drop-down list is set by default. Here, we insert the block field’s name (“MEALS”) in the General > FORM FIELD NAME field. Also, we click the “Manage Items” button, and then the Edit Manual Options pop-up appears.
In this pop-up, we press the “Add new Option” button to add a checkbox variant. Fill in the LABEL, VALUE, and CALCULATE fields for each option in the pop-up. In this case, we type the “Breakfast, USD 15” text into the LABEL field, then type the numerical values into the VALUE field (in this case, the “15” text). We leave the CALCULATED field empty because data for calculations will be taken from the VALUE field.
Next, we press the “Add new Option” button and, in the same way, we insert two options: “Dinner” and “Supper” and set their prices.
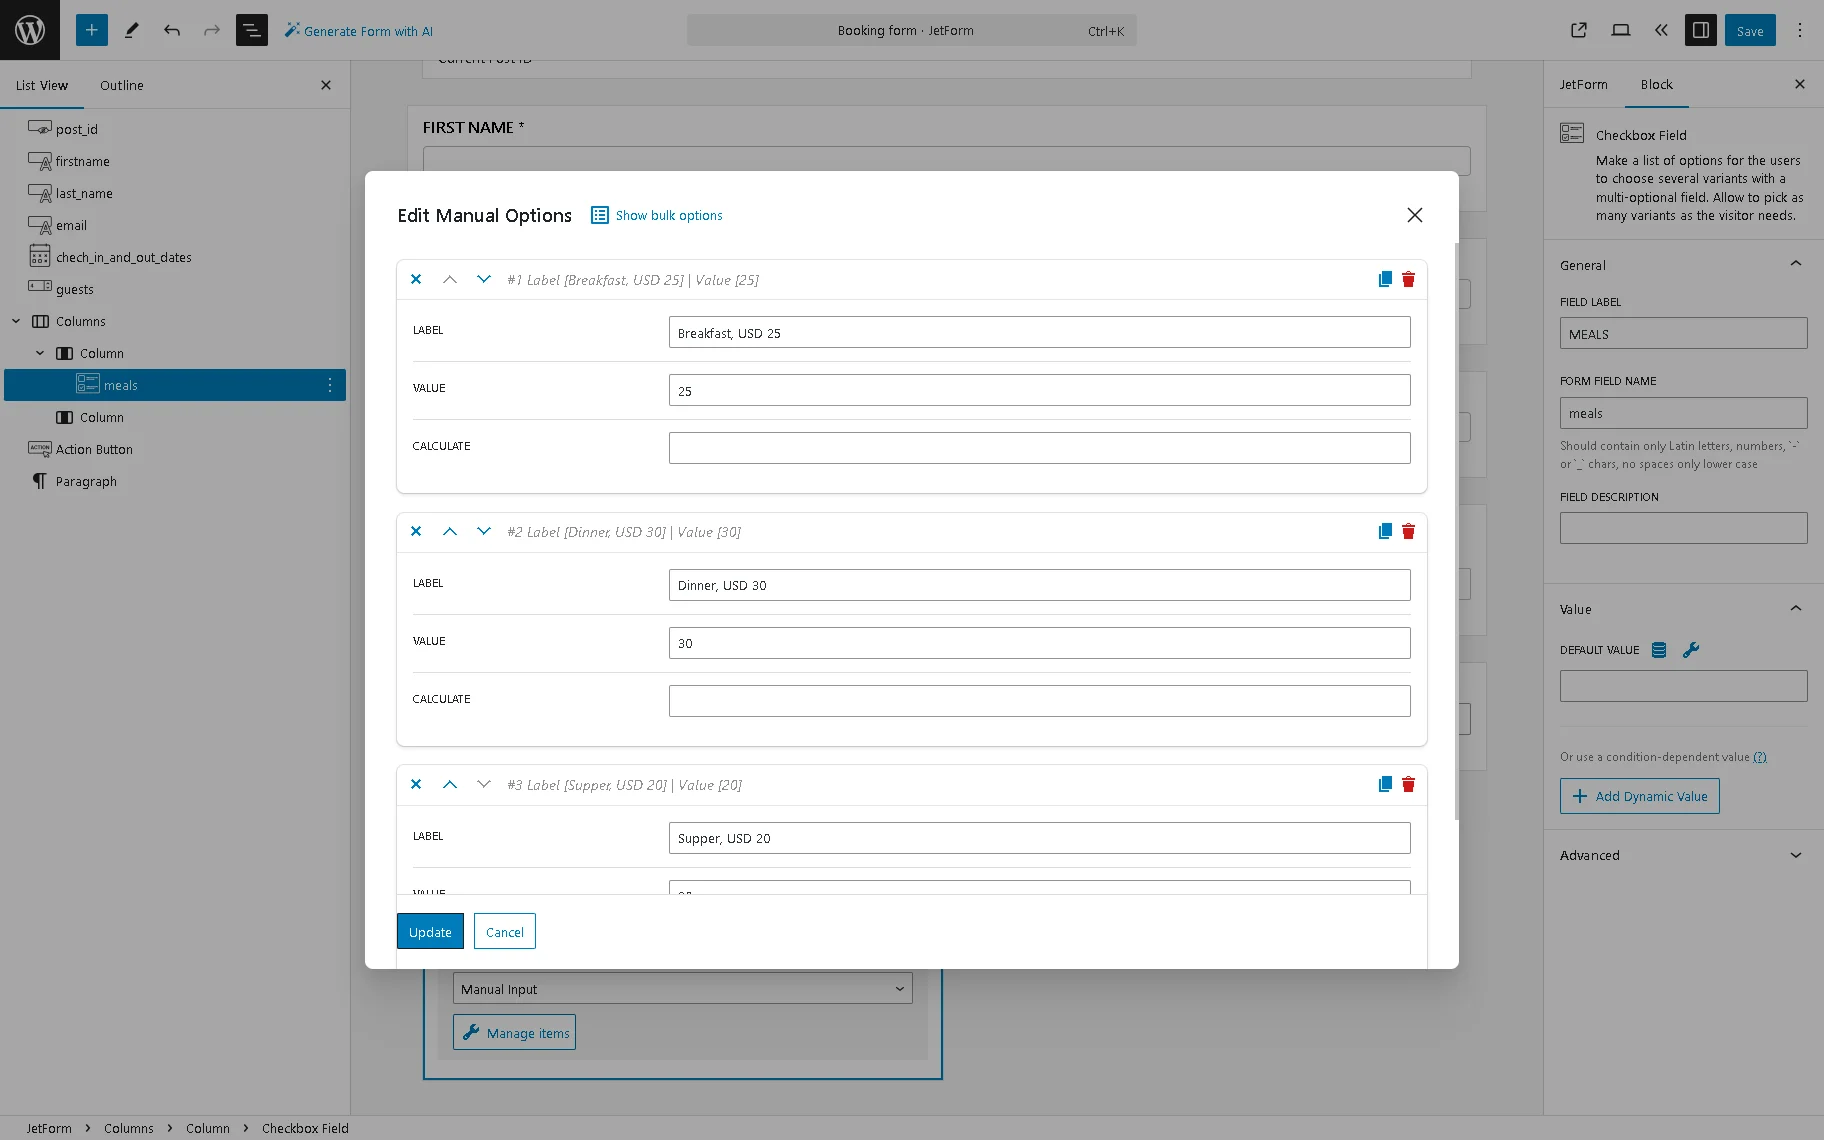
Press the “Update” button to save the options and close the pop-up.
Next, we add another Checkbox Field to allow the selection of additional services and manage its settings the same way.
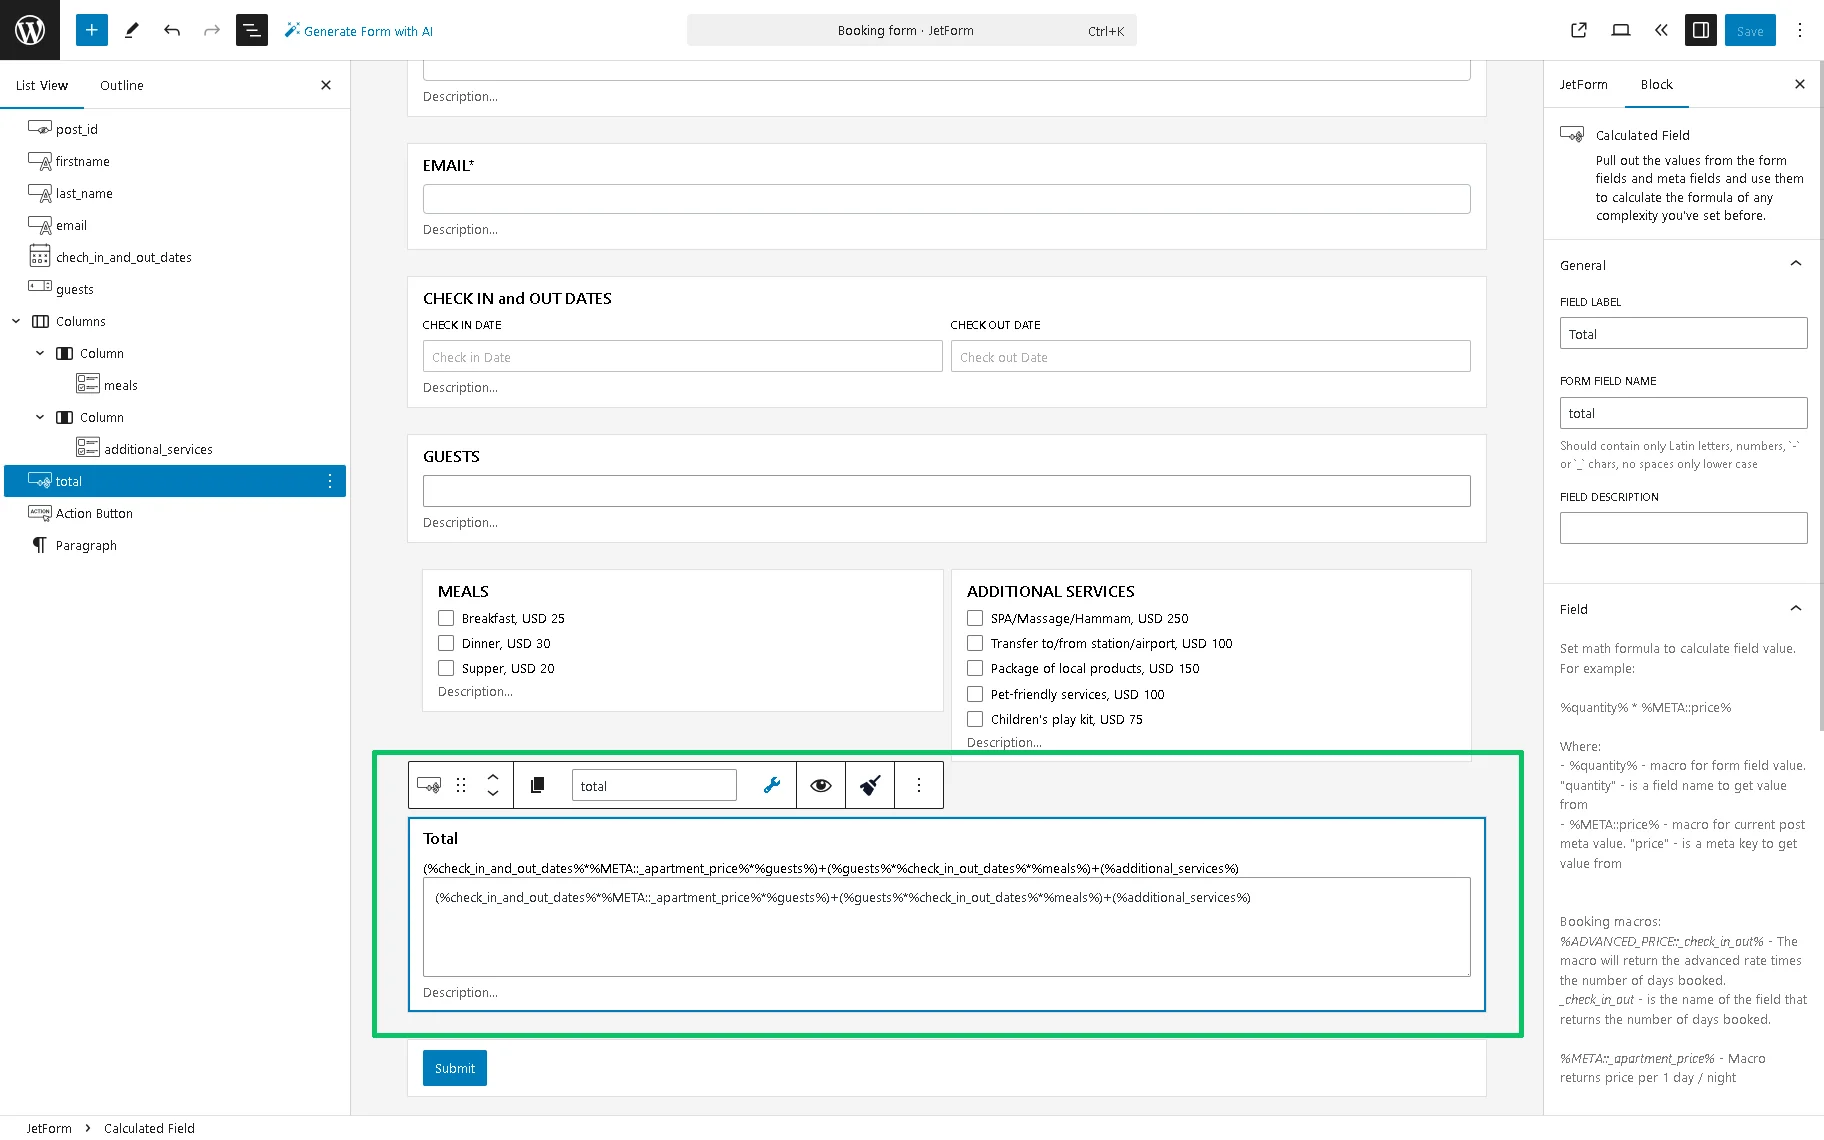
The next step is inserting the Calculated Field block. Find the Calculated Field block and drag and drop it where needed. Read this tutorial to learn How to Combine Hidden and Repeater Fields with the Calculated Field.
Type text in the FIELD LABEL field of the settings, whereas the FIELD NAME field will be filled in automatically. For better usability, add the prefix to the CALCULATED VALUE PREFIX field (here, the “Total price: $” text).
Then, press the “wrench” icon to add the needed fields or macros to the Calculated Field.
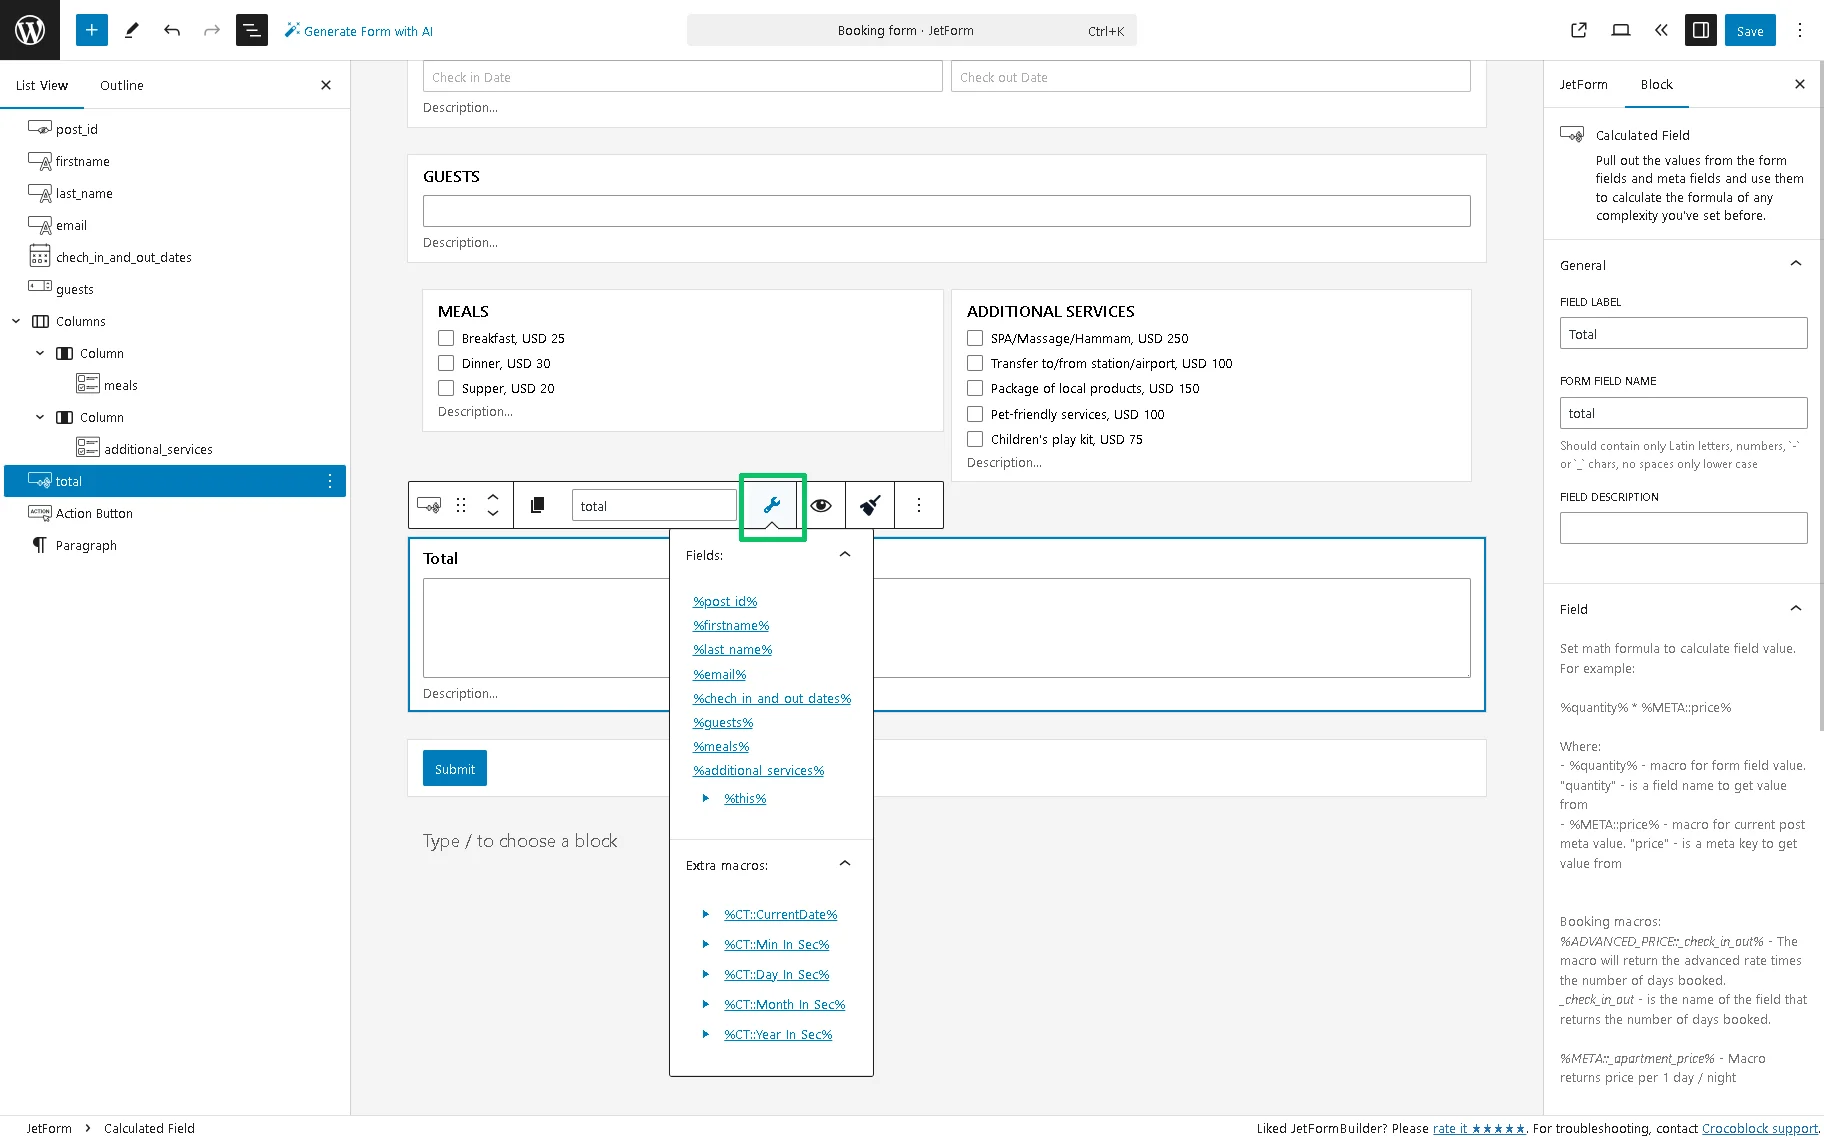
Insert the formula to calculate. For example, the Calculated Field below multiplies the input data and the embedded booking macros. We add the formula that has the following compounds:
- (%check_in_and_out_dates%*%META::_apartment_price%*%guests%) 一 the number of booking days (the “check_in_and_out_dates” form field), the booking macro that returns the price per 1 day/night, and the number of guests (the “guests” form field) are multiplied;
- (%guests%*%check_in_out_dates%*%meals%) 一 the “guests,” “check_in_and_out_dates,” and “meals” form fields are multiplied;
- (%additional_services%) 一 the “additional_services” form field is added.
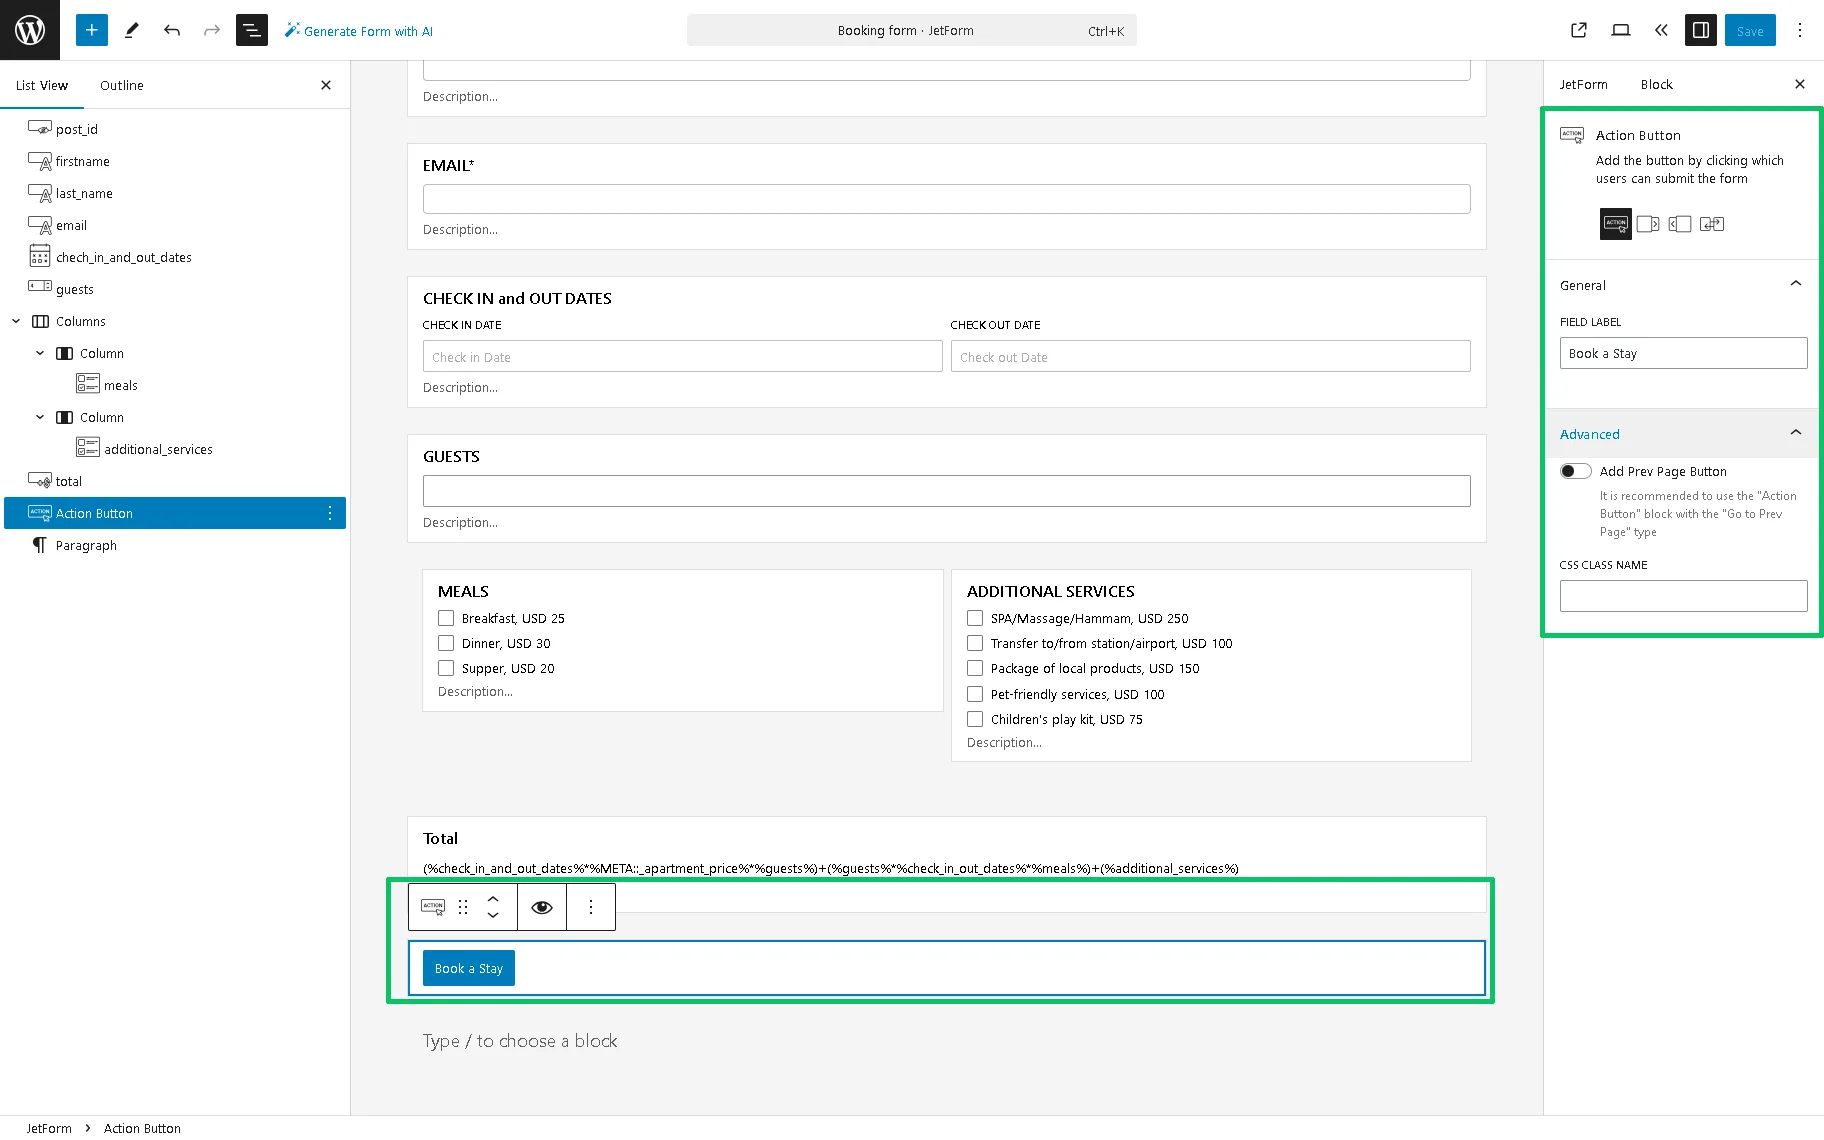
In the last step, customize the Action Button. To customize the button text (here, “Submit”), navigate to the Settings block and enter the desired text (in this case, “Book a Stay”).
Finally, press the “Publish/Update” button.
Set the Gateway Settings
Unfold the Gateway Setting block of the JetForm settings. Tick the “PayPal CheckOut” option and press the “Edit” button to open the Edit PayPal Checkout Settings pop-up.
Activate the Use Global Settings toggle in the Edit PayPal Checkout Settings pop-up. Then, the CLIENT ID and SECRET FIELDS will be filled in automatically and will display the data entered in the Client ID and Secret Key fields of the WordPress Dashboard > JetFormBuilder > Settings > Payments Gateways tab.
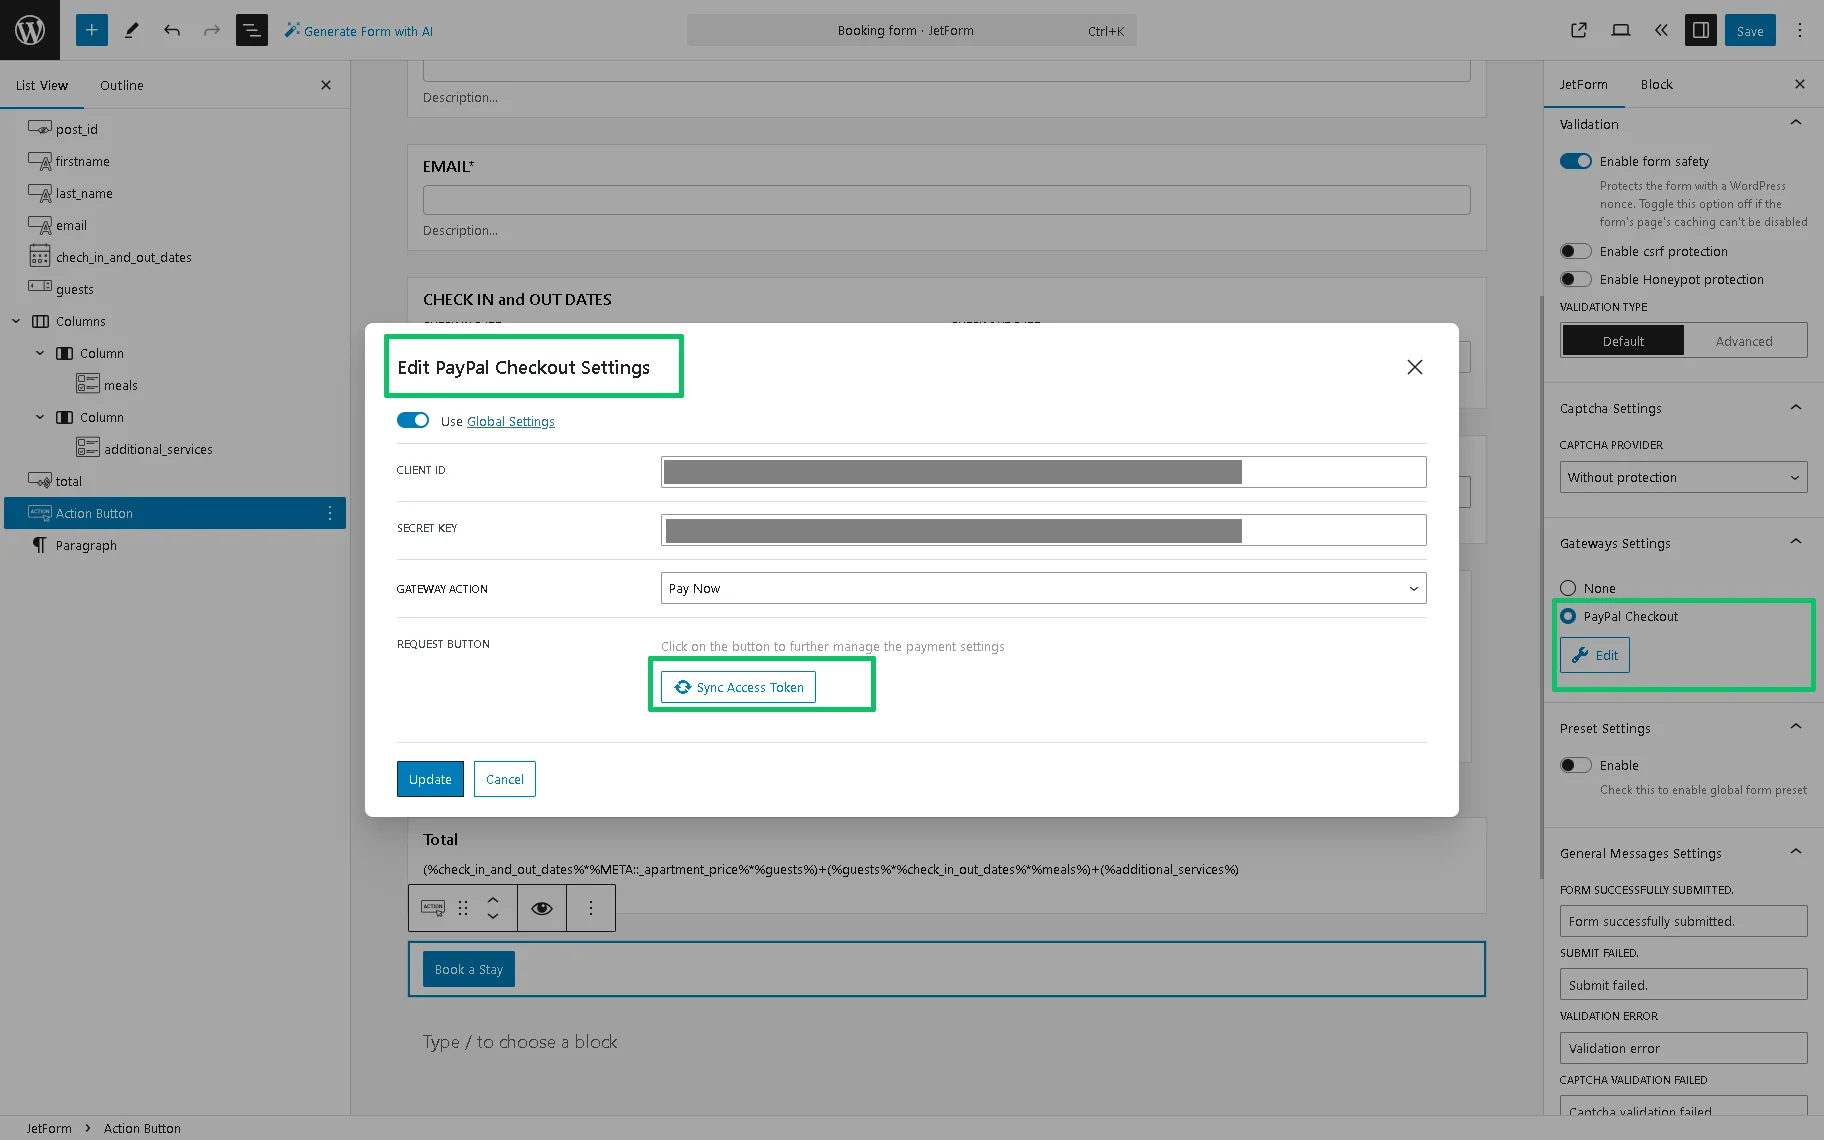
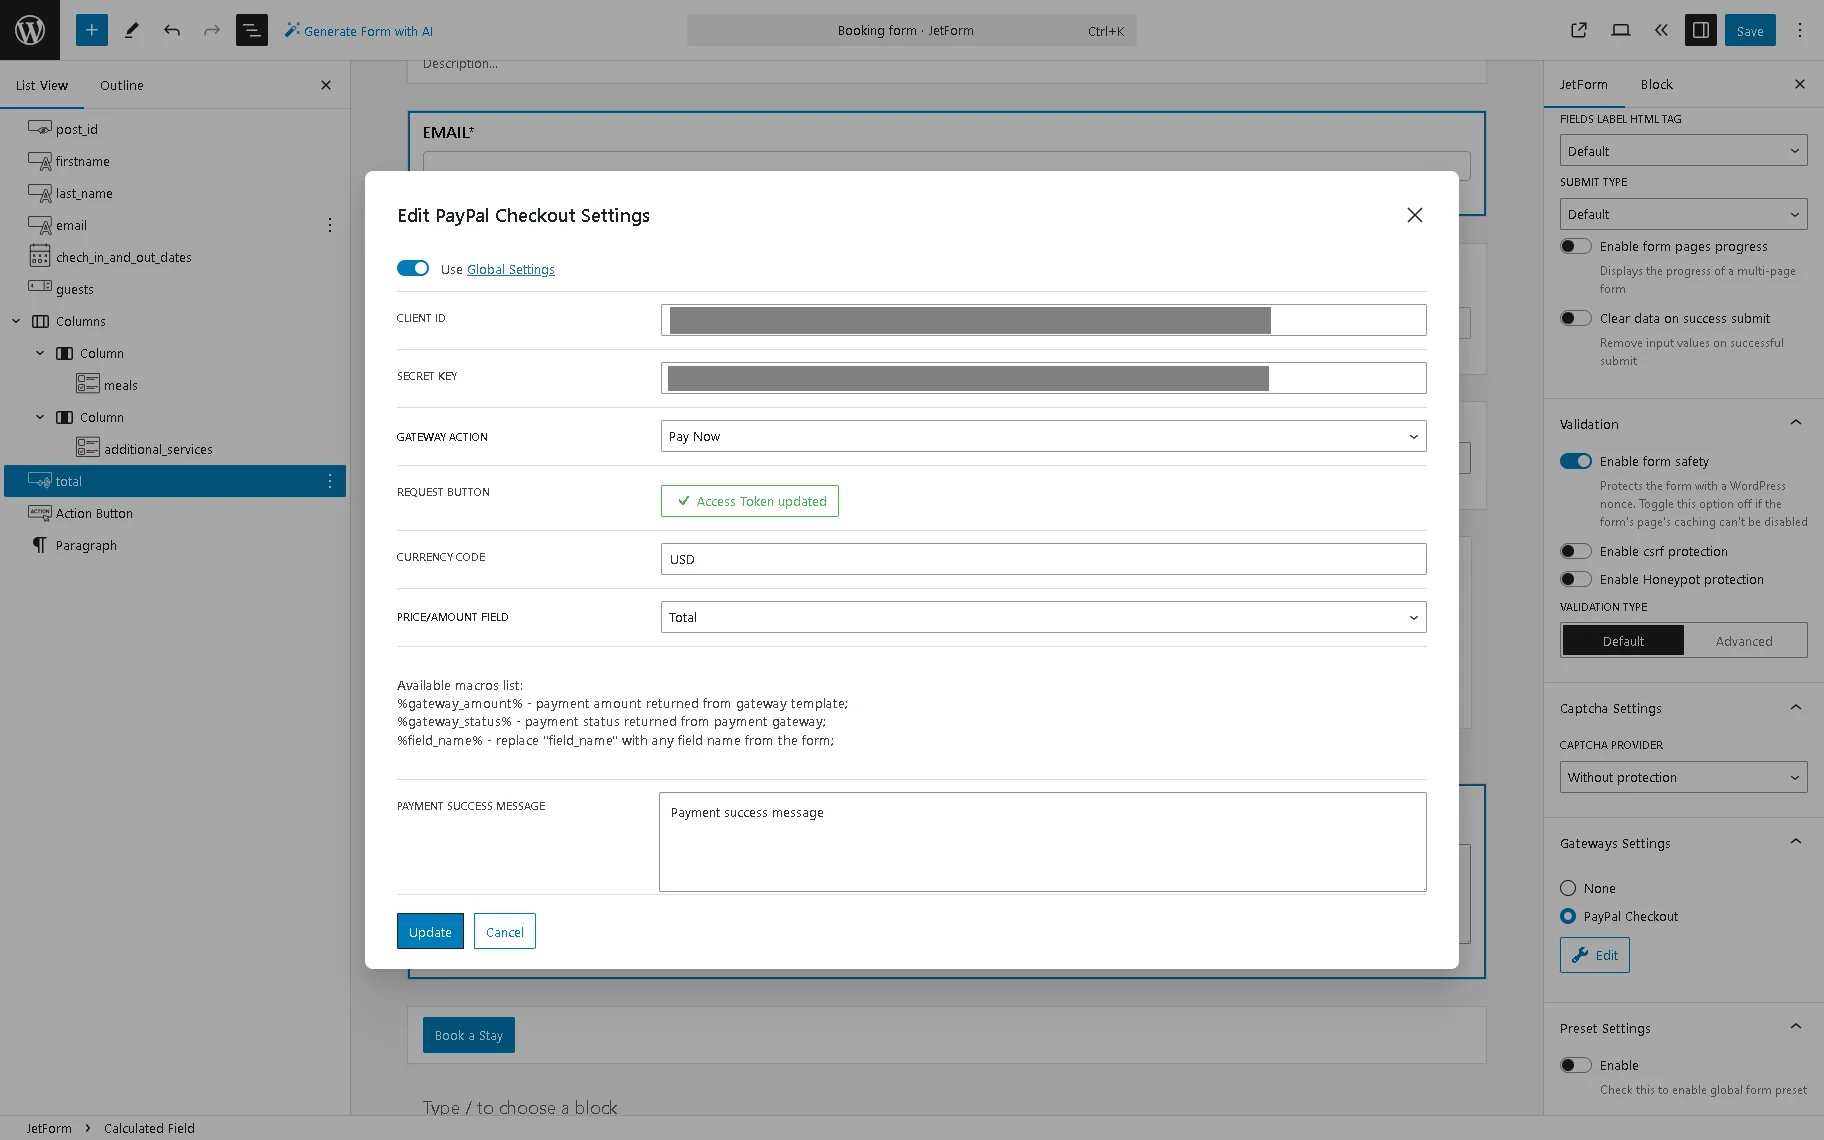
Click the “Sync Action Token” button. Once synchronization is completed, the text on this button turns to “Access Token updated” and the CURRENCY CODE and PRICE/AMOUNT FIELD.
In this tutorial, we type “USD” to specify the currency and select the newly added “Total” Calculated Field accordingly.
More details on receiving payments in different currencies are available in the Currency codes tutorial.
Press the “Update” button in the pop-up to save the settings.
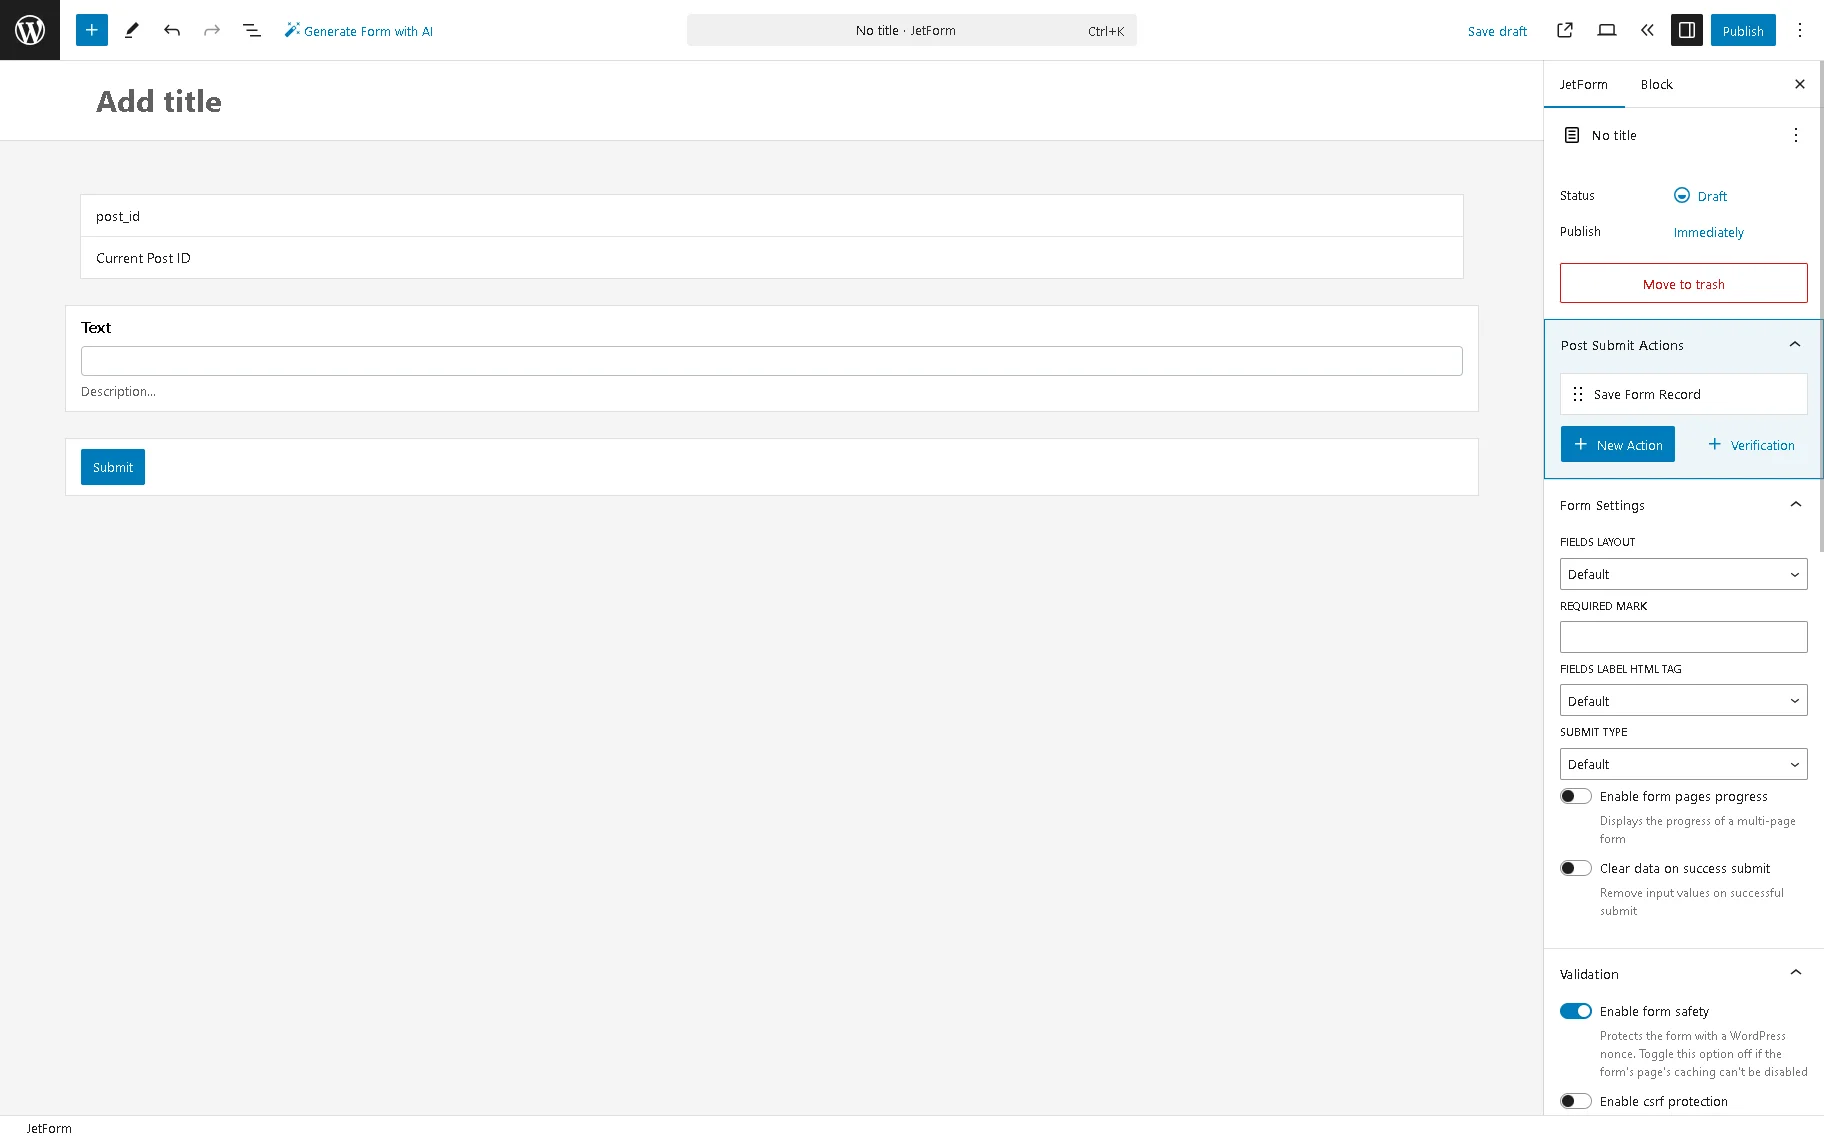
Set the Post Submit Actions
Navigate to the JetForm settings and unroll the Post Submit Actions tab. The “Save Form Record” option is set by default. This option allows you to collect and manage data via the JetFormBuilder Dashboard.

Read the How to Use Save Form Record Action and Manage Form Submissions tutorial for an in-depth understanding of the “Save Form Action” Post Submit Action features and settings.
Second, set the “Insert/Update Post” Post Submit Action. Press the “+ New Action” button and select the “Insert/Update Post” option from the pop-up.
A pop-up window will appear, allowing you to select the necessary POST TYPE (in this case, the “Booking Orders” CPT) and add the submitted information from the form. The POST STATUS is set to “Published,” which means that this status will be set for all created “Booking Orders” CPT posts.
After that, we navigate to the FIELDS MAP block in this pop-up, which contains the fields of the listed form and the drop-down lists next to them. Then we select the “Post Meta” option in the drop-down lists, choose the “Booking Orders” CPT field, which corresponds to each form’s field, and type the “Booking Orders” meta field names into the appeared bars.
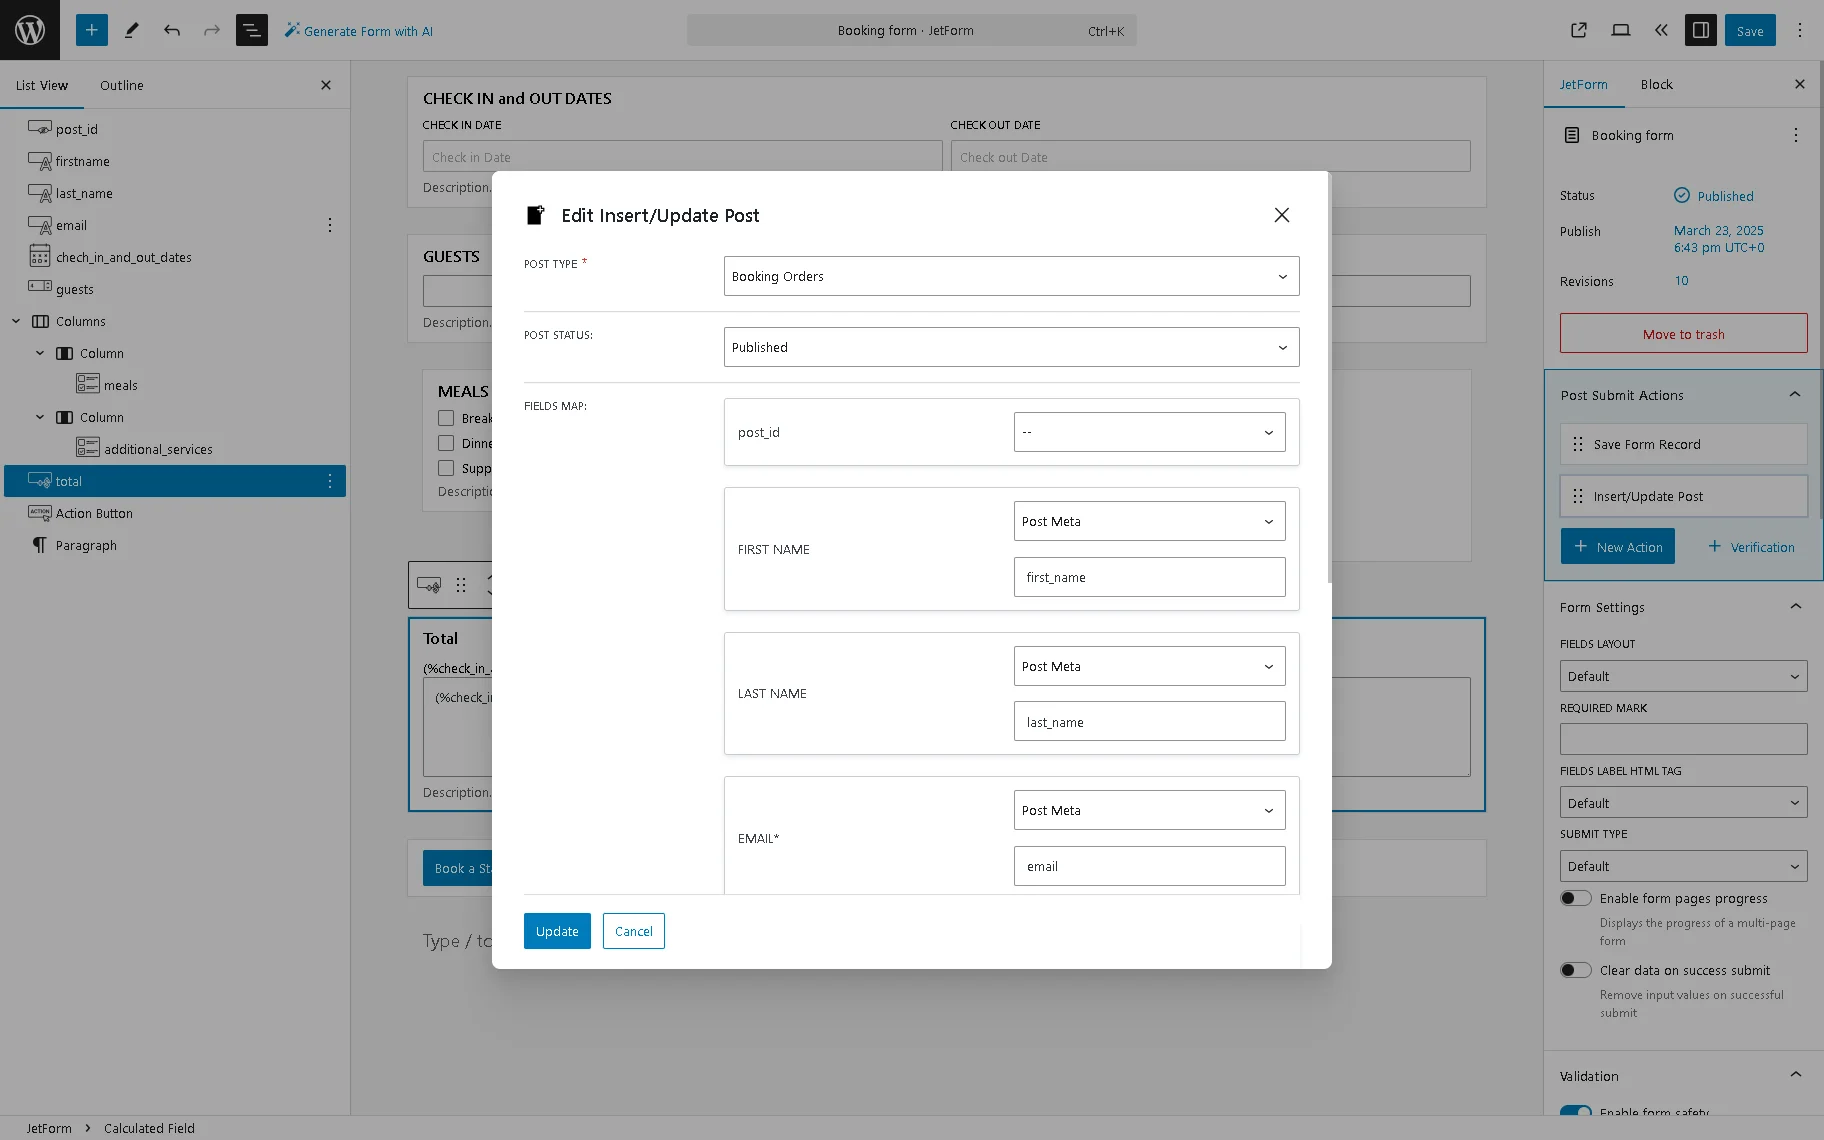
Press the “Update” button to close the pop-up.
Then, hover over the “Insert/Update Post” Post Submit Action and click the “criss crossed lines” icon to open the Edit Action Conditions & Events pop-up. Click the Events match tab and select the “GATEWAY.SUCCESS” event in the drop-down list.
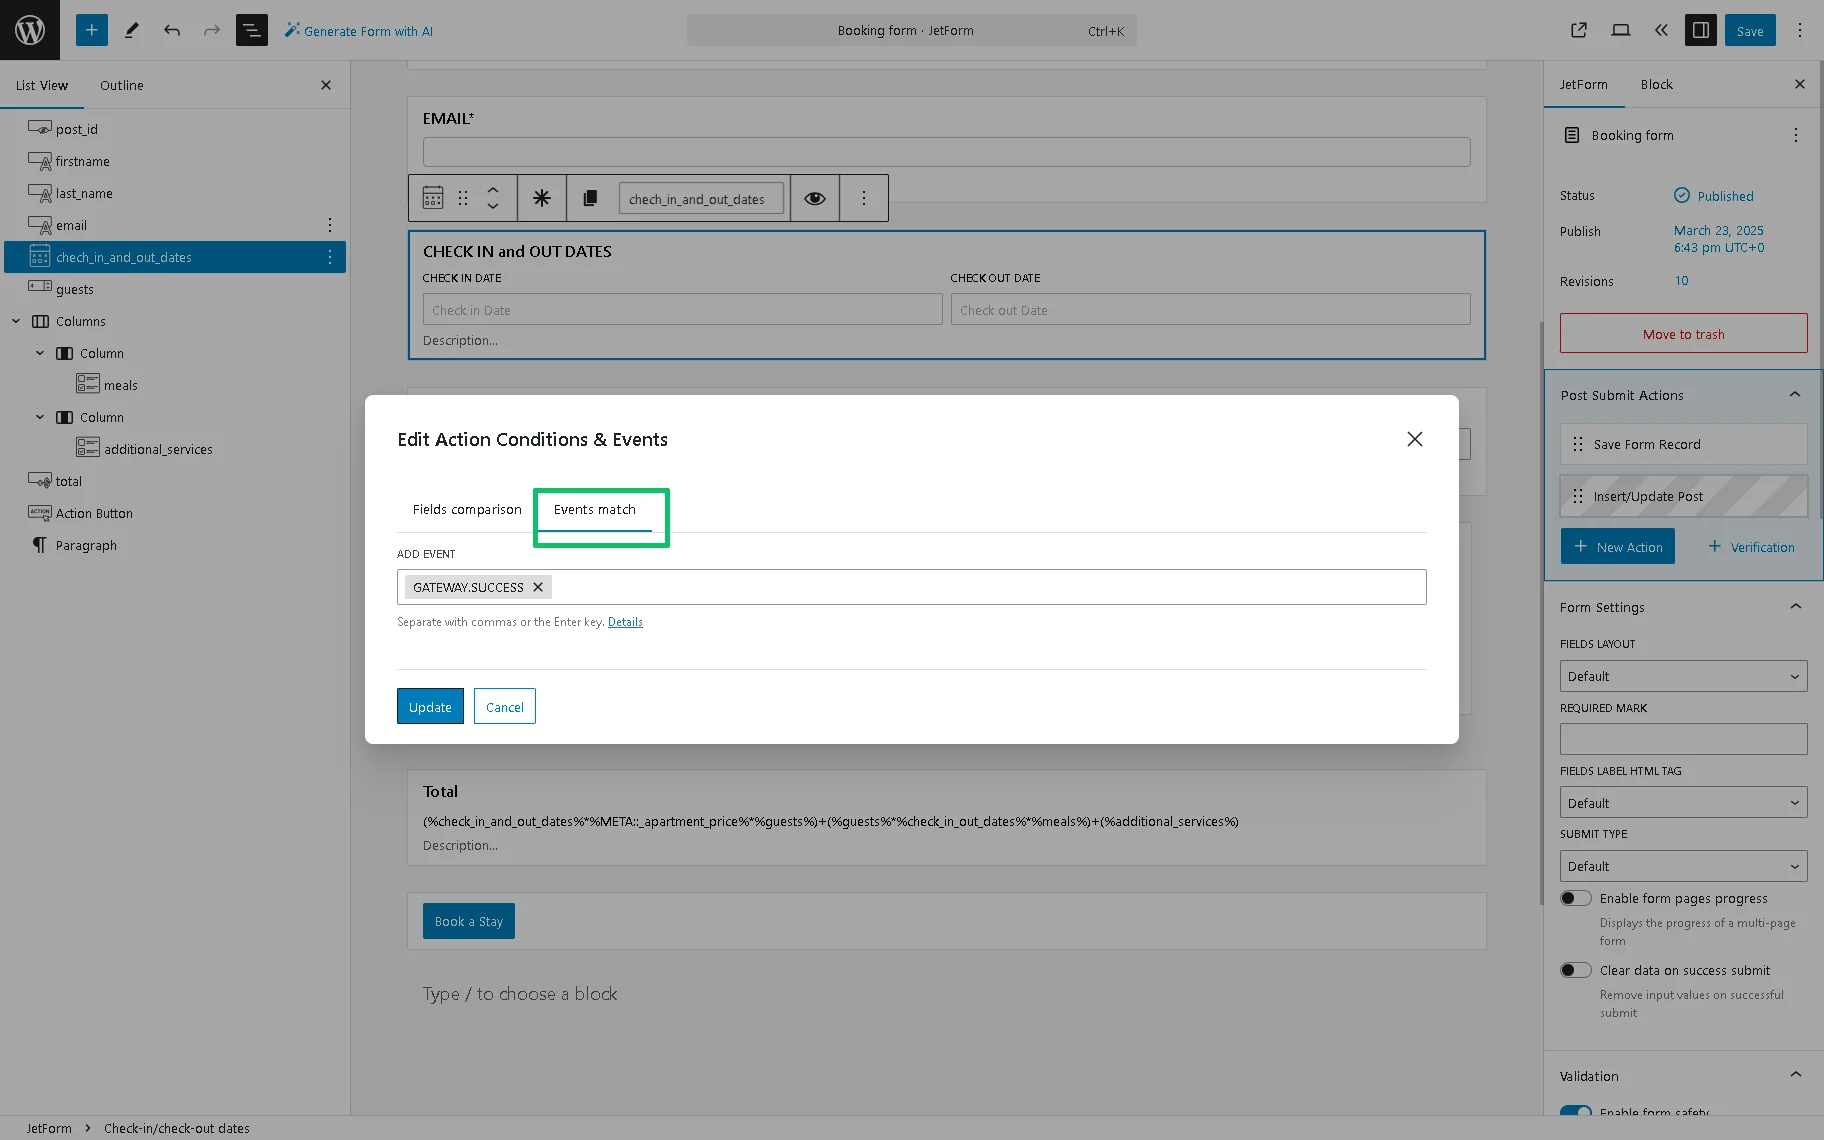
Finally, press the “Update” button to save the event and close the Edit Action Conditions & Events pop-up.
Third, set the “Apartment Booking” Post Submit Action.
Press the “+ New Action” button and pick the “Apartment Booking” option from the pop-up.
Then, in the newly-appeared Edit Apartment Booking pop-up, match the needed form’s fields with the options from the corresponding drop-down lists.
In this case, we select the following options in this pop-up:
- The “post_id” form field as an option from the APARTMENT ID FIELD;
- The “CHECK IN and OUT DATES” form field as an option from the CHECK-IN/CHECK-OUT DATE FIELD;
- The “EMAIL” form field as an option from the E-MAIL FIELD.
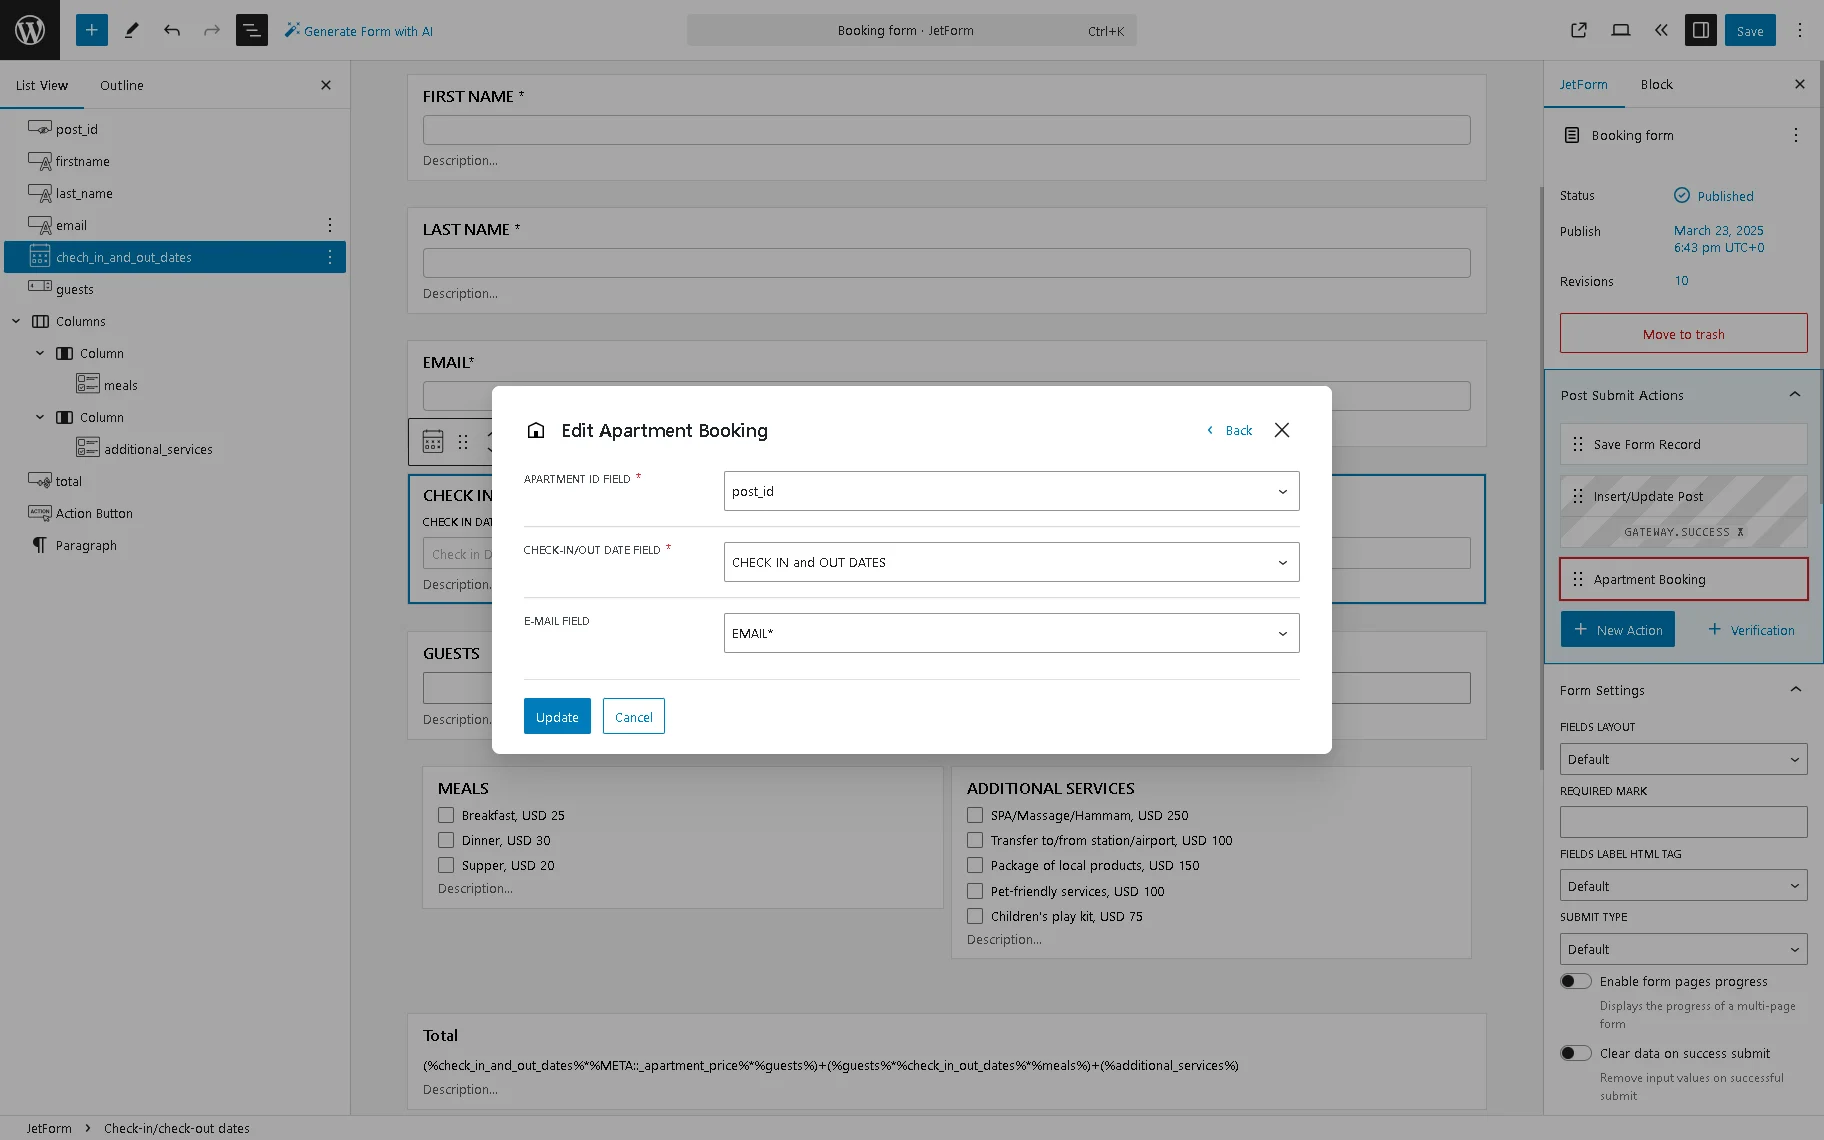
Press the “Update” button to save changes and close the pop-up.
As it was for the “Insert/Update Post” Post Submit Action, click the “criss crossed lines” icon and set the “DEFAULT.PROCESS” Event in the Edit Action Conditions & Events pop-up.
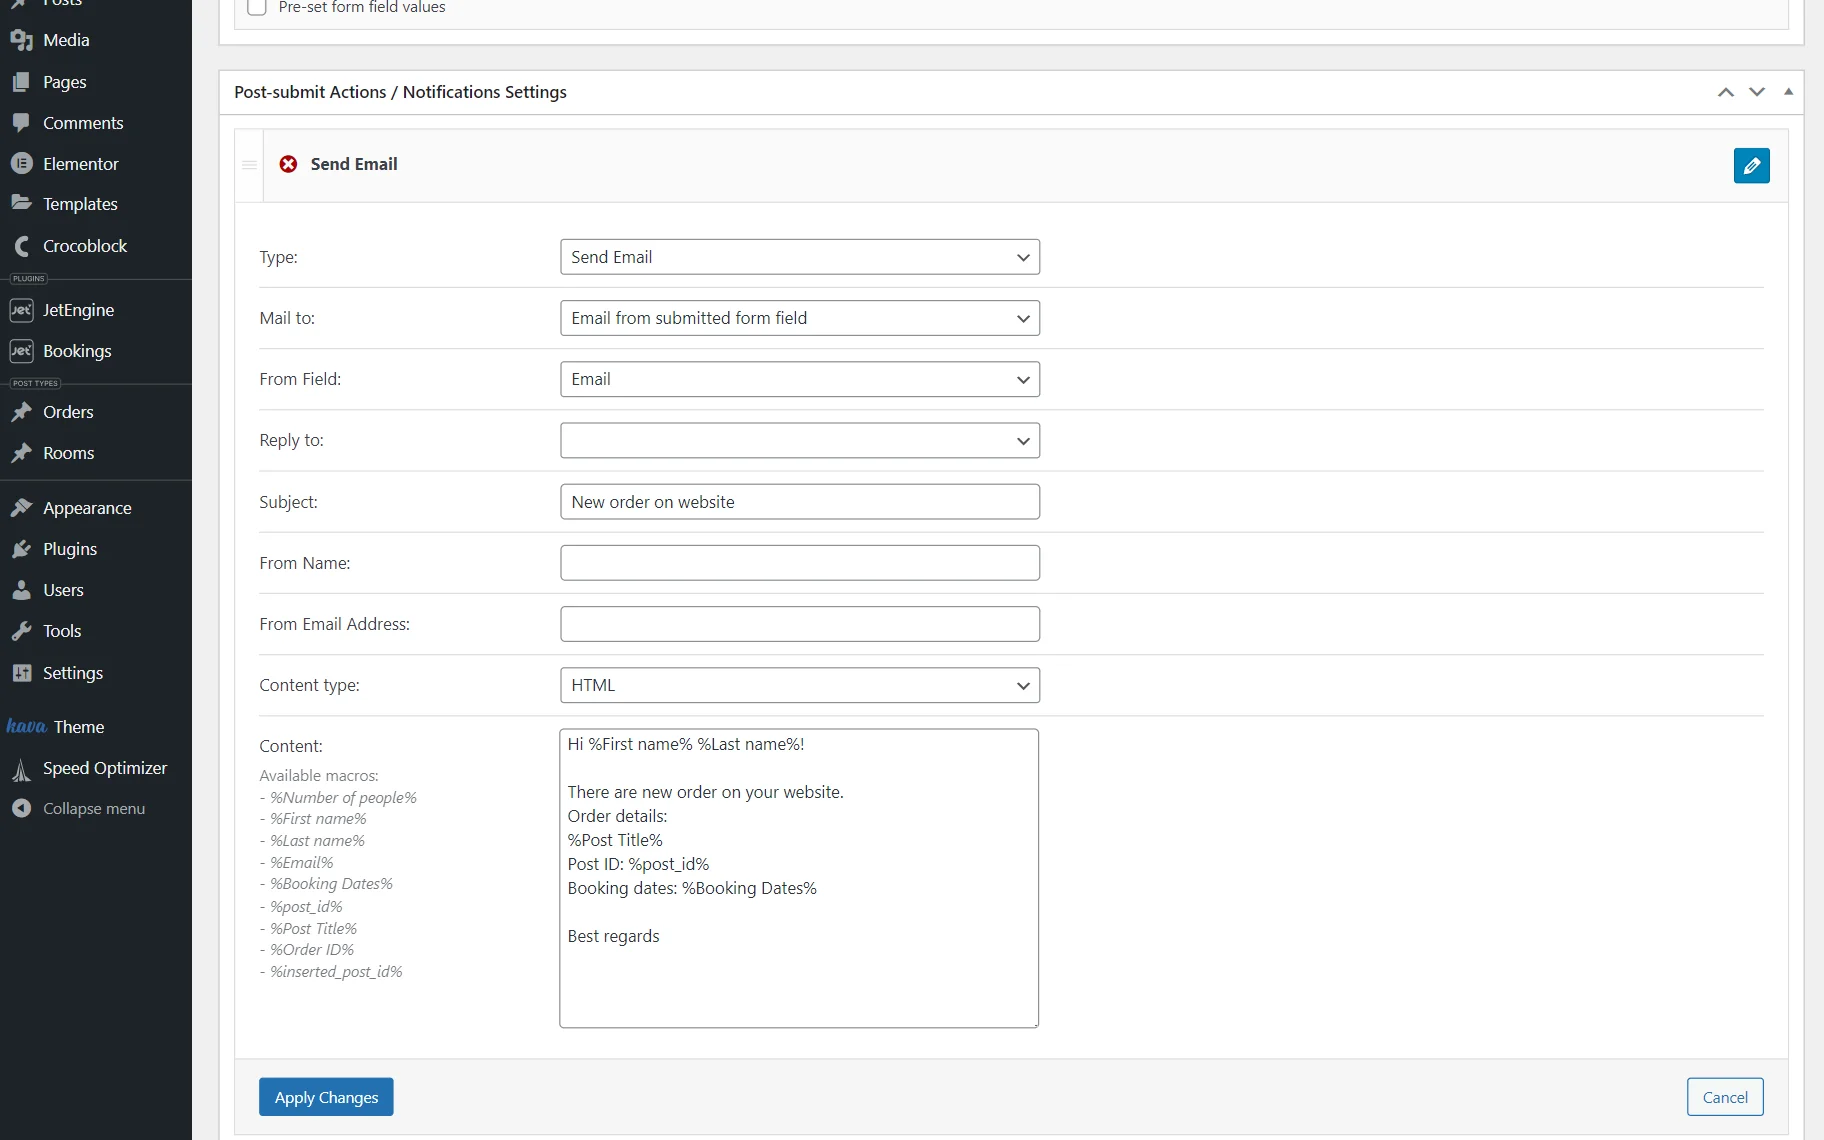
Fourth, set the “Send Email” Post Submit Action.
Press the “+ New Action” button and select the “Send Email” option from the pop-up.
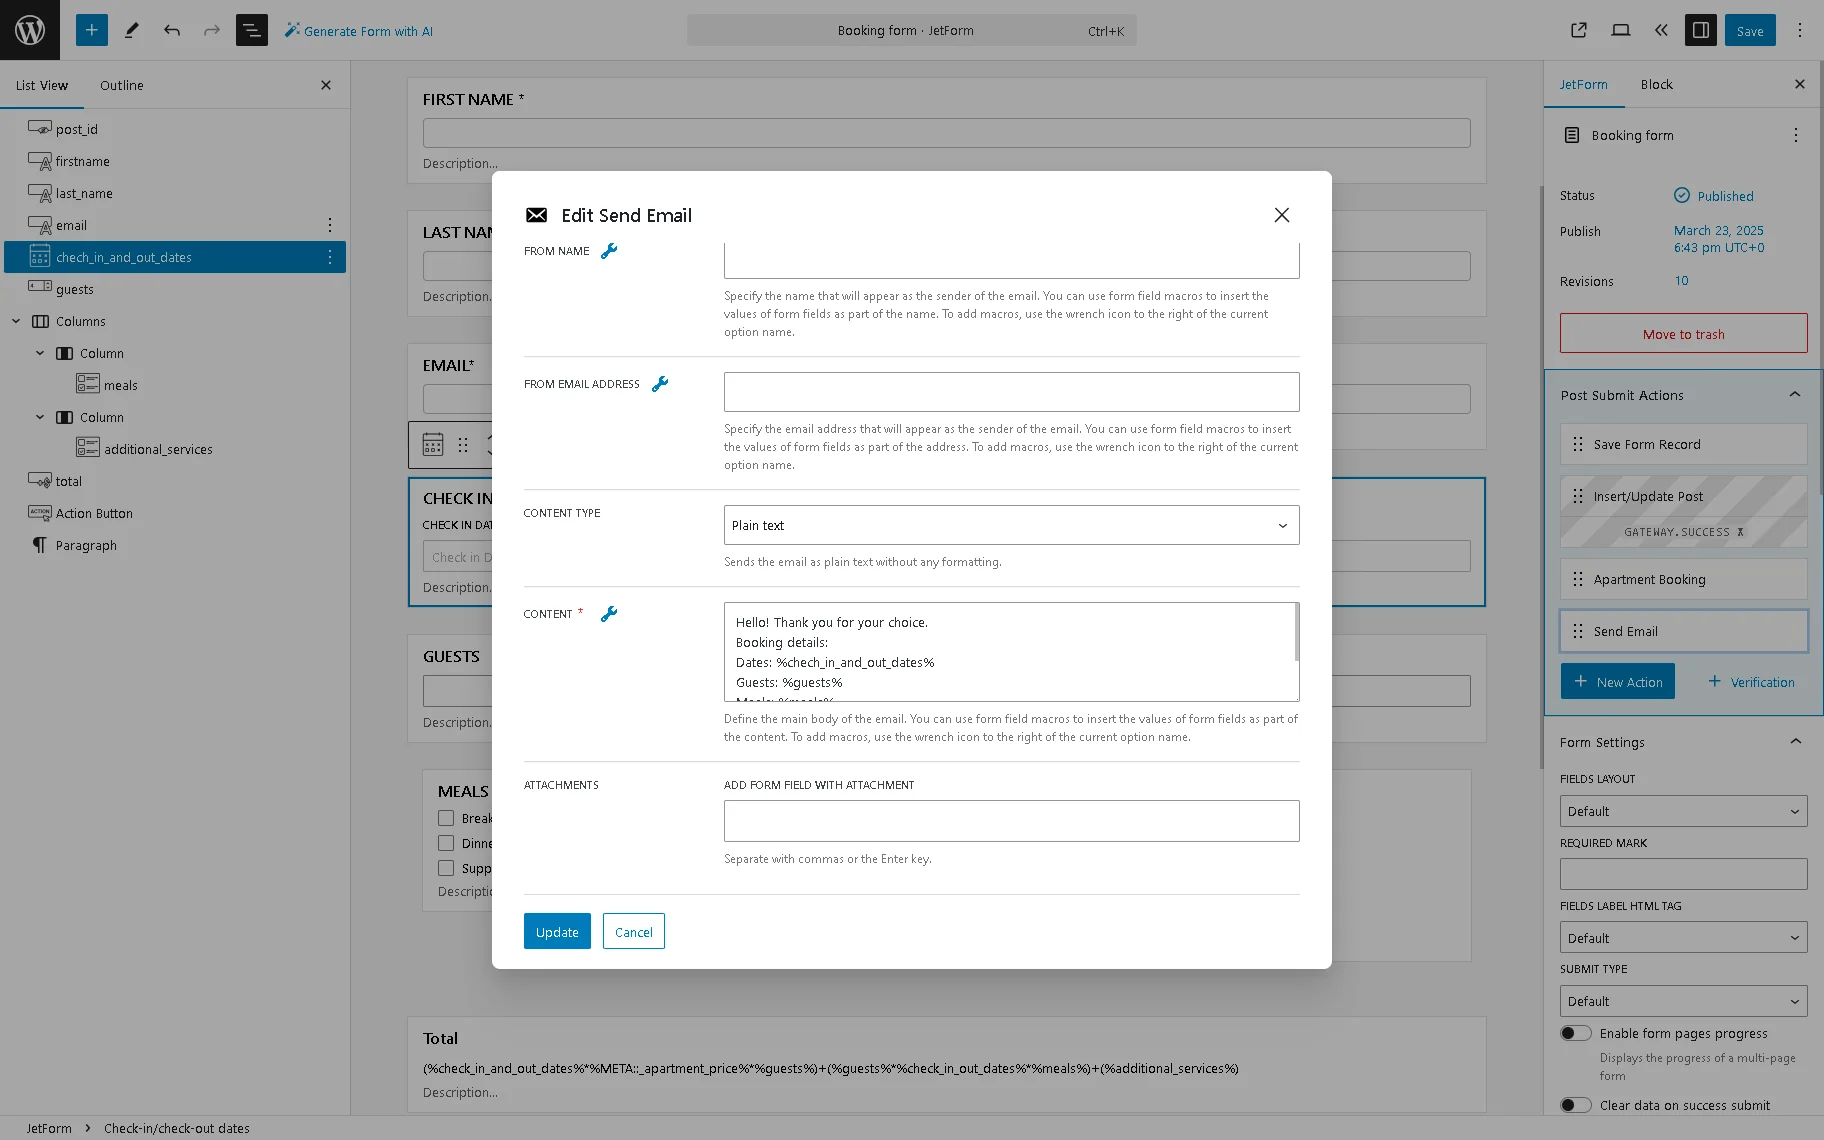
Pick the “Email from submitted form field” MAIL TO and select the needed field from the FROM FIELD drop-down list. Then, type the SUBJECT of the email and choose the “Plain text” CONTENT TYPE.
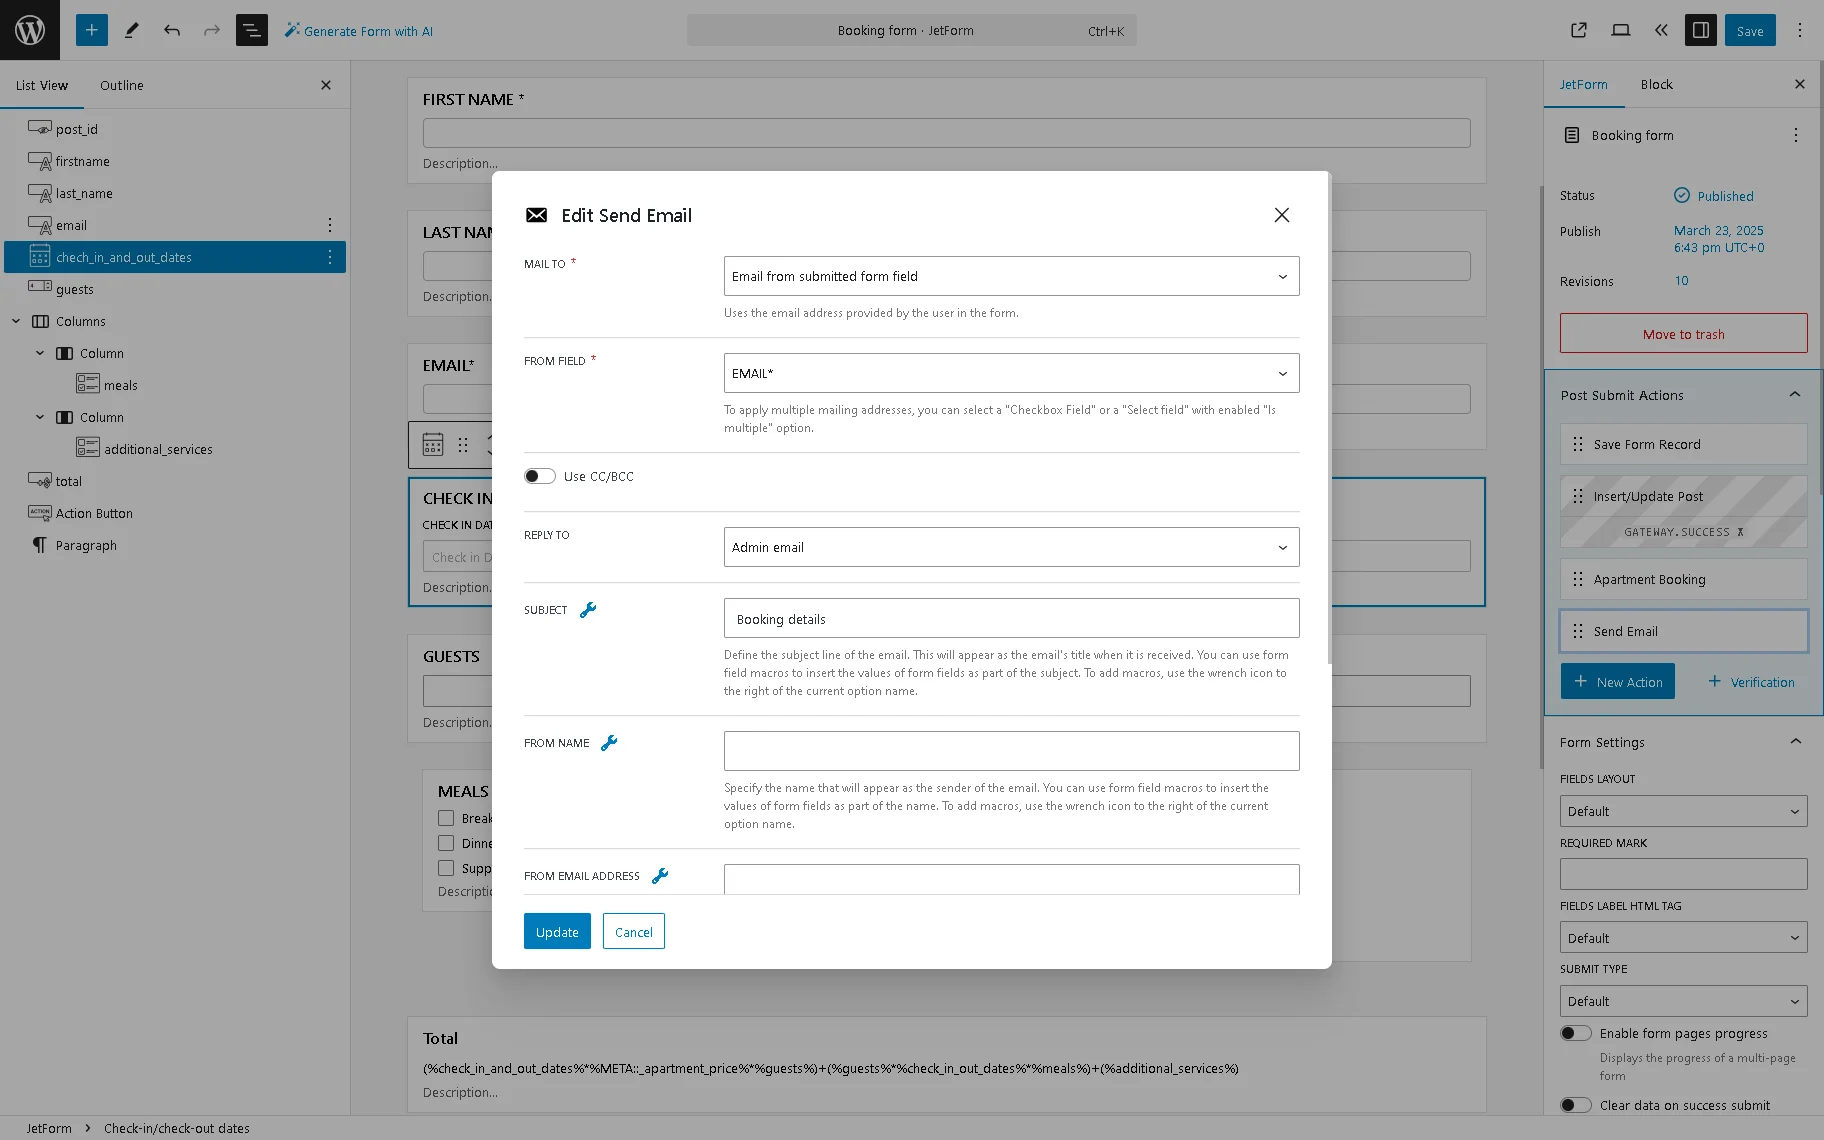
In this case, we use macros to add the current booking data into the email text. For more details on managing the “Send Email” Post Submit Action and applying macros, see the Send Email tutorial.
Add the Form to a Single Page
The built form is available for adding to single pages in the Elementor and Gutenberg editors, as well as in the Bricks theme. Here, we develop a single Elementor page for editing using the JetThemeCore plugin.
This tutorial explains How to Create a WordPress Single Post Page Template in more detail.
Create a single page for CPT and navigate to the single settings to set the CPT (here, the “Rooms” CPT) as a source for this single page through the Post Type drop-down list.
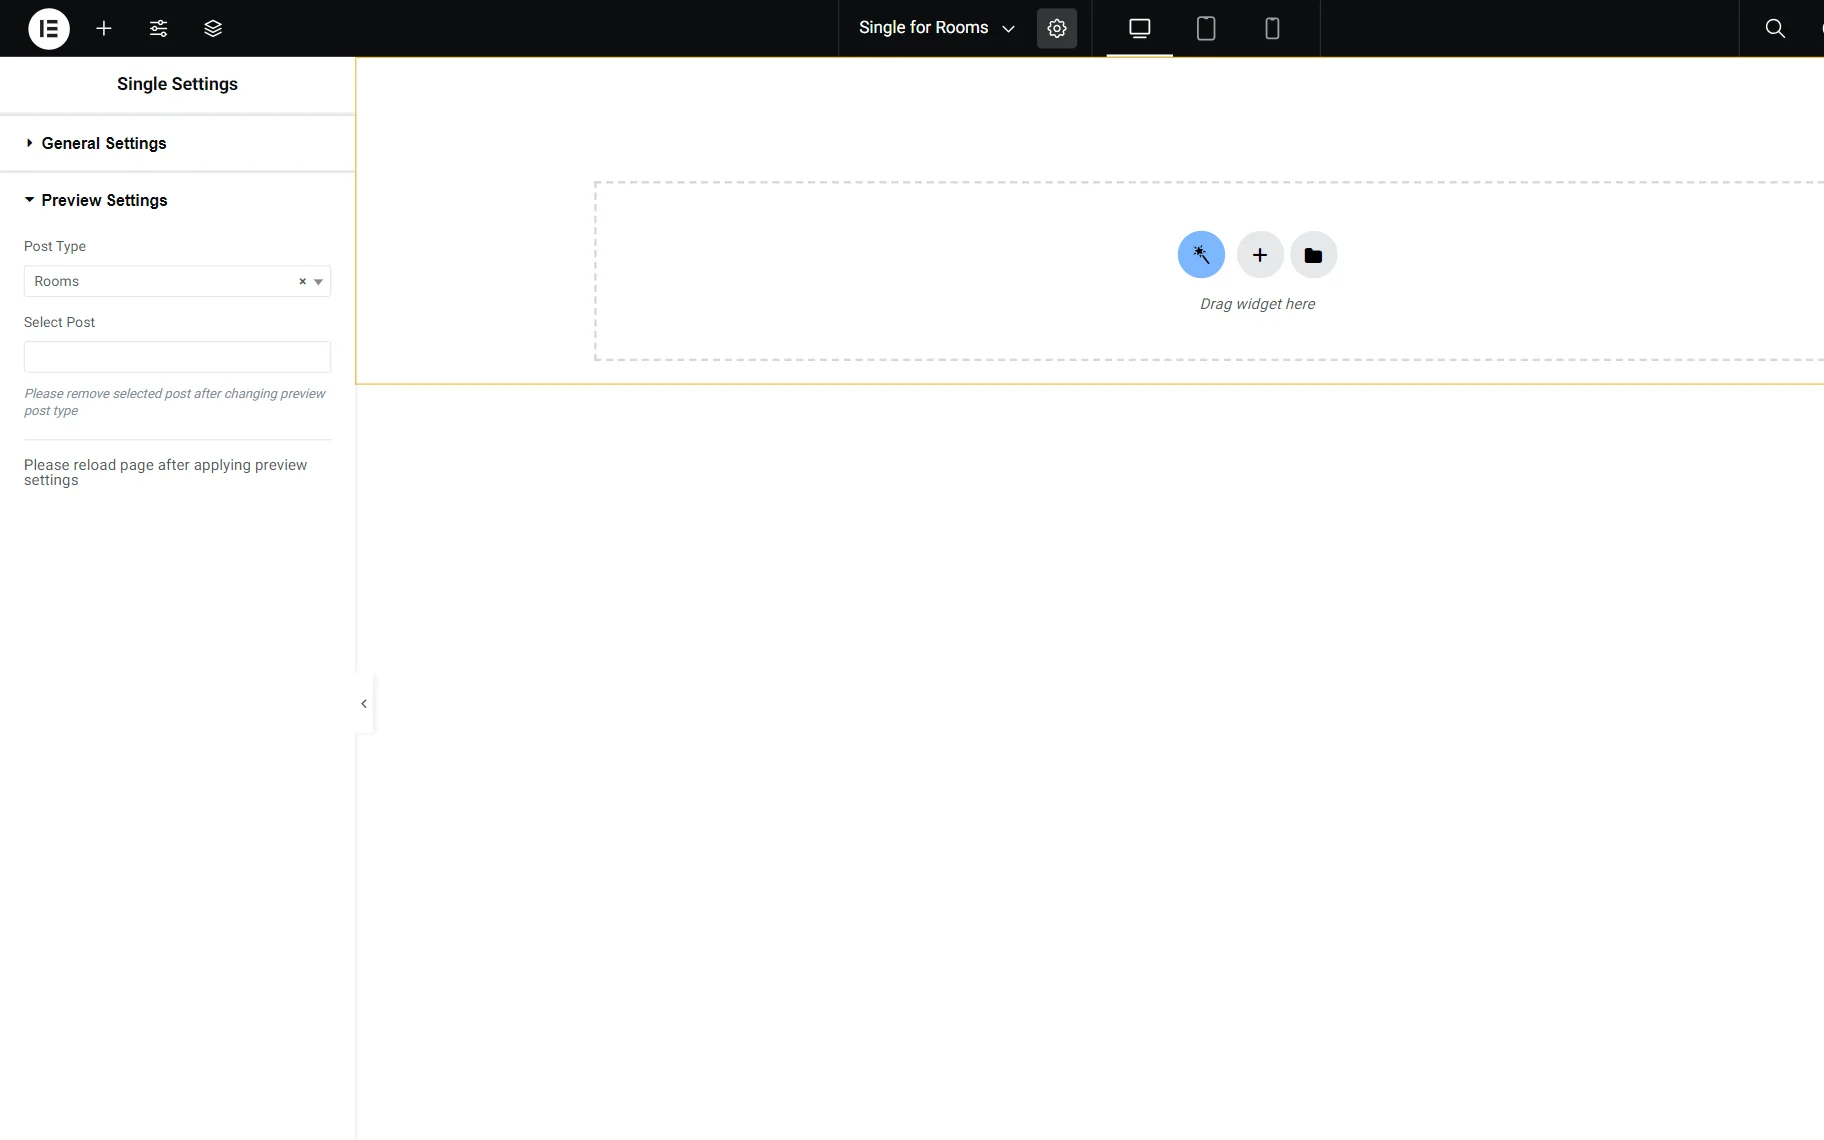
Design the single page according to your needs. Then, drag and drop the JetForm widget to the required location. Then, you can select the previously built form from the drop-down list and customize its appearance.
Read the How to Display the Booking Form on the Single Post Page to learn how to add booking forms to single pages.
Test the flow
First, fill out the form. Navigate to the front end and check if the form works correctly. Fill in the form fields and press the “BOOK A STAY” button.
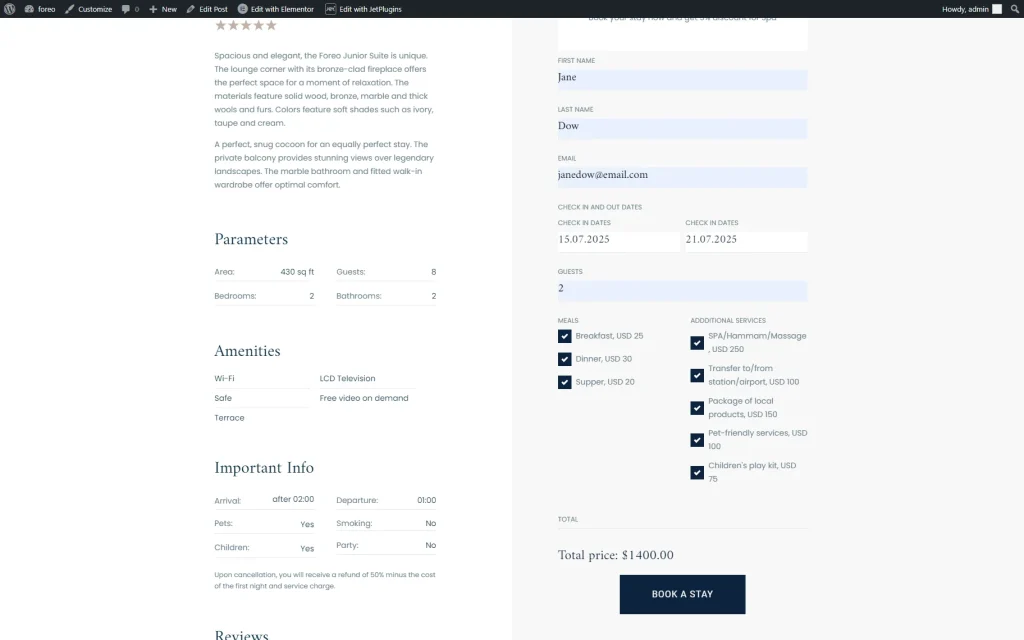
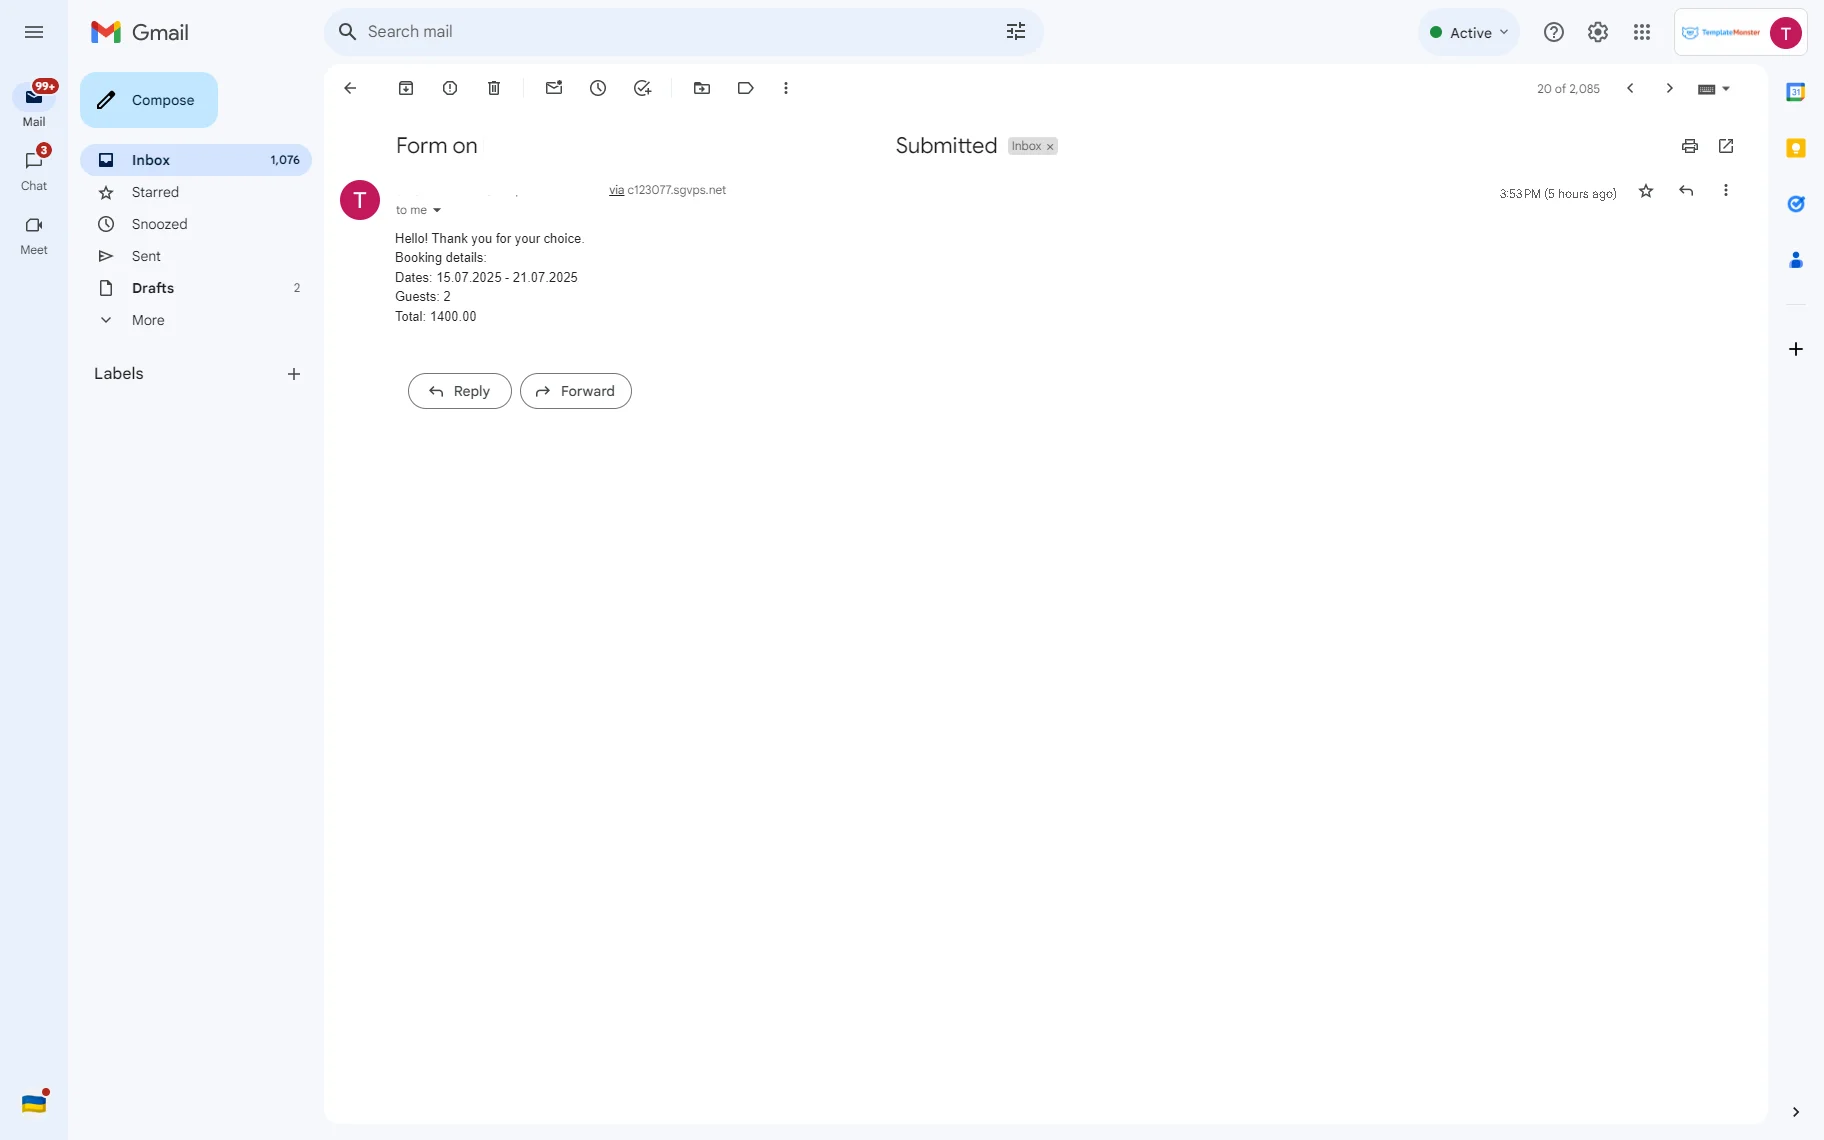
Once completed, you will be redirected to the PayPal page with the proposition to pay for the booking.
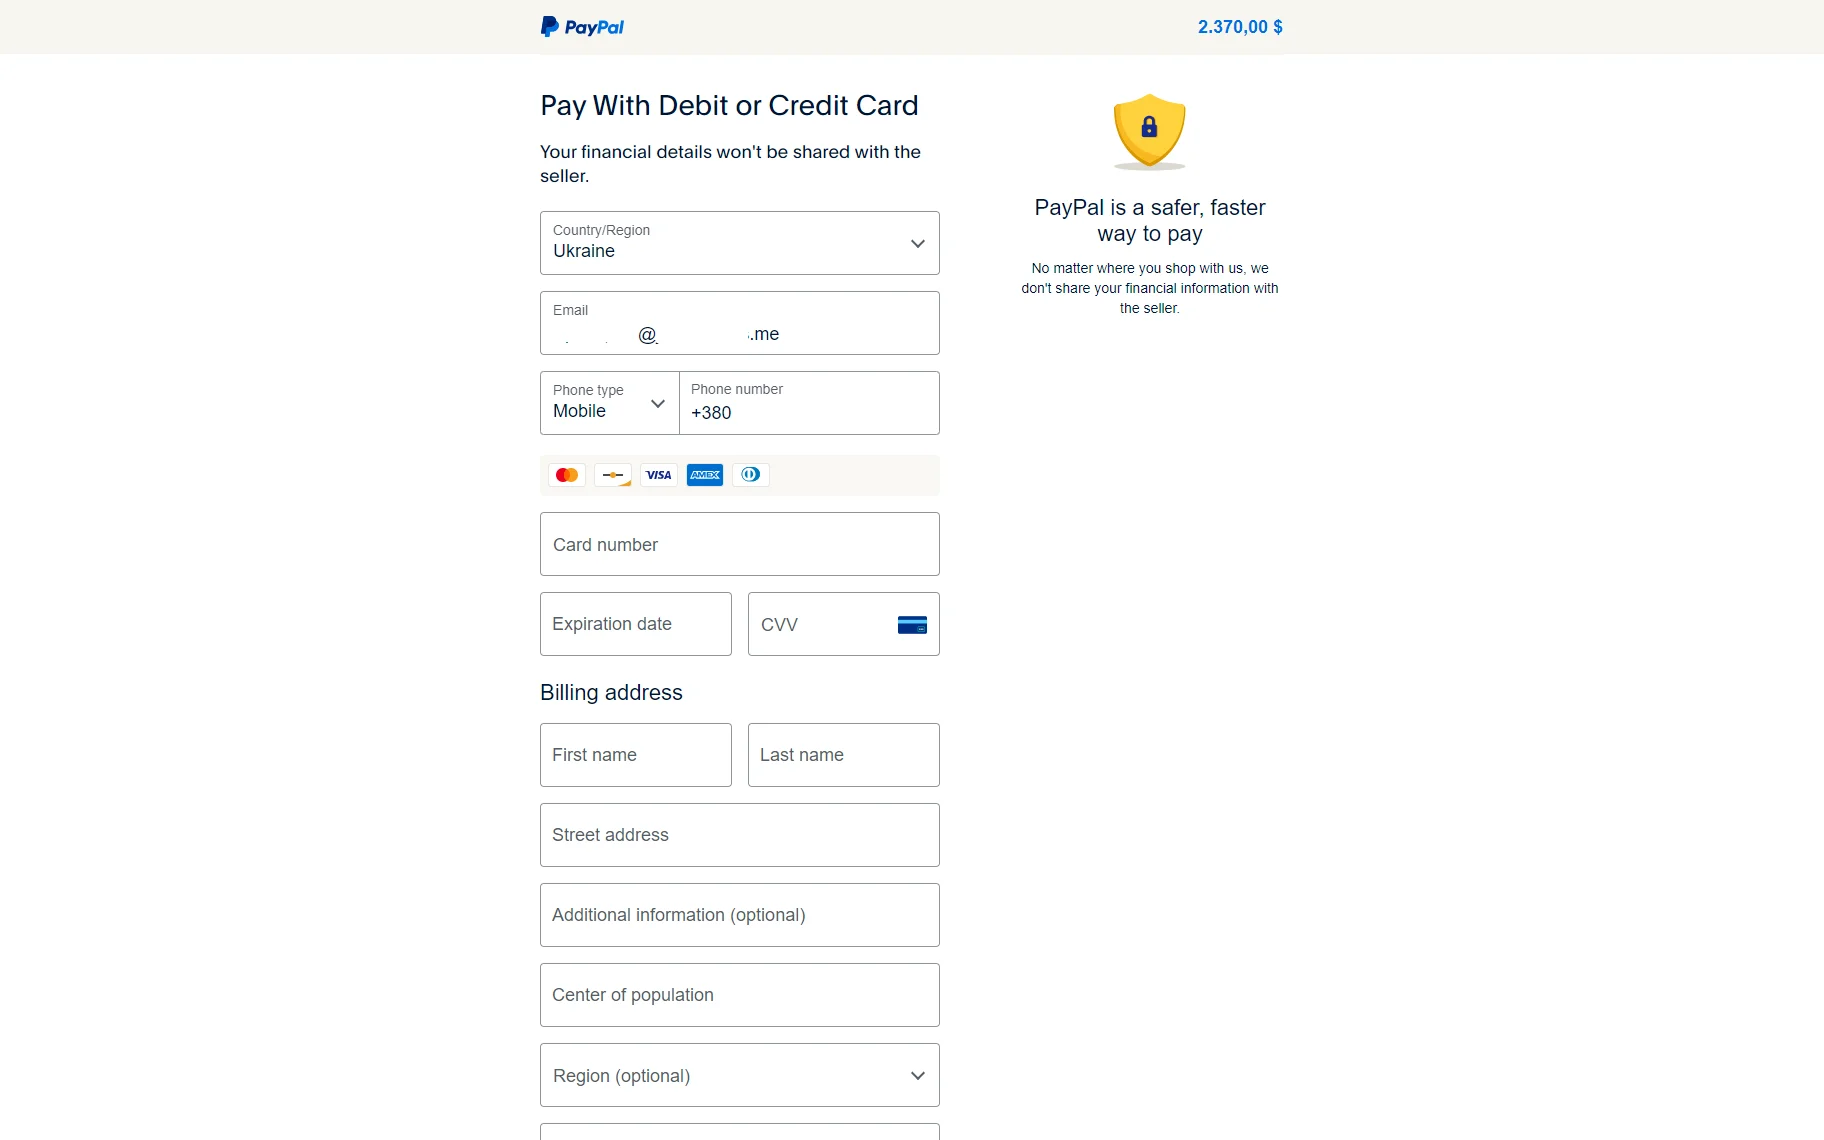
After completing the payment, you will get an email with the purchase details.
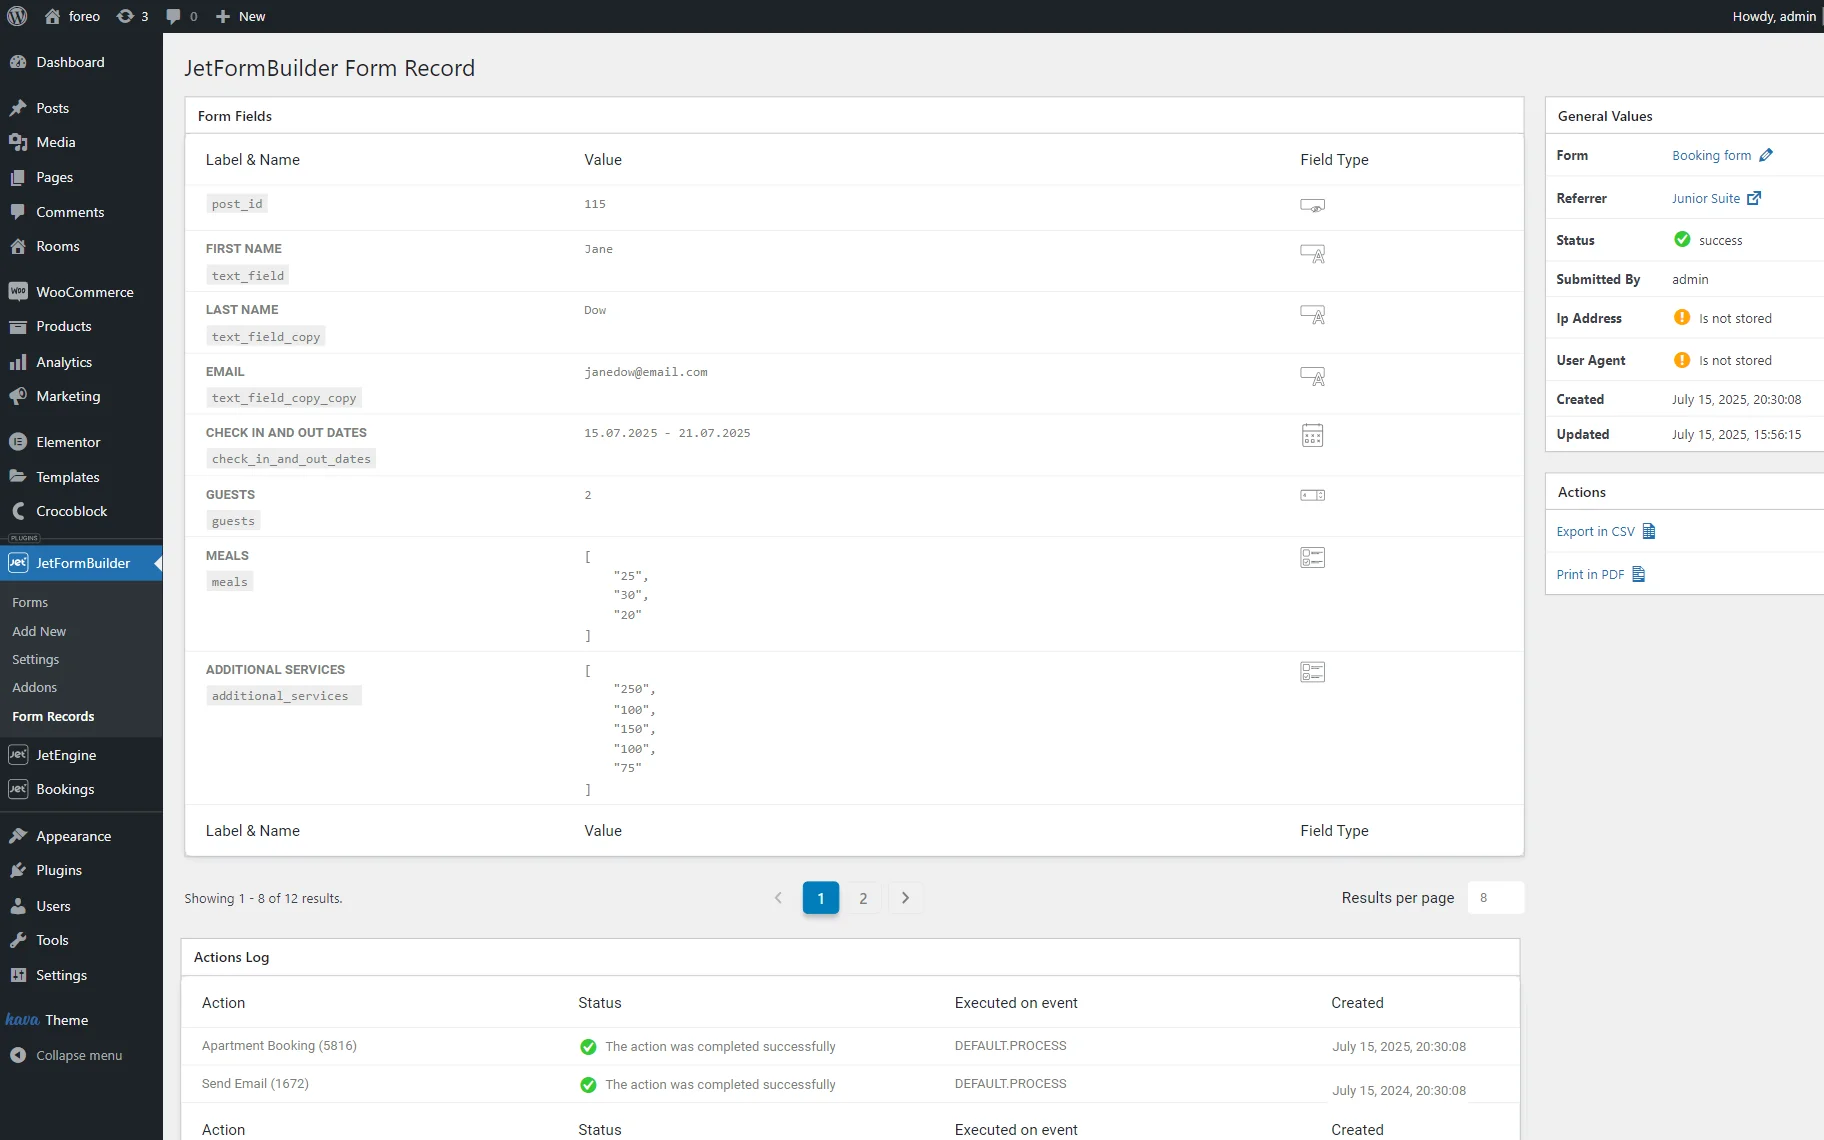
Second, check the JetFormBuilder form records data. Since we set the “Save Form Record” Post Submit Action, the JetFormBuilder plugin will save the submitted form data.
Navigate to the WordPress Dashboard > JetFormBuilder > Form Records tab. This tab displays all submitted forms and their statuses.
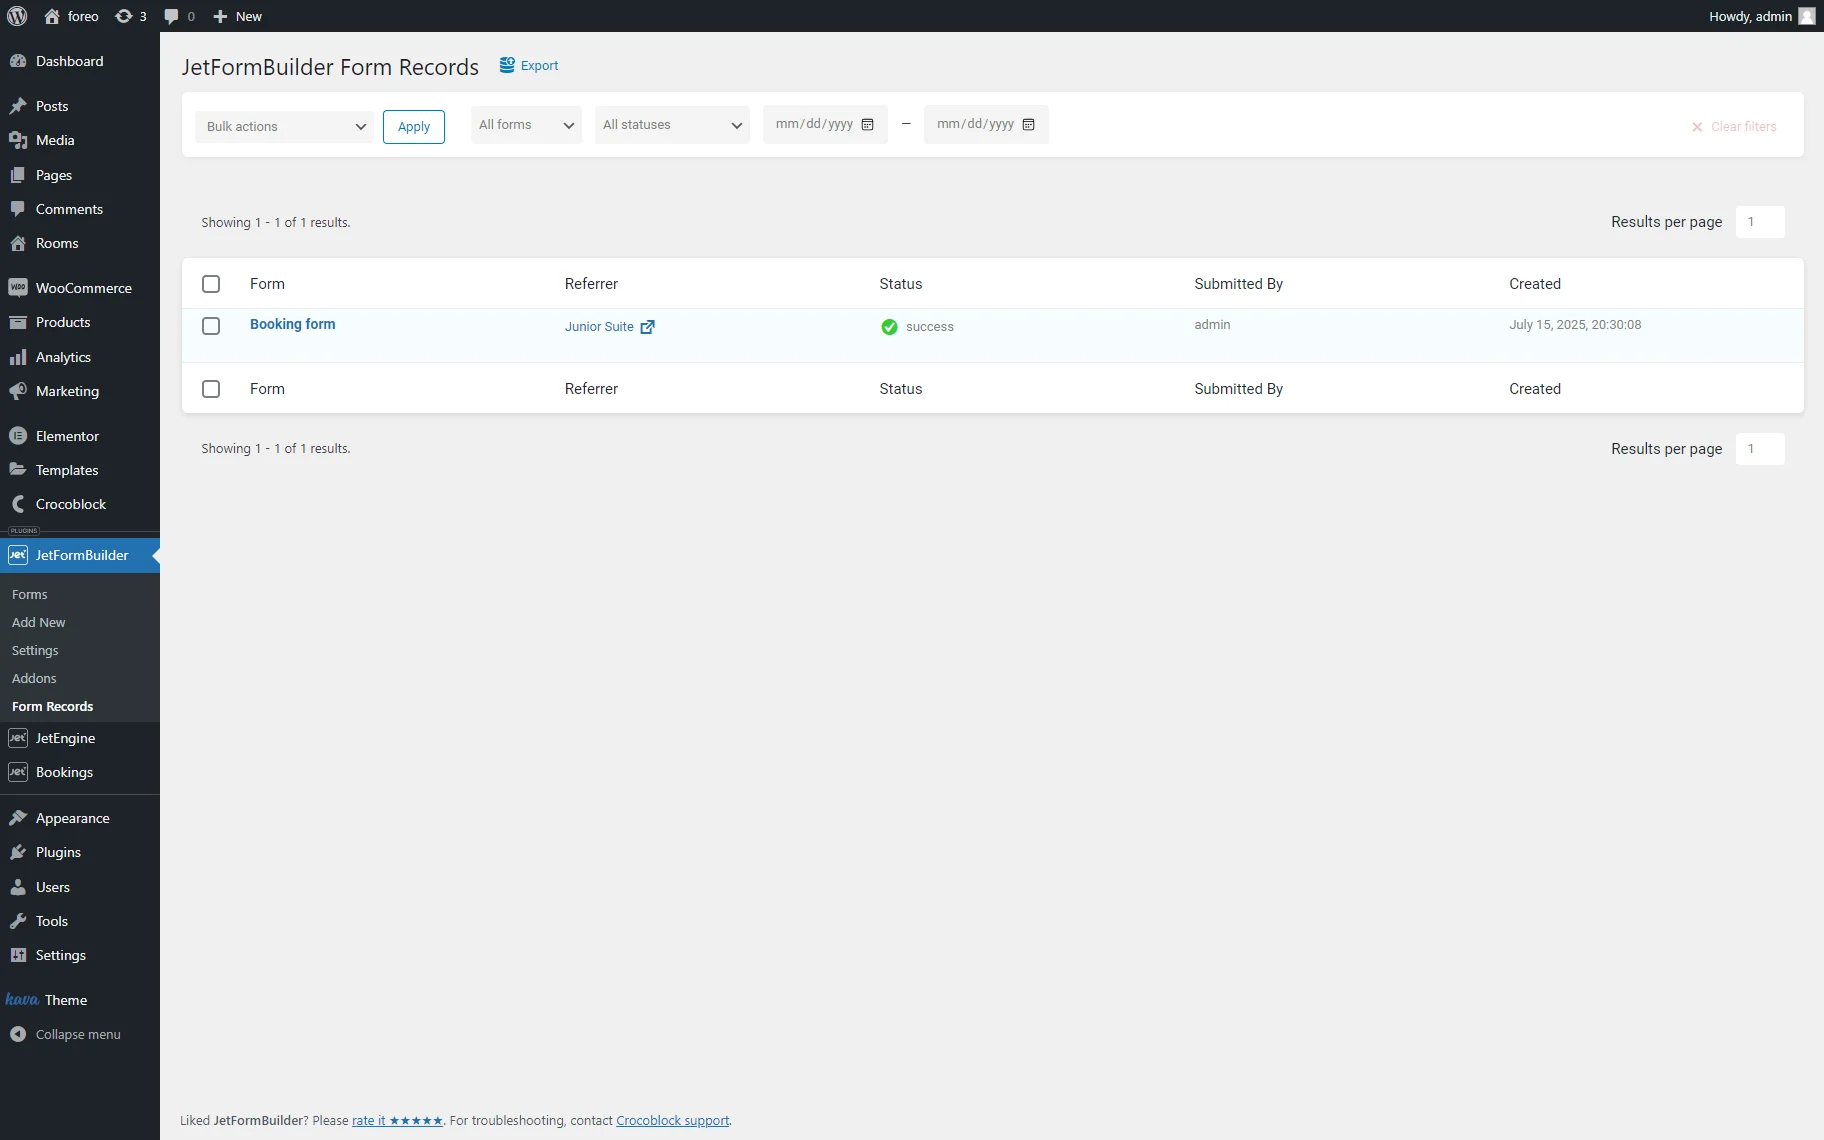
For more details about submitting the specific form, hover over its name and click the “Edit” link below.
Third, check the mailbox. Enter your mailbox and check if you received the email.
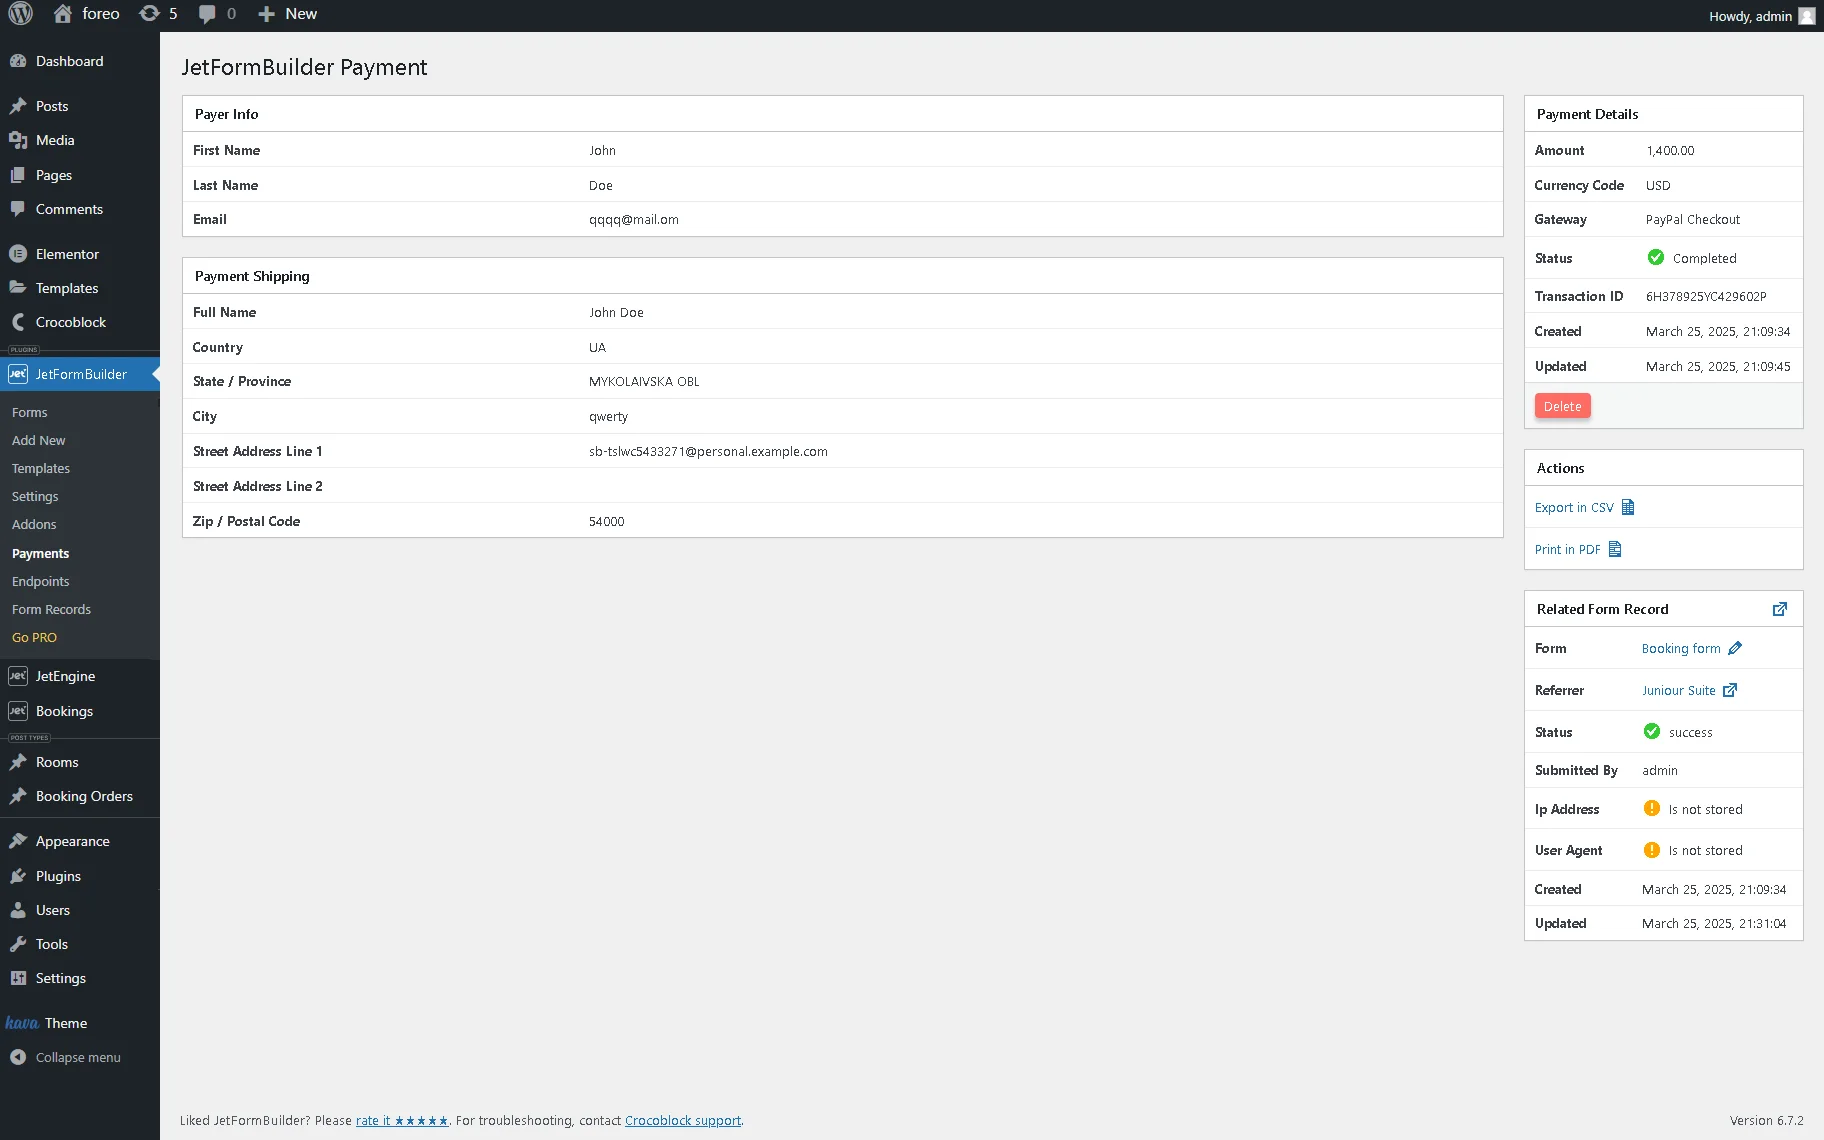
Fourth, check the JetFormBuilder payments. Return to your site and navigate to the WordPress Dashboard > JetFormBuilder > Payments path. The JetFormBuilder Payments tab collects all payments and their data.
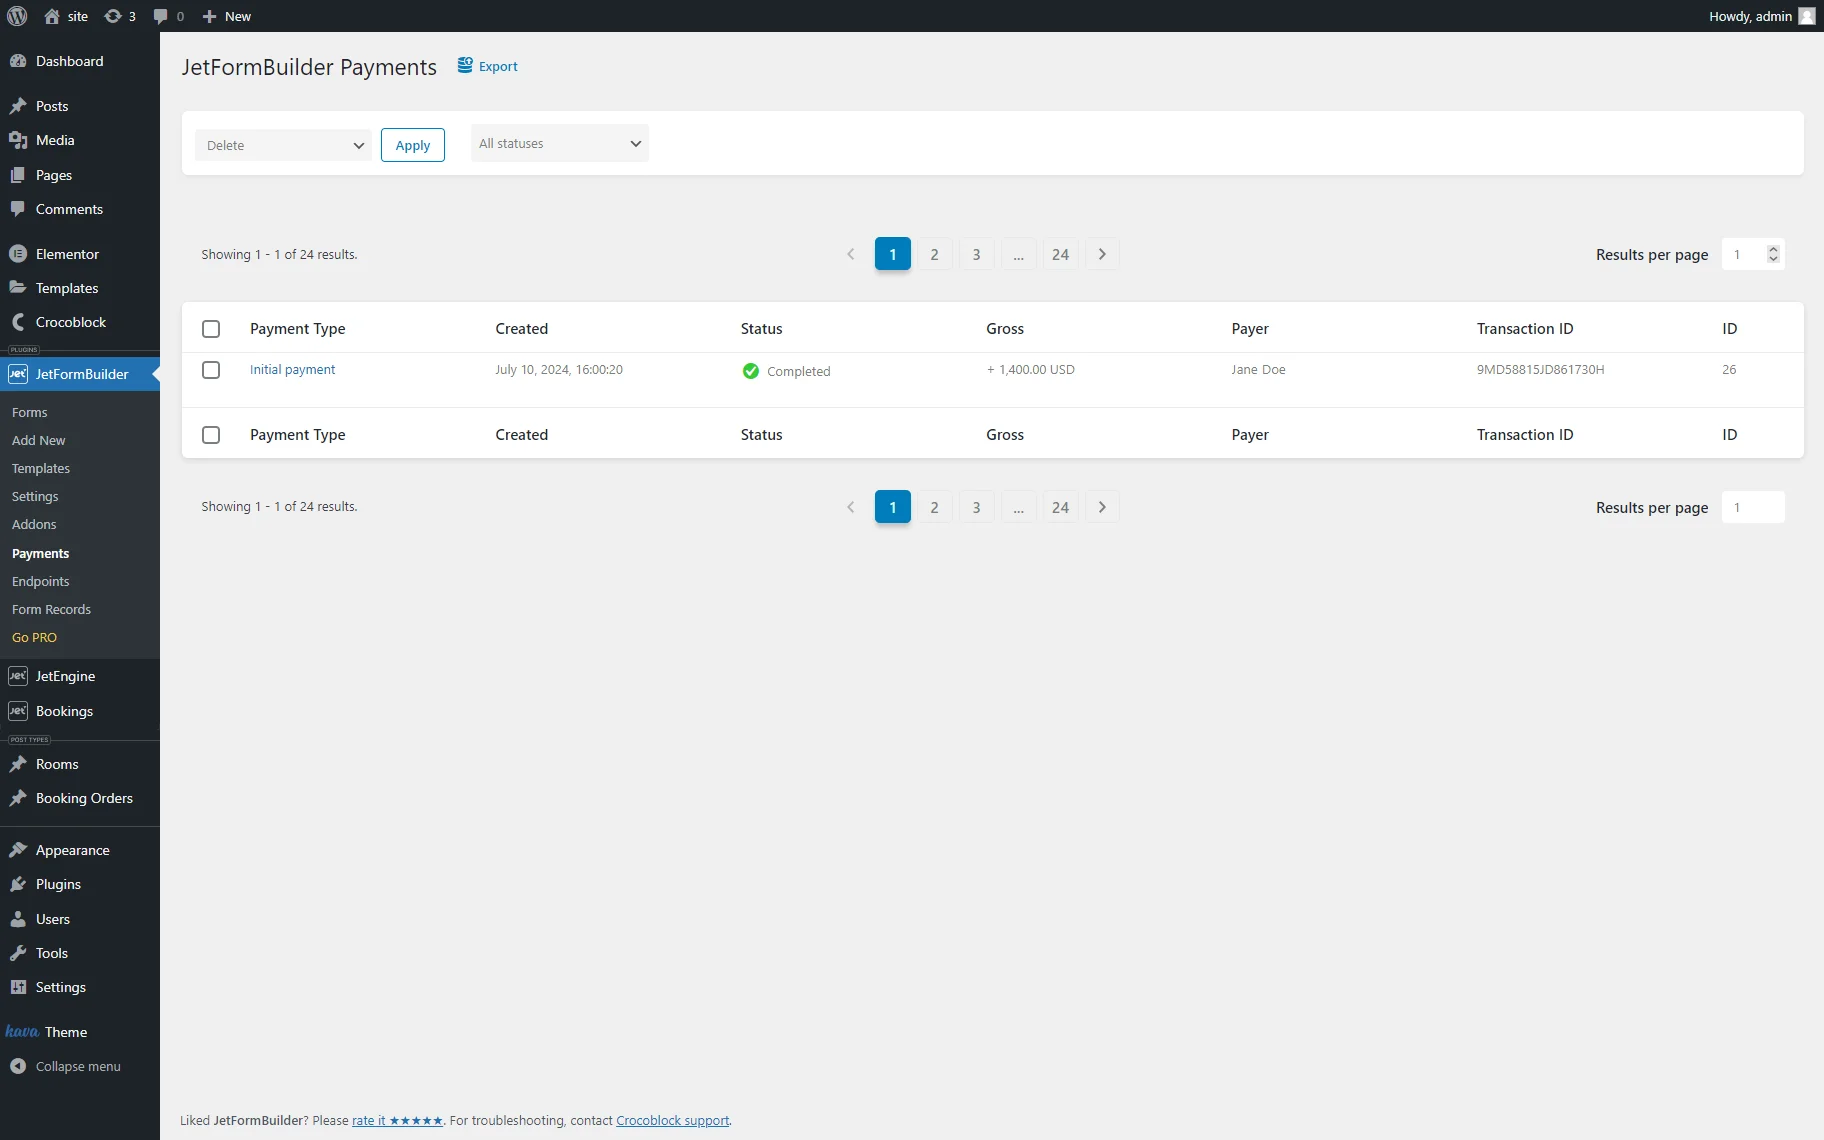
Hover over the payment’s name and press the “View” link. Then, observe the payment details.
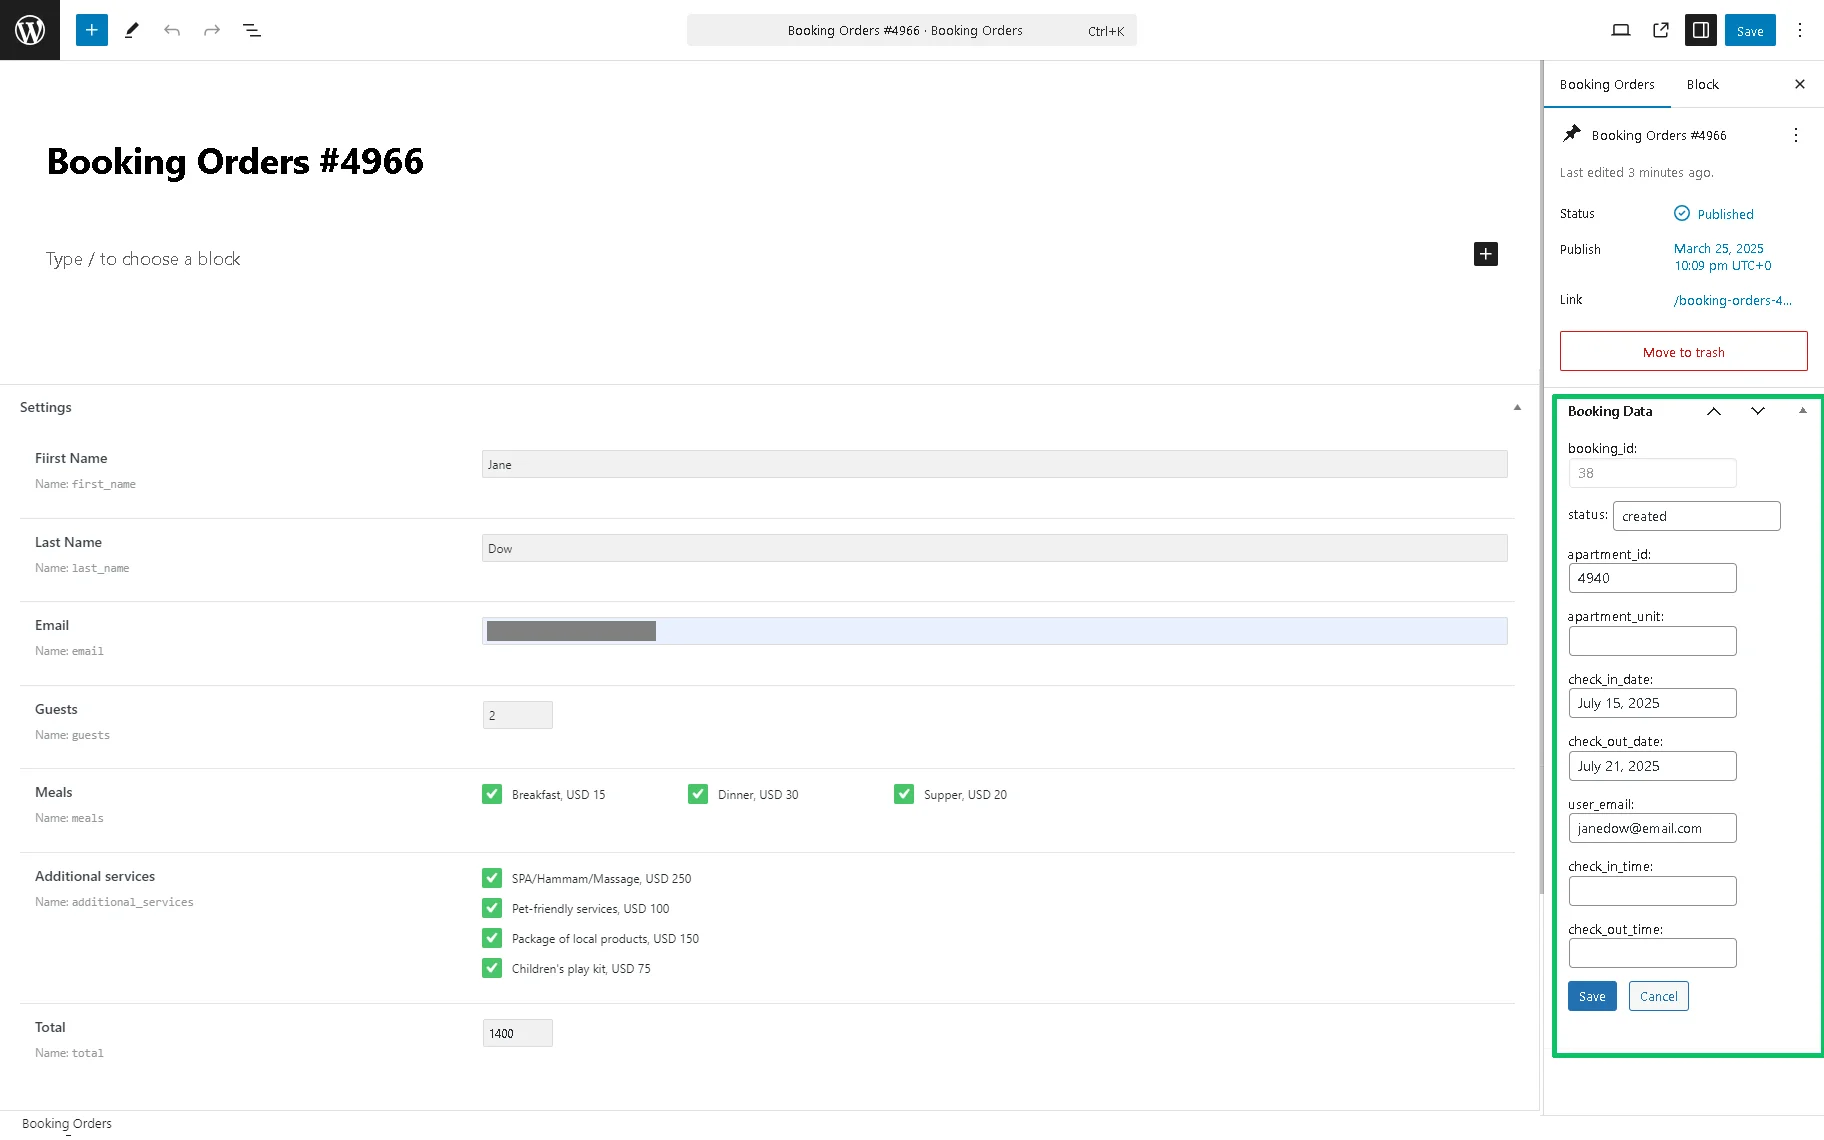
Fifth, check the CPT post. To check how the form creates the pre-specified CPT posts, navigate to the appropriate tab of the WordPress Dashboard (Booking Orders tab in this case). Then, unroll the created post.
Unroll the Booking Data section or the “Edit” button to correct something.
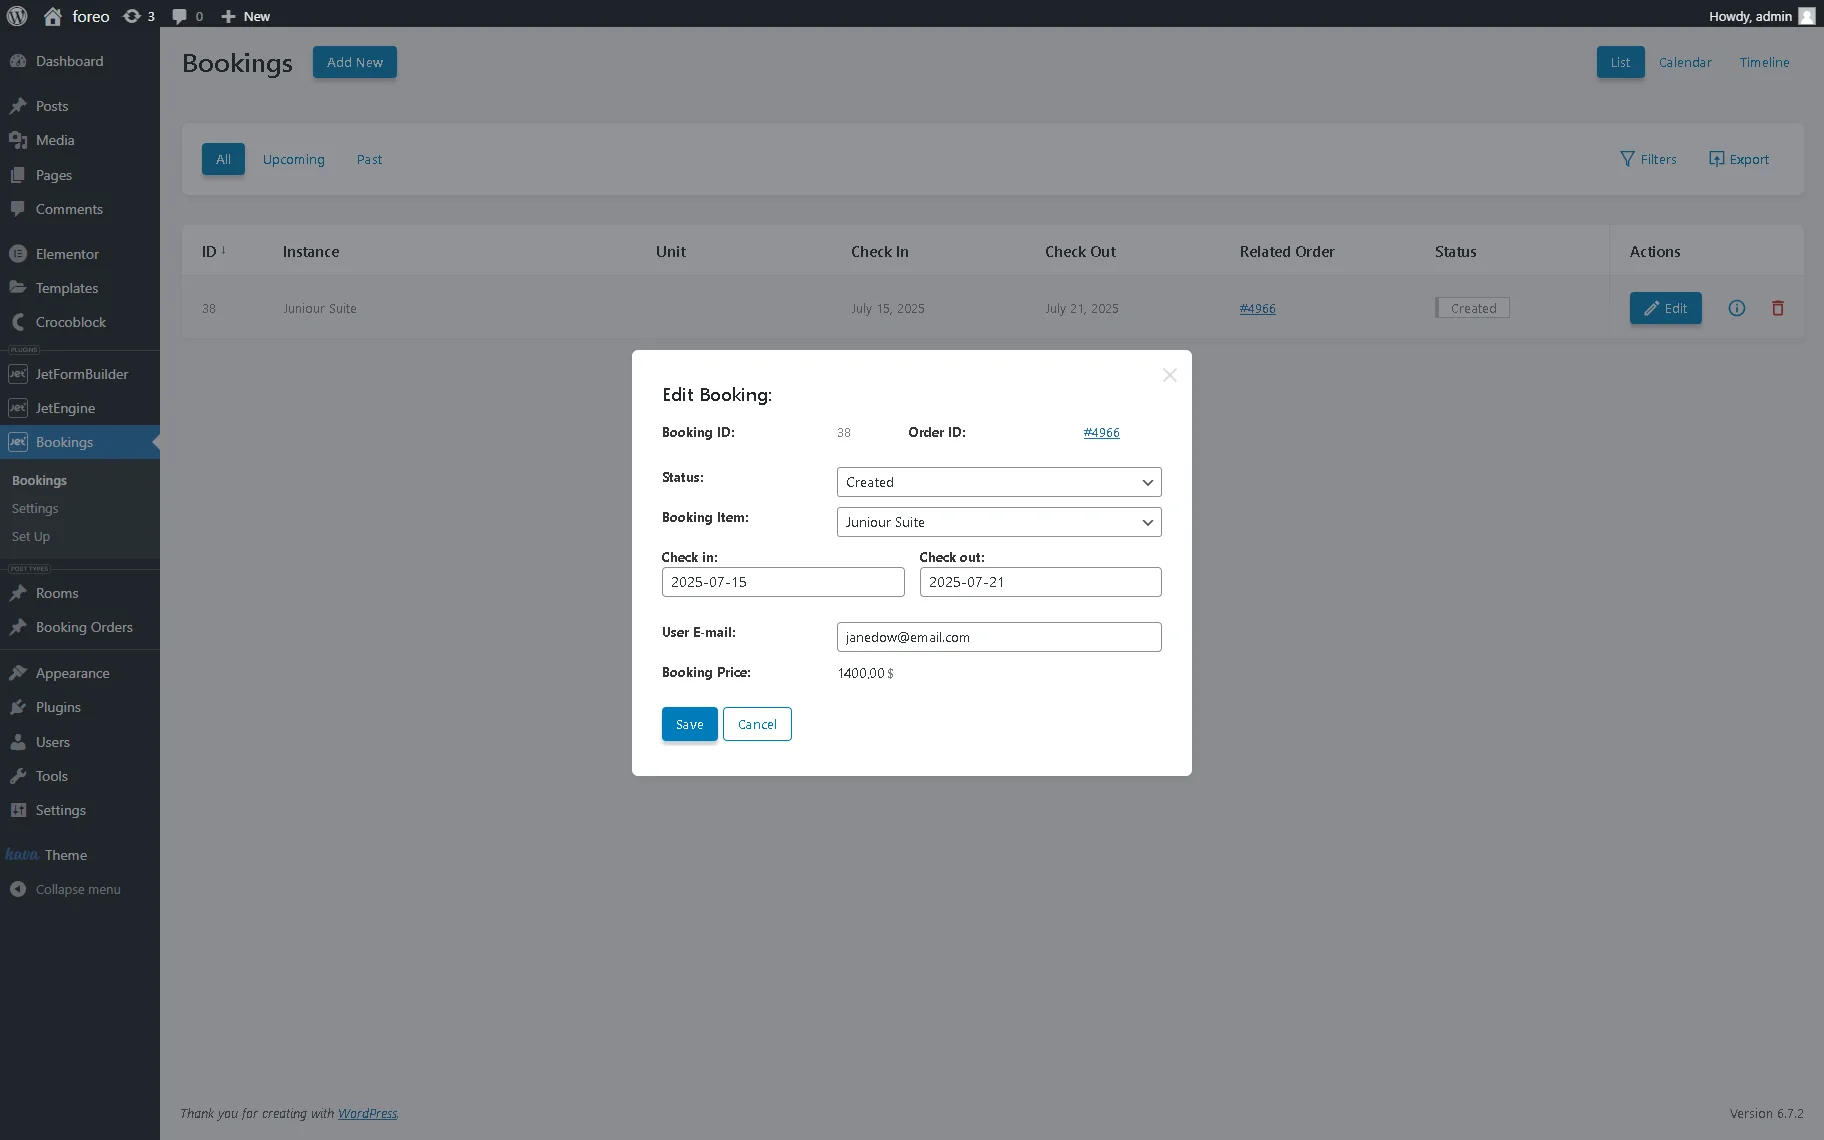
Sixth, check the booking data. The JetBooking plugin collects all orders in the WordPress Dashboard > Booking tab. Press the “Info” icon to unroll the booking data or the “Edit” button to correct anything.
JetEngine Forms (Legacy)
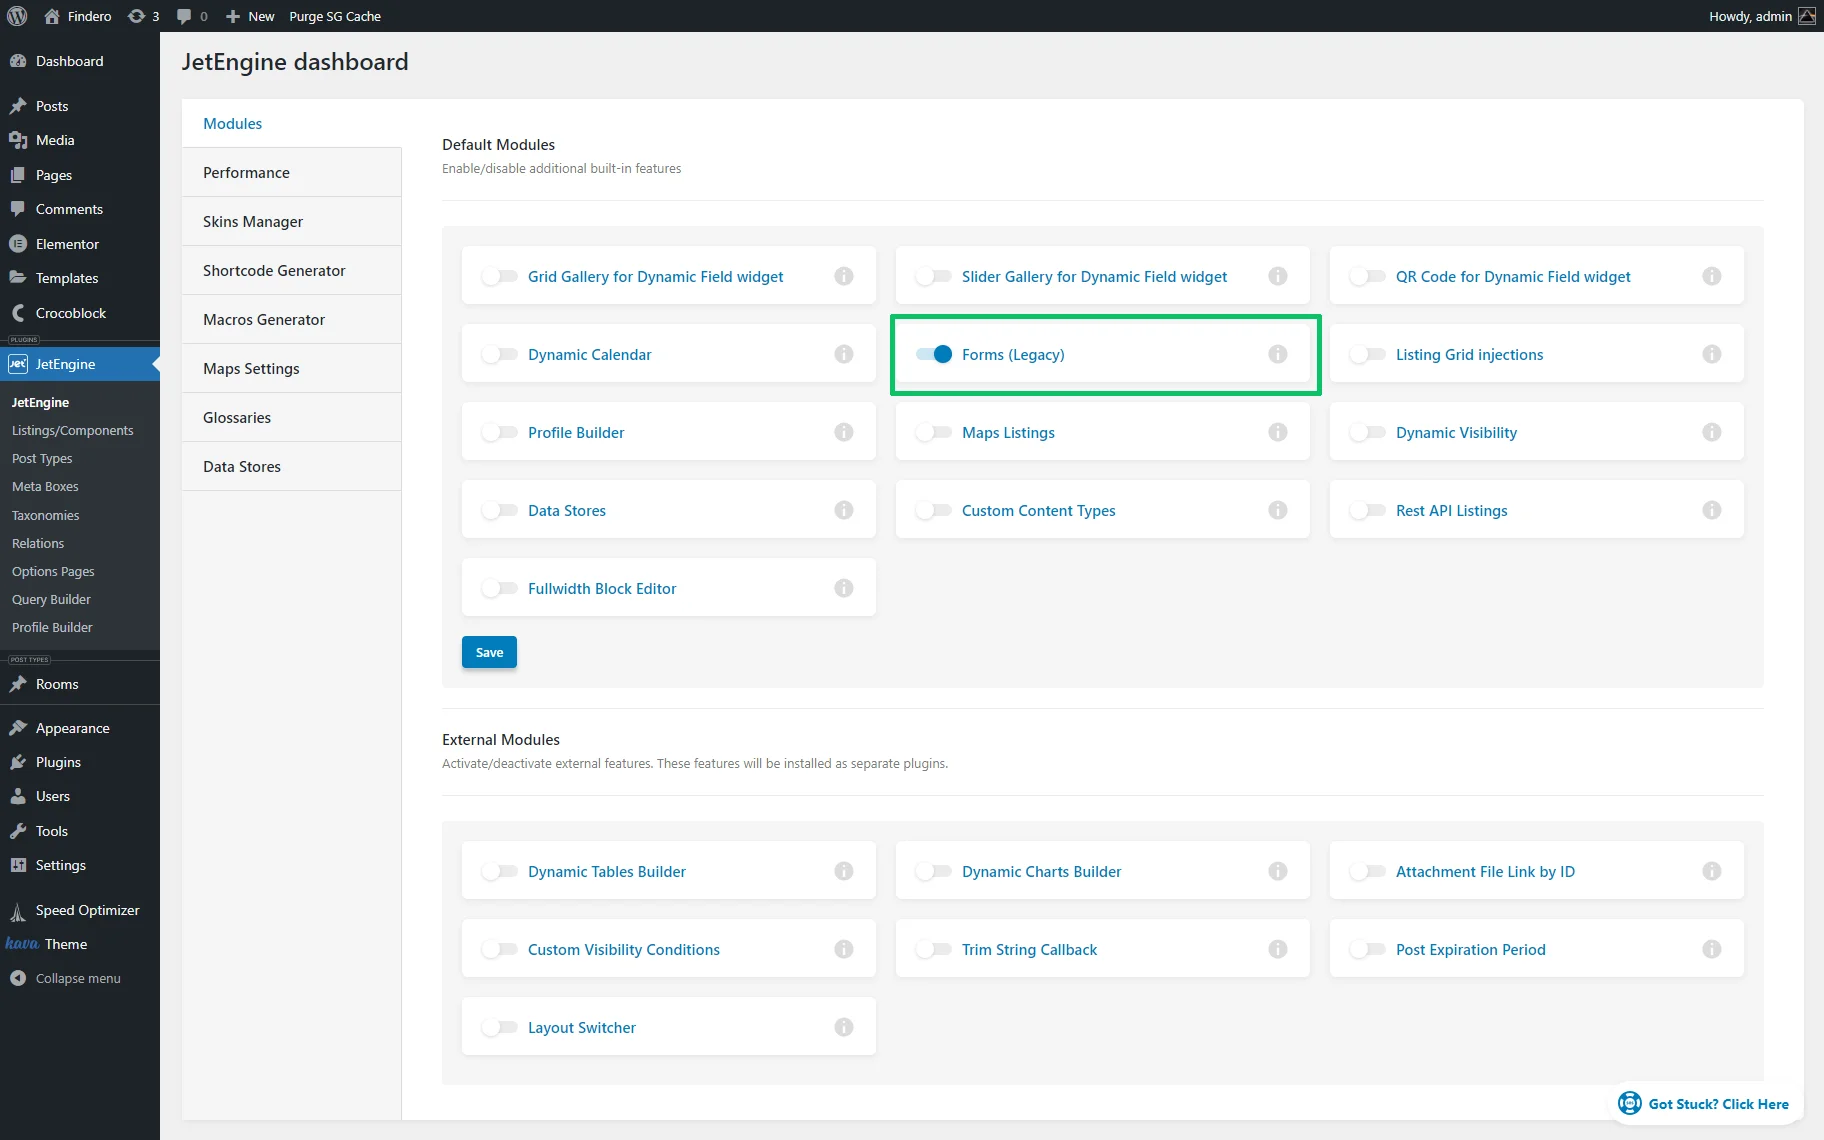
Activate the Forms (Legacy) toggle
Proceed with creating a booking form using the JetEngine plugin. First, navigate to the WordPress Dashboard > JetEngine > JetEngine > Modules and enable the Forms (Legacy) toggle.

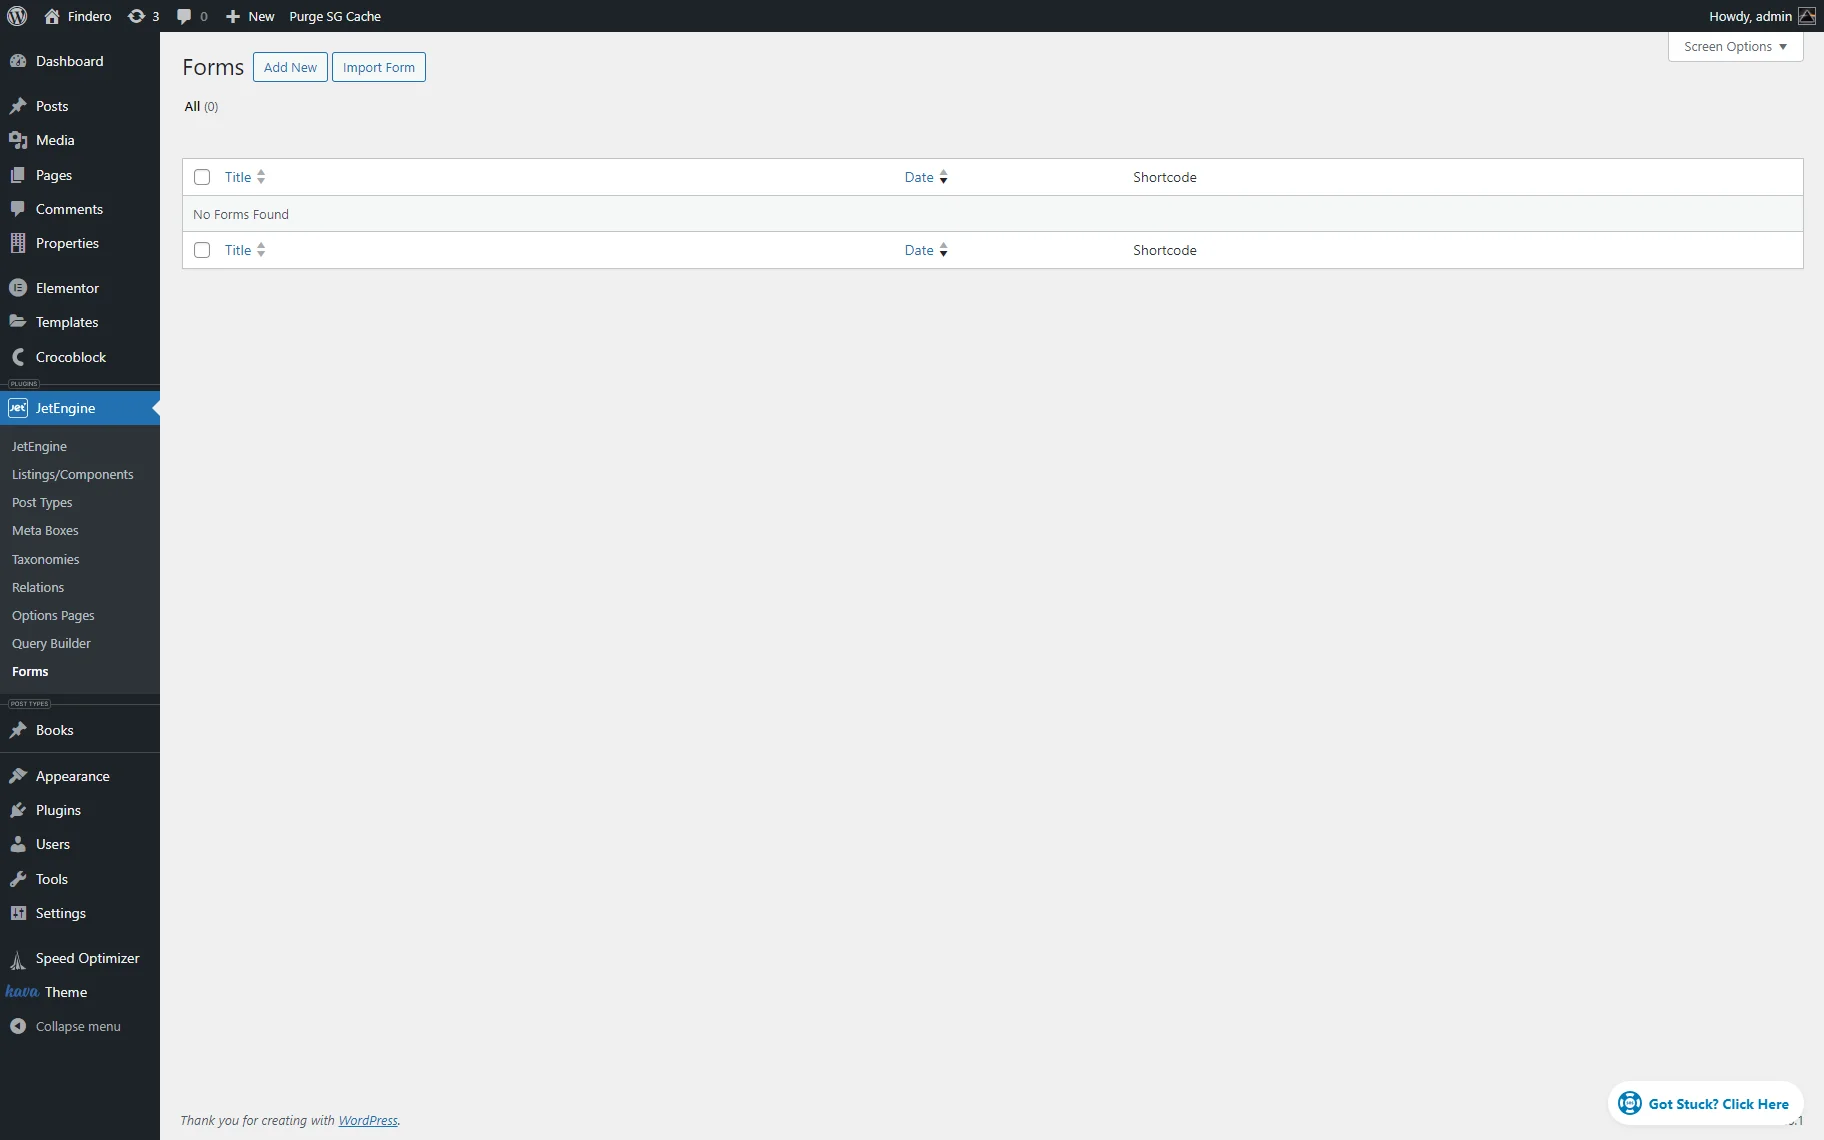
Press the “Save” button. Then, move to the newly appeared Forms tab in the JetEngine dashboard and expand this tab. Press the “Add New” button at the top of the tab to create a new form.

Add Fields to the Form
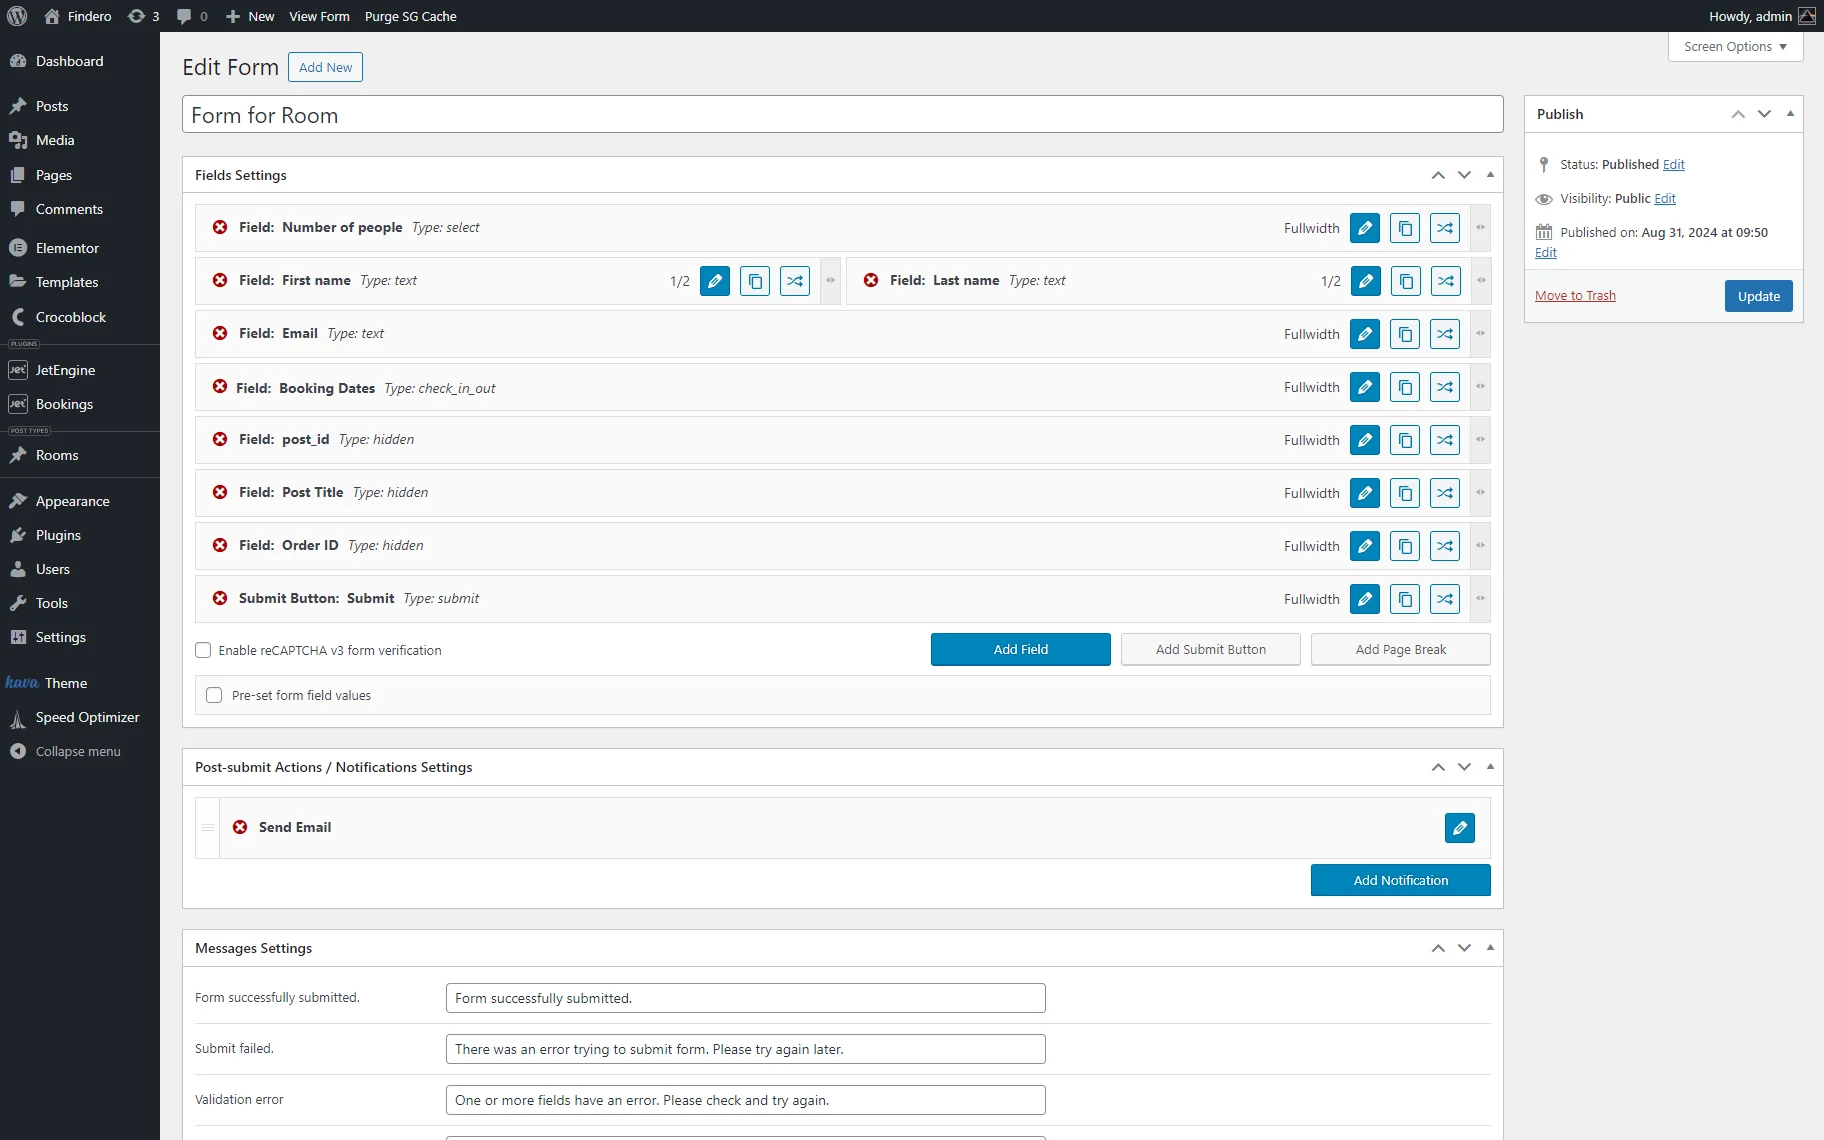
In our particular case, we create a form called “Form for Room.” For our tutorial, we create such fields as “Number of People,” which can be selected by the visitor, “First Name” and “Last Name,” and “Email.”

For more details about using the form’s functionality, read the How to build a form layout tutorial.
Things to know!
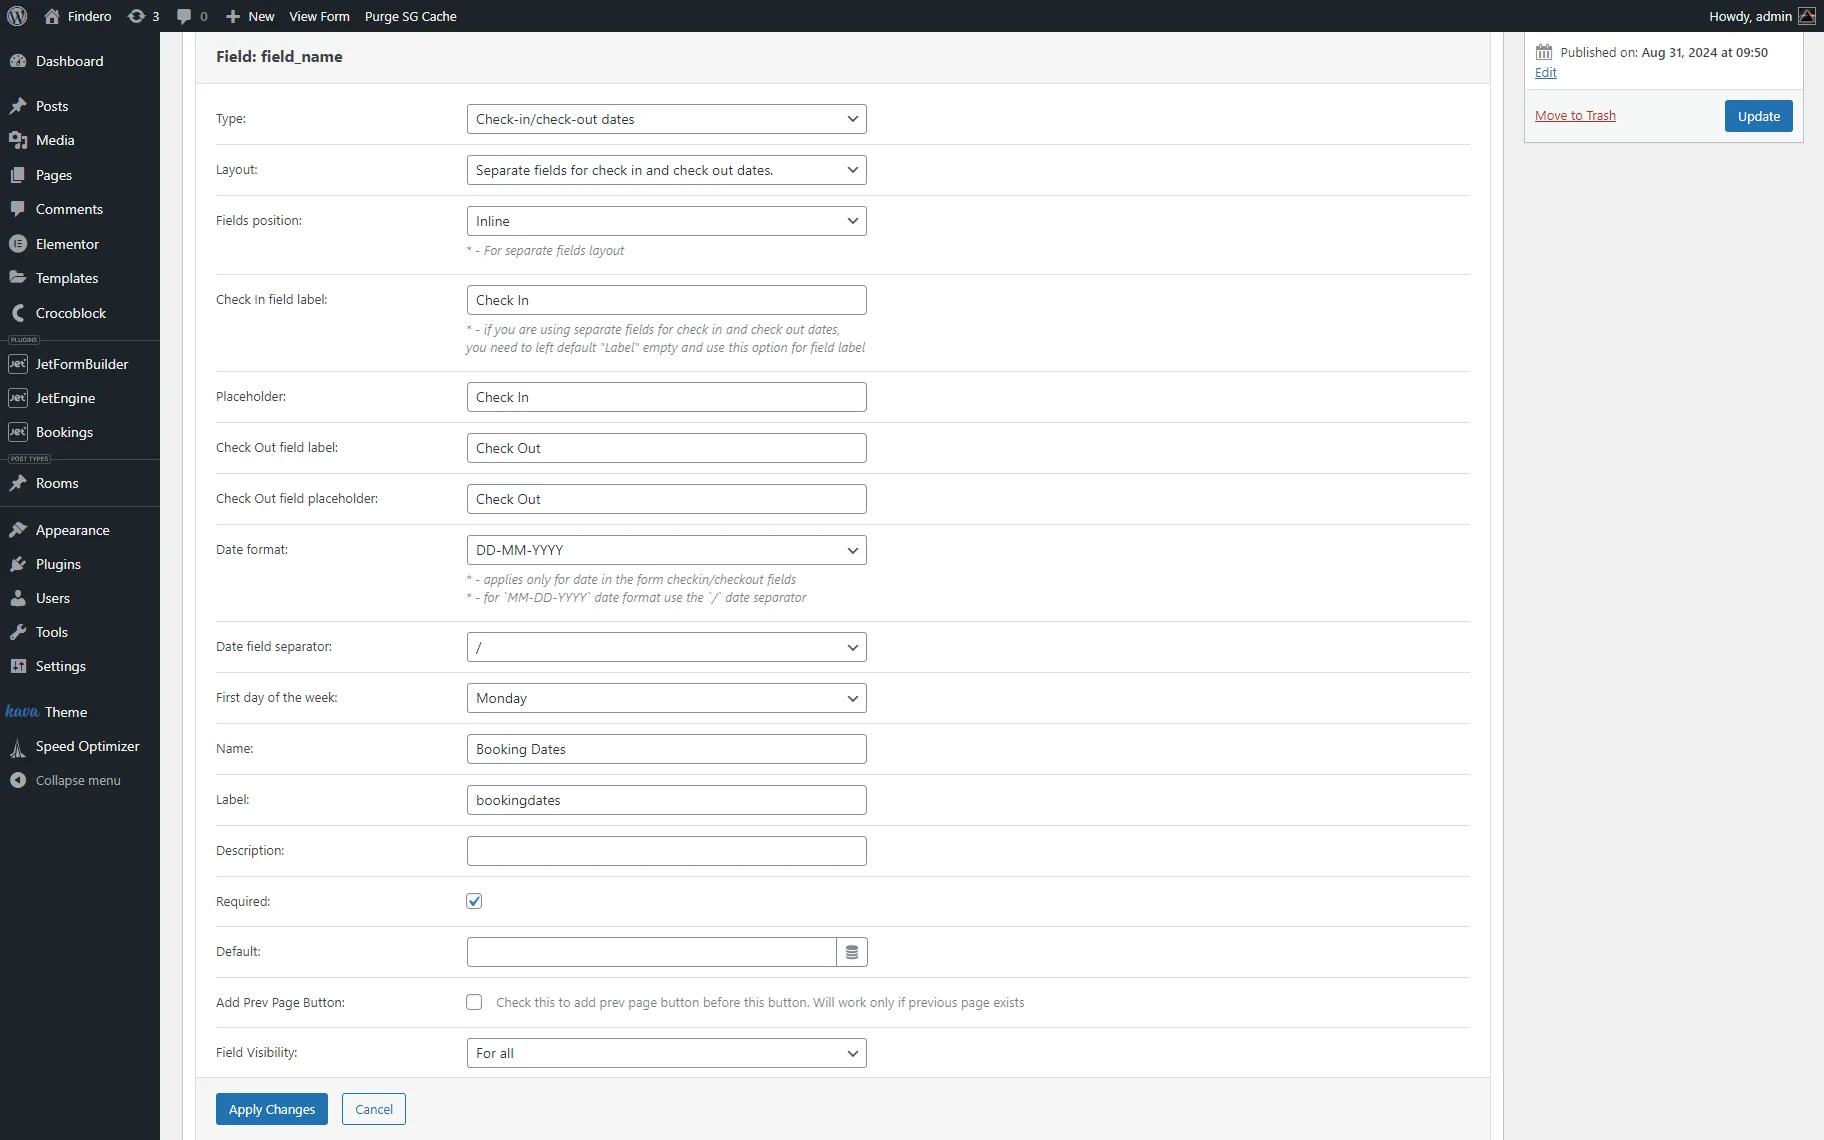
To apply the “Check-in/check-out dates” field, the “Plain” Booking mode of the JetBooking plugin should be set.
We add the “Check-in/check-out dates” field to the form and set the “Separate fields for check in and check out dates” option for Layout, “Inline” Fields position, add field labels and placeholders, pick the Date format, Date field separator, and First date of the week, as well as type the field’s Name (in this case, the “Booking Dates”).

Once completed, press the “Apply Changes” button.
In the next stage, keep the Hidden field in the booking form
By default, the booking form creates a “Hidden” field called “post_id”. Don’t delete it, as we will need it further.

In addition, we insert the Post Title and Order ID Hidden fields.
Set the notification
Let’s move on to set up the booking form’s Post-submit Actions / Notifications Settings block.
The “Send Email” Notification is set by default. We will adjust this notification later.
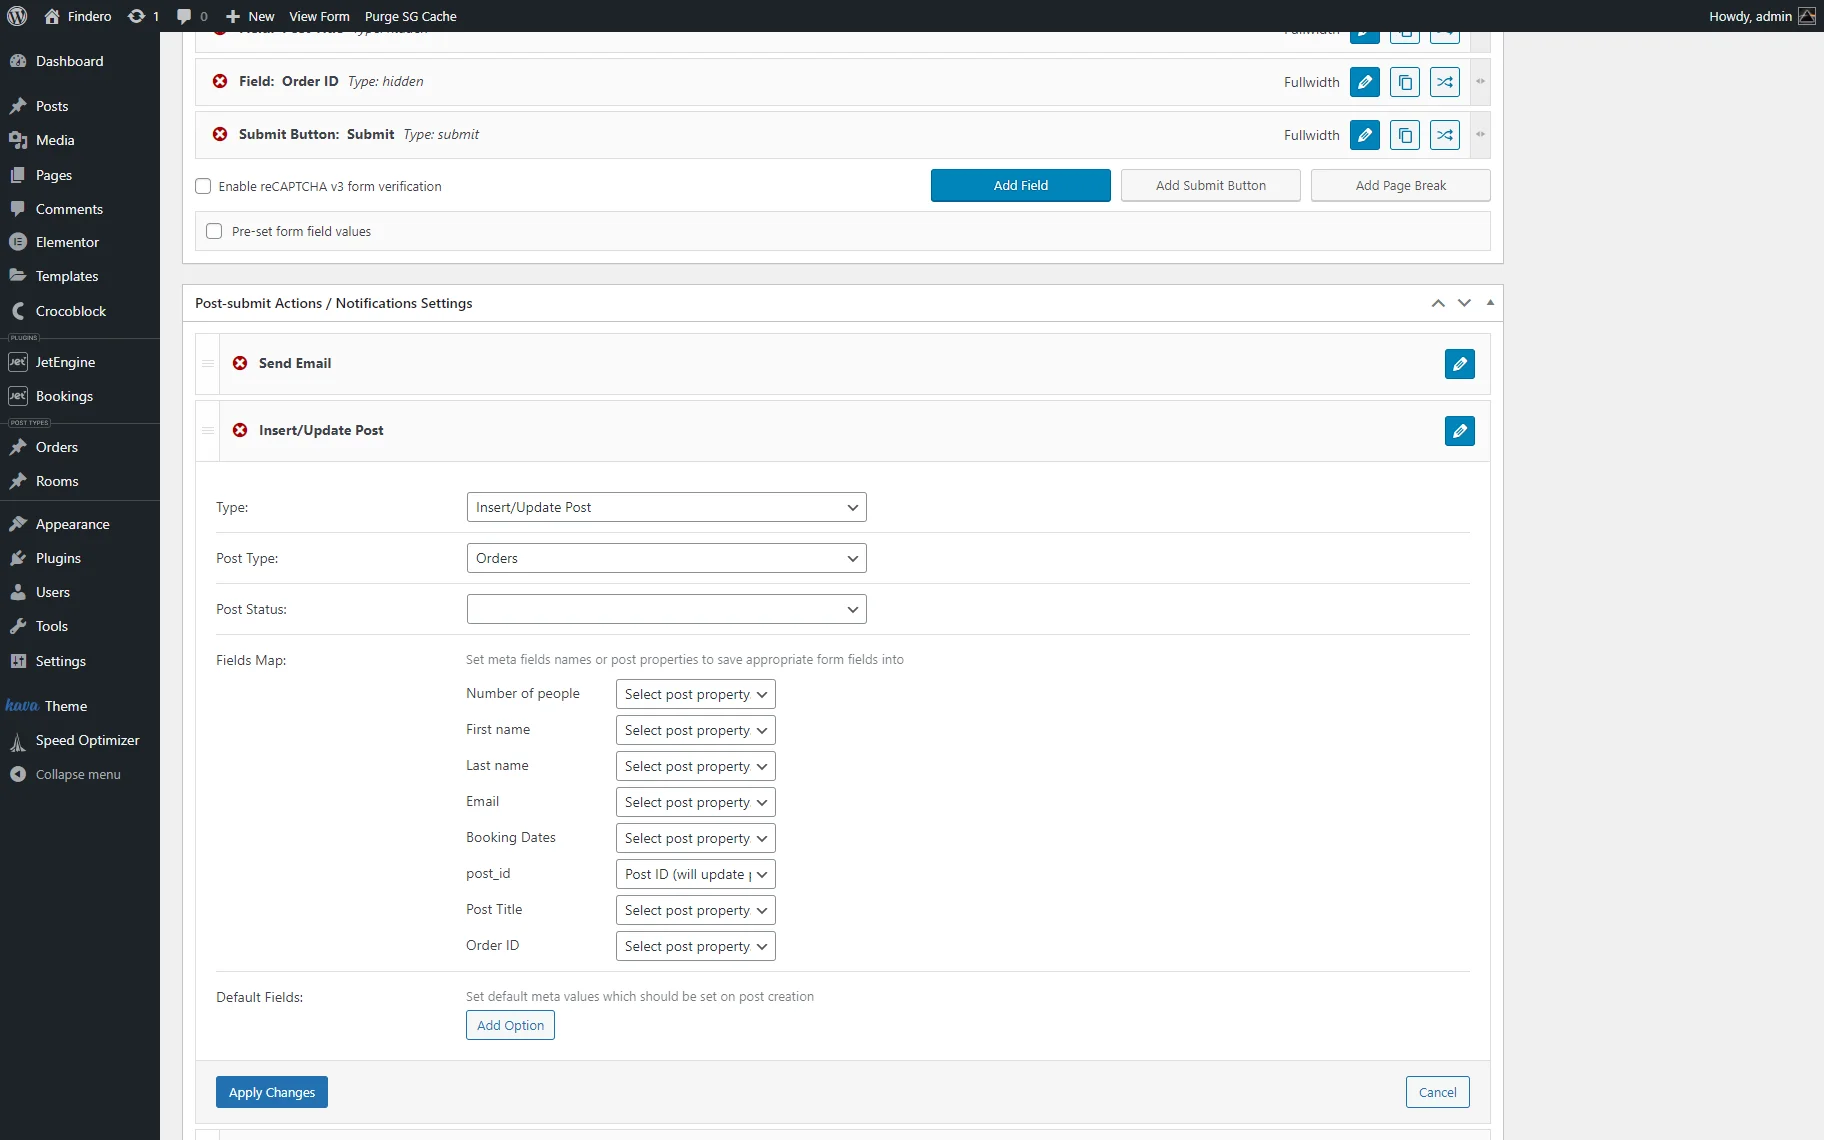
Add a new notification and select the Insert/Update Post option so that the information from the submitted form will be added to the CPT we specify. Then, set the Post Type to collect the order data (the “Orders” CPT, in this case).
Below is the Fields Map, which pulls the meta fields from the created CPT to which we want the information added. As for the “Orders” CPT, we haven’t created any meta fields, so we only set “Post ID (will update post)” for the post_id field.
Save the changes, then add a new notification.

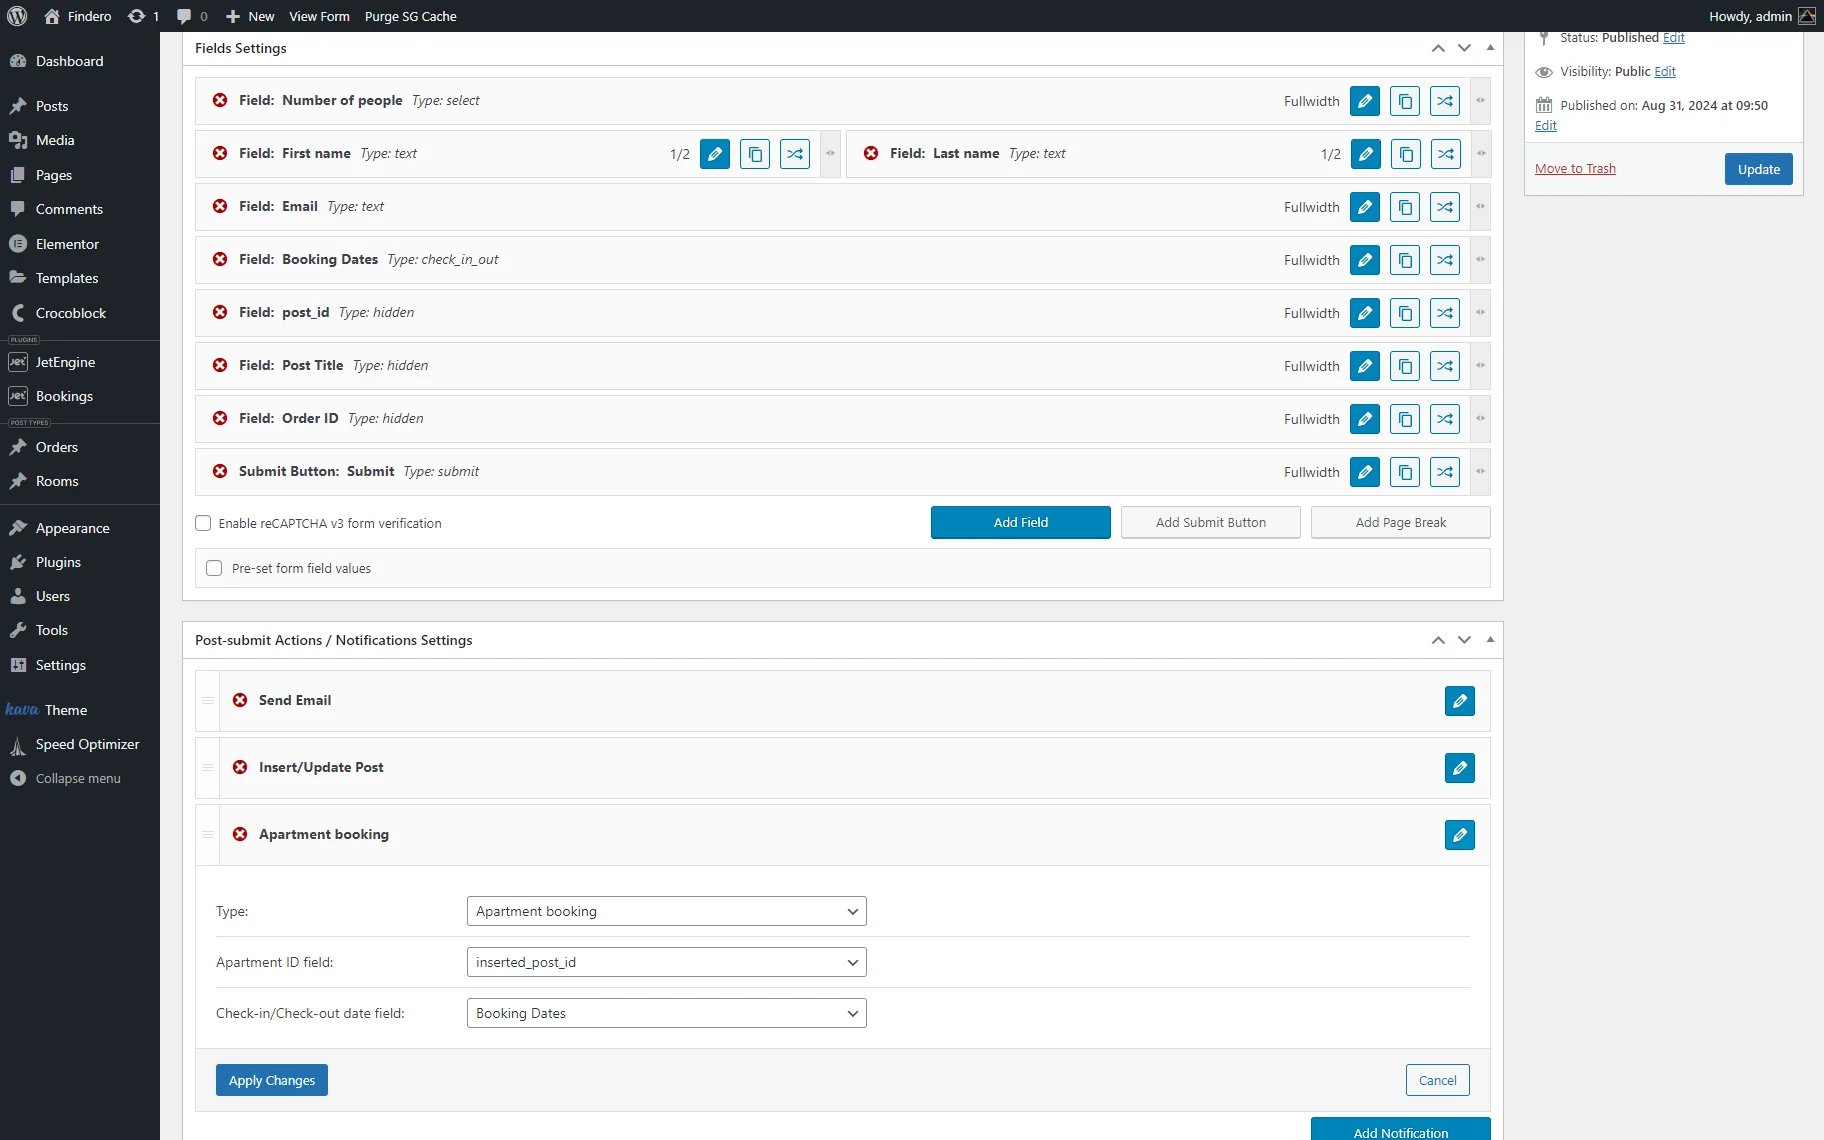
Second, set the “Apartment booking” notification. Add another notification and choose the “Apartment booking” Type. Then, in the Apartment ID field, select your post_ID. It’s information from the hidden field.
Next, there’s a field called Check-in/Check-out date. Here, select the corresponding field on the form (in this case, “Booking Dates”).

Things to know!
Please note that “inserted_post_id” should be set in the field, where the ID of the corresponding order will be stored in your booking table.
Lastly, we need to set up the “Send Email” notification in the booking form.
It allows sending an email to the customer after they have successfully booked the housing.
Return to the “Send Email” notification and unroll it. Then, select the corresponding email option in the Mail to field.
For more details, see the Send Email chapter of the Form Notifications Settings Overview (Legacy), which explains the notification settings.

We’ve built a booking form, and it is time to display it on the website. Follow the How to Display the Booking Form on the Single Post Page tutorial to find out how to do it.
That’s it. Now you know how to build booking forms using the JetFormBuilder and JetEngine plugins, manage the form’s Post-Submit Actions to add CPT posts for recording the order data, sending emails, and providing payment via a gateway on your WordPress website.
JetEngine Booking Form (Legacy)
Activate the Forms (Legacy) toggle
Proceed with creating a booking form using the JetEngine plugin. First, navigate to the WordPress Dashboard > JetEngine > JetEngine > Modules and enable the Forms (Legacy) toggle.
Press the “Save” button.
Then move to the newly appeared Forms tab in the JetEngine dashboard and expand this tab. Press the “Add New” button at the top of the tab to create a new form.
Add Fields to the Form
As for our particular case, we’ve created a form called Form for Room. Let’s review it more closely. For our tutorial, we created fields such as Number of People, which the visitor could select, as well as First Name, Last Name, and e-mail.
For more details about using the form’s functionality, read the How to build a form layout tutorial.
We added the Check-in/check-out dates field to the form and set the “Separate fields for check in and check out dates” option for Layout, “Inline” Fields position, added field labels and placeholders, picked the Date format, Date field separator, and First date of the week, as well as typed the field’s Name (in this case, the “Booking Dates”).
Once completed, press the “Apply Changes” button.
Keep the Hidden field in the booking form
By default, the booking form creates a hidden field called post_id. Don’t delete it, as we will need it further.

In addition, we inserted the Post Title and Order ID Hidden fields.
Set the Insert/Update Post notification
Let’s move to set up the booking form’s Notifications Settings block.
The “Send Email” Notification is set by default. We will adjust this notification later.
Add a new notification and select the Insert/Update Post option, so the information from the submitted form is added to the CPT we specify. Then, set the Post Type for collecting the order data (the “Orders” CPT, in this case).
Below is the Fields Map, which pulls the meta fields from the created CPT to which we want the information added. As for the “Orders” CPT, we haven’t created any meta fields, which is why we only have post_id.
Save the changes, then add a new notification.
Set the Apartment booking notification
Add another notification and choose the “Apartment booking” Type. Then, in the Apartment ID field, select your post_ID. It’s information from the hidden field.
Next, there’s a field called “Check-in/Check-out date“. Here, select the corresponding field on the form (in this case, “Booking Dates”).
Adjust the Send Email notification
Lastly, we need to set up the Send Email notification in the booking form.
It allows sending an email to the customer after they have successfully booked the housing.
Return to the Send Email notification and unroll it. Then, select the corresponding email option in the Mail to field.
For more details, follow the How to Adjust Send Email Notification in Form Widget tutorial, where you can learn more about the notification settings.
That’s it. Now you know how to build booking forms using the JetFormBuilder and JetEngine plugins.