
JetWooBuilder: How to Create a Checkout Page Template
Tutorial requirements:
- JetWooBuilder — develop a best-selling WooCommerce store from the ground up;
- Elementor free — add the necessary widgets into the editor, style it up, and publish it right away;
- WooCommerce — get secure payments, configurable shipping options, and more;
- JetThemeCore at least 2.0.1 version (not required, only if you want to create a page with header and footer.
How to Create a Checkout Page Template with the JetWooBuilder Plugin
1 Step — Enable Checkout widgets
Navigate to the WordPress Dashboard > Crocoblock > JetPlugins Settings and unfold the JetWooBuilder tab.
Scroll down to the Checkout Widgets section and ensure all the widget toggles are enabled.
2 Step — Create a Checkout template
Proceed to the Crocoblock > JetPlugins > Woo Page Builder submenu and click the “Create New Template” button.
Choose the “Checkout” option in the drop-down “This template for” list of the pop-up window and give it a title. Afterward, click the “Create Template” button.
You can place any widgets on the checkout page and build the layout you need. However, there is a restriction here.
There are two types of the checkout page template that you can create with the help of JetWooBuilder – the main template and the top template. The main template is assigned to the Checkout Template option, while the top template is assigned to the Top Checkout Template option.
The main checkout template is responsible for displaying the main checkout form. Checkout Coupon Form, Checkout Login Form, and all other Elementor widgets that add a form to the page (like the Form widget of the JetEngine plugin) won’t work correctly in the main checkout template. You better not place them to the checkout template you would like to assign to the Checkout Template option.
You can display additional forms in the top checkout template. Checkout Coupon Form, Checkout Login Form, and all other Elementor form widgets will work just fine here. On the other hand, other JetWooBuilder checkout widgets won’t be displayed correctly in the top template.
The reason for it is in the coding and the way the forms are displayed. So, once again, the widgets that you shouldn’t place on the main checkout template are:
- Checkout Coupon Form;
- Checkout Login Form;
- and all Elementor form widgets.
The widgets that you shouldn’t place on the top checkout template are:
- Checkout Additional Form;
- Checkout Billing Form;
- Checkout Order Review;
- Checkout Payment;
- Checkout Shipping Form.
3 Step — Fill the Checkout Page with widgets
Once the future checkout page is opened in the Elementor page builder, you can start filling it with sections and widgets. Let’s review the widgets offered by the JetWooBuilder plugin for the checkout page and see what you can use them for.
Checkout Coupon Form
This widget adds a block that allows customers to enter the coupon code. The block looks like a notification with a button. The coupon adding form appears when the client clicks the button. In the Style menu tab, you can customize the notification message, button, and form.
Checkout Login Form
If you want to offer customers to log in before filling out the checkout form, this widget could help. The block’s appearance is similar to the coupon block – the client will see a notification message and a button.
The login form will appear after clicking on the “Click here to login” button. All the appearance details can be set in the Style menu tab.
Checkout Additional Form
The additional information block goes at the end of the checkout and lets clients leave notes about the orders. Add it to the checkout page if you want your client to clarify some order details. Using styling tools, you can change the typography, colors, and background for the label, input field, and heading.
Checkout Billing Form
It is a main checkout page widget that displays a form for the billing data of the client. That form has all the necessary fields to perform billing, so you don’t have to worry about it.
Billing details fields are fully customizable in the Content tab.
Responsive Mode
You can observe that we have activated the Responsive Mobile Approach toggle, the feature that makes the billing form fit the screen of mobile devices. Let’s look at the mobile device’s view once this toggle is deactivated.
And now activate the toggle.
Checkout Order Review
This widget adds a totals table to your checkout page. It shows the customer short data about the items placed in the cart.
With the totals table on the page, the customer can review the order again to ensure everything is correct. The best place for this widget is on the top of the page, before the billing data form.
Checkout Payment
Here the customer can choose the payment method and finally hit the “Place Order” button. There’s also a message with the link to your website’s privacy policy page. If there are no defined payment methods for the client’s region, he will see a notification.
Checkout Shipping Form
If your company can sell items to other countries and provide clients with shipping services, this widget will help you add a shipping data form to the checkout page.
It also contains the fields for all the data you need to send the order to the client. In the Style menu tab, you can fit this block into all the others on the page.
When you are done building a main checkout page template, click the “Publish” button at the bottom of the page.
Repeat the same steps and create one more template, but this time for a checkout top one.
4 Step — Assign the Template to the Page
The created template is still not attached to the website’s page. To assign it, go to WooCommerce > Settings > JetWooBuilder and scroll the page down to the Checkout section.
Tick the Custom Checkout checkbox and choose the templates you’ve just created in the Checkout Template and Checkout Top Template drop-down menus. After that, click the “Save Changes” button.
Proceed to the front end, add a product to the cart, and you will be redirected to the Checkout page with the templates you created before.
How to Create a Checkout Template with the JetThemeCore Plugin
1 Step — Create a Checkout Template
With the recent update of the JetThemeCore plugin, you can create page templates and assign the needed elements like body, header, and footer in a couple of clicks.
Before you move on to creating a template, navigate to the Crocoblock > JetPlugins Settings > JetWooBuilder directory and make sure that you have all Thank You Widgets enabled.
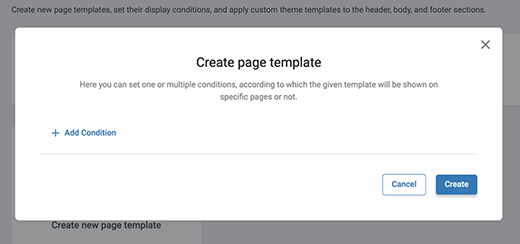
Head to Crocoblock > Theme Builder and click “Create new page template.”
There will be a new pop-up window where you can set one or multiple conditions, according to which the given template will be either shown on specific pages or not.
Hit the “Add Condition” button. Firstly, make sure that it’s set to Include.
In the following drop-down list, select “WooCommerce.”
Proceed to the last drop-down menu and choose the “Product Checkout” option.
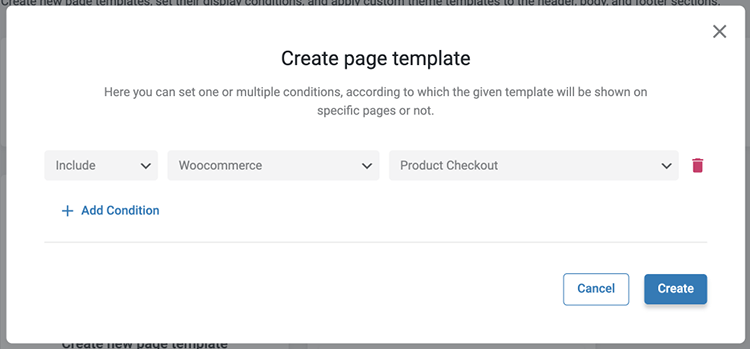
Once you hit the “Create” button, you will see a new template in the JetThemeCore dashboard. Give it a name.
Firstly, click on the “Add body” button. Here you can create a template from scratch with the JetThemeCore plugin adding the widgets described in the first part of this tutorial.
Or, you can simply click on “Add from library” and choose a template you already have, e.g., built with the JetWooBuilder plugin.
The color of the first icon under the Properties will indicate which plugin was used to create the chosen template.
Hit the “Use” button. The template is attached to the body now.
2 Step — Add a Custom Header and Footer to the Checkout Template
JetThemeCore plugin allows adding custom headers and footers to the templates right from the JetThemeCore dashboard.
To add an element to the checkout template, head to Theme Builder.
Click on the “Add header” button, create a new header, or choose one from the library.
Repeat the same steps and add a custom footer if needed.
3 Step — Check the JetWooBuilder Settings
When you are done with the template layout and design, it is time to check the JetWooBuilder settings.
Go to WooCommerce > Settings and open the JetWooBuilder tab. Scroll down to the Checkout section and ensure that the Checkout checkbox is disabled.
There is no need to choose the template in the Checkout Template drop-down menu as we have already assigned the template to the Checkout page in the Theme Builder dashboard.
Scroll the page down and click the “Save Changes” button.
Proceed to the front end, add a product to the cart, and you will be redirected to the Checkout page with the templates you created before.
Now you know how to use Checkout widgets and create a Checkout Page template from scratch with the help of the JetWooBuilder and JetThemeCore plugins.