Dynamic Link Block Overview
This detailed overview describes all the settings and options of the Dynamic Link block that can be used to create Listing templates and is fully available in the Gutenberg Editor.
Dynamic Link block can be used to add text or image with a link attached to it. The block’s settings will allow you to select the URL, form it and add prefix or query arguments to it.
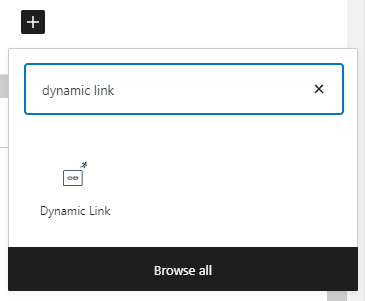
Find Dynamic Link Block
Though this block can be used on any page or block, the most useful it will be for Listing template creation. That way, it will further display the link dynamically for every item of the Listing Grid. So, to find the block, open your website’s dashboard and go to JetEngine > Listings. Click the “Add New” button to create a new listing or choose one of the created templates. When the Gutenberg editing page opens, press the “Add block” button with a cross-shaped icon on it and find the Dynamic Link block.
Add the block to the page by clicking on it. And now, let’s go through the settings.
Dynamic Link Block Settings
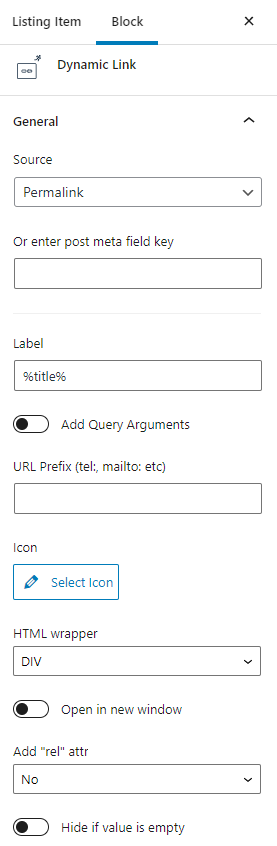
General
In this section, you can choose where the link will lead the user. You can either select it from the Source drop-down menu. Besides that, if you have a meta field where the URL will be stored, you can type the name of that meta field to the Or enter post meta field key bar.
Let’s see the options that the Source drop-down menu has.
Permalink
This option will lead the user to a single page of the item. For example, if you use this Dynamic Link in the Listing template and afterward in the Listing Grid, the user will be redirected to the page of the item which he/she has clicked.
Delete current post link
With this option, you can allow the user to delete some posts.
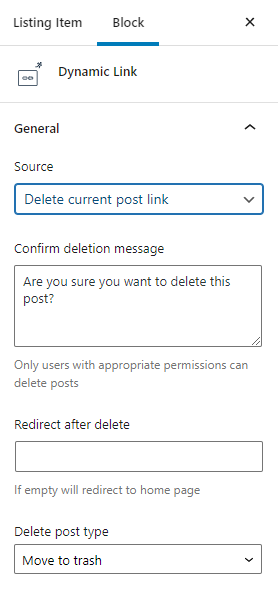
When the user clicks on this link, he/she will receive a confirmation message. The text of the message can be defined in the Confirm deletion message text area. Be aware that not all users will be able to use the deletion link. If the user has a role to which you have granted permission to edit and delete posts, only he/she will be able to use it.
If you want to redirect the user to another page after he/she deletes the post, type the URL to the Redirect after delete bar. By default, if this field is empty, the user will land on the home page.
You can also choose what will happen to the post after deletion in the Delete post type drop-down. You can either move it to Trash or delete it permanently.
Profile page
This option will appear if you enable the Profile Builder module of the JetEngine plugin. You can lead the user to the page created via the Profile Builder module. If you choose this option, the link will redirect the user to the page chosen in the Profile Page drop-down list.
Options
You can take the URL not only from the post’s meta field but also from the Options Page. In this case, the user will be redirected to the address, taken from the Options Page that you choose in the Option drop-down menu.
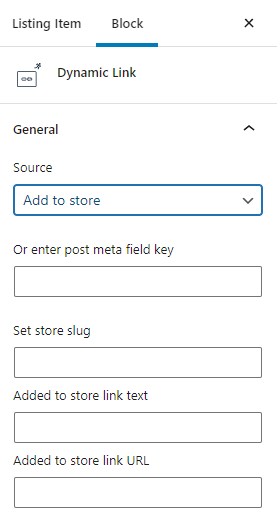
Add to store/Remove from store
These two options will appear if you enable the Data Store module. With its help, the user will be able to add the items to the data store and remove them from there. More details about the settings of these options you will find in the Data Stores creation tutorial.
Other meta fields
Under the described options, you will see the list of all meta fields that you have created so far. You can choose any of them as the source of the URL.
Other settings
Label
Into this bar, you have to place the name of the link. It will be the text that users will see on the page as a link. By default, it is filled with %title% macro code. If necessary, you can use other macro codes here, too.
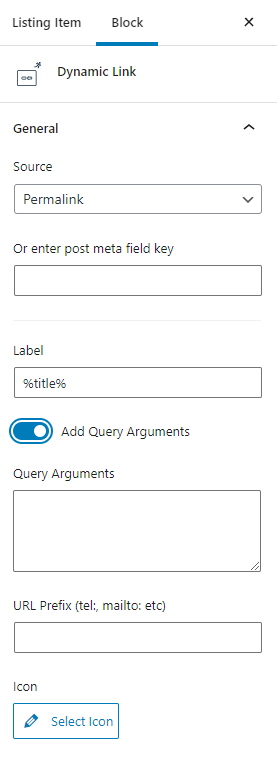
Add query arguments
After enabling this toggle, you get an opportunity to add query arguments and prefixes to the URL. Query arguments are little parts of the URL that are added to the end of the line and help to specify the address. For example, if you type the “post_id=%current_id%” parameter to the Query Argument text area, the URL will look like that:

URL Prefix
The text you will write in the URL Prefix bar will be placed before the URL. It doesn’t affect the URL itself, so it is rather a decorative element.
Icon
By clicking on the “Select Icon” button, you open the Media Library and can choose the icon (SVG file) or picture that will be added to the link. If you want, you can delete any text in the Label bar and leave only the image. The icon’s color, size, and positioning can be customized in the Block Style settings tab if you have installed the JetStyleManager plugin.
HTML wrapper
In this drop-down menu, you can choose the tag in which the Dynamic Link will be wrapped. It can be either a DIV and SPAN tag or the ones that make the link a heading – from H1 to H6. To find out more about HTML tags, follow the link.
Open in new window
When you turn on this toggle, the link you attach here will be opened in a separate window. It is highly recommended to enable it because it is much more convenient for users when the links open in a new browser window.
Add “rel” attr
Here you can choose to add a “rel” attribute to the link. It will define the relationship between the currently opened page and the linked page. More details about every attribute you can find here.
Hide if value is empty
When enabled, this toggle hides the link for those items where the source meta field is empty. In the Listing Grid, such items won’t have this Dynamic Link – it will be hidden.
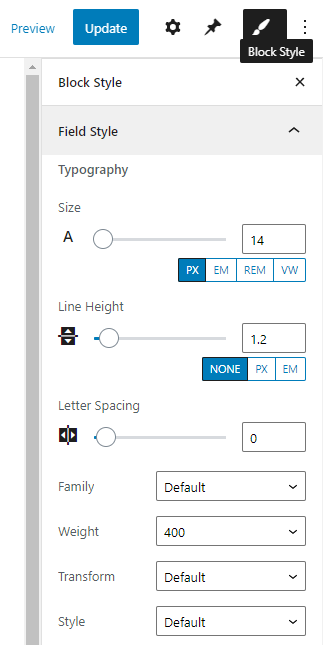
Style Settings
If you have downloaded and installed the free JetStyleManager plugin, you will see a “Block Style” button with a brush-shaped icon in the top toolbar. After clicking on that button, the styling settings section will open. Here you will be able to customize the appearance of the Dynamic Link. All possible options of the Block Style tab are described in this overview.
That’s all about the Dynamic Link settings. You now know how to customize it and use every feature to the fullest.