How to Use Borlabs Cookie Plugin with Map Listing
This tutorial describes how the Borlabs Cookie plugin and JetEngine’s Map Listings work together and how you can make the map load on a button click on the front end.
Before you start, check the tutorial requirements:
- JetEngine plugin installed and activated with the Maps Listing module enabled
- Borlabs Cookie plugin installed and activated
Whenever a WordPress cookie consent plugin is necessary to add to the website, you should consider its ability to collect cookies and automatically block external media. Borlabs Cookie is, therefore, one of the available options. Its Content Blocker feature allows for the detection and blocking of Google Maps iFrames, making the map load with a button click.
Map Listing content built with JetEngine can now be hidden in the front and will require additional action to load. Let’s see how to set it up.
WordPress Cookie Consent Plugin Setup
Install and activate the Borlabs Cookie plugin
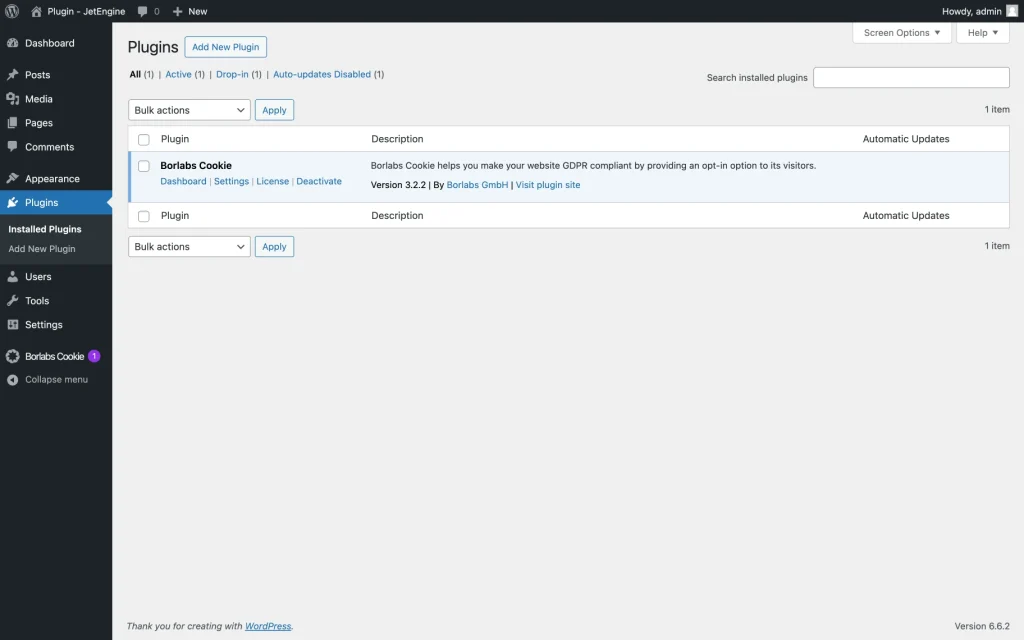
Open the WordPress Dashboard > Plugins > Add New directory and upload the cookie notice plugin archive to WordPress by clicking the “Install Now” button. Once it is uploaded, activate the plugin.
You will be redirected to the Installed Plugins page. Locate the Borlabs Cookie plugin and press the “License” link to continue the installation process.
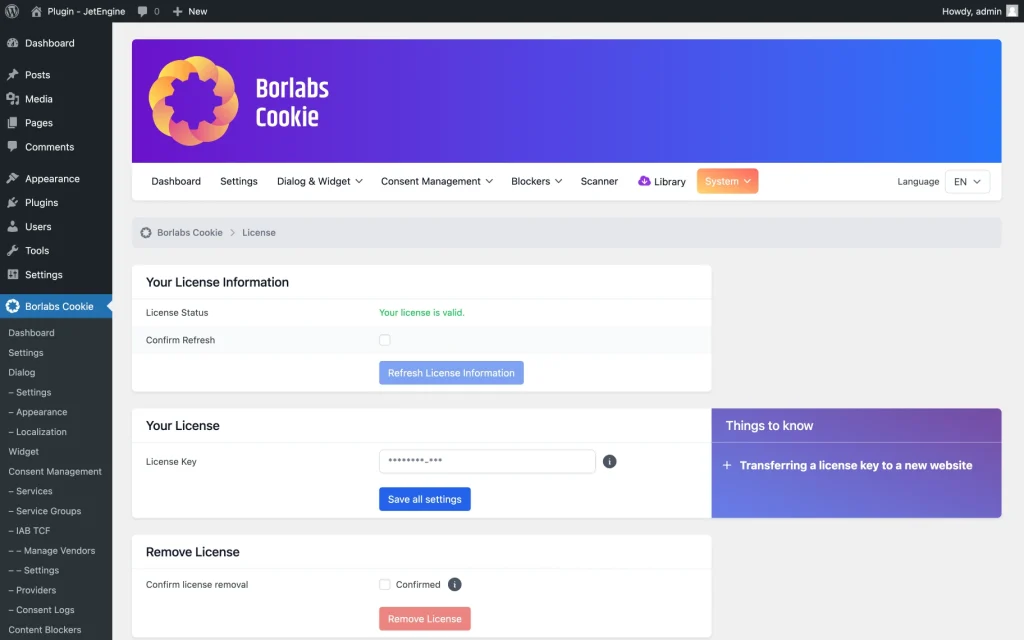
Once you are redirected to the License tab in the Borlabs Cookie dashboard, enter your license key into the corresponding field and press the “Save all settings” button.
The license is now active.
Install the JetEngine package
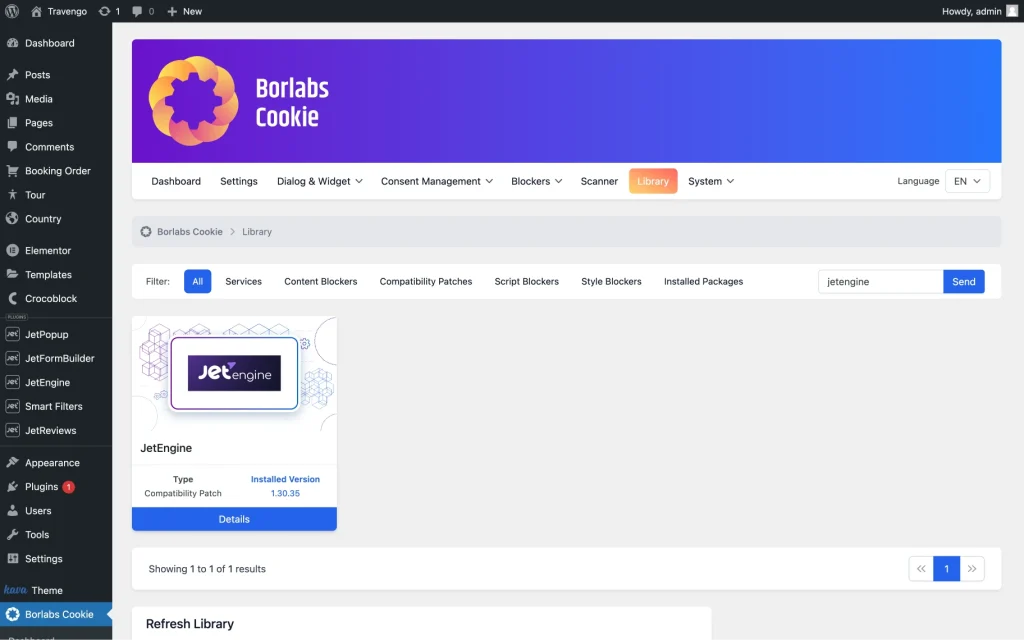
Go to the WordPress Dashboard > Borlabs Cookie > Library section and type “JetEngine” in the search field to install the JetEngine compatibility package.
When the JetEngine package is loaded, click on the “Details” button.
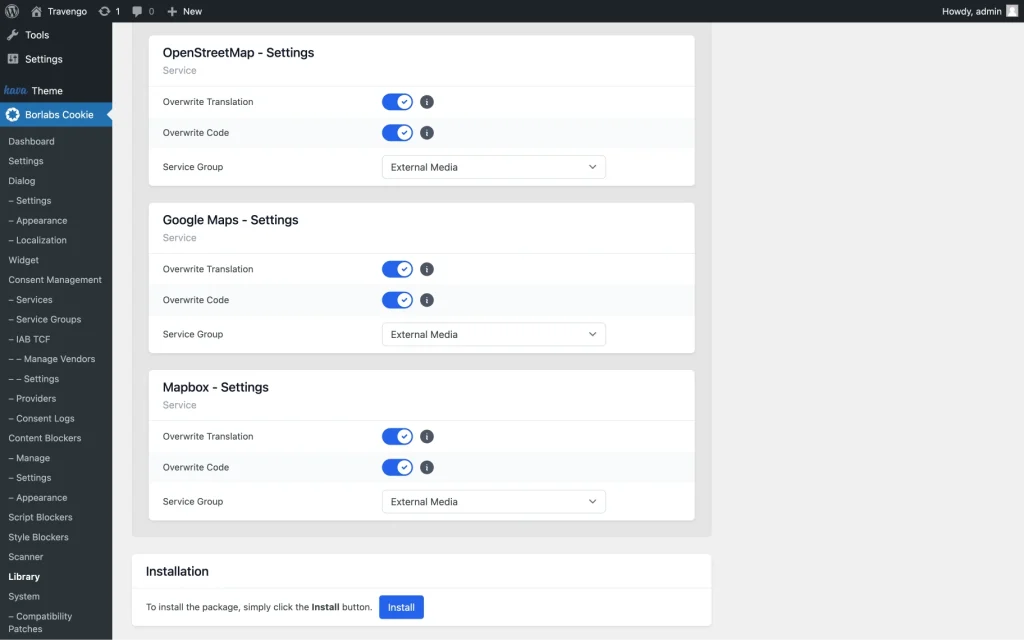
On the package page, you will find all the included components. By default, all language configurations are activated. To install the package, scroll to the bottom and click on the “Install” button.
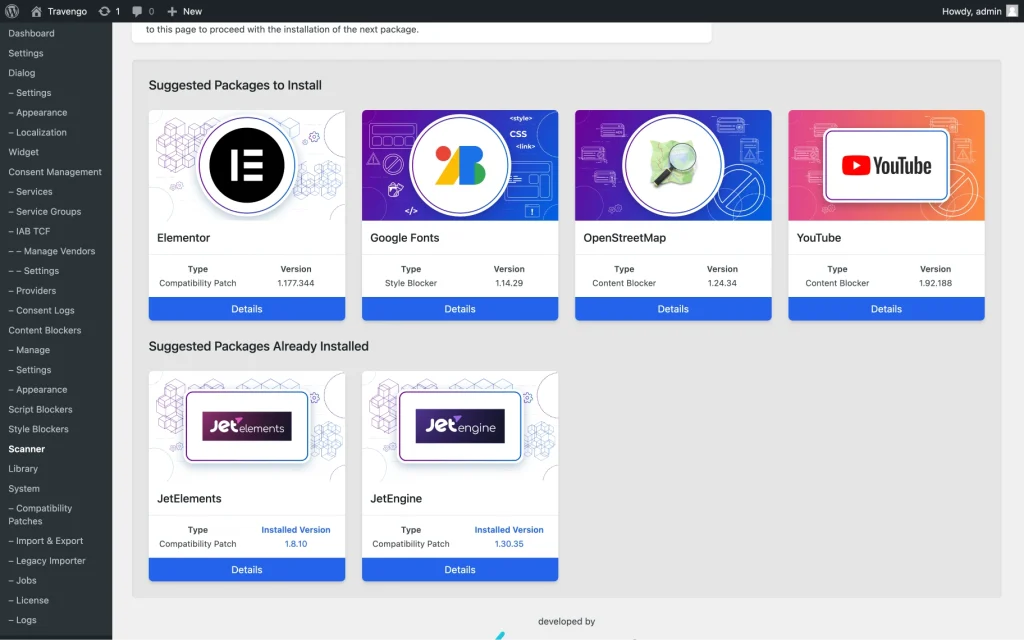
Alternatively, you can go to the WordPress Dashboard > Borlabs Cookie > Scanner section and initiate website scanning. The Borlabs Cookie plugin will detect compatible plugins installed on your website and will offer additional packages that can be installed.
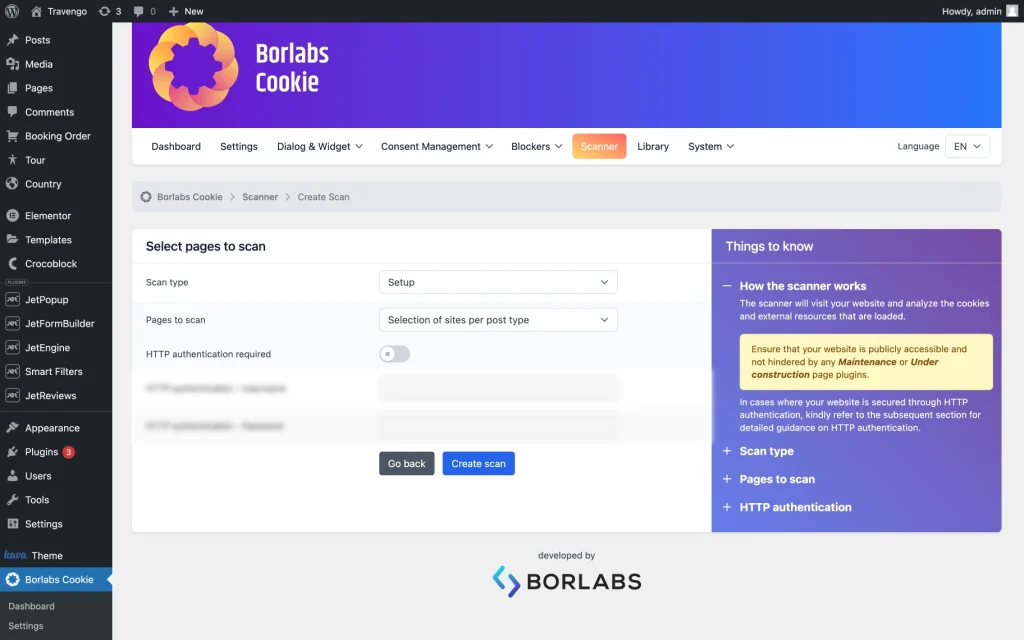
To initiate the scanning process, click the “Add New” button, and you will be redirected to the Create Scan page, where you can choose between several options:
- Scan type — in the dropdown, you can choose between “Setup” or “Audit”:
- Use the “Audit” scan type to verify that your website does not load cookies or external resources without obtaining the appropriate consent;
- Use the “Setup” scan type to determine which cookies or external resources your website uses. After the scan, you will receive recommendations for packages that you can install to block these cookies or external resources;
- Pages to scan — in the dropdown, you can choose between “Custom”, “Homepage”, and “Selection of sites per post type”:
- Use “Custom” to scan a specific page of your website;
- Use “Homepage” to scan your website’s homepage;
- Use “Selection of sites per post type” to scan a selection of your website’s pages. The scanner selects the homepage, the newest and oldest page of each post type, and its archive. If you choose this option, the expected scan will be about seventeen pages;
- HTTP authentication required — the switcher is deactivated by default; when activated, two additional fields will appear: HTTP authentication – Username and HTTP authentication – Password.
When the scanning process is complete, you will receive a list of suggested packages available for installation.
Activate the plugin features on the website
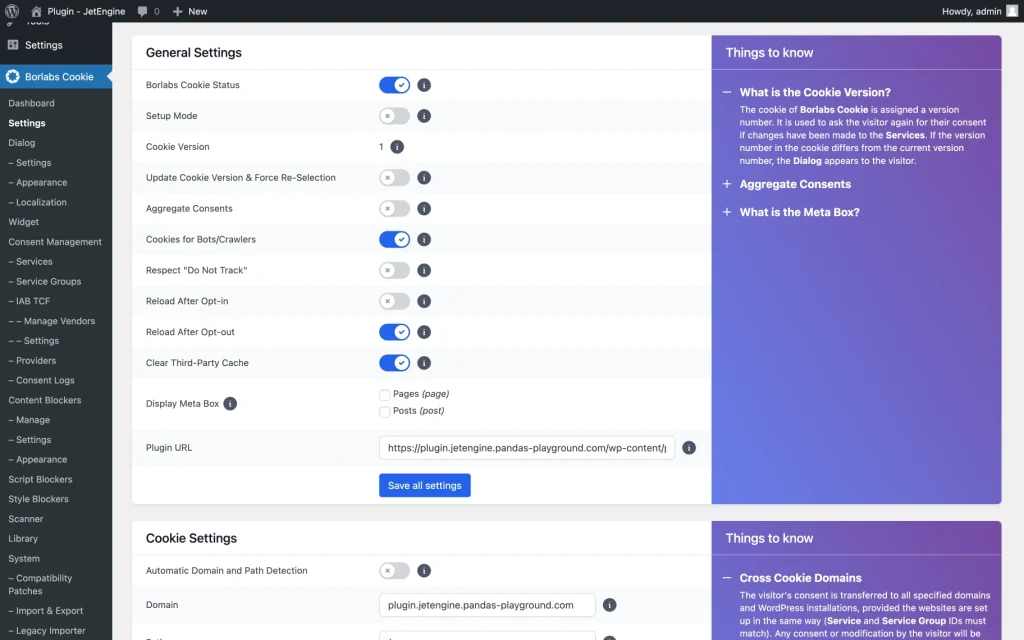
To enable the WordPress cookie plugin features, go to WordPress Dashboard > Borlabs Cookie > Settings and activate the Borlabs Cookie Status toggle in the General Settings section.
Press “Save all settings.”
Now, the plugin is ready for further work.
Create a Map Listing and configure its settings
To proceed with further fine-tuning, you need to create a map listing with the JetEngine plugin. Here, you can learn more about Map Listing.
Once you’ve done this, you’re ready to set up and use the WordPress cookie plugin and Map Listing Widget integration.
Content Blocker Tab Overview
Content Blocker is the cookie notice plugin’s functionality that permits Crocoblock license owners to set content restrictions to the Map Listing.
Manage section
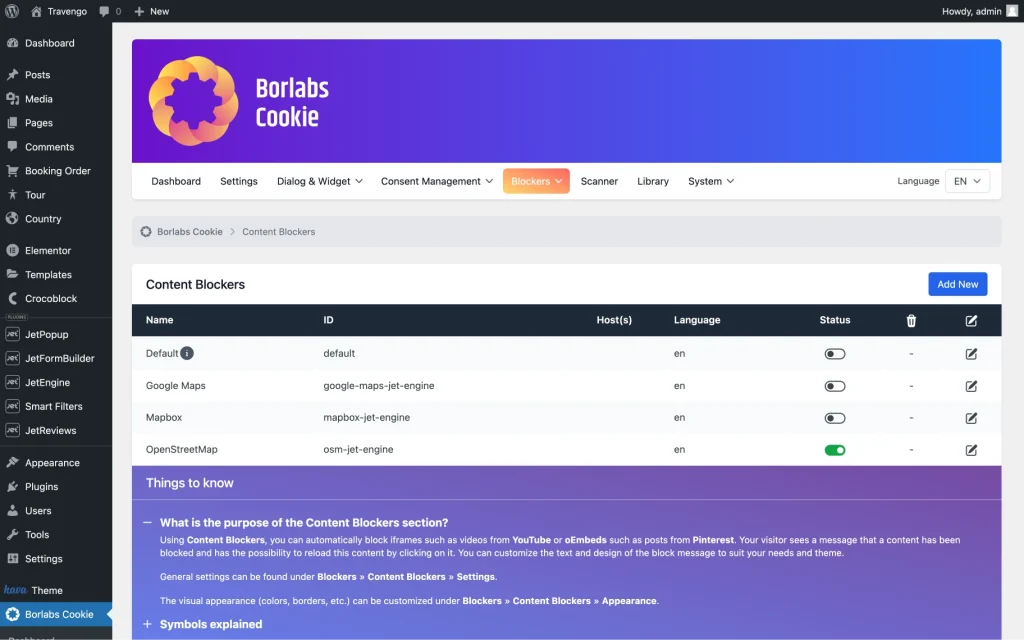
Please note that it is vital to enable the source in the Content Blockers section. If it is inactive, the Borlabs Cookie integration will not perform as needed.
You can open the preferred content blocker or add a new one by clicking on the corresponding button. The “Add New” button is in the upper right corner of the Content Blockers section. It allows users to add a new external content source to the default list.
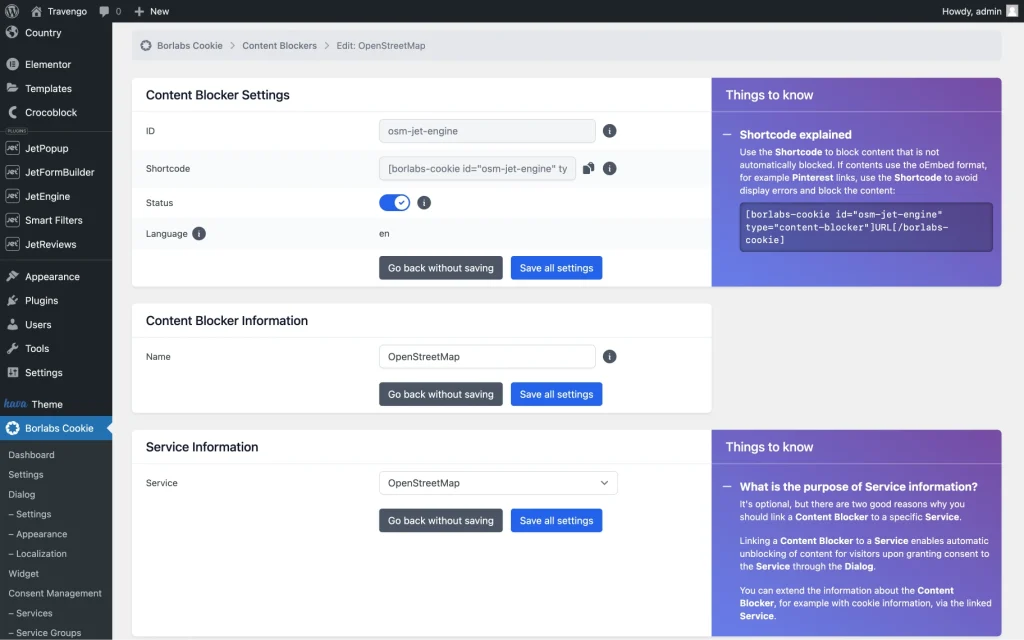
Content Blocker Settings
On the Content Blocker page, you will find the following settings.
The Content Blocker Settings section includes such fields:
- ID — a field that displays the ID of the content blocker;
- Shortcode — a field that contains the shortcode that can be used on any page if automatic content blocking is not working;
- Status — a toggle that can enable or disable the Content Blocker feature;
- Language — a field that displays the entry’s current language.
All of these sections have two buttons:
- “Go back without saving” — when clicked, you will return to the list of content blockers;
- “Save all settings” — when clicked, you will save all of the changes made.
The Content Blocker Information section includes one field:
- Name — a field that displays the name of the Content Blocker, which can be used within the Preview Blocked Content.
The Service Information section also includes one field:
- Service — in the dropdown, you can select the map service provider.
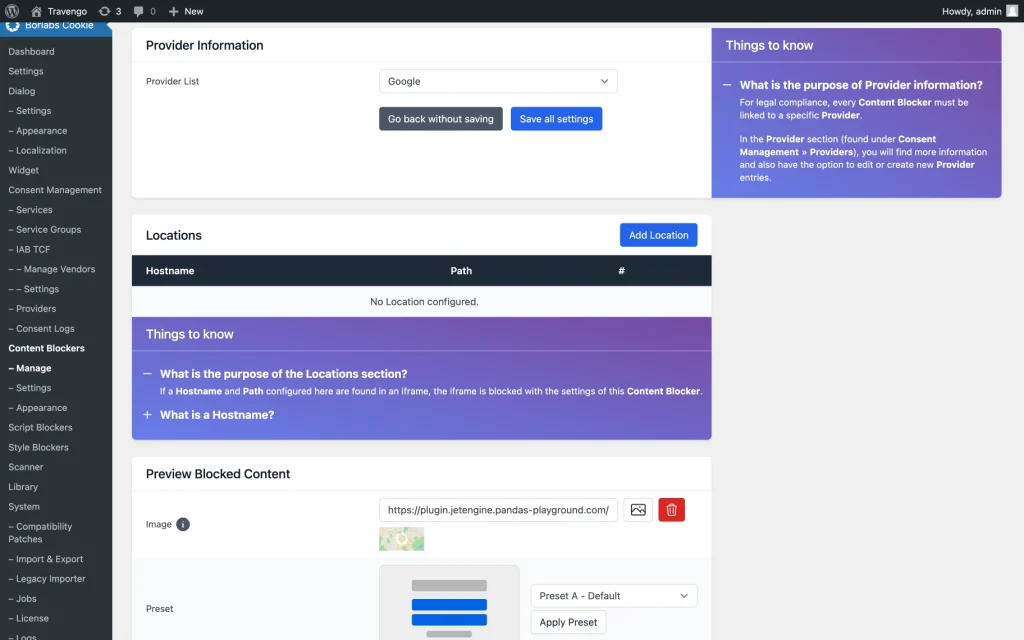
The Provider Information section includes the following settings:
- Provider List — a selector that allows linking each Content Blocker to a specific Provider for legal compliance. More information and options to edit or create Providers can be found under WordPress Dashboard > Borlabs Cookie > Consent Management > Providers.
The Locations section includes the following field:
- “Add Location” — fields that allow setting a new location in the format of hostname and path. If a Hostname and Path configured here are detected in an iframe, the iframe is blocked according to this Content Blocker’s settings. The Hostname refers to the website’s domain name, such as www.example.com for https://www.example.com.
The Preview Blocked Content section includes the following fields:
- Image — a field that allows selecting image preview for the blocked content (used only with Preset B and Preset C). The image URL is accessible within the HTML preview using the {{ previewimage }} variable;
- Preset — a selector that allows choosing the preset to define the preview display of blocked content:
- “Preset A — Default”;
- “Preset B — Default + Background Image”;
- “Preset C — Video Player”;
- “Preset D — Floating Icon”;
- “Apply Preset” — a button that saves preset configuration;
- HTML — a field that allows HTML code to be entered as a preview for blocked content. Variables like {{ name }} (for the Content Blocker’s name) and {{ previewimage }} (for the Image URL) can be embedded within the HTML;
- CSS — a field that allows adding custom CSS to style the preview for the blocked content.
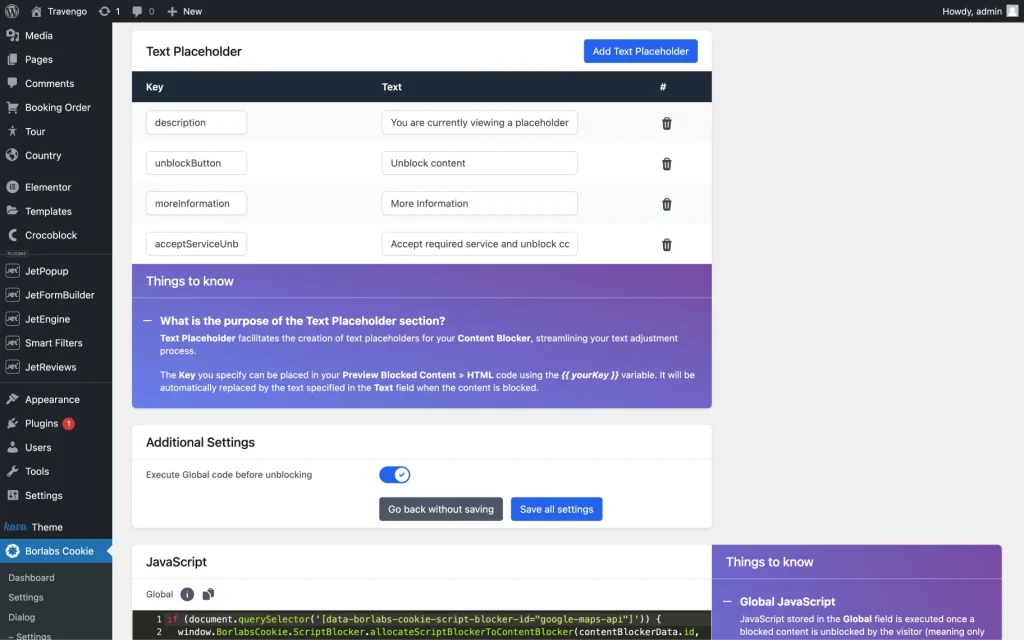
The Text Placeholder section has a set of fields, including a set of variables that can be adjusted for every content blocker. Upon default, four variables include:
- “description” — a variable that contains the description text placed in the blocker; the default text is: “You are currently viewing a placeholder content from <strong>{{ name }}</strong>. To access the actual content, click the button below. Please note that doing so will share data with third-party providers.”;
- “unblockButton” — a variable that contains the unblock button text; the default text is: “Unblock content”;
- “moreInformation” — a variable that contains the more info button text; the default text is: “More Information”;
- “acceptServiceUnblockContent” — a variable that contains the accept terms button text; the default text is: “Accept required service and unblock content”.
If you need to create a new variable, click on the “Add Text Placeholder” button.
The Additional Settings section includes the following field:
- Execute Global code before unblocking — a field that allows entering global code to be executed before content is unblocked.
The JavaScript section includes such fields:
- Global — a field that allows entering JavaScript (without <script> tags) to be executed once per page after blocked content is unblocked by a visitor, useful for loading external JavaScript libraries;
- Initialization — a field that allows entering JavaScript (without <script> tags) to be executed each time blocked content is unblocked. This code runs after the JavaScript from the Global field and is triggered each time the visitor unblocks content.
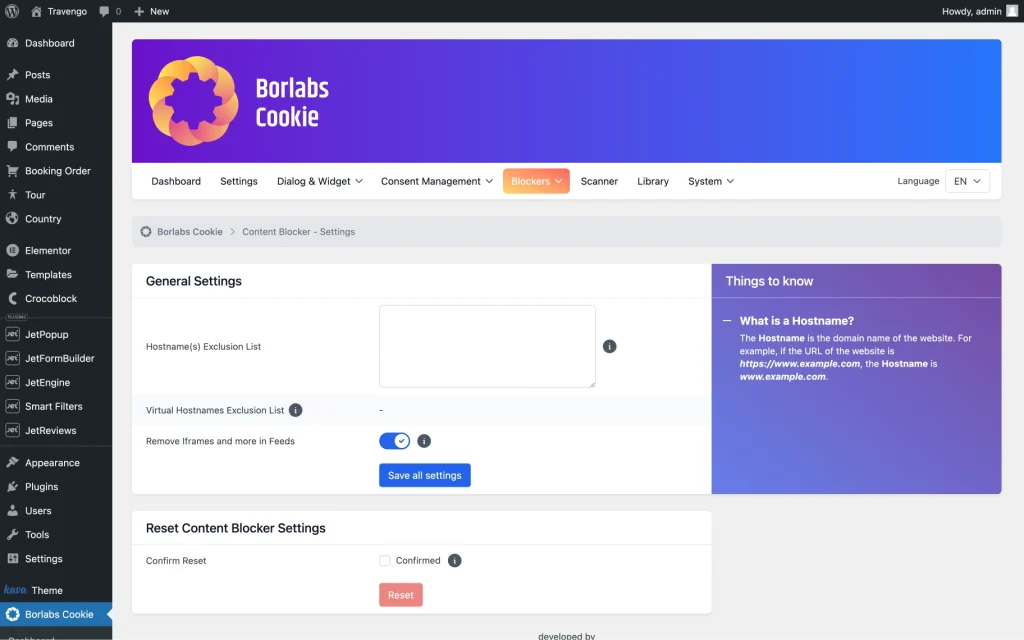
Settings
In the General Settings section, the settings are as follows:
- Hostname(s) Exclusion List — a field where you can list the host(s) that will be recognized by the system and won’t be blocked;
- Virtual Hostnames Exclusion List — a field that lists all hostnames specified in the preceding field;
- Remove iFrames and more in Feeds — a toggle that removes iFrames, blocked content, and shortcodes from feeds.
When you’re done altering the settings, click on the “Save all settings” button.
The Reset Content Blocker Settings section has only one feature: it allows you to reset custom Content Blocker settings to default. To do so, tick the Confirm Reset checkbox and press the “Reset” button.
Appearance
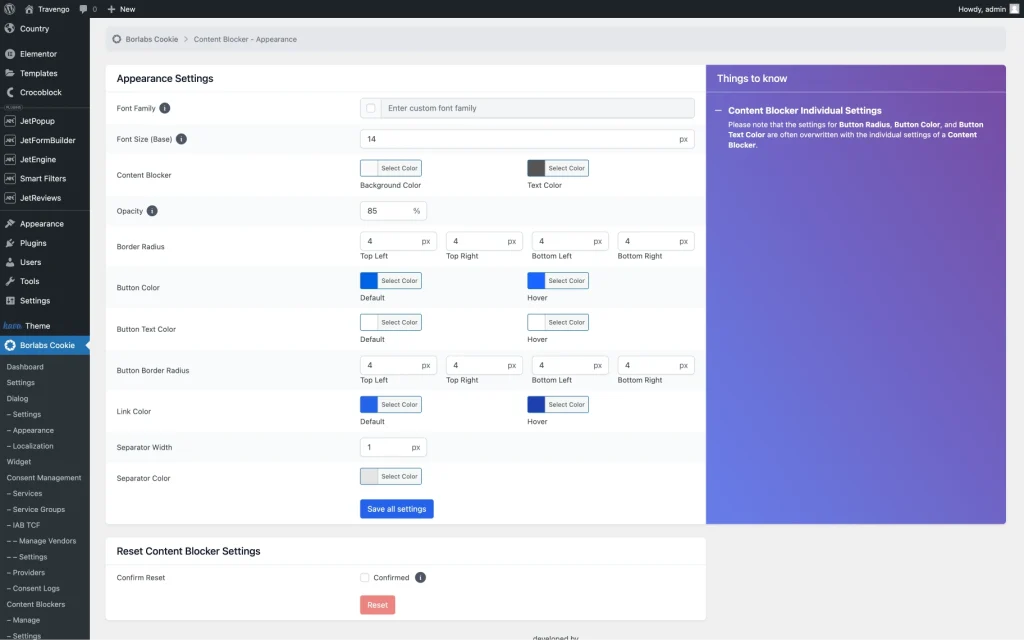
In the Appearance Settings section, we can see the following settings:
- Font Family — a checkbox that allows choosing the font to use instead of the default one;
- Font Size (Base) — a field that allows setting the font size in pixels; depending on the base font size, all the remaining cookie plugin elements will be adjusted proportionally;
- Content Blocker — a field that allows setting background and text colors;
- Opacity — a field that defines the visibility of the Background color;
- Border Radius — fields that allow set spacing around the edges of the button in pixels;
- Button Color — color selectors that allow adjusting the button color using the HEX palette;
- Button Text Color — color selectors that allow adjusting the button text color using the HEX palette;
- Link Color — a color selector that allows setting the desired link color in the HEX format;
- Separator Width — a field that allows choosing the separator size in pixels;
- Separator Color — a color selector that allows setting the separator color.
When you’re done with appearance customization, click on the “Save all settings” button.
Checking Map Listing Content Blocker
Once you configure the Borlabs Cookie plugin correctly, check how it works on the front end.
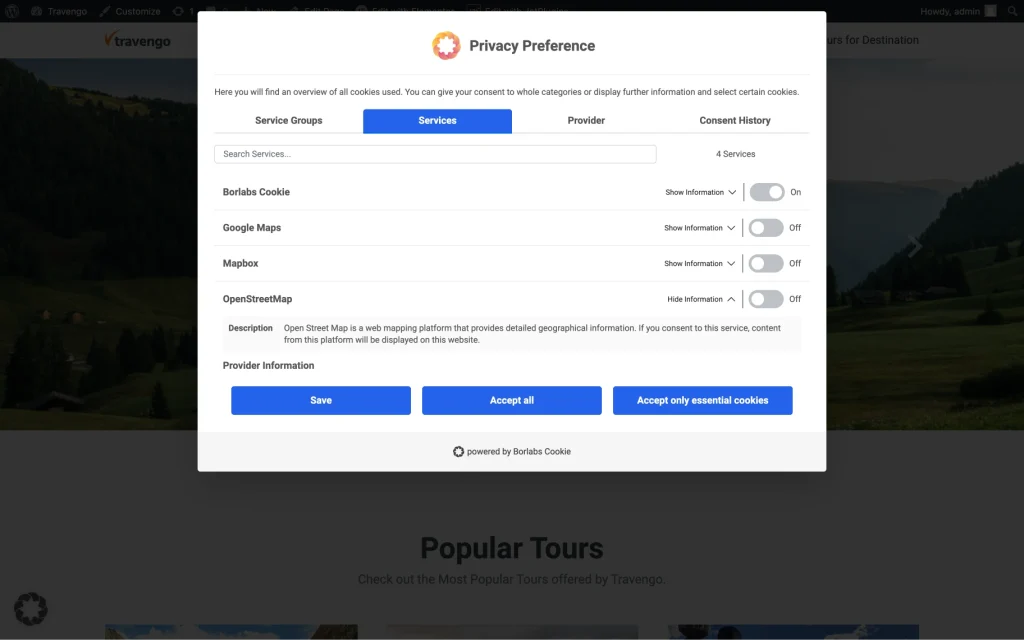
Open the website home page. You will see a default cookie consent pop-up indicating the sitewide privacy preference.
The service tab of the pop-up contains a set of switchers, including one for the map listing.
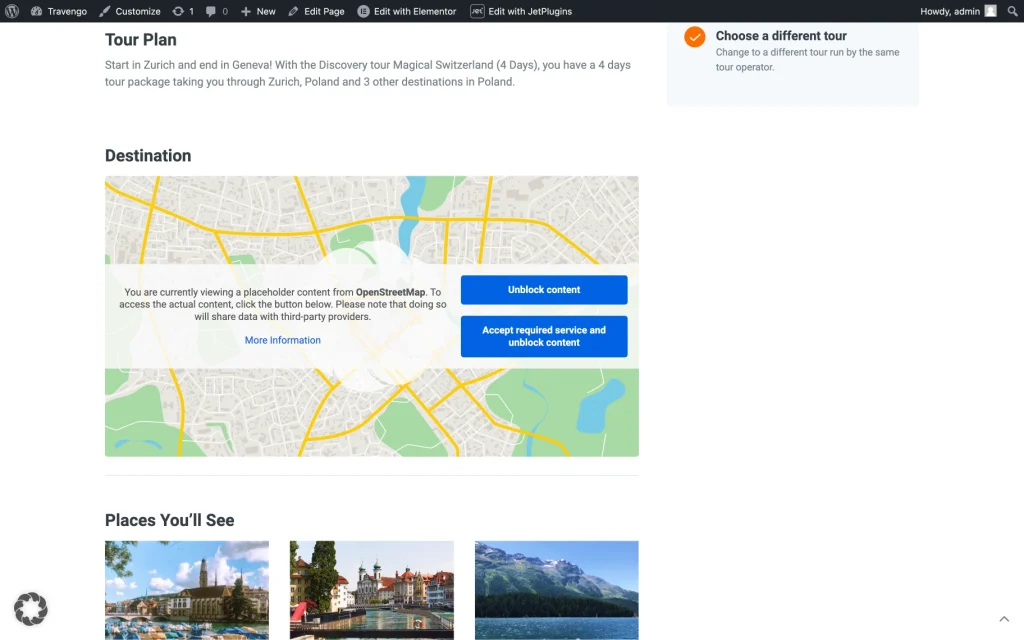
If every switch is set to “Off,” the website’s map listings will be blocked.
To remove the blocking, the user has to either click on the “Unblock content” button on the blocker or go back to the Privacy Preferences pop-up (which can be accessed by clicking on the icon in the bottom left screen corner) and switch on the corresponding switcher.
That’s it. Now you know how to use the Borlabs Cookie consent plugin and JetEngine’s Map Listing module to block the Google Maps or OpenStreetMap content on your WordPress website.
