A stunning gallery can make all the difference in how visitors engage with your website. But what if you could take it a step further and let users filter images by category or custom criteria? Whether you’re showcasing a photography portfolio, an online store, or a design showcase, a filterable gallery keeps things organized and interactive. In this guide, we’ll explore both easy and advanced methods to create a dynamic, user-friendly gallery that adapts to your content.
Table of Contents
- What Is a Filterable Gallery?
- Where Can You Use a Filterable Gallery?
- Choosing the Right Method: Keep It Simple or Go Pro?
- Creating a Filterable Gallery With Crocoblock Portfolio Widget
- Building a Dynamic Filterable Gallery With JetPlugins
- FAQ
- Choosing the Best Approach for Your Needs
What Is a Filterable Gallery?
A filterable gallery is an interactive image or content grid that allows users to sort and display specific items based on selected criteria, such as categories, tags, or custom filters. Unlike static galleries, where all images or items are displayed at once, filterable galleries provide a dynamic browsing experience by letting users refine their view with just a few clicks.
Key features of a filterable gallery:
- Dynamic filtering. Users can instantly display only the relevant items without reloading the page.
- Category-based organization. Content is sorted using predefined filters, such as project types, product categories, or tags.
- Interactive user experience enhances engagement by allowing users to control what they see.
- Seamless integration. The gallery can be applied to portfolios, product showcases, blog posts, and more.
So, what’s the benefit of using a filterable gallery? It streamlines navigation, allowing visitors to quickly find relevant content for a smoother browsing experience. It also enhances website aesthetics by keeping the layout clean and organized, preventing content overload. Enabling effortless category exploration boosts engagement and encourages longer site interactions. Additionally, since only selected content is displayed dynamically, it improves performance by reducing load times compared to lengthy, scroll-heavy galleries.
Filterable galleries are widely used in modern web design because they provide a sleek, efficient way to display large amounts of content while keeping the user experience smooth and intuitive.
Where Can You Use a Filterable Gallery?
A WordPress filterable gallery can be applied to almost any website where structured content needs to be easily searchable and visually appealing. It improves usability and engagement. But let’s take a closer look at industries and niches that benefit the most.
🎨 Creative professionals
Graphic designers, photographers, and videographers use filterable galleries to present their work in an organized way.
🛍️ eCommerce and retail
Online stores leverage filterable galleries to simplify product browsing and improve conversions.
🏡 Real estate and rentals
Agencies use them to help buyers or renters quickly find properties that match their preferences.
📚 Education and eLearning
Platforms use filterable galleries to help students navigate through various courses and resources.
✈️ Hospitality and tourism
Hotels, restaurants, and travel agencies use them to display rooms, services, or destination packages.
🏢 Corporate and business websites
Companies use them for case studies, testimonials, or service showcases.
Choosing the Right Method: Keep It Simple or Go Pro?
When deciding between a simple or advanced approach, consider the complexity of your task, the resources available, and the long-term impact of your decision.
When to use a simple approach
A simple method is ideal when:
- the task has a straightforward solution with minimal dependencies;
- speed and efficiency are priorities, especially for small-scale projects;
- there is limited technical expertise or a need for an intuitive setup;
- future scalability and customization are not major concerns.
When an advanced setup is necessary
An advanced approach is required when:
- scalability is essential, particularly for growing businesses or complex workflows;
- performance, security, or automation are critical factors;
- the simple method has limitations that hinder long-term goals.
Choosing the right method depends on balancing simplicity and capability. If a basic solution meets your needs, it’s often the best choice. However, an advanced setup may be necessary for long-term efficiency and growth.
Creating a Filterable Gallery With Crocoblock Portfolio Widget
Let’s start with a simple method for effortlessly creating a filterable gallery. First, install and activate the JetElements plugin. Once activated, go to the Pages section in your WordPress dashboard and either create a new page or open an existing one to which you want to add the filterable gallery.
Adding the Portfolio widget
- Open the page in Elementor editor.
- In the widget library, search for the Portfolio widget.
- Drag and drop it onto the page.
- The widget will automatically generate a default template that you can customize.
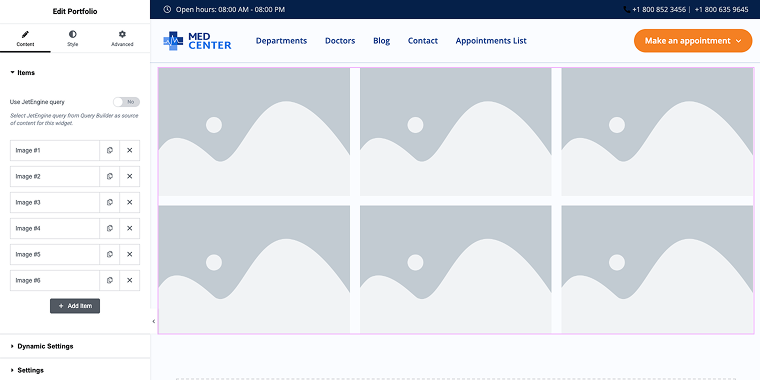
Configuring the gallery items
On the left sidebar, you’ll find all the necessary settings for your WordPress filterable gallery.
- In the Item field, add the number of items you need for your portfolio.
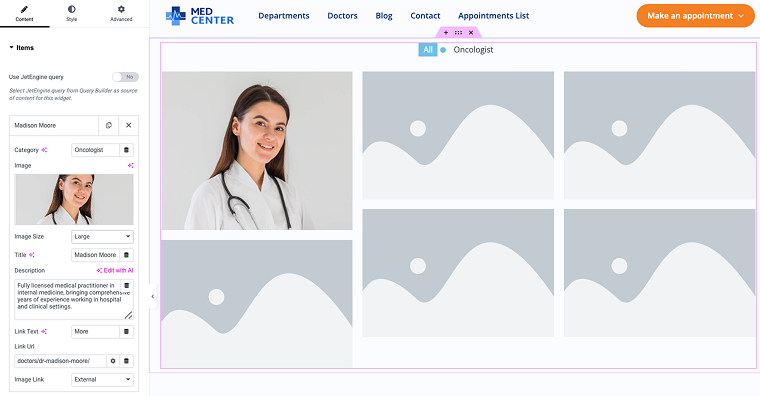
- Click on an item to configure it: upload an image, add a title and description, and assign a category (this is required for filtering to work).
Additionally, you can:
- set the image size for display;
- add a “Learn More” button with a link to the full item page;
- choose whether the link opens in a new tab.
Customizing portfolio layout
Now, let’s configure the portfolio layout. Choose from the following display options:
- Masonry (images retain their original sizes and fit naturally in one row);
- Grid (all items are displayed in equal-sized blocks);
- Justify (ideal for images of varying sizes, ensuring a balanced layout);
- List (items are displayed in a vertical list).
Select the layout that best matches your website’s aesthetics.
Additional display settings:
- Preset Field – choose how text and buttons are displayed;
- Columns – define the number of columns in the portfolio;
- Random Order – enable this to shuffle the items;
- Gap and Height – adjust the spacing between items;
- Pagination – activate the “View More Button” if you want to divide the portfolio into pages. You can customize the button text and set the number of items per page;
- Lightbox Display – toggle whether the item title and description appear in the lightbox along with the image.
Styling the filterable gallery
In the Style tab, you can customize the appearance of your Elementor filterable gallery by adjusting colors, shadows, and positioning. Alternatively, you can use the Advanced tab to access extra widgets and plugins that enhance functionality.
That’s it! Your Elementor filterable gallery is ready. Preview your page to see the final result and make any necessary adjustments.
Building a Dynamic Filterable Gallery With JetPlugins
Let’s dive into something both exciting and slightly complex! To create a dynamic, filterable gallery, ensure that you have JetEngine and JetSmartFilters installed and activated.
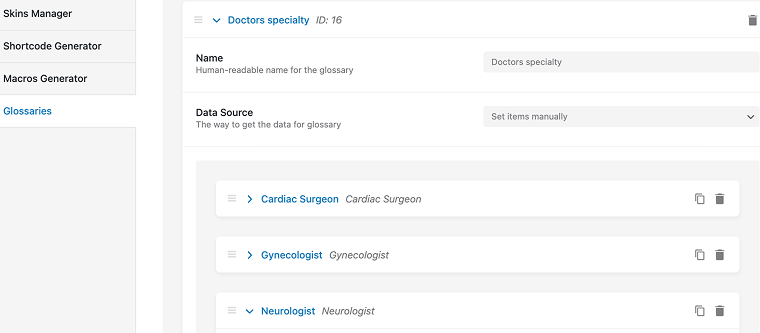
We’ll start by setting up a Glossary, a JetEngine feature that will save you a lot of time. With it, you can create predefined option lists and use them as a source for Select, Radio, and Checkbox meta fields, forms, and filters.
Go to JetEngine > Glossaries > New Glossary. In my case, I’m creating a Doctors Specialty glossary and adding fields like cardiac surgeon, gynecologist, neurologist, etc.
Creating a Custom Post Type
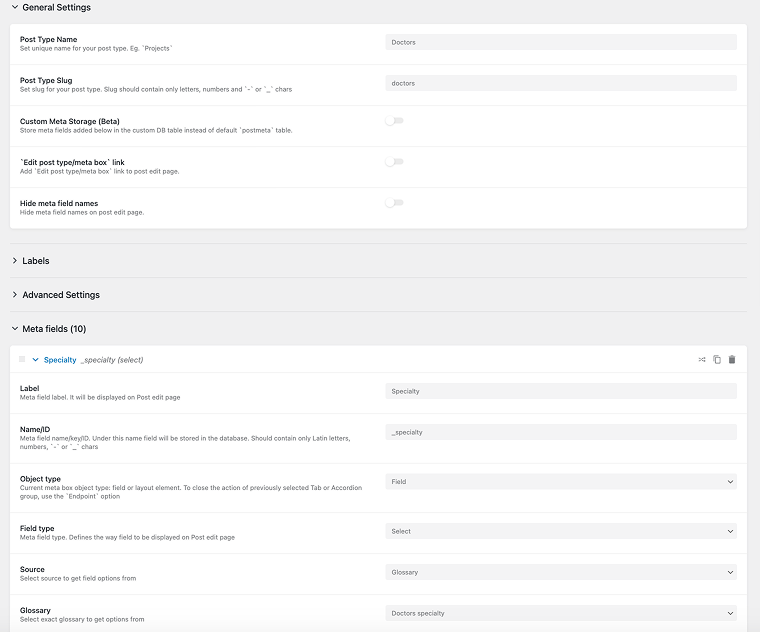
Now we’re ready to create a Custom Post Type (CPT). Go to JetEngine > Custom Post Types > Add New.
I created a Post Type – Doctors and added a meta field – Specialty. For the Source, I selected the glossary we previously created, set the Field Type to “Select,” and adjusted the Field Width to 33.3%.
You can add as many meta fields as you need and configure them to fit your requirements. Just make sure to choose the correct Field Type (e.g., Text, Textarea, Number, etc.) to avoid potential errors.
Next, we need to create a template for the Doctors CPT to ensure that content from the custom fields is displayed correctly on the page.
Before proceeding, make sure to fill in all the meta fields for at least one Doctors post. This will help you preview how the template will look with real content.
Go to Crocoblock > Theme Builder > Create New and set the following display conditions: Include > Singular > CPT Single > Doctors.
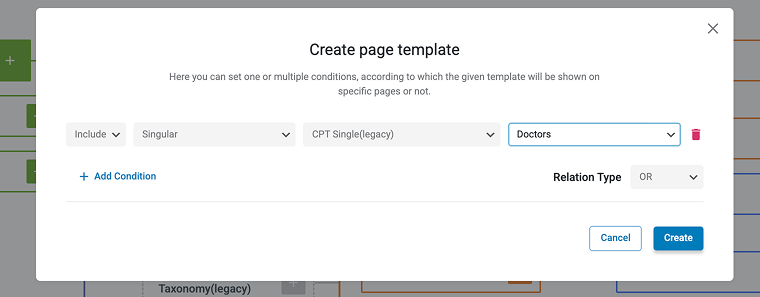
You can always adjust the display conditions later if needed.
Next, click “Create a template” to add the content section template. Select your preferred editor (Elementor in this case) and start customizing the layout.
To properly preview your design:
- Click the gear icon (Elementor settings).
- Go to Preview > Portfolio post type and select the relevant post (e.g., Dr. Emma Scott).
- Update the post and refresh the page to ensure the preview loads correctly.
Creating a listing template with JetEngine
To create a dynamic listing template for the Doctors post type, you must go to JetEngine > Add New.
- Set the Listing Source to “Posts,” and choose the Post Type as “Doctors,” select the Editor as Elementor and give your Listing a name.
- Once created, you can modify the Listing using Elementor. Add dynamic elements like Dynamic Field, Dynamic Image, and other dynamic widgets that will pull content from the Doctor’s custom fields.
Before starting the design, click the gear icon to adjust the preview width. This won’t reflect the final size but will give you a better idea of how the listing will look in a grid layout.
Additionally, you can make the entire listing item clickable by adding a link. This way, users can click on the item to open a detailed page.
Adding JetSmartFilters for filtering
To make the gallery filterable, add JetSmartFilters.
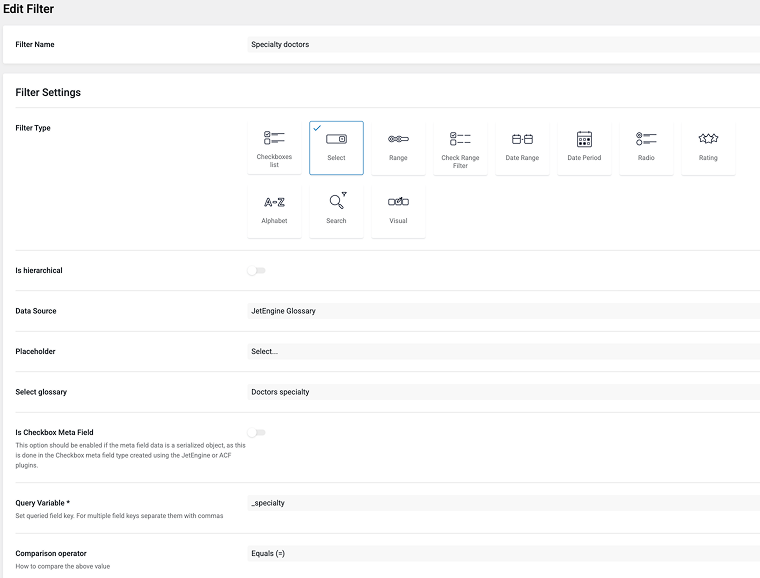
- Navigate to Smart Filters > Add New in your WordPress dashboard.
- Name the filter, for instance, “Specialty doctors” (or something relevant to your use case).
- In the Filter Type field, select “Select” to create a dropdown filter.
- For the Data Source, choose “JetEngine Glossary” to pull the filter options from your predefined glossary.
- Under Select Glossary, choose the glossary you’ve created for the specialties (e.g., “Doctors specialties”).
- In the Query Variable field, enter the meta field name you’re using for the specialties (e.g., “specialty”).
Adding a filter to the gallery page
Open the doctor gallery page in your editor and add the Listing Grid widget to display the list of doctors. Place the Select Filter widget above the Listing Grid.
In the Select Filter settings:
- In the Select Filter field, choose the filter you created earlier, such as “Specialty Filter.”
- For This filter for, select “JetEngine.”
- If you have multiple widgets on the page, set a unique CSS ID for the Listing Grid and enter it in the field of the filter.
NOTE
Ensure that the filter and the gallery are linked through the Query ID parameter, or use the default setting if there’s only one Listing Grid widget on the page.
That’s it. Now, update the page and test the filter by selecting different specialties to verify that the gallery displays the appropriate doctors.
FAQ
The Portfolio Widget works exclusively with Elementor; JetEngine and JetSmartFilters support both Elementor and Gutenberg, making the advanced method flexible for different builders.
All Crocoblock plugins are fully responsive, ensuring that your filterable gallery looks great on mobile devices. You can also customize the design using the mobile settings in Elementor or JetEngine to fine-tune the layout for smaller screens.
Yes! You can combine images and text posts in one gallery. You can filter by category or text (with the advanced method), and display both media and written content in the same layout.
Choosing the Best Approach for Your Needs
In conclusion, both methods for creating a filterable gallery resulted in stunning and visually appealing galleries. Using the Portfolio widget took only about an hour to set up and create the filtered gallery, while the JetEngine and JetSmartFilters approach required more time and effort. However, the end result was absolutely worth it. Whether you’re looking for a quicker solution or more customization, both methods offer great value, depending on your project’s needs. Keep experimenting to find the perfect fit for your gallery’s design and functionality!

