The default WooCommerce Checkout page can sometimes feel cluttered or confusing, which may frustrate customers and lead to abandoned carts – a scenario no eCommerce business wants. Fortunately, you can tailor the checkout experience to be more intuitive and aligned with your store’s needs.
For example, if you’re selling digital products, you probably don’t need lengthy address fields, so removing them can streamline the process. Also, some stores might want to offer different payment methods depending on the customer’s location.
By customizing the checkout, you can create a smoother, more user-friendly experience that keeps customers engaged and more likely to complete their purchases. Let’s explore some of the ways you can achieve this.
Table of Contents
- The Structure of Default WooCommerce Checkout Page
- WooCommerce Checkout Page Customization: Design and Layout
- WooCommerce Checkout Page Modifications: Useful Code Snippets
- FAQ
- Bottom Line
The Structure of Default WooCommerce Checkout Page
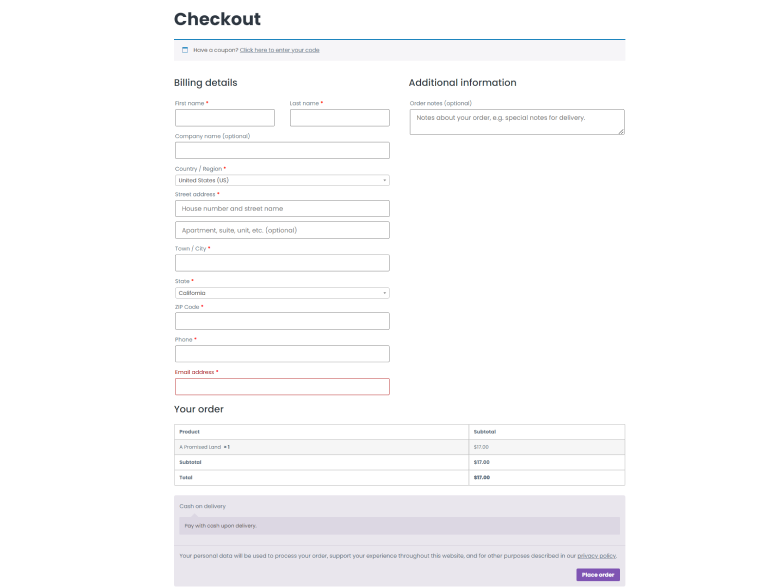
The WooCommerce Checkout page is the final step of the purchasing process on the website, and it follows the Cart page. The main purpose of this page is to collect information about the customer and shipping and perform the payment to place the order.
Thus, it has three logical parts:
- information about the user;
- shipping details;
- payment gateway choice and payment action.
This is what the default Checkout page looks like, but it depends on the active theme a lot. If it’s WooCommerce-optimized, it may have specifically designed templates that are more aligned with the overall website design.
You can find this page in the Dashboard > Pages > Checkout. As a rule, it will be a page with only one shortcode there: [woocommerce_checkout]. This shortcode actually shows the whole page.
The only problem with the fact that WooCommerce relies heavily on shortcodes is that you can’t edit the content of the page directly, and you will need either a dedicated plugin or some hooks. There are also checkout plugins for WooCommerce that are made solely for modifying this page.
Another way the Checkout page can be more or less editable is Block Editor WooCommerce blocks that became a part of the core plugin not so long ago. On one side, it’s a good thing, as it makes the page a bit more editable visually. But on the other, Gutenberg still needs a lot of custom CSS to look good, plus not all the hooks will work if you use blocks.
That’s why I prefer using either dedicated plugins to modify and customize WooCommerce checkout and other pages or custom code and hooks in particular.
WooCommerce Checkout Page Customization: Design and Layout
If you use Elementor on your website, look no further and check the JetWooBuilder plugin, as it allows you to modify any WooCommerce template using over 60 widgets.
To create your own custom template, go to Crocoblock > Woo Page Builder and choose the Checkout tab. There, create your template and save it.
You will have a choice of widgets and can add other plugins’ widgets, add various effects, and so on.
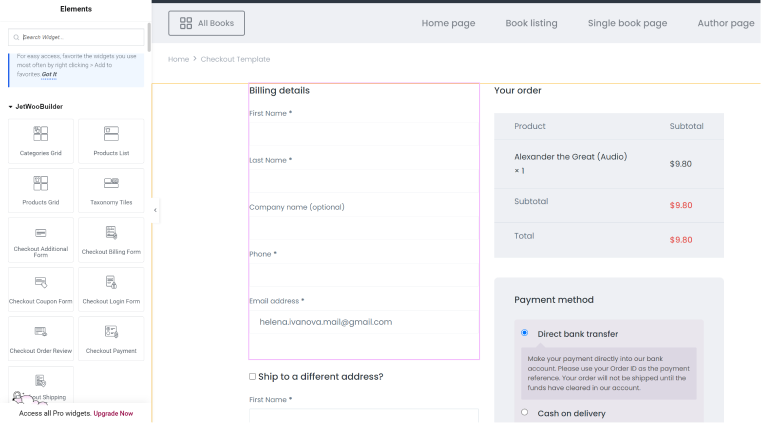
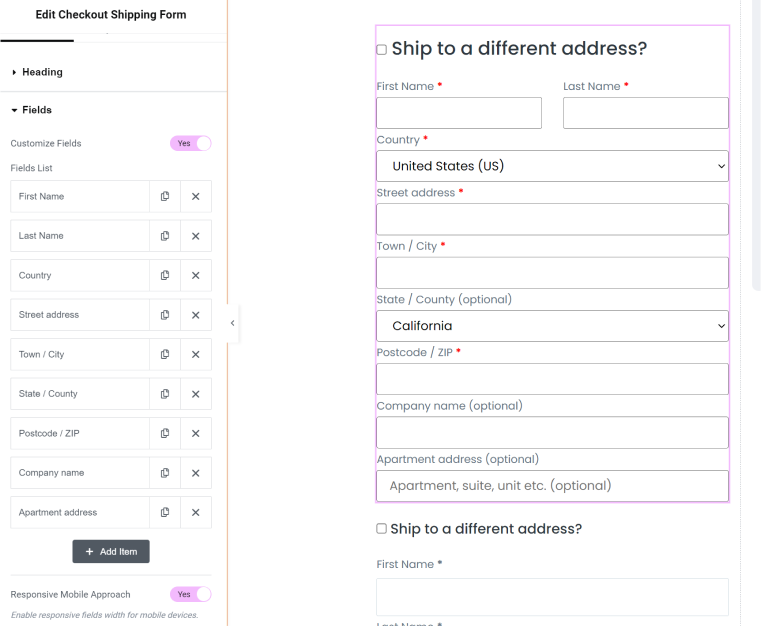
A good thing here is that you can edit things within the widget itself; for example, in the Billing or Shipping details widgets, you can edit the fields, add, delete, or rearrange them. And, of course, you can style every little detail the way you want.
After creating your custom template for the Checkout page, go to WooCommerce > Settings > JetWooBuilder and assign new templates to replace the default ones.
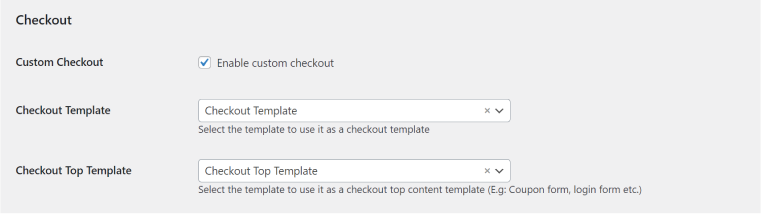
There, you can assign the Checkout Template and the Checkout Top Template. The Top Template is for the login form, coupon form, and other similar elements.
If it doesn’t work, and you still see the default template, go to Pages > Checkout page and make sure you have the shortcode [woocommerce_checkout] there, not the Gutenberg blocks, as JetWooBuilder custom templates replace the ones fetched by the shortcodes.
💡 Read more about creating a Checkout page in the documentation.
Combining Cart and Checkout pages
In many cases, combining these two pages is the best solution. To do that, create two templates with JetWooBuilder – one for Cart and one for Checkout. Make sure there is no duplication of elements or functionality overlapping each other. Then, assign these templates for Cart and Checkout, respectively, in WooCommerce > Settings > JetWooBuilder, just like I’ve described in the previous section.
Now, go to the Cart page and open it in Block Editor (not Elementor). You will see the [woocommerce_cart] shortcode there, so add one more shortcode underneath – [woocommerce_checkout]. As a result, you will get a combined template.
WooCommerce Checkout Page Modifications: Useful Code Snippets
These code snippets will work regardless of whether you use JetWooBuilder or the default template. However, if you create your Checkout page using Block Editor blocks, some of the functions might not work as expected.
Removing unnecessary fields
By default, there are a lot of fields, like Company or Phone, that you might not need. This is how to remove them:
function remove_company_and_phone_fields( $fields ) {
    // Remove the Company field from the billing section
    unset( $fields['billing']['billing_company'] );
    // Remove the Phone field from the billing section
    unset( $fields['billing']['billing_phone'] );
    return $fields;
}

add_filter( 'woocommerce_checkout_fields', 'remove_company_and_phone_fields' );
You can remove as many fields as you need. Here is the official reference where you can find all the field names. Just add them to the code above, and they will disappear.
Removing address fields if the product is virtual
This is my example scenario: I own a bookshop that sells physical books, audio, and e-books. If a customer is purchasing an audio or e-book, I want to hide the address fields during checkout (because such products will not be shipped physically but downloaded). However, if they are buying a physical book or a combination of physical and digital products, the address fields should be displayed.
By default, WooCommerce will display fields in the “Billing details” group (for virtual products as well) that actually include an address. So, I want to get rid of these fields.
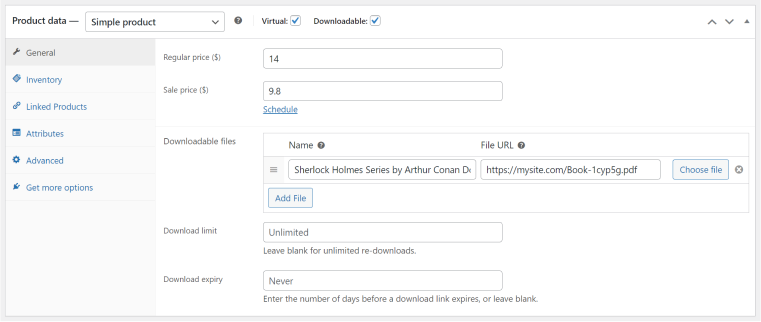
To implement it, you should first clearly mark virtual (audio and e-book) products. To do that, go to your virtual products and check the “Virtual” option in the Product data settings. If it’s a downloadable product, don’t forget to add a file to be downloaded.
Now, it’s time to use WooCommerce hooks and customize the content on the Checkout page. Insert this code into your functions.php file:
//Remove address fields for virtual products

function custom_toggle_checkout_fields_based_on_cart( $fields ) {

    $has_physical_product = false;
    // Loop through the products in the cart
    foreach ( WC()->cart->get_cart() as $cart_item ) {
        $product = $cart_item['data'];
        // Check if the product is physical (not virtual)
        if ( ! $product->is_virtual() ) {
            $has_physical_product = true;
            break;
        }
    }
    // If there are no physical products, remove the address fields
    if ( ! $has_physical_product ) {
        // Remove billing address fields
        unset( $fields['billing']['billing_address_1'] );
        unset( $fields['billing']['billing_address_2'] );
        unset( $fields['billing']['billing_city'] );
        unset( $fields['billing']['billing_postcode'] );
        unset( $fields['billing']['billing_country'] );
        unset( $fields['billing']['billing_state'] );
        // You can also remove more fields in the same way if needed
    }
    return $fields;
}

add_filter( 'woocommerce_checkout_fields', 'custom_toggle_checkout_fields_based_on_cart' );
Conditional payment options for physical and virtual products
Let’s continue with the previous scenario, where we have physical and virtual products. What if I want to enable a Cash on delivery payment option for a physical product, but if it’s a virtual product, I want to enable the PayPal payment option (can be Card payment, etc. – just edit the payment method in the code)?
Make sure your digital products are marked as virtual, as I’ve described in the section above, and insert this code into your functions.php file:
function custom_conditional_payment_gateways( $available_gateways ) {
    // Make sure WooCommerce cart is available and we are on the checkout page
    if ( is_admin() || ! is_checkout() || ! WC()->cart ) {
        return $available_gateways;
    }
    $has_physical_product = false;
    $has_virtual_product = false;
    // Loop through the cart items to check for physical and virtual products
    foreach ( WC()->cart->get_cart() as $cart_item ) {
        $product = $cart_item['data'];
        // Check if the product is physical (not virtual)
        if ( ! $product->is_virtual() ) {
            $has_physical_product = true;
        }
        // Check if the product is virtual
        if ( $product->is_virtual() ) {
            $has_virtual_product = true;
        }
    }
    // If there is at least one physical product, allow 'Cash on Delivery'
    if ( $has_physical_product ) {
        unset( $available_gateways[paypal] );
    }
    // If there are only virtual products, allow 'PayPal' and remove 'Cash on delivery'
    if ( $has_virtual_product && ! $has_physical_product ) {
        unset( $available_gateways['cod'] );
    }
    return $available_gateways;
}
add_filter( 'woocommerce_available_payment_gateways', 'custom_conditional_payment_gateways' );
As you can see, in the code, there are payment method abbreviations, e.g., “cod” stands for “Cash on delivery.” This is how to find abbreviations (IDs) for your other payment methods: go to WooCommerce > Settings > Payments, hover on the method you want to find the ID, and on the address line below you will see it:
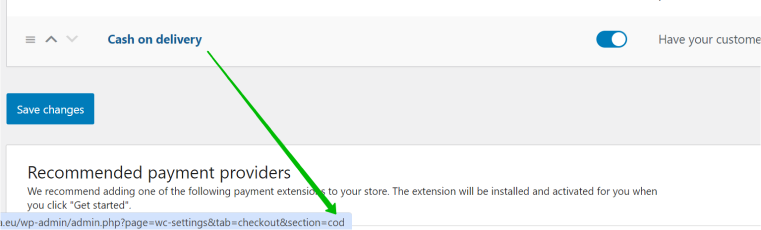
Knowing these IDs, you will be able to set and unset more payment methods by inserting them into the code provided above.
FAQ
It’s created automatically once you install the WooCommerce plugin. You can find this page in Dashboard > Pages. However, if you occasionally delete it, you can create it anew as any other page and paste the [woocommerce_checkout] shortcode, which will fetch all the Checkout page functionality.
If you use Elementor, the JetWooBuilder plugin is a good tool for customizing any WooCommerce page.
If you use JetWooBuilder, you can delete any field visually, just like any other element. Also, you can unset it using the custom code given in this article.
Sure, using the powerful JetFormBuilder add-on, you can add WooCommerce checkout to the WordPress form without using actual Shop functionality.
Bottom Line
The fact that WooCommerce pages are not editable like other pages may be confusing, especially for beginners. But if you understand the structure of the templates and how to replace them with custom ones, it’s getting much easier.
Most WooCommerce pages, in particular the Checkout page, need customization because default layouts are quite overwhelming. Using JetWooBuilder streamlines this process and lets you have much more freedom and control over your templates to achieve great results and boost sales.
