Setting up a user-friendly WooCommerce customer account is key to boosting customer satisfaction in your online store. Although it’s a built-in feature you can adjust in the settings, many store owners must take full advantage of it. In this article, I’ll show you how to optimize your WooCommerce customer account to make your site more user-friendly. I’ll cover how to simplify the registration process, create an effective customer dashboard, and secure customer data.
Why Customize the WooCommerce My Account Page?
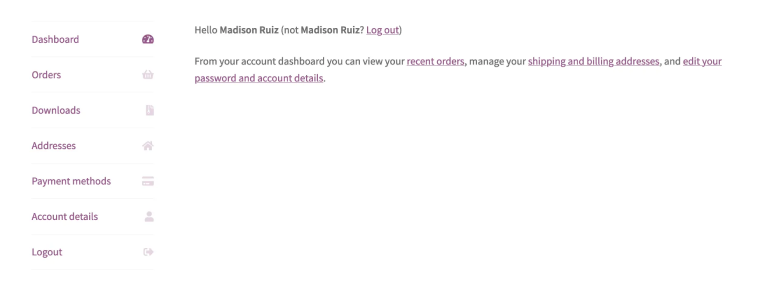
The My Account page serves as the central hub, where customers manage everything related to their shopping experience – from viewing orders and downloads to updating addresses, payment methods, and personal details. In short, it’s their personal dashboard inside your store.
For any eCommerce shop, this page is essential because it:
- gives customers full control over their data and purchases;
- simplifies order tracking, returns, and account management;
- builds trust and loyalty by making the shopping journey smooth and professional.
The WooCommerce My Account is a useful page, but in its default form, it feels somewhat limited. The design is minimal, with no space for branding, and the layout offers little flexibility. Additionally, there are no built-in tools to keep customers engaged or loyal.
By customizing this page, you can:
- Improve usability: customers quickly find orders, downloads, or addresses.
- Build trust and loyalty: branded dashboards convey a more professional and secure image.
- Boost conversions: adding promotions, loyalty points, or cross-sells directly in the account increases revenue.
- Enhance SEO and site structure: custom endpoints and internal linking strengthen navigation.
Essential Elements of the WooCommerce My Account Page
The default layout for the “My Account” page in WooCommerce is quite basic and can be inconvenient to use, which is why additional customization of elements is often necessary. Let’s go through them.
Dashboard
The Dashboard is the first thing users see when logging into their accounts. It displays account information, login options, the ability to change email, and other details. It’s a panel for managing the account.
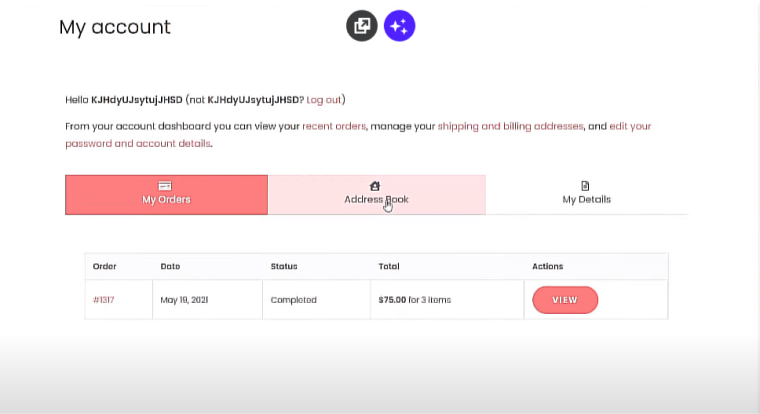
Orders
An organized order section is vital. This part should display all past and current orders with essential details such as order status, date, and total amount. Including options to view order details, track shipments, and reorder items directly from this section enhances user convenience.
Downloads
For stores offering digital products, a dedicated downloads section is a must. Here, users can quickly access their purchased files, view download limits, and see the expiry date for their downloads. Clear labeling and easy access buttons can significantly improve user satisfaction.
Addresses
The addresses section allows users to manage their billing and shipping addresses. A straightforward interface for adding, editing, or deleting addresses ensures that users can keep their details up to date effortlessly. A well-structured address book can save time during the checkout process and reduce cart abandonment rates.
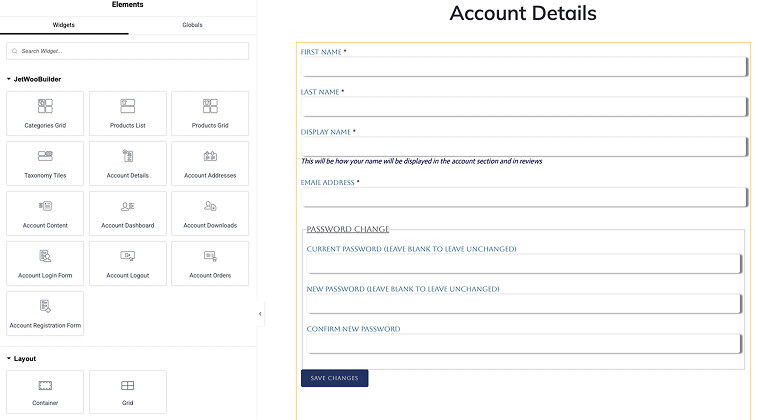
Account details
In this section, users can update their personal information, such as name, email, and password. Ensuring this section is secure and user-friendly is crucial. A clean layout with clear instructions can help users navigate and update their details without any hassle.
Payment methods
Allow users to manage their saved payment methods here. Providing options to add, edit, or remove payment details makes the shopping experience more flexible and convenient. Highlighting security features and reassuring users about the safety of their payment information can also boost their confidence in your store.
Logout
Finally, an easily accessible logout option is essential. Placing it prominently within the account menu ensures users can quickly and securely end their session.
JetWooBuilder Widgets for the My Account Page
If you want to create a WooCommerce Custom Account page quickly and without any problems, then using Elementor is ideal, as the drag-and-drop editor allows you to customize the account to suit your needs in any way.
Your main task is to create a multifunctional Custom Account page that is convenient for users, as this will be the primary interface for their order interactions. The most important thing is to let the client understand that they can control absolutely everything and also easily access their personal account.
JetWooBuilder copes with this task perfectly. This plugin allows you to easily add widgets to display order details, manage personal data and addresses, and integrate with various plugins. Inside, you can also find widgets for the My Account page, which will become a very important tool for you:
- Account Content
- Account Logout
- Account Dashboard
- Account Registration
- Account Login Form
- Account Addresses
- Account Orders
- Account Downloads
- Account Details

Creating a Custom My Account Page with Elementor and JetWooBuilder
The custom user dashboard in WooCommerce provides users with convenient access to key account information and features. Customers can view their order history, track delivery statuses, and manage personal data and account settings on this page. Integration with tools like Elementor and JetWooBuilder allows for creating a more intuitive and functional interface, enhancing the user experience and boosting customer loyalty.
JetWooBuilder makes it easy to customize the WooCommerce My Account page and its endpoints (Dashboard, Orders, Downloads, Addresses, Account Details). Here’s a quick guide.
In your WordPress Dashboard, go to Crocoblock > JetPlugins Settings > JetWooBuilder > Widgets tab and enable the My Account Page Widgets toggle. This ensures you can use the right widgets inside Elementor.

- Go to Crocoblock > Woo Page Builder > Create New Template to create endpoint templates.
- Select My Account in the “This Template For” dropdown, name it (e.g., Account Details), and click “Create Template.”
- In Elementor, drag in the relevant widget (for example: Account Details for the Details endpoint) and style it as needed.
- Publish the template and repeat the process for other endpoints, such as Dashboard, Downloads, Addresses, and Orders.
The created endpoints need to be assigned to the templates.
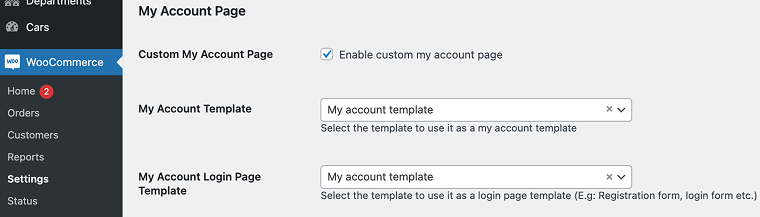
Navigate to WooCommerce > Settings > JetWooBuilder > My Account Page section. Enable Custom My Account Page and Custom My Account Page endpoints. Assign the templates you created from the dropdown menus.

Endpoint templates work with the default My Account page, keeping your theme’s navigation style. But if you want a fully unified design across the entire page, you’ll need to build a custom template from scratch.
Step 1. Create a menu with endpoints
Go to Appearance > Menus, create a new menu, and add WooCommerce endpoints such as Orders, Downloads, or Addresses. You can rename labels, reorder items, or add a custom link for Dashboard. Icons can also be assigned to each item for a more user-friendly look.
Step 2. Build the custom template
Navigate to Crocoblock > Woo Page Builder > Add New Template, choose My Account, name it, and click “Create Template.” In Elementor:
- Add a section with two columns.
- Insert your menu (you can use the JetMenu Vertical Mega Menu widget) into the first column.
- Place the Account Content widget in the second column. This displays the relevant endpoint when a menu item is clicked.

You can further style the layout, add headings, or insert extra widgets. Once ready, click “Publish.”
Step 3. Apply the template
Go to WooCommerce > Settings > JetWooBuilder > My Account Page section and assign your custom template.
Now, customers will see a cohesive My Account page where the menu and content seamlessly match your store’s design.
Optimizing WooCommerce Registration and Login
Before customers can use their accounts, they need to register and log in. This step must be frictionless.
Account registration form and login
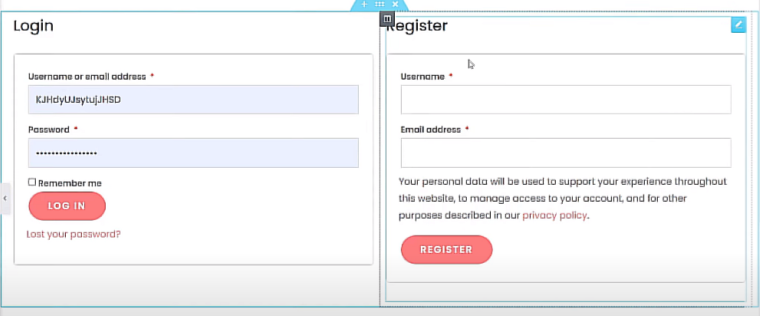
Keep fields minimal and ask only for essential details, such as name, email, and password. Every additional field increases friction and can discourage sign-ups. A clean, minimal design with clear labels and inline validation improves form completion rates.
Social login integration
Allow social logins via Google, Facebook, or Apple. This reduces the barrier to entry and speeds up the checkout process.
Pop-ups for WooCommerce login
What is the best way to encourage a client to log in? Just show them a pop-up login window, and they will at least think about logging in. On their own, pop-ups for the WooCommerce login page can be a valuable tool for encouraging customers to log in to your website. However, some points should be taken into account, such as design, animation, and text. Let’s look at a few key points.
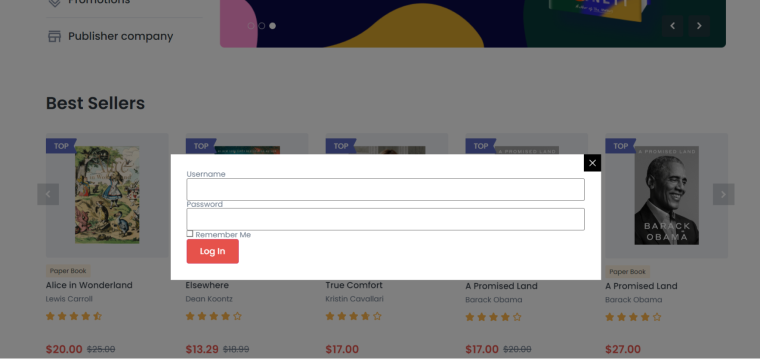
An attractive login window design should be harmonious and cohesive, matching your site’s style and using corporate colors and logos. The copy and call-to-action (CTA) should be clear and motivating. Instead of the standard “Login” or “Register,” use phrases like “Login and get a discount.”
Prioritize security and trust
Even if the login flow is simple, reassure users by displaying trust signals. Use SSL certificates, mention data protection practices, and consider enabling two-factor authentication (2FA) for higher-value stores.
For detailed implementation tips and best practices, check our full guide: WooCommerce Login Form Essentials.
FAQ
Customer accounts in WooCommerce make it easy to access users’ order history and saved addresses, and speed up their shopping experience. Customers can easily track orders and manage preferences, which improves the user experience. Store owners gain valuable customer data to personalize marketing and service, increasing loyalty and driving repeat purchases.
With social logins, you can make logging into a Customer Account much easier, which increases usability and improves user experience. Users can quickly log in through their social media accounts, such as Facebook or Google, without having to remember additional passwords.
WooCommerce offers various tools to improve account security, including two-factor authentication and regular data backups. Plugins that monitor activity and automatically block suspicious login attempts are also recommended.
Conclusion
Having a competent Customer Account in WooCommerce can be a key factor in making the platform more convenient for your clients, as it allows them to track the status of their orders, adjust settings, and view their cart, thereby increasing sales. An intuitive and functional account page not only improves the user experience but also promotes loyalty, bringing customers back again and again.
