Spam bots and fake entries can slow down your website, clutter your database, and undermine the quality of your data. Protecting your forms is crucial for keeping your site reliable, secure, and user-friendly. Implementing reliable security measures helps protect your website.
In this guide, I’ll show three practical ways to secure your WordPress contact forms using JetFormBuilder with CAPTCHA integration and other methods. By following these methods, you can stop spam, ensure proper data submission, and enhance the overall user experience.
Why Secure Contact Forms in WordPress?
Contact forms are one of the most targeted objects on a WordPress site. They are the main entry point for new leads, customer requests, or user registrations, which also makes them an attractive target for automated scripts and nasty bots. Without proper protection, a simple form can quickly turn into a source of spam, fake sign-ups, and even security vulnerabilities.
Common risks of unprotected forms
Spam submissions. Bots are designed to flood forms with irrelevant or cruel messages. This not only clutters your inbox but can also hide actual customer requests among spam noise. Studies show that spam accounts for almost 45% of all email traffic worldwide, and forms are a major entry point.
Fake registrations. On membership or eCommerce sites, attackers often create multiple fake accounts using disposable emails. This can distort your analytics, overload your database, and in some cases, open the door to fraudulent activity.
Automated bots. Bots attempt heavy attacks, try to exploit vulnerable form fields, or inject harmful links. If a form isn’t secured, it can become an easy target for attackers to harm your website.
That’s why securing contact forms is critical not only to block spam but also to protect your website’s performance and ensure a smooth user experience. Extra safeguards make every submission count as a real opportunity rather than noise or a potential threat.
- Protect your website’s performance – spam and fake entries increase server load and database size. This can slow down your site and even lead to downtime in extreme cases.
- Maintain accurate data – if forms are filled with junk or fake accounts, it becomes difficult to track real leads, making your marketing and sales data unreliable.
- Defend user trust – visitors expect forms to work smoothly and securely. If they experience errors, get spammed, or notice suspicious activity, they are less likely to engage with your brand.
- Reduce security risks – vulnerable forms can be exploited for SQL injections, cross-site scripting, or phishing attempts. Adding security layers like CAPTCHA and validation significantly reduces these threats.
How to Protect WordPress Contact Forms?
Protecting WordPress contact forms usually comes down to adding extra layers of verification that make it difficult for bots to submit fake data, while keeping the process simple for real users. Over the years, a few methods have become the standard for stopping spam and vulnerabilities.
1. CAPTCHA (Completely Automated Public Turing test to tell Computers and Humans Apart)
CAPTCHA is the most common security tool for forms. It requires users to complete a small challenge before submitting, which bots usually can’t solve.
- Google reCAPTCHA: the most widely adopted solution. It comes in different modes: reCAPTCHA v2 (the “I’m not a robot” checkbox), invisible reCAPTCHA, and reCAPTCHA v3, which scores user interactions in the background. Google’s reCAPTCHA documentation confirms that it helps block automated abuse without adding friction for most users.
- hCaptcha: a popular alternative to Google’s solution, especially for websites focused on privacy. It works in a similar way but is often preferred by site owners who want more control over user data.
2. Honeypot fields
A honeypot is a hidden field added to your form. Humans don’t see it, so they never fill it out. Bots, however, typically complete all fields, including hidden ones. When a submission contains data in that invisible field, it’s automatically flagged as spam.
Honeypot protection is lightweight and invisible to real users, meaning it doesn’t affect the form’s usability. It’s recommended as a “silent” antispam layer alongside CAPTCHA for stronger protection.
3. Email checks and verification
Many fake registrations and spam form submissions use disposable or invalid email addresses. Adding an email verification step ensures that only users with real inboxes can complete the process.
- Basic email validation: checking if the submitted email address is properly formatted ([email protected]).
- Domain checks: blocking known disposable email providers.
- Email confirmation: sending a verification link that the user must click to confirm their identity.
JetFormBuilder Tool for Securing Contact Forms
JetFormBuilder is a free WordPress plugin that enables you to build any type of form, simple contact forms, newsletter, sign-up forms, or advanced multi-step and dynamic layouts, directly within the Gutenberg block editor. It’s designed to be powerful and intuitive, with over 24 field types, post-submission actions, conditional logic, styling flexibility, and seamless integration with page builders like Elementor or Bricks.
With JetFormBuilder, site owners can apply different methods to keep contact forms safe and reliable:
- CAPTCHA support with multiple providers (including Google reCAPTCHA (v3), hCaptcha, Friendly Captcha, and Cloudflare Turnstile);
- Honeypot protection;
- CSRF protection and nonce validation;
- Input sanitization.
Beyond direct antispam measures, JetFormBuilder has other built-in tools that support usability and make forms more powerful:
👉 Form progress saving, which helps users complete complex forms over multiple visits and ensures data is entered in the correct format.
👉 With form records management, you can store, view, and manage form submissions straight from the WordPress dashboard. This helps you quickly spot anomalies or spam patterns.
As you may have understood, to secure your WordPress contact forms, we’ll use JetFormBuilder. You can start by creating your contact form using the JetFormBuilder guide or follow the video tutorial for step-by-step instructions.
Method 1: Adding Built-In Form Validation
Form validation ensures that the data entered by users meets the required format and controls before it’s submitted. This not only prevents spam and errors but also improves the overall user experience.
Now, let’s set up an advanced form validation.
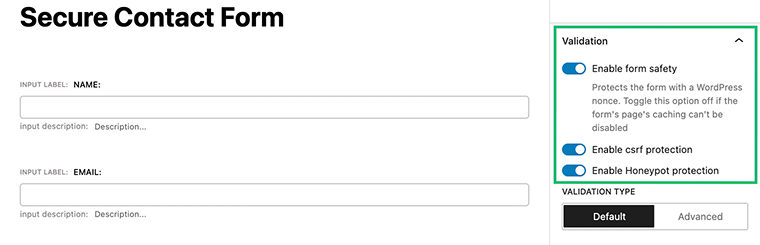
Go to your form’s Settings tab and open the Validation menu. Enable the following options as needed:
- Enable form safety: protects your form with a WordPress nonce, which is useful if there are no caching-related conflicts. Disable if your form page caching cannot be turned off.
- Enable csrf protection: guards against cross-site request fraud attacks, ensuring that authenticated users cannot be tricked into submitting forms unintentionally.
- Enable Honeypot protection: adds an invisible field to trap bots. If the field is completed, the submission is automatically blocked.
Creating a form with CAPTCHA
To add Сaptcha form protection, I used hCaptcha (you can also choose reCAPTCHA, Friendly Captcha, or Turnstile). First, we registered the Site Key and Secret Key at hCaptcha.com. You can check the full guide from our How to Add hCaptcha to a Form tutorial.
In the WordPress Dashboard, go to JetFormBuilder > Settings > Captcha Settings, open the hCaptcha tab, and enter the keys. These global settings can then be applied to any form. After saving, we switched to the form editor.

Inside the form’s Captcha Settings, we selected hCaptcha and enabled the Use Global Settings option to pull in the saved keys.

By clicking “Add hCaptcha,” the block was placed at the bottom of the form. If it’s not added manually, the system automatically inserts it before the Submit button. The block comes with the same options as the Captcha Settings tab.
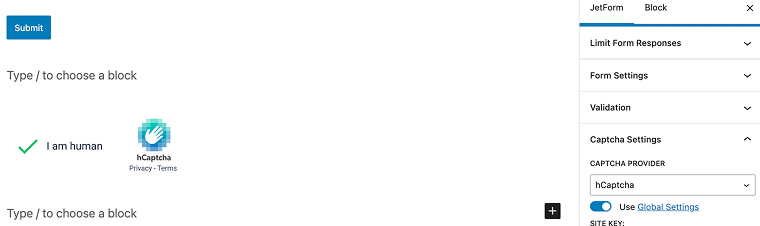
Finally, preview how the CAPTCHA would look on the front end and, once satisfied, clicked “Publish/Update” to save the form.
Method 2: Confirm Submissions with Email Verification
Another effective way to secure WordPress contact forms is to require users to verify their submissions via email. This step not only blocks spam bots but also ensures that the person filling out the form is using a valid, accessible email address. JetFormBuilder has a built-in Verification action that makes this process simple.
When enabled, the form sends a verification email to the user after submission. The entry is only considered valid if the recipient clicks the verification link. Let’s break down how this feature works.
In the form editor, open the Post Submit Actions tab and click “Verification.” Each form can only have one Verification action. You can edit it by selecting the pencil icon, which opens the customization pop-up.
Key settings:
- Link Lifespan – defines how long the verification link remains valid (in hours). If left empty or set to “0,” the link never expires.
- Email Field – selects which form field stores the user’s email address. This is where the verification email will be sent.
- Custom Verification Email – instead of the default message, you can create a personalized verification email by enabling the toggle and setting up a Send Email action.
- Success Page – determines where users are redirected after successfully verifying their email. If none is set, they’ll return to the form page.
- Failed Page – defines the redirect destination if the verification fails.
Method 3: Limit the Number of Form Submissions
And the third way to secure your contact forms is by controlling how many times a form can be submitted. This prevents spam floods, protects your server from unnecessary load, and helps you maintain cleaner, more reliable data. JetFormBuilder gives you two flexible options:
1. Limit form responses
With the Limit Form Responses setting, you decide the maximum number of successful submissions a form can accept. Once the point is reached, the form will no longer accept new entries.
To enable this option, make sure you have the Limit Form Responses addon installed. You can find it in WordPress Dashboard > JetFormBuilder > Addons.
Once active, open your form in the JetFormBuilder editor. Go to the Limit Form Responses menu and enable the Limit Form Responses toggle.
Here you can configure:
- Limit – enter the number of submissions allowed. Only successful responses count toward this number.
- Closed Message – the text users see when the form has reached its limit. If left blank, users will still see the form but will get an error after pressing Submit.
- Error Message – the message displayed when someone attempts to submit after the limit has been reached. Shortcodes can be used in both messages for personalization.
This option is especially useful for scenarios like event registrations, limited-time offers, or surveys with a cap on responses.
2. Restrict users from multiple responses
If you want to prevent the same person from submitting the form repeatedly, JetFormBuilder allows you to restrict entries per user.
In the Limit Form Responses menu, enable the Restrict users from multiple responses toggle.
You can define a user in different ways:
- IP address – blocks repeat submissions from the same IP.
- Logged-in users – restricts based on WordPress accounts.
- Cookie value – identifies and limits users via cookies.
- Session value – limits submissions to one per browser session.
Additional settings include:
- Maximum submissions – the number of times a user is allowed to submit the form.
- Reset interval – defines how often the submission counter resets (daily, weekly, monthly, yearly, or never).
- Restricted message – the message shown when a user tries to exceed their allowed submissions. Shortcodes are supported here as well.
Field and Block Validation: Helping Users Submit Correct Data
When we talk about form security and usability, there are actually two different types of validation you can apply in WordPress forms:
Field (block) validation
These are messages related to a specific field and appear when the entered data does not meet the requirements. The user sees them immediately or after clicking the Submit button, but the error is localized only to that field:
- Field is empty – when a required field is not filled in.
- Email is not valid – triggered if the email format is incorrect.
- URL is not valid – when the entered web address is invalid.
- Input mask is not completed – appears for phone numbers (or similar fields) if they don’t match the required format.
- Files limit exceeded – when more files than allowed are uploaded.
- File size limit exceeded – when the uploaded file is larger than the allowed size.
- File type is not included in the allowed types list – when a user uploads a file type outside the permitted list.
- Value does not reach the minimum – when a number/range is below the set minimum.
- Value exceeds the maximum – when a number/range is above the set maximum.
- Not enough characters – when the text is shorter than the minimum length.
- Character limit exceeded – when the text exceeds the maximum allowed length.
- Timestamp is too early – when the selected date/time is earlier than allowed.
- Timestamp is too late – when the selected date/time is later than allowed.
Advanced form field validation
JetFormBuilder offers two validation types: Default (browser native) and Advanced, with the latter providing greater flexibility and stronger security. Select Advanced to reveal the Edit Validation Messages button, where you can adjust error messages and configure manual options for different field types.
- Inherit validation – the block inherits validation rules from the form.
- Equals – checks whether one field’s value matches another (for example, Password/Confirm Password).
- Must contain characters – requires certain characters in a field (for example, “@” in an email).
- Must not contain characters – restricts certain characters from being entered.
- Matches regular expressions – data must match a regex pattern.
- Does not match regular expressions – data mustn’t match a regex pattern.
FAQ
reCAPTCHA v2 shows the familiar “I’m not a robot” checkbox or image puzzle.
reCAPTCHA v3 runs silently in the background and assigns a spam score to each submission.
hCaptcha works similarly to v2 but prioritizes privacy and gives site owners more data control.
No. Honeypots are lightweight hidden fields and have a minor impact on performance. They silently catch basic bots that fill out every visible (and hidden) field.
Yes. Google reCAPTCHA, hCaptcha, Friendly Captcha, and Turnstile are all proven tools that filter automated submissions. These technologies reduce spam without adding unnecessary friction for genuine users.
In The End
Securing your WordPress contact forms is essential not only to prevent spam but also to maintain reliable data and protect your users. By implementing CAPTCHA, limiting submissions, and adding email verification, you create a safer and more trustworthy form experience. These measures help your website run smoothly, protect site performance, and ensure that every submission you receive is meaningful.


