In this article, we will look closer at WordPress option pages, their use cases, and how to create and display them with JetEngine:
What Are WordPress Options Pages?
Options pages are additional sets of fields that are available globally throughout the website and don’t belong to any particular post. They are stored in the wp-options database table.
As you can see from the visualization of a WordPress default database below, all tables are interrelated (with the help of keys), while only two are global – wp-options and wp-links. The latter is a legacy, so we will not consider them.
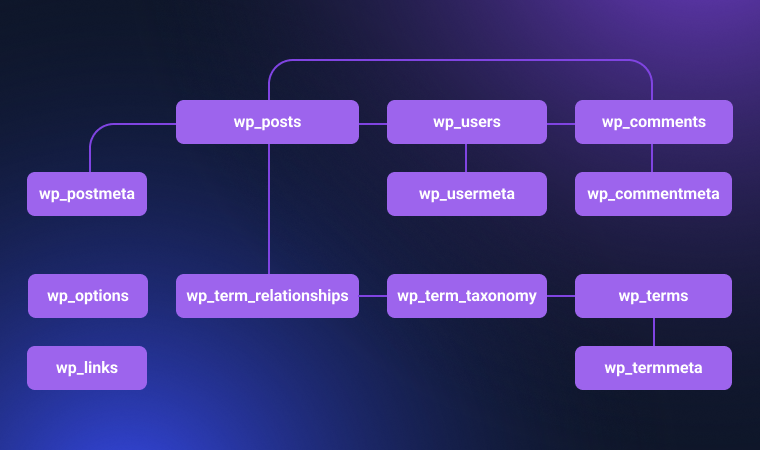
That’s why you can fetch data from this table literally anywhere on your website: headers, footers, any post, page, taxonomy, etc.
It’s the main reason option pages are used for settings or global data. For sure, you saw theme and plugin settings on the left panel of the WordPress dashboard – so these are options (or settings) pages.
Creating Options Pages manually and with JetEngine
You can write an options page code manually and add it to functions.php or a dedicated plugin (there are WordPress options page generators to save you time, like this one), but it’s quite hectic, though.
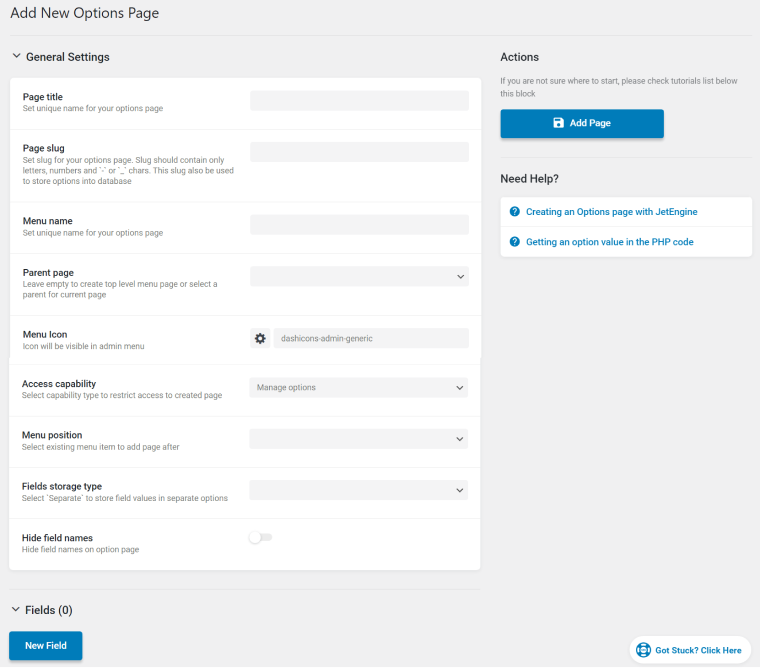
Instead, you can create Options Pages with JetEngine using a convenient interface with tons of settings and 18 field types to choose from, and, of course, a conditional logic that allows making something really flexible.
Extra compatibility features starting from JetEngine 3.1.0
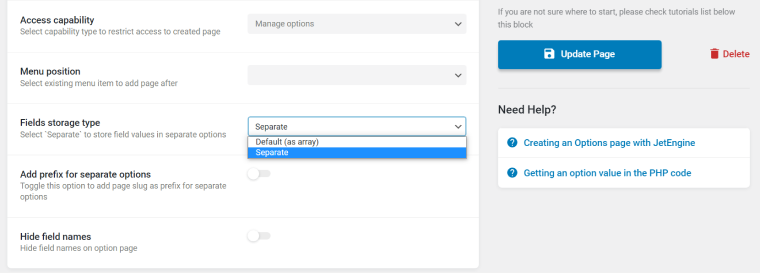
Starting from JetEngine 3.1.0, you can choose a field storage type and store options either as an array or as a separate row of the wp-options table (by default, WordPress stores option fields separately: each field has its table row in the database and a unique key).
JetEngine Options Pages can also store it this way but don’t forget to switch to “Separate” in settings; otherwise, it will be stored as an array (by default). Thanks to it, there’s better compatibility with tools like WPML. Also, you can use JetEngine Options Pages UX to work with options of WordPress core and other plugins.
There’s one more important thing has been added – the Add prefix for separate options toggle. When it’s on, the page’s slug will be added to the fields. It’s done to avoid interfering with some core or third-party plugins’ options. But if the toggle is disabled, the field’s name can match the key under which this option is stored in the database (so you can work with existing core/plugin options).
JetEngine Options Pages Use Cases
There are many ways to use Options Pages. Here I will show you only a few examples to give food for your imagination.
Adding fields to show in several places on the website
The best example of such fields is contact information. If you have a big eCommerce site and change a phone number, e-mail, or mailing address, you definitely don’t want to check every page of the site and change them manually.
Another useful example is promotions. Let’s say you have a sale offer and want to place it in the header, footer, and pop-up banners. The offer is -15% this week, but it will be -10% next week. So, instead of changing it in several different places manually, you can add this field to an Options Page and then, using a JetEngine Dynamic Field, display it whenever you want.
This is an example:
Using existing wp_option values in JetEngine Option Pages
It’s a case for rather a narrow application; however, it may be handy if you want to give a certain group of users (with limited rights) a custom list of options to edit but don’t want to give full access. Or, you want to particular list of options always within reach. For example, it can be some WooCommerce global fields.
So, you can add existing option fields’ names/IDs to your Options Page, and the name can be found in the Database wp_options table. Use the same field type as the original field. Note that the Fields storage type should be switched to “Separate” to do so.

And this is an example of an Options Page that uses existing fields. As you can see, the existing values are automatically fetched from the database:
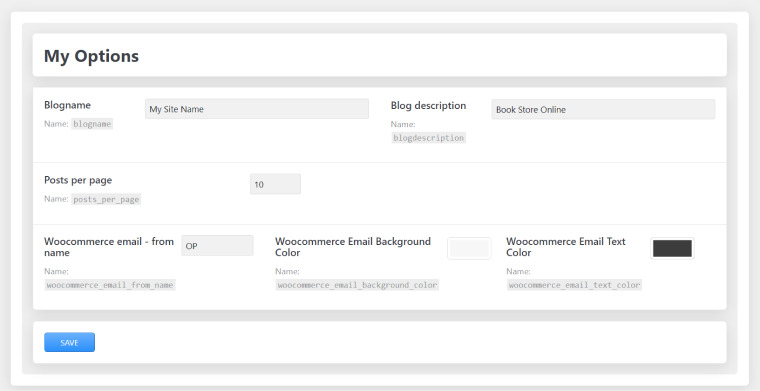
Use Options Pages this way when you really know what you are doing.
Changing colors and media globally
With JetEngine, you can use colors dynamically, retrieving the values dynamically. I’ve already shown an example in the previous screenshot.
Below is the simplest example of how you can assign colors to your categories and posts or assign them to your icons or whatever you have on your website.

Not lettings clients touch your code/layouts
Let’s get this straight: most of us, who create websites for clients, have one fear after handing out the ready site to the client: that they will edit it, mess something up. Especially when they say, “Don’t worry, my secretary knows how to deal with websites,” do you feel a bit anxious?
If you don’t want to mess up the layouts or code you’ve created, it’s a great idea to use Options Pages and put everything you want your clients to deal with on them. Be it not only contact information or some settings but also, for example, hero carousels, galleries, etc. As I’ve already mentioned, you can add custom options that you’ve created and those that already exist in your theme. So, everything can be in one place, your Options Page dedicated to a particular topic.
Adding a custom panel to your website
Let’s imagine that your shop doesn’t have work hours, and you want to introduce your clients to the person to work with them (I think it’s a great use case for clinics or salons). So you want to let your clients know you are working now (or not) and who will be your consultant.
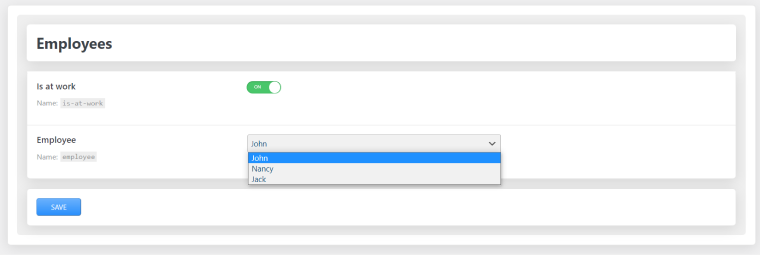
I will add an Options Page with fields (or you can add these fields to another Option Page) that have switchers to show whether anyone is on duty today and the name of this person (taken from a glossary, in my case).
I’ve added a dedicated Options Page for them to put a status that they are at work and then a conditional field (if they are) to choose from Glossary a name of those who can work there:
And then, using a Dynamic Field, I’ve displayed them in the header:
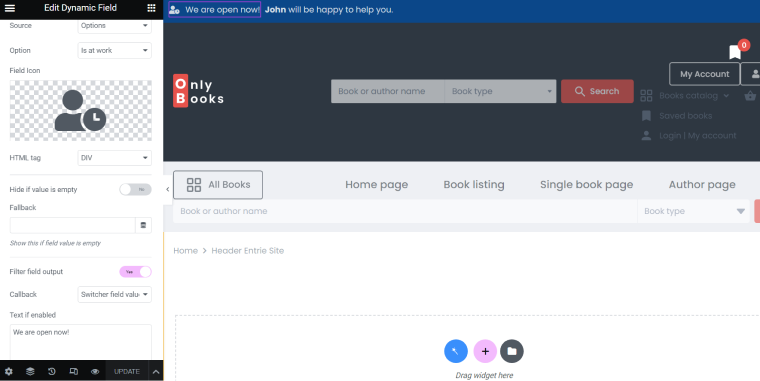
There are two dynamic fields that show whether you are ready to deal with customers and who will do it.
Looks cool, isn’t it? And all the employers should do is change the working status and the name of the person who is available today.
Fetching Options Pages’ values using PHP code
WordPress developers can get values of JetEngine Options Pages using this code:
The Bottom Line
In short, Options Pages let you work smart, not hard, and make your website truly dynamic. Using them, you can add all kinds of information that will be available globally, all over your site. Modify texts, media, galleries, sliders, and colors, add or remove panels, and have control over all of this from one place on your site, thanks to JetEngine Options Pages.
