How to Display Custom Content Type Items Using REST API
From this tutorial, you will learn what REST API is and how you can use it to pull the items of a Custom Content Type from one site to another.
Creating a “GET item REST API Endpoint”
To use REST API functionality, you have to enable it. Open the WordPress Dashboard and go to JetEngine > JetEngine Dashboard > Modules. Scroll the page down and find the REST API Listings toggle, enable it, and click the “Save” button.

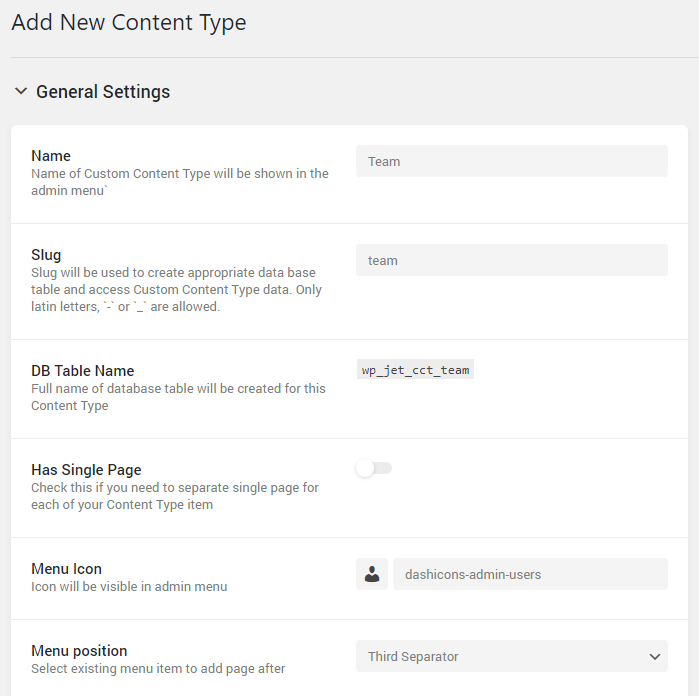
To create an Endpoint, you will have to add a CCT. Proceed to JetEngine > Custom Content Types and click the “Add New” button. Choose CCT’s name, menu icon, and position, as well as Content Type UI Access Capability. If you need some help, go through this CCT creation guide.
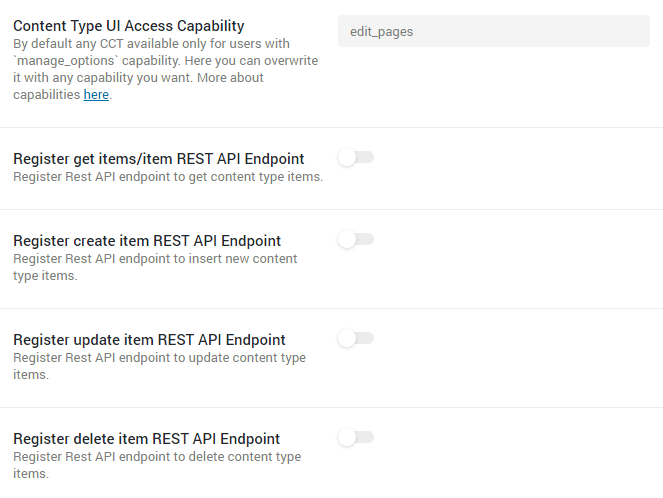
Four lower toggles allow you to register REST API Endpoints for getting, creating, editing, and deleting the items of this CCT. Enable the Register GET items/item REST API Endpoint toggle.
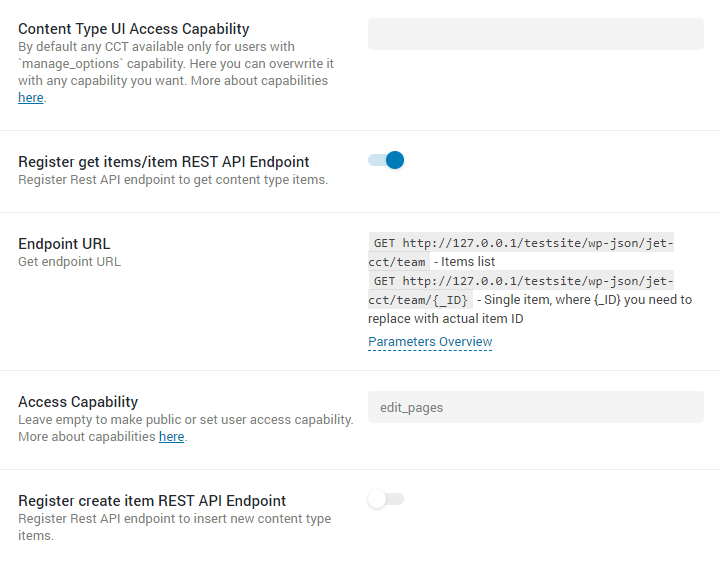
In the Endpoint URL field, you will see two URLs that can be used for the connection. The first one is for the list, and the second can be used as an example if you want to pull a single item.
You can add some parameters to the Endpoint URL if you need them. To see the list of available parameters, click the “Parameters Overview” option. Let’s take a closer look.
_ID– you can place the separate items’ IDs at the end of the URL, and it will pull only the single item’s data;cct_author_id, cct_created, cct_modified– those three parameters are not supposed to work with the URL. they only list fields that are available to the user. The meta fields added by you will also be listed here. You can display these fields in the listing and listing grid;_cct_search– this parameter helps you get only the items that include a certain word. Put it at the URL’s end this way: “_cct_search=something” and instead of “something” use the word to search in the item’s content. The word is searched in all fields;_cct_search_by– it works only with the “_cct_search” parameter. This parameter specifies the search. You can list some of the fields here and search the items only by those fields. Add the fields after the “_cct_search_by=” and separate them with commas;_limit– it will help you limit the number of pulled items. Use numbers only for this parameter;
_offset– with this one, you can define the item’s offset. Place it at the end of the URL like this: “_offset=2”, where “2” should be replaced with the number of items you want to skip;_orderby– this parameter will help you order items by field. Write the field’s name after the “=” sign. If you use it, you must also define the type of order with the help of the “ordertype” parameter;_order– you can choose ascending (asc) or descending (desc) order and set it for the pulled items. Put it in the URL like this: “_order=asc” or “_order=desc”;_ordertype– it can help you order the items according to value type – integer, float, timestamp, date, or string;_filters– finally, this parameter adds JSON-encoded filters to the URL.
If you want to use several parameters, separate them with “&”. Here’s an example of a URL with parameters:
http://127.0.0.1/testsite/wp-json/jet-cct/team/?cct_author_id=1&_orderby=_ID&_order=desc&_ordertype=integer
Don’t forget to add the “?” sign at the beginning of the row of the parameter because it marks the beginning of the query string.
In the Access Capability field, you can choose who will be allowed to access this CCT. By default, there are no restrictions, and anyone can see it. Let’s change it to “edit_pages” – this means that only editors and admins would be able to use it.
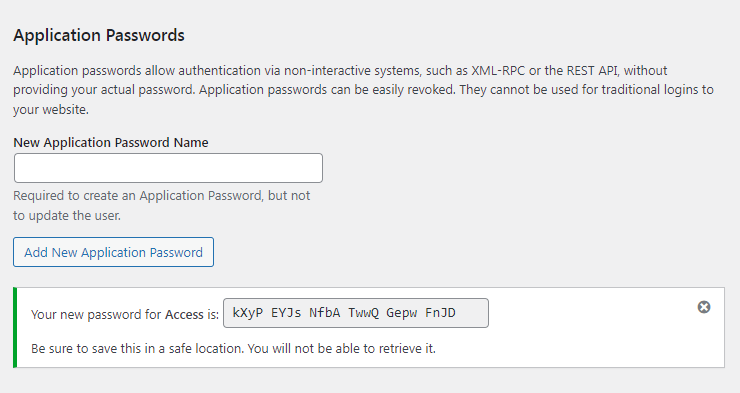
You would also need to set the application passwords. Proceed to the Users > Profile WordPress tab and scroll down to the Application Passwords heading.
Enter any name into the New Application Password Name field, and hit the “Add New Application Password” button.
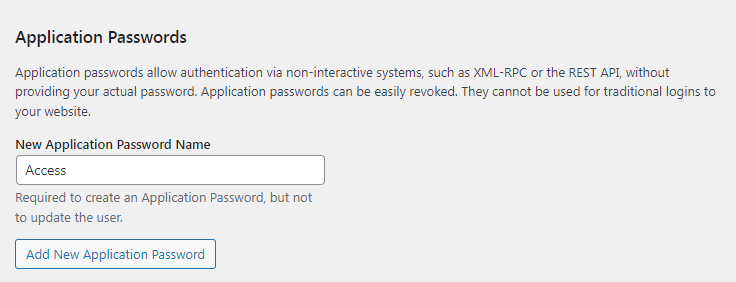
Copy the new password and save it somewhere.
Proceed to add the necessary meta fields and then hit the “Add Content Type” button. Go to the newly created CCT tab and add some posts. If you have already created a CCT and now want to get access to it, you can just open the editing window and enable the Register GET items/item REST API Endpoint toggle.
How to Set Connection Between Two Websites Using REST API?
Go to the website where you would like to list the CCT items and enable the REST API Listings toggle in JetEngine > JetEngine Dashboard > Modules. After clicking the “Save” button, the Rest API Endpoints tab will appear in the JetEngine Dashboard, so open it.
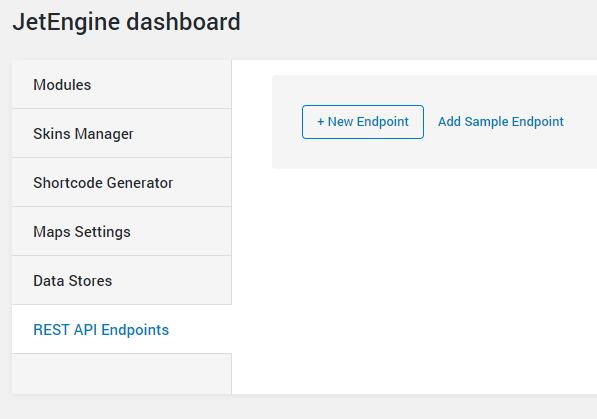
You will see two options: adding a new Endpoint and a sample one. The sample will help you display the list of Crocoblock items. All the features are set here and can work as an example. Let’s add a new Endpoint and deal with all the settings from the ground up. So, hit the “New Endpoint” button.
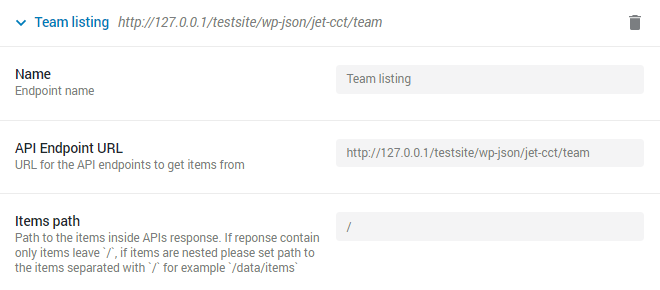
- Name. It is the Endpoint’s title, visible in the list;
- API Endpoint URL. This is the field where you should place the URL from the Endpoint URL text area. Also, use the parameters to specify the data that will be pulled from the CCT;
- Items path. If the URL brings you to the page where only items are stored, leave the slash (/) in this field. And in case there are several folders, define the path to the items here. For example, there are three folders, but the needed items are in the one named “items”. Then you should write “/items” in this field. You can read the dedicated troubleshooting about getting the right item path. Here you can also find out how to set up the API from the RapidAPI website;
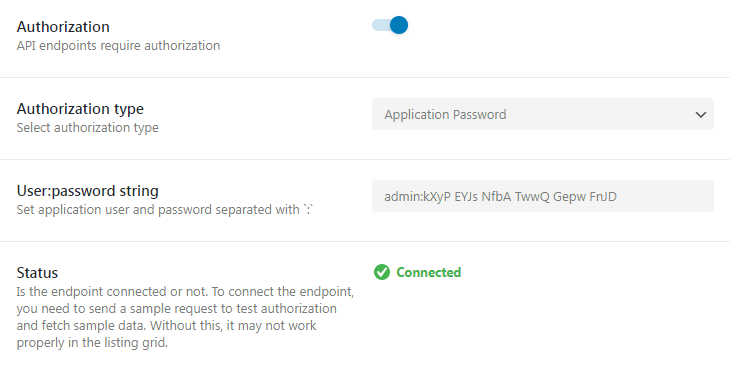
- Authorization. If there is any other but the default option in the Access Capability field of the CCT you chose, turn this toggle on. In the Authorization Type select, choose the “Application Passwords” option and insert the name and password into the User:password string field. Be aware not to make any spaces between the user’s name and password, separate them only with the “:” symbol;
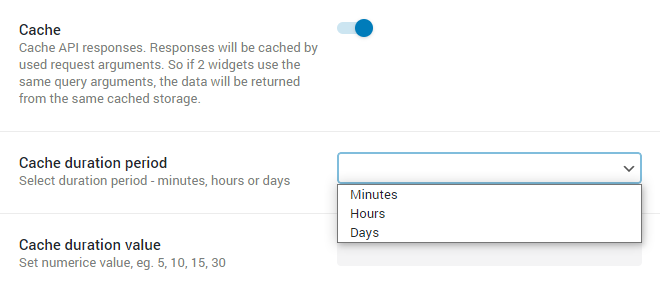
- Cache. If you enable this toggle, the responses will be cached according to their query arguments. This will sufficiently reduce the response speed. The caching can be performed regularly, and you can choose the period in the Cache duration period drop-down and the number of minutes/hours/days in the Cache duration value bar.
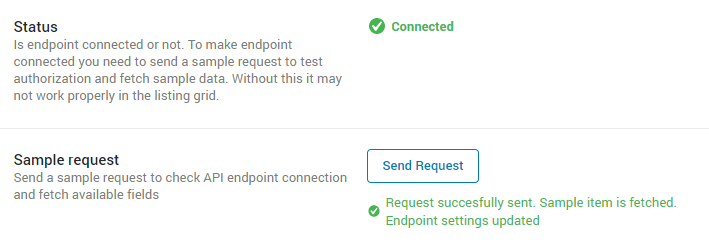
When you are done with that, click the “Send Request” button to create a connection. If everything has gone successfully, you will see a “Connected” mark in the Status field. Press the “Save” button, and the Endpoint will be added to the list.
You can get an error if there are no items in the connected CCT, so create a few items previously.
You might also find the following video guide useful for connecting a central WordPress site with a participant site using JetEngine REST API endpoints, building dynamic listing templates from API data, and displaying live participant content in real time.
How to Display Items Obtained via REST API in Elementor?
To display data via Listing Grid, you need a listing template. So, go to JetEngine > Listings and create a template for the data obtained using the REST API. Click the “Add New” button and choose the “REST API Endpoint” option in the Listing source drop-down menu. Select the added Endpoint and define its name.

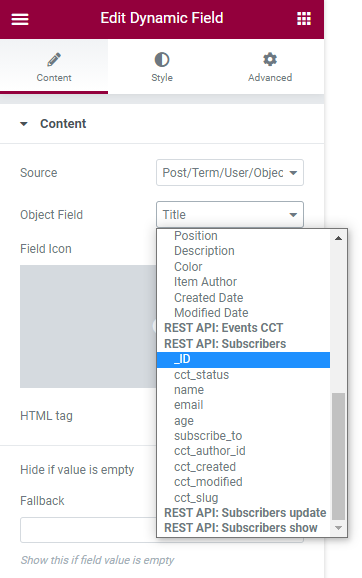
After clicking the “Create listing Item” button, you will be redirected to the Elementor page builder window. All the fields you would like to display in the listing can be added with the help of the Dynamic Field widget. There are two ways to define what field to show.
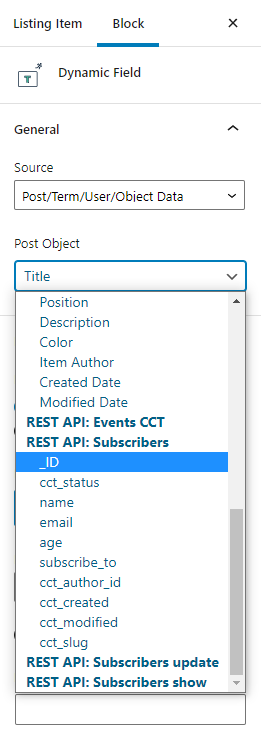
The first one is to display the fields directly. In the Source drop-down menu of the Content menu section, choose the “Post/Term/User/Object Data” option. In the Object Field drop-down list, you will be able to choose the meta fields of the CCT.
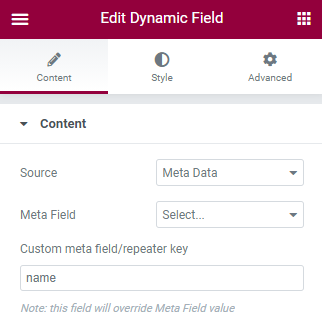
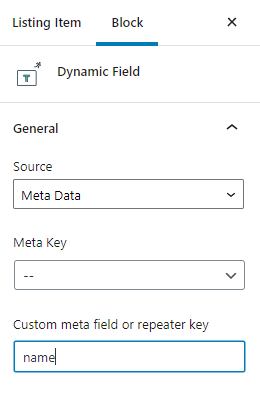
The second is to use the meta field keys. Choose the “Meta Data” option in the Source field and paste the field’s slug to the Custom meta field/repeater key text area.
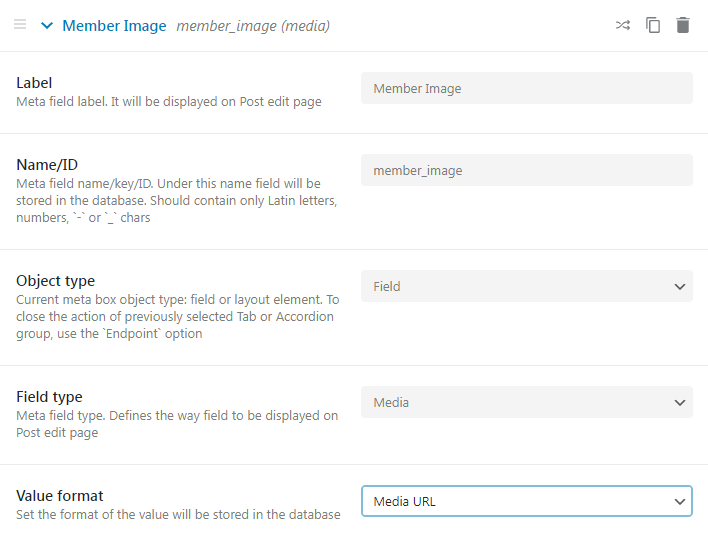
You can display the CCT images got with the REST API in the following way.
At first, you need to create on the main website the media meta field for the CCT, where you should choose the “Media URL” Value format. If you select the “Media ID” option and get the image with the REST API, it may turn out that the image with the same ID already exists on the secondary website, and this can cause conflict.
Then, on the Listing template on the secondary website, drag-n-drop the Dynamic Image widget, select the “Post/Term/User/Object Data” option, and choose the media meta field as the Object field. Toggle on the “Customize field output” option and enter <img src=”%s”> into the Field format.

When you are done, click the “Publish” button and return to the dashboard. Find the page where you would like to place the Listing Grid and open it in the Elementor page builder. Drag and drop the Listing Grid widget to the page. In the Listing field, choose the listing template you have just created.

Afterward, you can customize the appearance of the listing grid in the Content and Style menu tabs, so it will fit your needs.
How to Display Items obtained via REST API in Gutenberg?
Here again, first of all, you will need a listing template. Go to JetEngine > Listings and create a template for the data obtained using the REST API. Click the “Add New” button and choose the “REST API Endpoint” option in the Listing source drop-down menu. Select the added Endpoint and define its name. In the Listing view drop-down list, choose the “Blocks” option.
Click the “Create listing Item” button, and you will be redirected to the Gutenberg page editing window. All the fields you would like to display in the listing can be added with the help of the Dynamic Field block. There are two ways to set the field you want to show.
1. In the Source drop-down menu, choose the “Post/Term/User/Object Data” option. In the Object Field drop-down list, you will be able to choose the meta fields of the CCT obtained via the REST API.
2. Choose the “Meta Data” option in the Source field and paste the field’s slug to the Custom meta field/repeater key text area.
When you are done, click the “Publish” button and return to the dashboard. Find the page where you would like to place the Listing Grid and open it in the Gutenberg editor. Find the Listing Grid block and add it to the page. In the Listing field, choose the listing template you have just created.
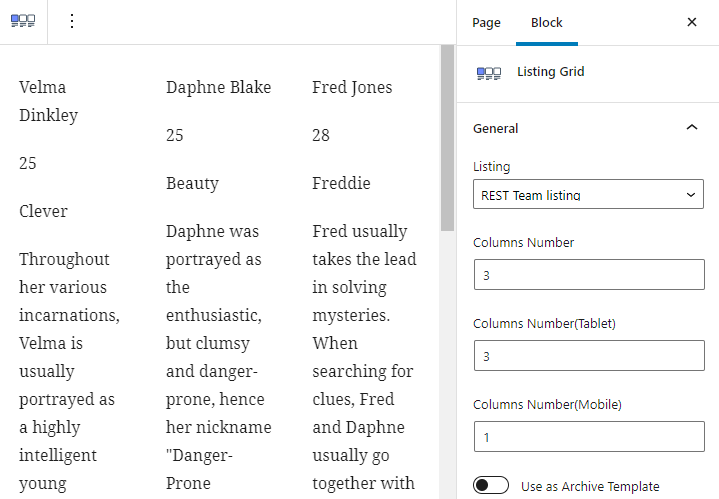
Afterward, you can customize the appearance of the listing grid in the Block Style menu. Don’t forget to press the “Update” button.
That’s all. You now learned how to use REST API to display Custom Content Type items from one site to another using JetEngine functionalities.