How to Add and Edit Custom Content Type Items Remotely Using REST API
Learn how to set the REST API connection between two WordPress sites to create, get, and edit the Custom Content Type items remotely via a JetFormBuilder form. This REST API functionality by the JetEngine plugin can also grant you access to CCT items management.
Before you start, check the tutorial requirements:
- Elementor (Free version), Block Editor (Gutenberg), or the Bricks theme
- JetEngine plugin installed and activated
- JetFormBuilder plugin installed and activated
- Two WordPress sites created
In this tutorial, we consider setting up a REST API Endpoint on a WordPress site (the main site in this tutorial) to add and edit CCT items via the JetFormBuilder’s form, which will be displayed on another site (the auxiliary site “Travengo” in this tutorial).
You can also refer to our video guide on sending form data between WordPress sites with JetEngine REST API.
Register the Items REST API Endpoint Actions
Navigate to the main site.
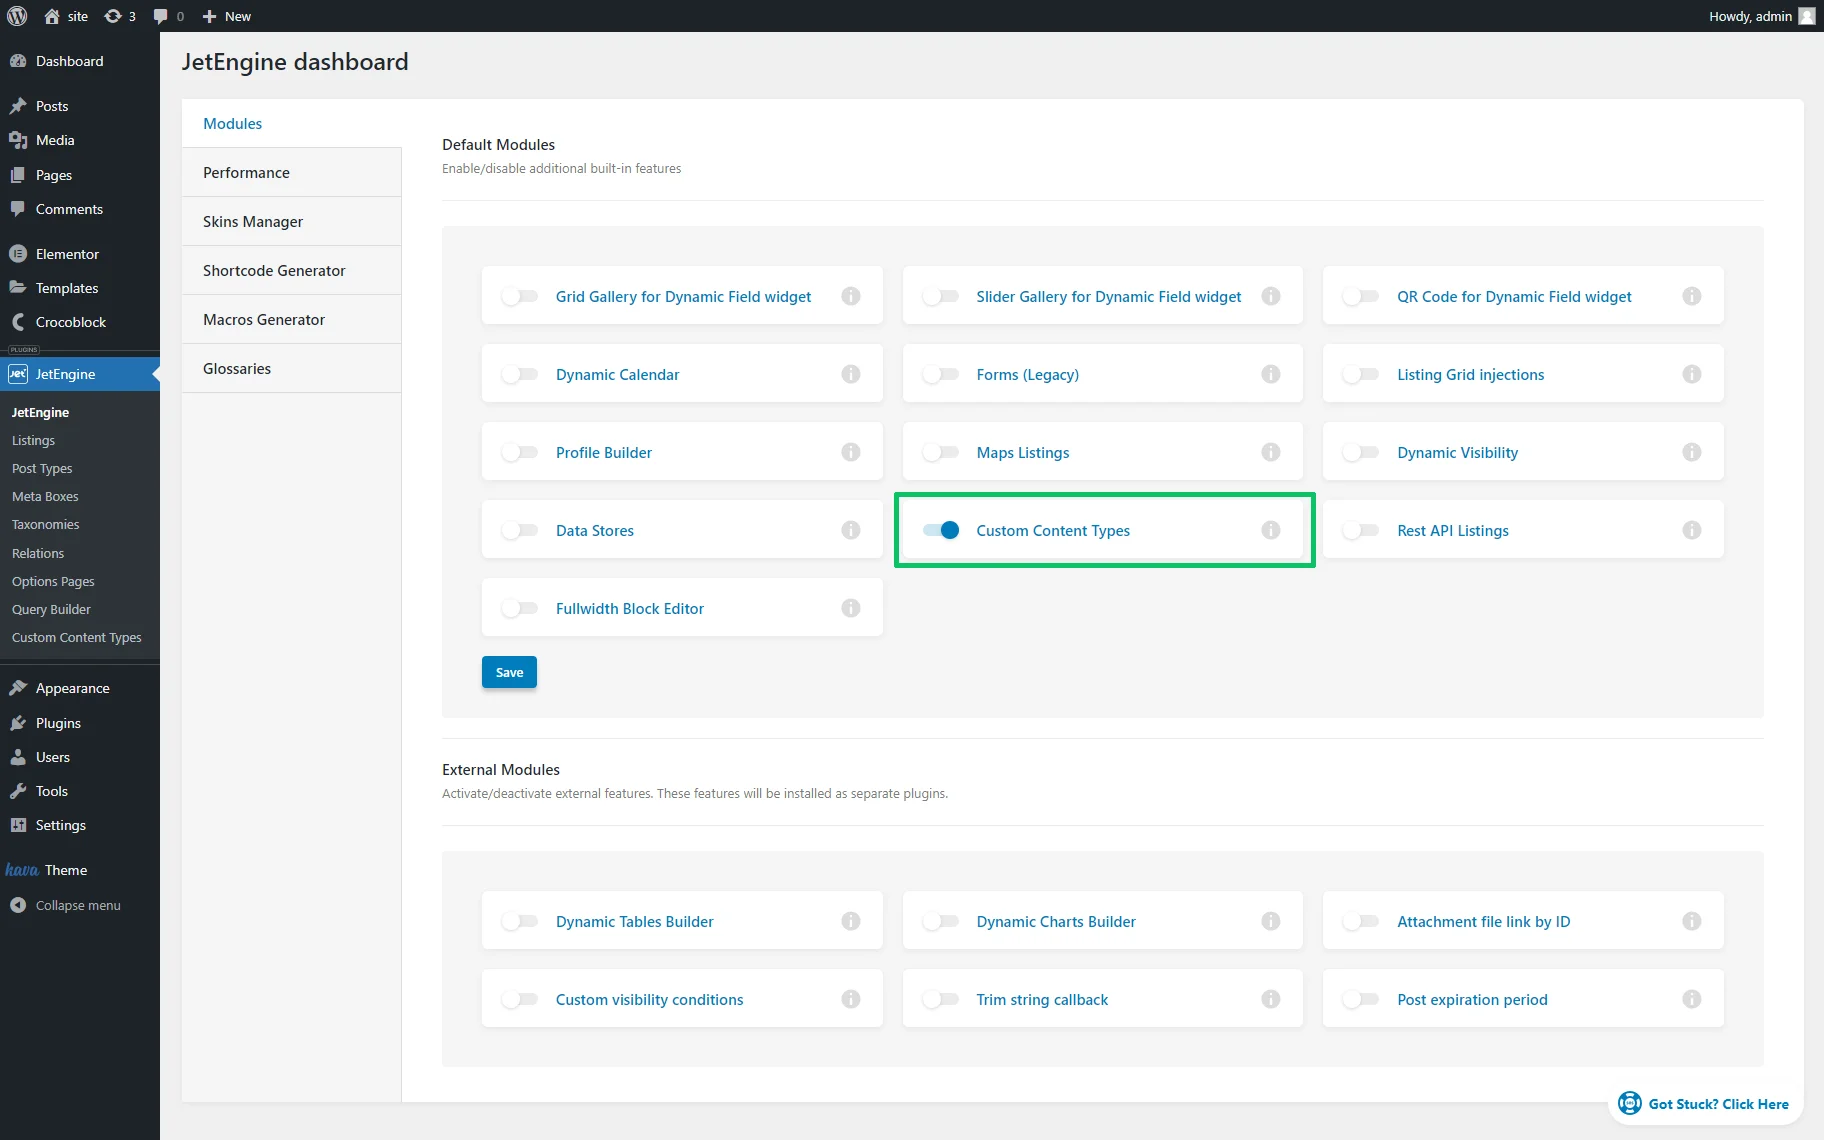
Activate the Custom Content Types module
Navigate to the WordPress Dashboard > JetEngine > JetEngine > Modules tab and activate the Custom Content Types toggle. Press the “Save” button. After the page reloads, the Custom Content Types tab will be added to the dashboard.
Create a CCT with REST API Endpoint
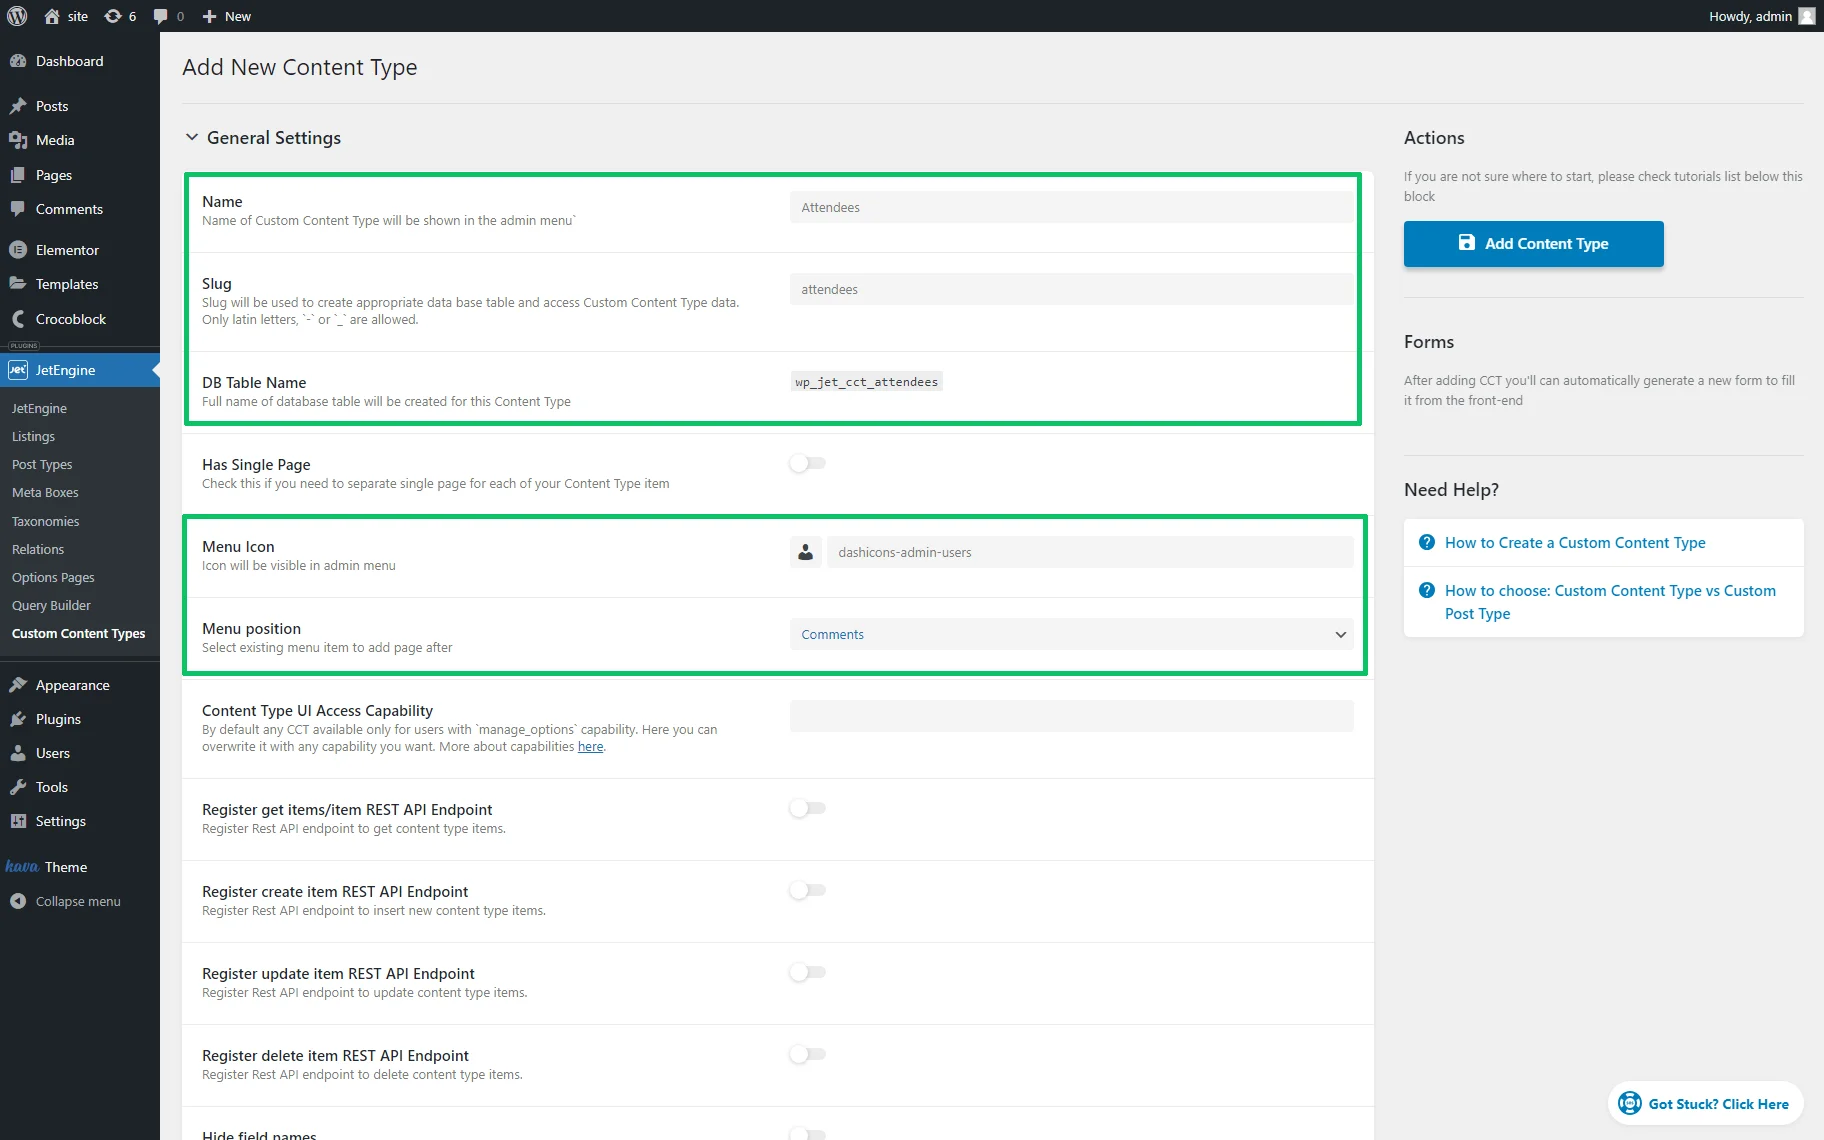
Proceed to the WordPress Dashboard > JetEngine > Custom Content Types, and click the “Add New” button. Type the CCT’s name in the Name field (“Attendees” in this case), select the Menu Icon and Menu position (in this case, we selected the “Comments” option for the Menu position field, which means that this CCT will be displayed below the Comments tab in the WordPress Dashboard). The Slug and DB Table Name fields will be filled in automatically.
Learn more about the General Settings from the Custom Content Type (CCT) Overview.
Add the needed meta fields
Scroll down to the Fields tab and press the “New Field” button to create meta fields. In this case, we created the following meta fields: “Name,” “Phone,” “Email,” and “Comments” custom fields with the “Text” Field type.
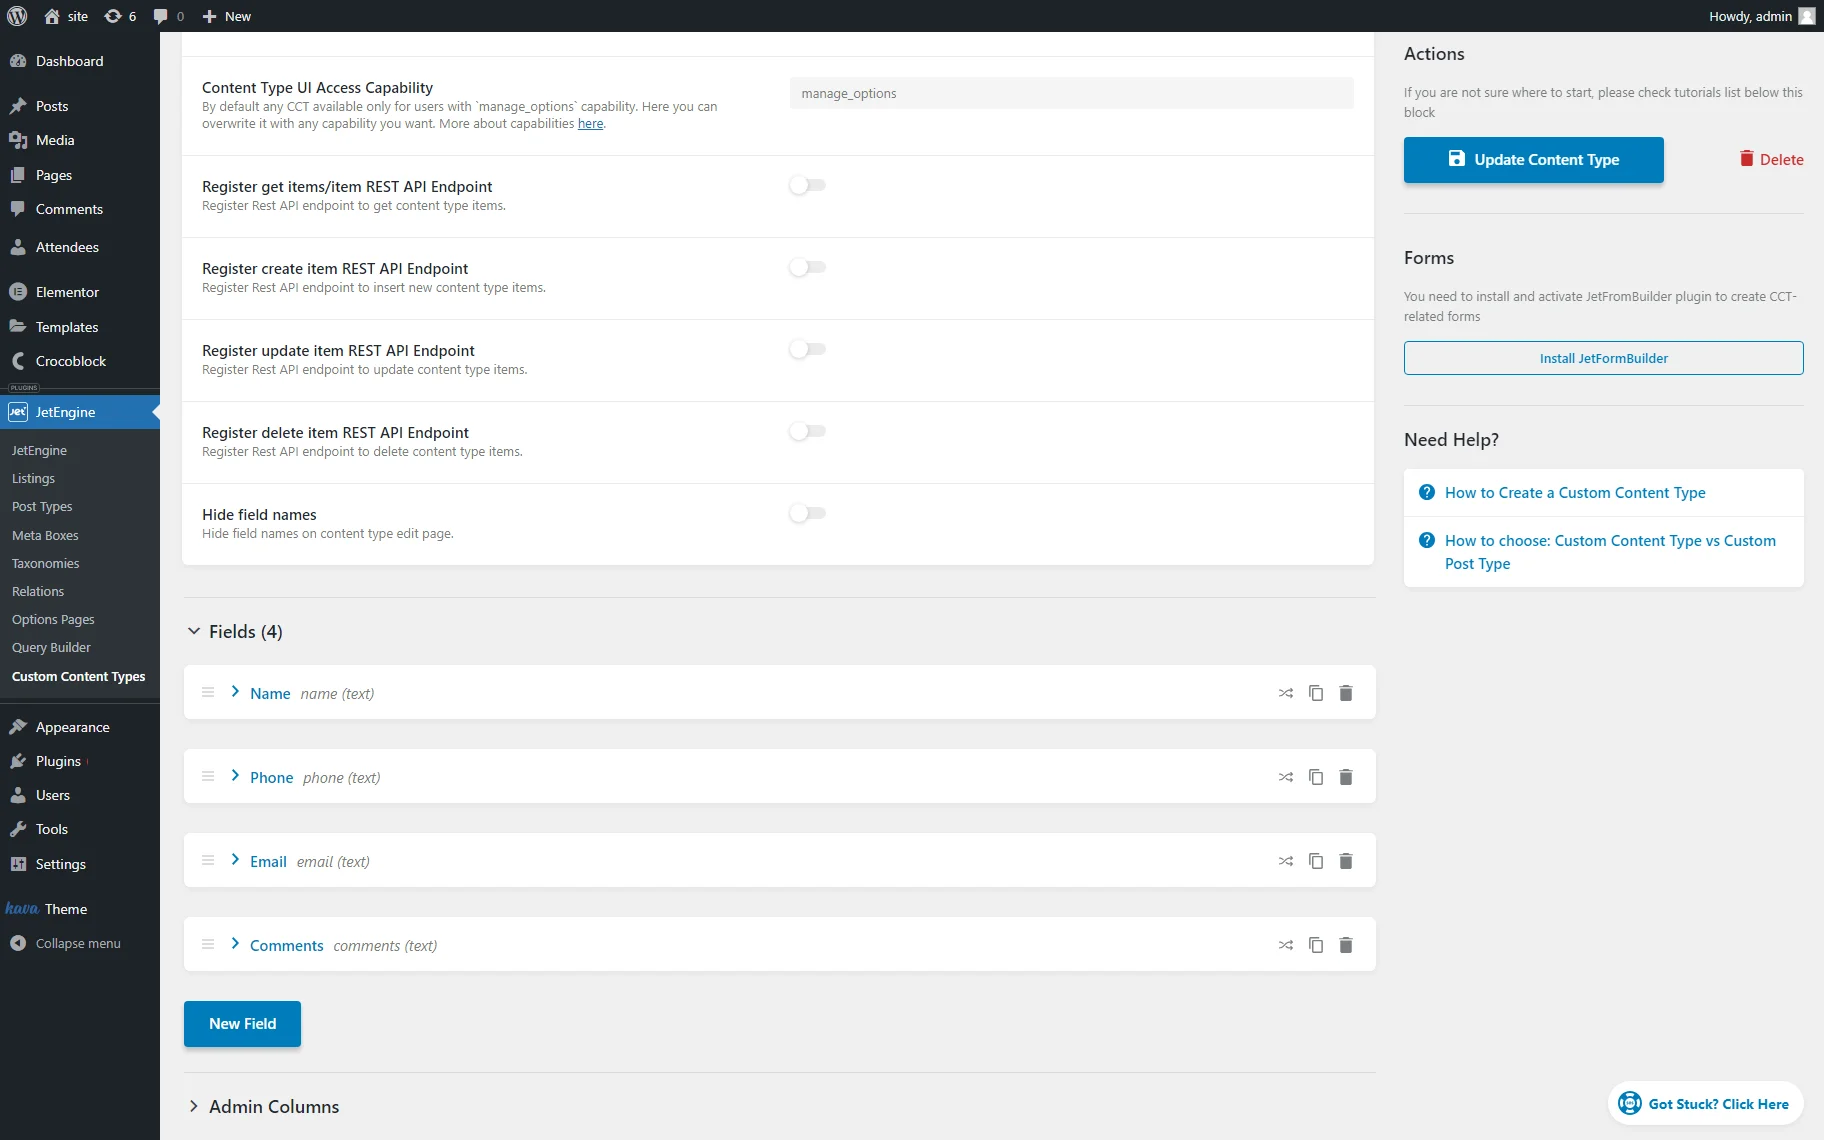
Additionally, we enabled Admin Columns for all meta fields (except the “Comments” meta field) to display the collected data via the WordPress Dashboard.
Register the needed item REST API endpoint actions
Return to the General Settings tab.
Enable the toggle(s), allowing users to take specific action(s) on the main and auxiliary sites.
In our case, users are allowed to create and update CCT items via JetFormBuilder forms, so we enabled the Register create item REST API Endpoint, Register get items/item REST API Endpoint, and Register update item REST API Endpoint toggles.
Each toggle activates the Endpoint URL and Access Capability fields if enabled.
Then, we copied and saved the URL, which appeared in the Endpoint URL (the “https://**************.com/documentation/wp-json/jet-cct/attendees” text). This link is relevant only for the considered case; you will apply your own link on your site.
Finally, we set the user access capability as an option in the Access Capability field. By default, there are no restrictions, but in this case, we typed the “manage_options” text, which means that only the “Super Admin” and “Administrator” can create the endpoint.
Read the WordPress Roles and Capabilities tutorial to know how to assign capabilities for different user roles.

If you would like to allow the visitors to edit the items, please consider a few details:
- The update functionality doesn’t allow editing the existing data; it allows rewriting it. The user will have to fill in all the fields once again, and the new information will replace the old one;
- You will have to add fields to the form that will let the users choose what item they want to update;
- To show the user the list of available items, you have to create a separate listing. To learn how to do this, follow the How to Display Custom Content Type Items Using REST API tutorial.
- You will have to create a separate form for the update functionality. Combining requests to different REST API URLs in one form is not possible.
Press the “Add/Update Content Type” to save the CCT settings.
Add the CCT items
Navigate to the created CCT tab (in this tutorial, “Attendees”) and press the “Add New” button to create the CCT items.
Fill in the CCT item with data. Once completed, press the “Save” button.
Learn more about how to create CCT and manage the CCT items in the How to Create Custom Content Type (CCT) tutorial.

Enable a Connection with the Endpoint
Enable the REST API Endpoints module
These actions are performed on the auxiliary site (“Travengo” in this case).
Go to the website where you want to add the form (“Travengo” in this tutorial) and proceed to WordPress Dashboard > JetEngine > JetEngine > Modules. Enable the REST API Listings toggle.

Press the “Save” button.
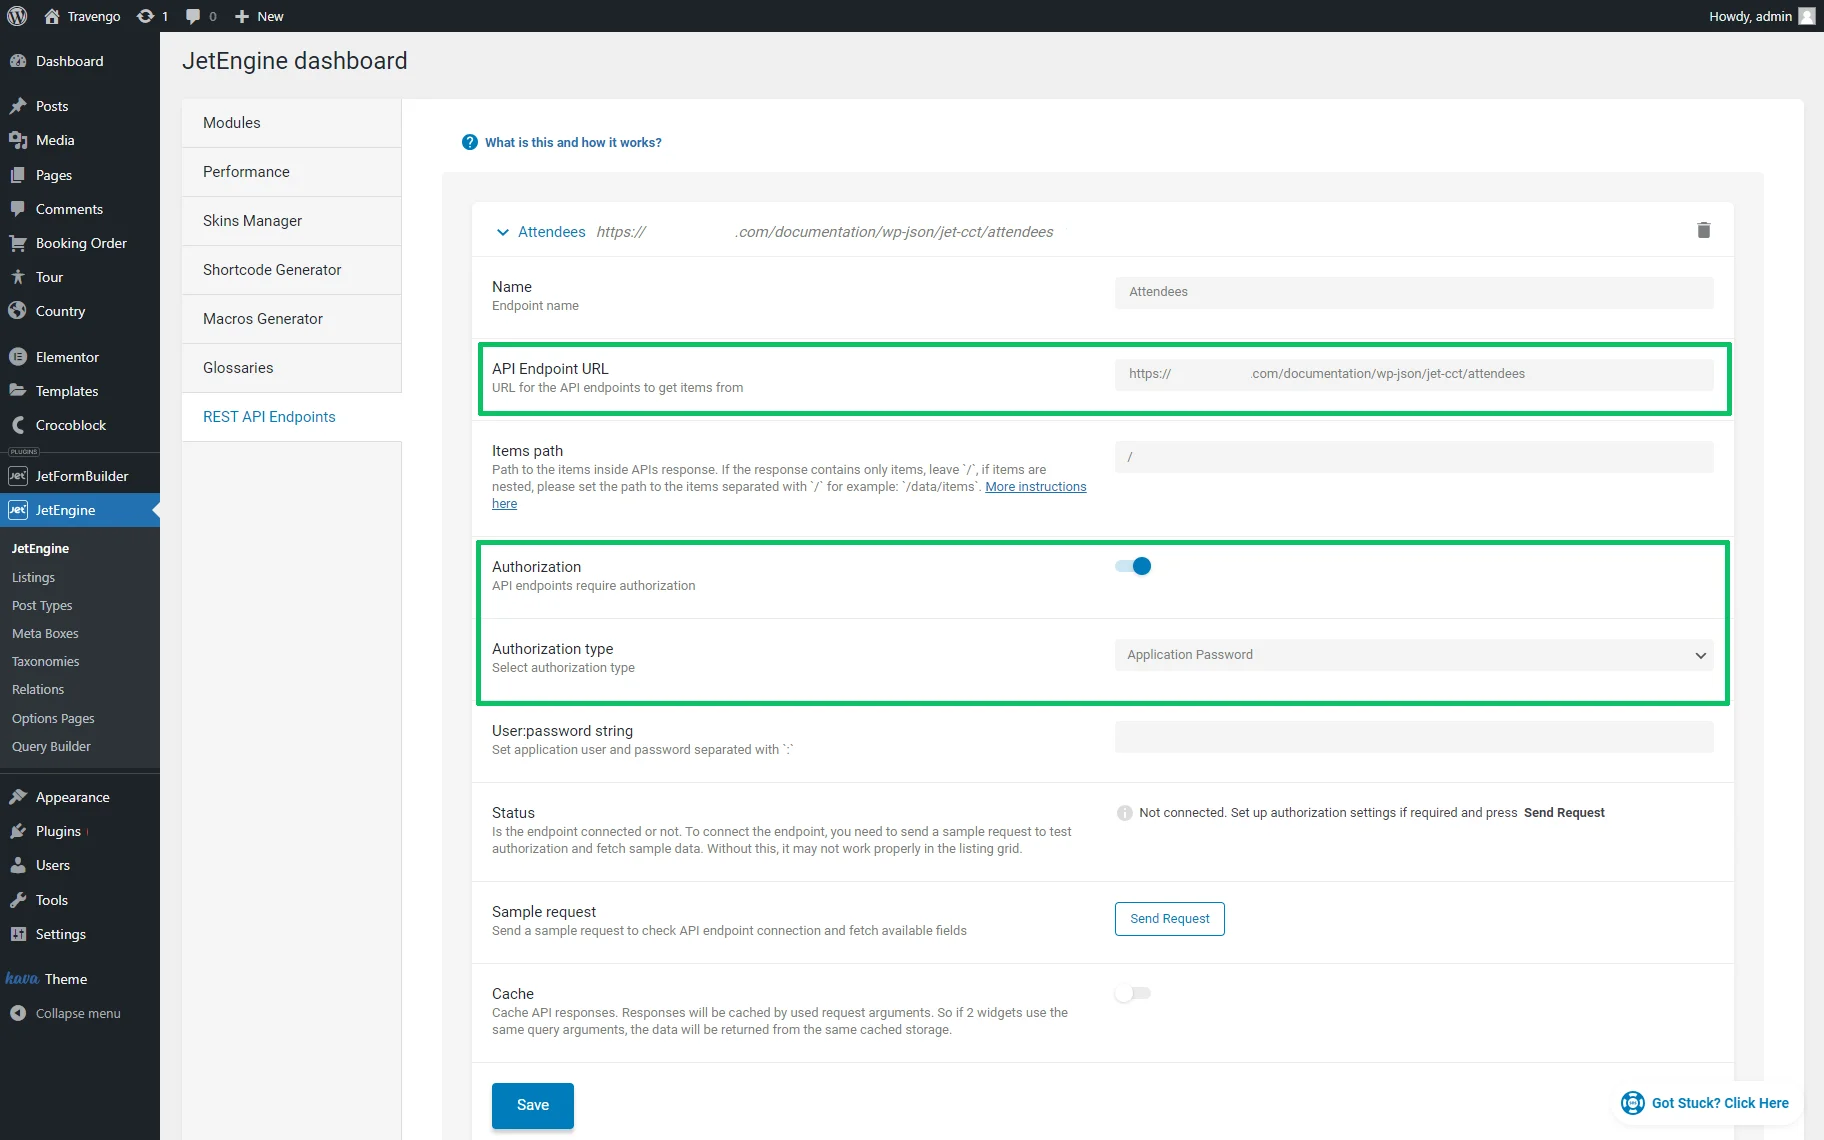
Then, the REST API Endpoints tab will be added to the JetEngine Dashboard. Open this tab and click the “+ New Endpoint” button.
After entering the Name of the endpoint (the “Attendees,” in this case), paste the copied URL from the Endpoint URL field under the Register create item REST API Endpoint toggle (from the main site) to the API Endpoint URL field under the Name field (the “https://*************.com/documentation/wp-json/jet-cct/attendees” text). This link is relevant only for the considered case; you will apply your own link on your sites.
After adding the text to this field, the link will be displayed near the endpoint’s title.
Then, if you have adjusted the Access Capability, turn the Authorization toggle on.
Select the “Application Password” option in the Authorization type drop-down list.
Press the “Save” button.
Add the Application Password
Navigate to the main site.
Proceed to the WordPress Dashboard > Users tab. Select a user whose role allows creating the endpoint according to the option set in the Access Capability field of the CCT settings.
Hover over the user name, press the “Edit” link, unroll the user’s settings, and scroll down to the Application Passwords heading.
Enter any name into the New Application Password Name field and hit the “Add New Application Password” button.
Then, a new password will be generated and displayed below the New Application Password Name field.
Copy the new password and save it somewhere.

Press the “Update User” button.
Set the connection
Return to the auxiliary site and navigate to the WordPress Dashboard > JetEngine > JetEngine > REST API Endpoints tab, unroll the previously created CCT (the “Attendees” in this case), and paste the application user’s name and the copied password into the “User:password string” field. In this case, this text looks as follows: “admin:9jDw gRsO Wuyh FFI5 QX7D aYUS”, where the “admin” text is the application user’s name, and the “9jDw gRsO Wuyh FFI5 QX7D aYUS” text is the pasted password. This password is relevant only for the considered case; you will apply your password on your site.
Press the “Send Request” button in the “Sample Request” field.
If the connection is set, the status “Connected” will be displayed in the “Status” field.

Click the “Save” button.
Connect the Form to CREATE Item REST API Endpoint
Create a form
Move to the auxiliary site (“Travengo” in this case).
Unroll the WordPress Dashboard > JetFormBuilder > Add New tab to create a new form. The form will be open in the Gutenberg editor.
Initially, the form includes the Welcome block, which allows the application of the pre-created or AI-generated forms.
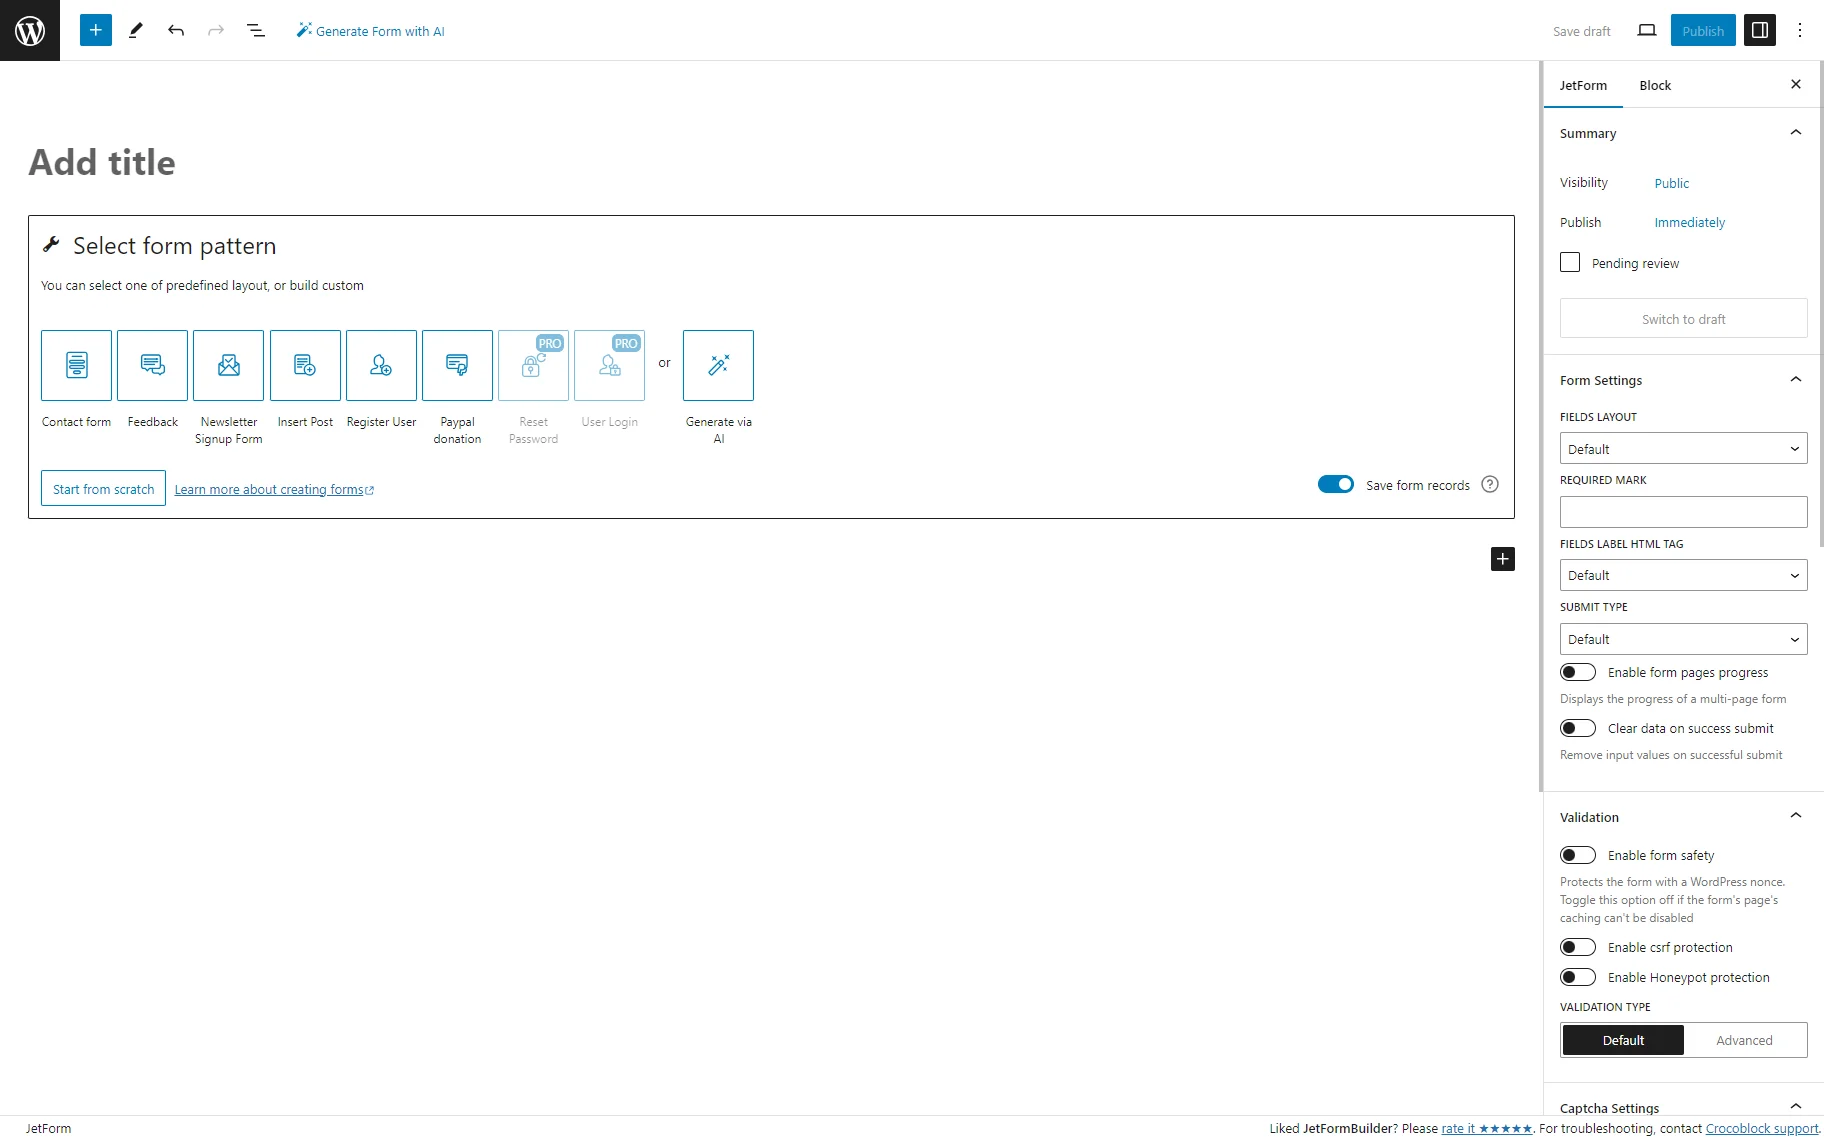
Press the “Start from scratch” button to develop a custom form.
The Welcome block will be closed, and the default Hidden Field, Text Field, and Action Button will be added.
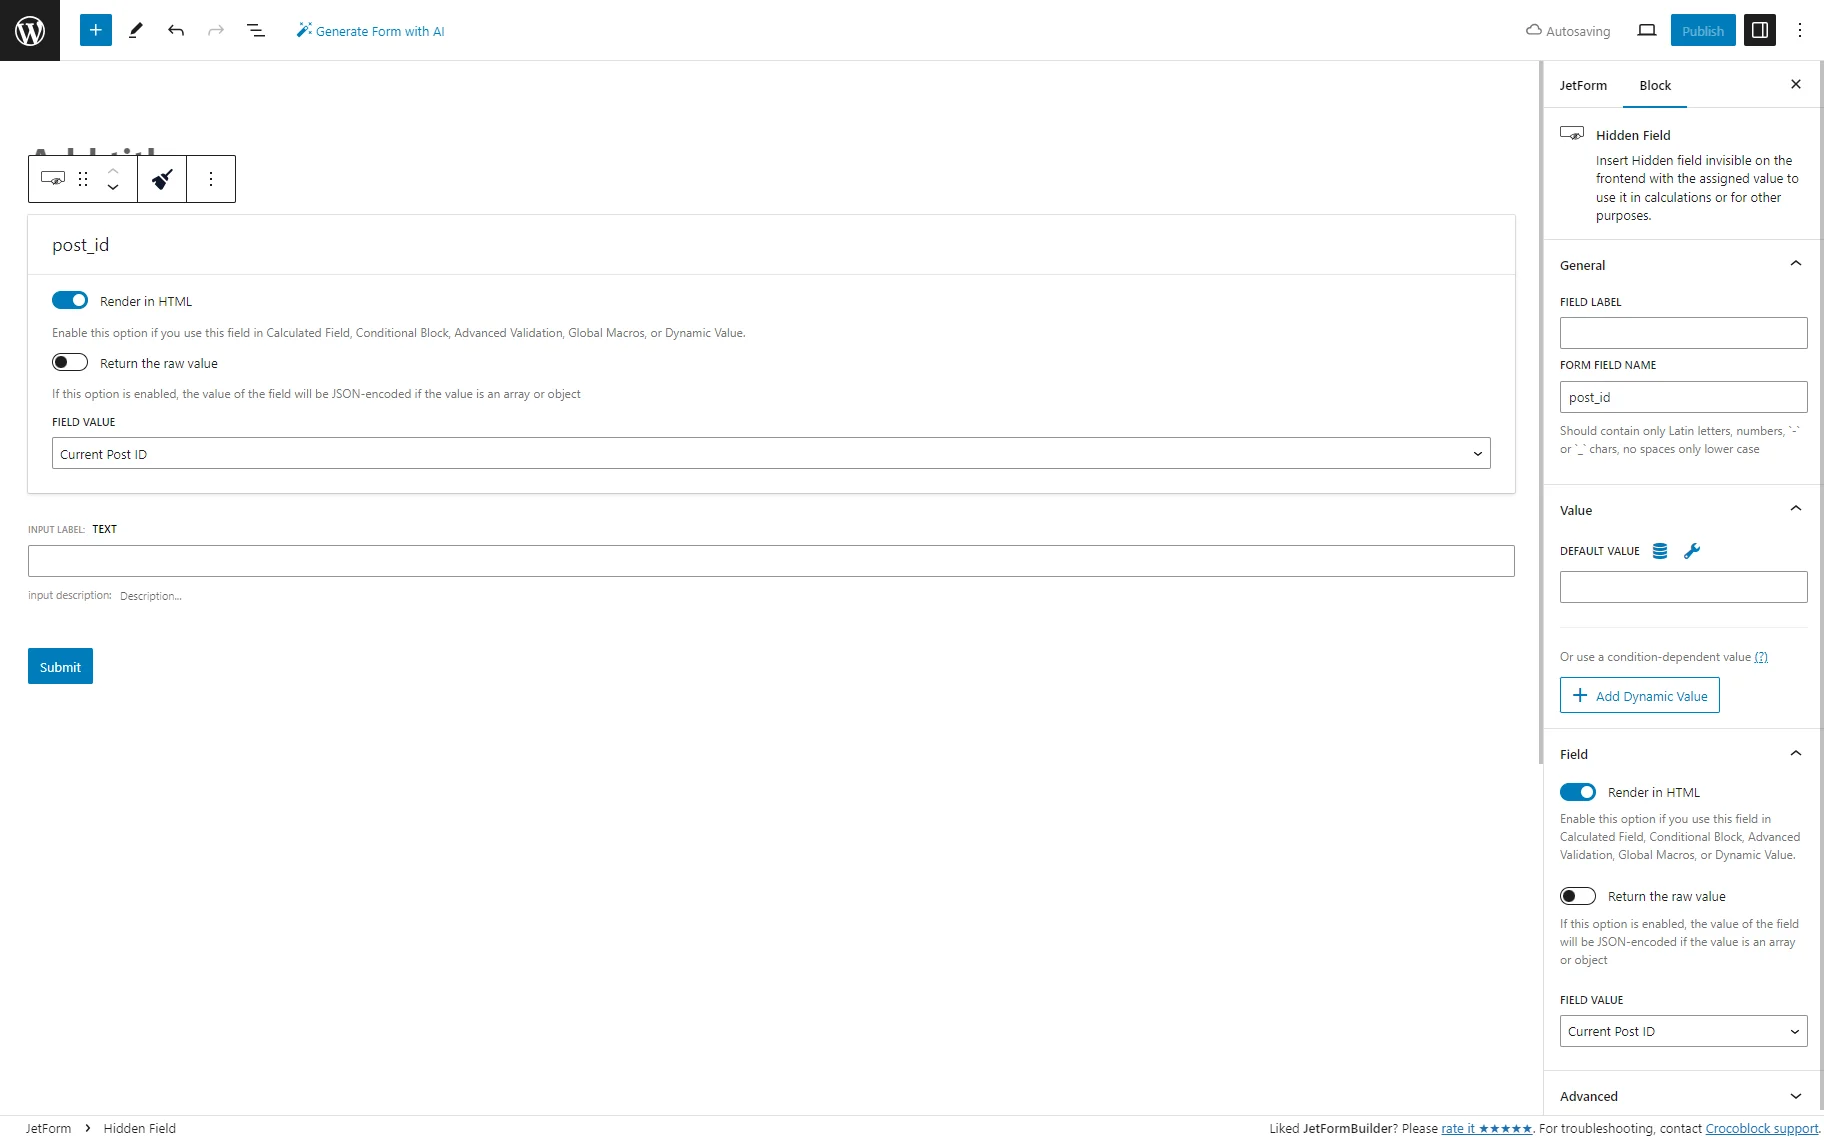
The default Hidden Field is not necessary in this case; we left this field to save the post ID in the form record data.
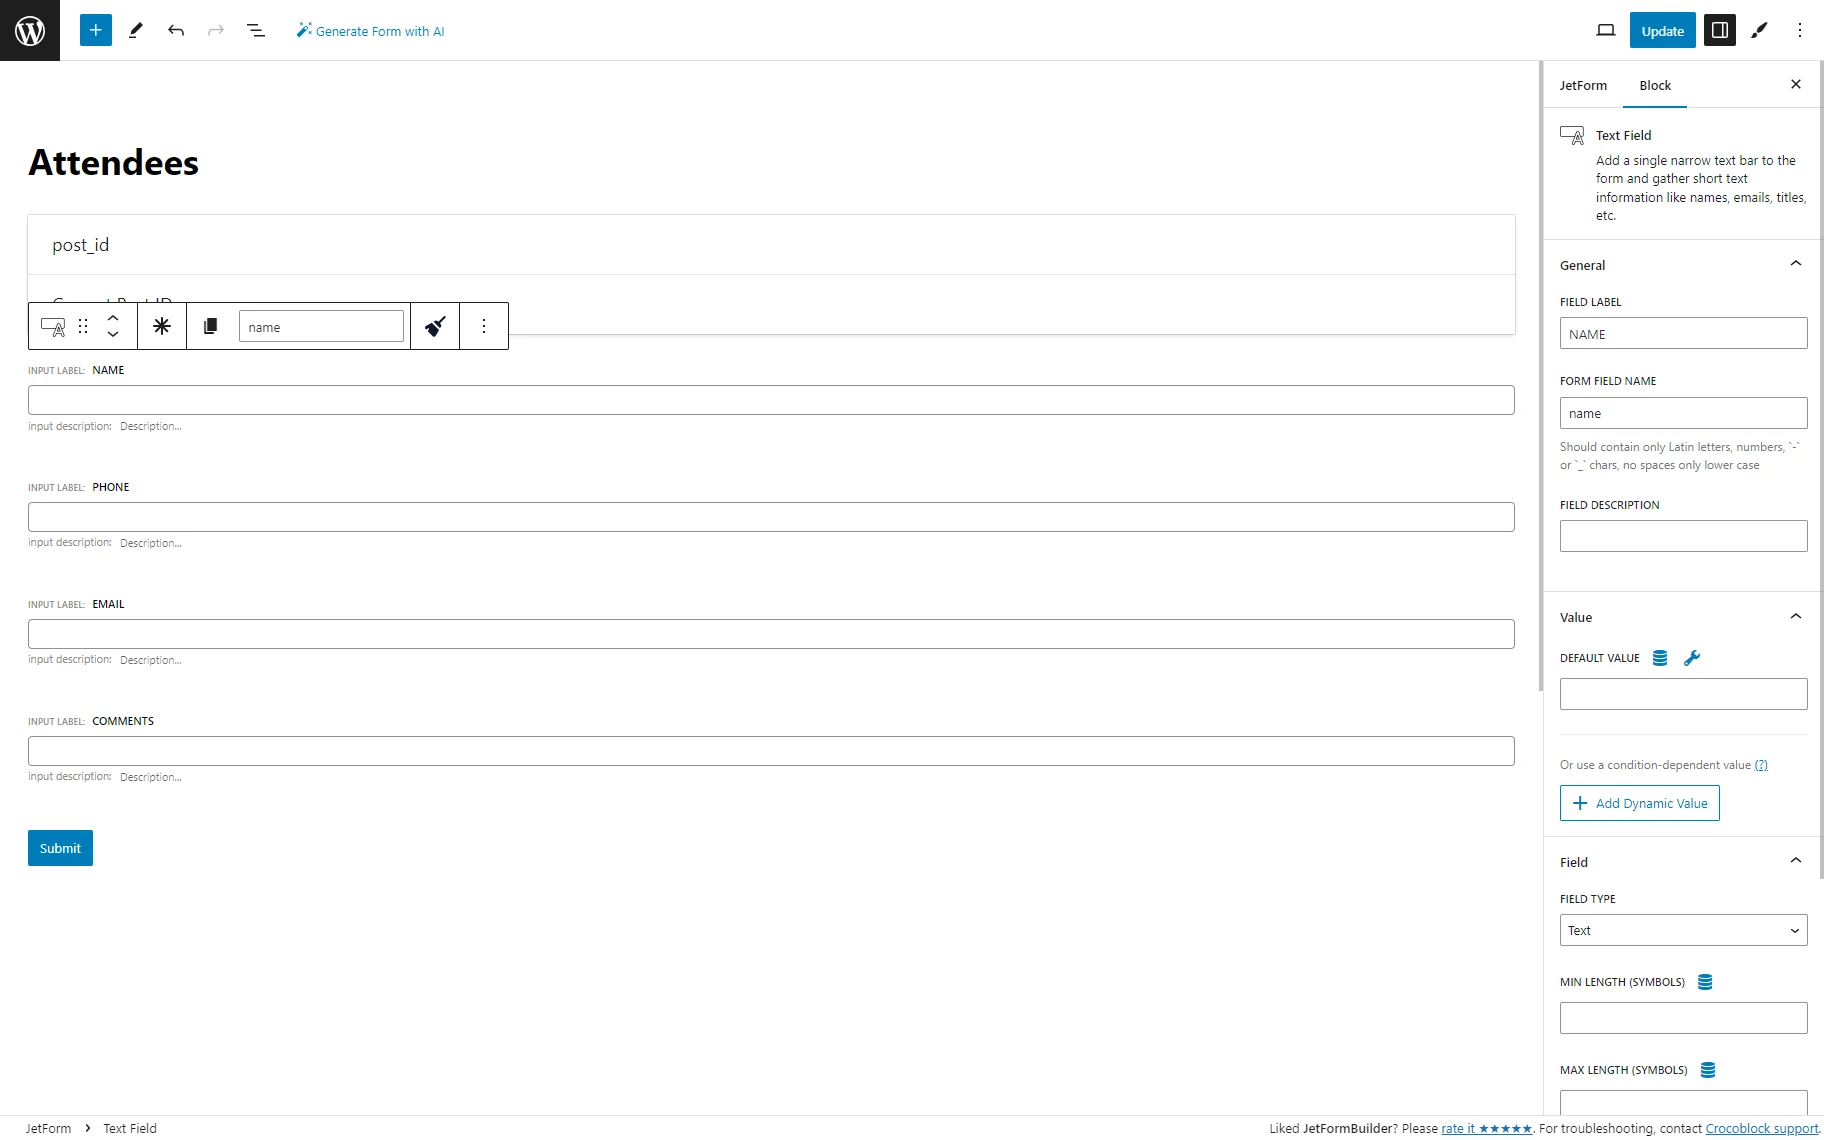
Add the form’s title (“Attendees” here). Click the “Add Field” button and create all the necessary fields corresponding to the CCT fields.
In this case, we created the following block fields: “Name,” “Phone,” “Email,” and “Comments” Text Fields.
If you need a hint, go through the Creating a Form tutorial.
Create a request
When the form fields are ready, open the JetForm tab on the right panel and scroll down to the Post Submit Actions.
The “Save Form Record” Post Submit Action is added by default. We leave this action to collect form records. Press the “+ New Action” button and select the “REST API Request” option from the drop-down list.

Press the “pencil” icon below the “REST API Request” option. The Edit Action pop-up will appear.
Navigate to the main site and move to the WordPress Dashboard > JetEngine > Custom Content Types tab. Unroll the CCT (“Attendees” in this case) and copy the URL from the Endpoint URL field under the Register create item REST API Endpoint toggle.
Return to the auxiliary site and continue to develop the form (the “Attendees” form) and paste the copied URL from the Endpoint URL field under the Register create item REST API Endpoint toggle (the main site) with the slash at the end of the line to the REST API URL field (the “https://************.com/documentation/wp-json/jet-cct/attendees/” text in this case).
Then, fill in the CUSTOM BODY text area, which is for the JSON code of the request. Here, you need to define the connections between the form fields and the CCT meta fields. In the description placed on the right side of the text area, there is a link to the Online editing tool – open it. Delete the rows from 2 to 14 and use this code instead:
"CCT_field_ID" : "macros"
Instead of the “CCT_field_ID” part, you have to put the IDs of all the Custom Content Type meta fields.
The result has to look like this, where the “name,” for example, is the name of the meta field from the main site, and the “%name%” is the macro with the FORM FIELD NAME:
In this tutorial, the text in the Custom Body looks as follows:
{

"name" : "%name%",

"phone" : "%phone%",

"email" : "%email%",

"comments" : "%comments%"

}
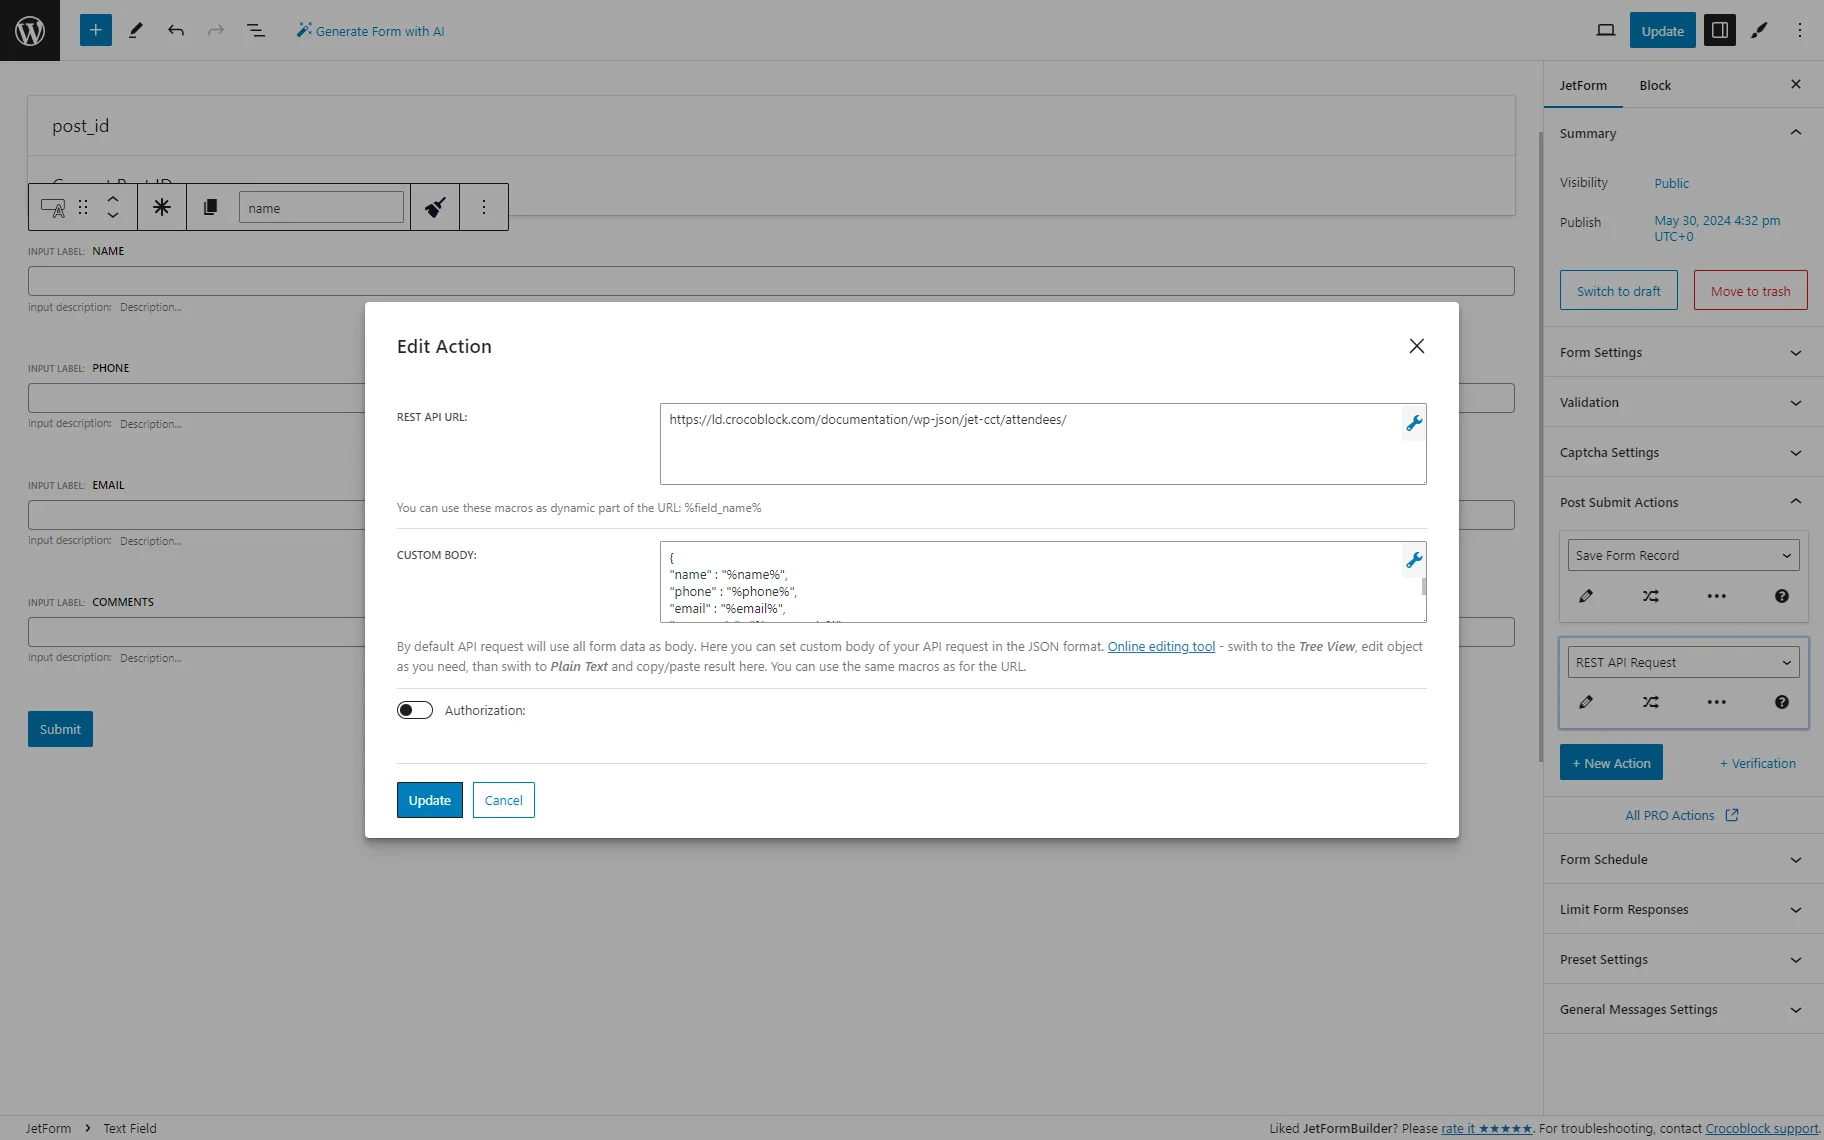
Move the Authorization toggle at the bottom of the Edit Action pop-up. Then, select the “Application Password” option in the AUTHORIZATION TYPE drop-down list and paste the application username and password into the USER:PASSWORD STRING field as you did previously to set the connection.
In this case, the text looks as follows: “admin:9jDw gRsO Wuyh FFI5 QX7D aYUS”, where the “admin” text is the application user’s name, and the “9jDw gRsO Wuyh FFI5 QX7D aYUS” text is the pasted password. This password is relevant only for the considered case — you will generate your own password.
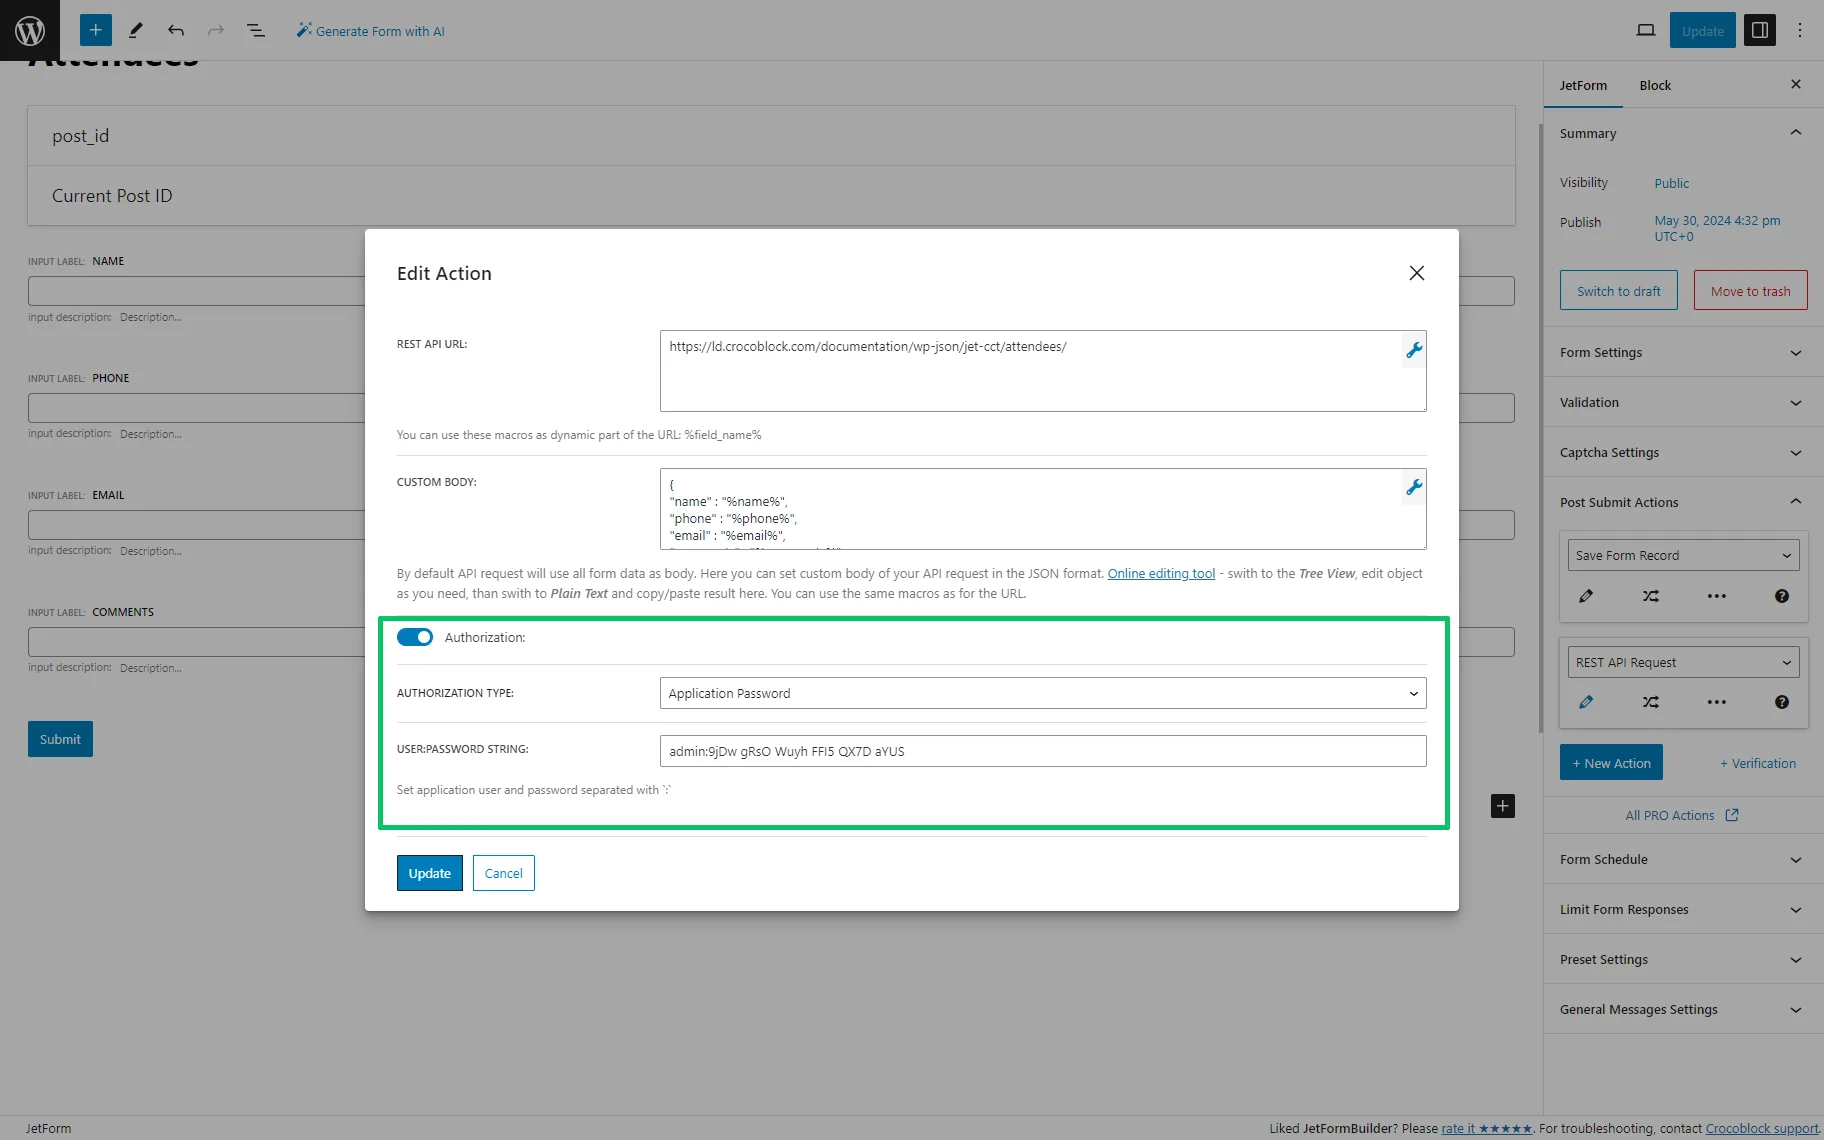
Press the “Update” button to close the pop-up and publish the form.
Add the form to a page
In this tutorial, we added the created form into a pop-up to improve usability. Here, we created a pop-up of the classic type and deleted its default content.
Read the How to Create a New Popup Template in Elementor tutorial to learn how to create pop-ups and manage their settings. Also, you can check the How to Create Popup in Gutenberg tutorial.
Then, we added the JetForm widget onto the pop-up, selected the developed form (“Attendees” in this case) in the Choose Form drop-down list, and selected the “AJAX” Submit Type.
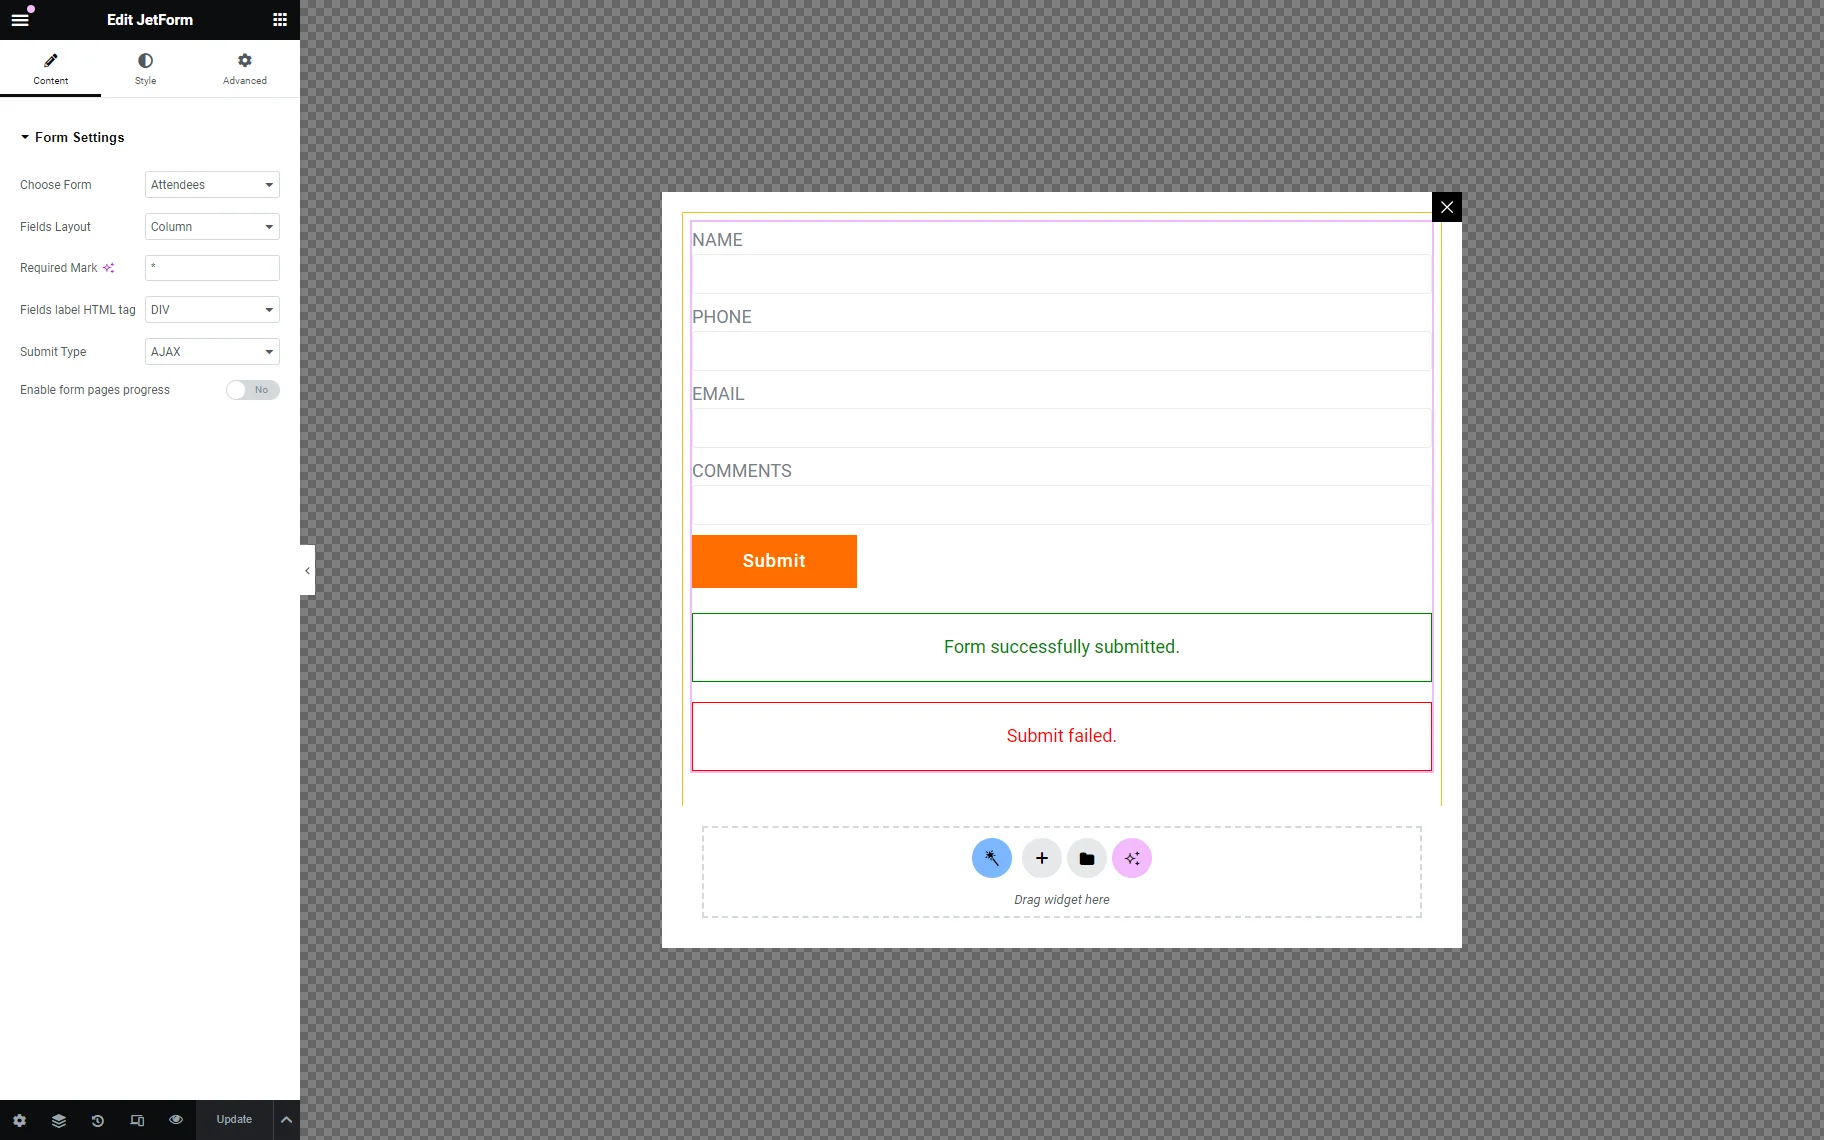
Once completed, press the “Update” button.
To know how to manage the form’s settings, read the How to Display a Form on the Front End tutorial.
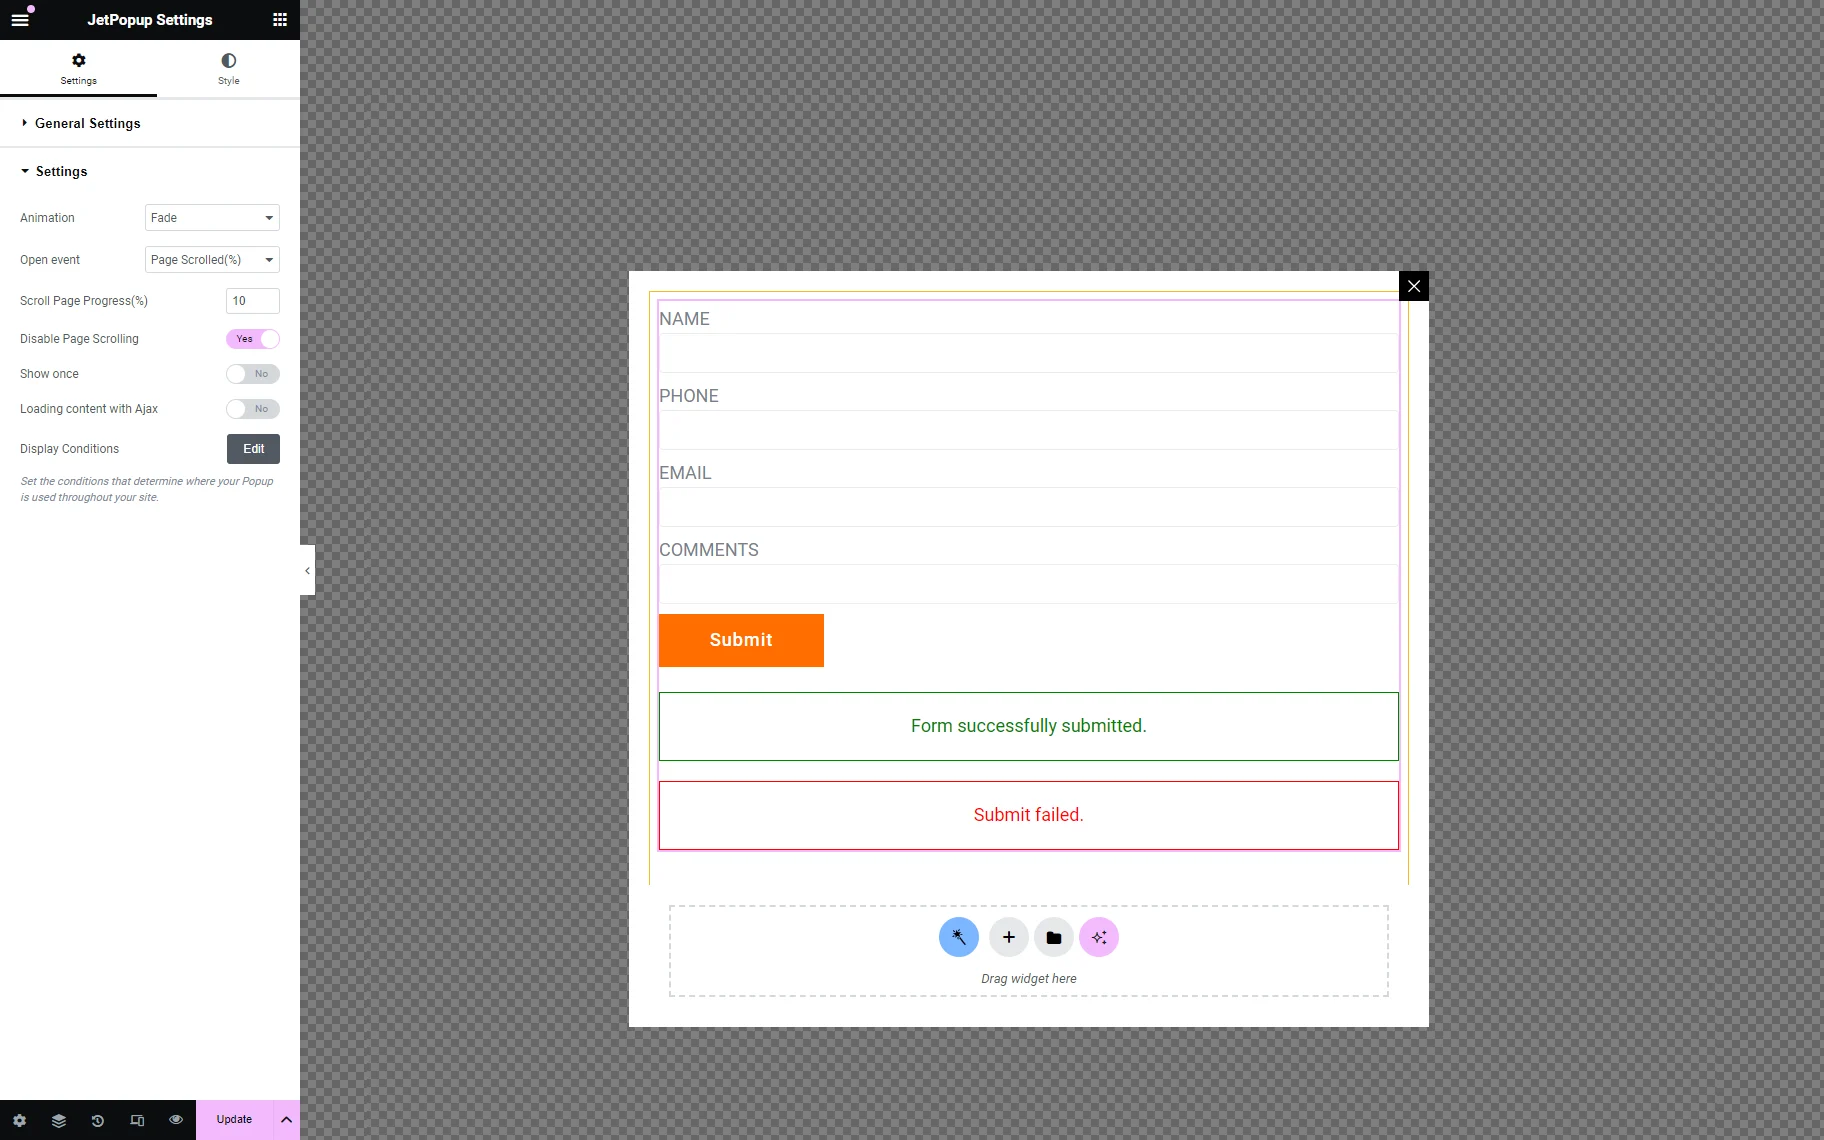
Finally, we set the condition to display the pop-up while scrolling on the single pages. To do this, we navigated to the left bottom corner of the page, pressed the “gear” icon, and unrolled the Settings block in the opened tab. Here, we specified the “Page Scrolled(%)” Open Event and set the Scroll Page Progress(%) to display a pop-up on the page while it is being scrolled.

Then, we pressed the “Edit” button near the Display Condition option on the Settings tab. This redirects to the WordPress Dashboard > JetPopup > All Popups tab and opens the Set the popup visibility conditions pop-up. In this pop-up, we pressed the “+ Add condition” button, selected the “Include” and “Singular” options, and chose the needed CPT to display the pop-up.
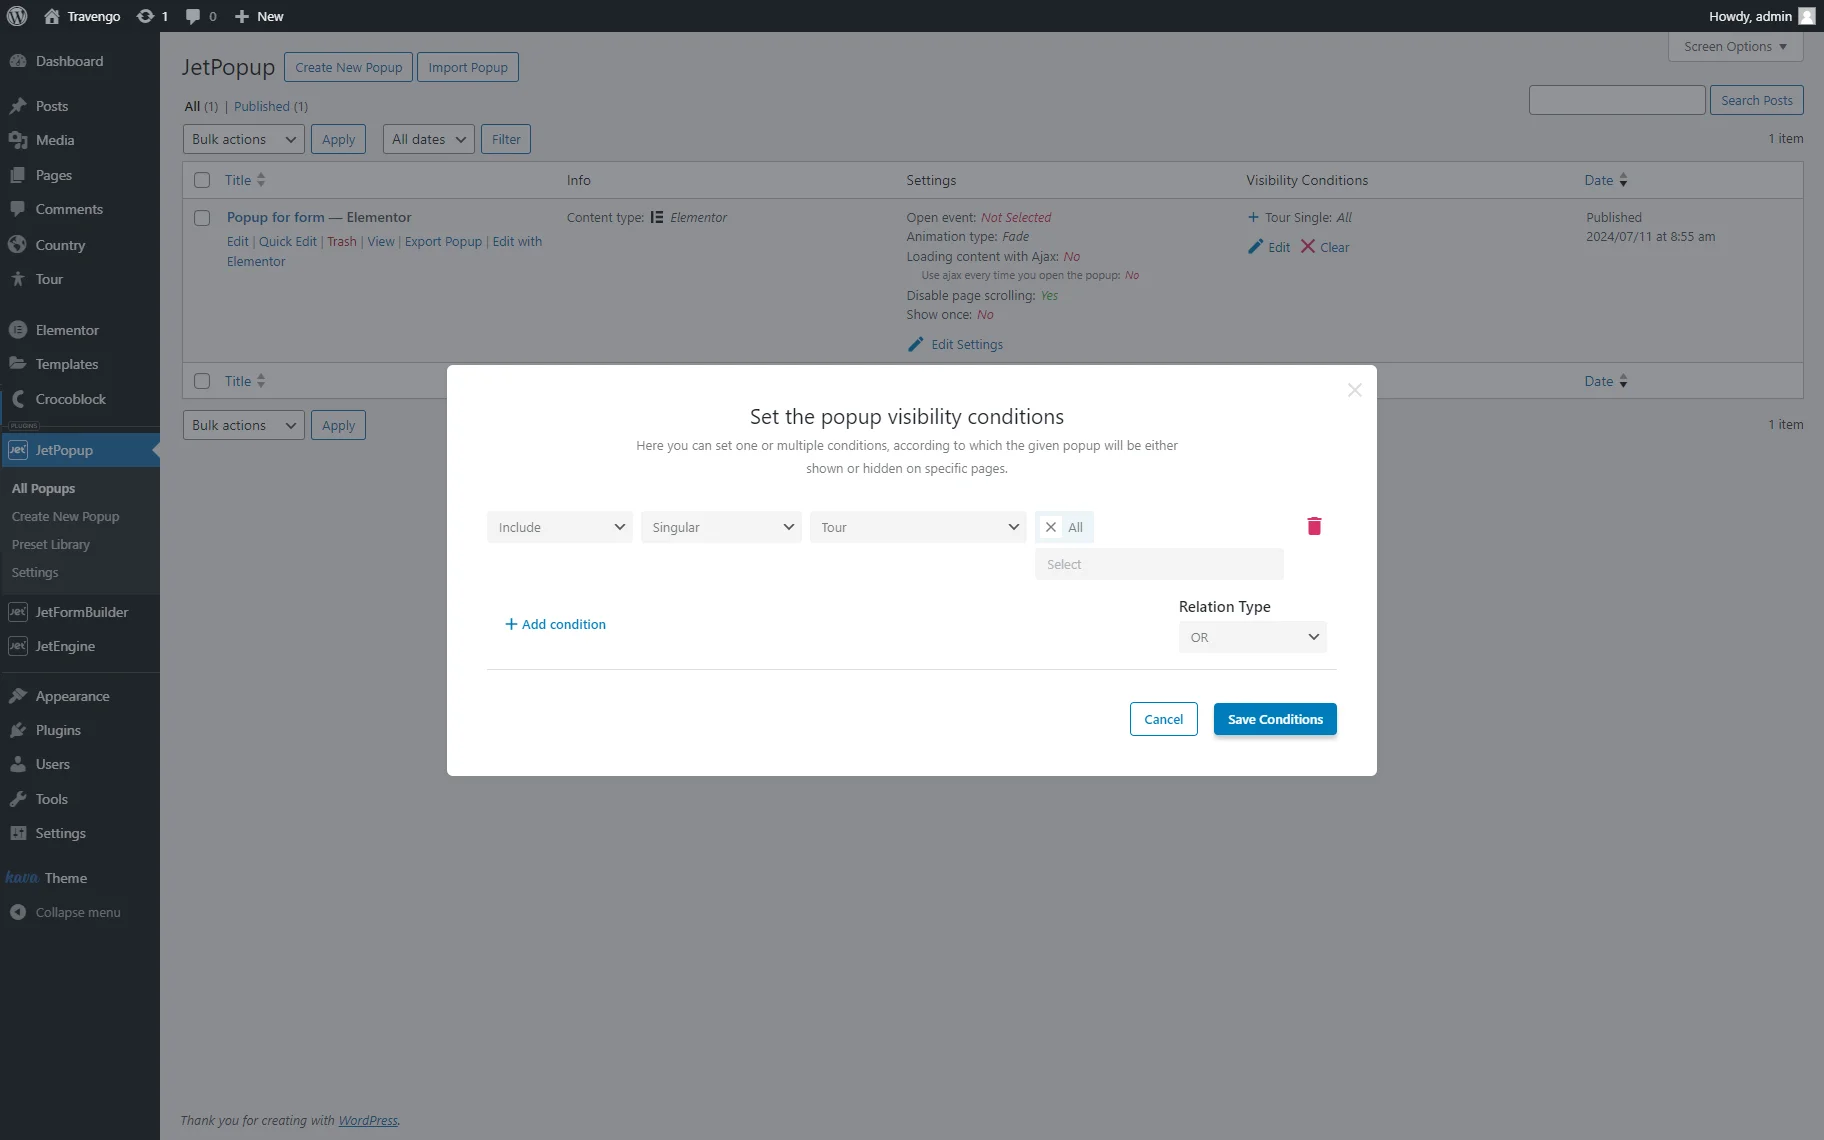
After setting the conditions, press the “Save Conditions” button.
The tutorial details how to set a condition to display pop-ups in the How to Assign Popup to Different Locations tutorial.
Finally, open a page on which you want to display this form. In this tutorial, we display the pop-up on the single pages. Read the How to Create a WordPress Single Post Page Template tutorial to learn how to create single pages.
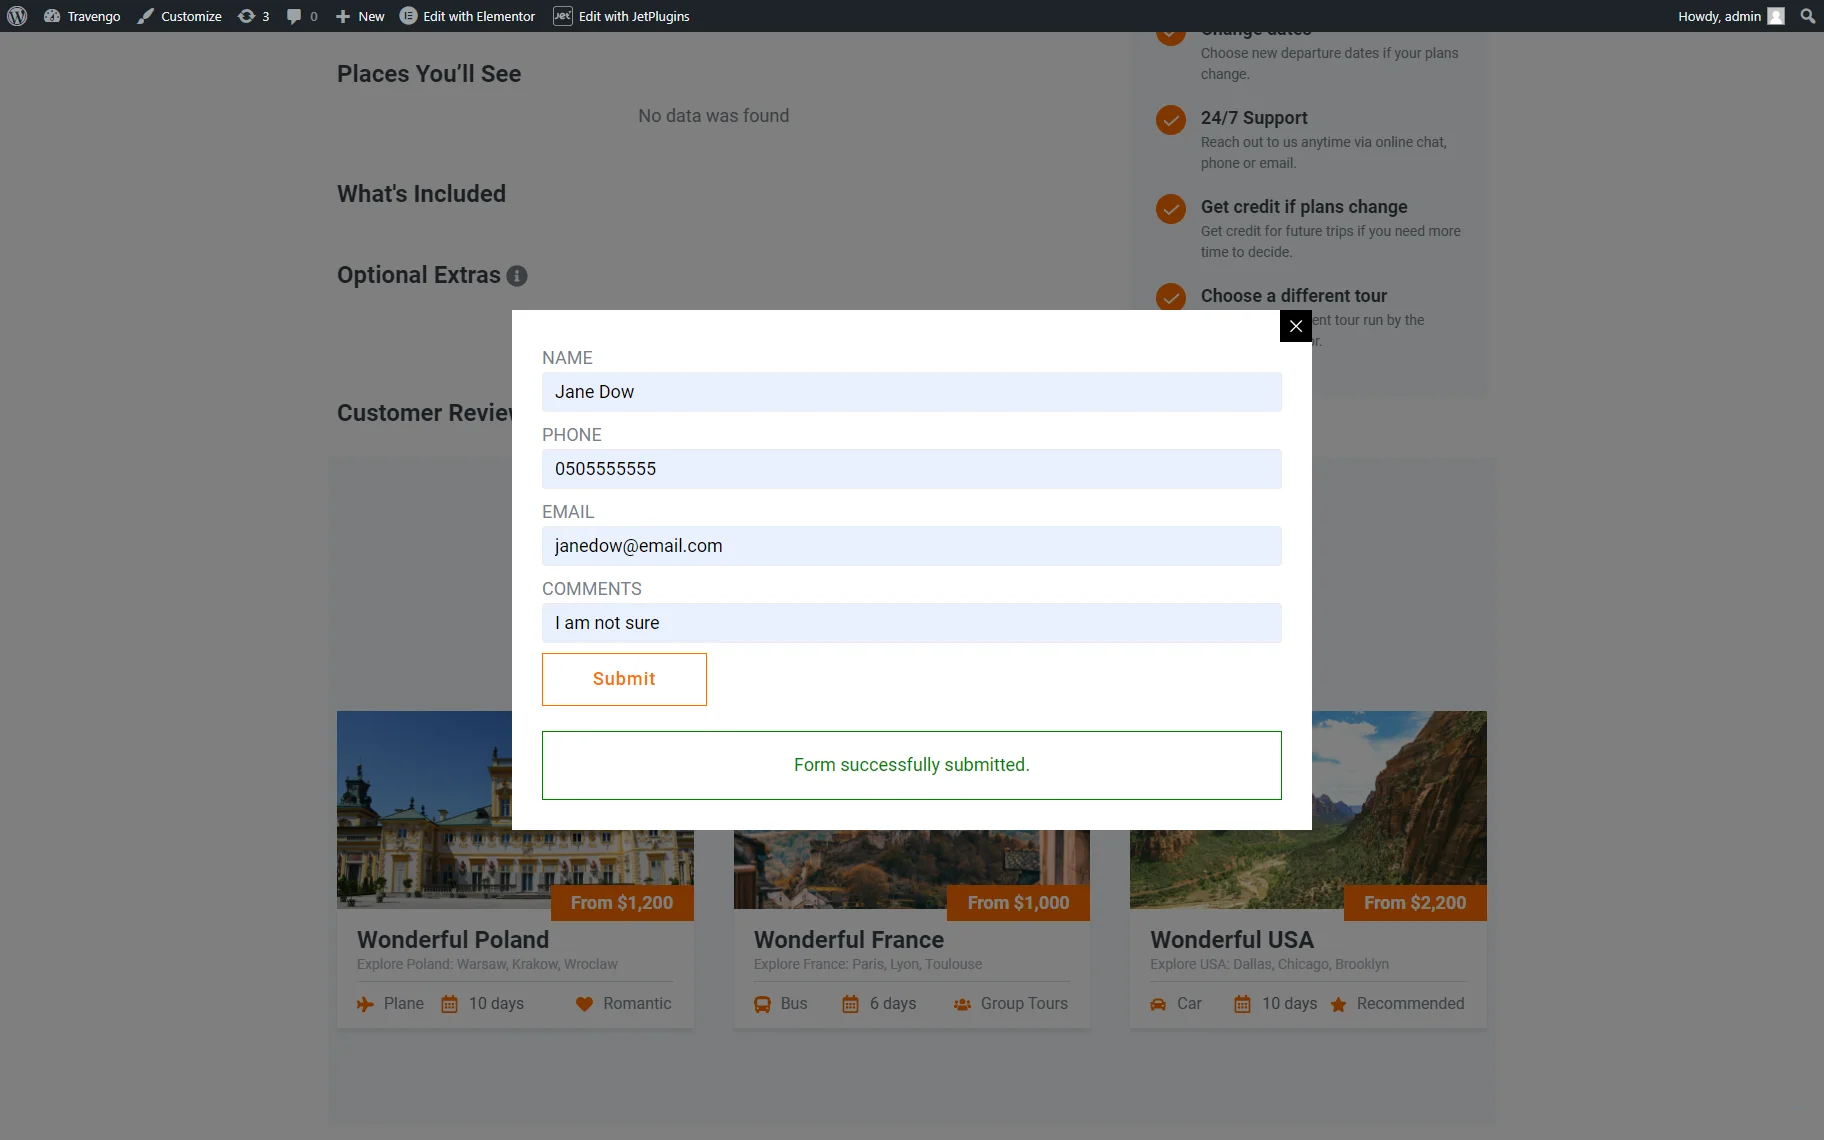
Navigate to the front end to check if the form works correctly. Fill in the form’s fields and press the “Submit” button.
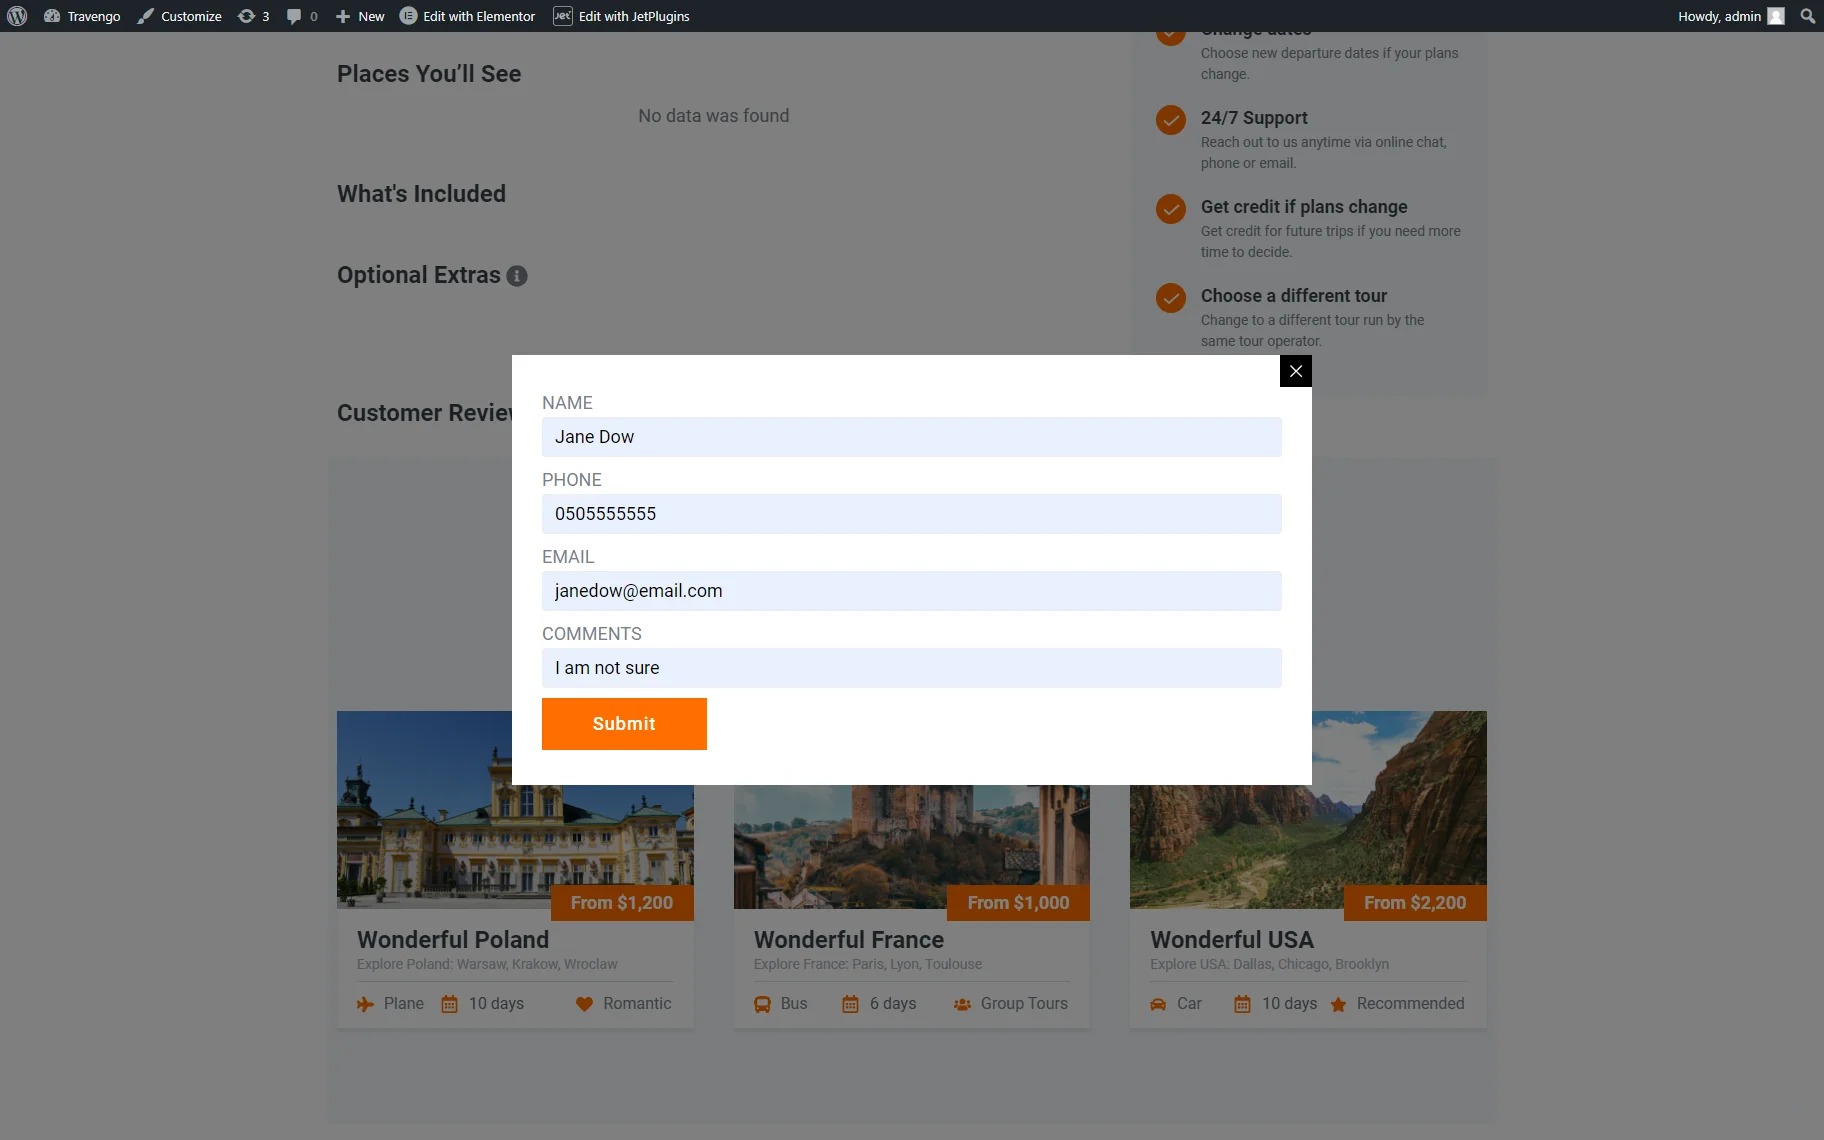
Once successfully submitted, the pop-up will show the “Form successfully submitted.” text.
Check the form records
Navigate to the WordPress Dashboard > JetFormBuilder > Form Records tab.
This tab enlists all form data regardless of whether the form was submitted successfully or not.
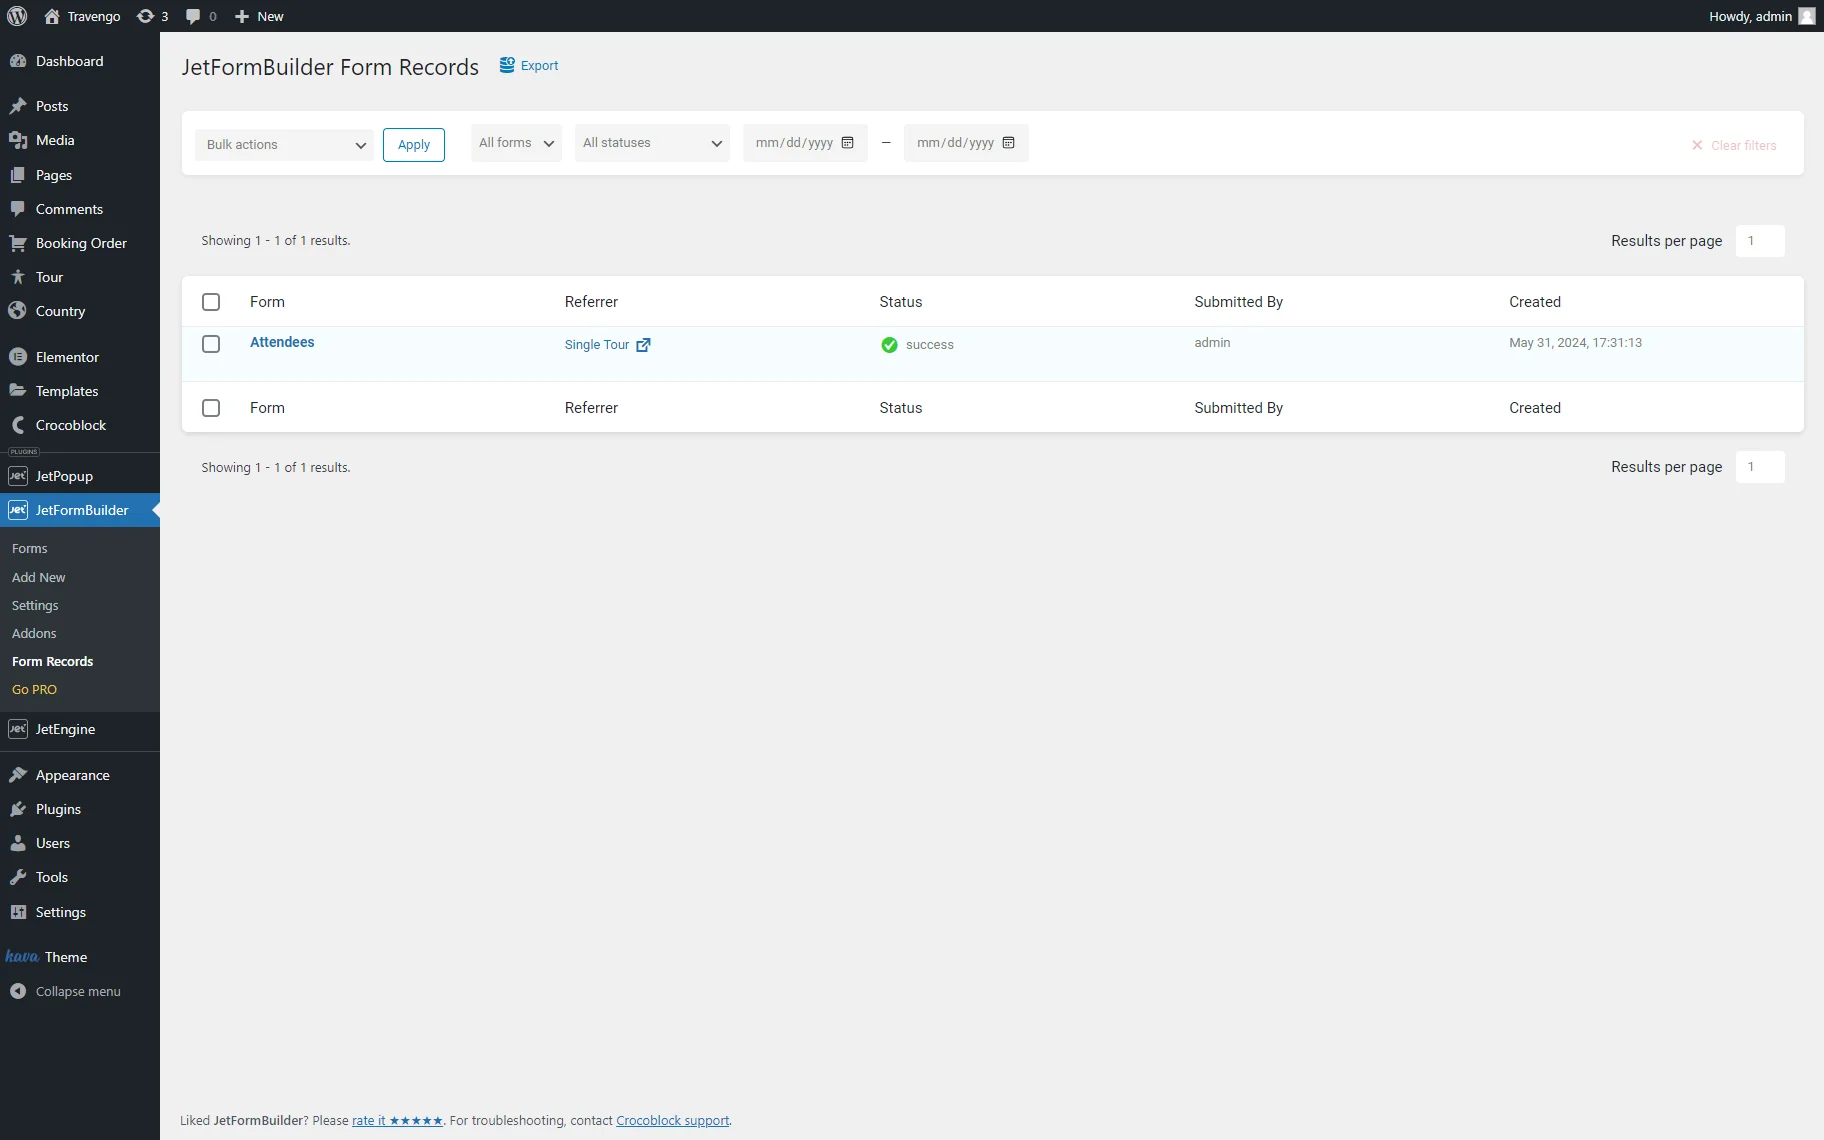
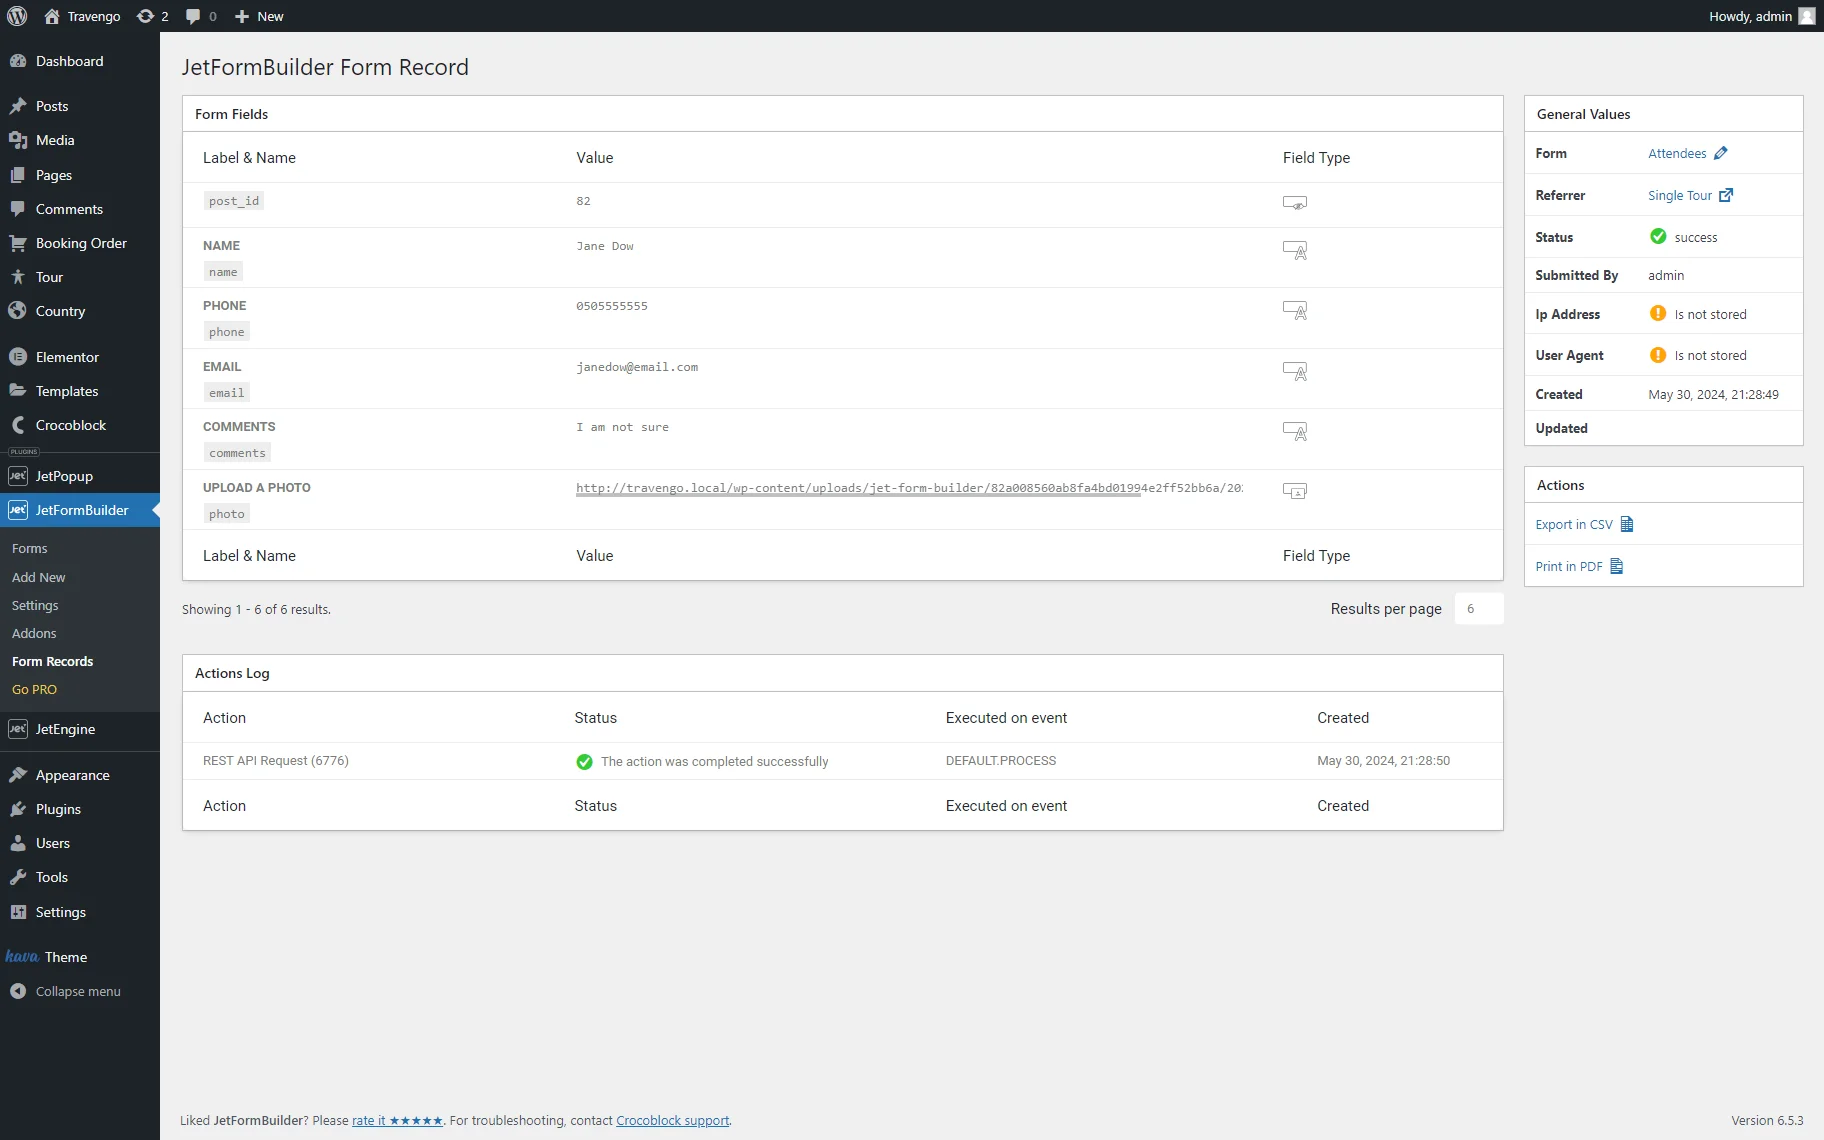
Unroll the needed form record and check the form’s data.
Check the CCT items on the main site
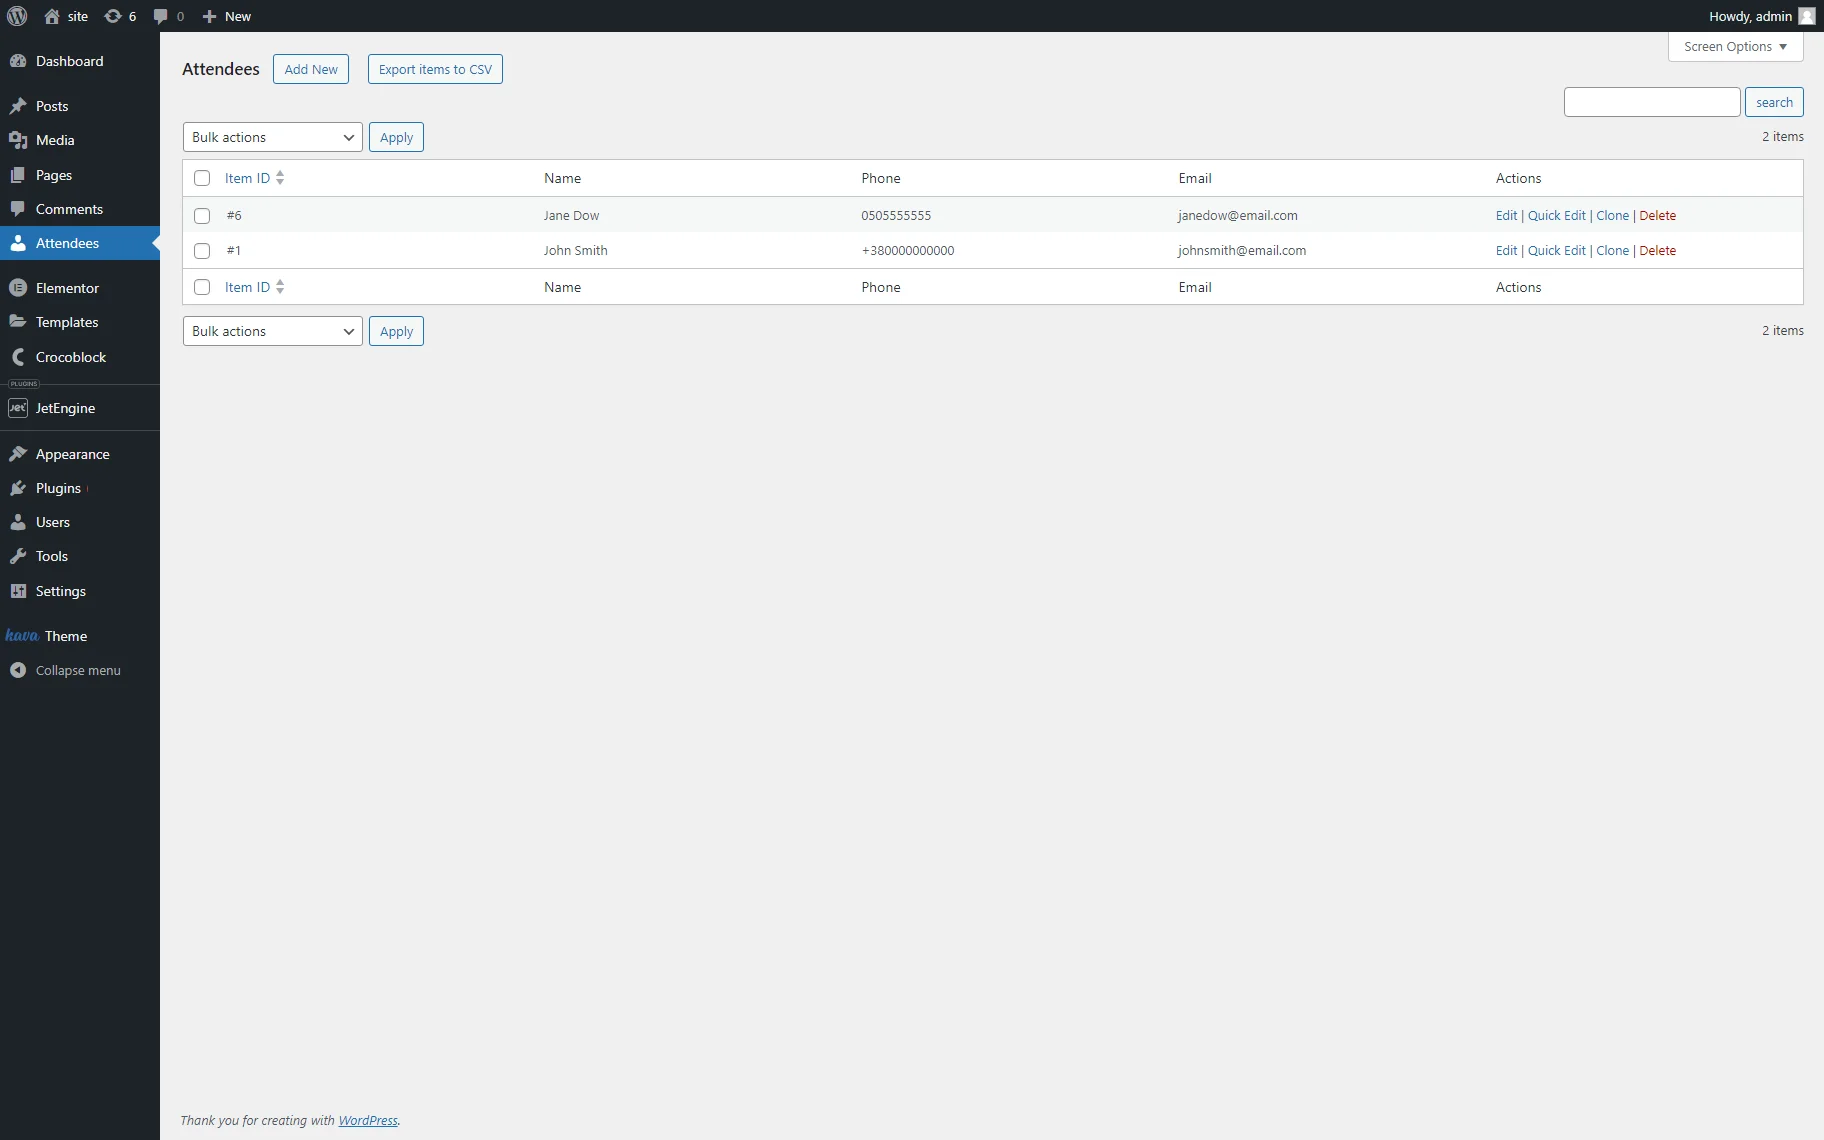
Navigate to the main site. Open the CCT item list (“Attendees” in this tutorial) and check if the CCT item was added to the list.
Connect the Form to GET and UPDATE (EDIT) item REST API Endpoint
To edit the CCT items, we get them from the main site using the GET item REST API Endpoint first and then update this data on the auxiliary site via JetFormBuilder forms.
Edit the created form
Return to the auxiliary site (“Travengo” in this case).
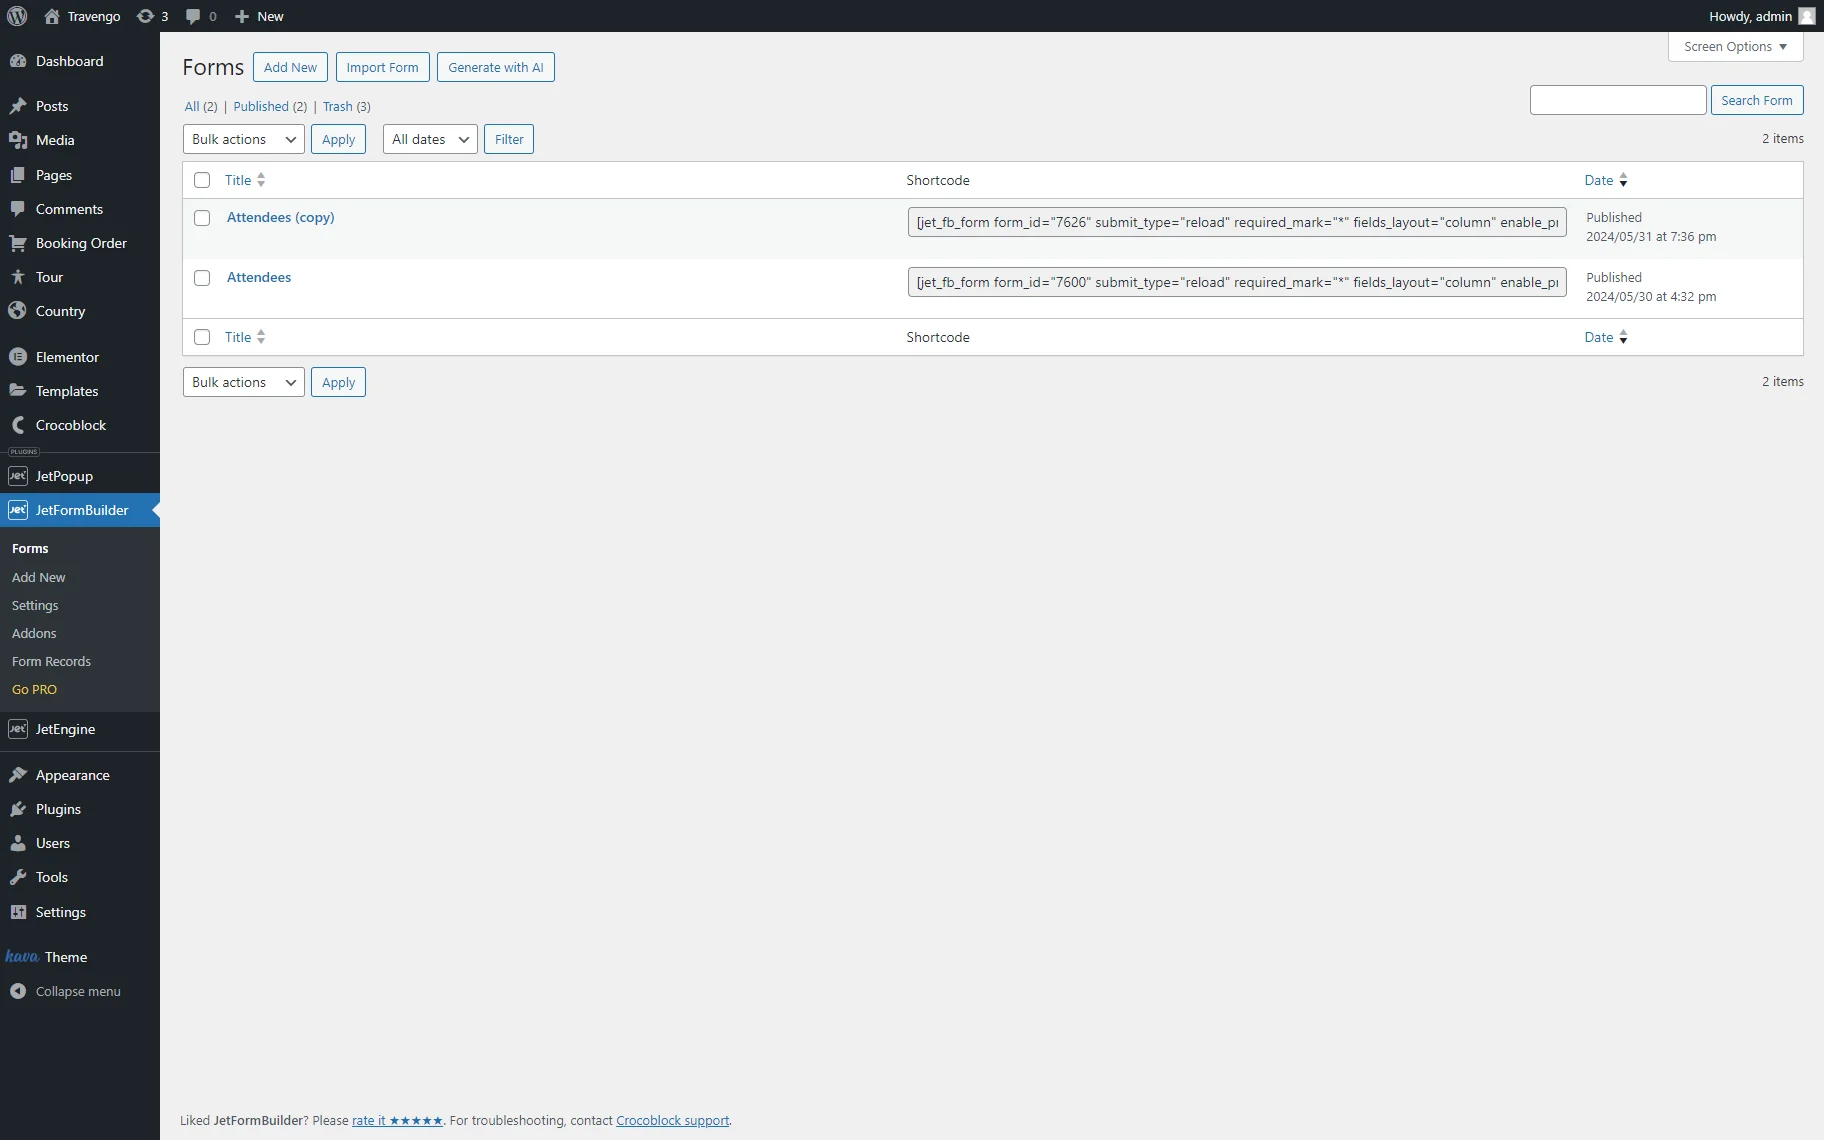
Navigate to the WordPress Dashboard > JetFormBuilder > Forms tab. Hover the cursor on the previously created form and hit the “Duplicate” link.
The duplicated form will appear in the list with the “(copy)” text added to the initial form’s name.
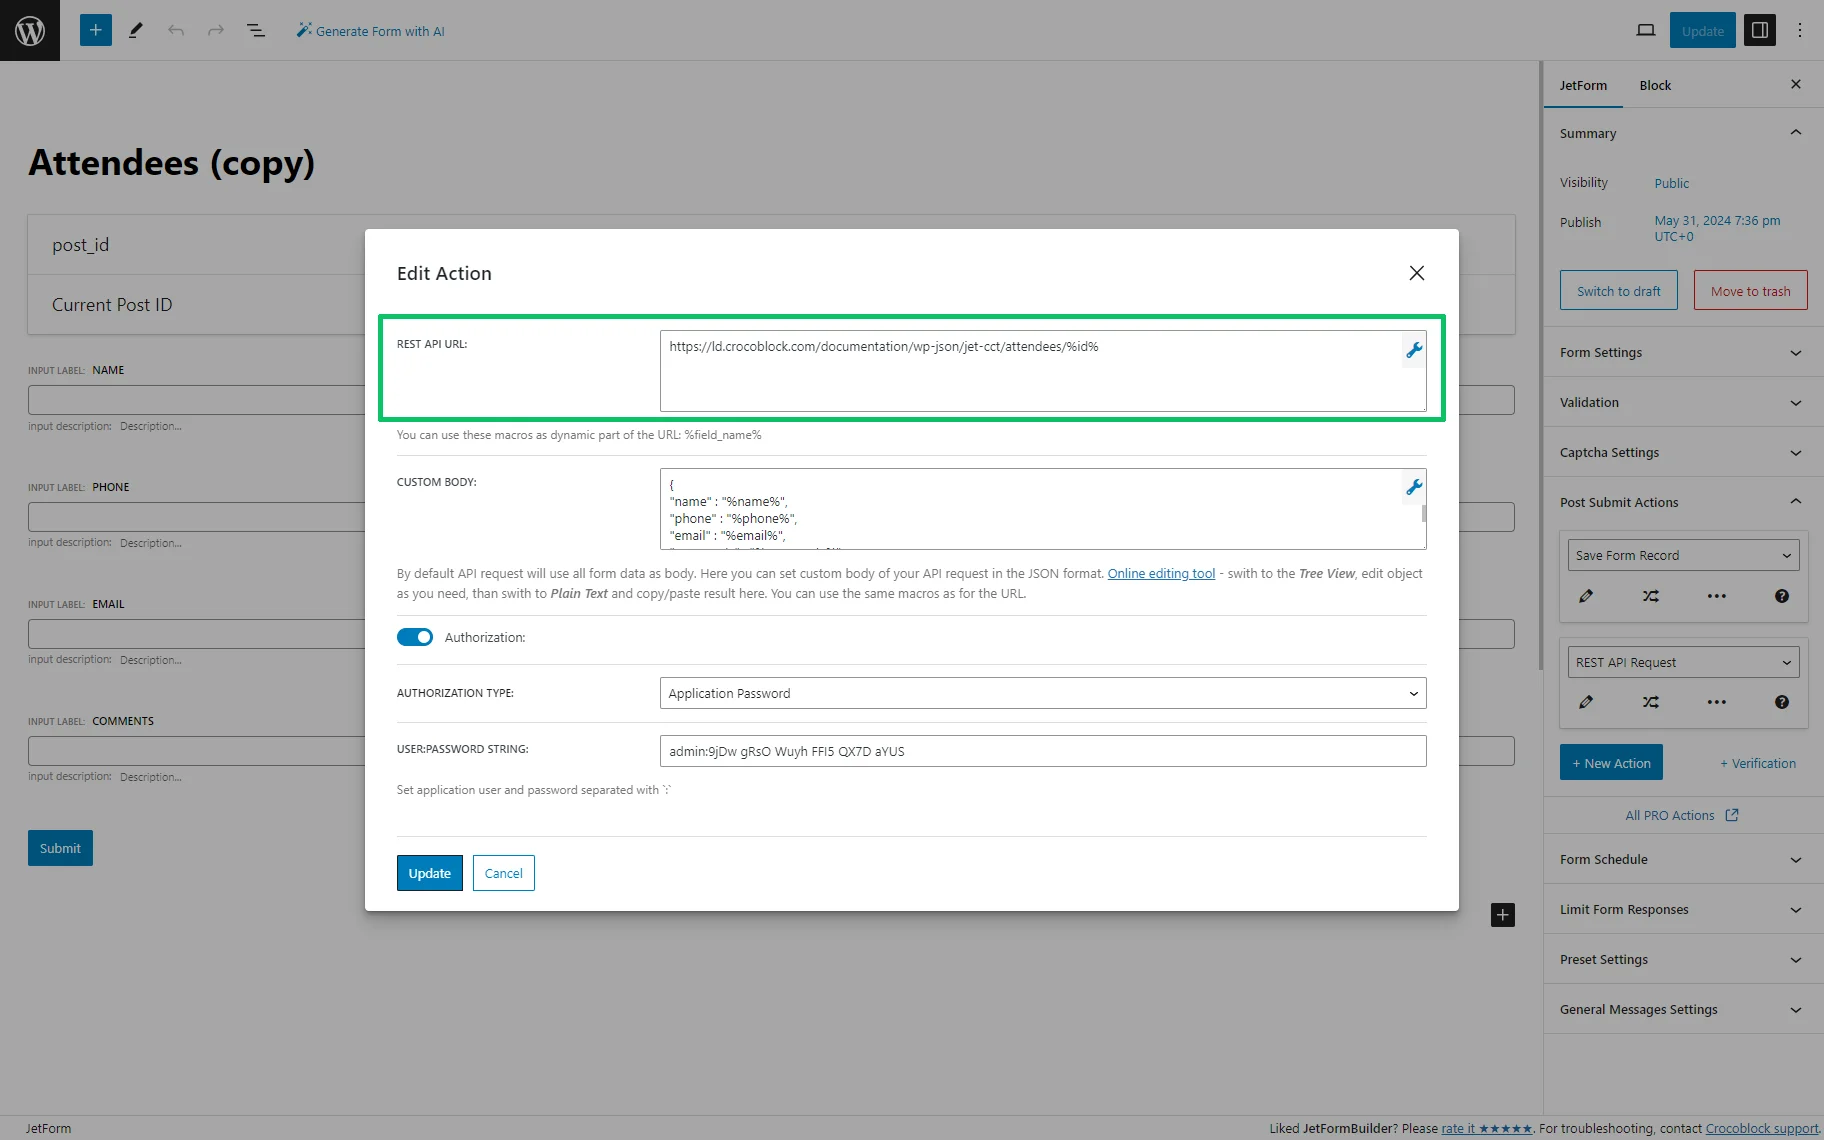
Open the duplicated form and unroll the JetForm tab. Scroll down to the “REST API request” Post Submit Actions.
Then, press the “pencil” icon to edit this Post Submit Action. Here, we added the “%post_id%” text to the end of the REST API URL field, which means that the FORM FIELD NAME field of the Hidden Field block of this form will be used for the identification of a new CCT item. In this case, the full line looks as follows:
https://.com/documentation/wp-json/jet-cct/attendees/%post_id%
As mentioned above, this link is relevant only to this tutorial; you should use your own links.
However, you can add another field to use for identification.
Press the “Update” button to save the changes and close the pop-up.
Then, change the text on the Action button from “Submit” to “Save.”
Navigate to the Preset Settings tab of the JetForm settings. Activate the Enable toggle, select the “Custom Content Type” option from the SOURCE drop-down list, and choose the “Current post” option from the GET ITEM ID FROM drop-down list. Finally, set the “Item ID” option for the field selected as an identification (in this case, for the “post_id” Hidden Field).

Publish the form or update it if you have published it already.
Create a pop-up to add the modified form
Create another pop-up to add the form for updating the CCT data (we named this pop-up “CCT update”).
Delete the unnecessary widgets and drag-n-drop the JetForm widget onto the pop-up. Select the modified form (“Attendees (copy)” in this case) in the Choose Form drop-down list, and choose the “AJAX” Submit Type option.
If needed, apply the Style settings.
Then, unroll the Settings tab and move the Loading content with Ajax and Force loading toggles.
Press the “Update” button.
Create a listing item to display the REST API items
Navigate to the WordPress Dashboard > JetEngine > Listings/Components tab and press the “Add New Listing Item” button.
Select the following options from the appropriate drop-down lists:
- Pick the “REST API Endpoint” option from the Listing source: drop-down list.
- Select the REST API Endpoint (“Attendees, https://*************.com/documentation/wp-json/jet-cct/attendees”) among the endpoints enlisted in the From API endpoint: drop-down list.
Then, add the name of the listing item and select an editor.
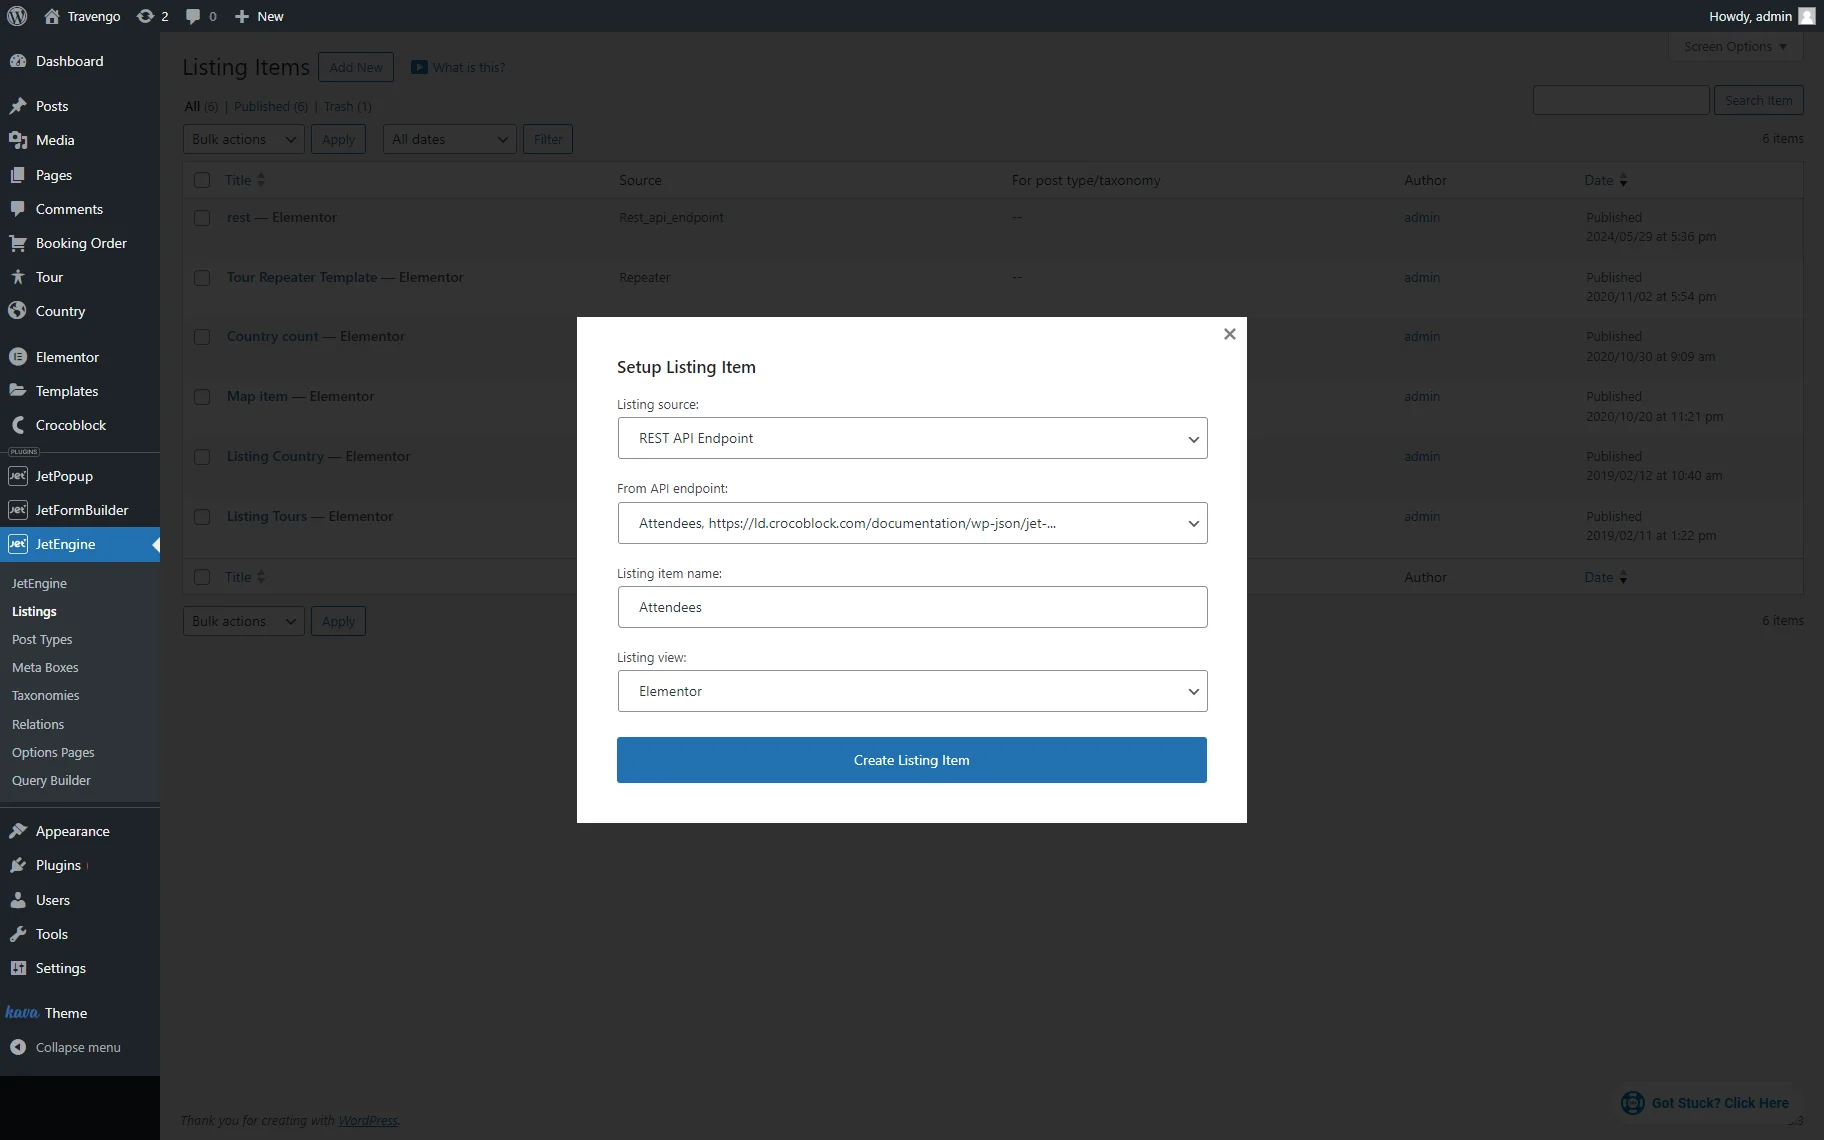
Press the “Create Listing Item” button.
Add the form to the listing item
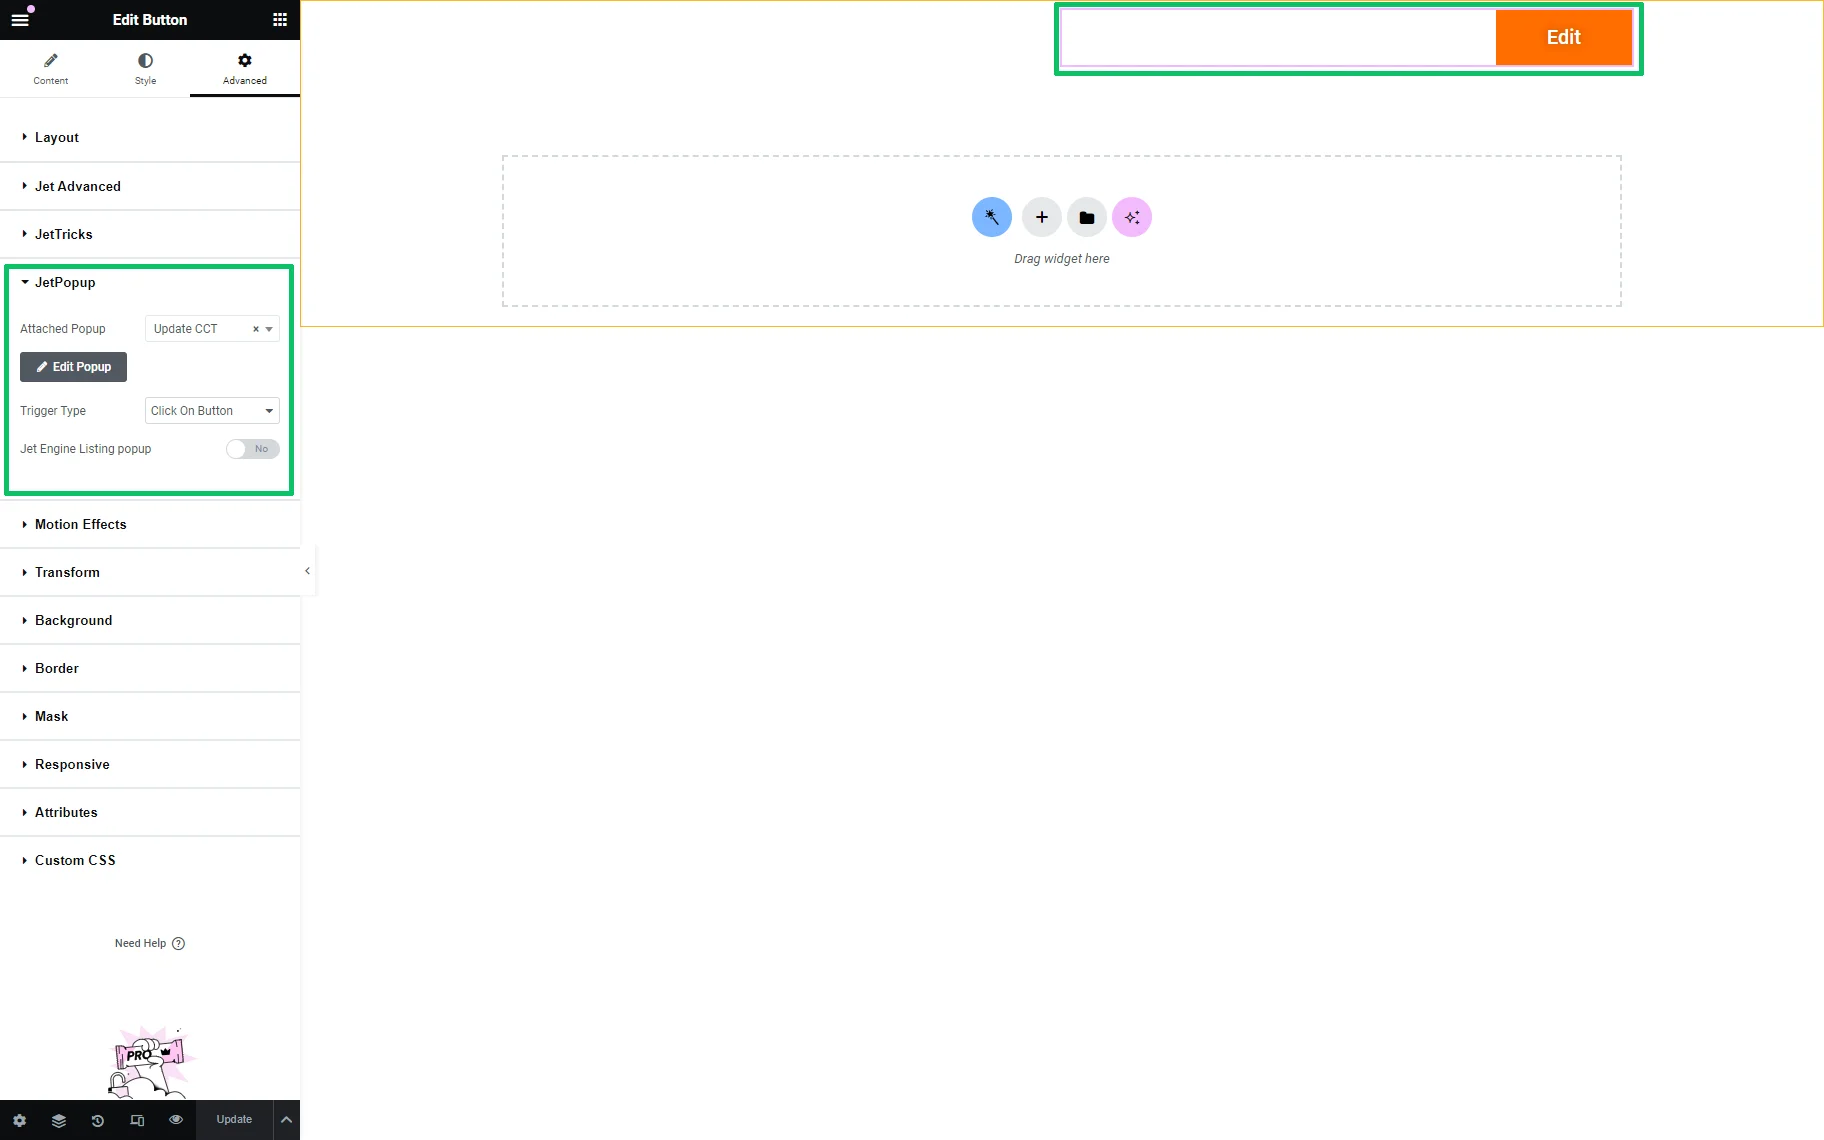
In this case, we divided the listing layout into two sections. Then, we put the Button widget in the right section to apply the pop-up. We navigated to the Advanced settings of the widget and unrolled the JetPopup setting block. We selected the previously created pop-up (the CCT update pop-up) and set the “Click on Button” Trigger Type.
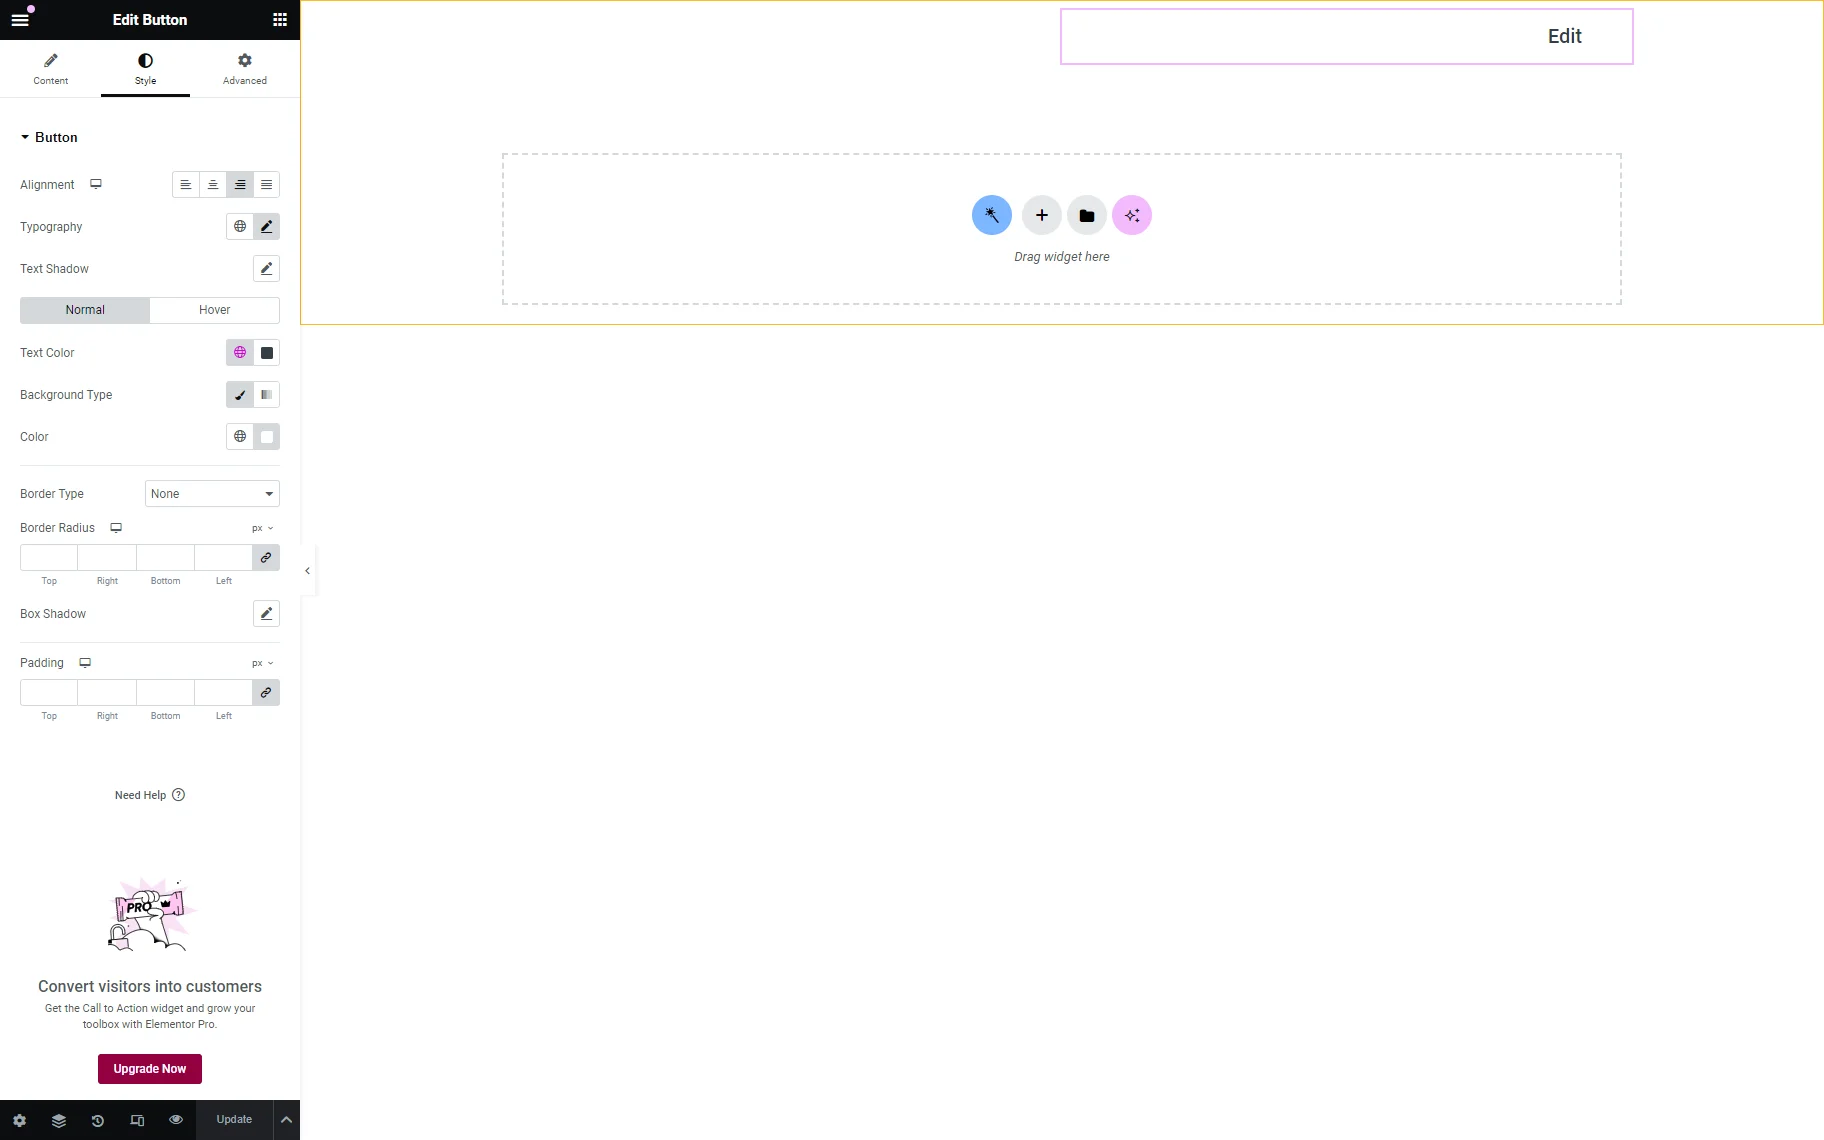
Additionally, we styled the button – selected the white color as the background and customized the text font.
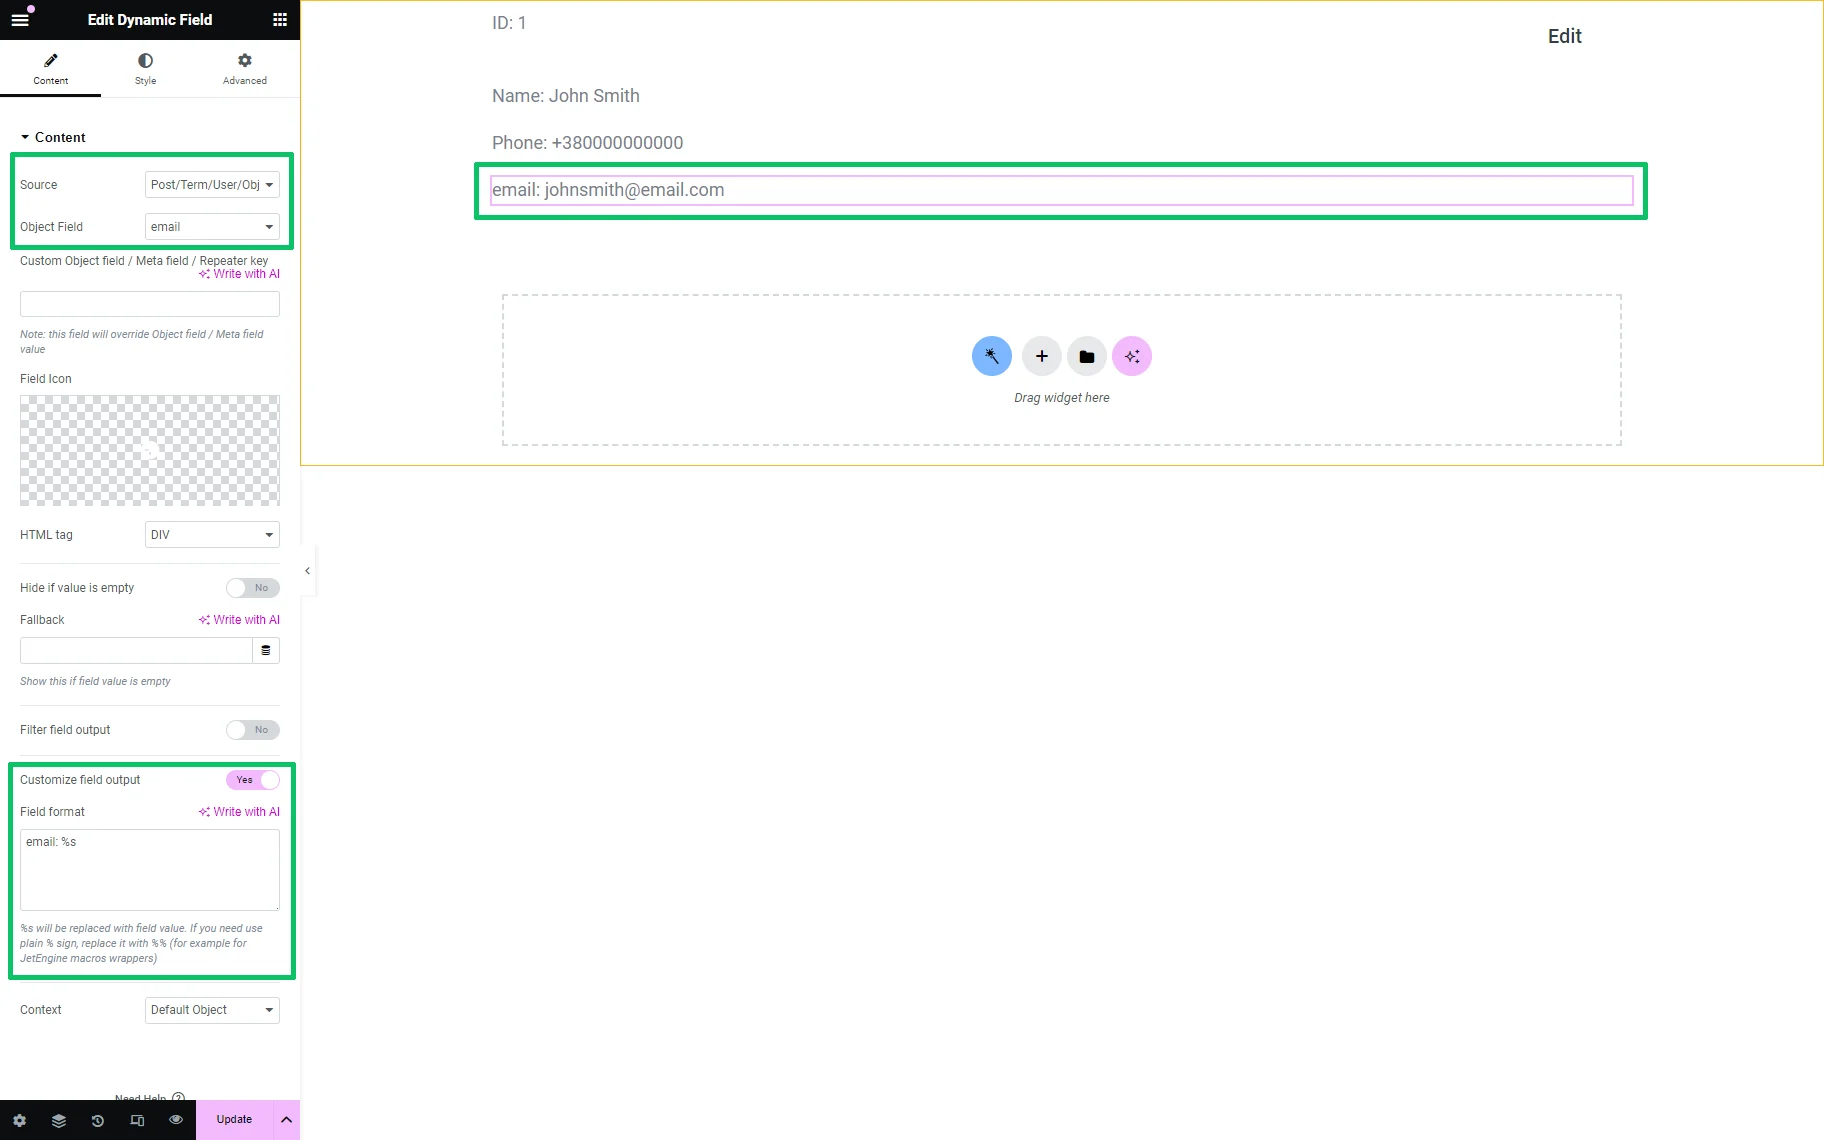
Add the dynamic fields to the item
To add the needed dynamic fields to the listing item, we drag-n-drop the Dynamic Field widgets and set the following settings for each widget:
- Selected the “Post/Term/User/Object data” option from the Source drop-down menu;
- Unrolled the Object Field drop-down list and scrolled it down to the enlisted CCT fields (the “REST API:Attendees” group of options, in this case);
- Moved the Customized field output toggle and added the text into the “Field format” field.
Finally, press the “Update” button.
Read the How to Show Content with the Help of REST API tutorial to learn how to display different types of content, including images.
Add the listing to a page
Create a page where you want to add the listing. Then, drag-n-drop the Listing Grid widget onto this page. Select the needed listing in the “Source” drop-down list.
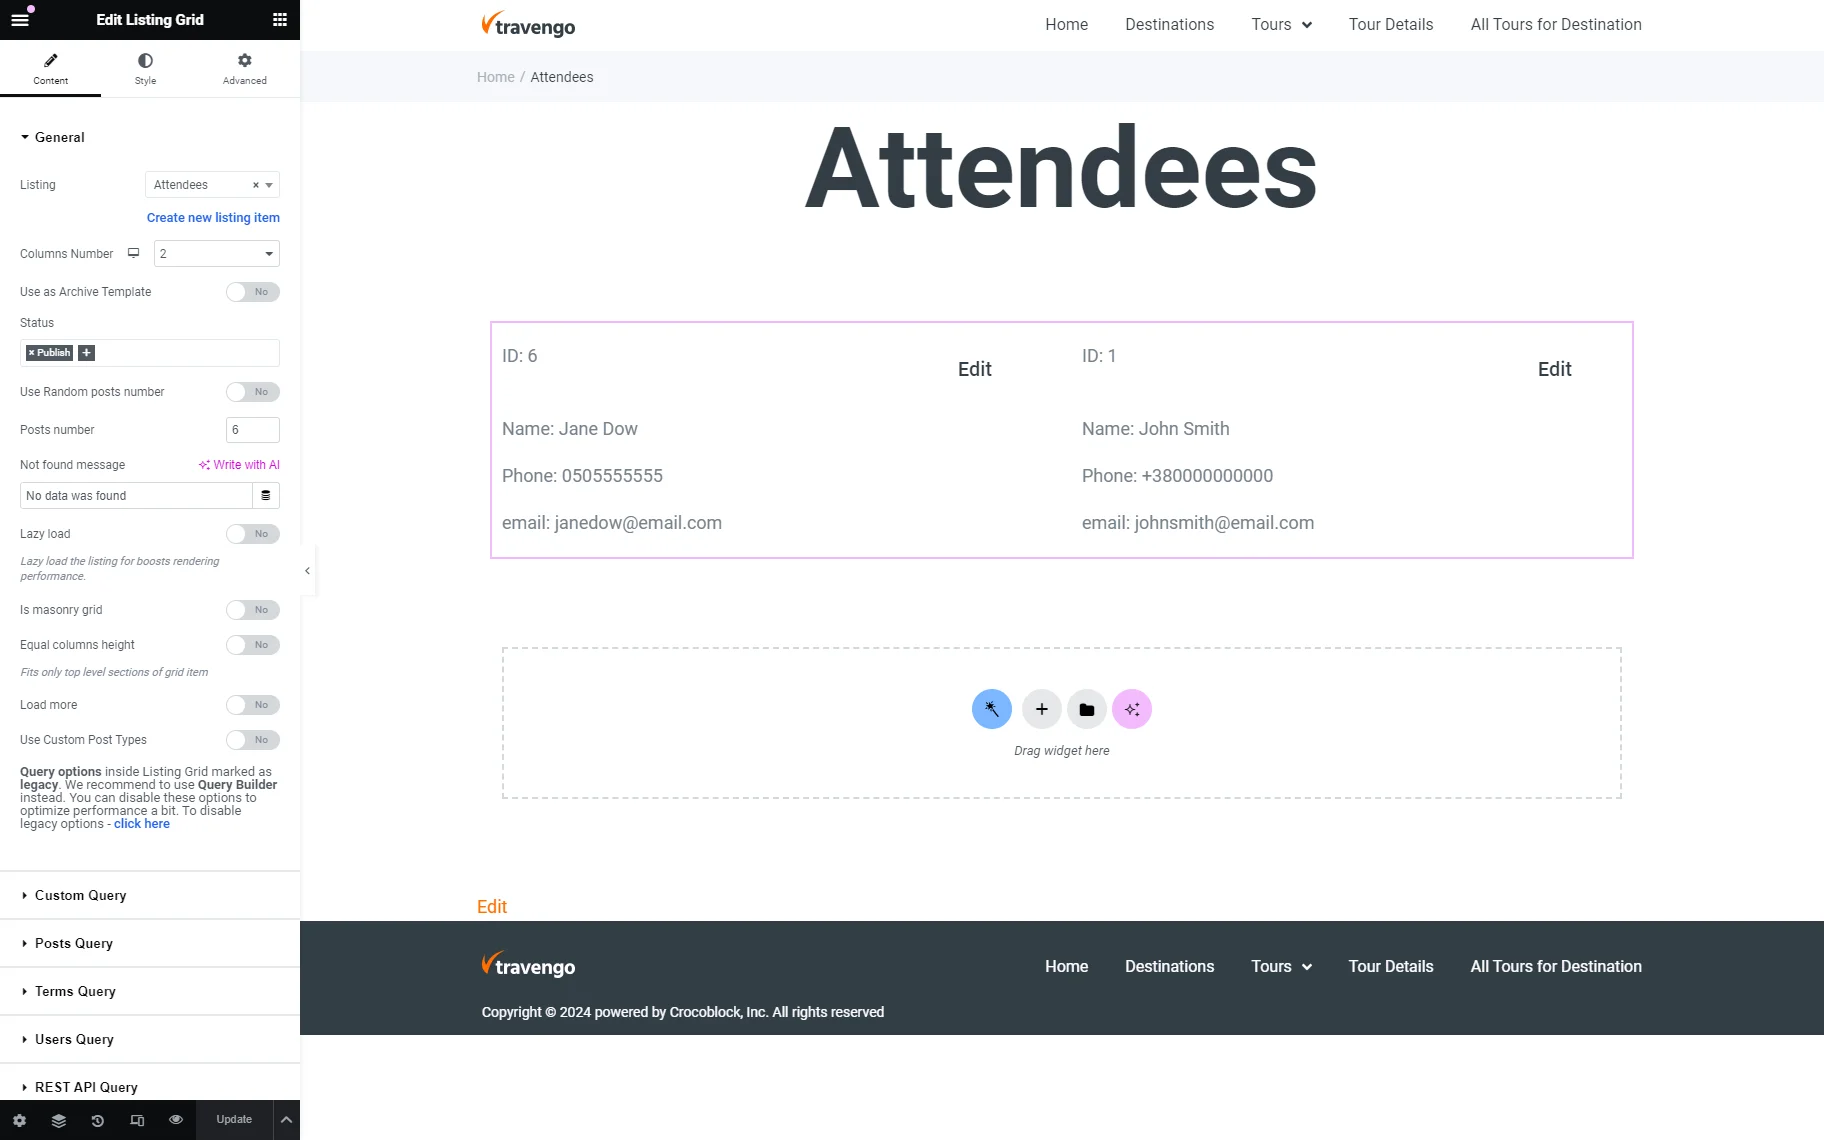
alt text: listing grid with added cct items
More details about the Listing Grid widget can be found in the Listing Grid Widget Overview.
Press the “Update” button.
Check the result on the front end
Navigate to the front end.
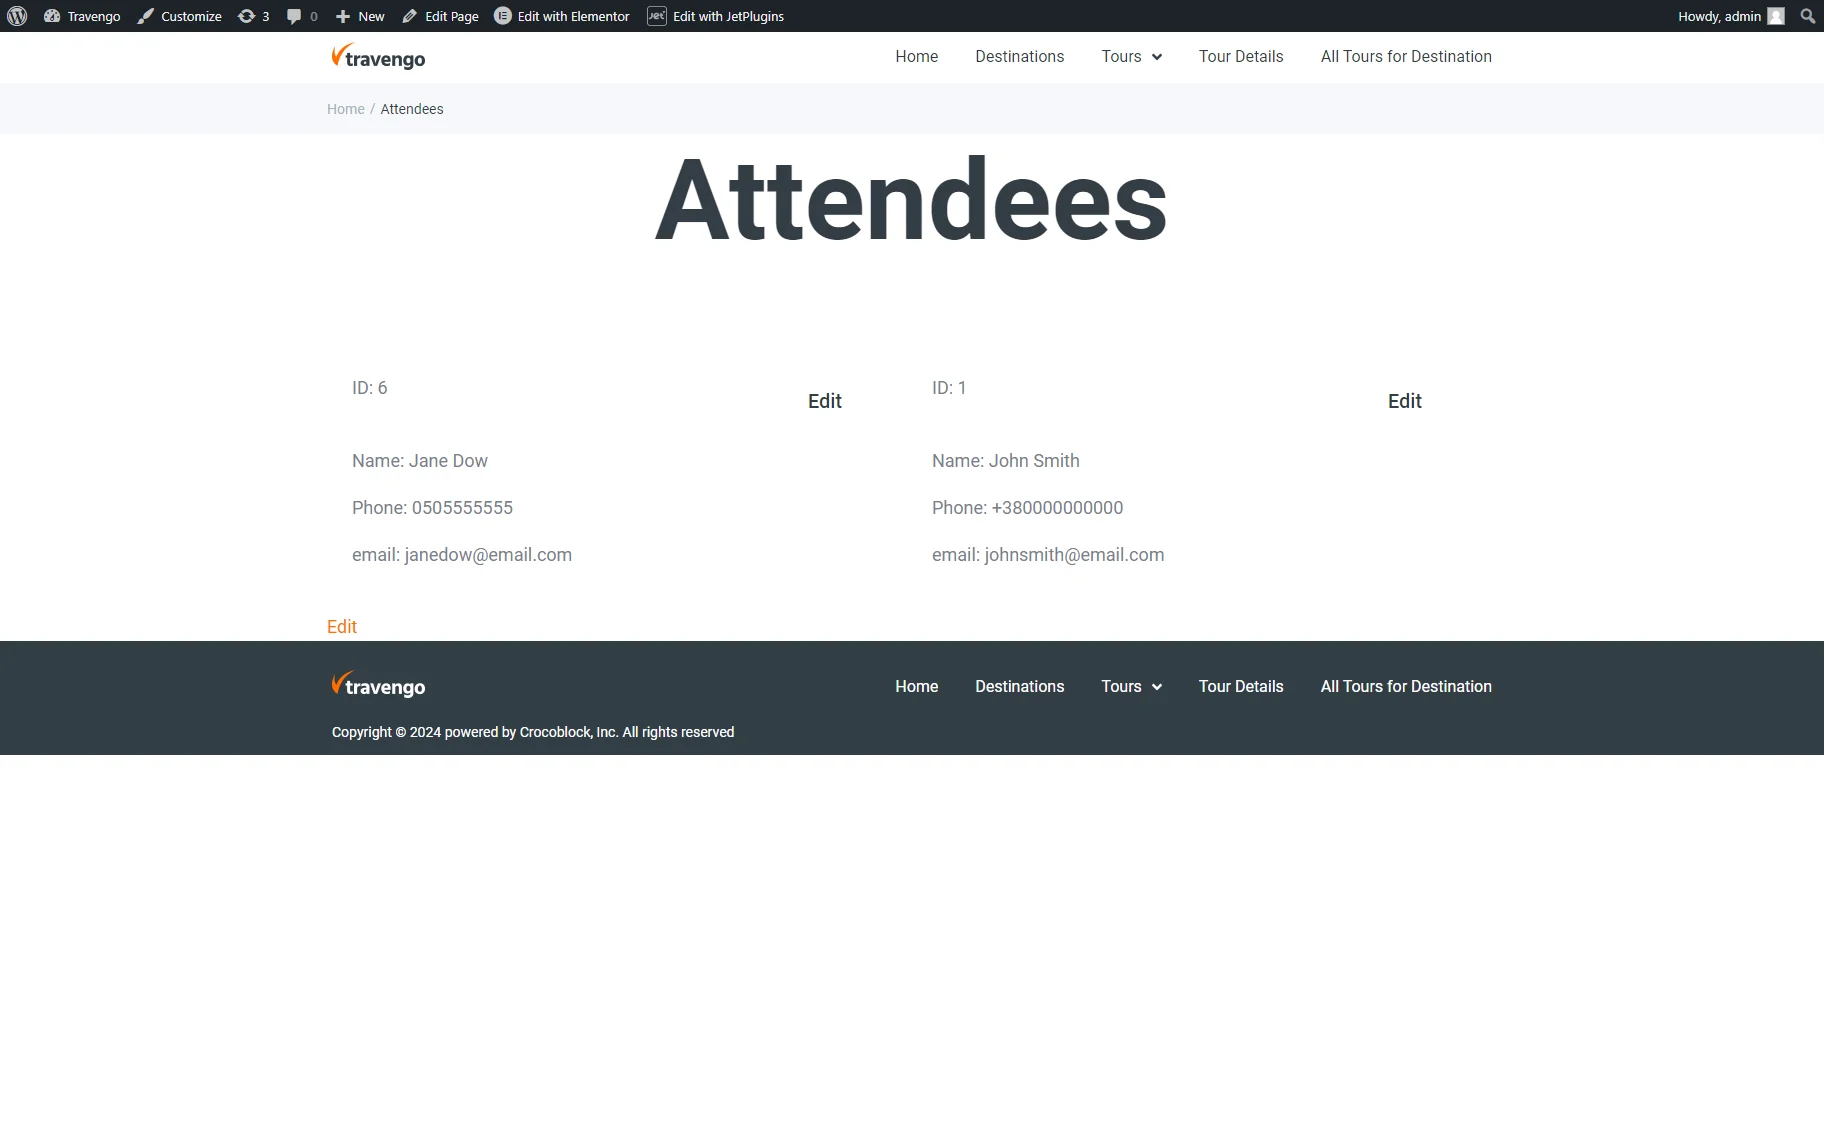
Press the “Edit” button near every enlisted CCT item.
Then, fill in the form fields. Once completed, press the “Save” button in the pop-up.
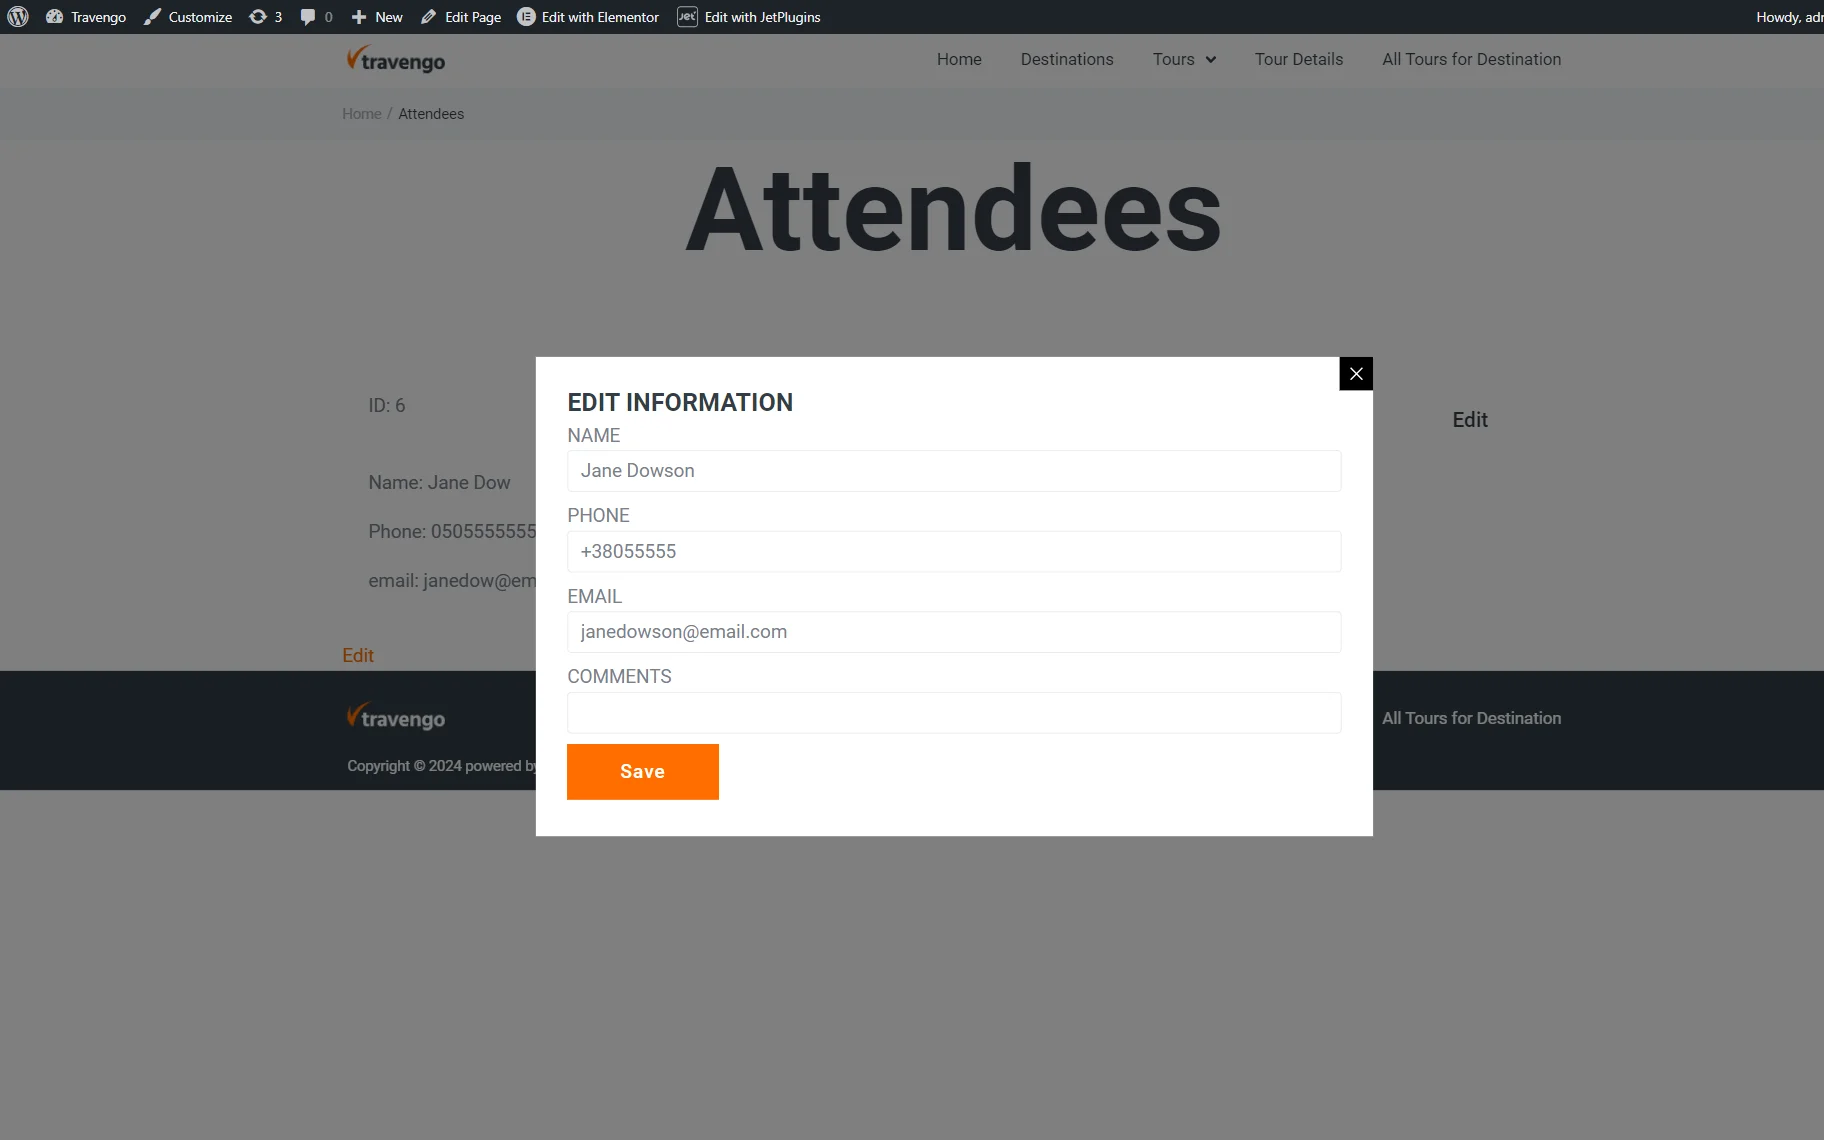
If the form works correctly, the pop-up will show the “Form successfully submitted.” text.
Check the CCT items on the main site
Navigate to the main site. Open the CCT item list (“Attendees” in this tutorial) and check if the new values of the CCT item were updated.

That’s all about setting the REST API connection between two WordPress sites to create, get, and edit the Custom Content Type items remotely via JetFormBuilder forms.