How to Attach Meta Boxes to Native Product Settings and WooCommerce Variations
This tutorial describes how to add custom fields with meta boxes to WooCommerce products and variations with the JetEngine WordPress plugin.
Before you start, check the tutorial requirements:
- Elementor (Free version)
- JetEngine plugin installed and activated
- WooCommerce plugin installed and activated
- JetWooBuilder plugin installed and activated with a single product template created.
If you have not done this yet, please follow this tutorial.
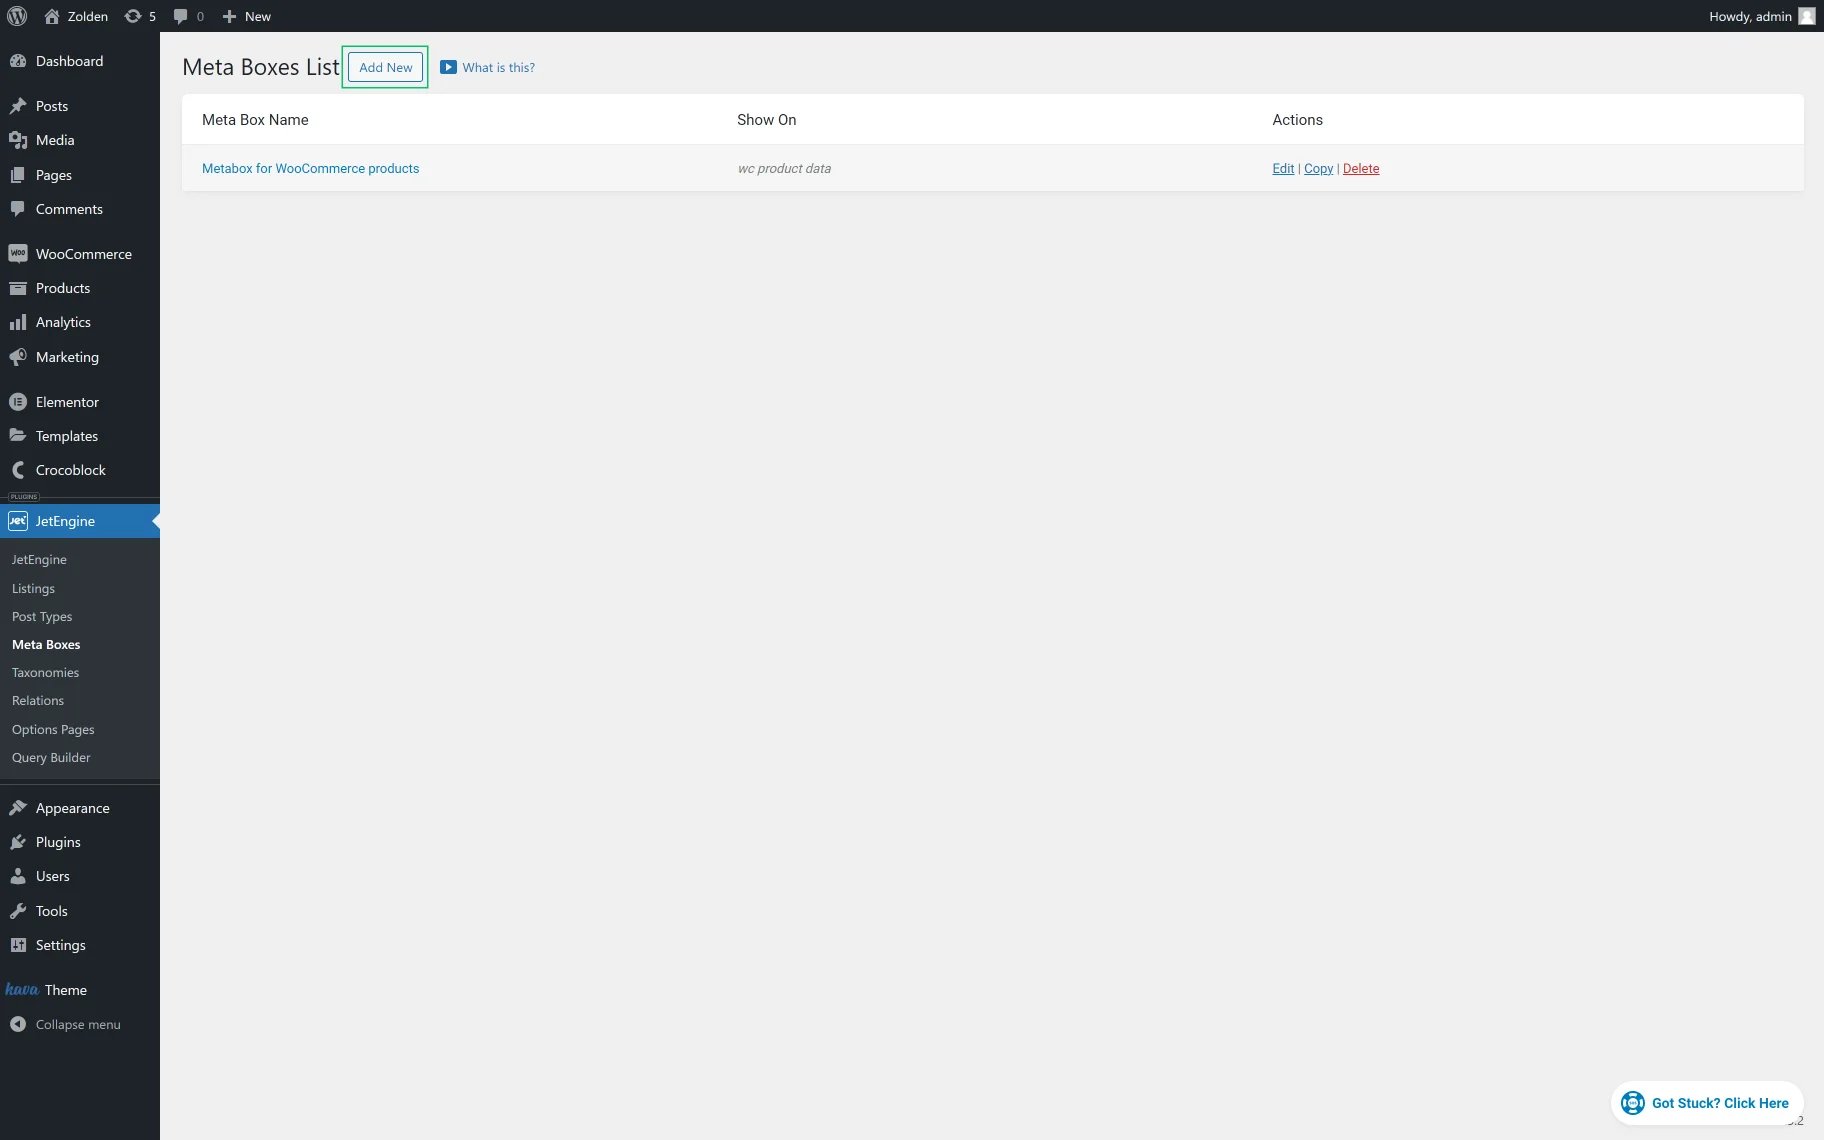
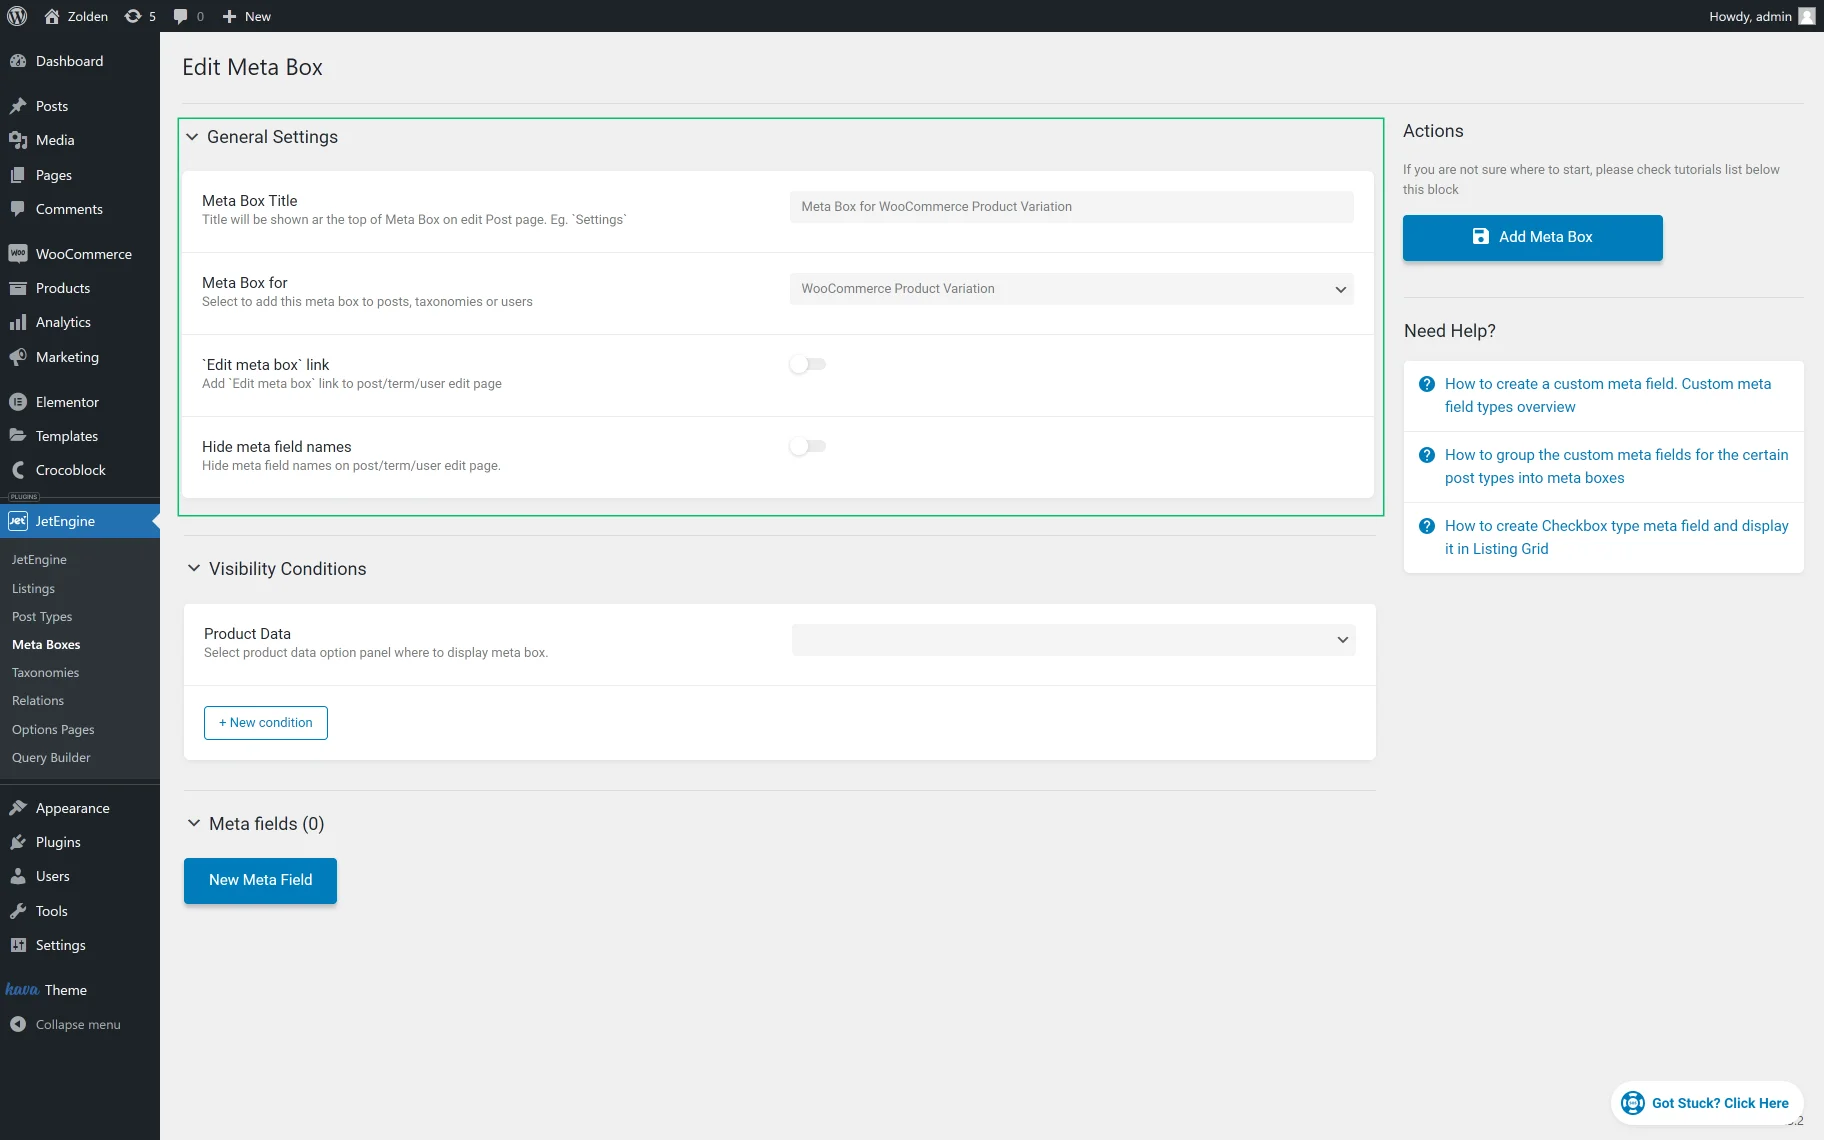
To create a meta box (both for WooCommerce products and variations), follow the WordPress Dashboard > JetEngine > Meta Boxes path and hit the “Add New” button.
WooCommerce Product Data
General Settings
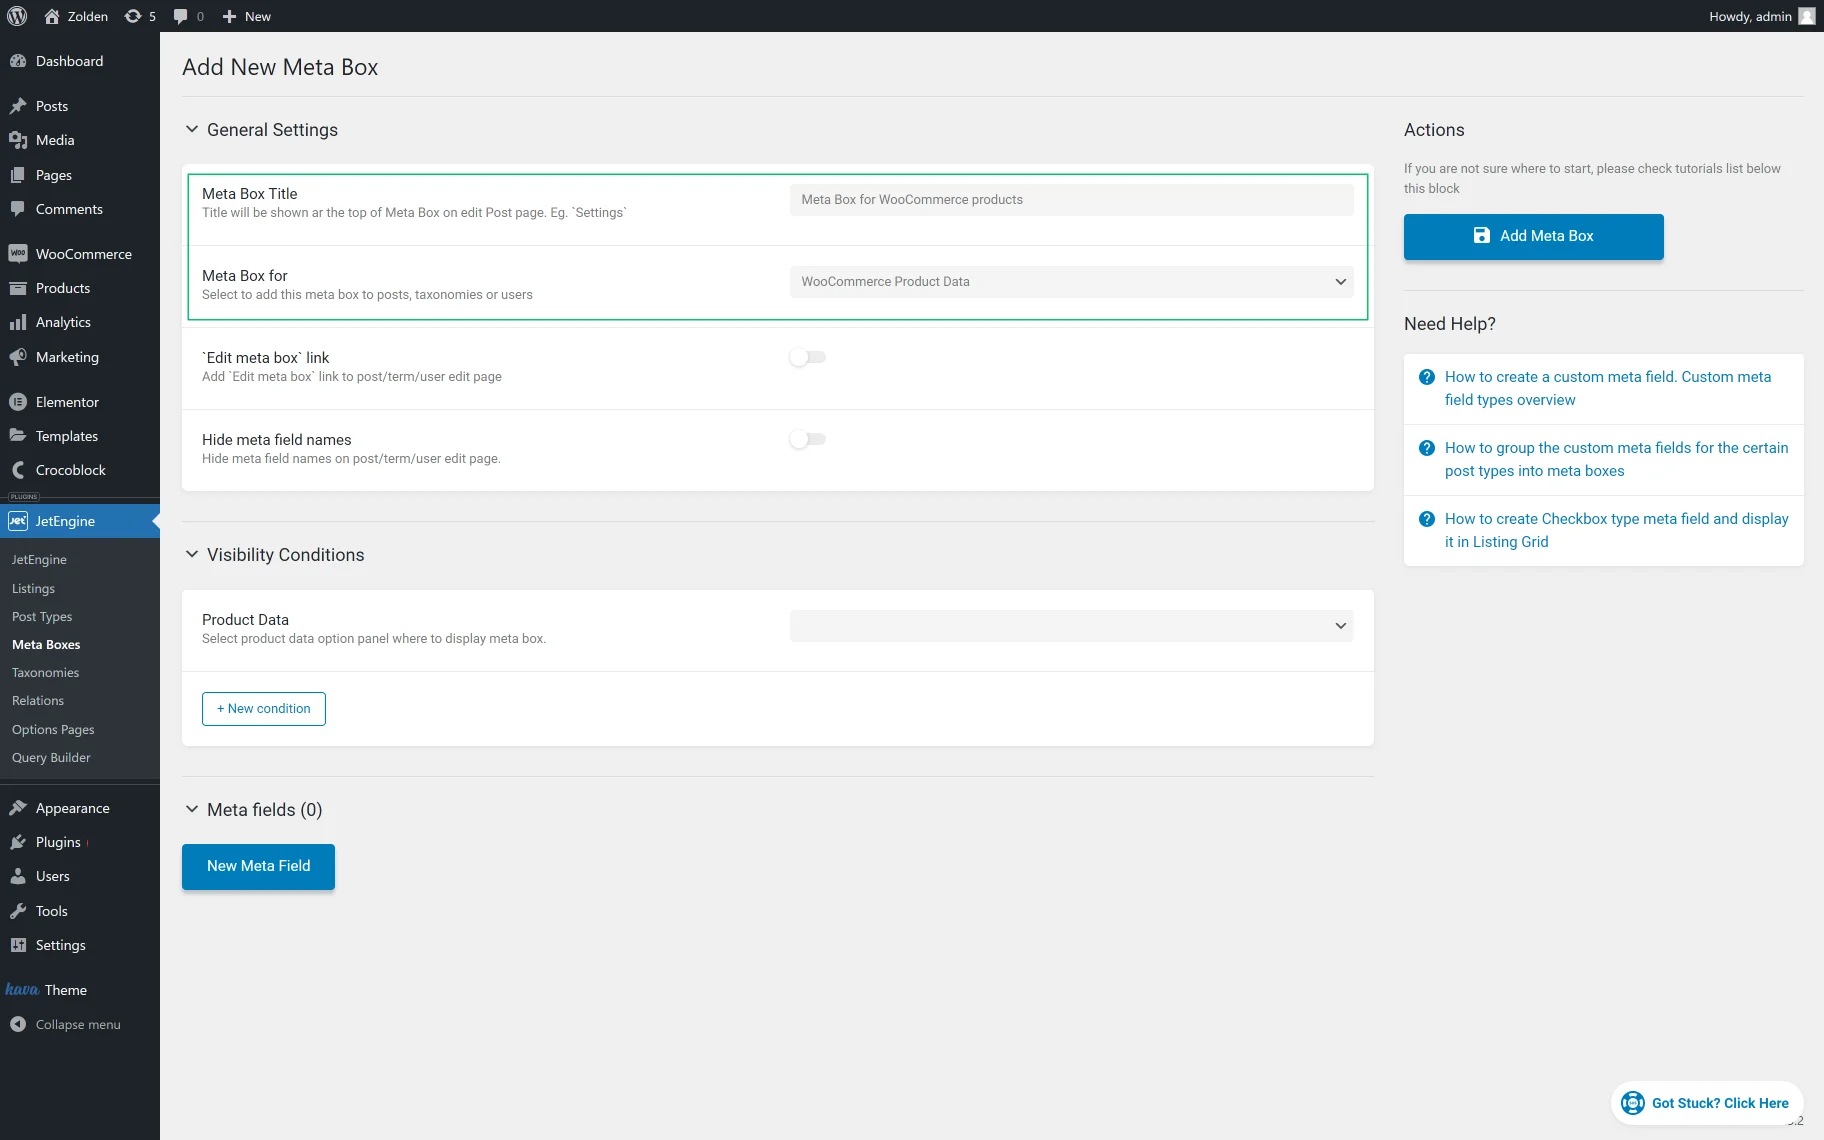
In the General Settings section of the Add New Meta Box tab, enter the Meta Box Title and select the “WooCommerce Product Data” option in the Meta Box for drop-down list.
Add meta fields for WooCommerce Product Data
Skip the Visibility Conditions section.
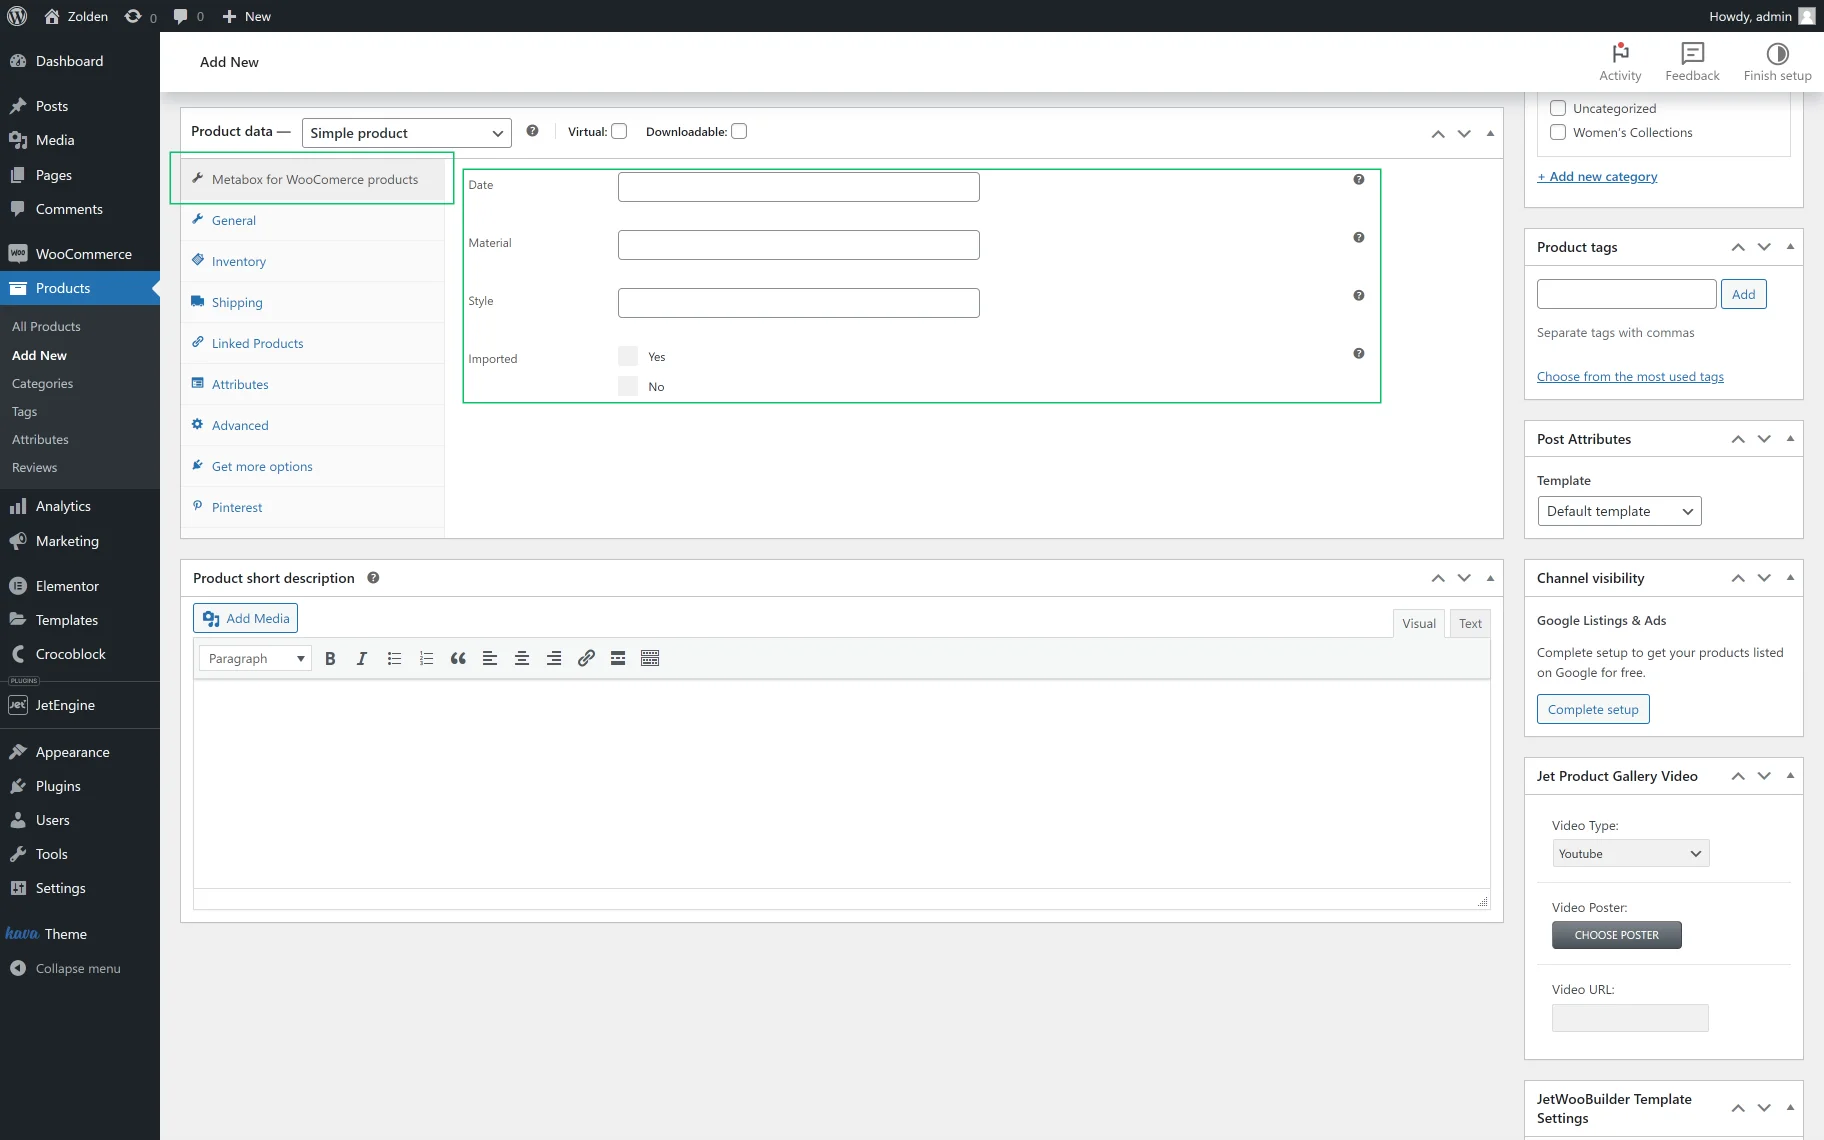
Create the needed meta fields in the Meta fields section. Learn more about meta field types from the Custom Field Types Overview.
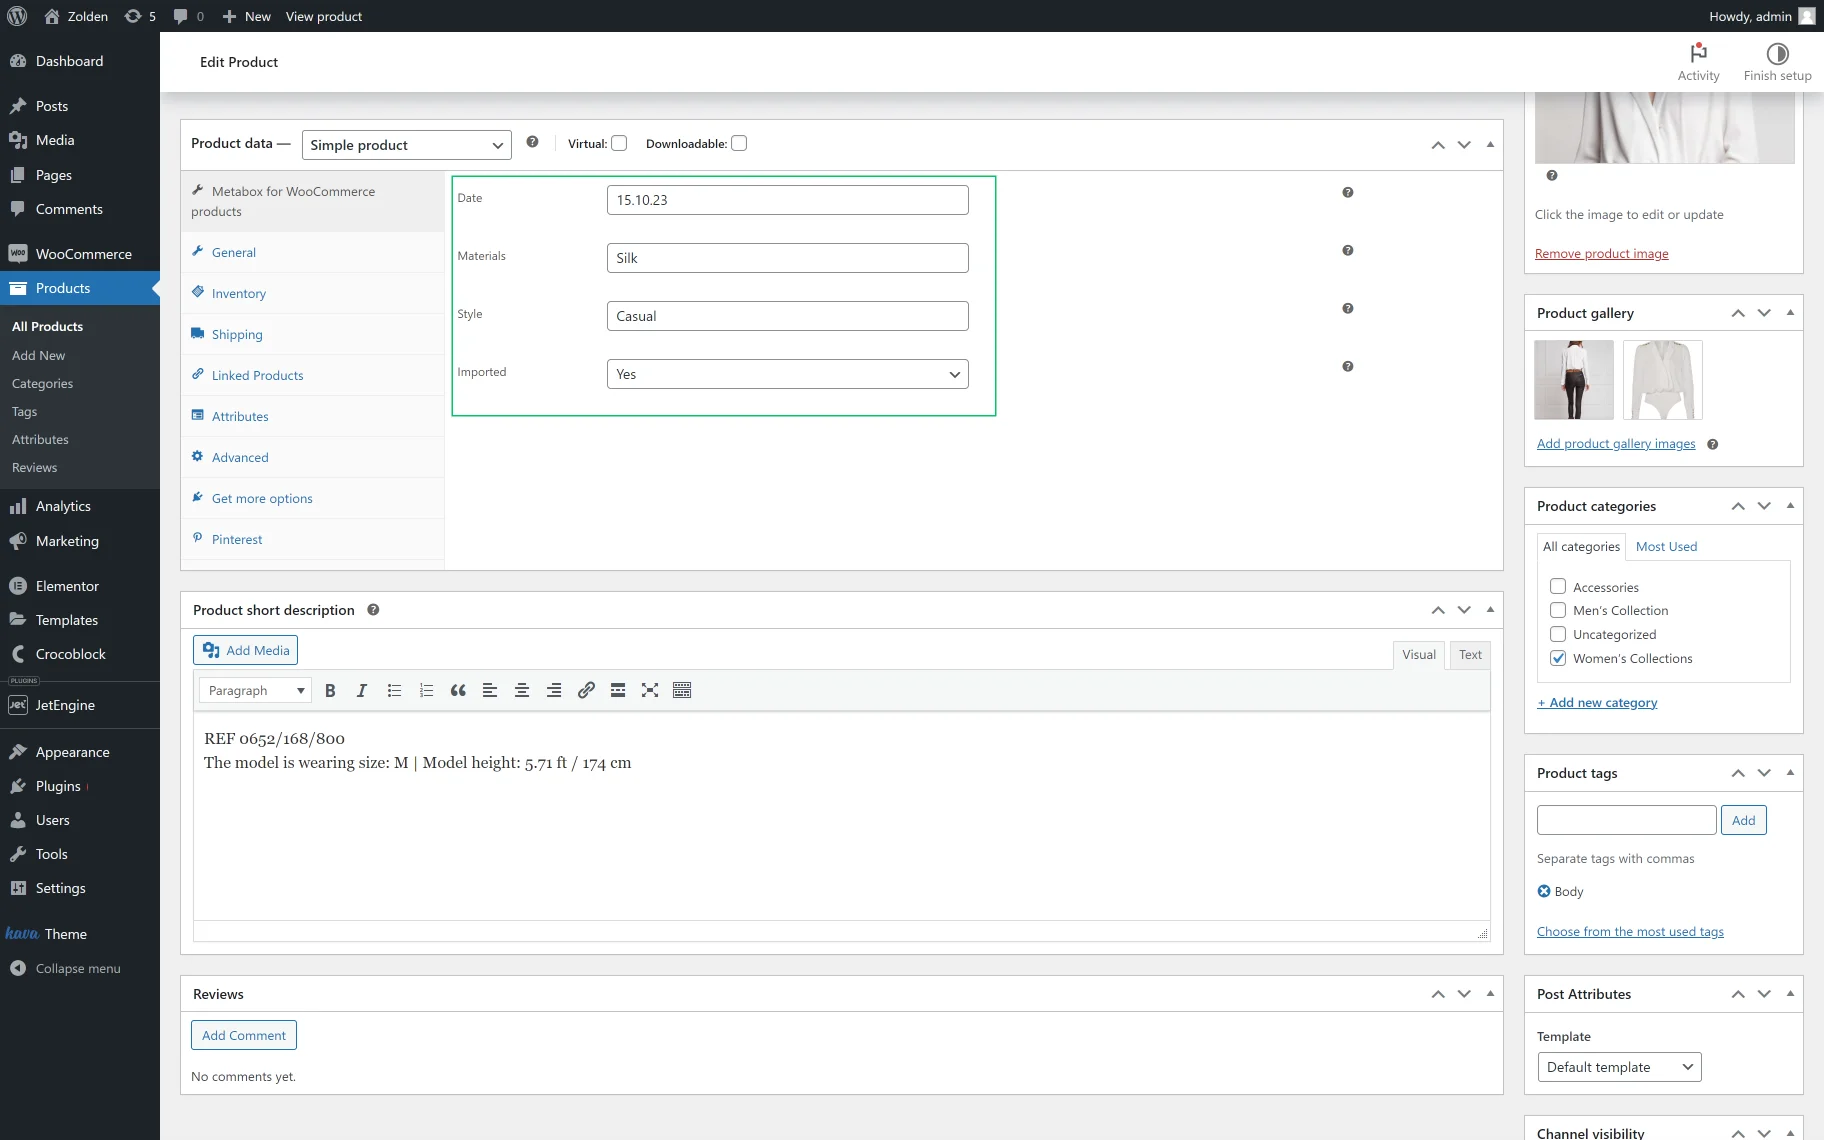
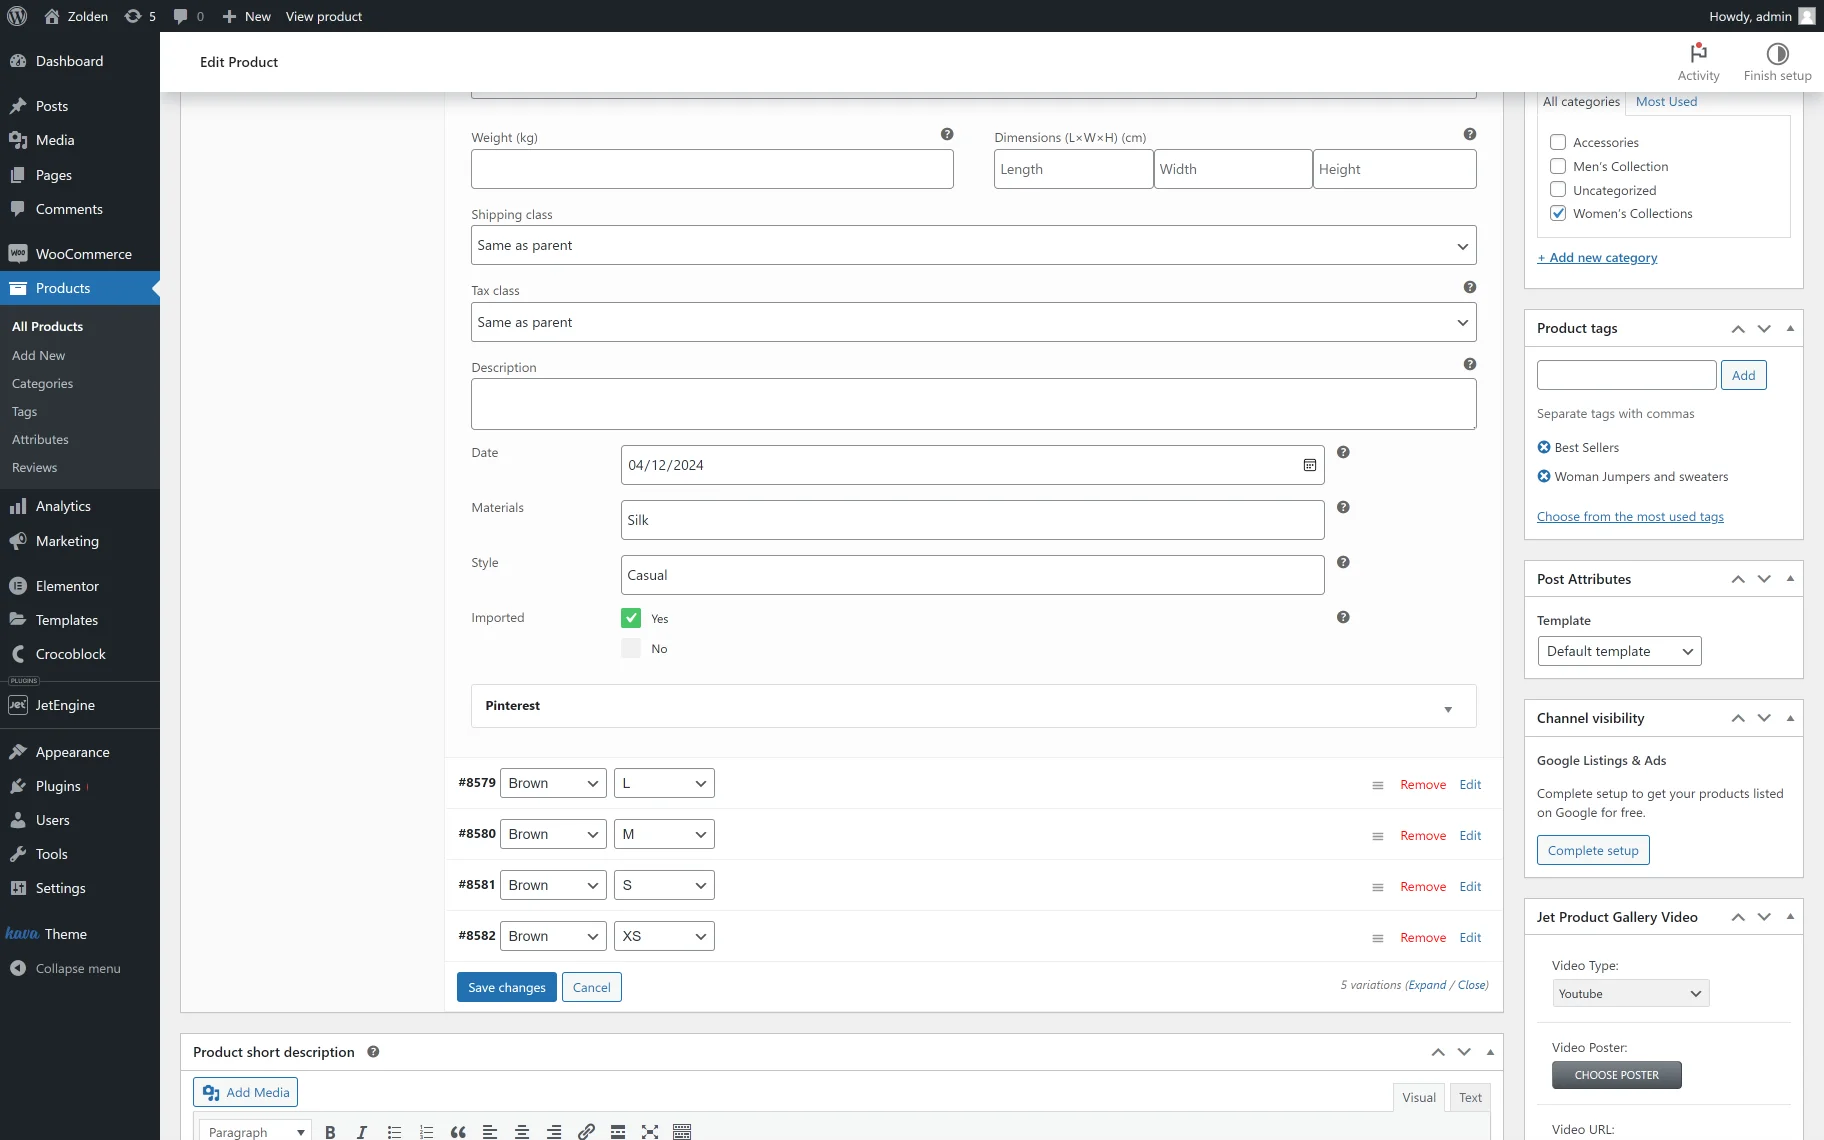
In the given case, we added four meta fields: “Date,” “Materials,” “Style,” and “Imported.”
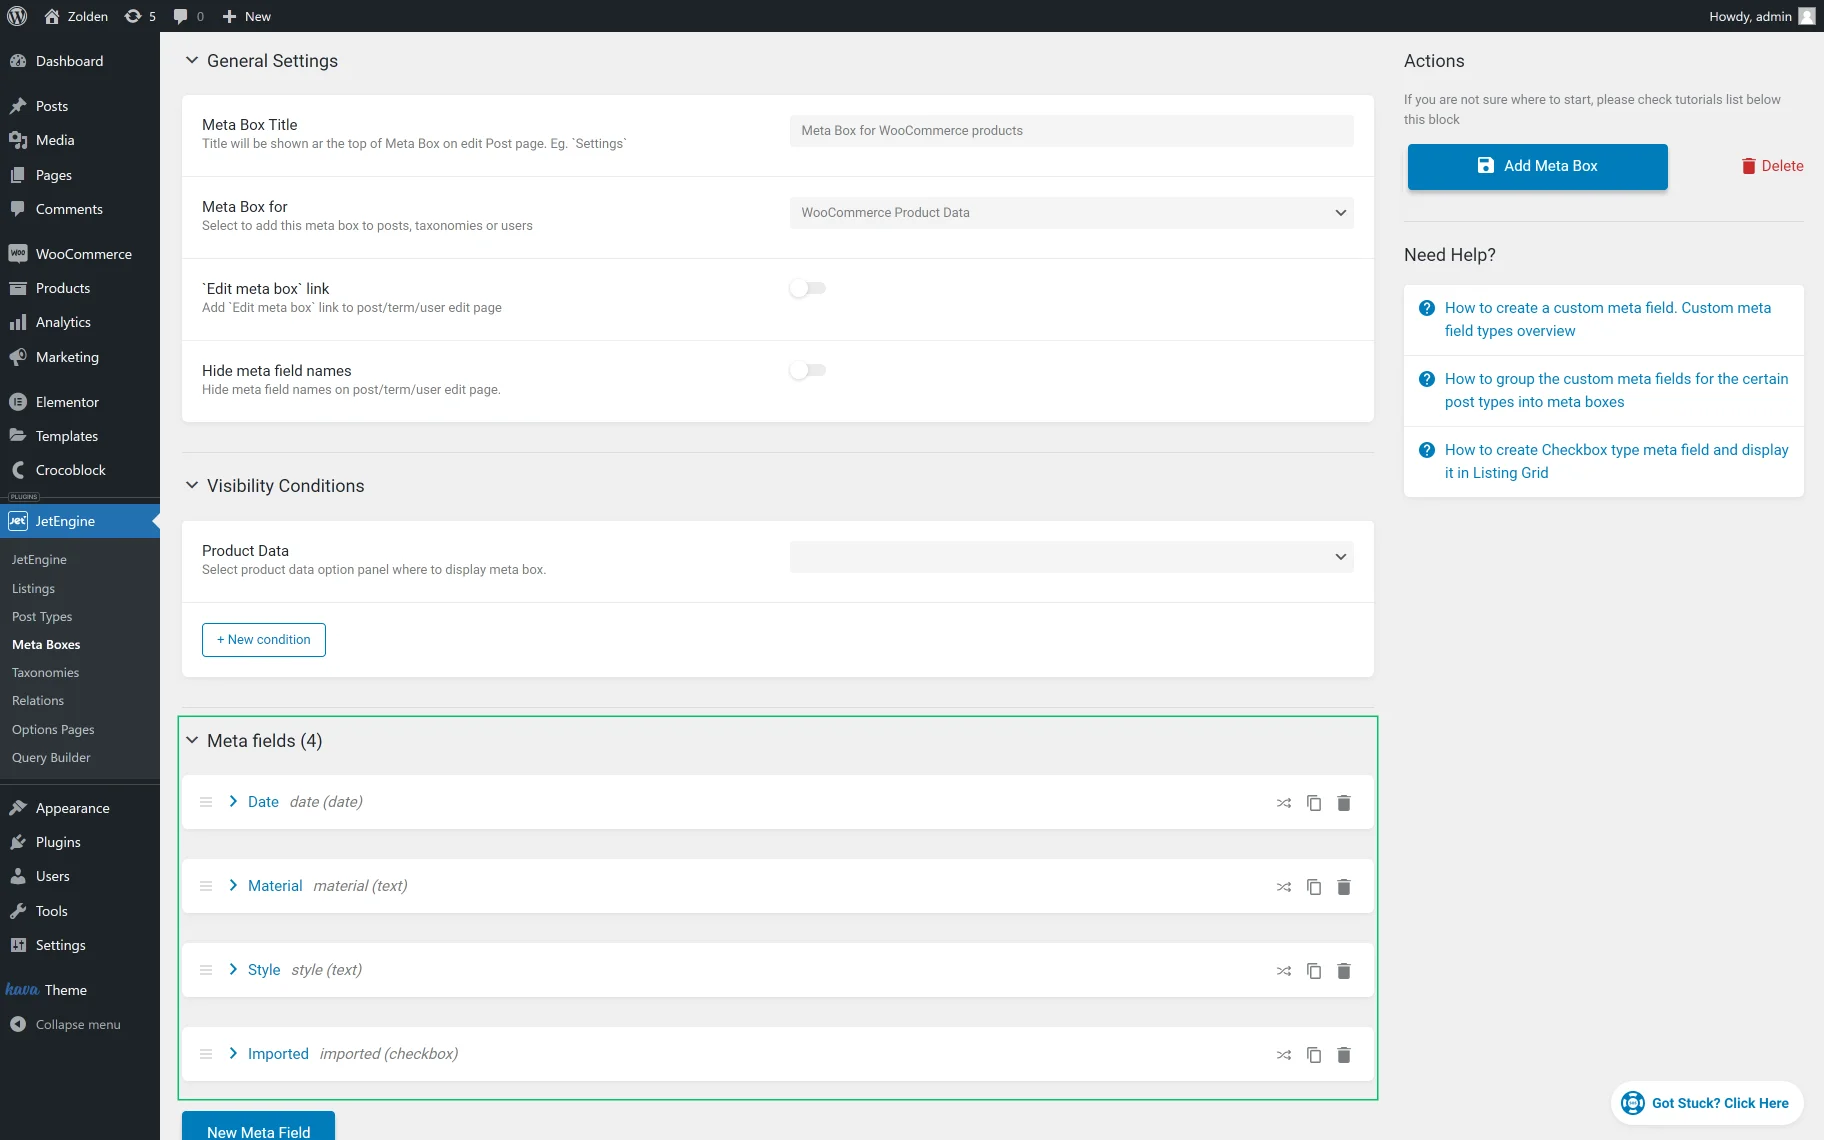
When you finish, hit the “Add Meta Box” button or the “Update Meta Box“ button if you edit a previously created meta box.
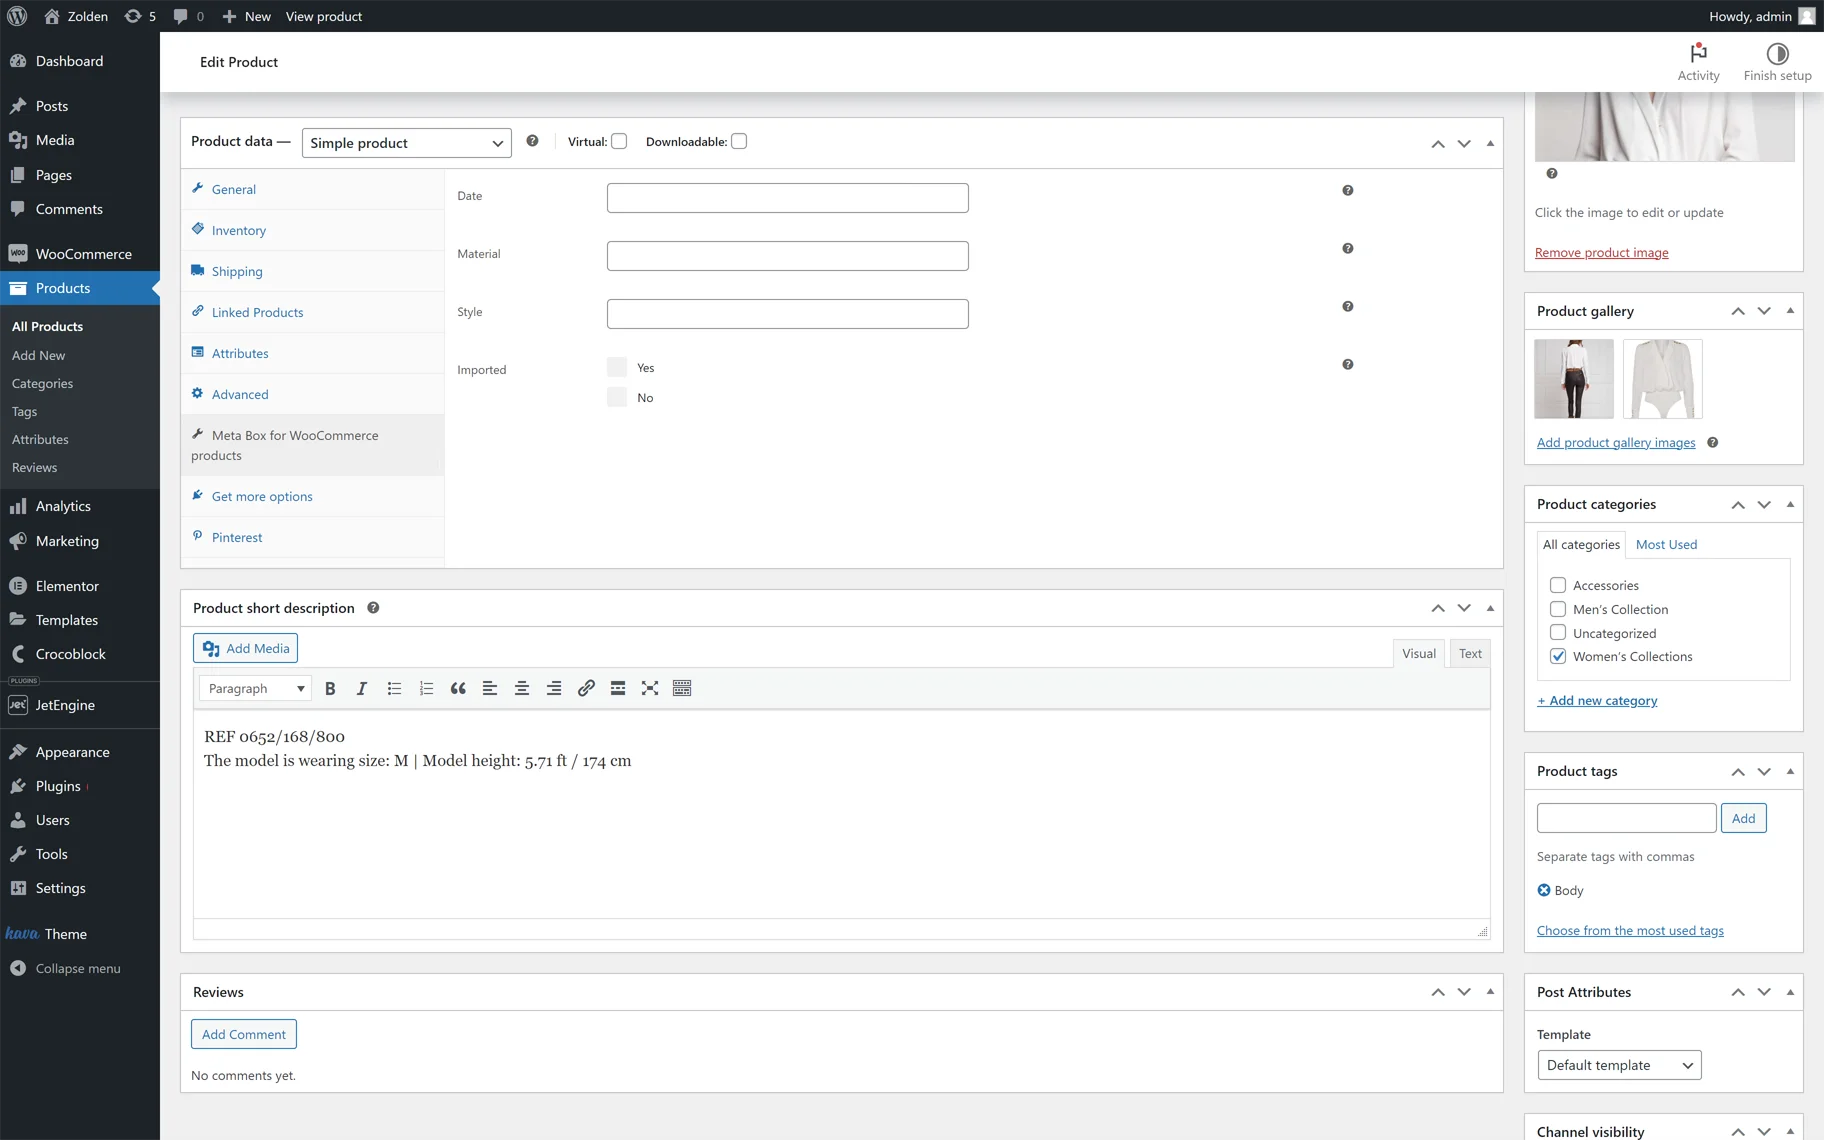
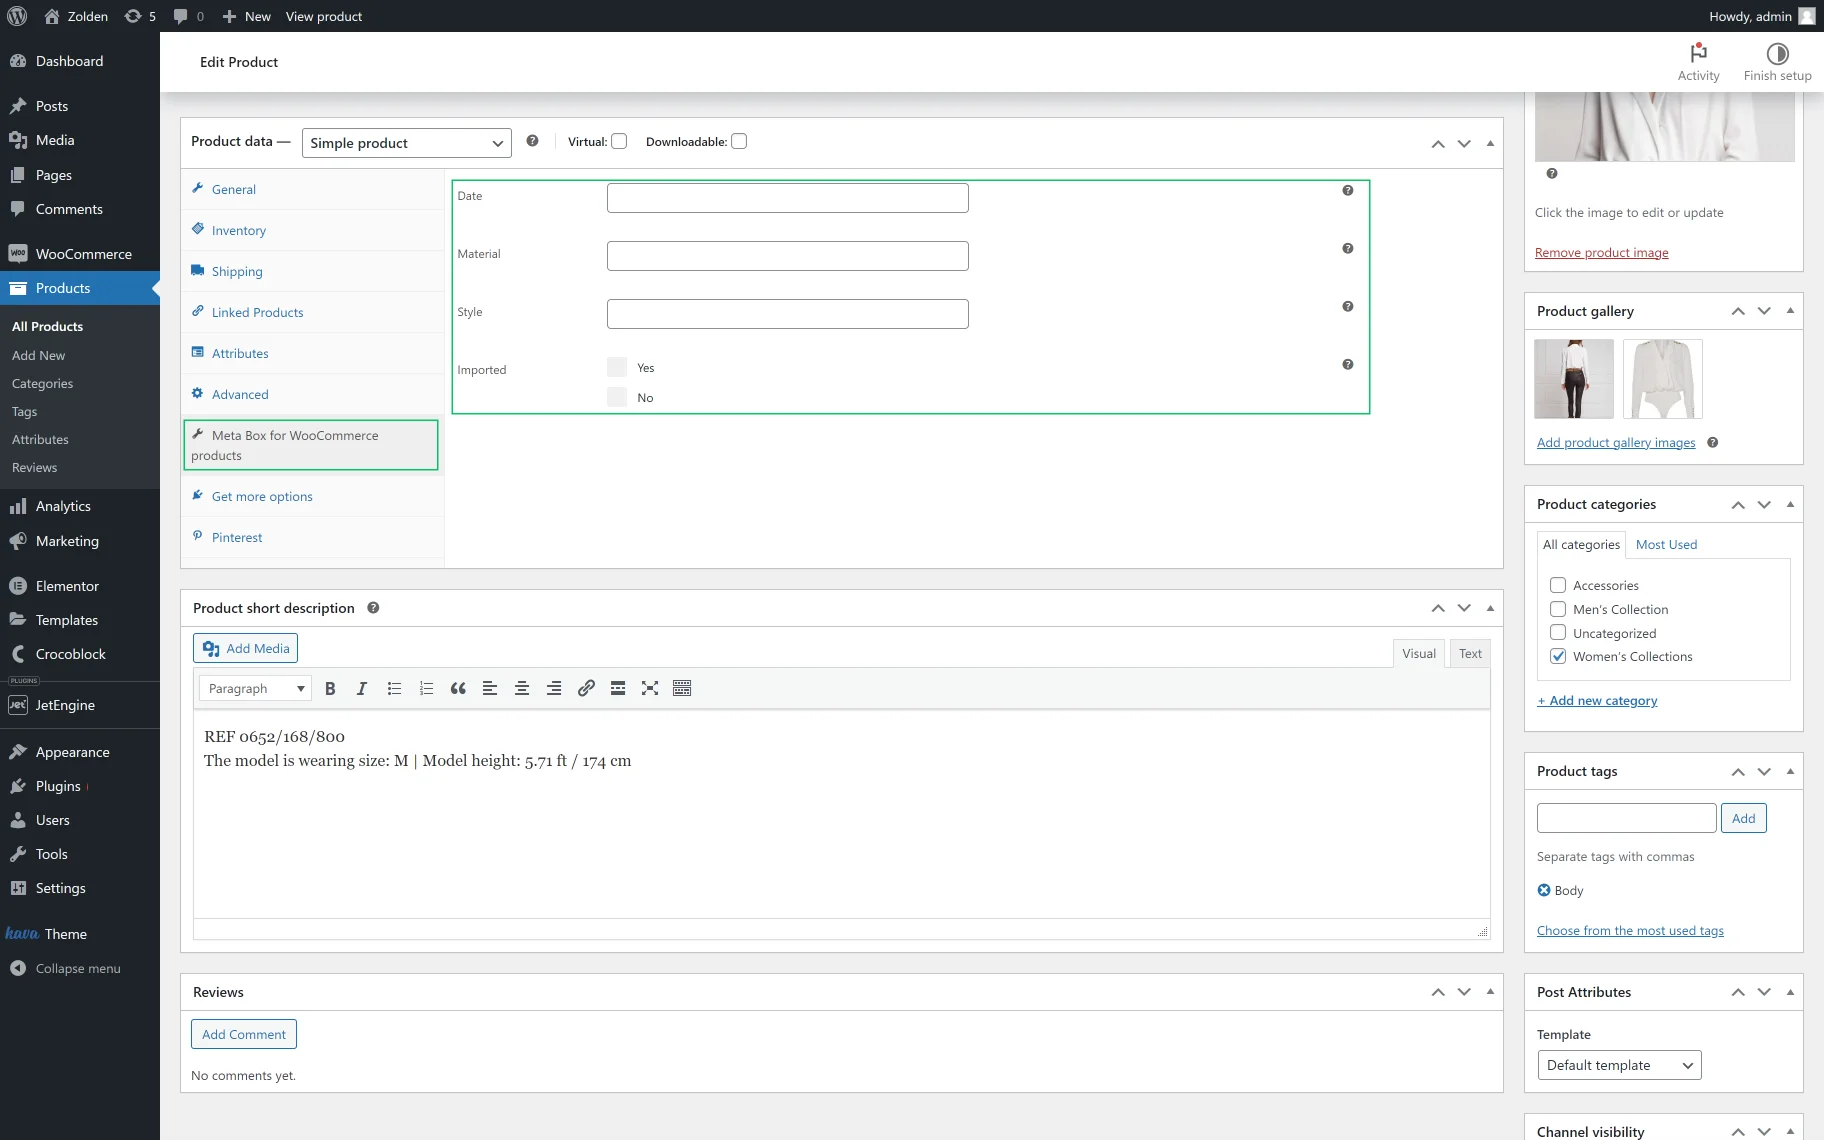
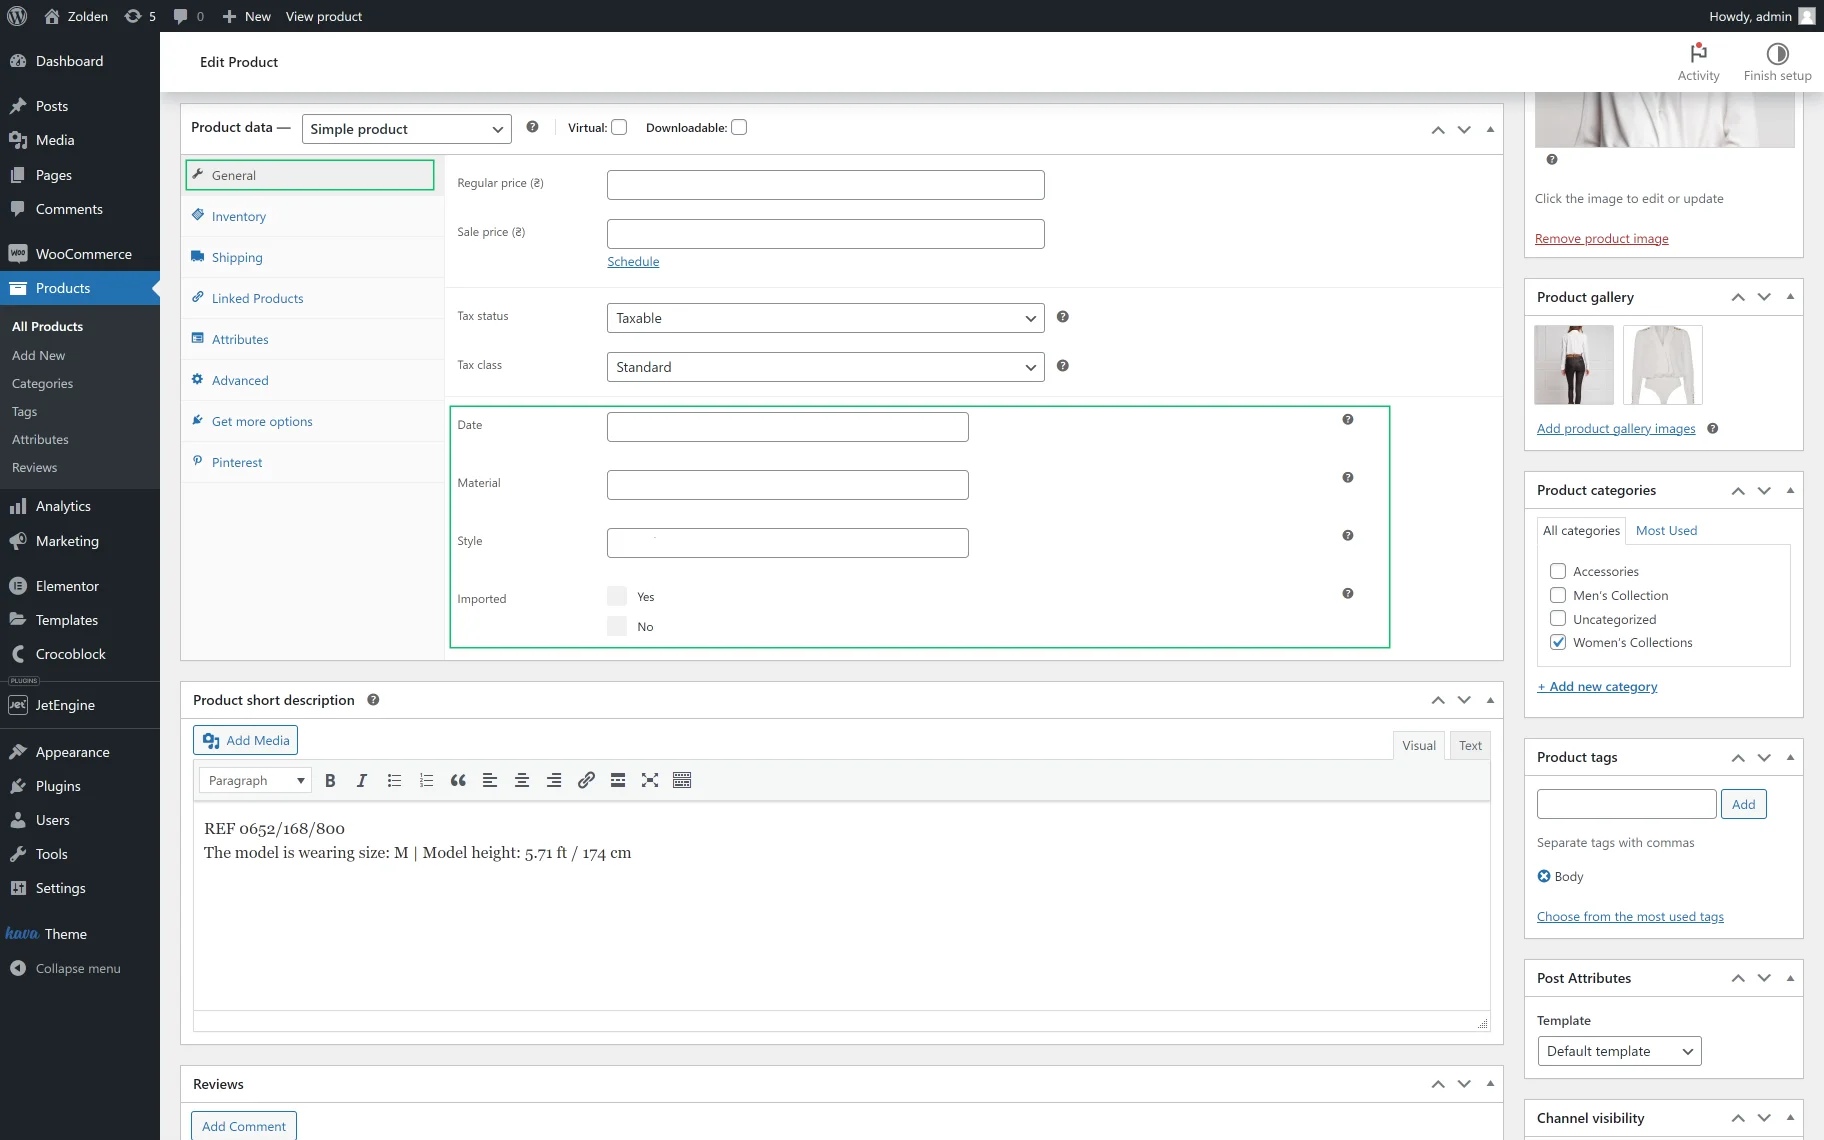
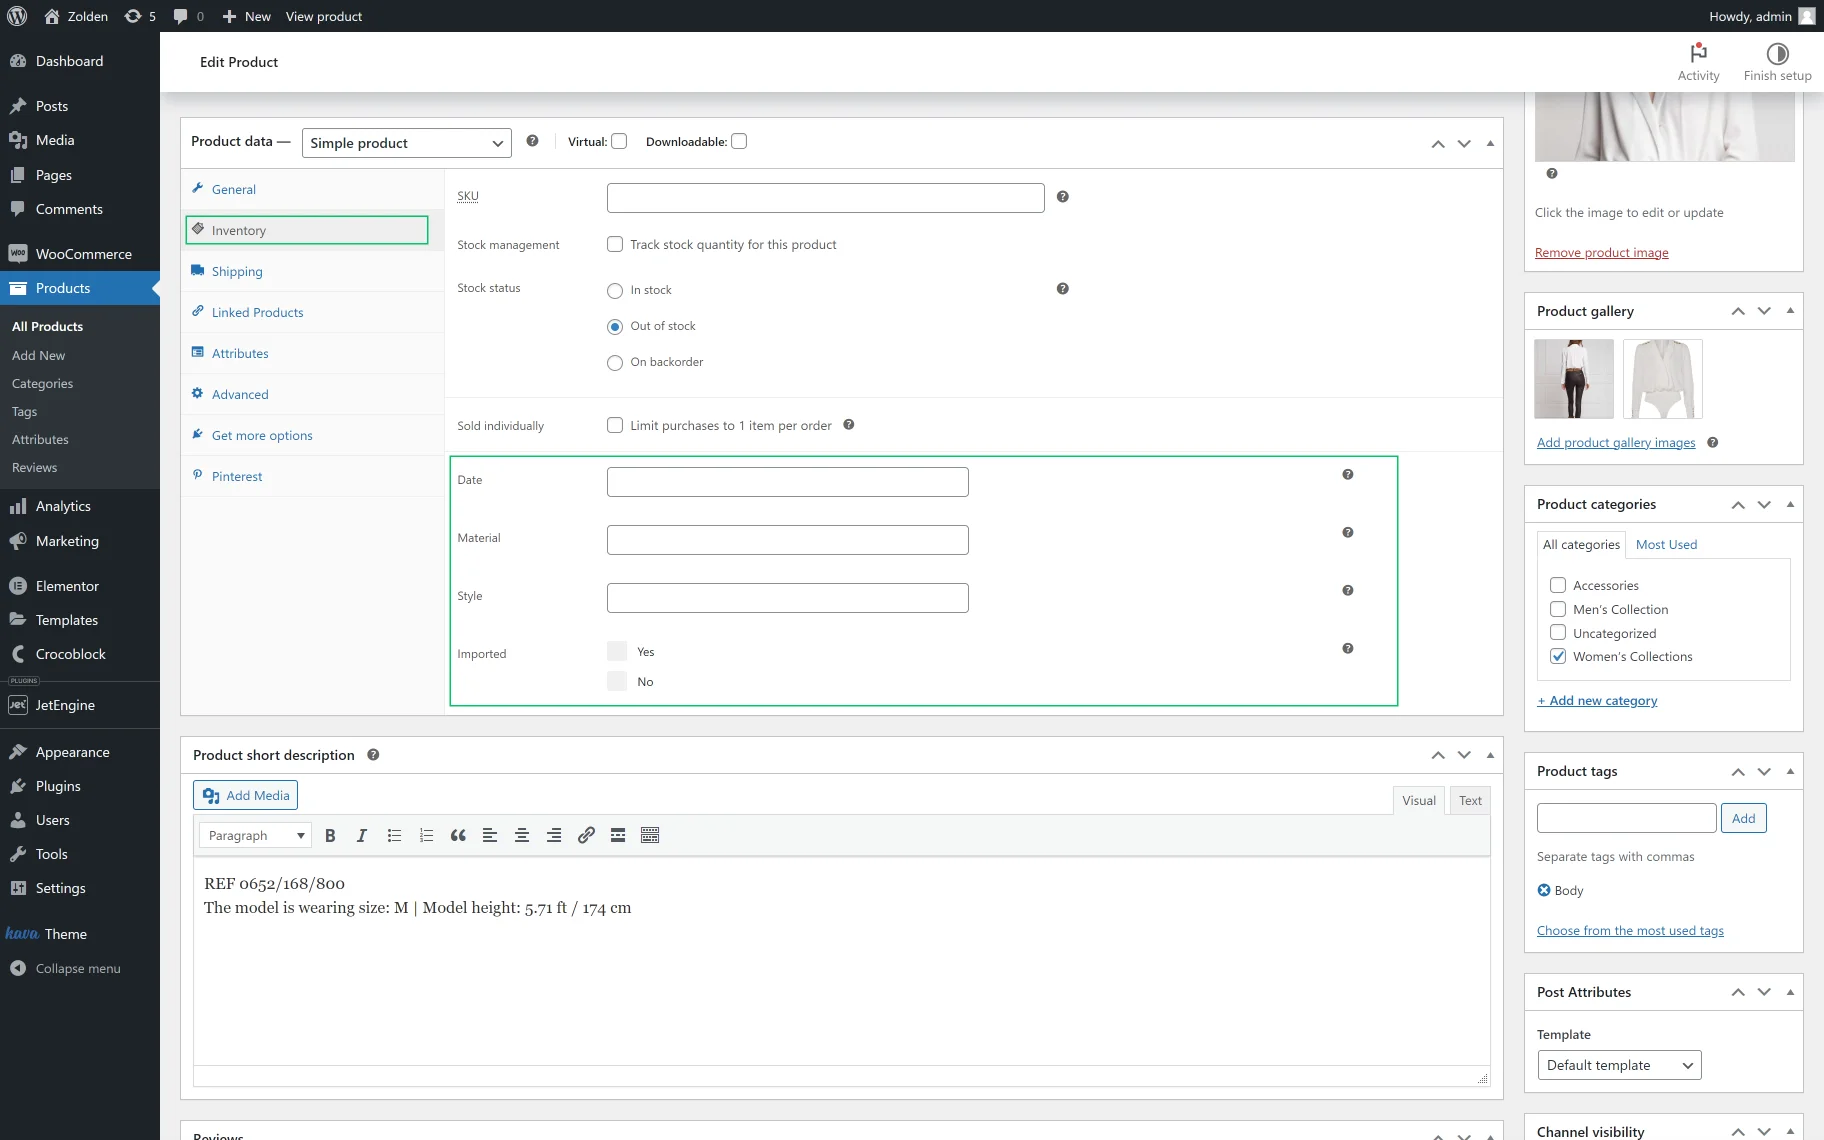
The custom meta fields will appear in the WordPress Dashboard > Products tab when you click to add or edit a product.
Set Visibility Conditions
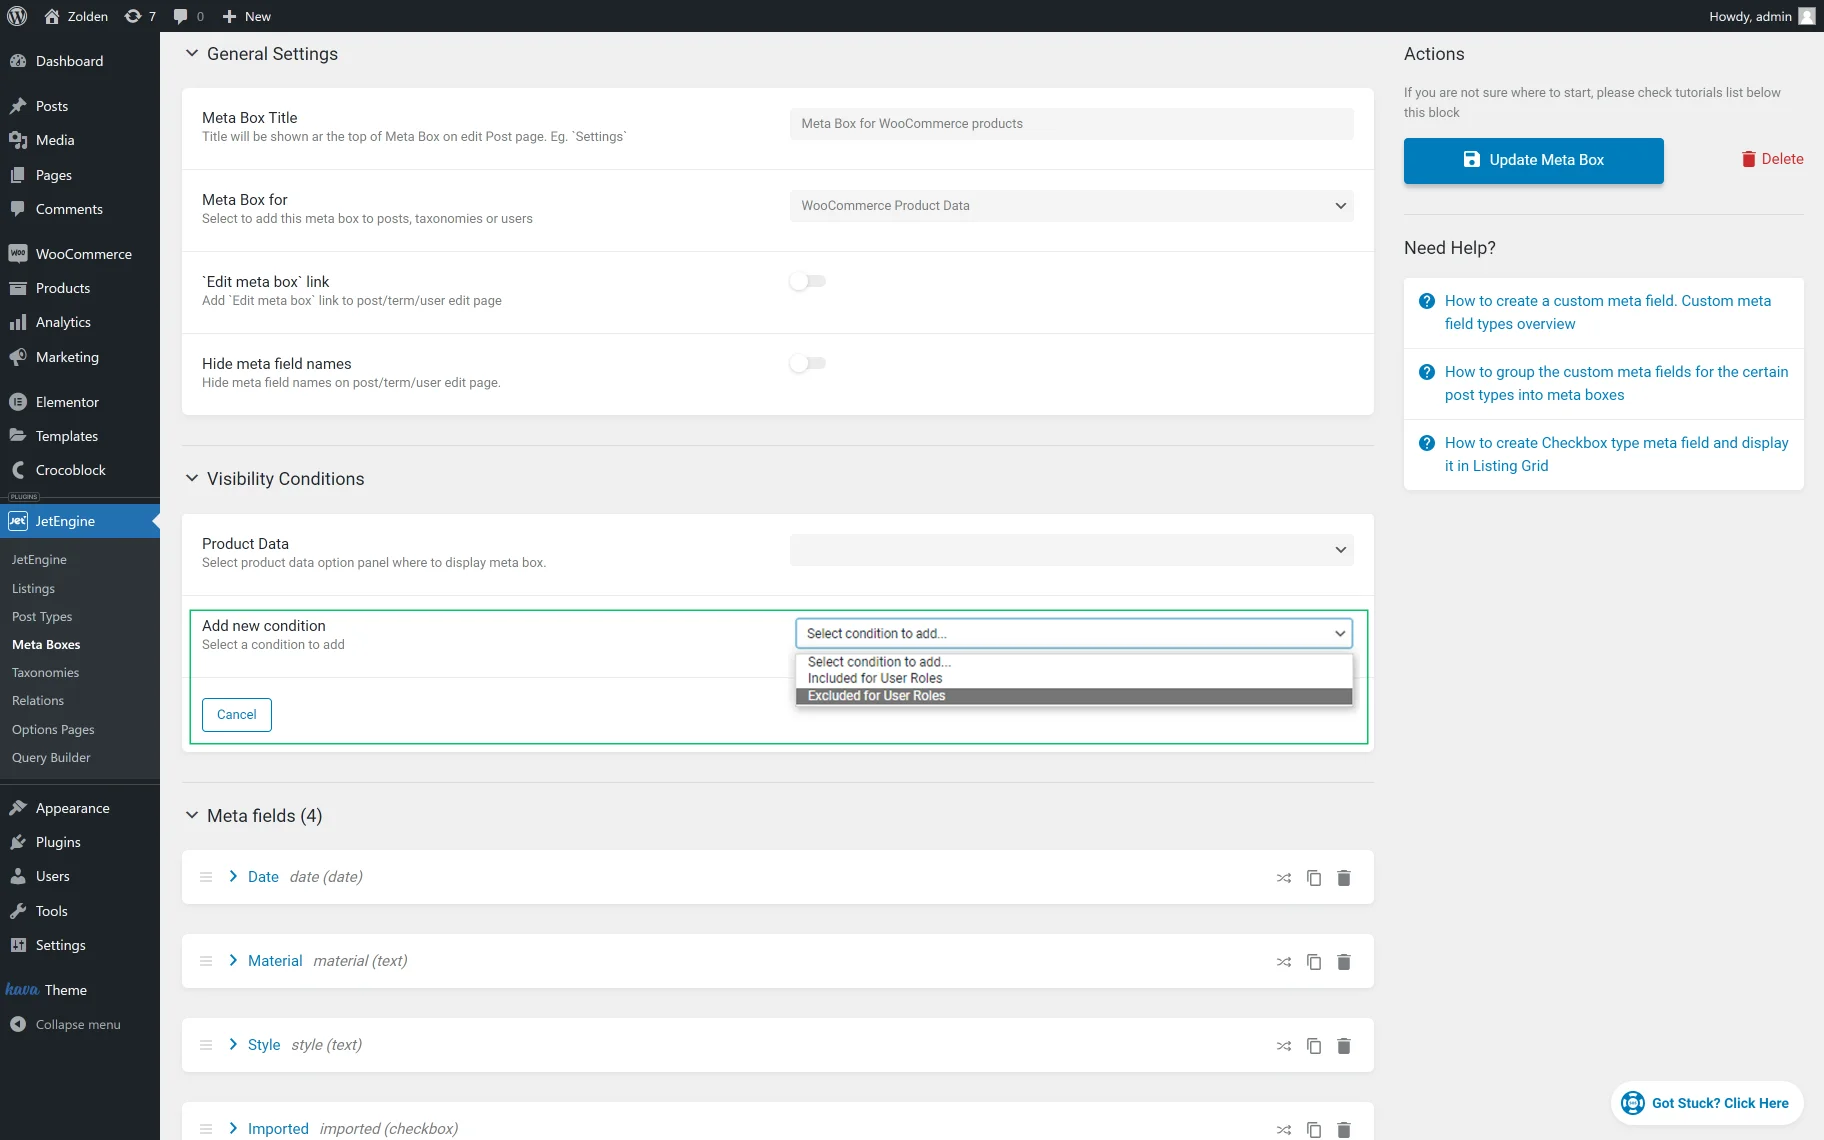
In the Visibility Conditions section of the meta box settings tab, you can indicate where the meta box will be displayed on the product editing page.
In this tab, you can also add a new condition by pressing the “New condition” button.
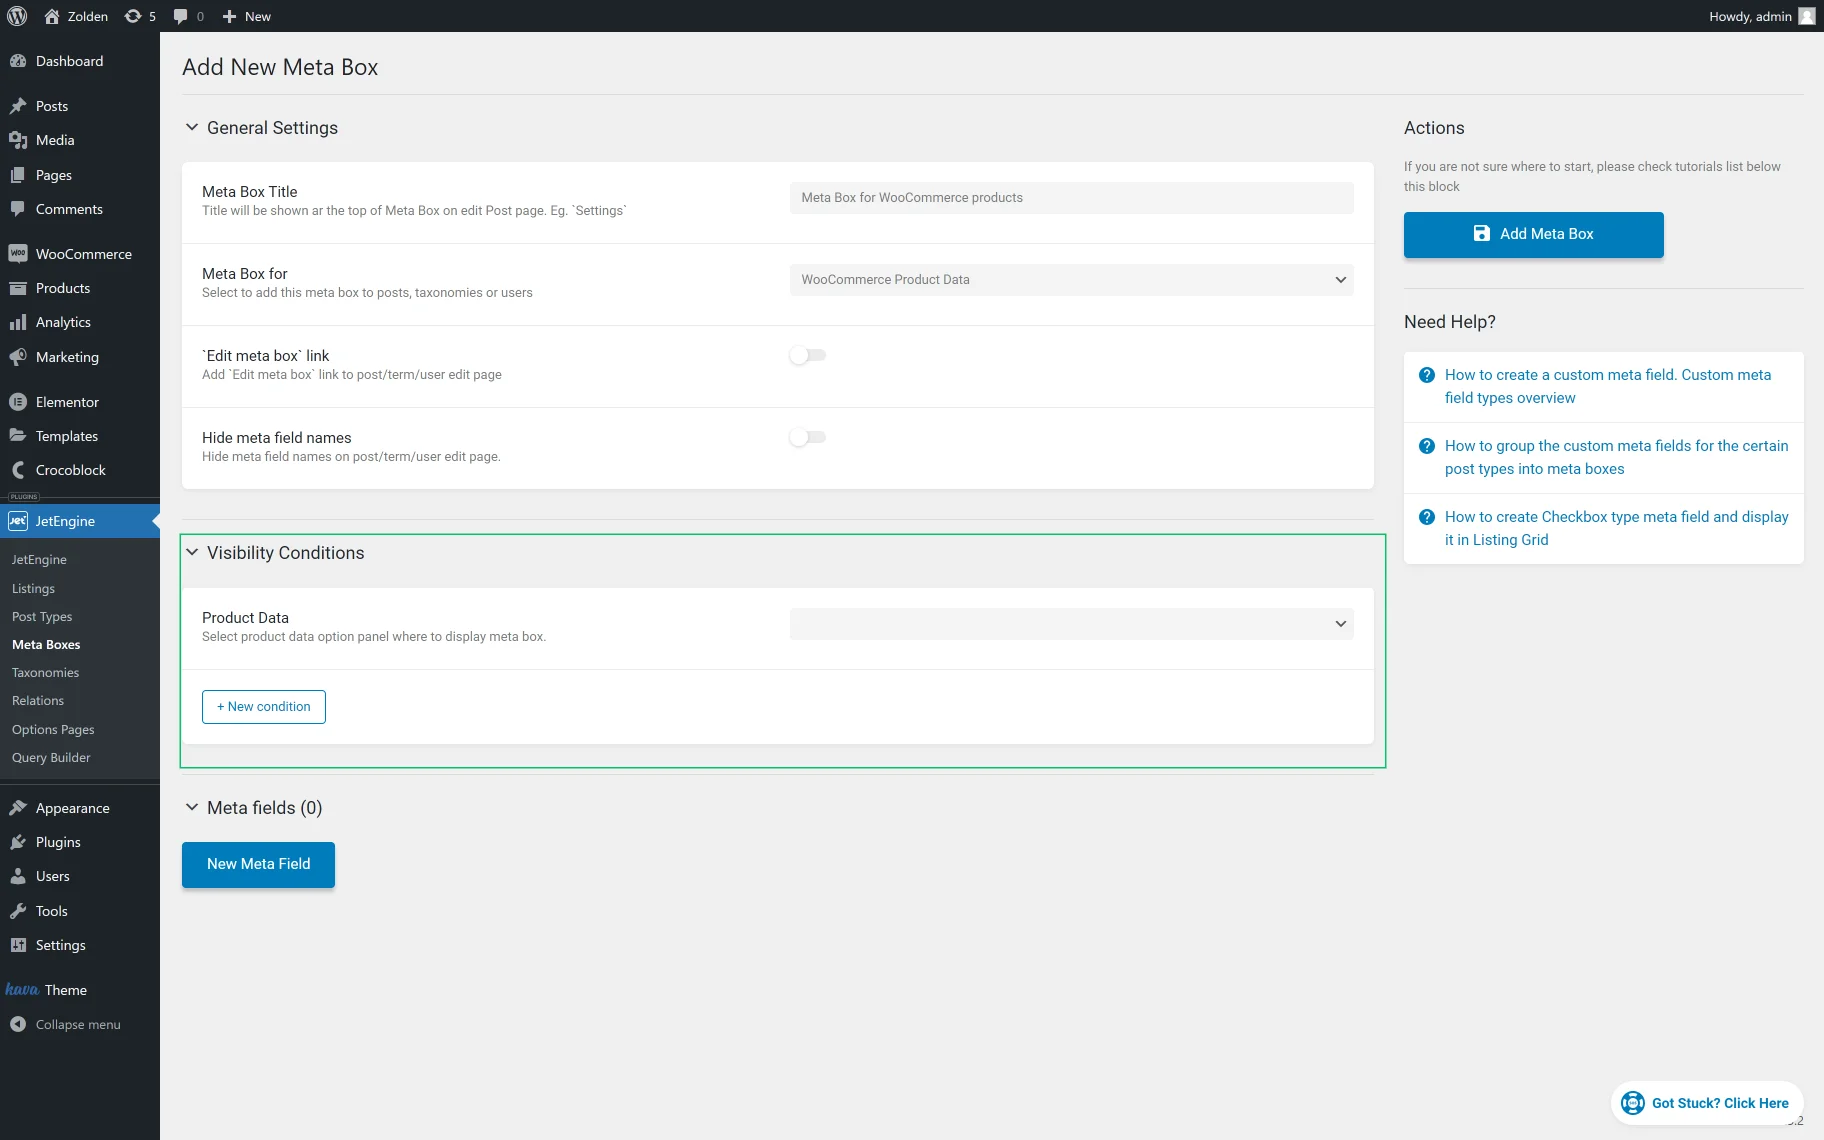
Indicate where the meta box will be displayed
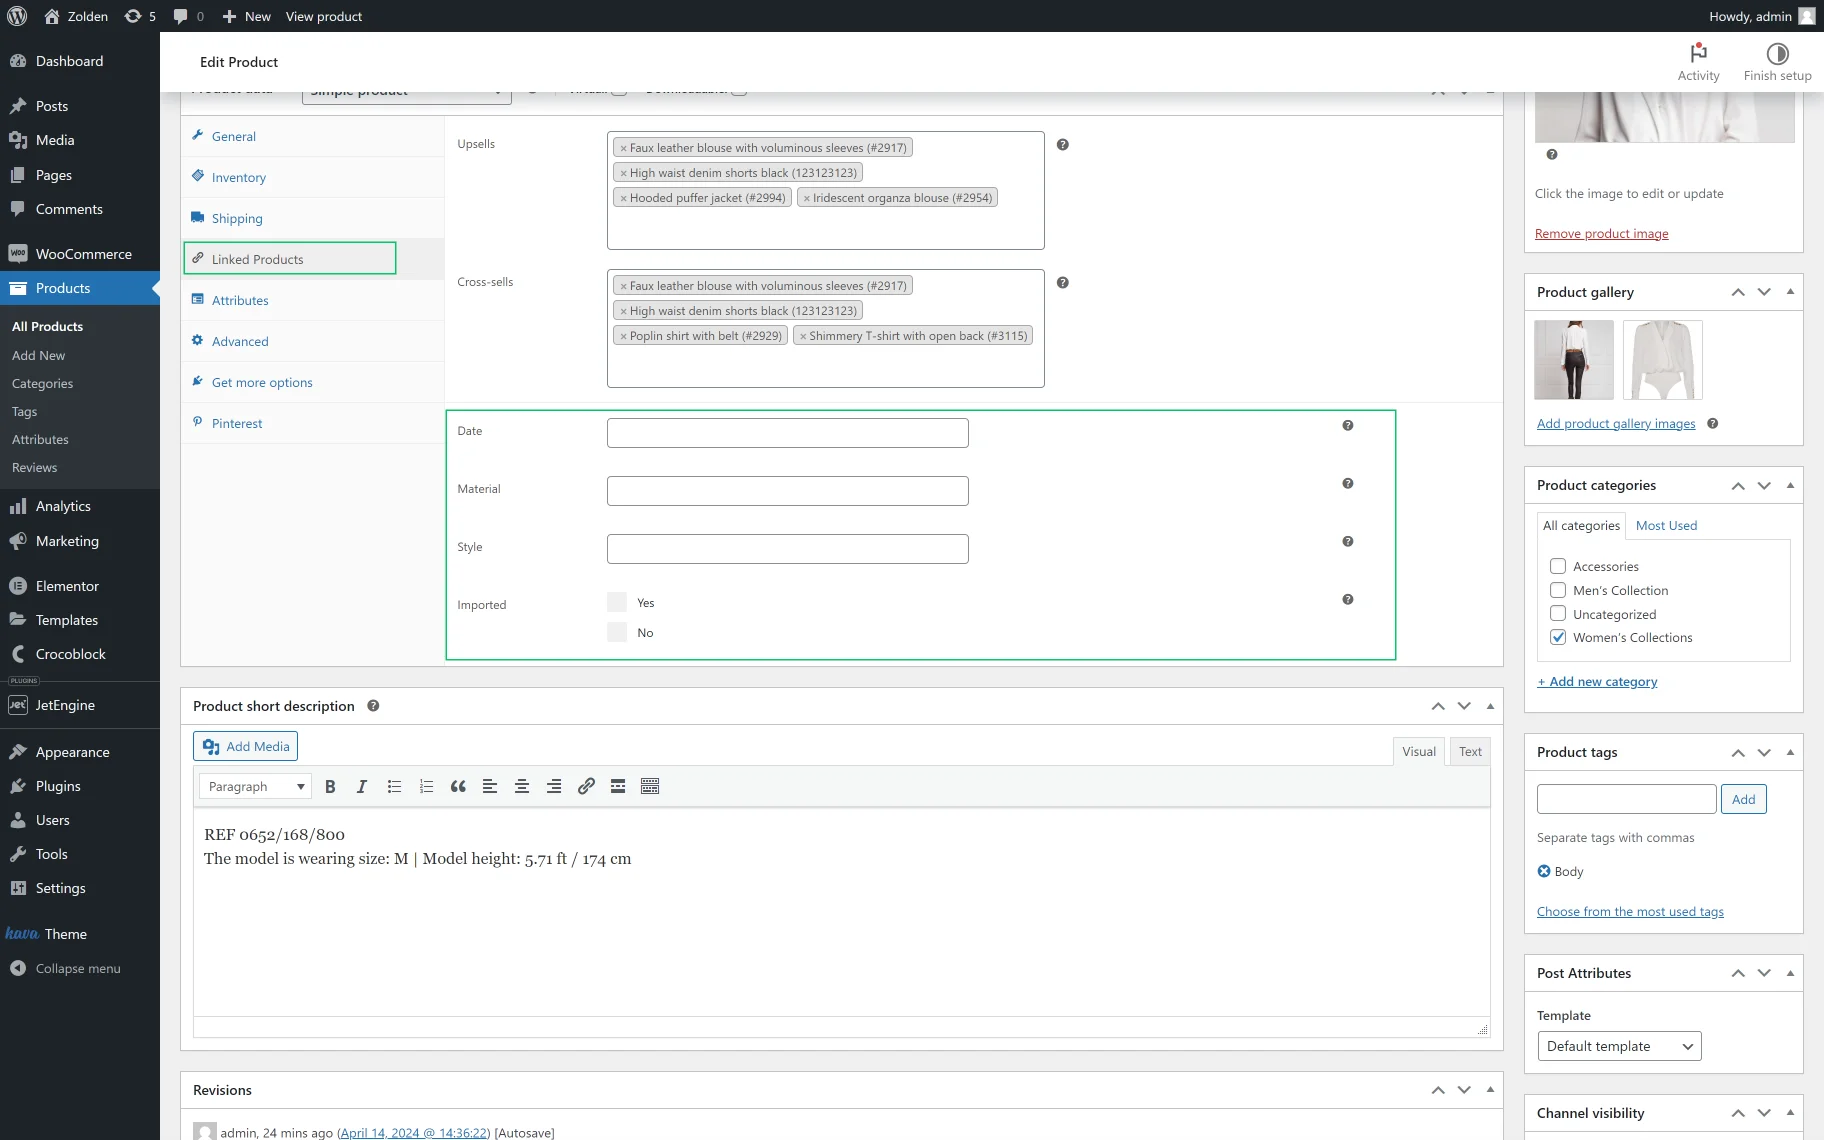
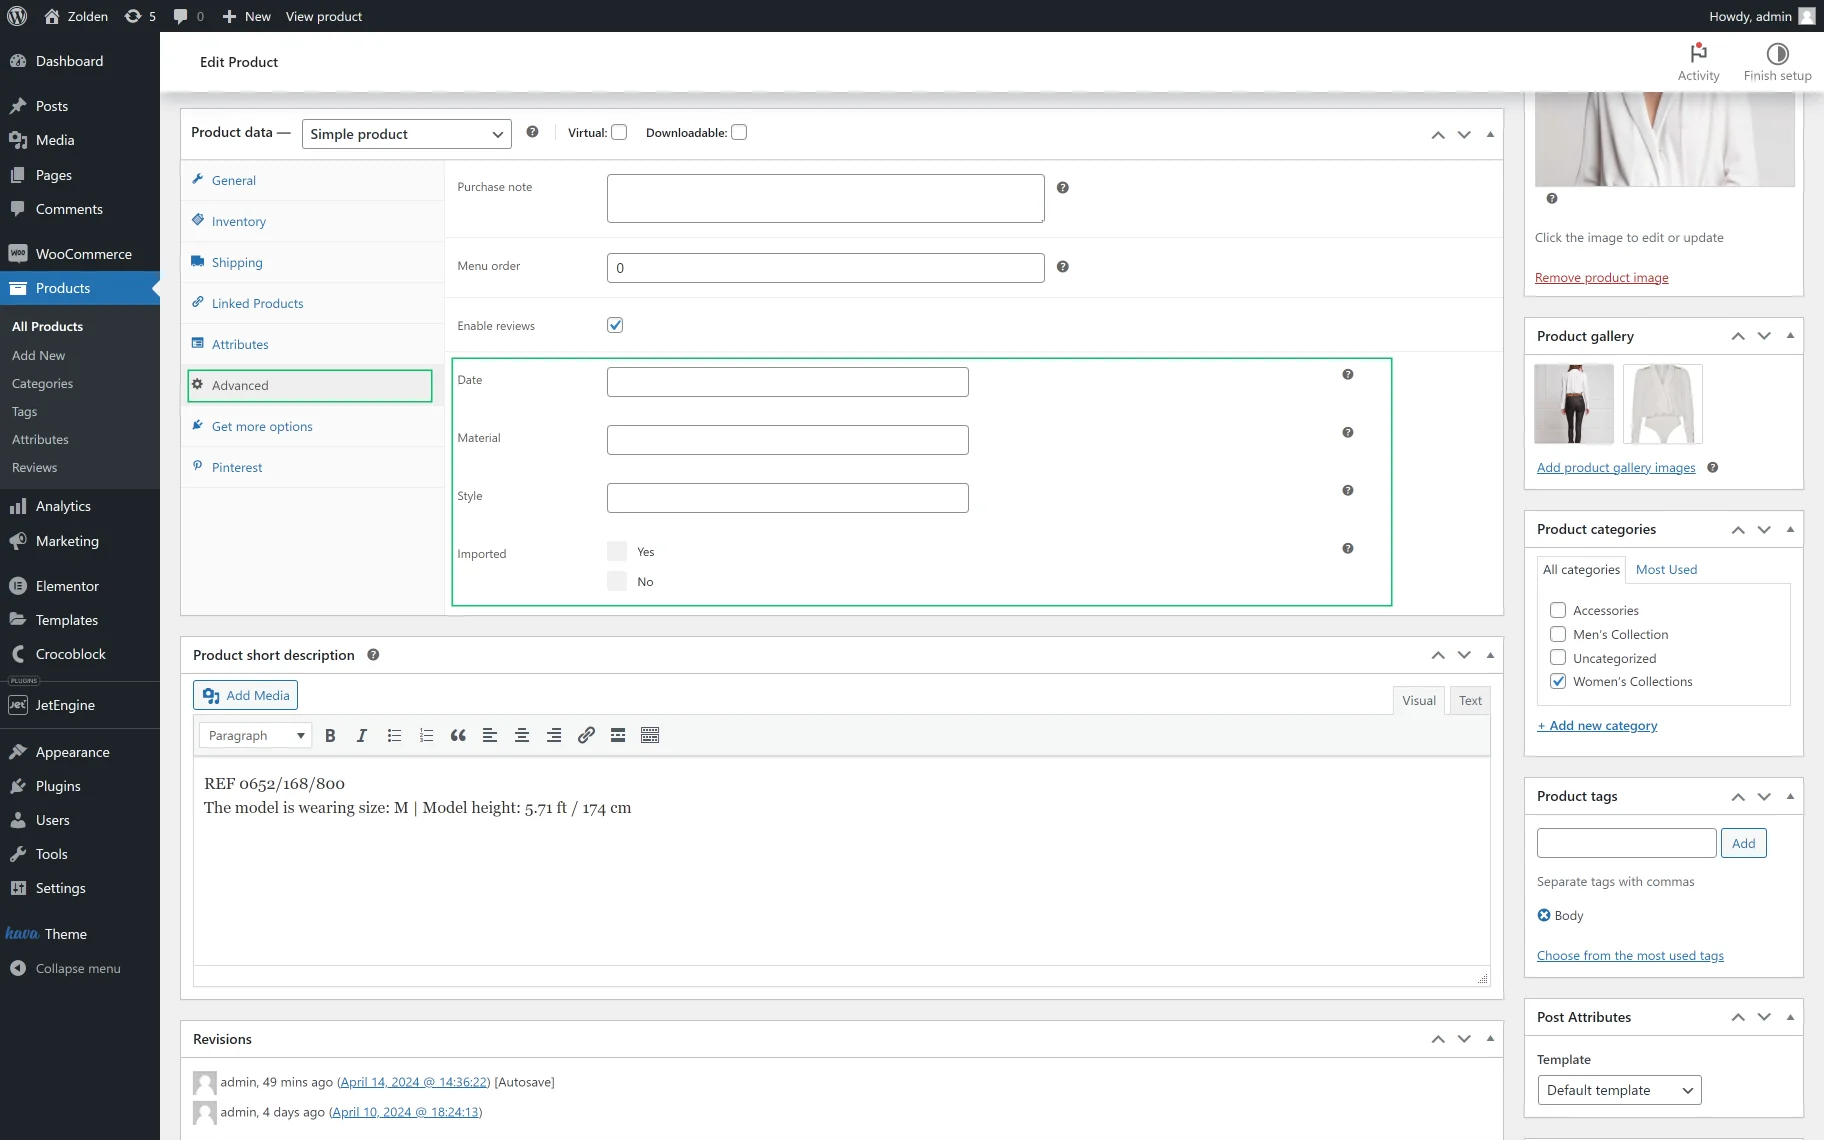
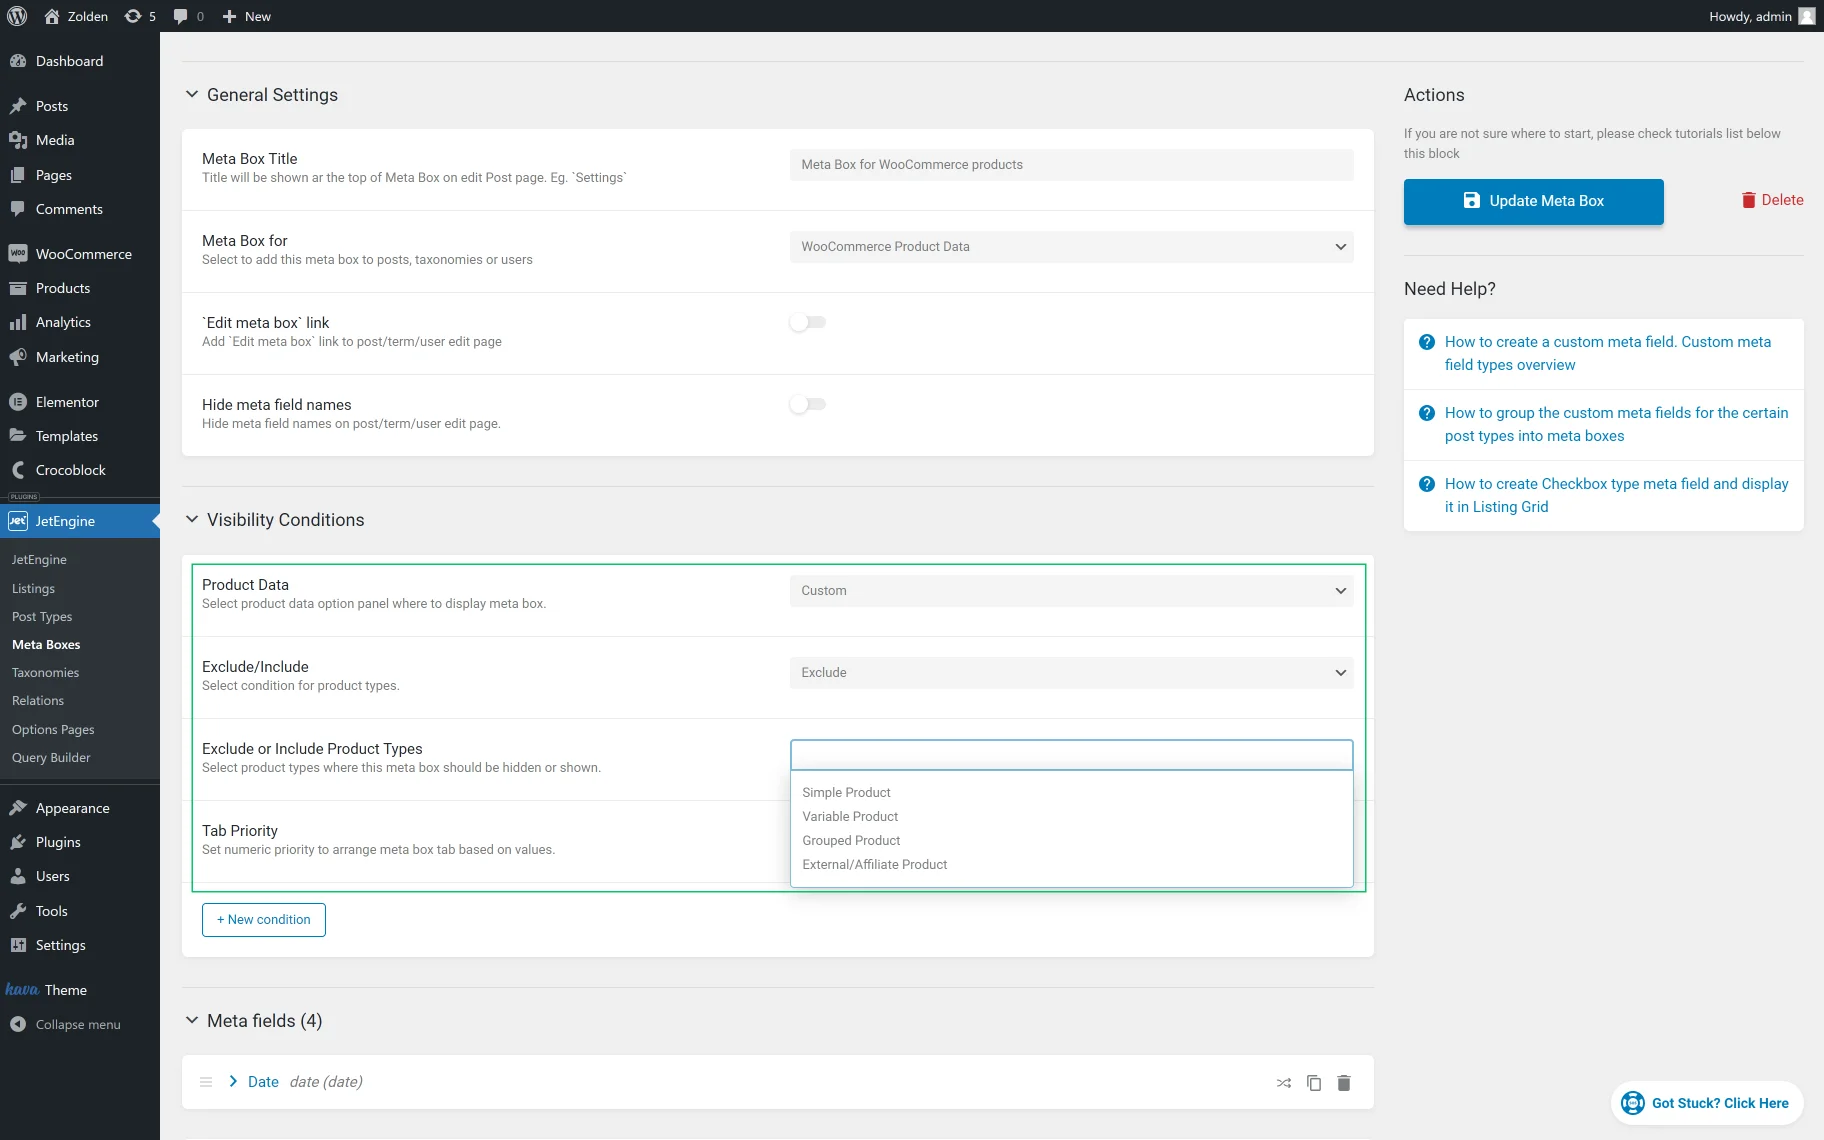
Unroll the Product Data drop-down list of the Visibility Conditions section and select the tab of the Product panel settings where the meta box will be displayed. The Products Data drop-down list includes the “Custom,” “General,” “Inventory,” “Shipping,” “Linked Products,” and “Advanced” options. You can select the needed option from the list or leave the drop-down empty. If you leave the drop-down empty, a separate tab for the meta box in the Product setting panel will be created.
Select the appropriate option from the WordPress Dashboard > Add New Meta Box > Visibility Conditions > Product Data drop-down list and return to the WordPress Dashboard > Products > Edit Products tab to check the position of the created meta box.
- If you select the “Custom” option from the Product Data drop-down list, it will also create a separate tab for the meta box. The created meta box will be displayed below the Advanced tab of the Product setting panel.
- If you select the “General” option from the Product Data drop-down list, the created meta fields will be displayed at the end of the General tab of the Product setting panel.
- If you select the “Inventory” option from the Product Data drop-down list, the created meta fields will be displayed at the end of the Inventory tab of the Product setting panel.
- If you select the “Shipping” option from the Product Data drop-down list, the created meta fields will be displayed at the end of the Shipping tab of the Product setting panel.

- If you select the “Linked Products” option from the Product Data drop-down list, the created meta fields will be displayed at the end of the Linked Products tab of the Product setting panel.
- If you select the “Advanced” option from the Product Data drop-down list, the created meta fields will be displayed at the end of the Advanced tab of the Product setting panel.
If you select any option from the Product Data drop-down list, the Exсlude/Include drop-down list and Tab Priority text field become available.
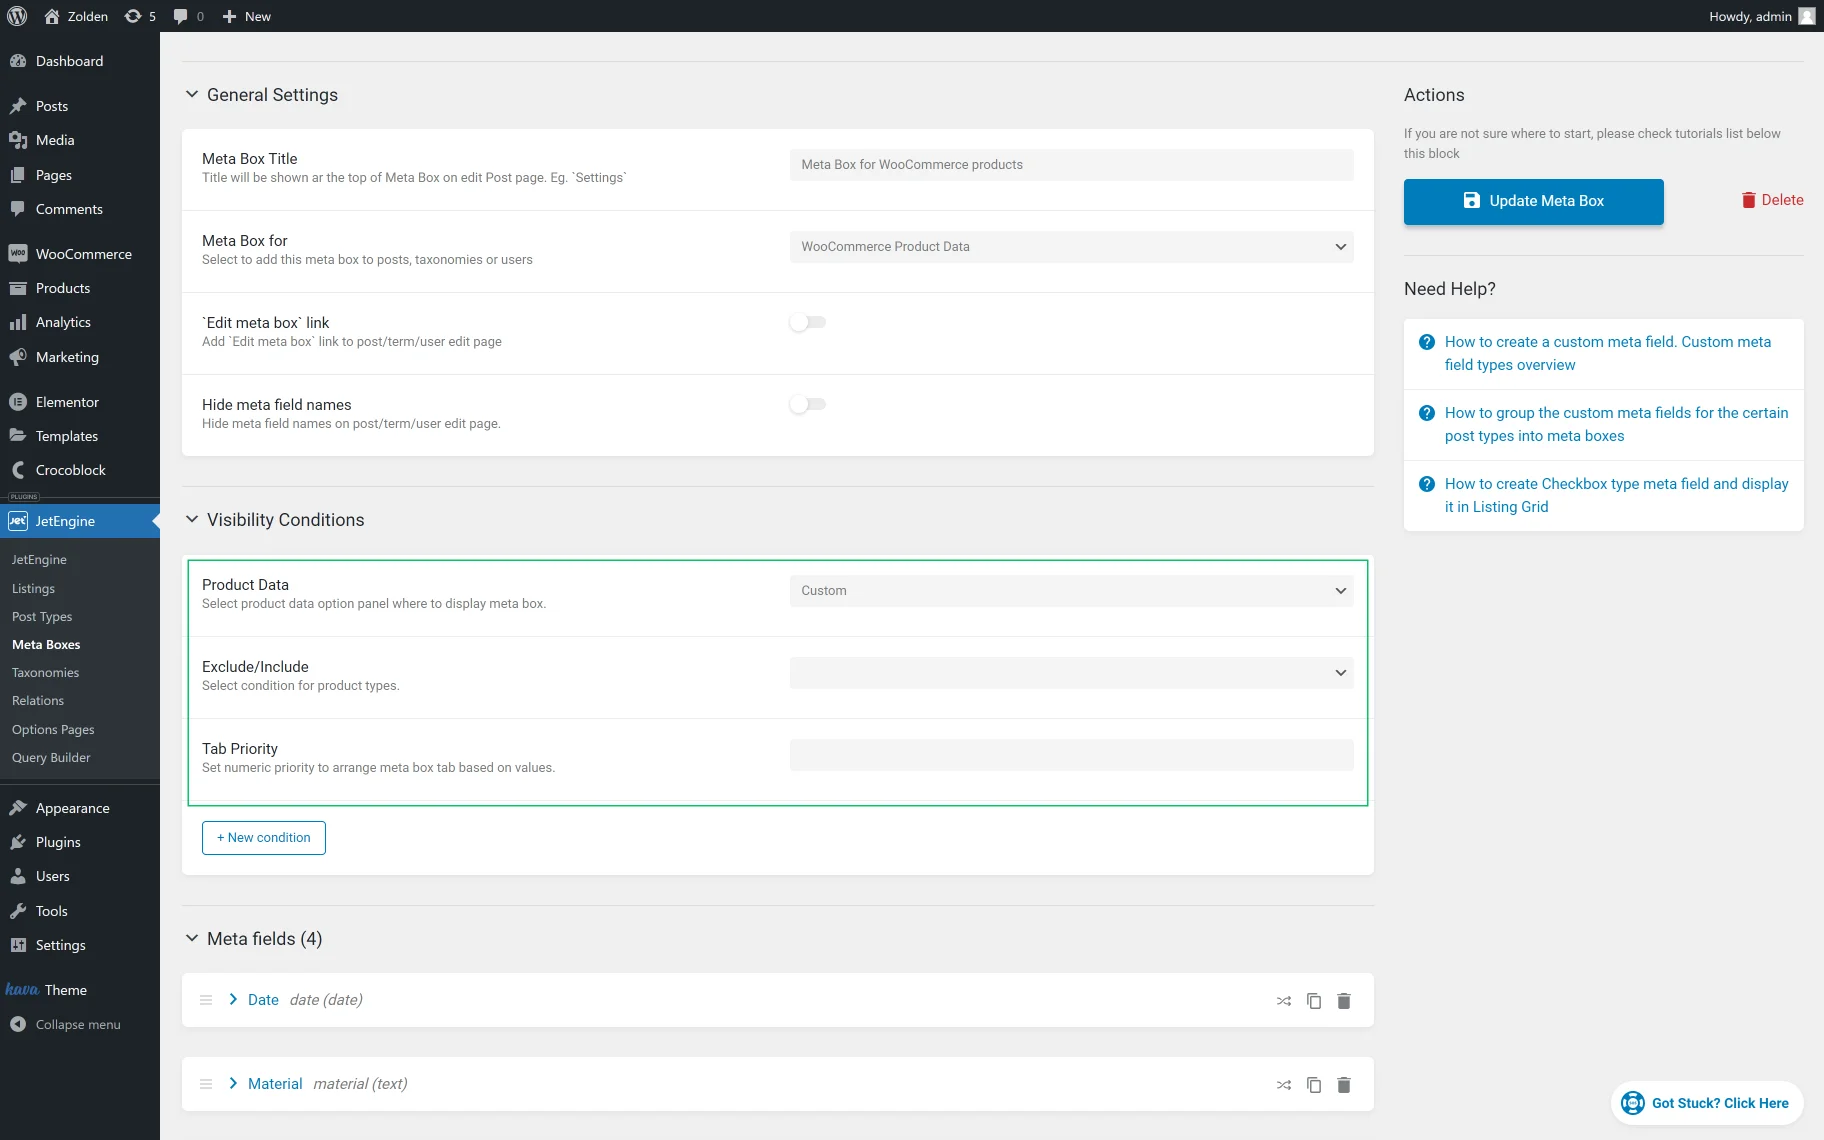
The Exсlude/Include drop-down list is disabled by default, so the meta box will be shown for all product types. After picking an option in the Exclude/Include selector, the Exclude or Include Product Types drop-down list will appear.
The Exclude or Include Product Types drop-down list allows you to choose product types in which the meta boxes will be displayed or hidden, according to the option selected in the Exclude/Include field.
The Tab Priority text field is responsible for the numeric priority of the meta box against other tabs; it is set as an integer. The smaller the number, the higher the tab will be displayed in the list.
For example, if you set “1” in the Tab Priority field, the meta box tab will be the first in the product panel.
All other options in the Products Data drop-down list from the Visibility Conditions section don’t have any additional settings and have the same functionality. If you select them, the meta fields from the meta box will be added to the existing tabs.
Add new visibility conditions
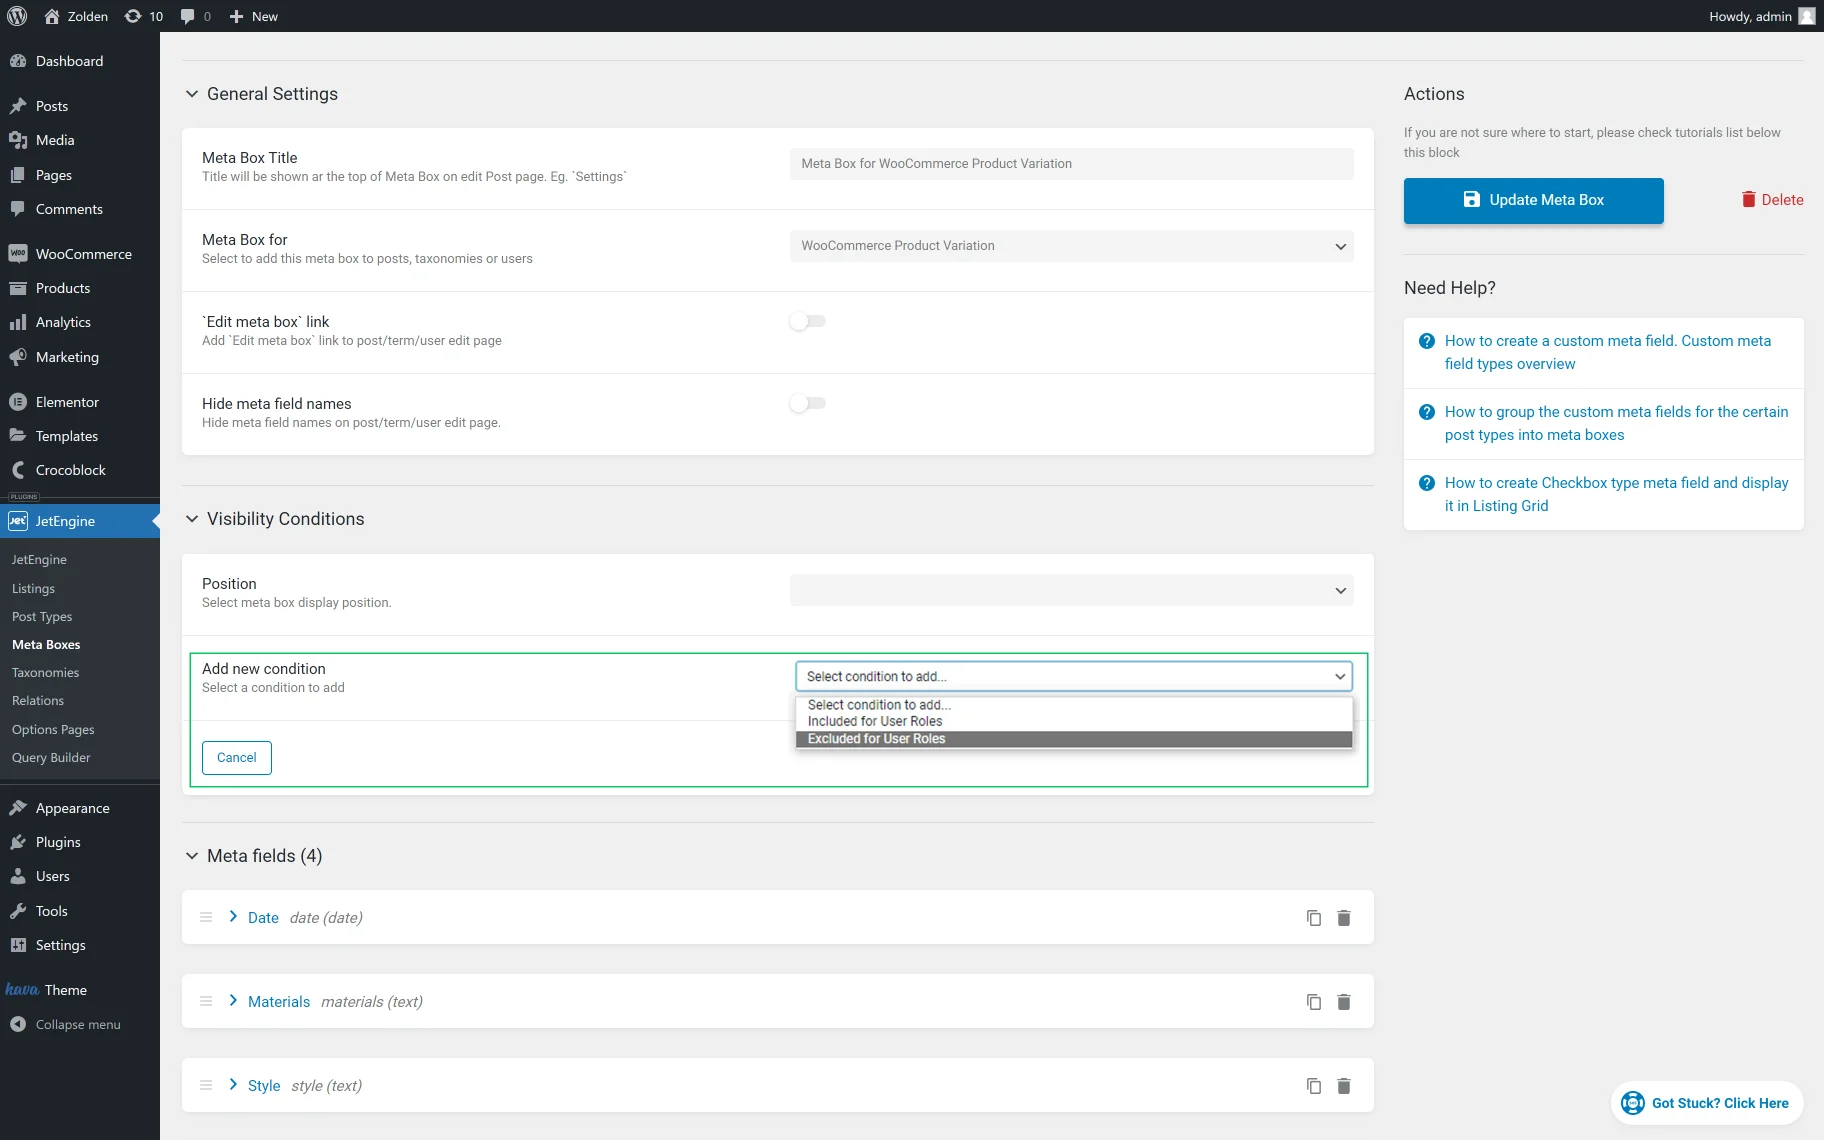
Pressing the “New condition” button unrolls the Add new condition drop-down list, which has two options to select: “Included for User Roles” and “Excluded for User Roles.”

If selected, any of these options enable the Included for User Roles and Exclude for User Roles drop-down lists, which allow selecting some options, such as “Administrator,” “Author,” and more.
Fill in the Meta Fields
You can now return to the product editing page, fill in the meta fields, and hit the “Update” button.
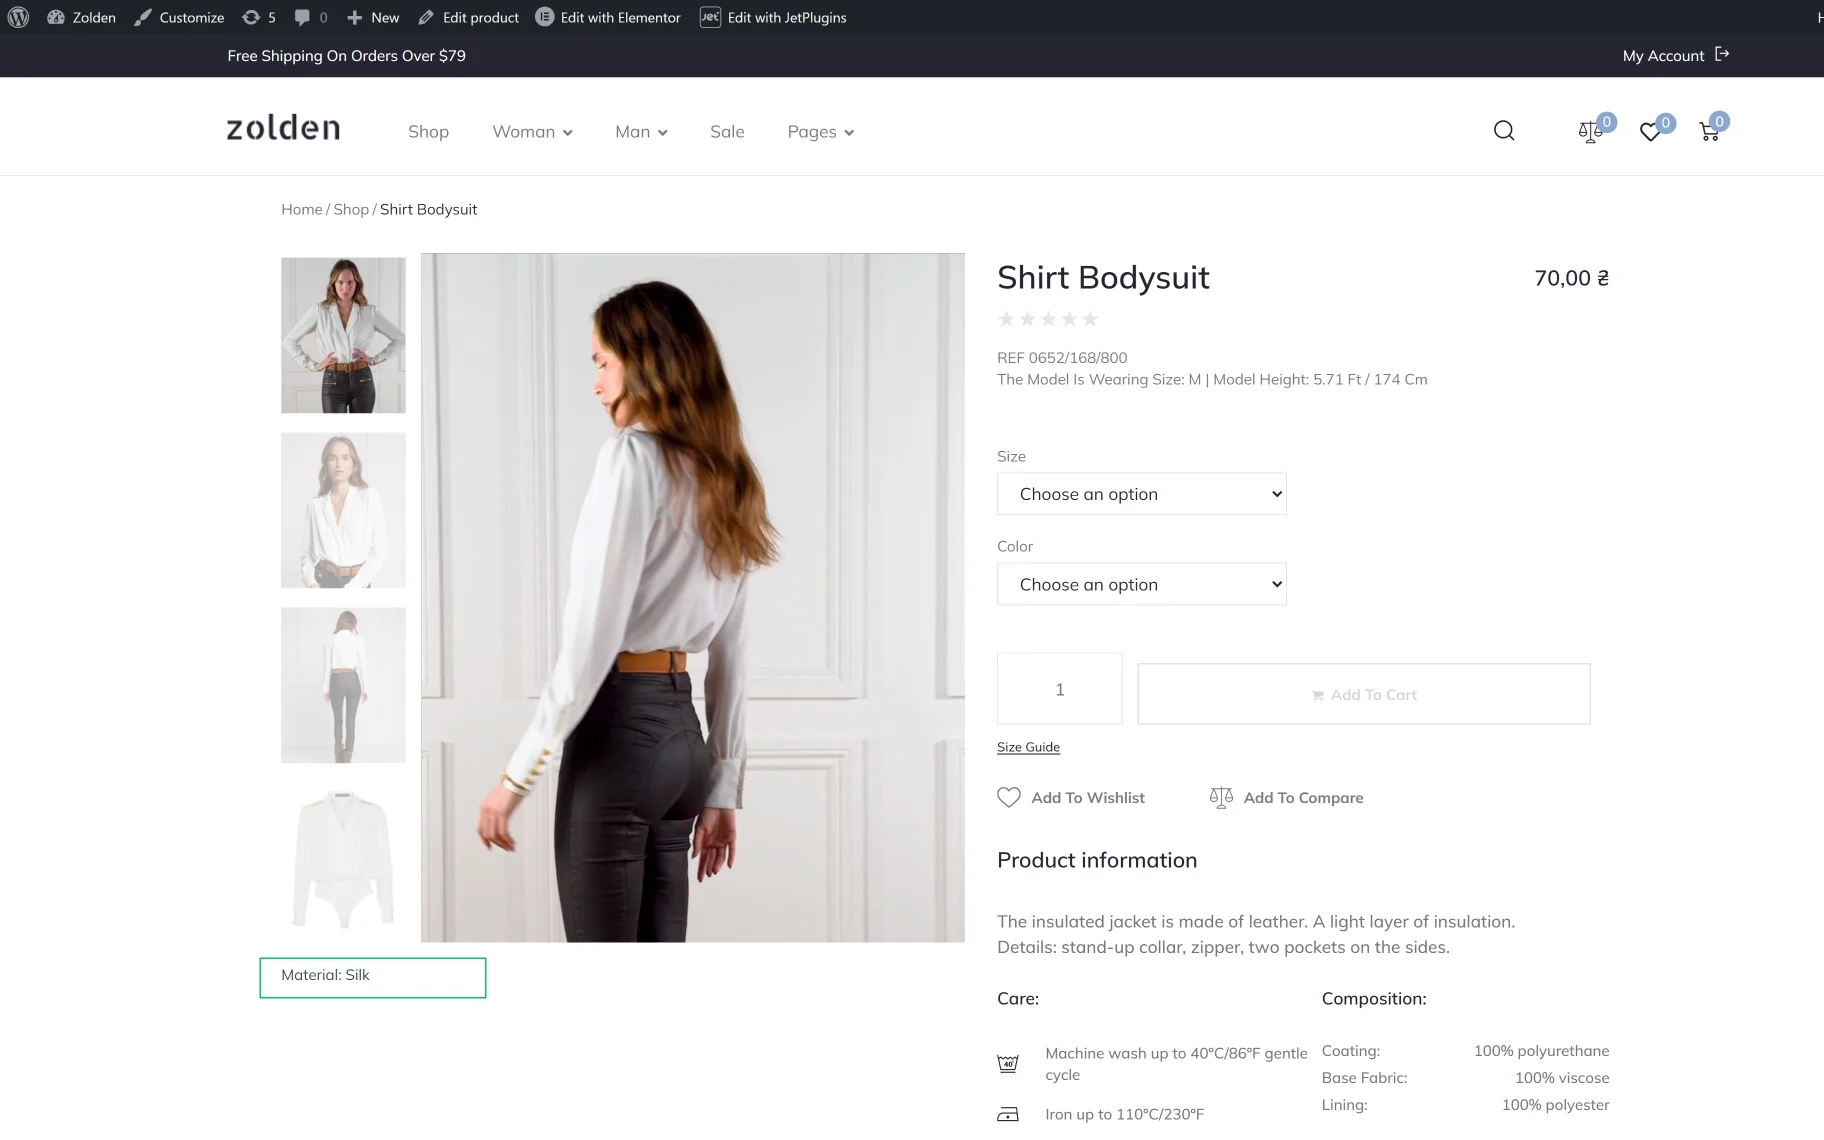
Display Meta Fields on the Single Product Page
To learn how to create a single product template, read the How to Create a Single Product Page Template tutorial.
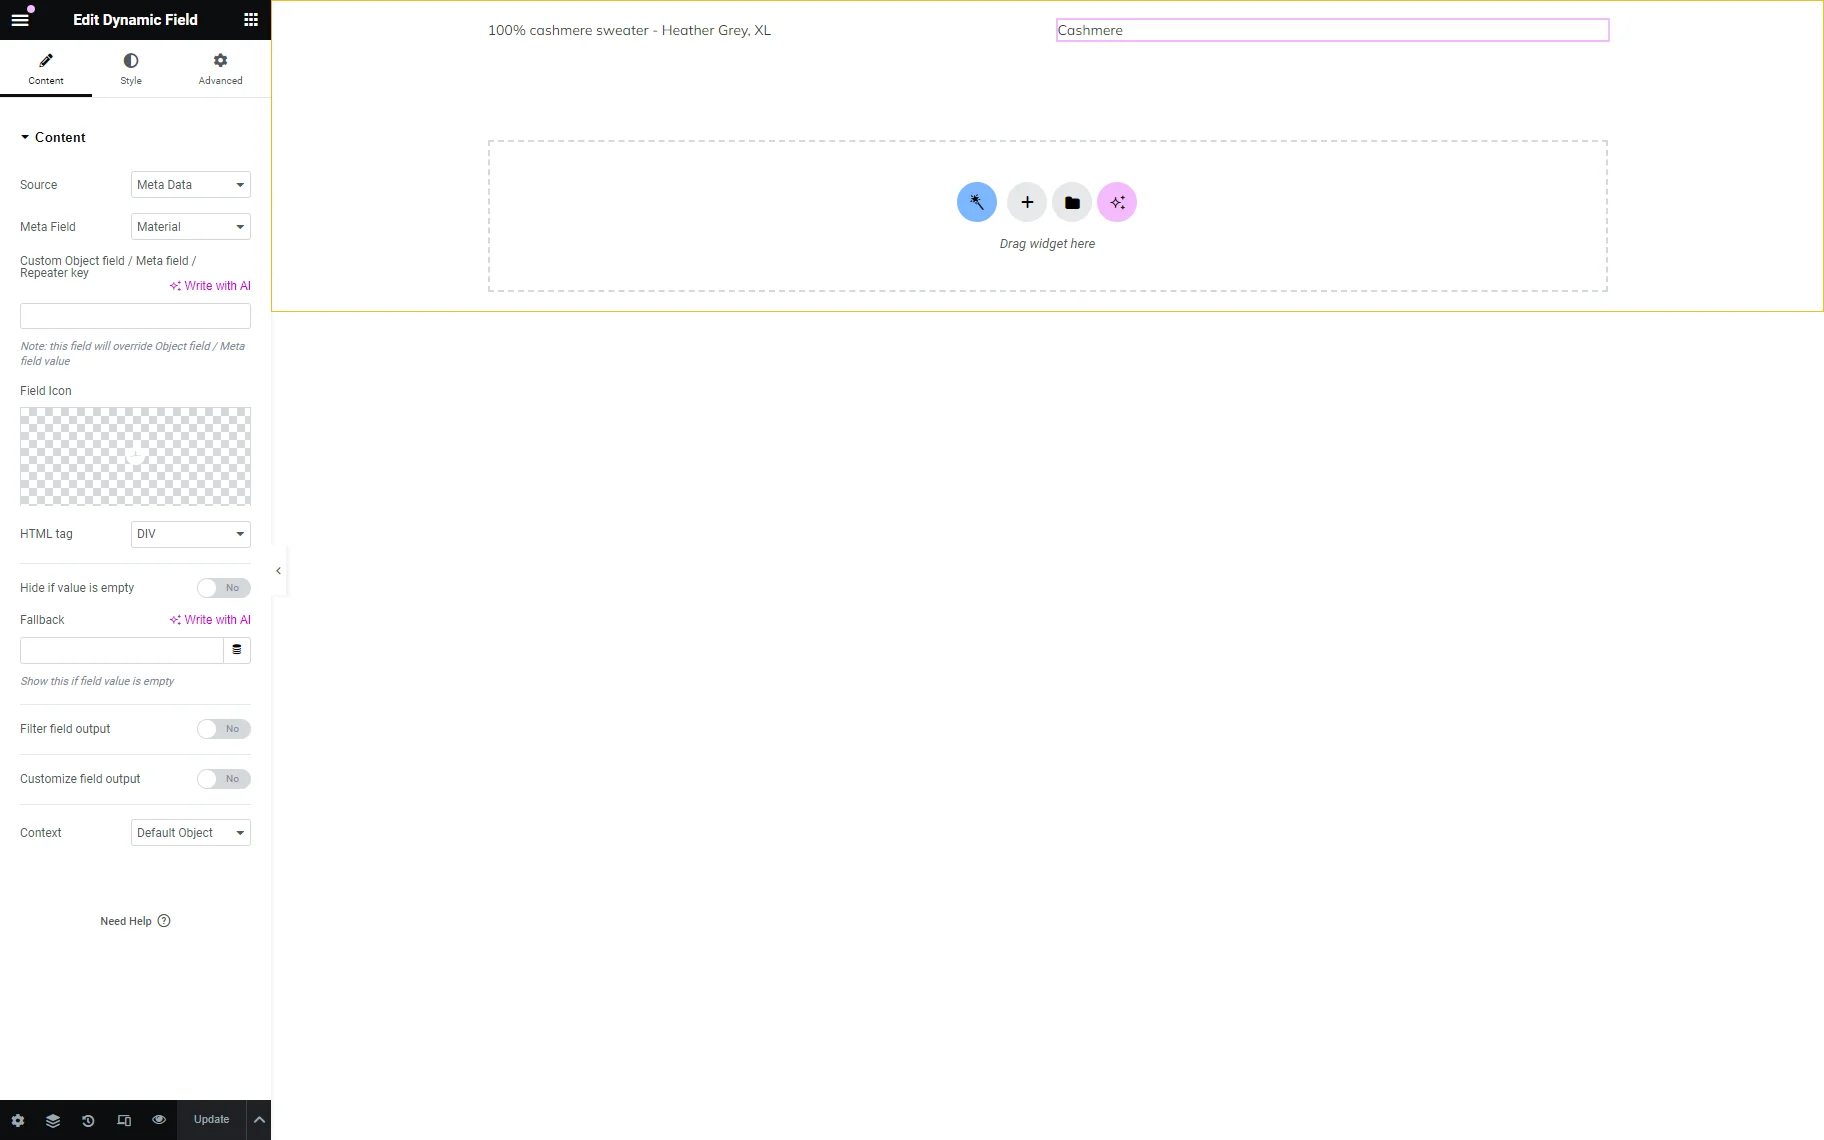
Open the page in the Elementor editor and drag-n-drop the Dynamic Field widget. Then, select the “Meta Data” Source and choose the needed Meta Field you want to display.
Also, use the Customize field output option to add text before or after the value.
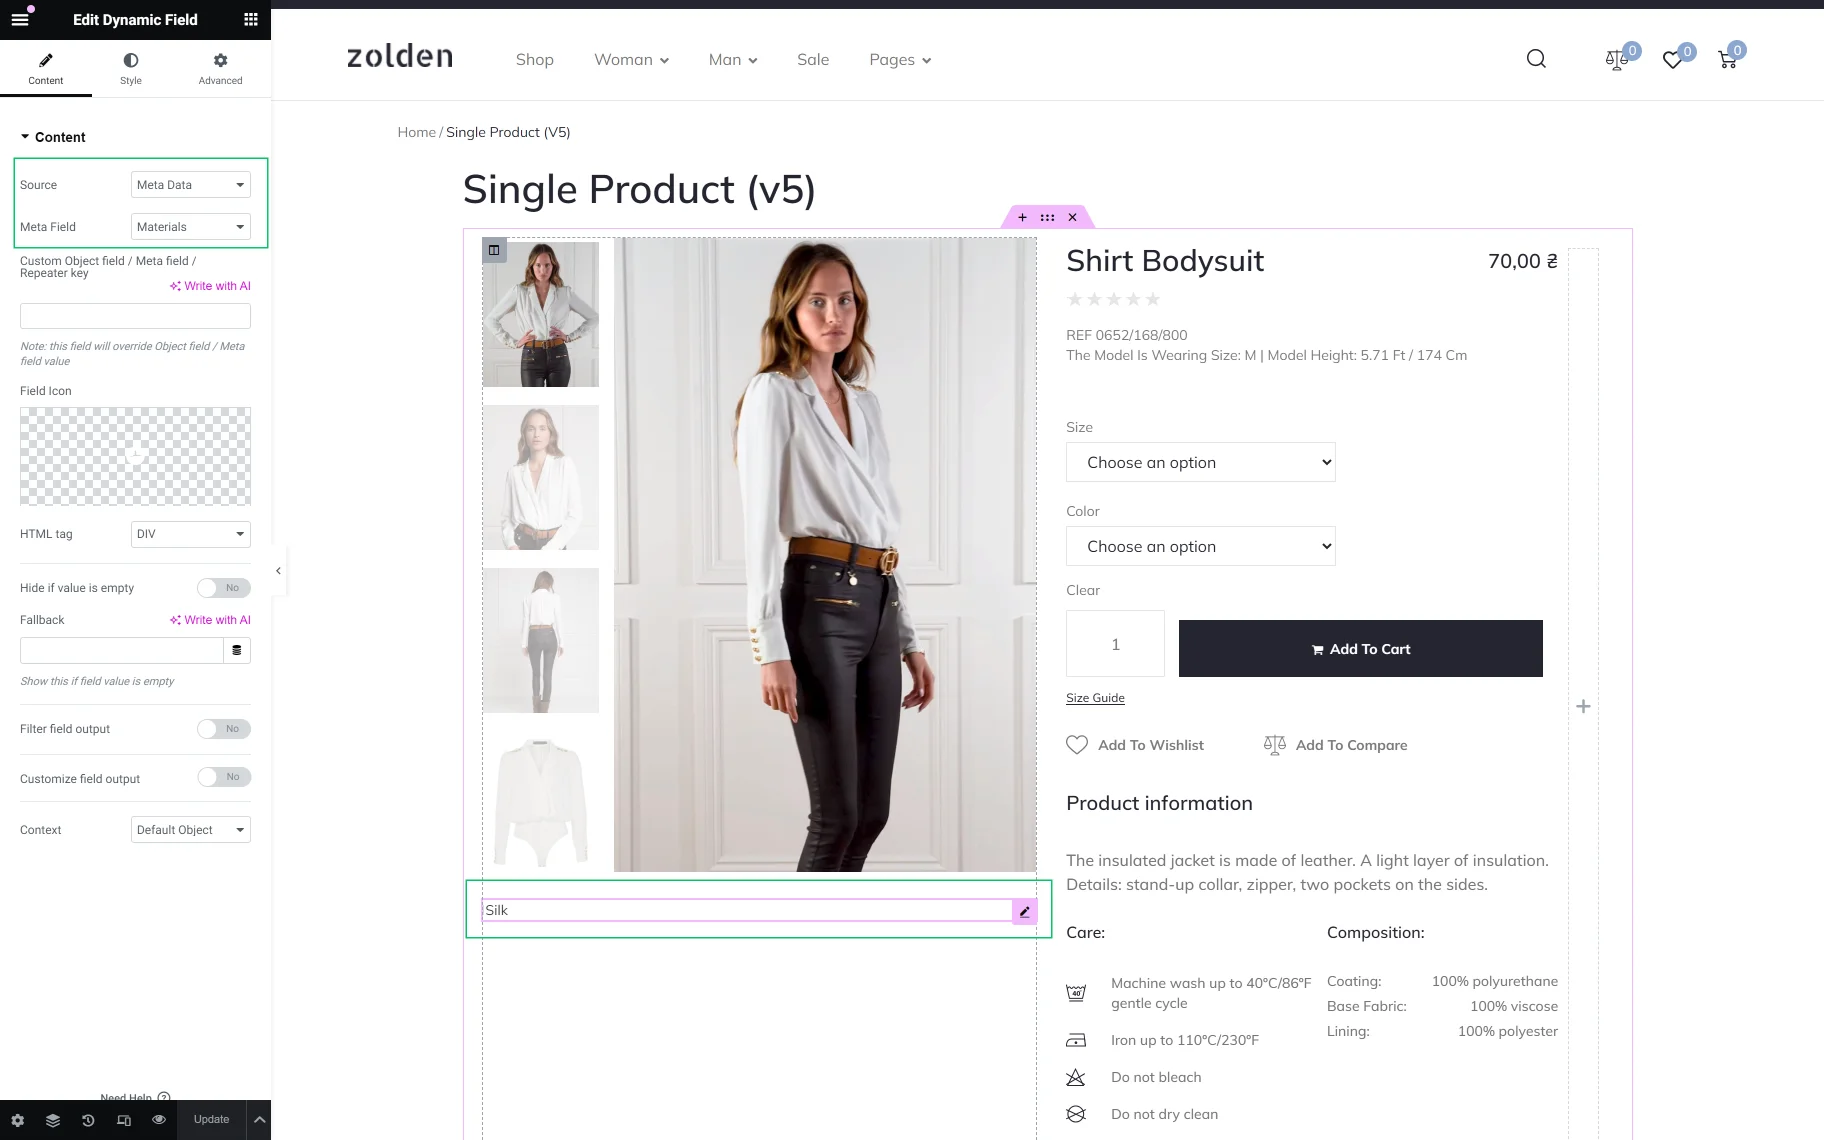
If you left this meta field empty, enable the Hide if value is empty toggle to hide the Dynamic Field widget on the front end.

Hit the “Update” button and check the result on the front end.
WooCommerce Product Variation
General Settings
When creating the meta box, in the General Settings section of the Add New Meta Box tab, enter the Meta Box Title and select the “WooCommerce Product Variation” option in the Meta Box for drop-down list.
Add meta fields for WooCommerce Product Variation
Create the needed meta fields in the Meta fields section. Learn more about the meta field creation from the Custom Field Types Overview.
In the given case, we added four meta fields: “Date,” “Materials,” “Style,” and “Imported.”
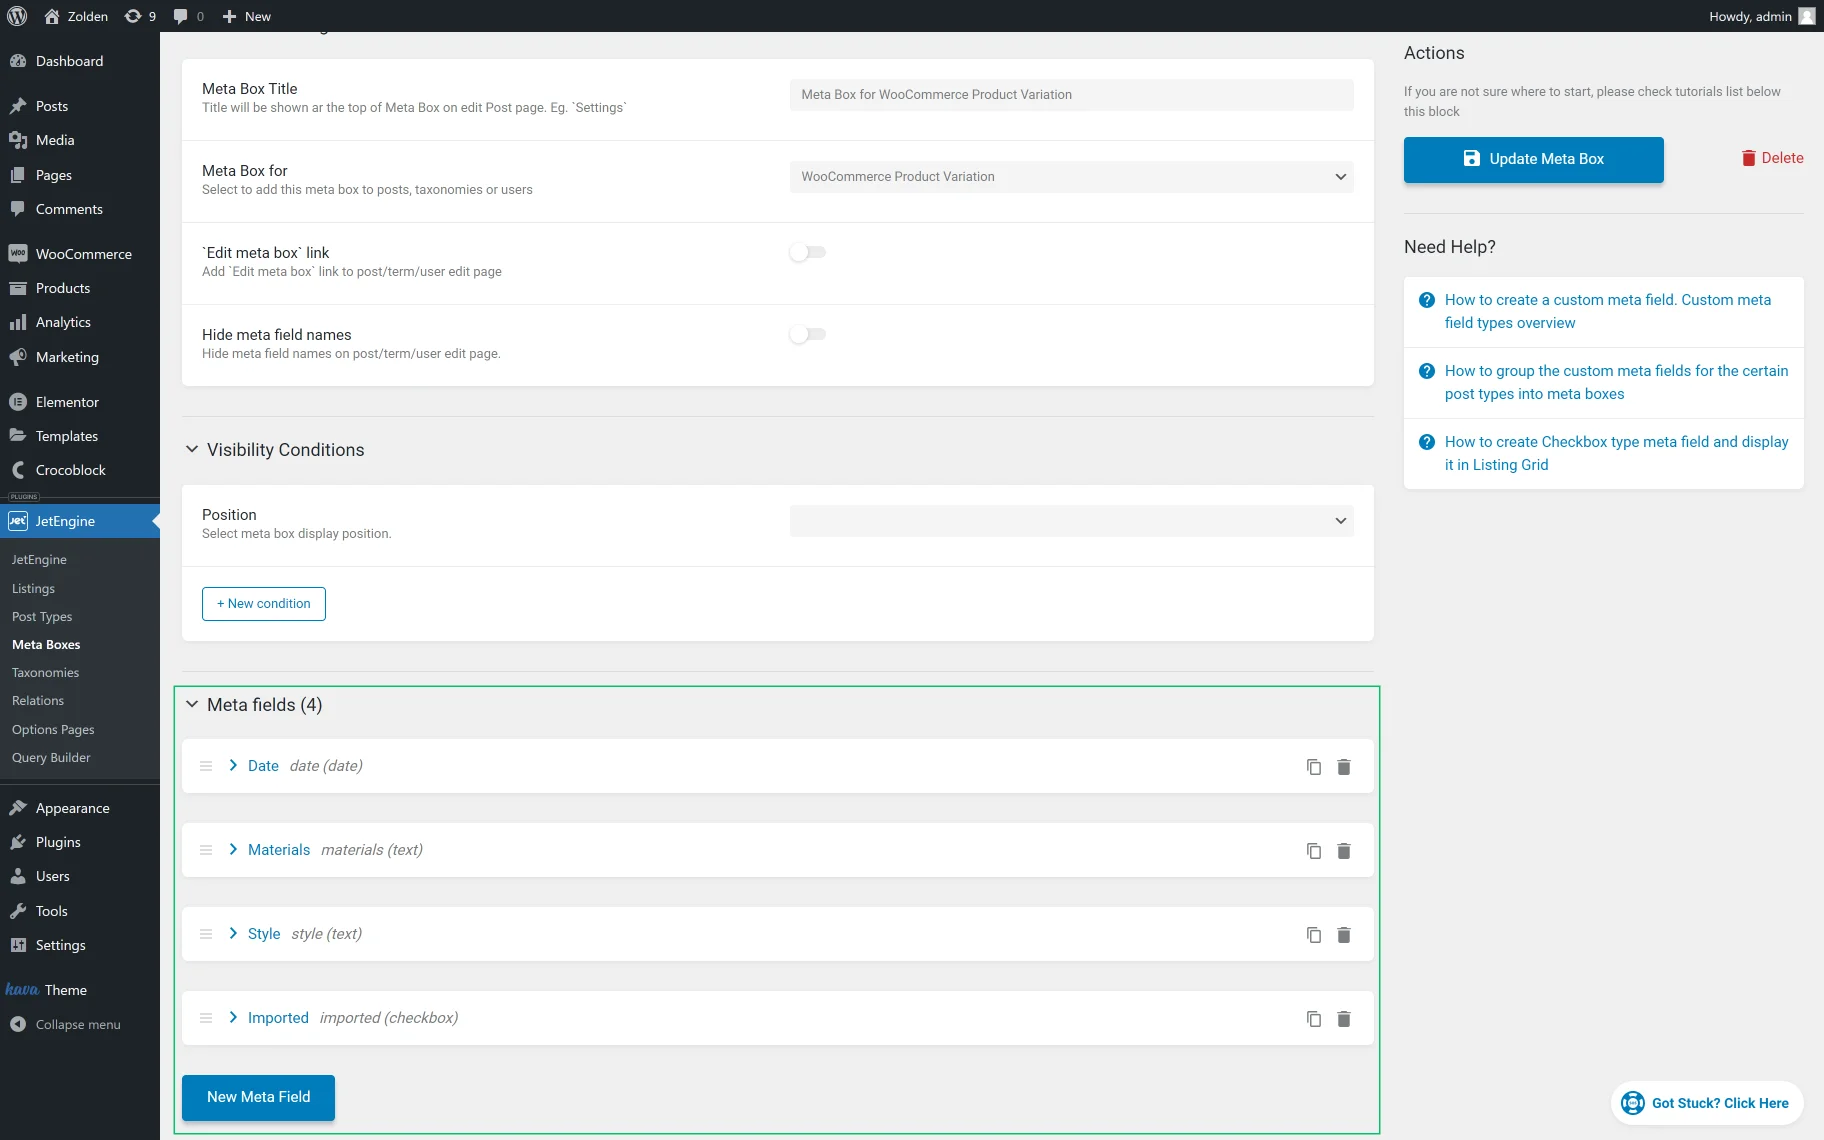
When you finish, hit the “Add Meta Box” button or the “Update Meta Box“ button if you edit the previously created meta box.
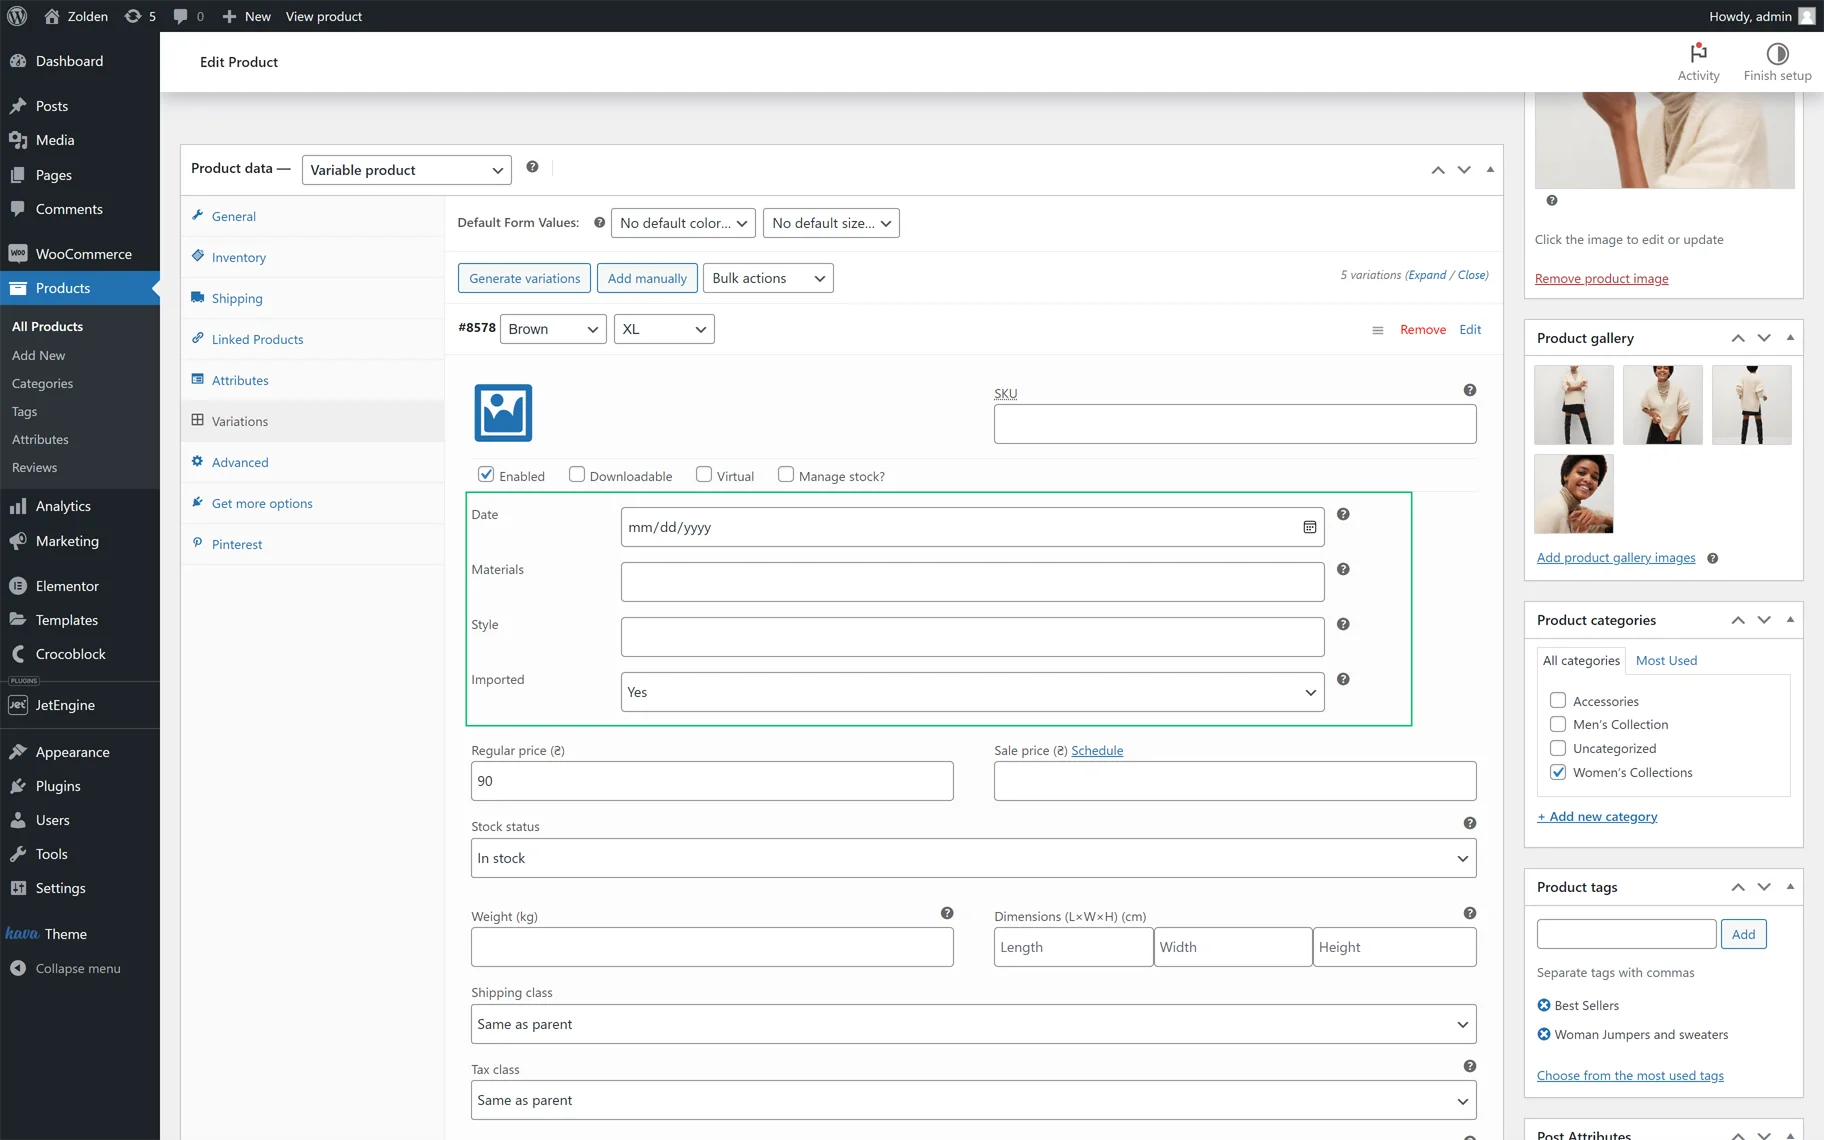
If you create a meta box for the “WooCommerce Variations,” the custom meta fields will appear in the WordPress Dashboard > Products tab when you add or edit a product that has the “Variable” type.
Click to edit one of the variations to see the meta fields.
Set Visibility Condition
In the Visibility Conditions section of the meta box settings tab, you can indicate where the meta box will be displayed on the product editing page.
Indicate where the meta box will be displayed
Select the needed option from the Position drop-down list: “Options,” “Pricing,” “Inventory,” “Dimensions,” “Download,” and “Attributes.” In this section, you can add a new condition by pressing the “New condition” button.
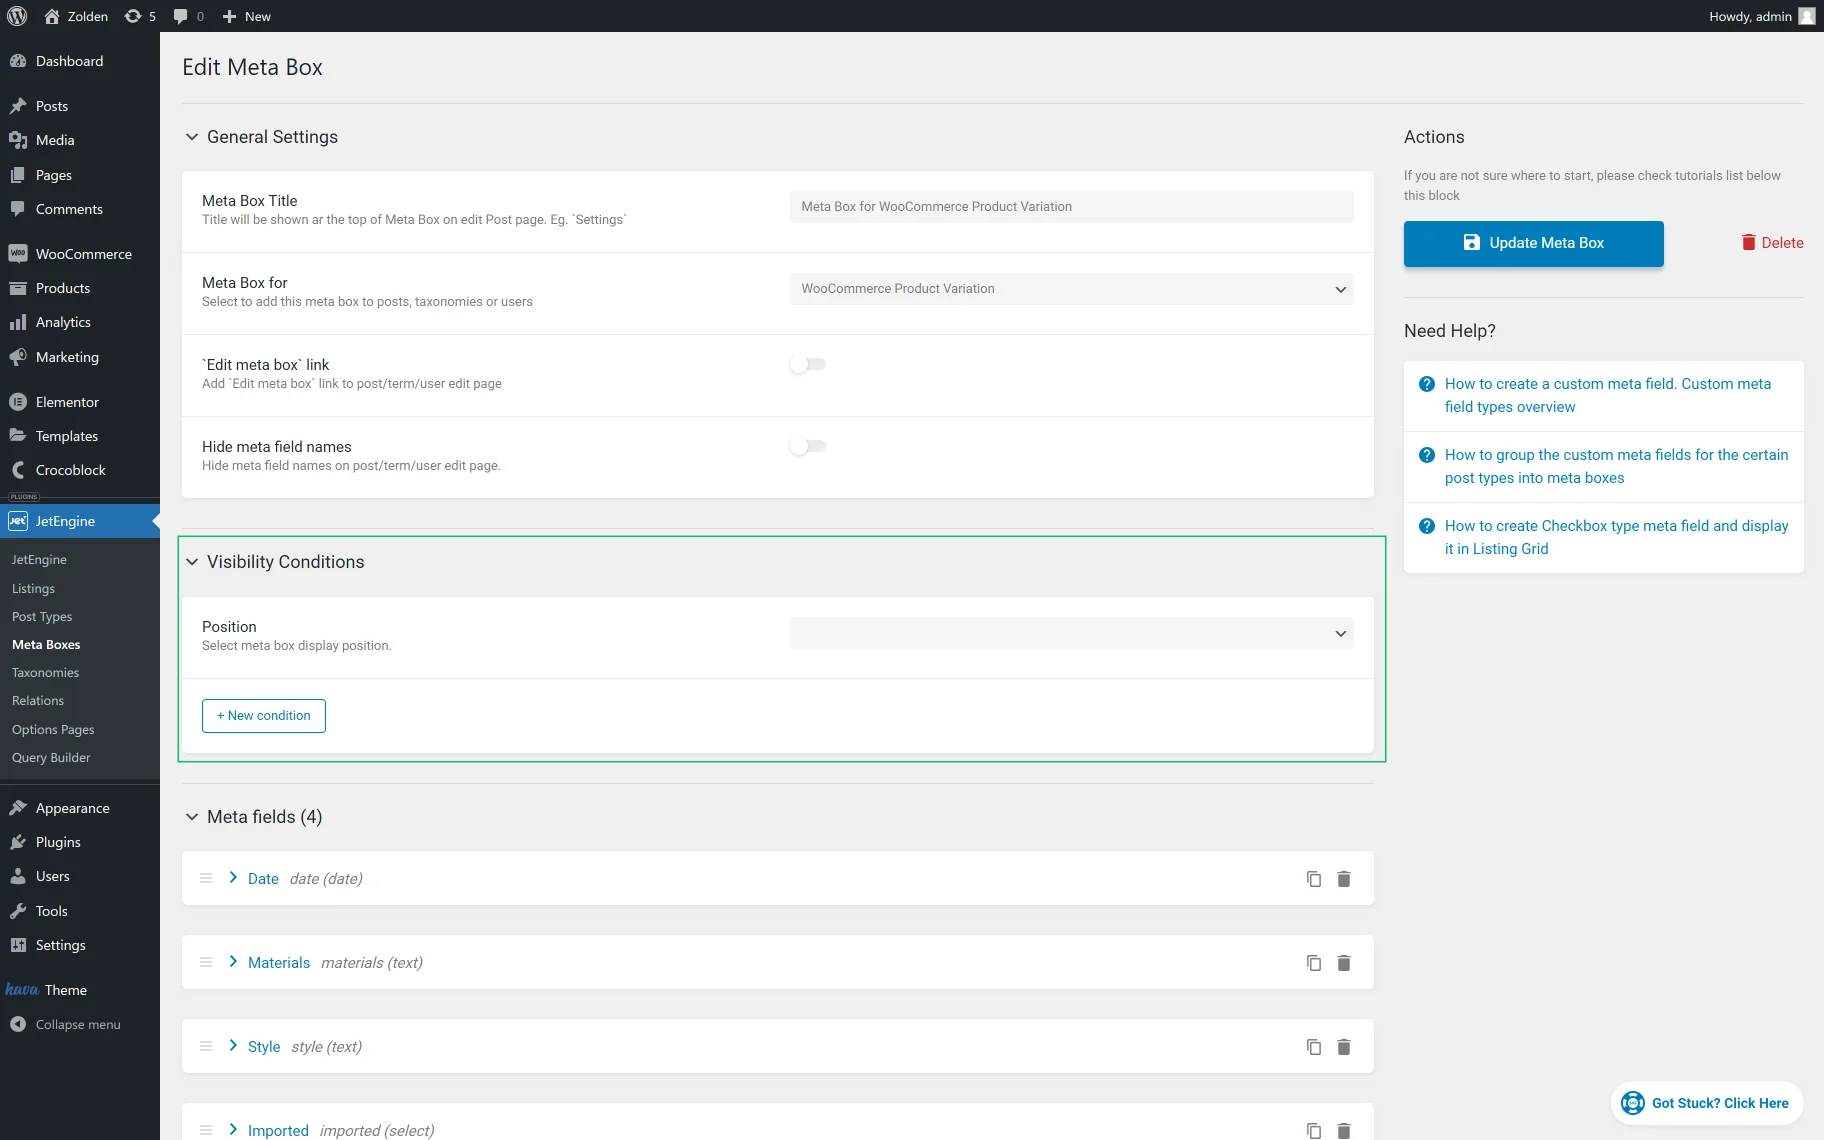
Unroll the Position drop-down list and select the option you need. Select the appropriate option from the WordPress Dashboard > Add New Meta Box > Visibility Conditions > Position drop-down list and return to the WordPress Dashboard > Products > Edit Products tab to check the position of the created meta box.
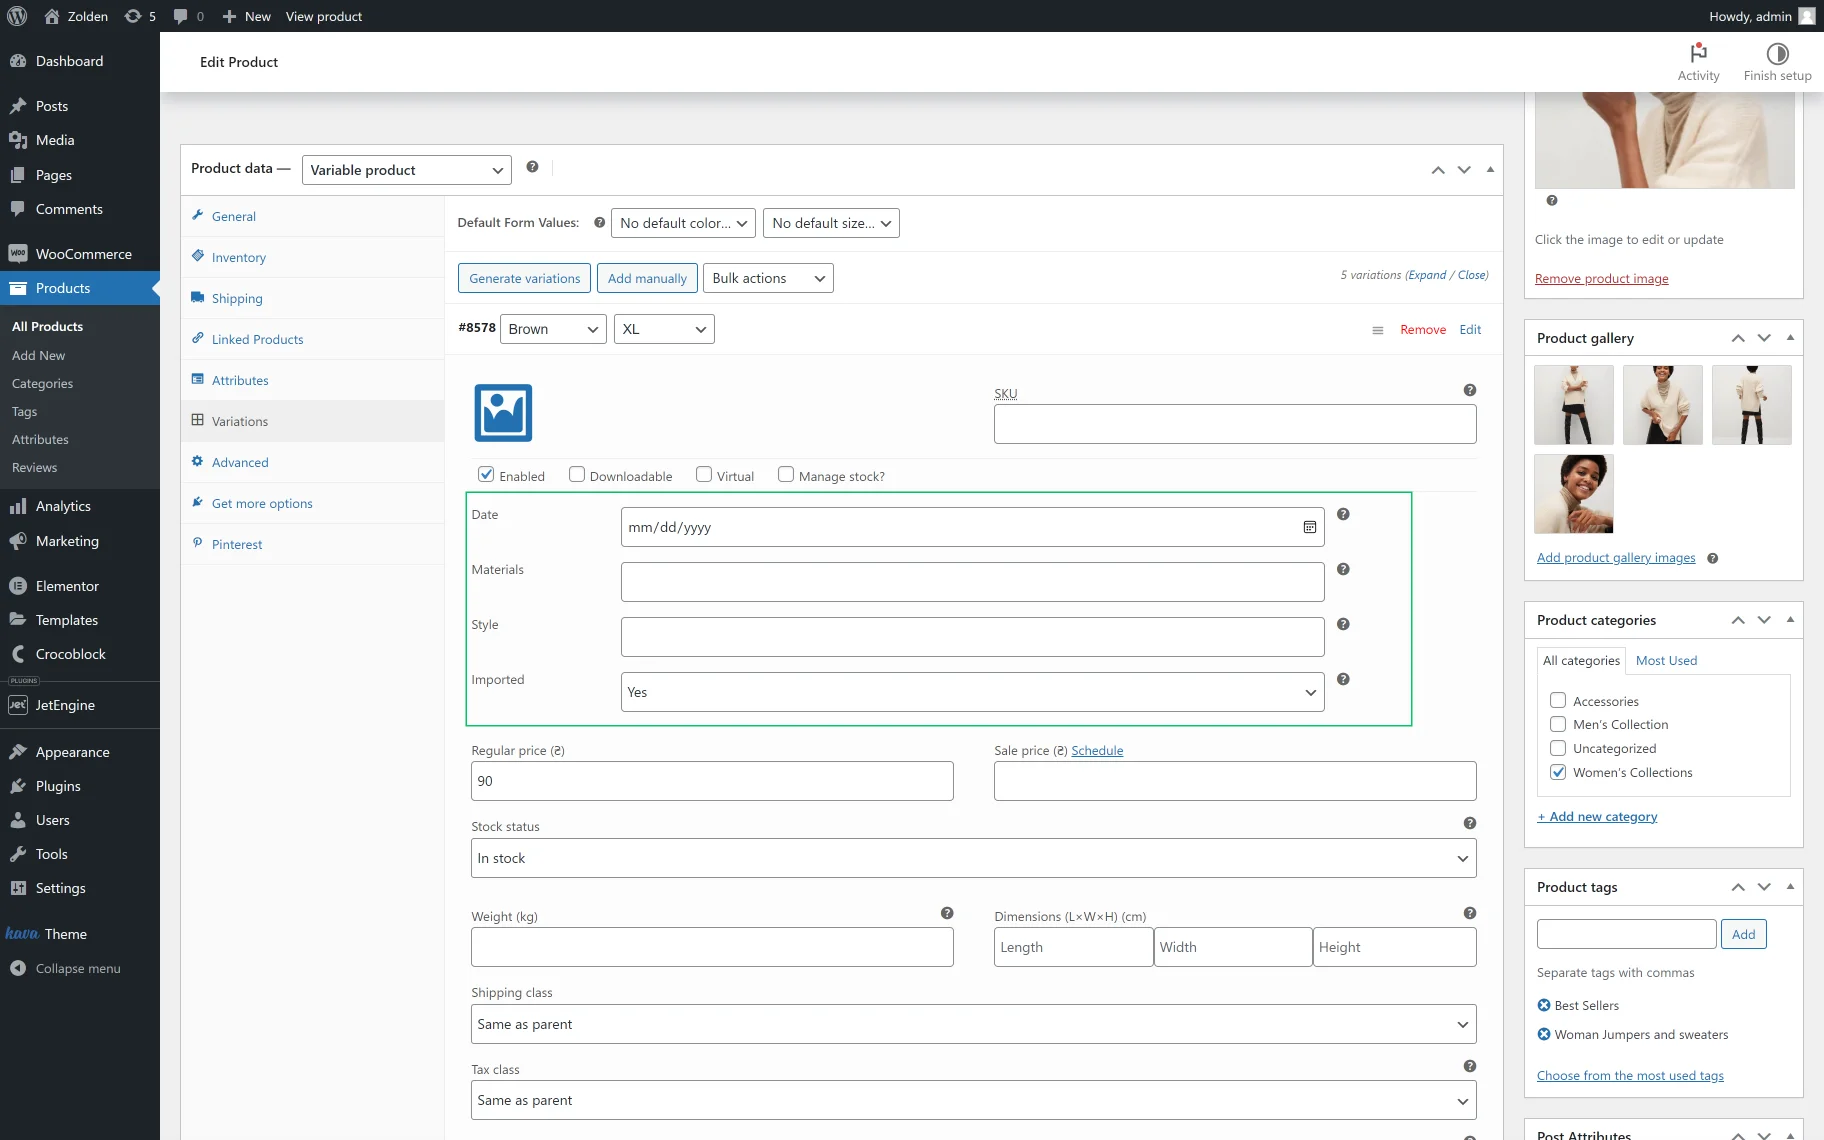
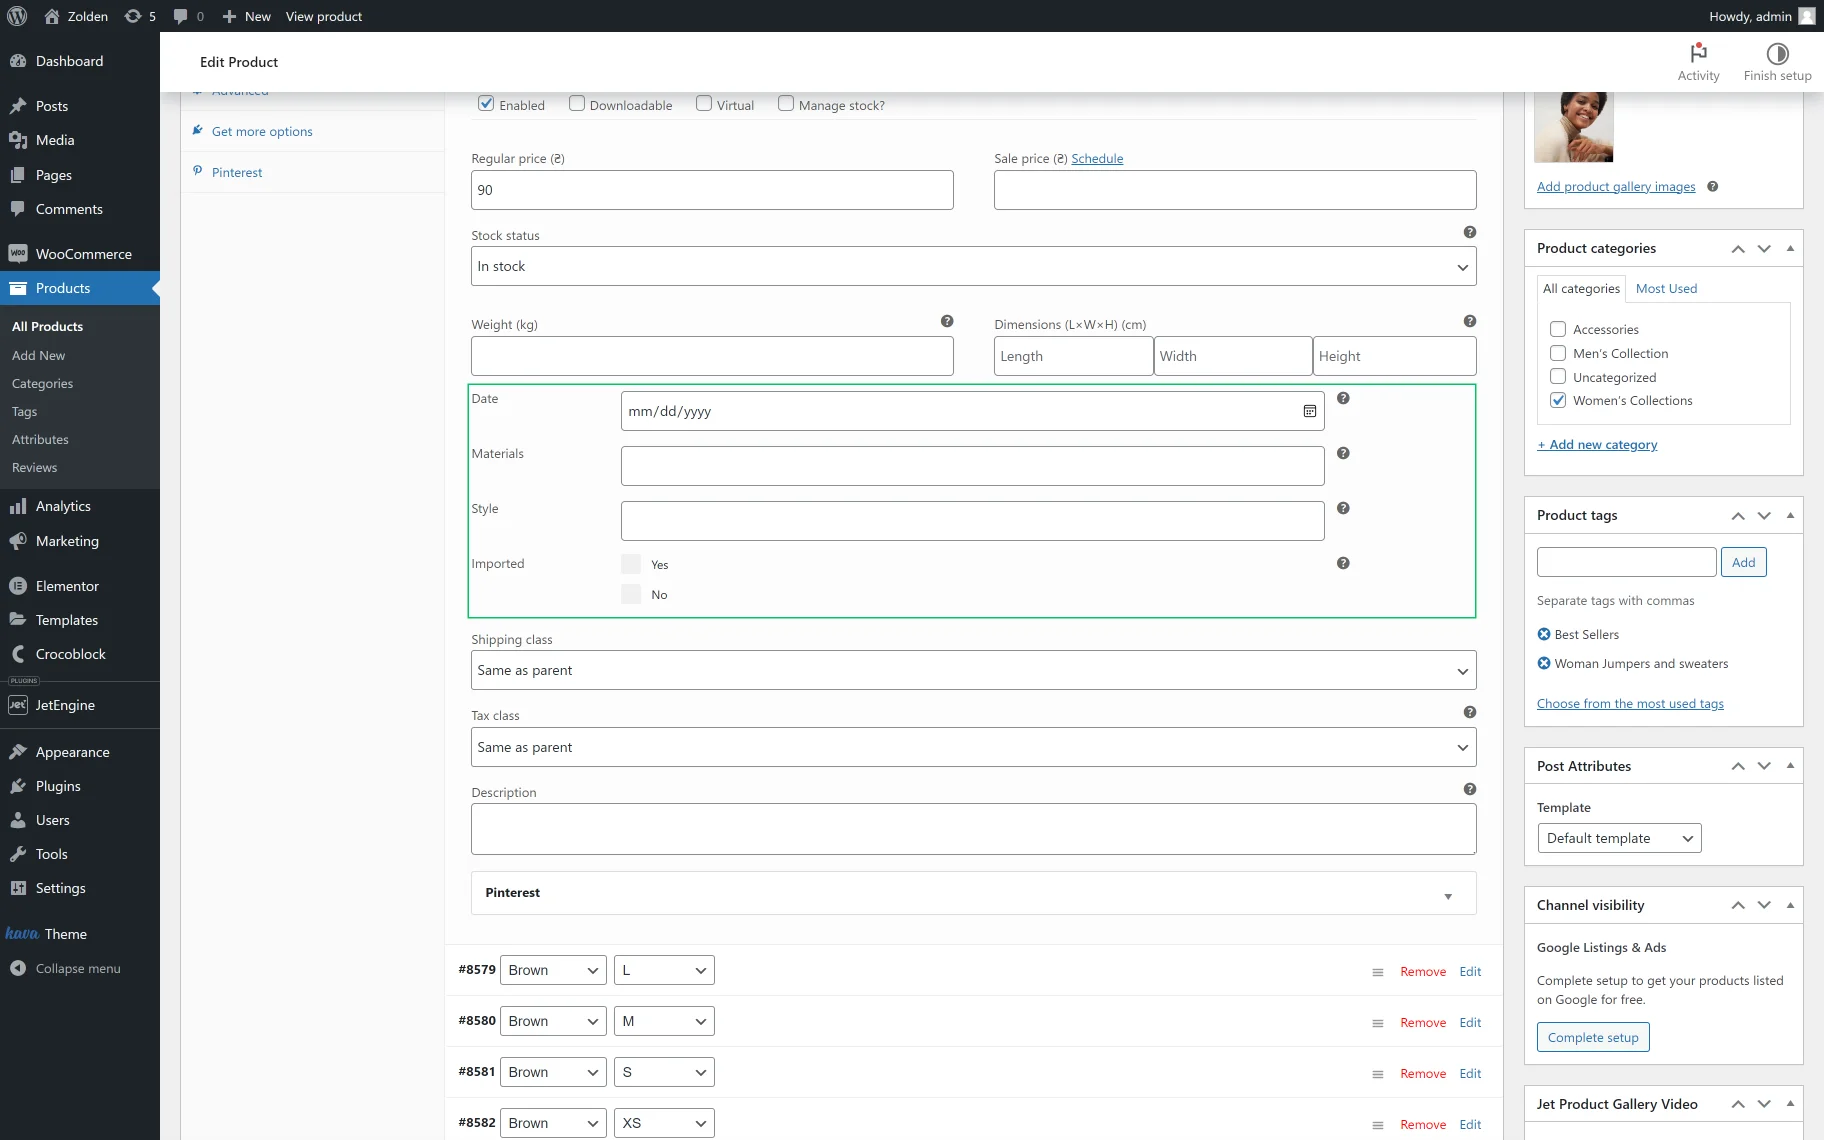
- If you select “Options” from the drop-down list, the fields from the meta box will be displayed at the WordPress Dashboard > Products> Variations tab below the “Enabled,” “Downloadable,” “Virtual,” and “Manage stock?” checkboxes at the beginning of the variation editing.
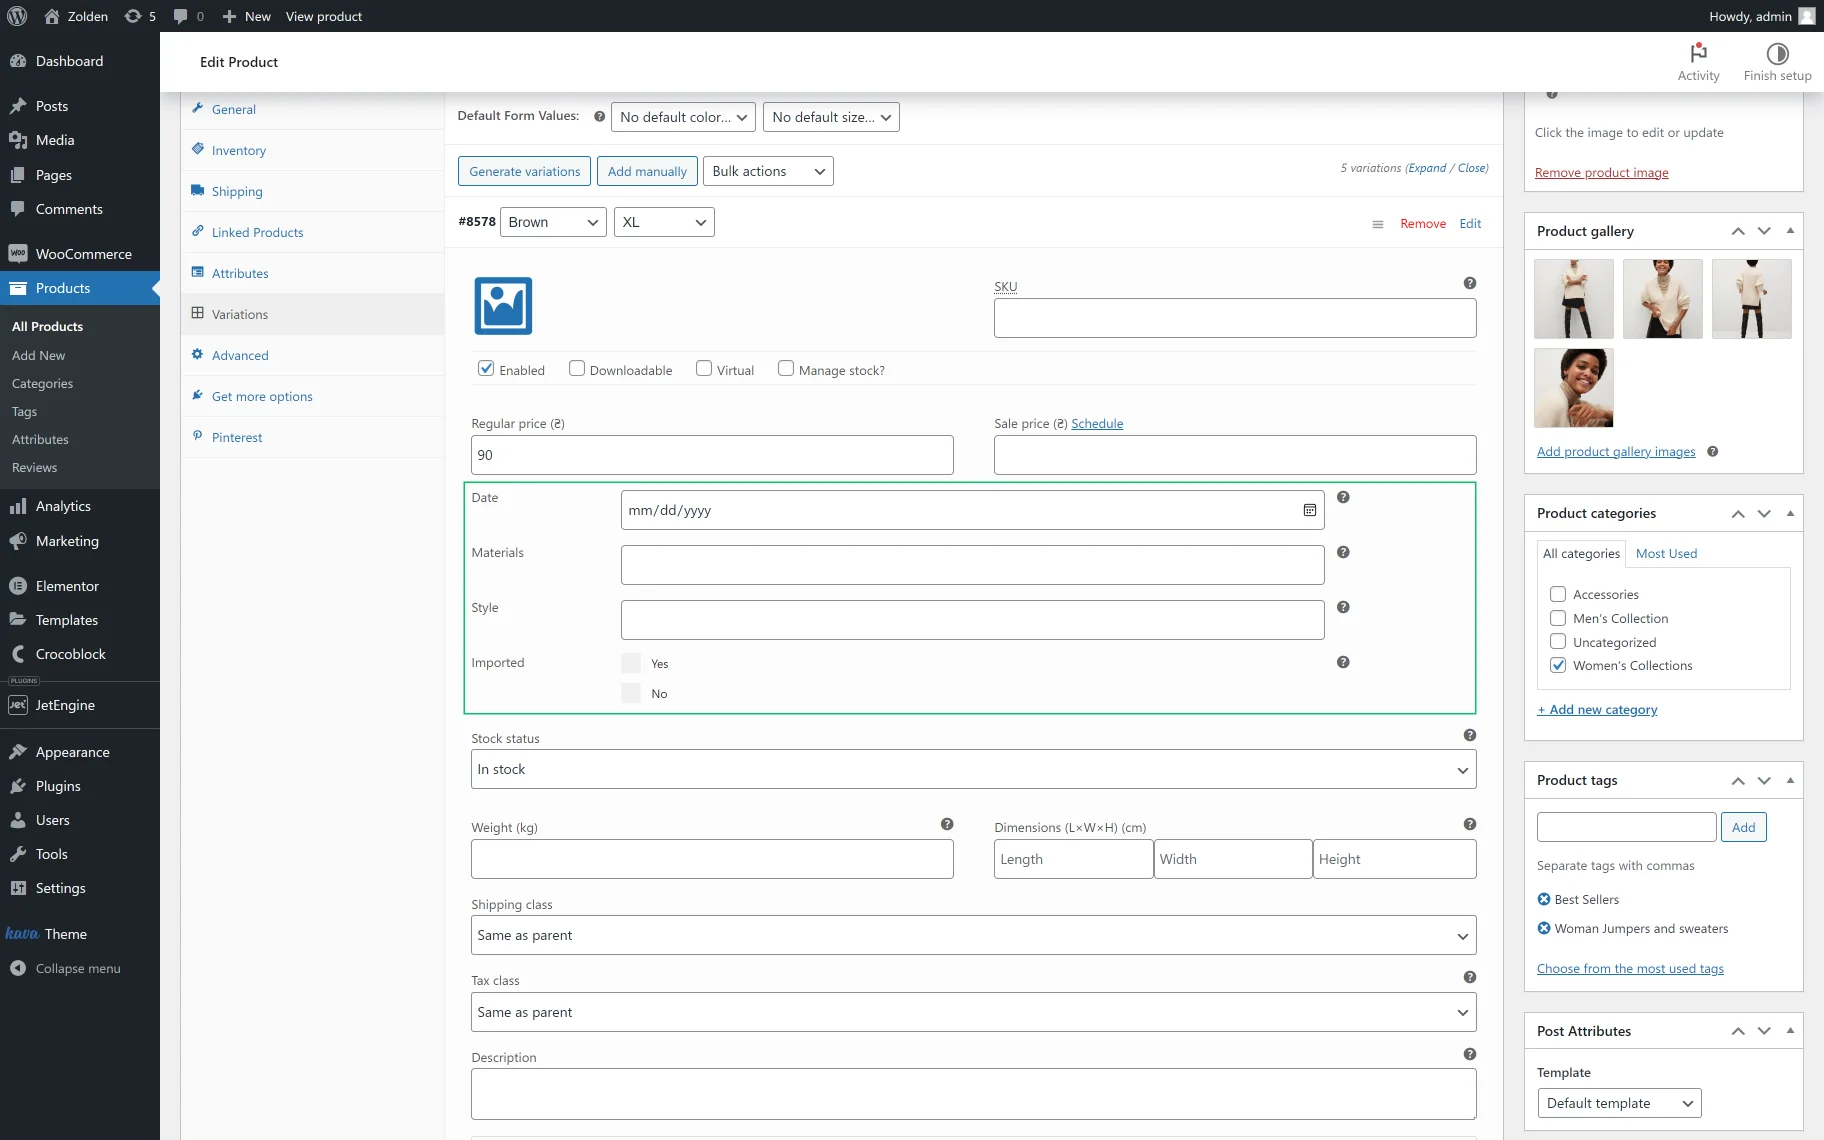
- If you select the “Pricing” option from the drop-down list, the meta fields from the meta box will be displayed at the WordPress Dashboard > Products > Variations tab after the Regular price and Sale price fields.
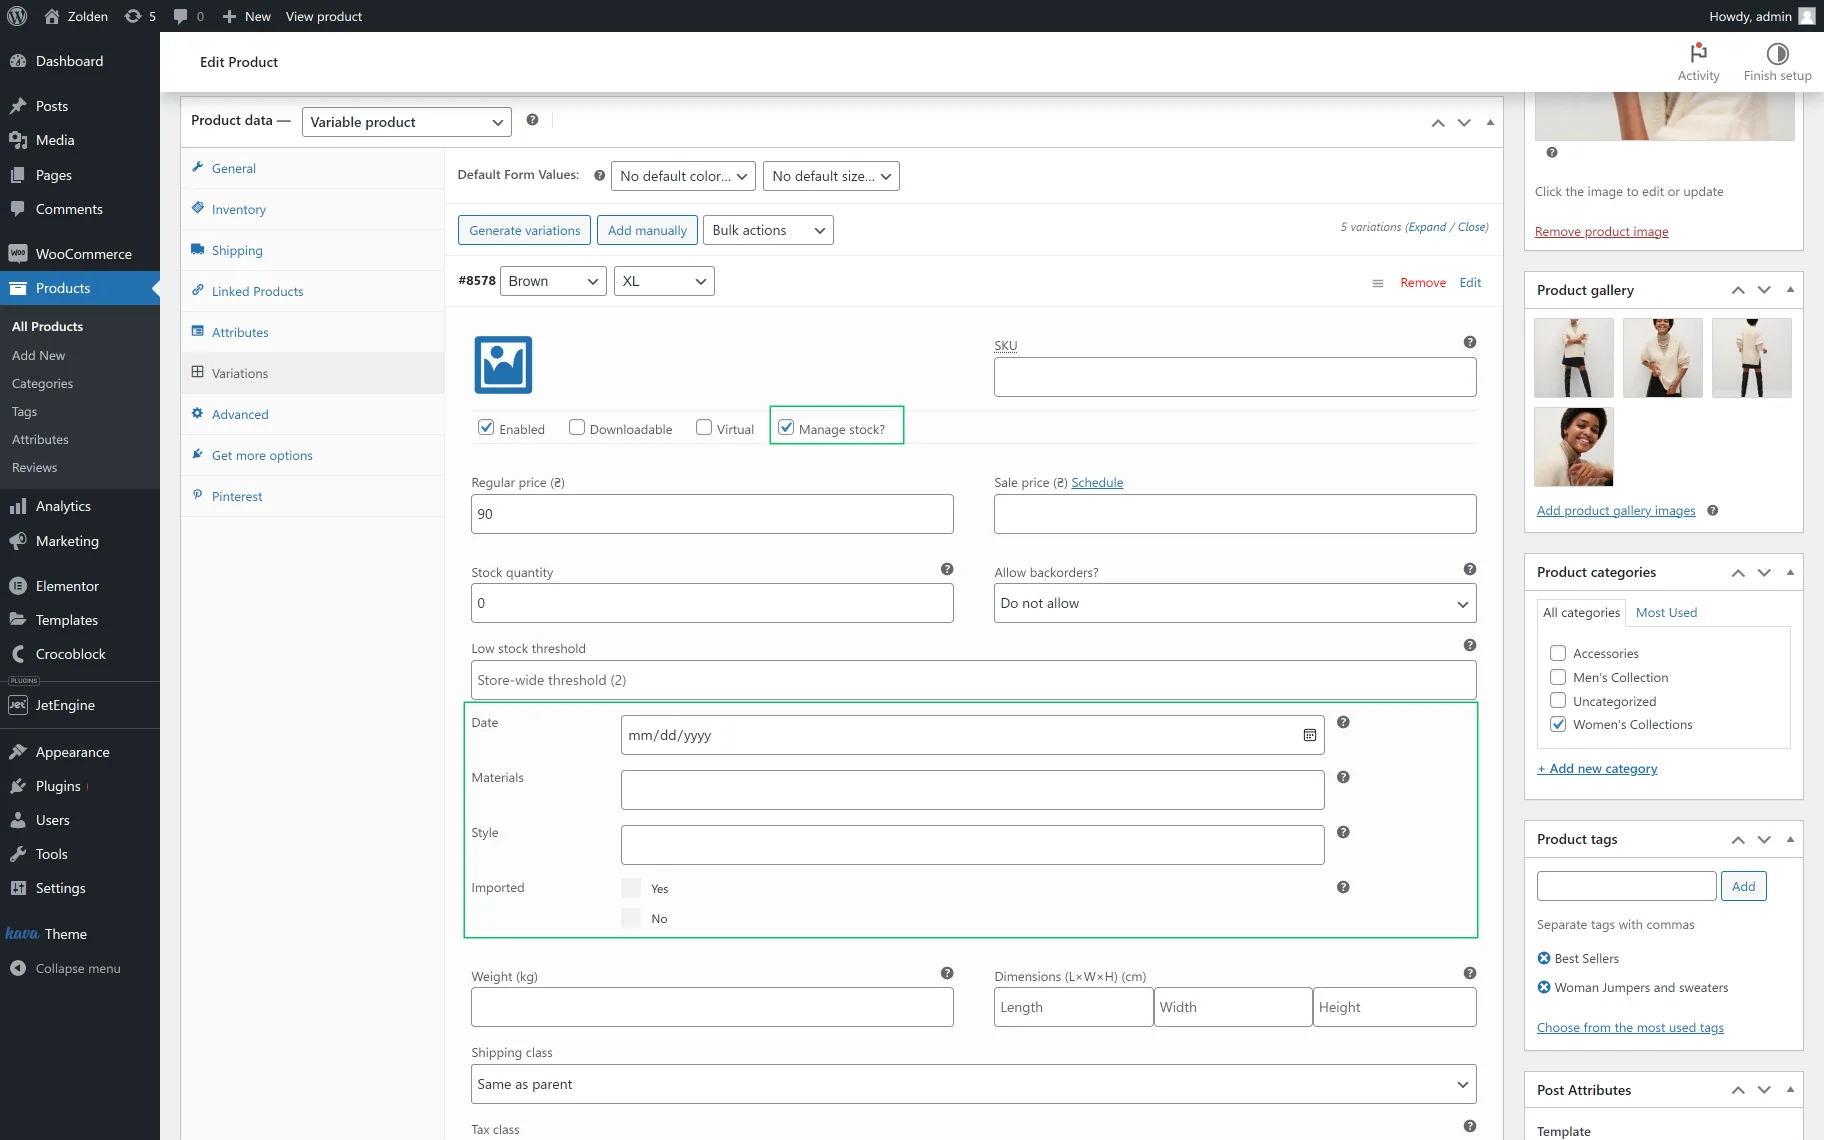
- If you select the “Inventory” option from the drop-down list, the meta fields will be displayed at the WordPress Dashboard > Products > Variations tab after the Low stock threshold field. They will be visible only if the “Manage stock?” checkbox is ticked.
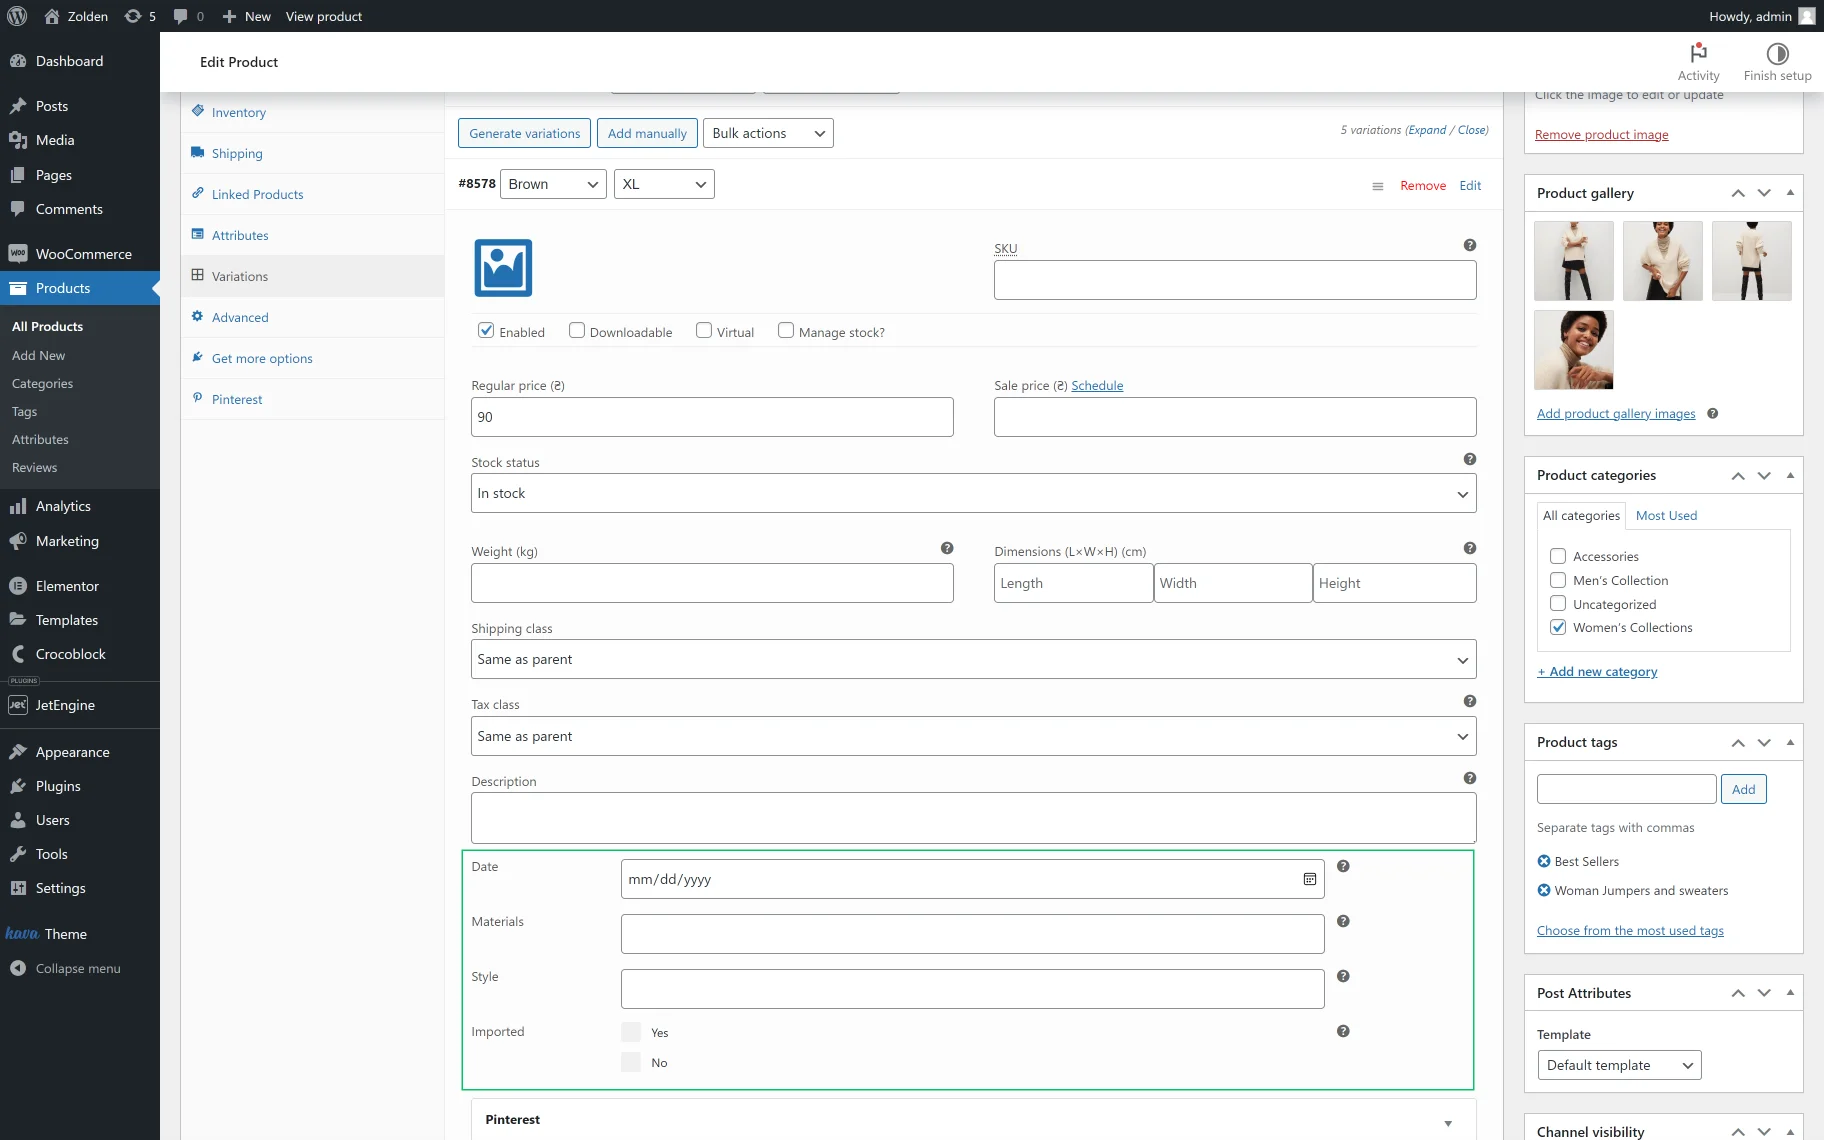
- If you select the “Dimensions” option from the drop-down list, the meta fields will be displayed in the WordPress Dashboard > Products > Variations tab below the Weight and Dimensions fields.
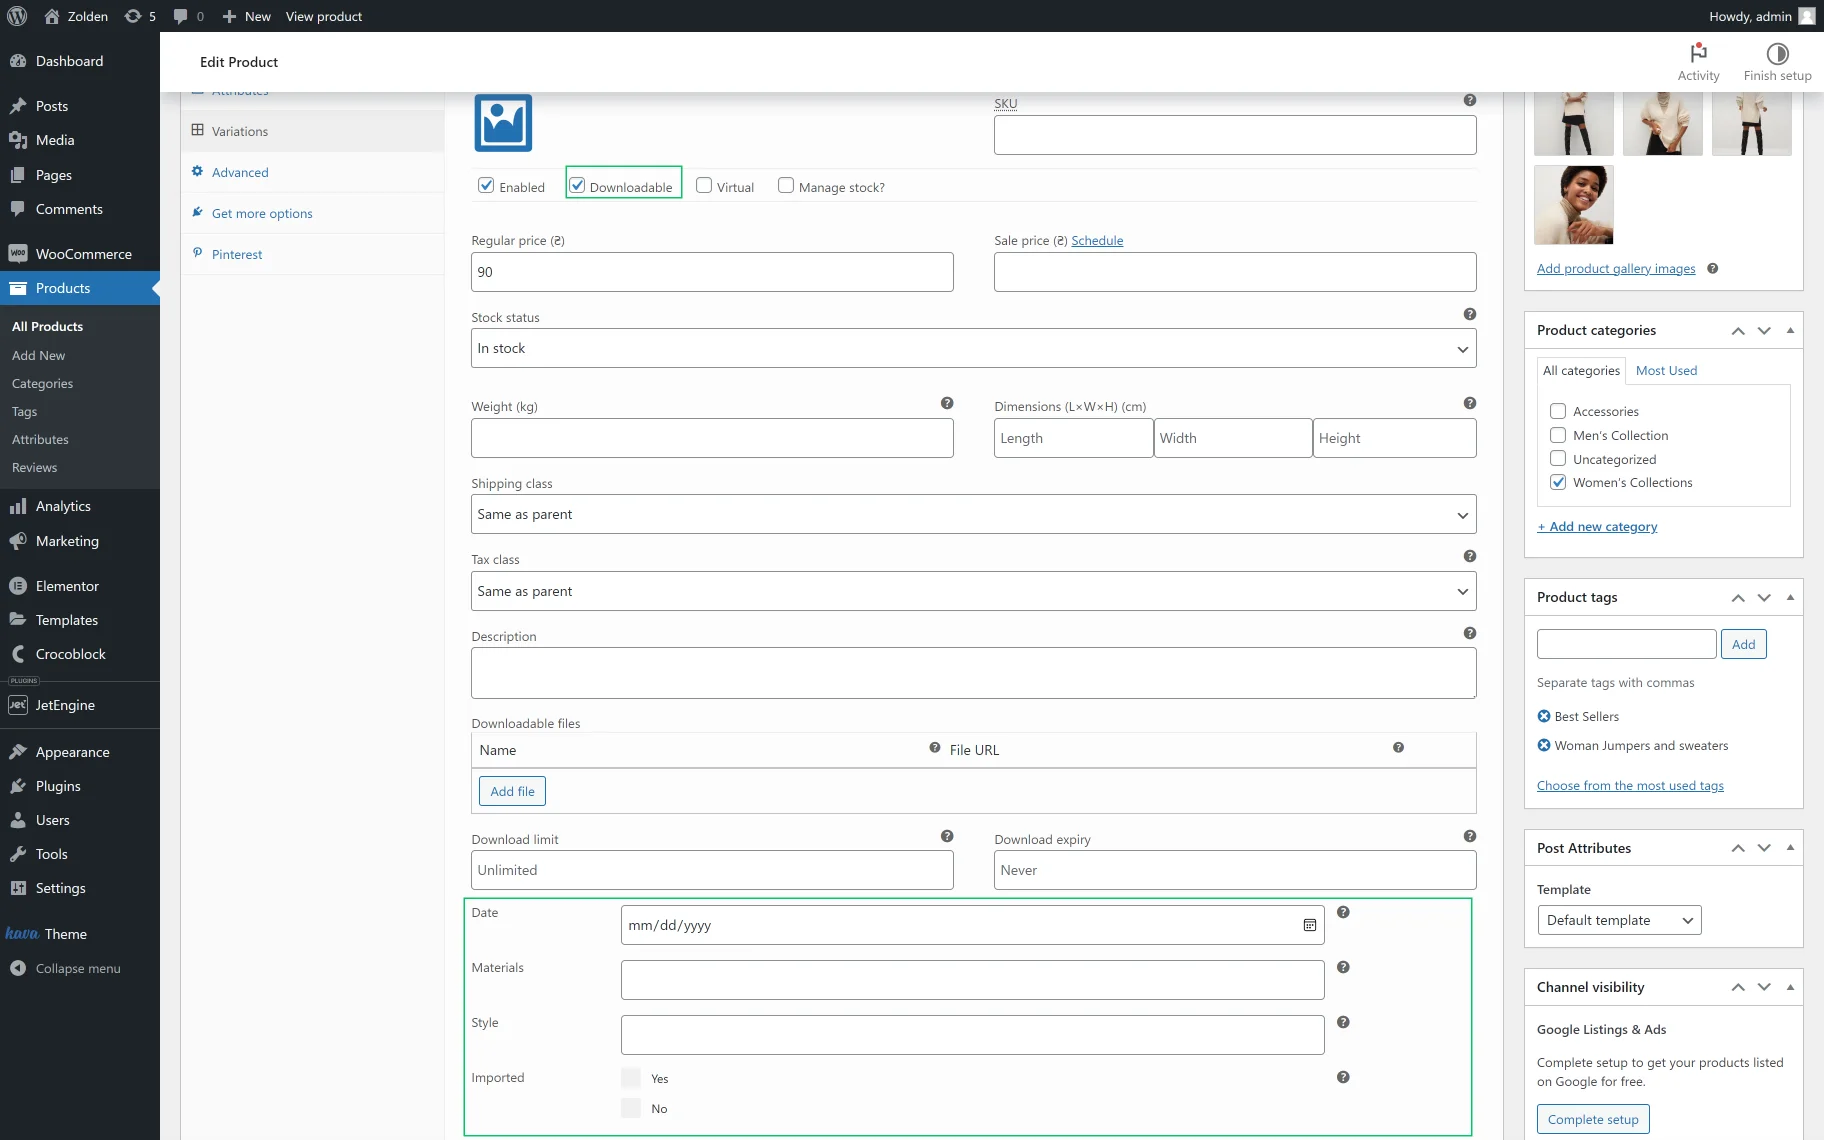
- If you select the “Download” option from the drop-down list, the meta fields will be displayed in the WordPress Dashboard > Products > Variations tab below the Download limit and Download expiry fields. The meta fields will be visible only if the “Downloadable” checkbox is ticked.
- If you select the “Attributes” option from the drop-down list, the meta fields will appear at the end of the variation editing panel in the WordPress Dashboard > Products > Variations tab.
Add new visibility conditions
Pressing the “New condition” button unrolls the Add new condition drop-down list, which has two options to select: “Included for User Roles” and “Excluded for User Roles.” This drop-down list has the same options and provides the same functionality as for the WooCommerce products.
Fill in the Meta Fields
You can now return to the variation editing panel to fill in the meta fields and fill in the variation data. To save the variation data, press the “Save changes” button. After that, hit the “Update” button.
Display meta fields on a page
To display the meta fields of the “WooCommerce Product Variation,” one should create a listing item with the following settings:
- select the “Posts” option from the Listing source drop-down list;
- choose the “Variations” option from the From post type drop-down list.
Check out the How to Build WooCommerce Products Listings with the Dynamic Tag tutorial to learn how to manage listings for WooCommerce products.
Find the Dynamic Field widget/block/element, specify the “Meta Data” Source, and choose the needed Meta Field.
Save the listing item.
Then, create a page and add the Listing Grid widget/block/element. In this tutorial, we use the Elementor page builder.
Select the required listing in the Listing field.
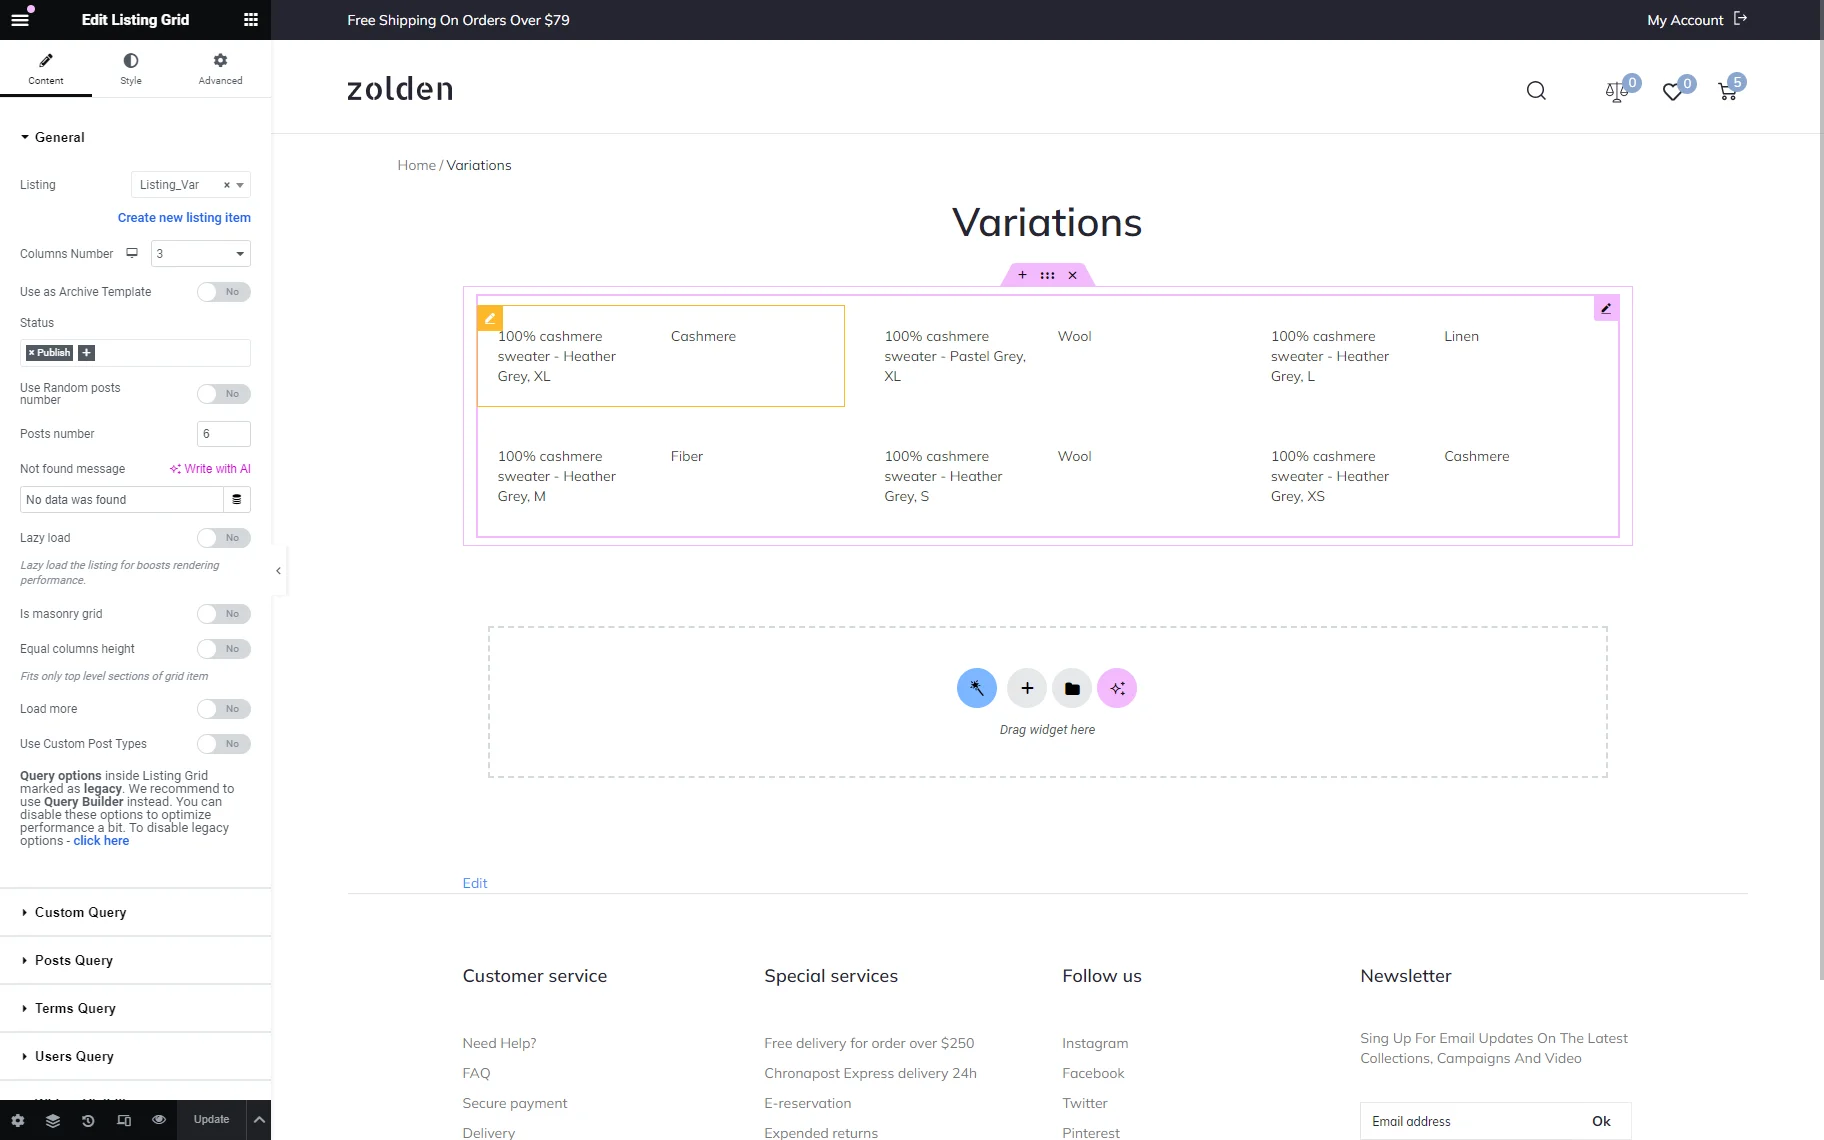
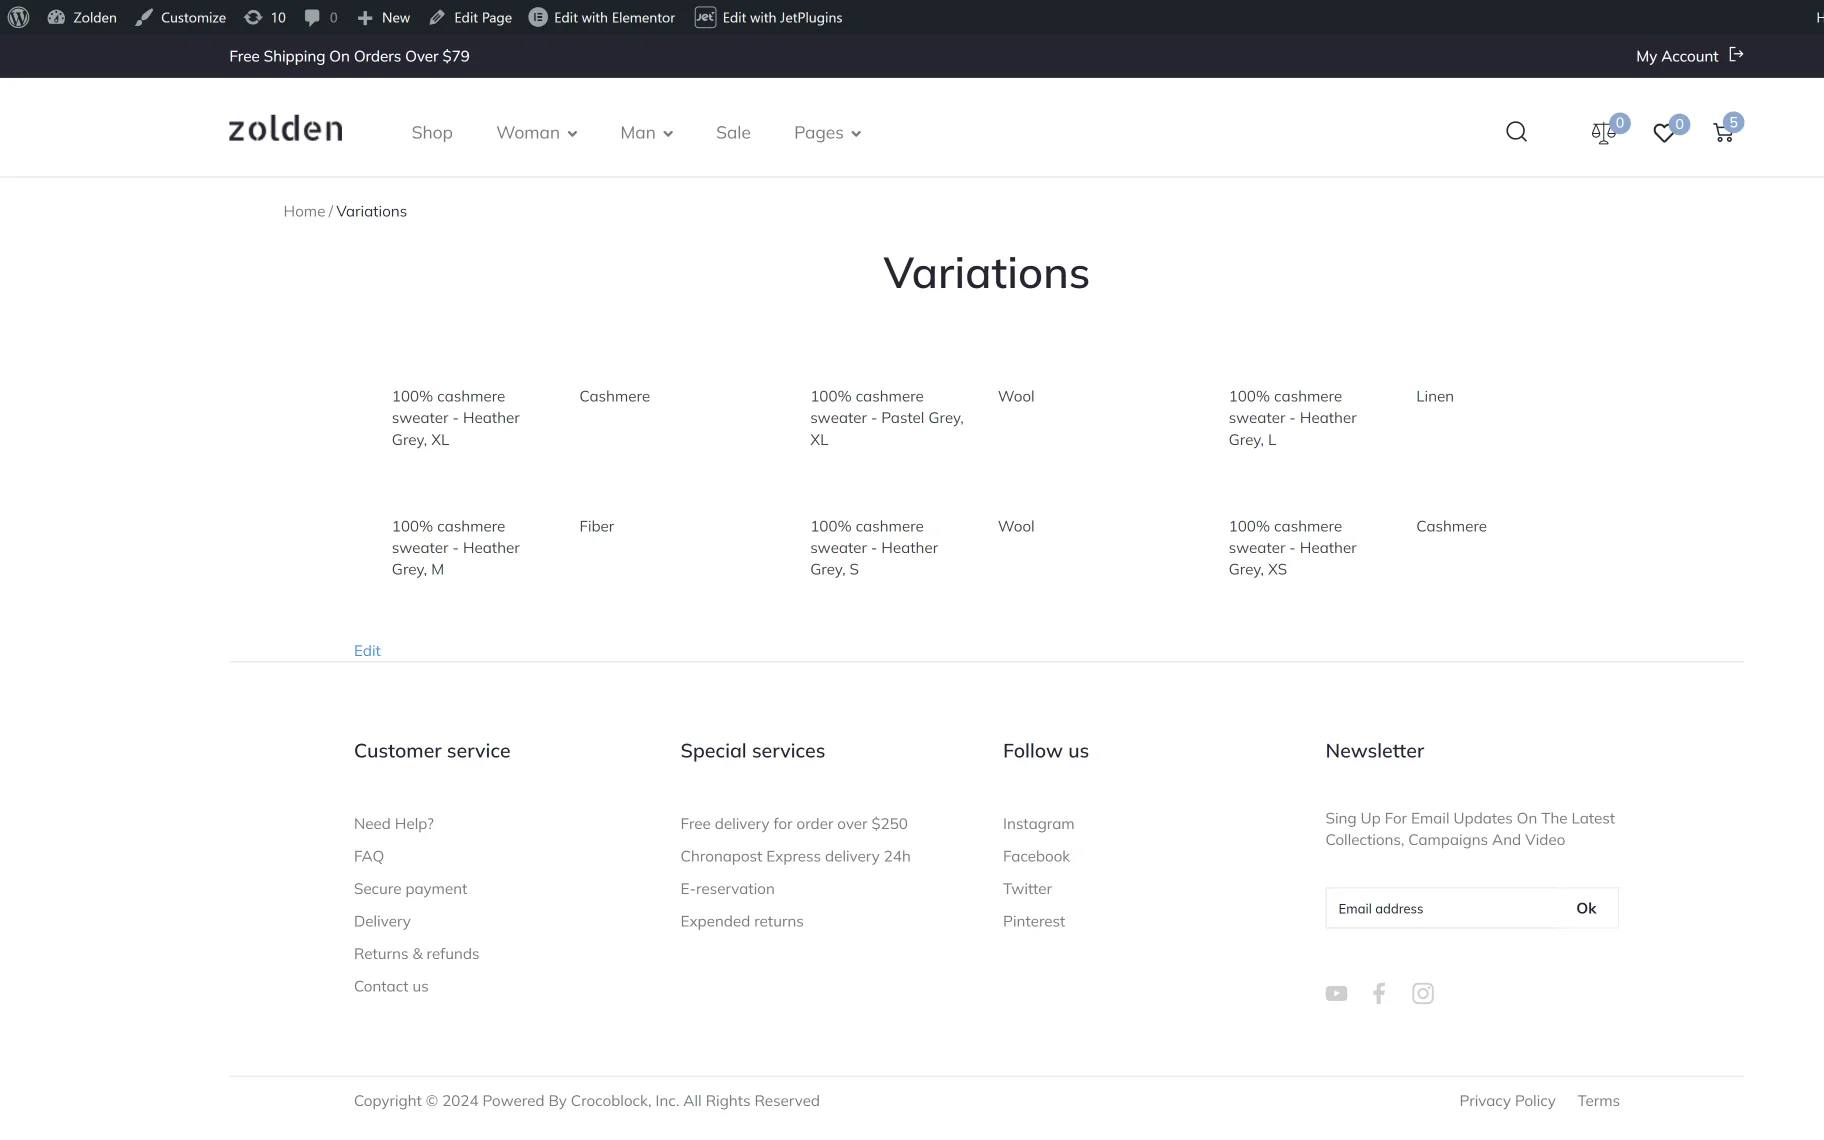
Hit the “Update” button and navigate to the front end to check how the meta fields for “WooCommerce Product Variation” will be displayed on the page. Partially, all variations of the same product will be displayed.
That’s all. Now you know how to create the meta box for the WooCommerce products and variations with the JetEngine WordPress plugin.