There are some cases when you don’t want to set up WooCommerce – for example, when you have just a couple of products. The best solution in this case will be to use a form. In this article, I will discuss such forms and how to create them using JetFormBuilder.
Table of Contents
Selling Products Using JetFormBuilder
If you have a few products or services that you want to sell but don’t want to set up a WooCommerce store, or the product has a few conditions to form a price, then JetFormBuilder will be a good option for you.
Calculated fields and Conditional blocks will be the basis of such a form. And here are the elements we will need:
- the product with an image and a description;
- the price field;
- the quantity field.
Since there is no Cart, it’s important to show something similar; that’s why we have some fields related to the order:
- subtotal fields for each product;
- total;
- checkout.
As an option, it can be a multi-step form where the customer makes a series of choices for complex products or services, where each step offers a new element that can be added to a purchase.
Creating a form structure
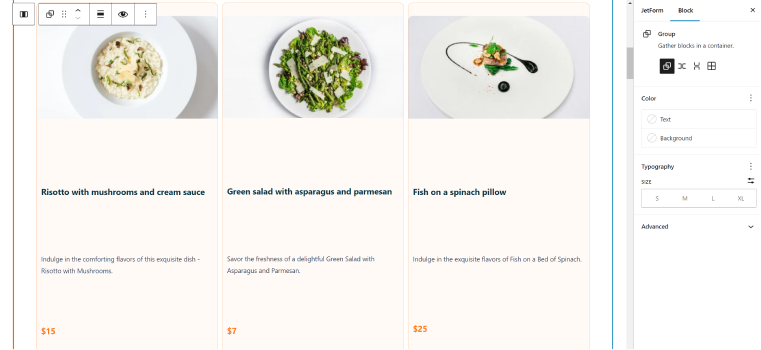
Let’s say we want to create a simple menu form with a few dishes to choose from. It can have different layouts, but mine will be a three-column layout. I add three columns, each featuring an image, a description, and price blocks. These blocks are just images and text, not JetFormBuilder elements.
You can use not only native Block Editor blocks for that; I highly recommend using one of the additional block plugins to make the process of styling much easier – have a look at our ultimate list of Gutenberg tools.
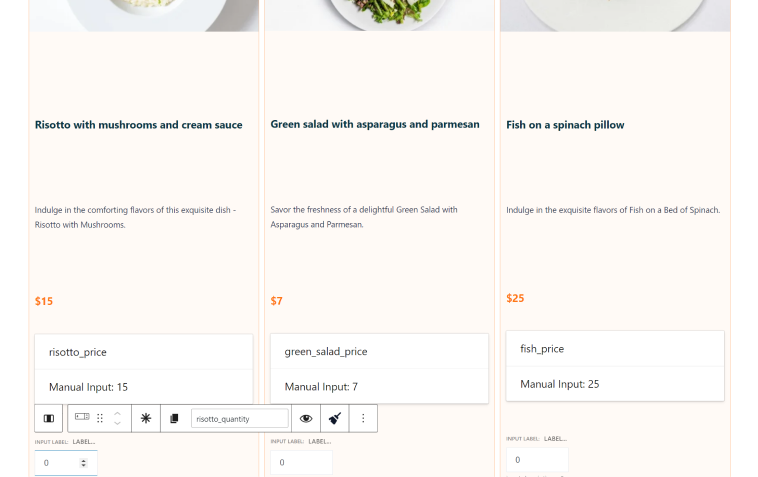
Now, let’s add two JetFormBuilder fields: Price and Quantity fields. Yes, we already have the price as a paragraph block here, but we can’t use it for future calculations. We need a form input instead. The hidden field is the best choice here – let’s add these fields and manually duplicate prices there. Check the “Render in HTML” control there and name them properly because we will need to have these values rendered for calculations.
Next, let’s add the “Quantity” Number field and name them accordingly (using the dish’s names) so customers can select the quantity of the corresponding dishes.
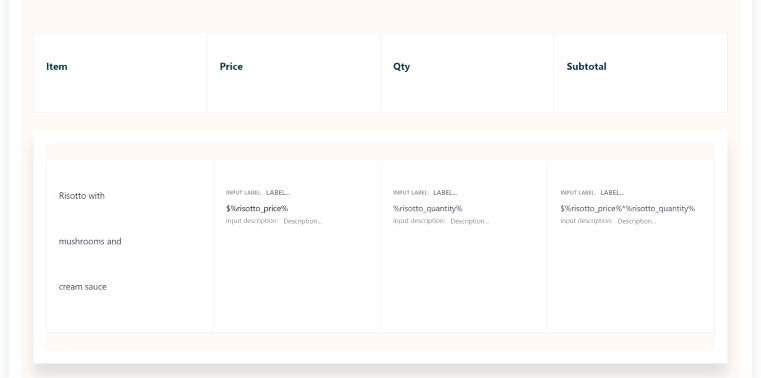
The next step is to create subtotal fields that will act like a Cart. To do this, we need to create as many subtotal Calculated fields as we have products. The formula will be Price*Quantity (from the numeric field). For example, we have Risotto as a product. There are three fields connected to it:
- risotto_price – Hidden field;
- risotto_quantity – Numeric field;
- risotto_subtotal – Calculated field.
I will create such elements for each product here. But I want the blocks with Subtotal to be shown only if the product is added. That’s why the block with the particular product’s Subtotal should have conditional visibility with the condition that the corresponding Quantity field is not empty:
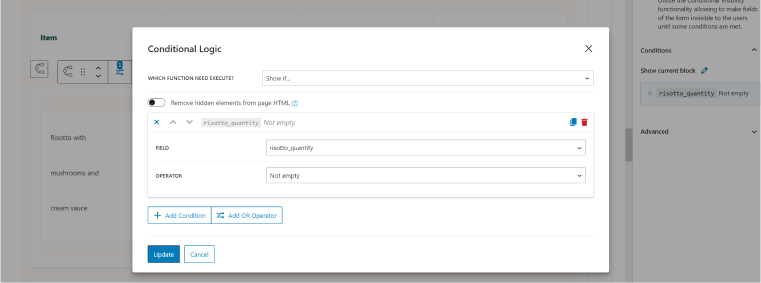
Also, I don’t want to show the whole Subtotal block if there are no products selected – that’s why I will add one more conditional field for the entire block and add all the products’ quantity fields (the “not empty” condition) with the OR operator.
Finally, the Total field is a Calculated field, which is the sum of all the subtotal fields. Later on, this field can be used as a source to fetch the amount for the payment gateway.
Now, we need fields for the customer’s details and delivery address. The delivery block is also conditional.
To add a nice switcher for choosing a delivery option, I’ve used the Advanced Choices field, where you can use not only icons but also images for the choice fields.
The last step in this form is the payment. JetFormBuilder has integrations with PayPal (even in a free version) and Stripe (a Pro add-on), and in this article, you can find all the information on how to connect the payment gateways.
Collecting orders
Ordering the product is just the first part of the process because now, you have to fulfill this order on time and confirm it with the customer. So, now it’s time to configure post-submit actions.
First of all, we should use Save the Form Record so the records can be saved in the database. Next, it would be good to send an email to the customer and to the shop specialist (to receive and deliver the order). The Send Email action is responsible for that, and it’s very intuitive to set up.
Other than that, you have many options, as JetFormBuilder forms can be connected with the Webhook option, which can be used in many third-party applications. For example, it can be connected to Zapier, with SMS, and so on.
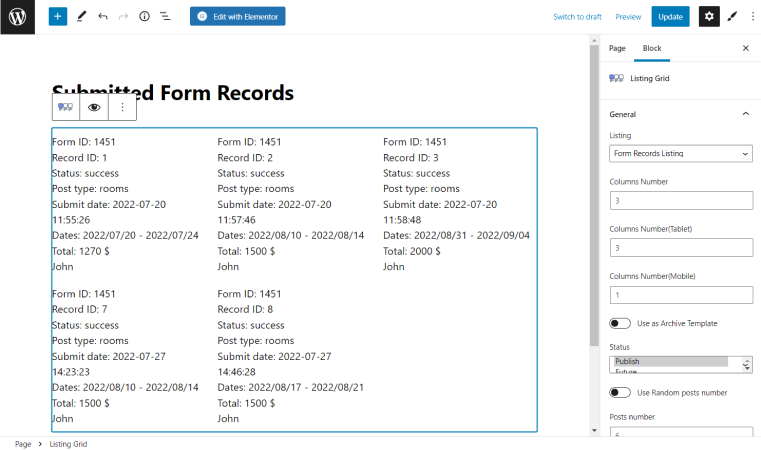
One of the advantages of WooCommerce is the dashboard that monitors all the orders and the information from the customers. Well, you have two major options for implementing this with JetWooBuilder. The first one is the queried form submissions. However, you will need JetEngine to do that.
If you are a Crocoblock subscriber, then you probably know how much it can do with anything related to dynamic data fetching, including JetEngine’s Query Builder as a unique tool to manipulate WP queries and fetch values from a database using a completely visual interface. So, you can do it also with the JetFormBuilder’s records.
Using this query, you can create a listing for the existing orders and display it on the page, which is visible only to admins.
Another way to collect orders from the form is to use the Insert/Update Post action on the form submission. You should create a custom post type with all the custom fields corresponding to the fields on the form. Then, map these fields in the Insert/Update Post action’s settings. As a result, these fields will be populated with the data you receive from customers. You don’t have to publish such posts; just set the “Draft” post status in the action settings so that you will have them in the Dashboard, but they will not be visible on the front end.
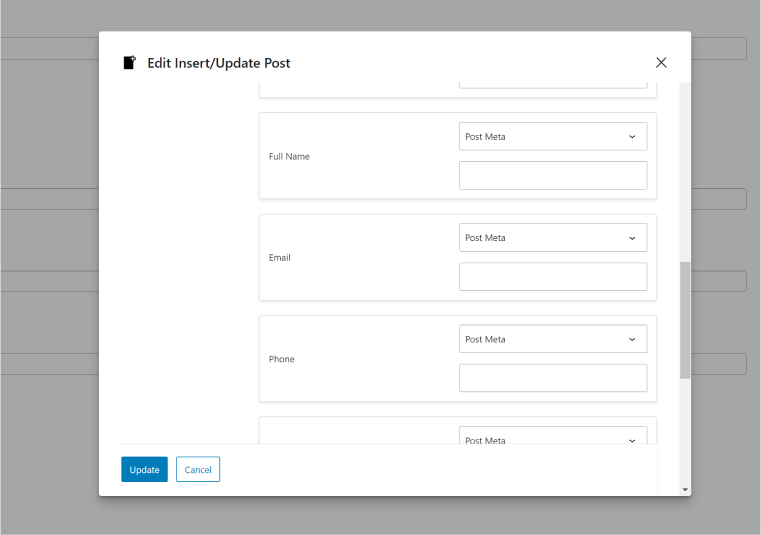
Actually, in order to optimize the website performance, it would be better to use Custom Content Types (a JetEngine feature) to collect orders instead of custom post types. The process of mapping fields is the same.
FAQ
Yes, you can use JetFormBuilder forms, integrate payment gateways, and collect orders, as described in this article.
If you have just a few products, using a form instead of WooCommerce might work better for you.
Yes, you can connect the payment gateway to a form.
Takeaway
In this article, I described how to sell products on your WordPress website without using WooCommerce. For sure, in most cases, WooCommerce would be the ideal solution. However, if you have just a few products or if the order requires a process of customization by the user, forms can be a better option.
Using the JetFormBuilder plugin, you can sell products on your website and collect payments for them. If you add JetEngine functionality, you can create a custom dashboard for storing your orders.

