WordPress has been far beyond just a blogging platform for many years so far. It’s a powerful (and free, which is an ace on our sleeve) CMS for implementing various ideas and projects. Custom post types are one of the essential tools to do it. What is it and how to display custom posts properly using templates are the topics for this article. Let’s get started.
What Are Custom Post Types?
The idea of inventing custom post types as an instrument is the following: there should be a particular “container” for the particular data on the website. And it should also be displayed in a specific way, with suitable meta boxes and visual representation on the front end (e.g., for the portfolios or authors’ profiles, the list can be endless).
So let’s talk about custom post types (CPT) and custom templates for them. What are they? What critical points should be taken into account when creating them? What are their essential components, and what efficient ways of making them exist?
The difference between custom post type and custom template
First, let’s get rid of confusion and clear things up. What is the difference between custom post types (CPT) and custom templates for the default WordPress post types (posts, pages, archives)?
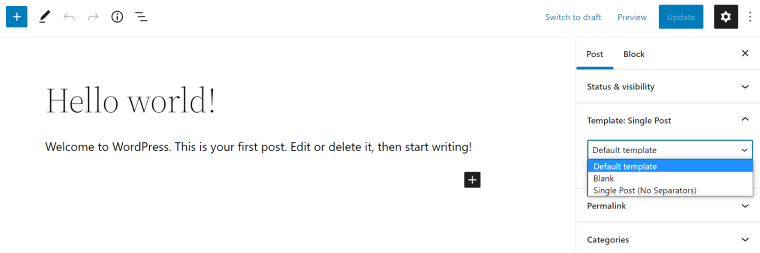
A custom post template is a file defining how something will look on the front end, so a custom template is anything different from the default WordPress templates (the most basic are: single.php for posts, page.php for pages, archive.php for the blog, etc.).
So, if you want any page/post/category to look different, create a custom template and simply assign it on the admin panel to the page or post before publishing it. But they will have the same properties as other default posts and pages.
When creating a custom post type, you can assign a whole new set of parameters and properties (e.g., will it be hierarchical, have a short description/comments, and many more). They all will be saved in the database as a post_type value. Thus, creating a custom post type allows you to form a different entity with particular properties, custom fields, etc.
WordPress templates: usage and hierarchy
WordPress has three default template files: index.php, archive.php, and single.php. But most of the themes, even the most basic, also use home.php (for the main page), page.php (for pages), and 404.php. And you can even use this list to create simple websites. But, of course, most of the themes have much more templates (for tags, authors, etc.) and make good use of template parts, the building blocks of everything on the website.
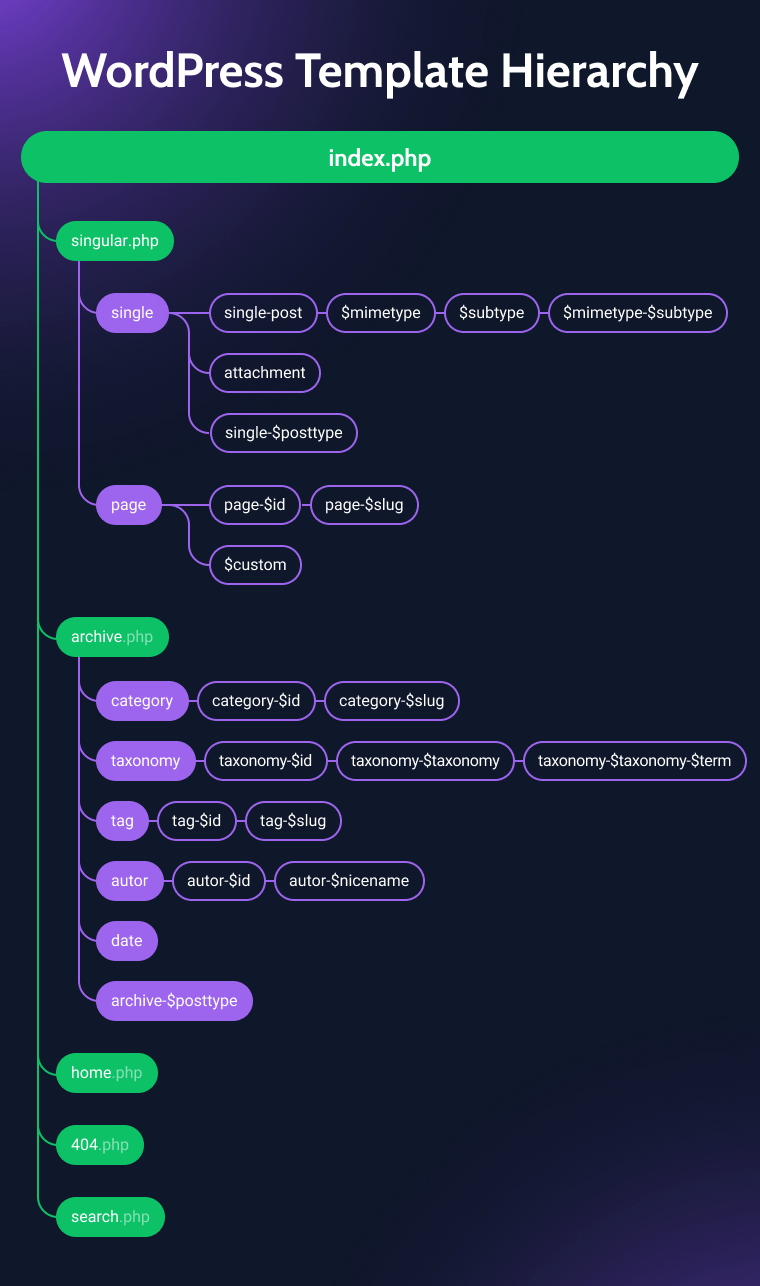
More detailed hierarchy: WP Hierarchy
The logic of default WordPress templates is the following: it there’s no home.php, WordPress will use page.php to display the main page. If there’s no page.php, it will use single.php. If nothing else exists, it will use index.php, the root, most basic template.
But this logic works the other way: you can create as many templates as you need, even for each post type. Also, you can choose one of the custom templates while creating the post or page.
Custom templates hierarchy
To assign specific templates for specific posts/pages, categories/taxonomies, you should add the ID of the post/page or add the name of the category/taxonomy to the template. For example, a unique template for a page with id=2 will look like page-2.php; for the category called “books,” it will be category-books.php; for the tag “fiction,” it will be tag-fiction.php, and so on.
If you want to enable templates for custom post types, add the post type name after the name, like this: archive-{post_type}.php.
WordPress custom post types: use cases
The first thing to consider before creating a well-organized and good-looking website is its structure – if it’s well-thought-out, the good UX/UI and functionality will come almost naturally. Custom post types play a crucial role in forming proper-structured websites. Let’s go over some points showing how CPT help to reach this goal.
- CPT help to display particular posts differently and use custom fields where you need them.
Let’s say you are a designer and want to create your website with a blog and portfolio. The portfolio should have a list of the projects you’ve done. Each portfolio item should have info boxes where you will put the client’s name, the industry the project is for, the release date, and the software you have used. You want those info boxes to work as categories and filters: to be clickable, so viewers can sort the projects by client, software, etc.
Of course, you can use default WordPress posts for your portfolio items and the default categories and tags options to structure the projects. But there will be several problems:
- Those tags and categories you use for the portfolio will mix up with your blog posts and categories.
- Blog posts and portfolio items also will be mixed together.
- Portfolio items will have the same layout as the blog posts unless you don’t stylize each and every item manually.
The list can go on and on. And the conclusion is that it’s simply a horrible idea to implement it this way.
NOTE:
In case you are fancy and want to use the custom fields (meta boxes) in the posts for your info boxes, bear in mind that you need to change the template code by adding a line for displaying them, as well as write a function that will query and filter those meta boxes.
The right way of doing it is to use a custom post type for the portfolio items, adding all the custom fields needed (name of the client, release date, etc.). Then create a template for this custom post type and enjoy the simplicity of the process of adding projects and the way they can be beautifully sorted. In case you want to change something in how the items are displayed, you just do it once, and the layout will change for all of them.
- They help to sort and query the items properly.
I think I gave enough proof that using the default WordPress post types and the options they offer is a bad idea for cases similar to those described above. So, using CPT functionality is the way to do it. Even if you write a piece of code for sorting items by custom fields, it will be much easier if all of them belong to a particular post type. There are excellent CPT plugins in the market which do all the work for you.
Another fantastic thing about custom post types is that they help implement the relationship function to do a proper search, filter, and suggest related items. As you can see, custom post types are a solid basis for creating dynamic websites.
- They help to have a proper hierarchy and keep the admin panel organized.
Needless to say, it’s much handier to have a separate item in the admin menu for, let’s say, the portfolio projects, with those projects being categorized inside, than trying to find them in the pile of your posts or pages, as well as keeping a well-organized category hierarchy for specific items. And yes, let’s not forget about the custom URLs as a side effect of this proper hierarchy which is a big deal in terms of SEO optimization.
Creating Custom Post Types and Their Templates
Let’s go into the practical steps of implementing custom post types on the website, making them structured and displayed correctly. We will look at the nutshell of the CPT logic and how to create and stylize them both hard and easy way.
Registering custom post types and their attributes
To understand the idea and structural elements of WordPress CPT, let’s have a quick look at the piece of code that registers it.
When registering the new custom post type, you define a bunch of parameters. Whether the CPT will be public or private, whether it will be hierarchical or not, whether it will be displayed in the admin menu, and so on. Let’s look at the most basic code that registers a custom post type (labels array is not included here):
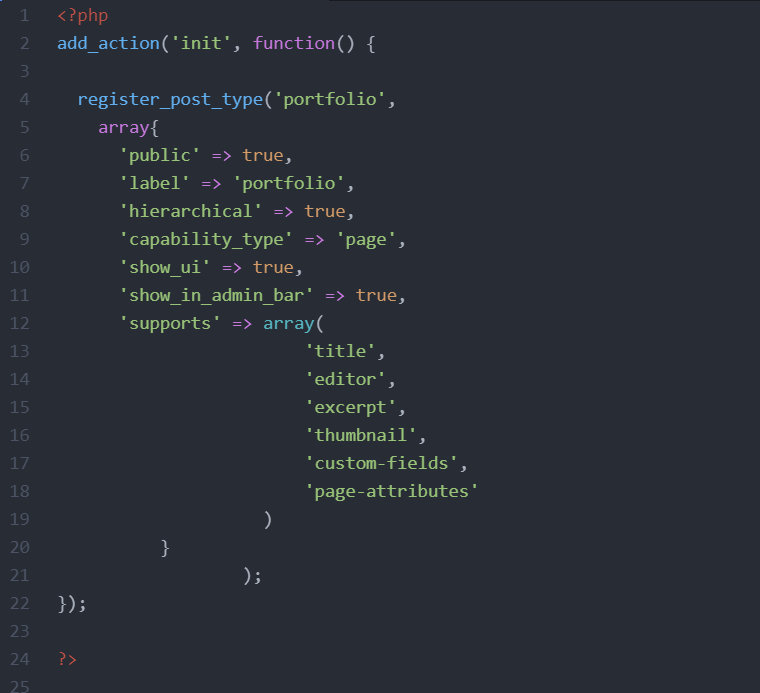
In the “supports” parameter, we can see an array with attributes it will support: title, editor, excerpt, thumbnail, custom fields, and page attributes. This list can go on, so the developer defines which constituent elements the CPT will have. It’s also important to register an array of labels so that the custom post type will look good in the backend. This generator helps to write all your arrays the easy way.
The next step is making a template for this custom post type. The name of our registered post type is “portfolio” (line 4), so we should create a file named single-portfolio.php – it will be a default template for this post type.
NOTE:
Do not forget to put a proper name and include our custom post type name in the “template post type” line inside the template file.
Also, what is important, is creating taxonomies for our custom post types – hence, they can be organized in their own categories. This can be done in a similar way as registering CPT.
But what if you prefer to use Elementor or Gutenberg for building the whole website and don’t have time and energy to do it the hard way, learning the ropes of even the basic coding and bug fixing? Well, those days, even experienced developers often prefer to deal with custom post types with the help of plugins. They not only give a handy visual UI but also make it possible to easily create beautiful CPT and archive templates with Elementor or Gutenberg editor and all the powerful features it provides.
Creating and using custom post types templates
Creating CPT templates is the final step in adding custom post types to your website structure. The great thing about it is that you can define unique styles and layouts for each post type, not worrying that it will affect other post types.
So, you can be very specific and make the UX/UI perfectly well-considered to represent that exact piece of information.
Yet again, there are two ways of doing that.
- The first one is by writing a raw code: creating the new PHP files both for the single item template and for its archive (category), and maybe for the filter/search results. Then stylize each of the blocks with the CSS.
- The second option is to use a plugin. Most of them are paid, so when choosing to buy one, it’s important to choose a powerful one. That means it should not only create CPTs with flexibility and detailing but also give numerous options to display the information in many different ways you might need. In other words, a powerful plugin like JetEngine with the function of creating a variety of relationships and listings.
Conclusion
Custom post types instrument is a powerful tool for creating great websites. They are simply essential when there’s a need for dynamic queries. They allow you to store and display various types of data properly. Moreover, you can assign custom templates to each CPT.
There are two ways of creating CPT and templates for them: with the help of raw code (it takes tons of time, decent programming skills, and doesn’t give any advantage) or using a plugin.
Especially if you prefer to make websites with the help of visual or block builders, such as Elementor or Gutenberg, using a custom post type plugin is a must. It will help easily create and manage custom post types with all the meta fields and display them in beautiful templates designed with a visual builder without a single line of code.