
There have probably been times when you wanted to hide part of your website, whether it was sales information or something illegal.
Just kidding. 😅
But jokes aside, you probably do need to hide some sections from non-registered users — for instance, the My Account menu or the Wishlist page. Besides, you might face this issue when creating the website template and understand the necessity to make one for a particular page. It is really tiresome and time-consuming.
Yet, Elementor — the plugin we all love for its flexibility — allows us to set everything as we need on our websites with less effort. Let me introduce the JetEngine Dynamic Visibility module for Elementor (it works in Gutenberg as well), which will make your life easier.
Table of Contents
- What Is Dynamic Visibility?
- That’s How It Works — Use Cases
- JetEngine Dynamic Visibility Module
- FAQ
- Bottom Line
What Is Dynamic Visibility?
As the name suggests, Dynamic Visibility lets you show or hide certain blocks of content depending on various conditions that you set up.
For example, you can hide blocks based on whether the user is registered or not.
You can also add a content column only for viewing on mobile devices but hidden on the desktop. Or display some sections of the page based on the user’s login status or other specific conditions. If you are working on a specific section, you can hide viewing by the general public. Actually, there can be a lot of combinations; it depends on the power of the tool you use for setting such visibility. And, as you might have guessed, JetEngine’s Dynamic Visibility module is really versatile and offers a lot of room for creativity.
⚡ One more thing to consider how useful this functionality can be is that it can save you a lot of time, and this is how it works. So, Elementor provides us with the impressive flexibility to create templates and uniquely customize every page. Yet, sometimes your website requires you to use different page layouts depending on the case. Or, probably, you need to make just a few changes on one page, etc.
In this case, with Elementor visibility control tools, you won’t waste time duplicating data or making the same changes in multiple places. Rather than creating dozens of templates to meet the requirements, apply Elementor dynamic visibility and hide necessary sections on any page.
This gives you complete control over each element on the page. Profit!
That’s How It Works — Use Cases
You may say: OK, this is great, but what are the examples from real life? Well, probably the most frequent case to use Elementor visibility is to show or hide content depending on whether the user is registered or not. As well as showing or hiding the registration form.
This is some of the other examples where to use them.
- A must-have tool for Membership sites (to show/hide content depending on the user’s role and plan).
- Showcase special promotions only on weekends.
- Set up exclusive discount coupons for subscribed users only.
- Display a particular picture gallery only to the respective clients.
- Show different navigation menus either to registered users or non-registered ones.
- Display holiday notices or a specific message only for logged users.
- Personalize every website page for a particular group of users, depending on their role, status, or even age, with the help of Elementor visibility control.
- Hide or show certain blocks only on mobile devices.
- Show WooCommerce products only if there is enough in stock, if there is a sale, if it’s virtual, etc.
- Display the block only in particular post types and hide in all the others.
- Use it with JetEngine Dynamic Calendar, for example, showing the “coming soon” label.
Let’s look closer at some particular examples.
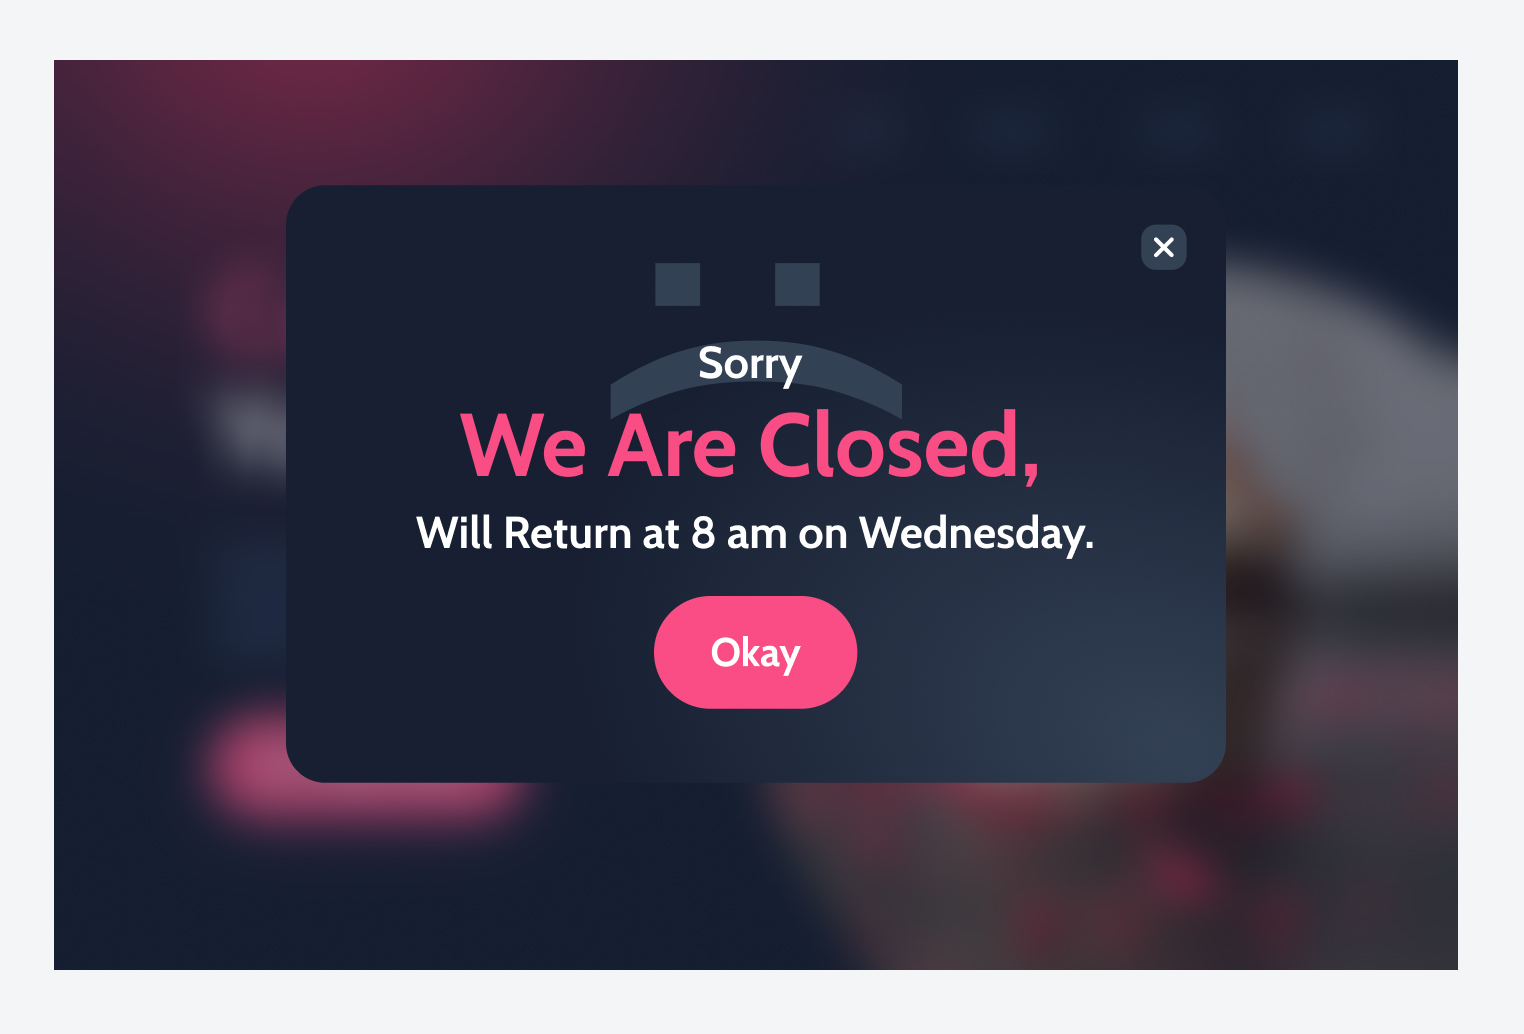
Suppose you launched a website for a small business, say, a cake shop. You are closed every Monday and Tuesday. Of course, you can update information about working hours every Sunday evening, setting a message about being closed. Then, you need to remove this message on Wednesday morning to show you are open.
It is unnecessary and tiresome work, and by the way, human factors cannot be excluded. For example, the employee responsible for it might sometimes forget. Instead, configuring a conditional display and showing the required message on particular days is more reliable and efficient. This is how dynamic visibility for Elementor can make the process simpler.
Feel free to check this video tutorial about setting it up.

Another use case: if the user is logged in, don’t show them a pop-up with “Become a member” or “Register now” text. But if the user isn’t logged in, you can set a Subscribe Form widget to be visible for them.
Let’s consider some more examples.
Imagine you have a grocery shop or delivery website (or both combined). When a customer visits it, they will see a pop-up with a form to provide their date of birth or a switcher to choose that the visitor is of legal age. When the visitor submits this form and is not of full age, tobacco-related products and alcohol are hidden from the main menu (if you set up a mega menu) and footer. All ads with these goods and the corresponding sections on a shop page are hidden, too. This video tutorial has all the details about setting it up. Lastly, suppose you have a website with educational content, e.g., courses (basically, a membership site). You can configure the dashboard depending on the following:
- users’ roles (admins or not);
- students’ level (to show them Basic courses, etc.);
- give a test for the first entry users to check their level;
- create a course page where the lessons are opened only if the previous ones are completed;
- open some new menu entries when the user reaches a particular level;
- add a promo of the related courses in case the user marked their level or selected the courses they passed.
Overall, there are plenty of potential use cases for the Elementor visibility control feature.
JetEngine Dynamic Visibility Module
The ultimate plugin you will need is — no surprise — the JetEngine plugin. After enabling Dynamic Visibility for Widgets and Sections in JetEngine’s settings, you will be able to define Elementor visibility control parameters for various page elements. Dynamic visibility for Elementor is located in Advanced settings, which appear when you click on any element, section, widget, etc.
Note that Dynamic Visibility is toggled on for every element separately, which gives more flexibility in configuring page parts.
You can add as many conditions as you need, but be careful with that. JetEngine’s visibility module provides many Conditions contradicting each other, so be careful not to mix them up.
First, you choose whether you will show or hide the element if the conditions that you select are met.
Then, you choose the condition and fill in all the details. And there are really a lot of conditions to choose from. That’s why this module offers really huge flexibility; just look at this list:
So, as a result, you can get an almost limitless number of combinations, and you will definitely be able to get what matches your goals.
The list of conditions is divided into several sections:
- General conditions;
- JetEngine-specific;
- Users;
- Posts;
- Date and Time;
- Listings;
- if you have WooCommerce installed, the dedicated section will also appear.
This article from Knowledge Base gives a detailed description of each condition. So you can define the rules for Switcher fields, define whether the users can add the posts, display elements that are referred to a particular post type, show any section only on the Archive pages or pages attached to a specific taxonomy, and so on.
If you are setting up more than one condition, you need to define the Relation that also has two options:
- AND – visibility rule will work only if the predefined conditions are met;
- OR – visibility rule will work if any of the predefined conditions are met.
The Relation option gives more flexibility for setting up visibility logic for Elementor.
There’s also one very useful toggle there: Dynamic Visibility Column Resize. Using it, you can resize the column in a section. E.g., you hide the left part, enable the option and get an automatically aligned column. If you don’t toggle this option, you’ll get the column that will take 50% of the width.
Along with this, you can define Elementor visibility control for JetEngine form fields, so it’s easy to adapt them to the website’s needs. For example, you can display or hide the form dynamically, fill it with the pre-set data, or even set multiple rules for every part of the form. Thus, depending on the user’s role, whether they are logged in or not, it is possible to display the forms that suit them.
Lastly, Crocoblock provides a free extra add-on, JetEngine – Custom visibility conditions – it adds two additional custom conditions for the Dynamic Visibility module. Those two conditions are for posts:
- Make sections/columns/widgets visible/invisible to the author of the post only using the “Is post by current user” condition.
- Show/hide the sections/columns/widgets depending on the status of the post using the “Post Status is” condition.
It’s made as an additional add-on for the sake of performance, so if you don’t use it, keep it deactivated.
FAQ
Yes, it fully supports Gutenberg.
No, Dynamic Visibility comes as one of the modules of the JetEngine plugin.
No, you don’t have to know how to write any code to set up dynamic visibility if you choose to go with JetEngine.
No, JetEngine works perfectly well with a free version of Elementor.
The Bottom Line
Now you see that it is easy to configure Elementor visibility control, and it isn’t scary anymore. A variety of WordPress plugins will help you personalize every page element according to the users’ roles and your purposes and make your website more flexible.