Croco Black Friday 2024 banner element
Copy discount code:
bfcroco2024
Days
Hours
Minutes
Croco Black Friday 2024 banner element
Help Center
How to Create Filters with Query Builder Source

How to Create Filters with Query Builder Source

From this guide, you will discover how to build filters based on the JetEngine Query Builder and JetSmartFilters plugin.

Before you start, check the tutorial requirements:

  • Elementor (Free version) or Block editor (Gutenberg)

  • JetEngine plugin installed and activated

  • JetSmartFilters plugin installed and activated

Create Custom Query

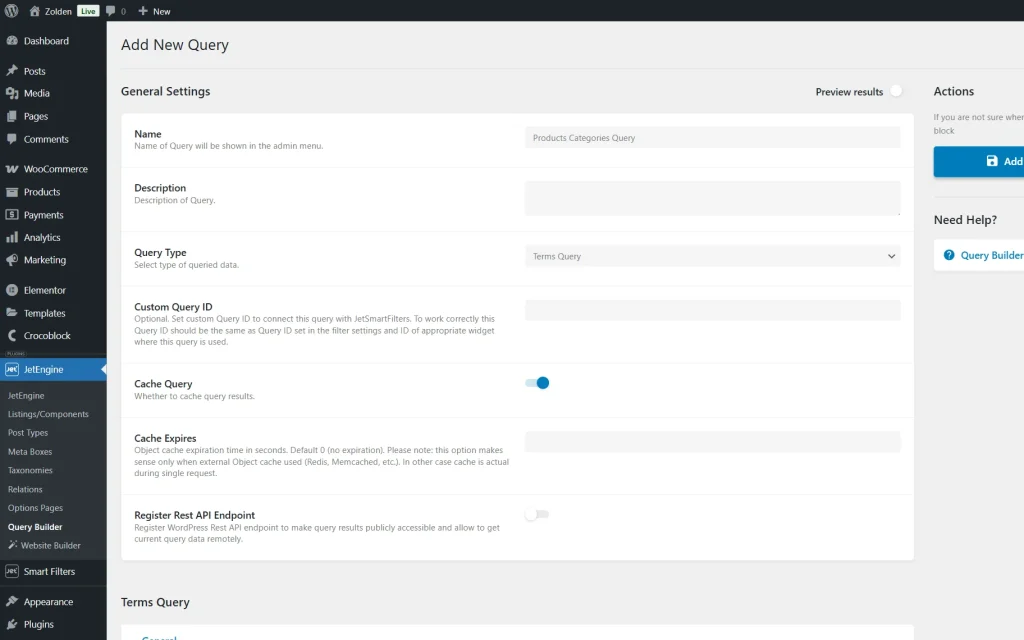
Proceed to WordPress Dashboard > JetEngine > Query Builder and create a new query by clicking the “Add New” button. 

Write the Name of the custom query, and select a needed Query Type

In the provided example, we want to display a list of product categories ordered by a term name to override the default order by created date. 

It means that a custom query can be used if the order of items needs to be altered.

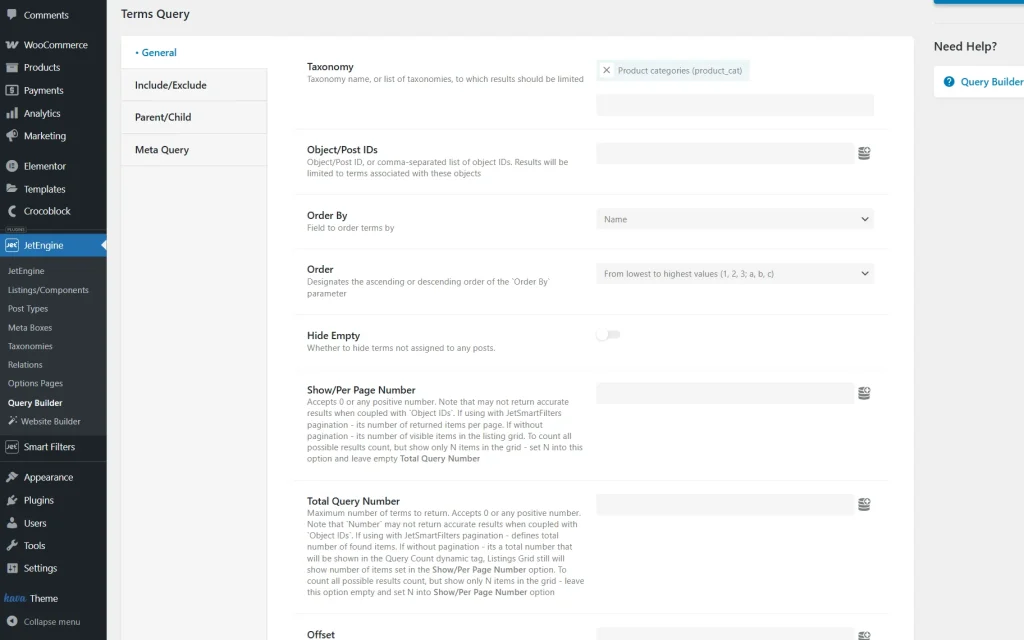
Therefore, a “Terms Query” type is selected. Then the “Product categories” option is picked as a Taxonomy

In the Order By field, we chose the “Name” option and set the ascending “From lowest to highest values” Order.

terms query settings

At this point, the query can be saved to be later used in the filter. To do so, press the “Add Query” button.

Before going to the filter settings, let us check another example of using the Query Builder’s custom query as a filter source.

In this example, we will show the process of displaying the list of users as filter options to filter the Form Records. The idea is to select a user in the filter and show their relative submissions in the Listing Grid widget.
The setup would be the following: a form created with the JetFormBuilder plugin collects submissions via Save Form Record post-submit action.

save form record post submit action

The form also needs a Hidden field that collects the ID of the user that submits the form. Based on this field, filtering will be performed, which is why it is necessary.

So, we select the “Current User ID” option as a Field Value.

current user id hidden field

Next, we create a custom query in Query Builder to output the form records from a needed form. The “JetFormBuilder Records” Query Type should be selected accordingly.

In the JetFormbuilder Records Query section, the Form from which the submissions need to be filtered should be selected.

jetformbuilder records query settings

After it, we create a Listing template for this custom query by going to WordPress Dashboard > JetEngine > Listings and hitting the “Add New” button.

This listing template allows showing the list of form records using the Listing Grid widget. 

In the Listing Settings section, “Query Builder” should be selected as Listing Source. Then we specify the built query.

listing settings in elementor

In the listing template, you can present the field values a user filled in during the post submission.

The field of the form record containing the data submitted via a frontend form is ‘jfb_fields,’ as can be seen in the Preview results of the custom query. 

This field includes an array of fields and their values that were filled within post submission. We need to understand this when outputting the fields in the listing template.

preview settings in query builder

So to show a value of the ‘text_field’ from a form, the following settings have been applied to the Dynamic Field widget.

The Custom Object field/Meta field/Repeater key is set to ‘jfb_fields.’

Then we activate a Filter field output toggle and apply a Callback ‘Get child element from object/array’ to get a ‘text_field’ field. Please, use it as a reference to show other fields of the form record in the listing template. 

Then the listing template for form records can be considered complete.

dynamic field content settings

Again we can move on to WordPress Dashboard > JetEngine > Query Builder to create another custom query that lists the users in a filter.  

Respectively, a “Users Query” Query Type is to be chosen.

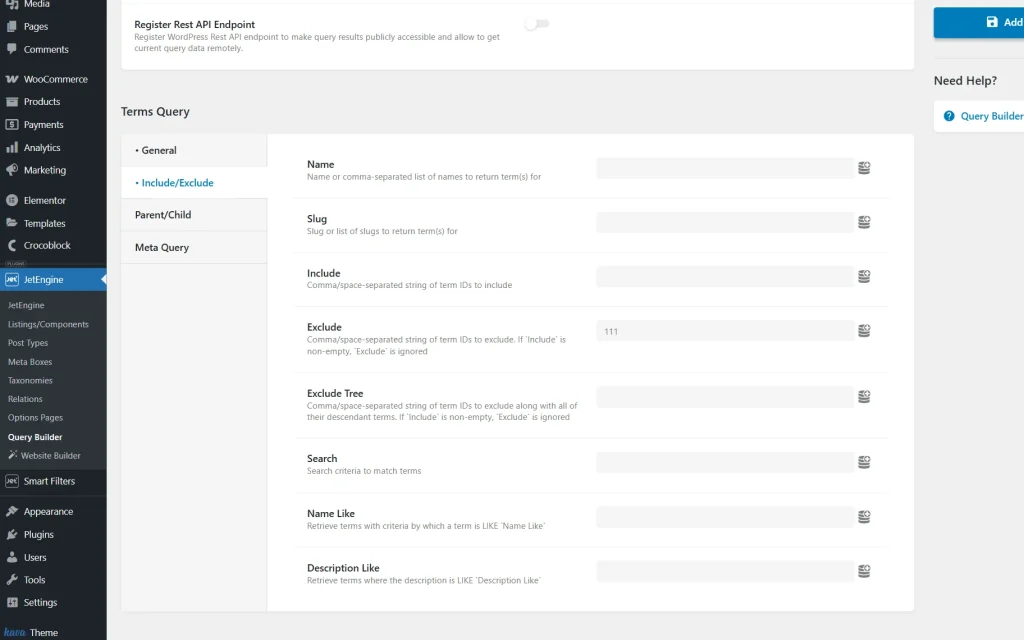
In this example, we want to show only the users with the user role “Editor,” specified in the Role setting of the User Role tab. 

If there is no need to add other query clauses, let us save the query and create a filter.

users query settings

Create Filter with Query Builder Source

Go to WordPress Dashboard > JetSmartFilters > Add New.

Firstly, we will create a filter for a Terms Query that was made at the beginning of this tutorial.

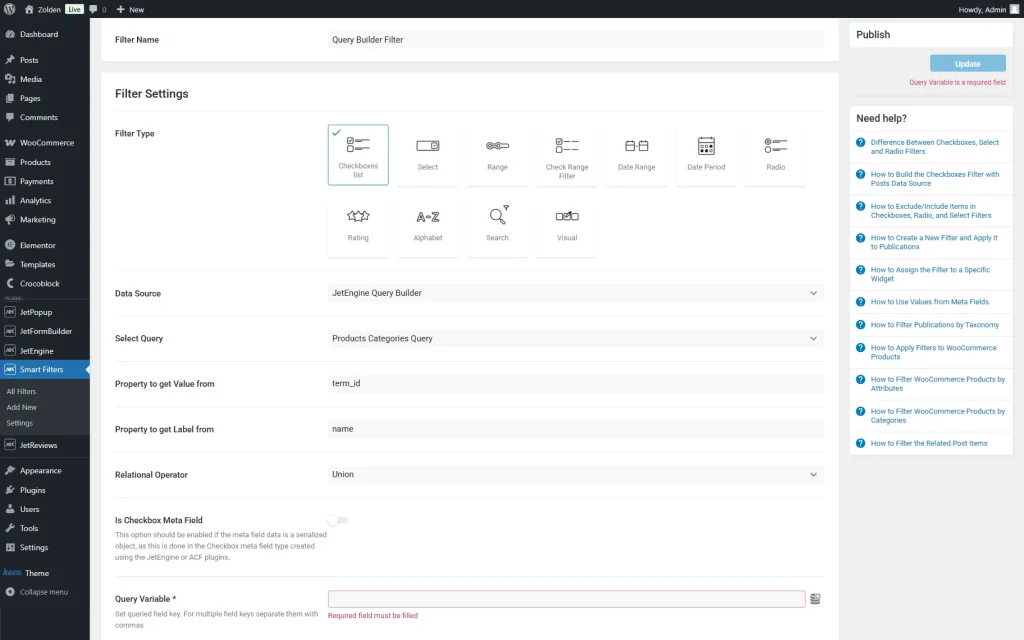
Select a Filter Type: “Radio,” “Checkbox,” or “Select.” In the Data Source,  you can see a “JetEngine Query Builder” source, which we need.

jetengine query builder filter data source

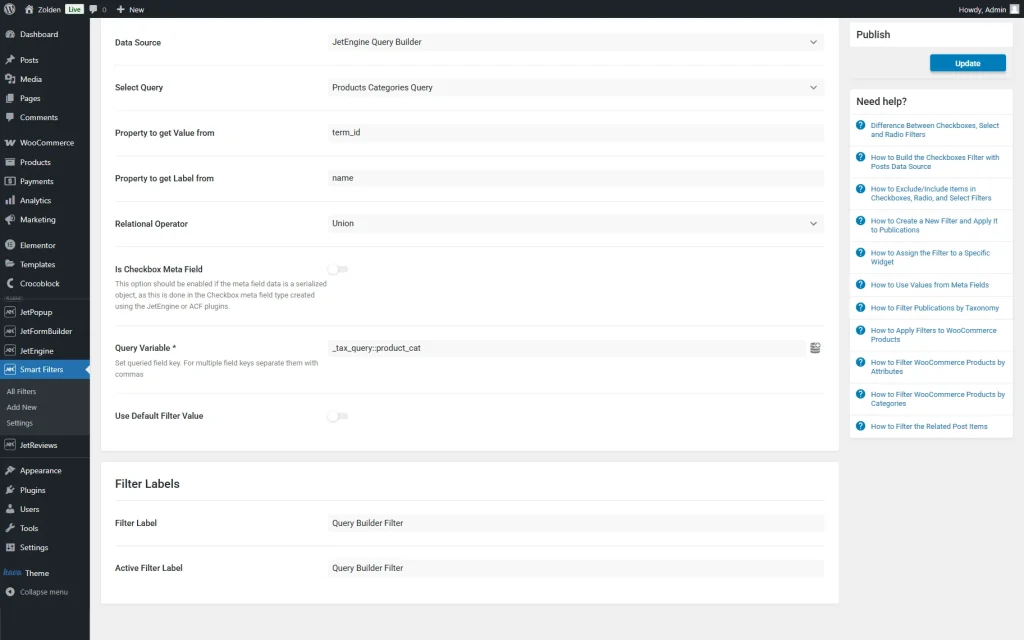
After adding the source, three new fields appear. 

In the Select Query field, a custom query from Query Builder is to be chosen from which the filter options are filled. 

In the described case, a previously created Terms query with the terms order is added.

data source settings

The Property to get Value from defines the property based on which the filtering is performed. 

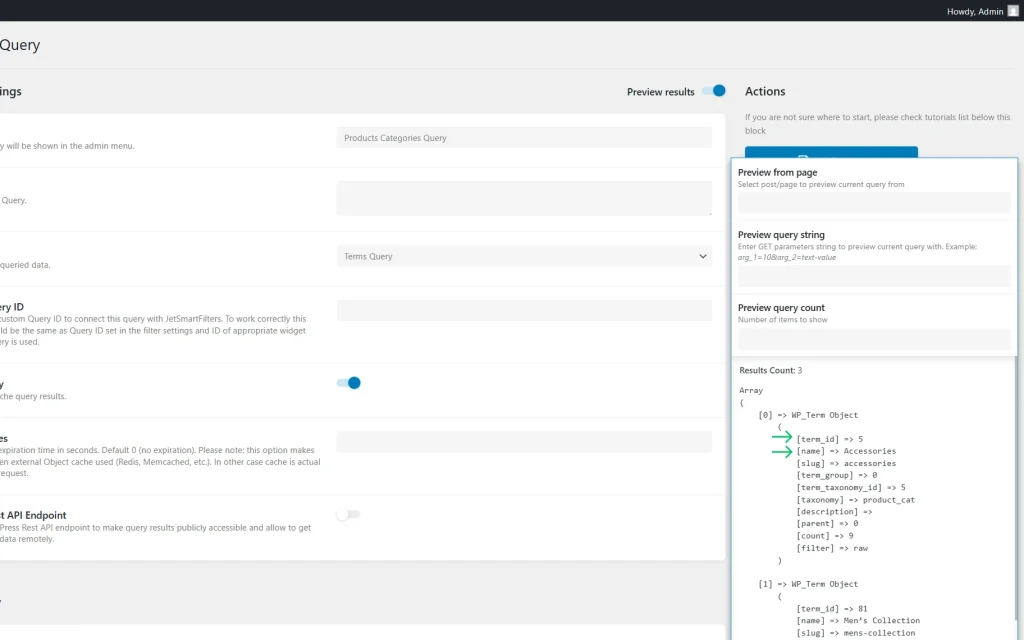
According to the used query, the ID of the term is the value. You can go back to the custom query in the Query Builder to see how the ID property of the term is named.

term id and name in preview

The Property to get Label from is what a user sees on the front end as a label of an option. According to the described case, the field containing the term’s name is ‘name.’

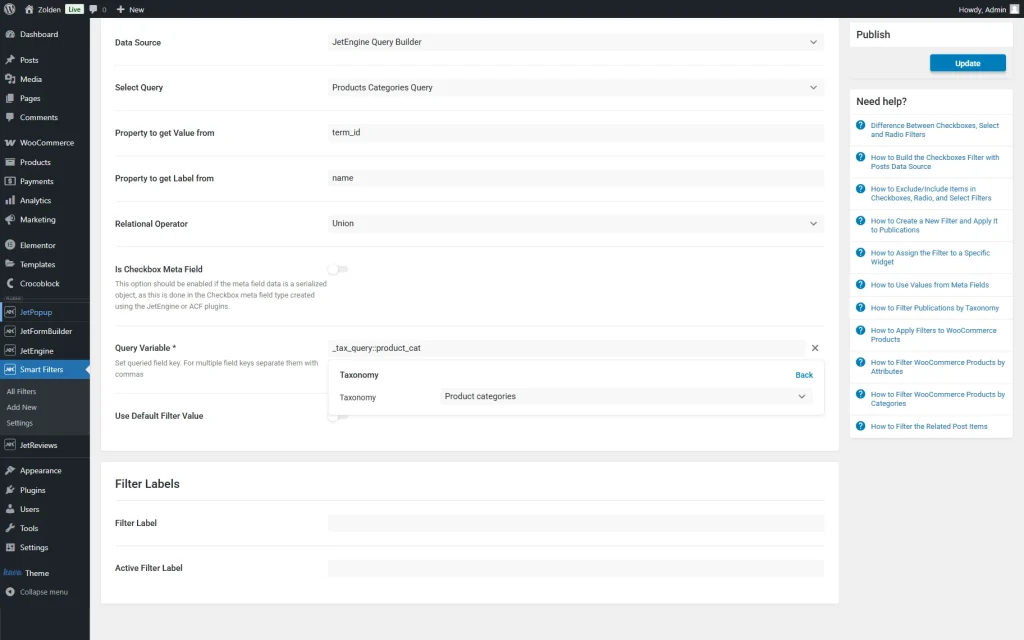
Lastly, the Query Variable should contain the taxonomy to filter by.

query variable field

It can be selected by pressing the “Dynamic Tag” button next to the field. Then click “Taxonomy” and pick the “Product categories” option.

dynamic tags button

Now, the filter can be saved.

And let us complete the knowledge of Query Builder as a filter source by creating a filter based on the custom query for users.

Create another filter. Let it be of “Radio” Type. The Data Source is “JetEngine Query Builder.” The Select Query field represents the user query created earlier in this tutorial.

radio field query builder

The Property to get Value from is the id of a user, which, according to the custom query’s preview, is named “ID.”

id in query preview

The Property to get the Label from is “display_name.”

display name in query preview

The filter setup is completed, so we can proceed to the next stage.

Add Filter to Page or Template

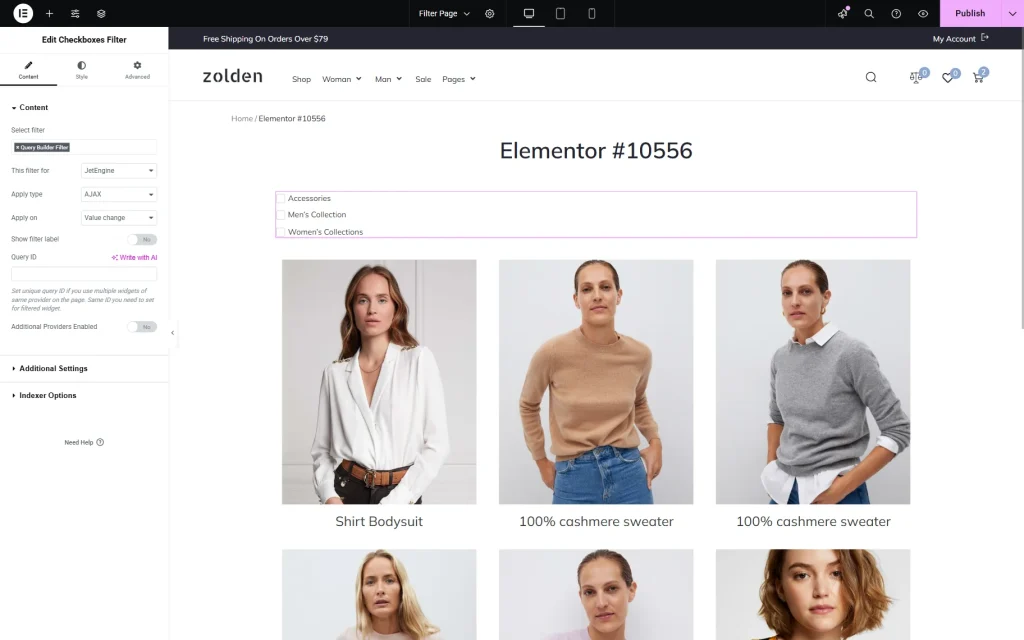
Let us see the filter in action. Open a page or a template in a preferred editor.

Add a Checkboxes Filter widget to the editing area. If you previously created a Select or Radio filter type, add the widget accordingly.

We also added a Listing Grid widget and selected it as a filter provider by picking the “JetEngine” option in the This filter for field of the Checkboxes filter settings.

checkboxes filter settings in elementor

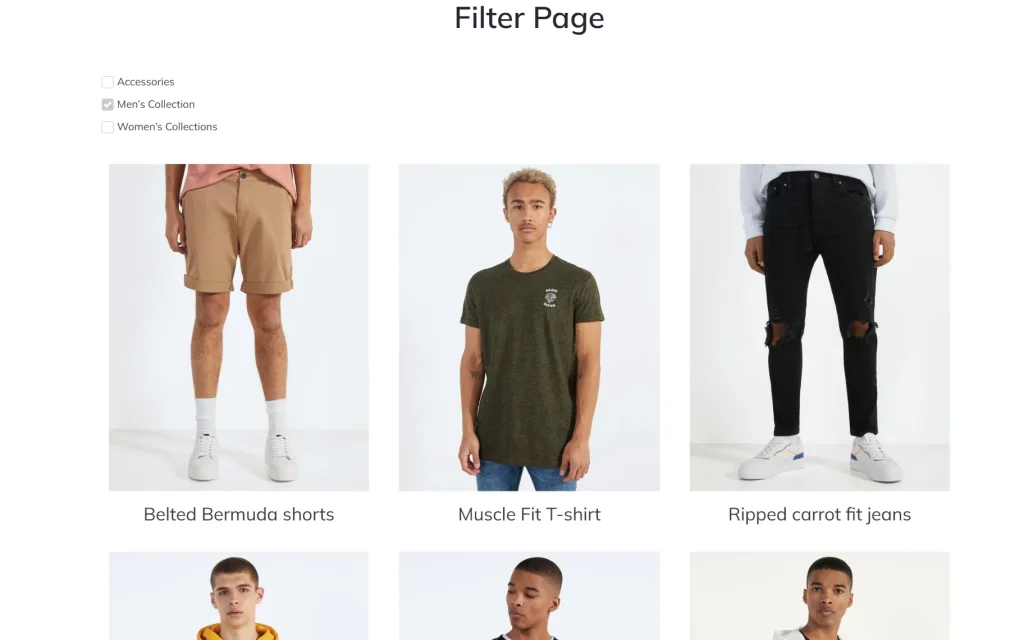
Time to check the result on the front end. 

The options are ordered in alphabetical order. The filter works, and the products are filtered according to the selected product category.

query filter on front end

To understand the difference with and without Query Builder as a source, here is the filter based directly on the “Product Categories” Taxonomy. The custom order is not preserved anymore.

taxonomy filter on front end

Here is a Radio Filter based on the Users Query that filters the Form Records Listing.

Warning

Make sure to add a Query ID to the filter widget.

radio filter settings in elementor
Warning

Also, specify the ID in the Listing Grid widget in the CSS ID field of the Advanced settings tab. It should be the same as in the Query ID field of the custom query for Form Records.

listing grid advanced settings

Check the final result on the front end.

The form records are filtered by users that submitted them.

filtered form records

Also, the data is displayed correctly in the Listing Grid widget.

form fields values

That’s all; now you know how to create filters with the Query Builder as a source by using JetEngine and JetSmartFilters on your WordPress website.
Was this article helpful?
YesNo

Need help?

Ask Facebook community

Get answers from 22K Crocoblock Community experts from all over the world.

Start a live chat

Ask question to support agent and share its details via chat messages.