How to Use the Manage Capacity Feature for Efficient Appointment Scheduling
Discover the process of creating flexible booking systems with the Manage Capacity feature in JetAppointment. Learn how to allow multiple clients to book appointments simultaneously while maintaining smooth and efficient scheduling.
Before you start, check the tutorial requirements:
- WooCommerce plugin installed and activated
- JetApppointments plugin installed and activated
- JetEngine plugin installed and activated
- JetFormBuilder plugin installed and activated
The Manage Capacity feature in JetAppointment allows businesses and service providers to manage the number of clients who can book a specific service at the same time. This feature is particularly useful when multiple clients can be served simultaneously, such as in medical practices, fitness classes, or workshops.
In this tutorial, we will walk through configuring and using the Manage Capacity feature to accommodate different appointment scenarios based on your specific service needs.
What Is Capacity in JetAppointment
In JetAppointment, Capacity defines how many booking items are available for a single time slot.
By default, every submitted appointment takes one item of capacity. For example, if a service has a capacity of “3,” three separate bookings can be made for the same date and time before that slot becomes unavailable.
The behavior changes when the User Can Manage Booked Capacity option is enabled in the plugin settings.
With this option activated, users can choose how many appointment capacity WordPress items they want to reserve within a single booking. This is useful when one submission should reserve multiple places at once.
For example:
- if a workshop has a capacity of “10,” one user can book “4” spots for their group, leaving “6” spots available for others, or book all “10” at once;
- if a private service has a capacity of “3,” one user can reserve all 3 items, making the slot unavailable for additional bookings.
In simple terms, Capacity controls how many clients, participants, or reserved places can fit into one appointment slot. At the same time, the User Can Manage Booked Capacity option defines whether that amount is always fixed at one or can be selected by the customer during the booking process.
Enable the Manage Capacity Feature
To enable the feature, follow the path: WordPress Dashboard > Crocoblock > JetPlugins Settings > JetAppointments > General Settings, and enable the Manage Capacity switcher.
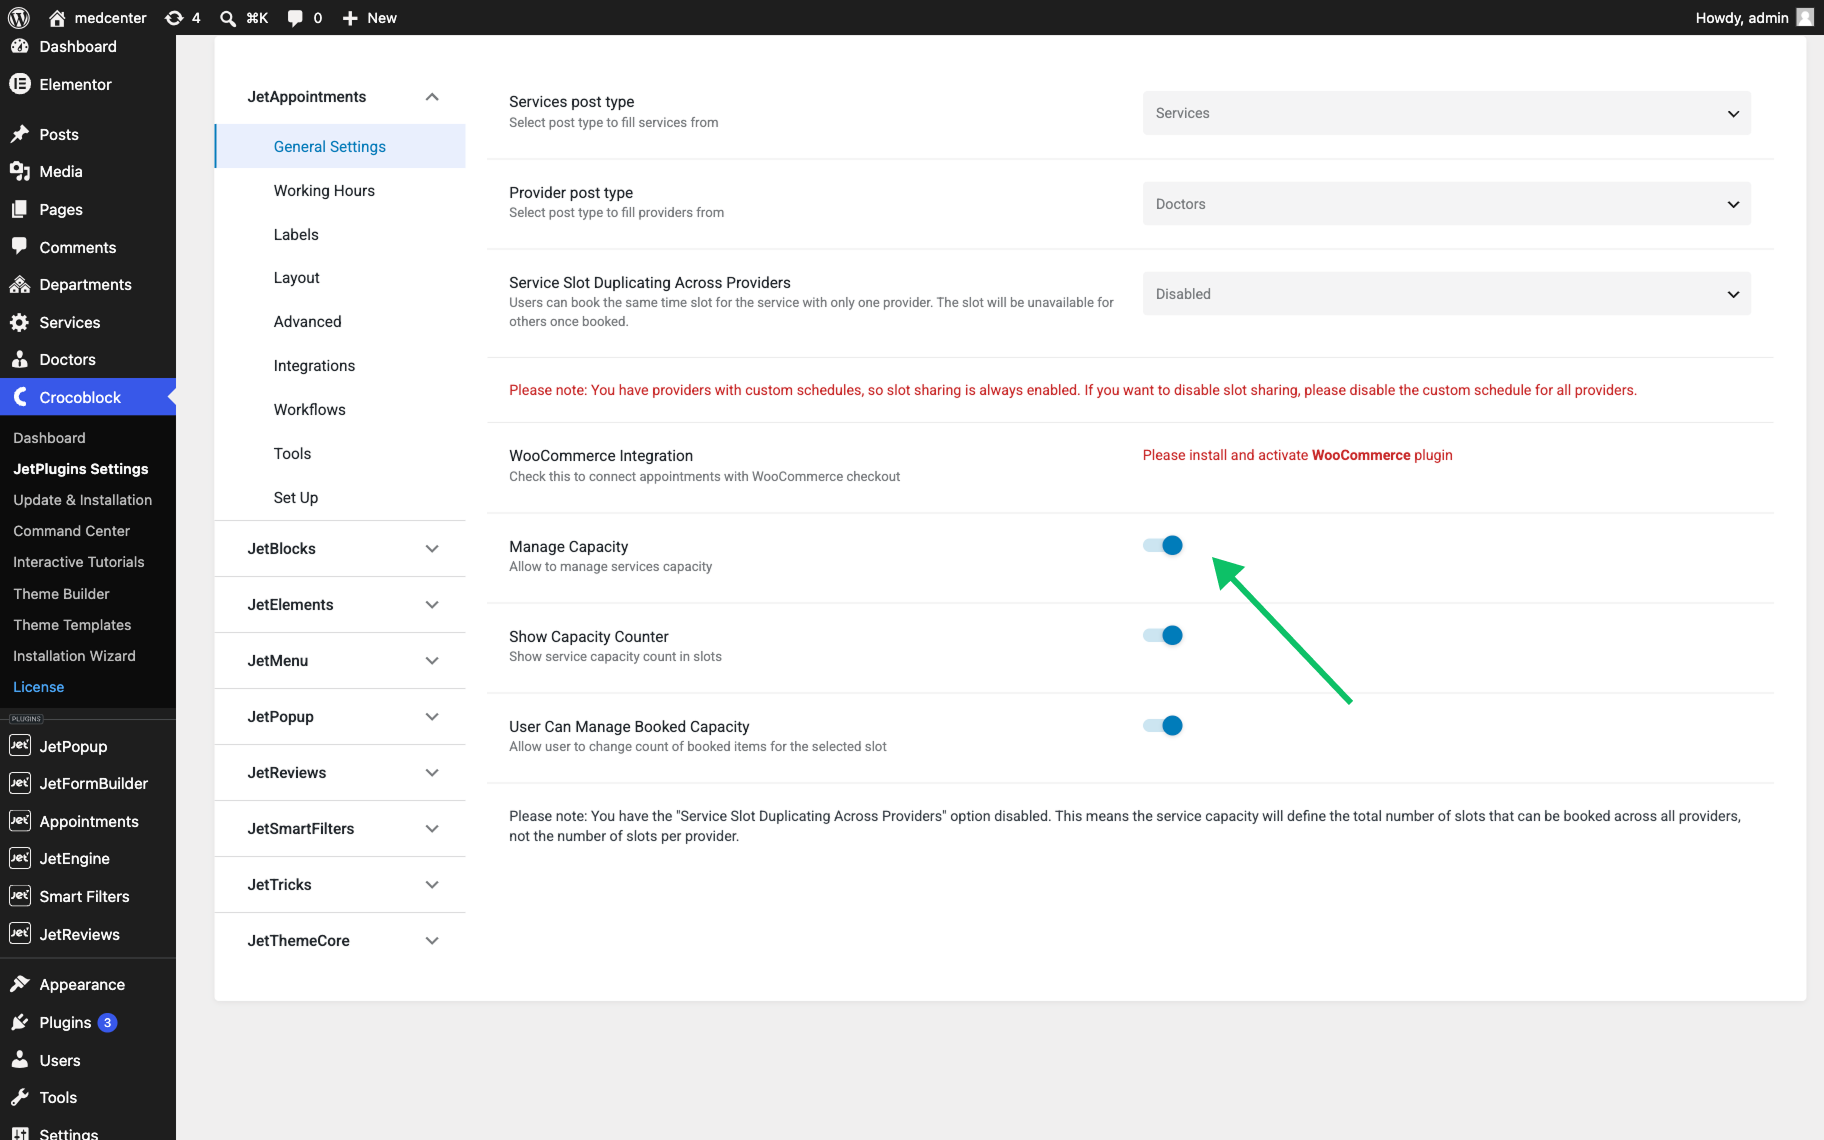
You can also enable additional features that appear when the Manage Capacity switcher is activated:
General Settings of the JetAppointment plugin include the following settings:
- Services post type — defines which Custom Post Type JetAppointment uses as the source for available services in the booking system;
- Service Slot Duplicating Across Providers — a feature that can be either enabled or disabled. It defines whether the same service time slot can be booked separately for each assigned provider:
- When set to “Enabled”, each provider has their own availability for the same service slot. For example, if a service is available at 10:00 and has three providers assigned, clients can book the 10:00 slot separately with each provider;
- When set to “Disabled”, the service slot is shared across all assigned providers. In this case, the service Capacity defines the total number of bookings available for that slot across all providers, rather than the number of bookings available for each provider.
- Provider post type — defines which Custom Post Type JetAppointment uses as the source for service providers;
- WooCommerce Integration — the switcher becomes available when the WooCommerce plugin is installed, which allows one to add the WooCommerce payment gateway to the appointment booking process;
- Manage Capacity — a feature that is deactivated by default. When enabled, it allows setting the maximum number of bookings available for a single appointment slot. This option is useful for services that can accommodate multiple clients at the same time, such as JetAppointment group bookings capacity sessions, workshops, or practices with several specialists available simultaneously;
- Show Capacity Counter — a feature that is deactivated by default. When this switcher is enabled, it displays the service capacity count in appointment time slots;
- User Can Manage Booked Capacity — a feature that is deactivated by default. When this switcher is enabled, users can adjust the number of booked items for a selected slot.
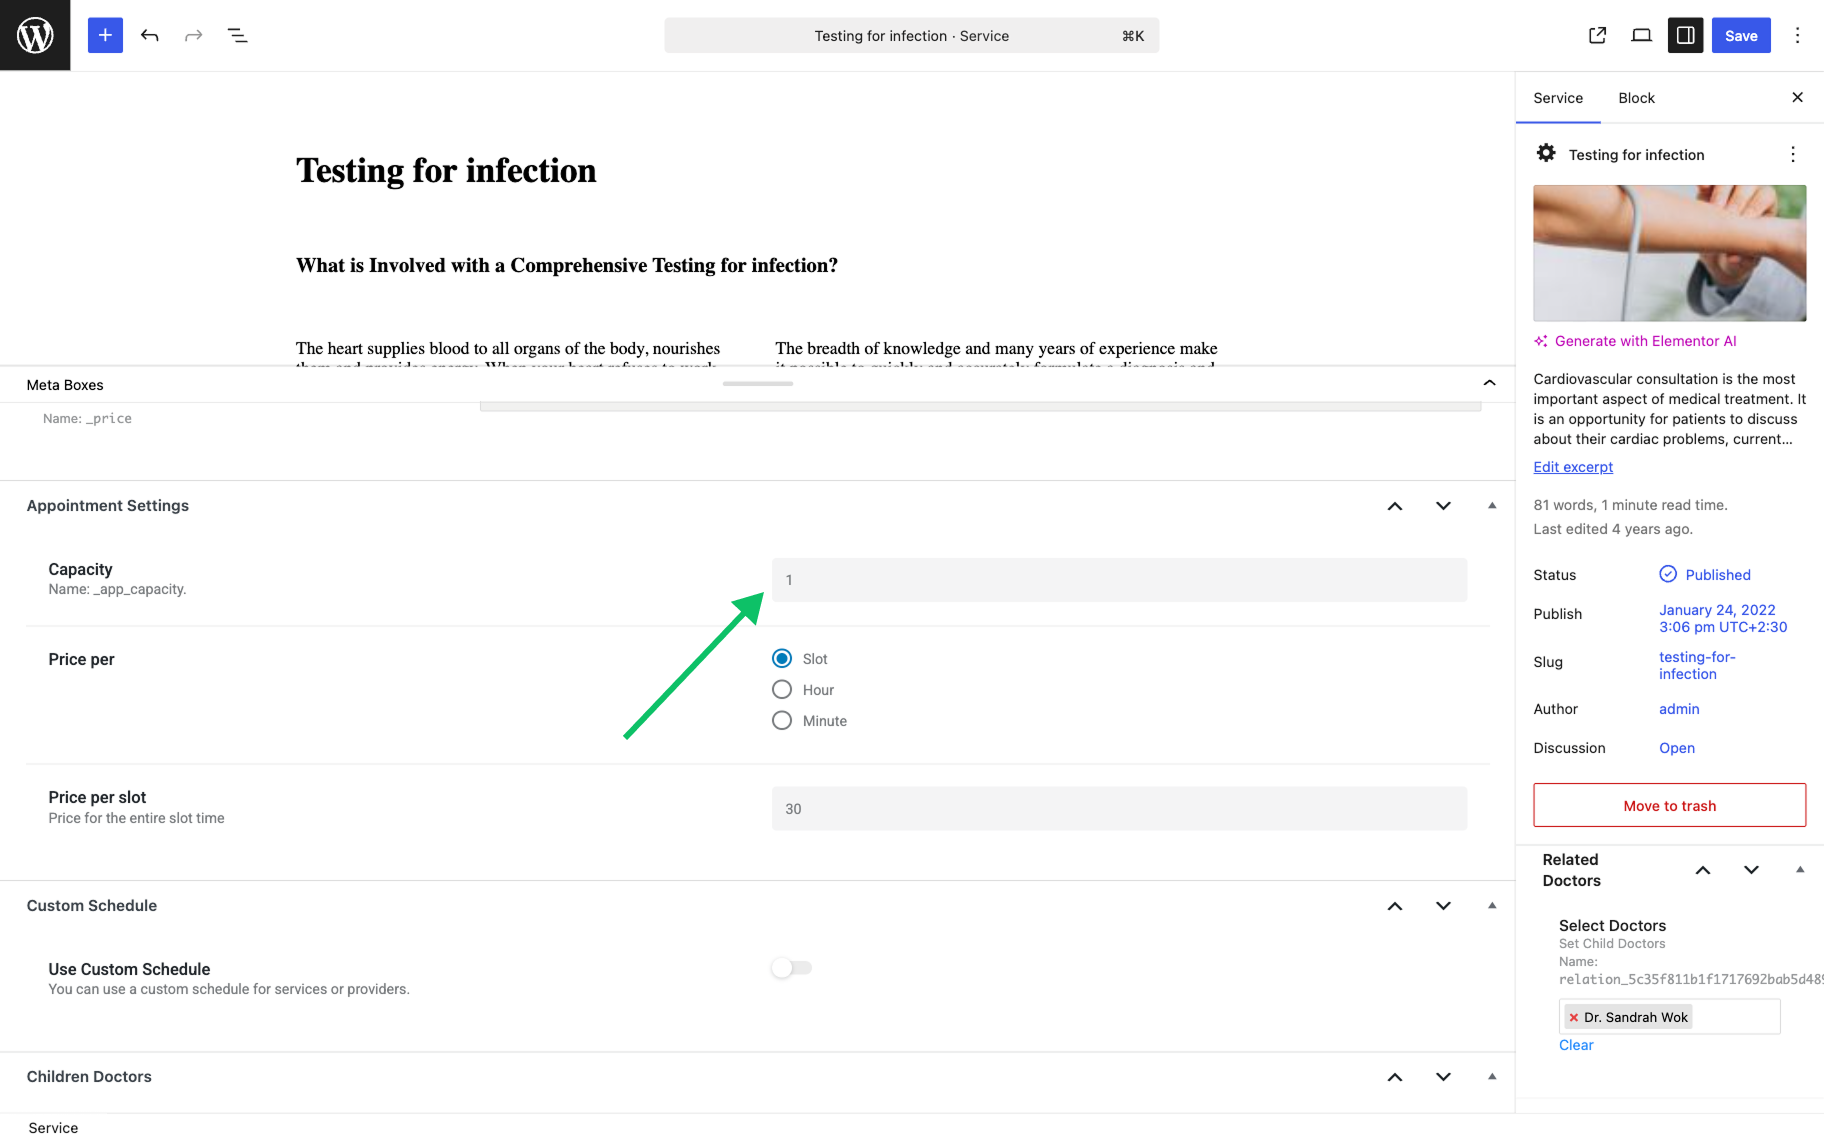
After enabling the Manage Capacity, you must also update the Capacity values for each Service post.
Connect the JetFormBuilder form to the booking process
To be able to store booking details, the JetAppointment plugin has an “Insert Appointment” form action for the JetFormBuilder forms. To add the form action in the JetForm settings, go to the Post Submit Actions section, click “New Action” and select Insert Appointment in the pop-up.
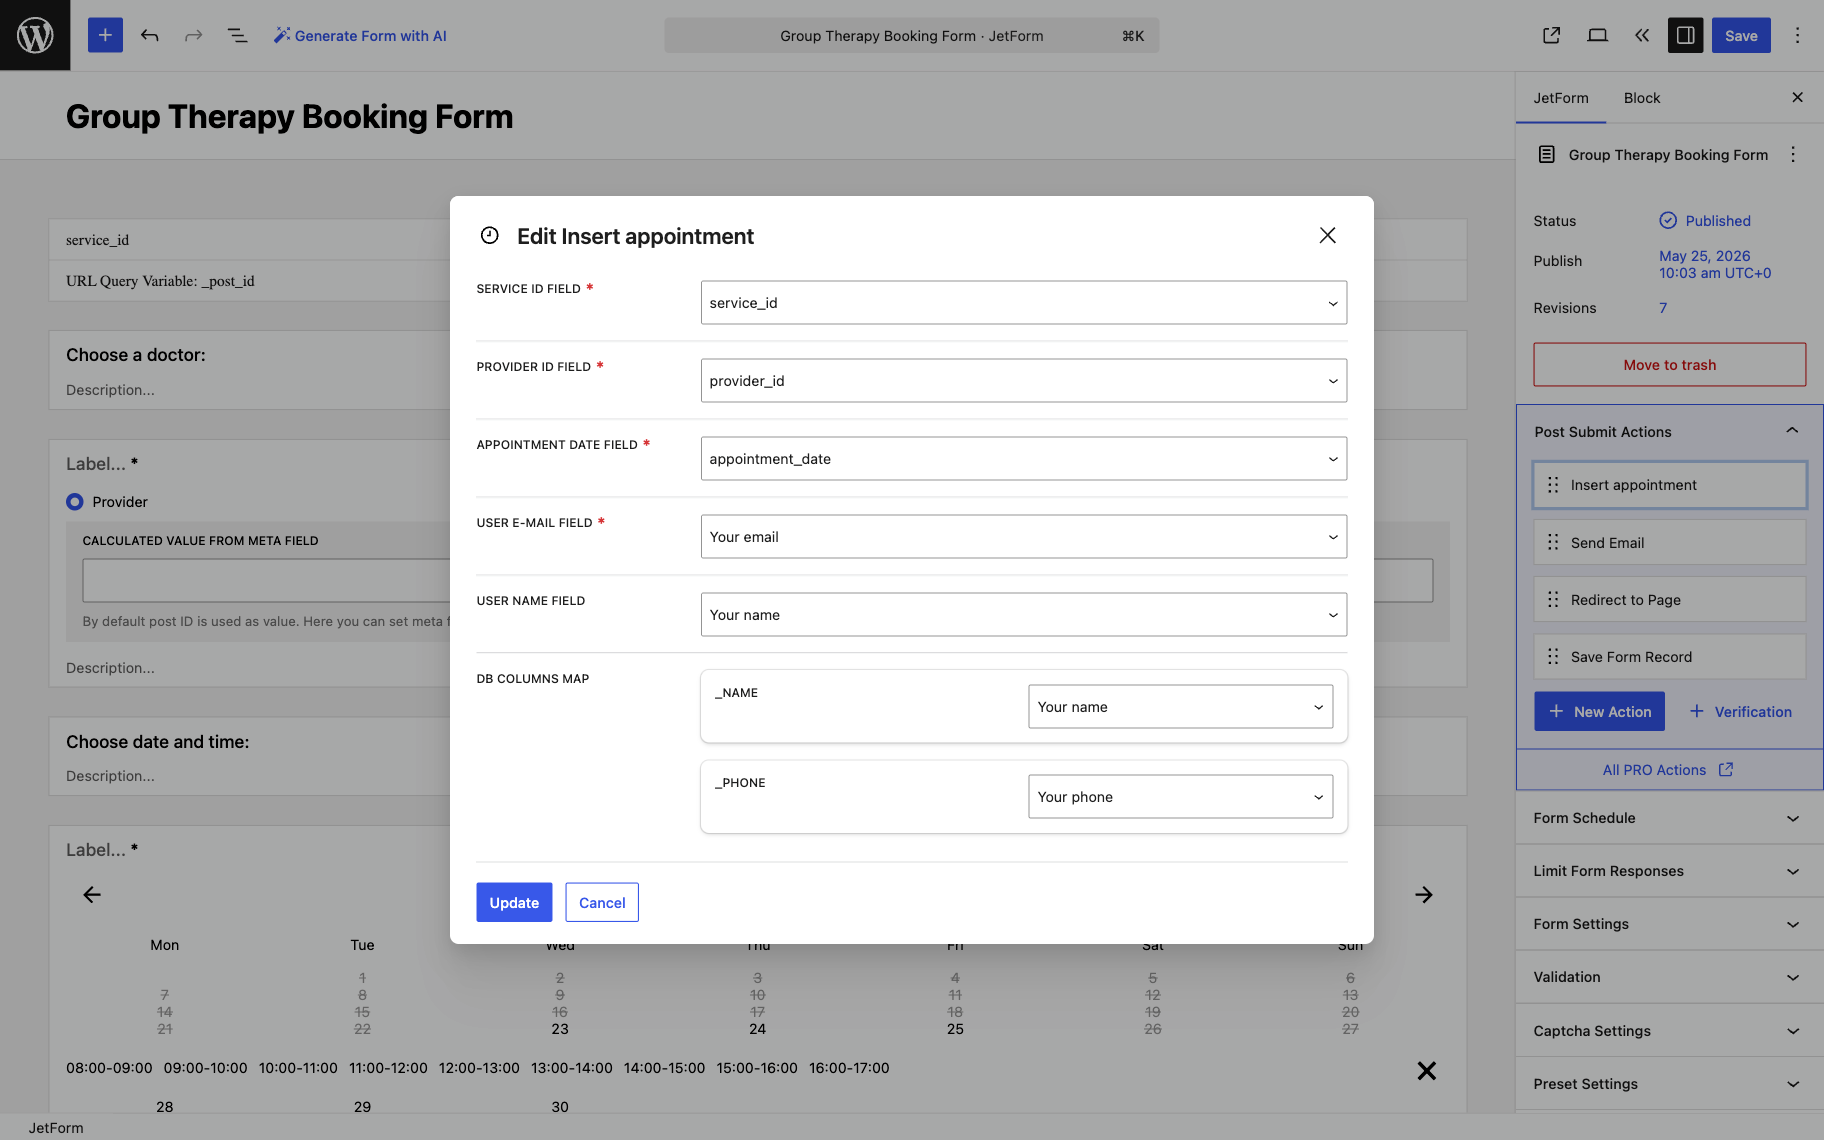
Inside the form action, you need to map the fields to the ones in your form. Based on the form field data, this form action creates an appointment entry in the corresponding section of the website: WordPress Dashboard > Appointments > Appointments, where site admins can moderate the submissions.
JetAppointment Booking with WooCommerce Pricing
If you plan to use JetAppointment together with WooCommerce, the booking flow can combine appointment scheduling with the WooCommerce checkout system.
After installing WooCommerce and activating the WooCommerce Integration toggle in the plugin settings (WordPress Dashboard > Crocoblock > JetAppointments > General Settings), the plugin automatically creates an Appointment sample product, which activates the checkout option. The actual billable products are the Service type CPT posts. Do not delete this sample product; payments will not work without it. If you do not need it displayed on the front end, simply hide it from the shop catalog.
Configure the booking form
Open the booking form in JetFormBuilder and edit the Insert Appointment form action.
After WooCommerce integration is enabled, an additional field named WOOCOMMERCE PRICE FIELD appears in the action settings. As well as a set of other WooCommerce-related fields that will fetch data for the checkout.
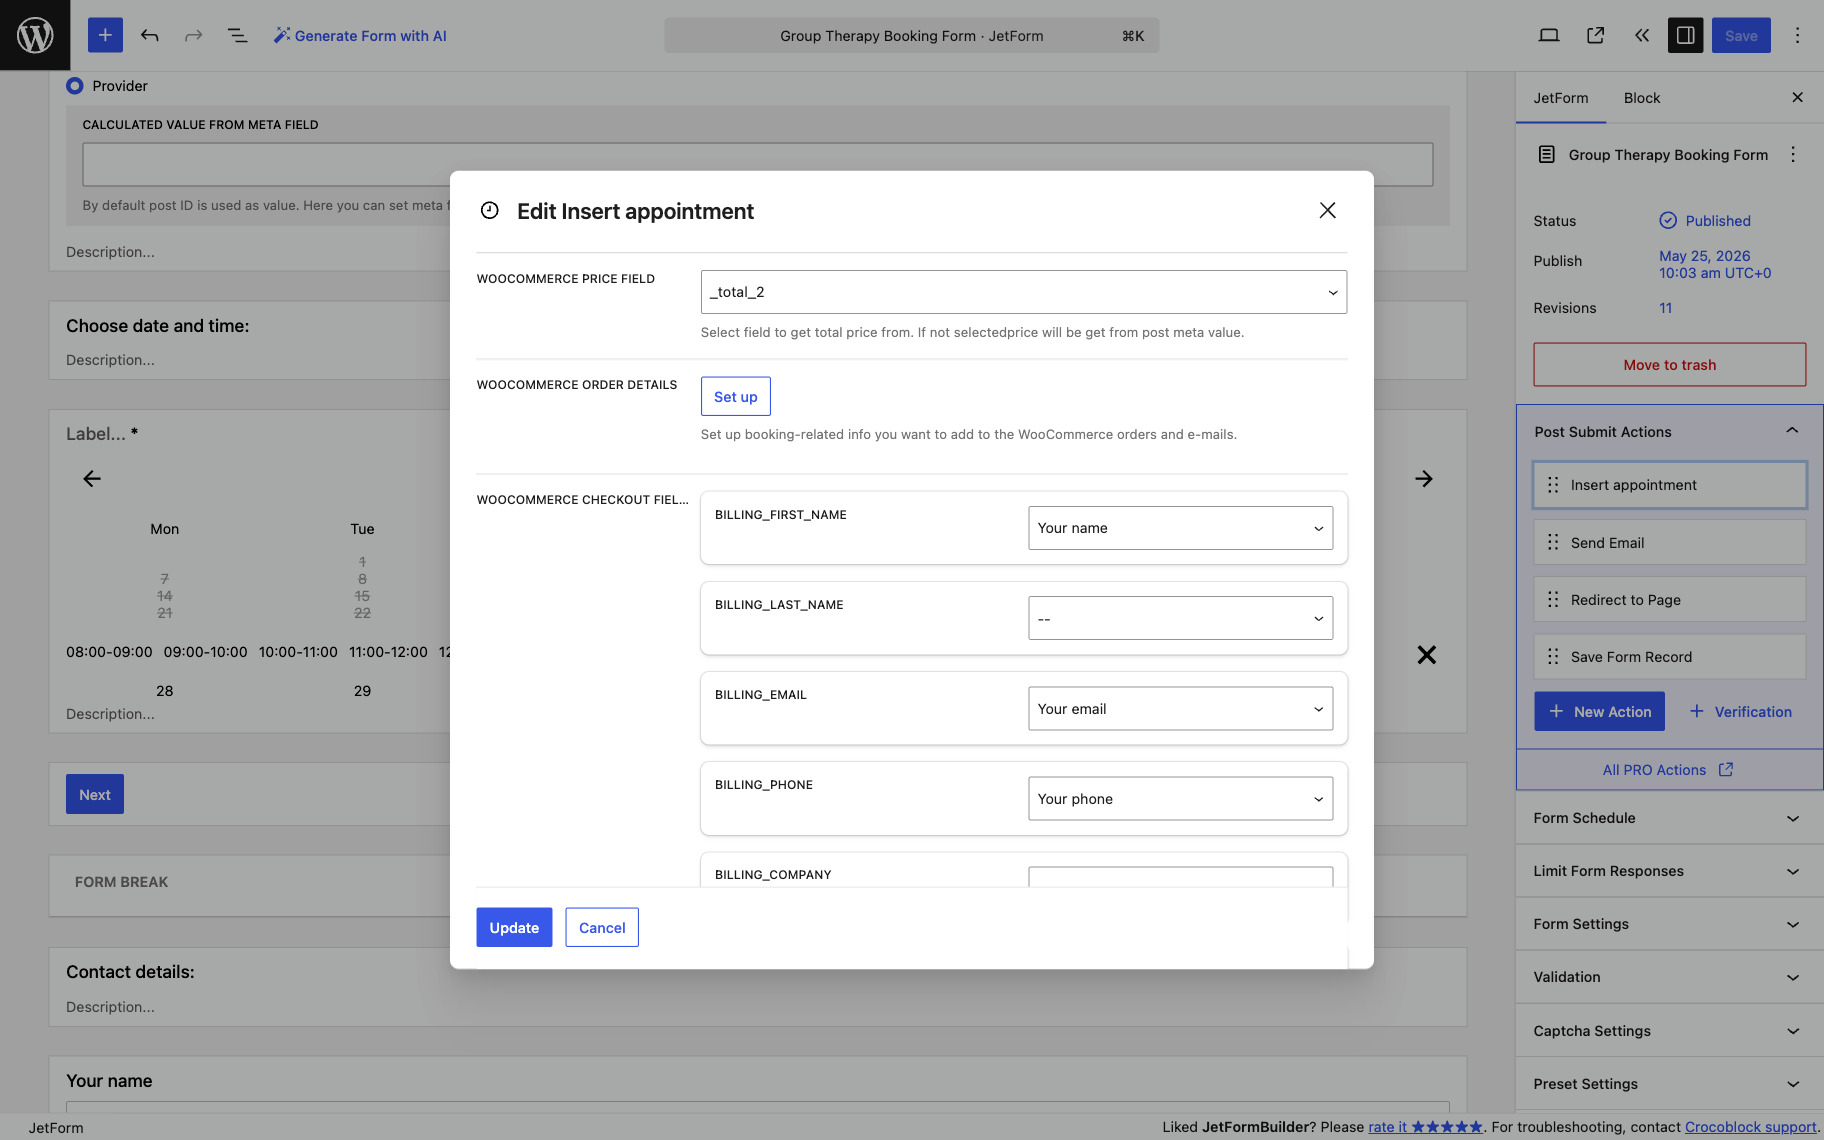
In this field, select the form field that outputs the calculated total booking price. This connection allows JetAppointment to pass the calculated service cost to WooCommerce during form submission.
How the checkout flow works
Let’s say the service’s maximum capacity is “5” items, and a user books all “5” at once.
Once the user submits the booking form:
- JetAppointment creates the appointment entry;
- calculated booking price result is passed to WooCommerce via the Insert appointment form action;
- user is redirected to the WooCommerce checkout page;
- the payment is completed through the configured WooCommerce payment gateway.
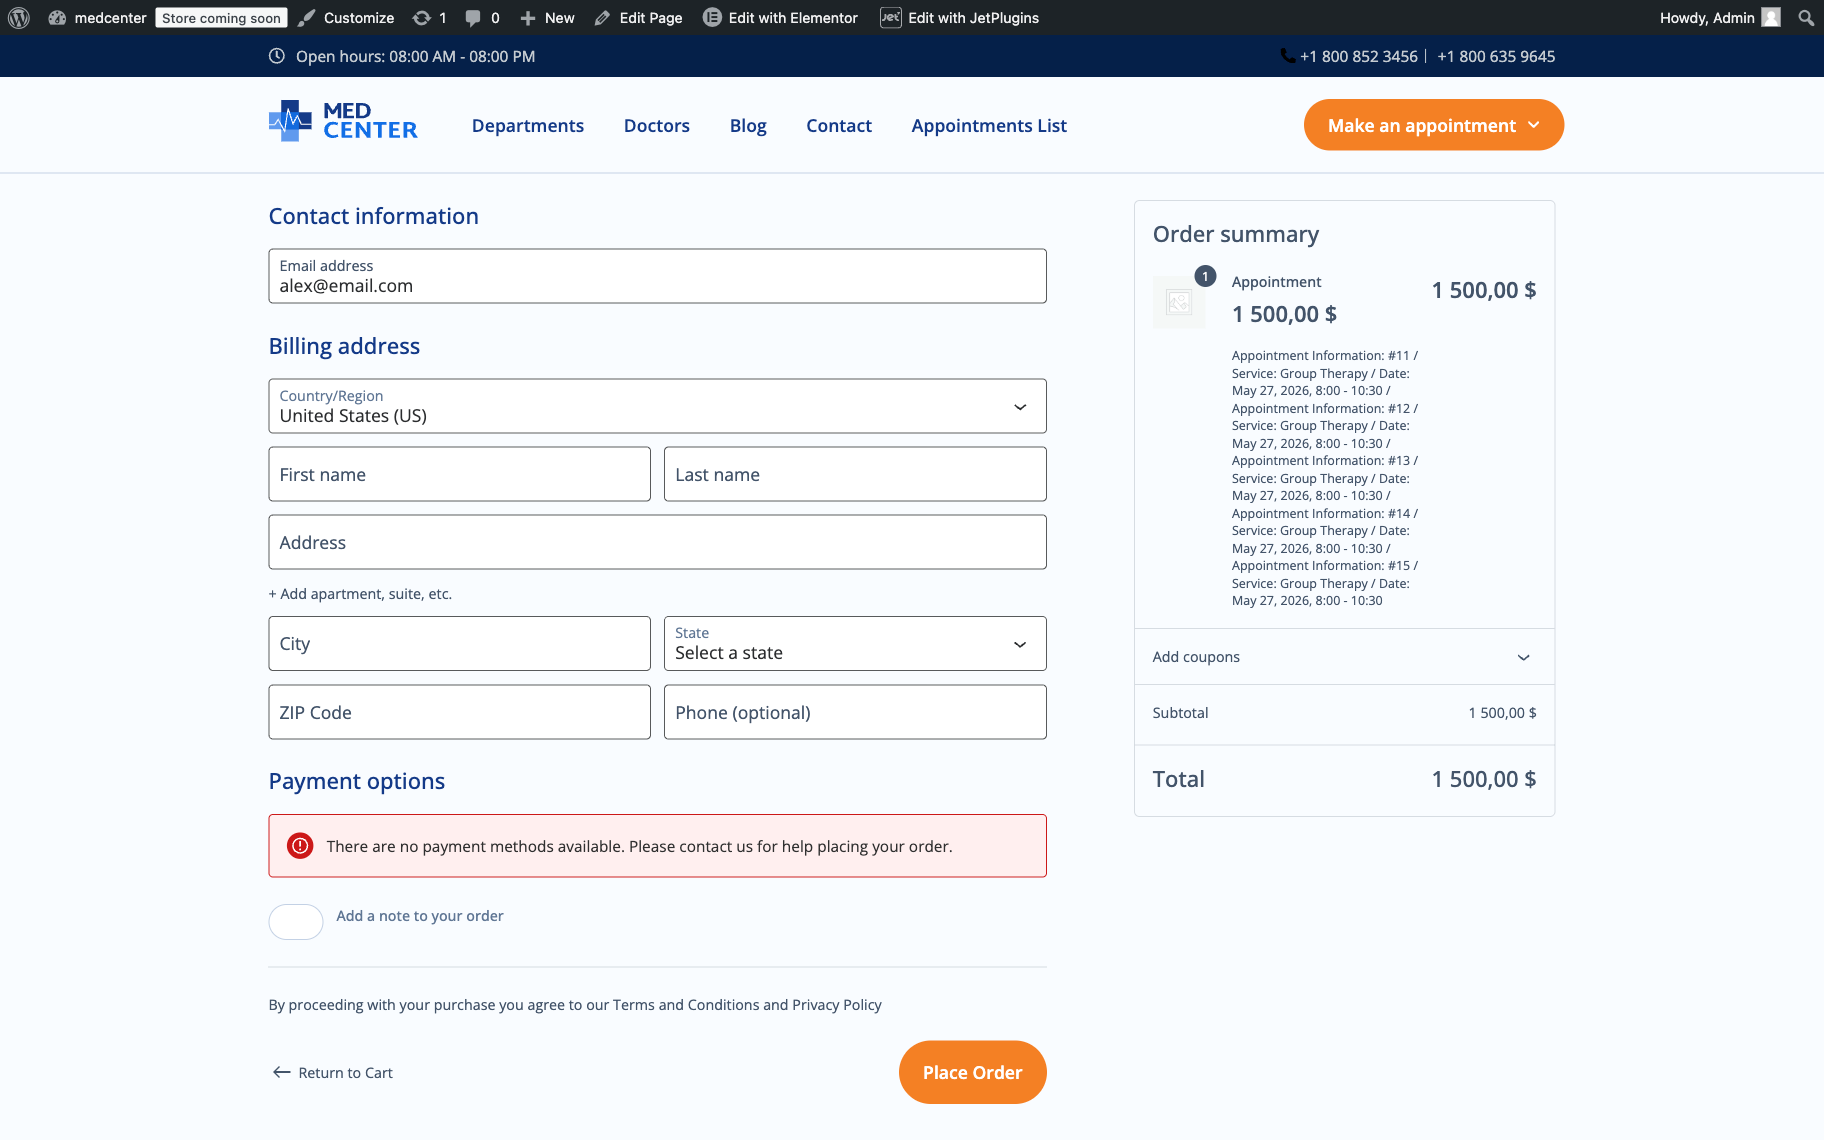
The Order summary will contain details of “5” capacity items.
This setup allows one to use JetAppointment for appointment booking logic and availability management, while WooCommerce handles the checkout and payment processing.
Capacities for Different Days or Slots
At the moment, JetAppointment does not support assigning different Capacity values for specific days or individual time slots within the same service. The Capacity value is configured at the service level and applies to all available appointment slots for that service.
This limitation remains even when the Use Custom Schedule option is enabled for the service. Custom schedules allow you to configure different working hours and slot availability, but they do not provide separate capacity settings for individual dates or time periods.
For example, if a service has a capacity of “10,” that value will remain the same across all configured days and slots, regardless of custom schedule adjustments.
Workaround
The simplest solution is to create separate services for different capacity scenarios. For example:
- Workday services might have a Capacity value of “10”;
- Weekend services might have a Capacity value of “20”.
Using Capacity with Time Picker
The Time Picker option adds a different way of handling appointment start and end times compared to the traditional slot-based system.
To enable it, go to WordPress Dashboard > Crocoblock > JetAppointments > Working Hours > Booking Schedule. Here, the Schedule Type setting controls how booking times are presented to users.
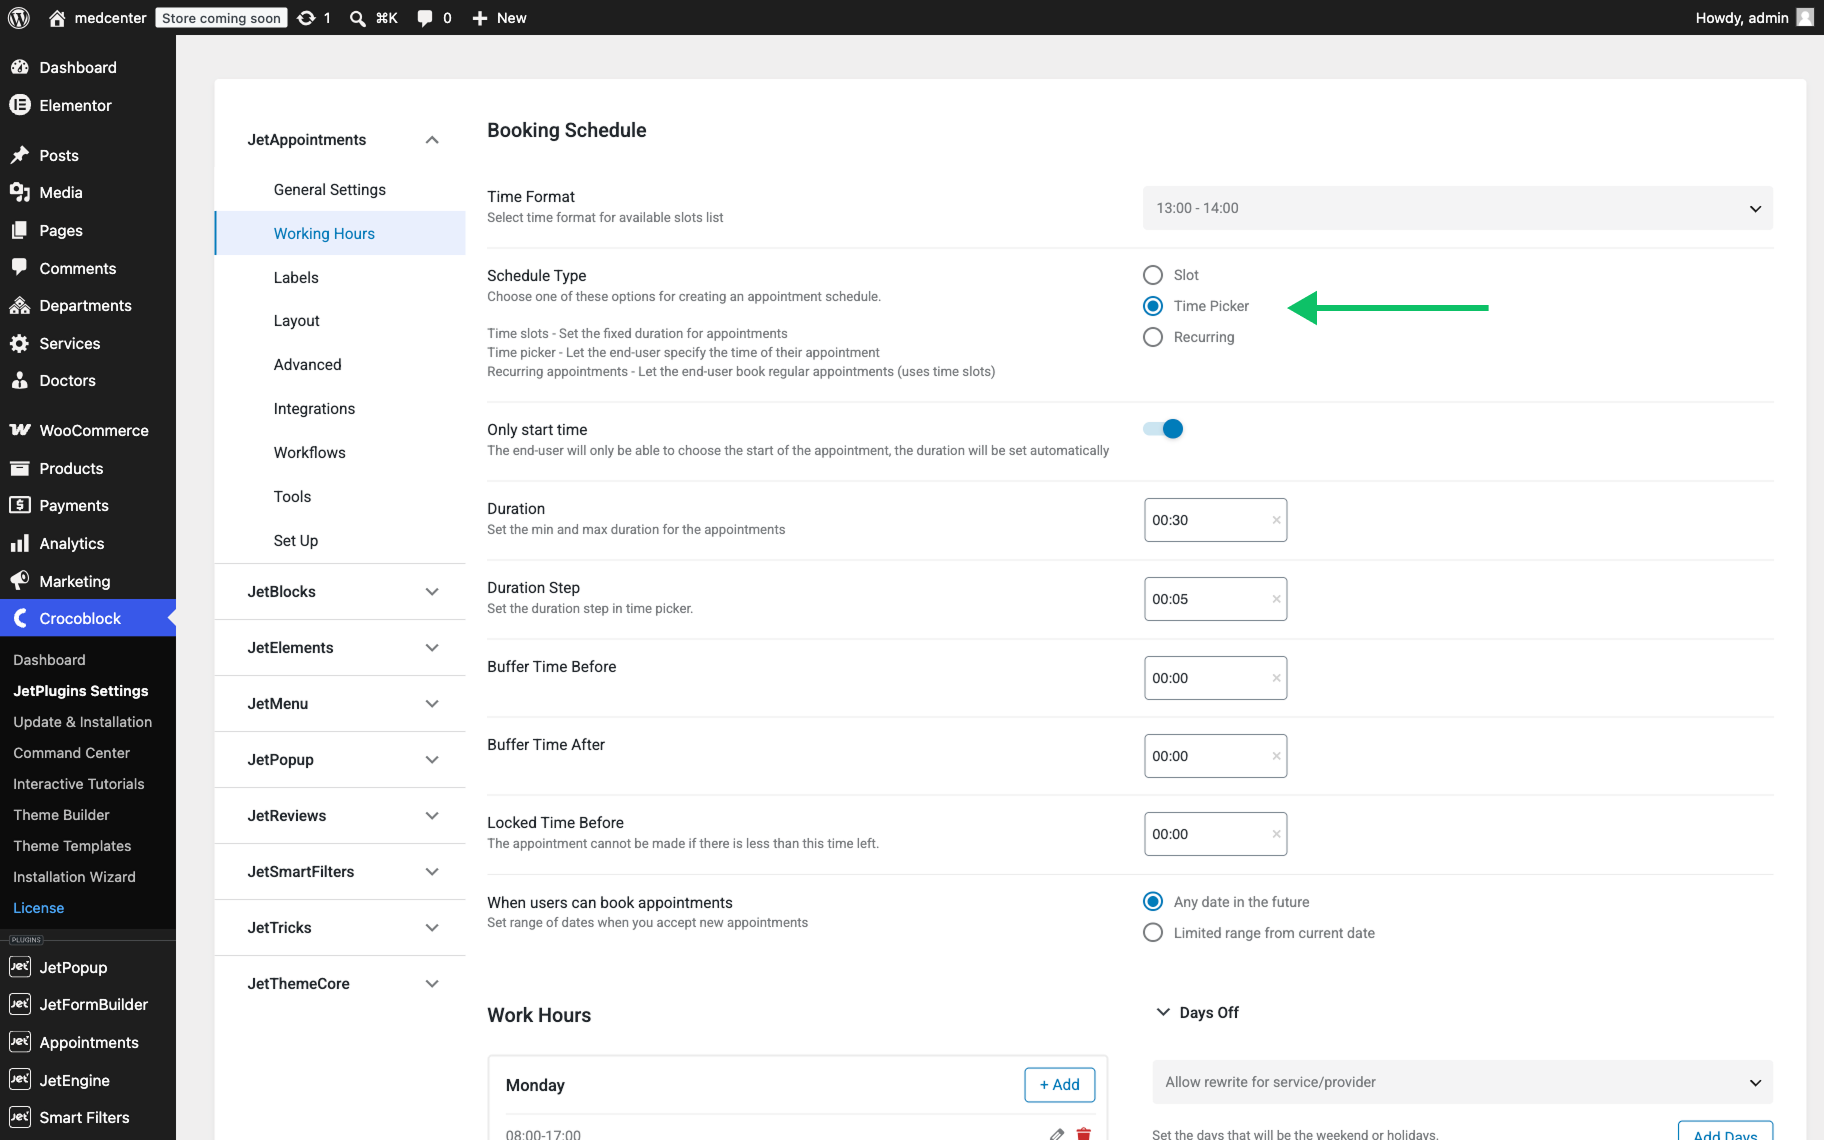
When Schedule Type is set to “Slot”, the booking system relies on predefined time intervals. With “Time Picker”, capacity still works the same at the service level, but the booking behavior becomes more flexible in how time is consumed.
If multiple clients are allowed within the same time range, the system will still apply the Manage Capacity rules, limiting how many overlapping bookings can exist at the same time.
When switching to “Time Picker”, the logic changes. Instead of choosing from fixed slots, the user can select a specific start time within the available working hours. The system then applies the service Duration automatically to calculate the end time.
“Time Picker” includes an additional setting called Only start time. When enabled, the user interface simplifies the booking process:
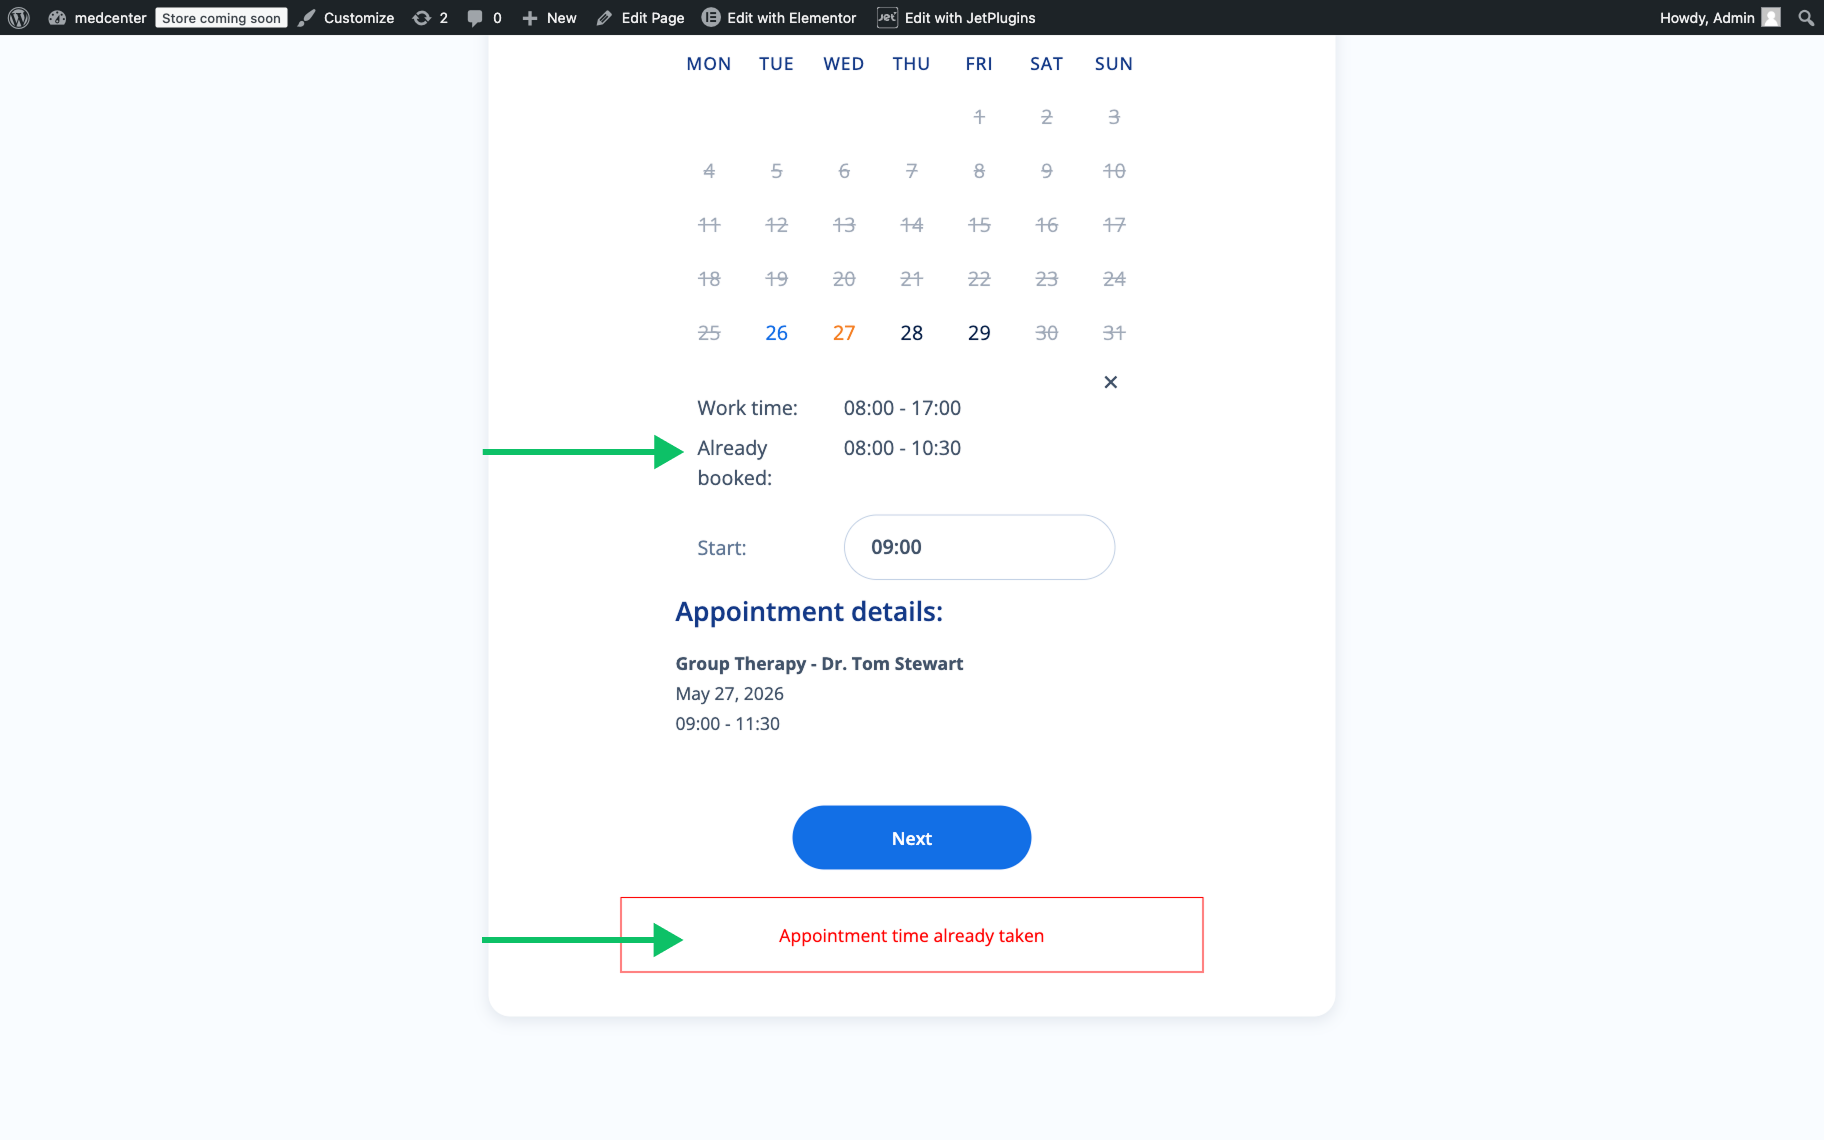
- the user selects only the start time;
- the end time is not chosen manually;
- the appointment duration is applied automatically based on the service settings;
- if the user tries to make a booking for a period that was booked previously, they will see a corresponding warning message, “Appointment time already taken”.
This option is useful when the service provider wants to keep the duration fixed while still allowing flexible start times within working hours.
From a user perspective, this reduces decision points and speeds up the booking flow, while the system still maintains control over total capacity usage and time allocation.
Build a Case Scenario
In our case scenario, the Sports medicine service offers three appointment slots for a specific date, with three doctors available to attend to patients.

Each patient can book one of the available slots for their appointment.
Since there are three doctors, the system allows for three patients to be seen simultaneously, utilizing the Manage Capacity feature to ensure all slots are efficiently booked without overlap.
Set the Capacity limit
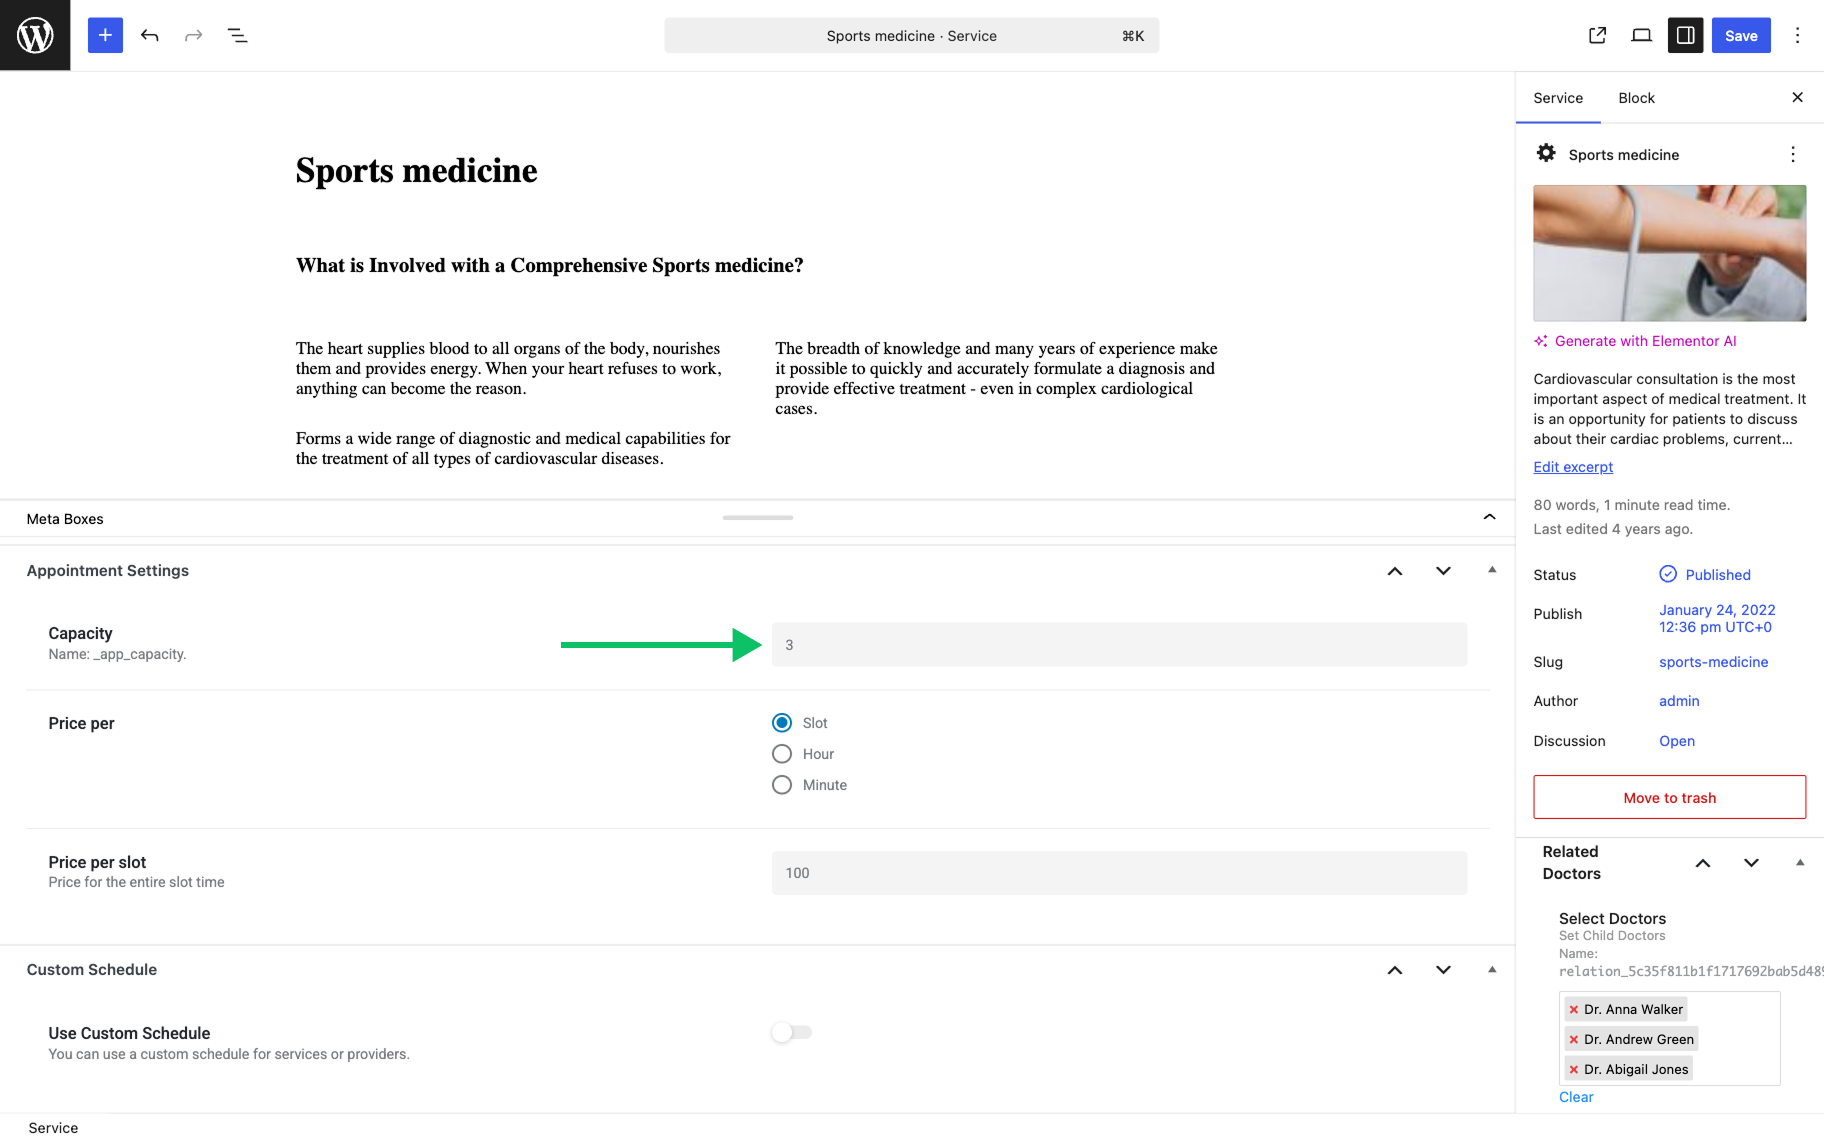
To change the number of available slots, go to the Services section in your WordPress Dashboard, pick the service you want to adjust, and click “Edit.”
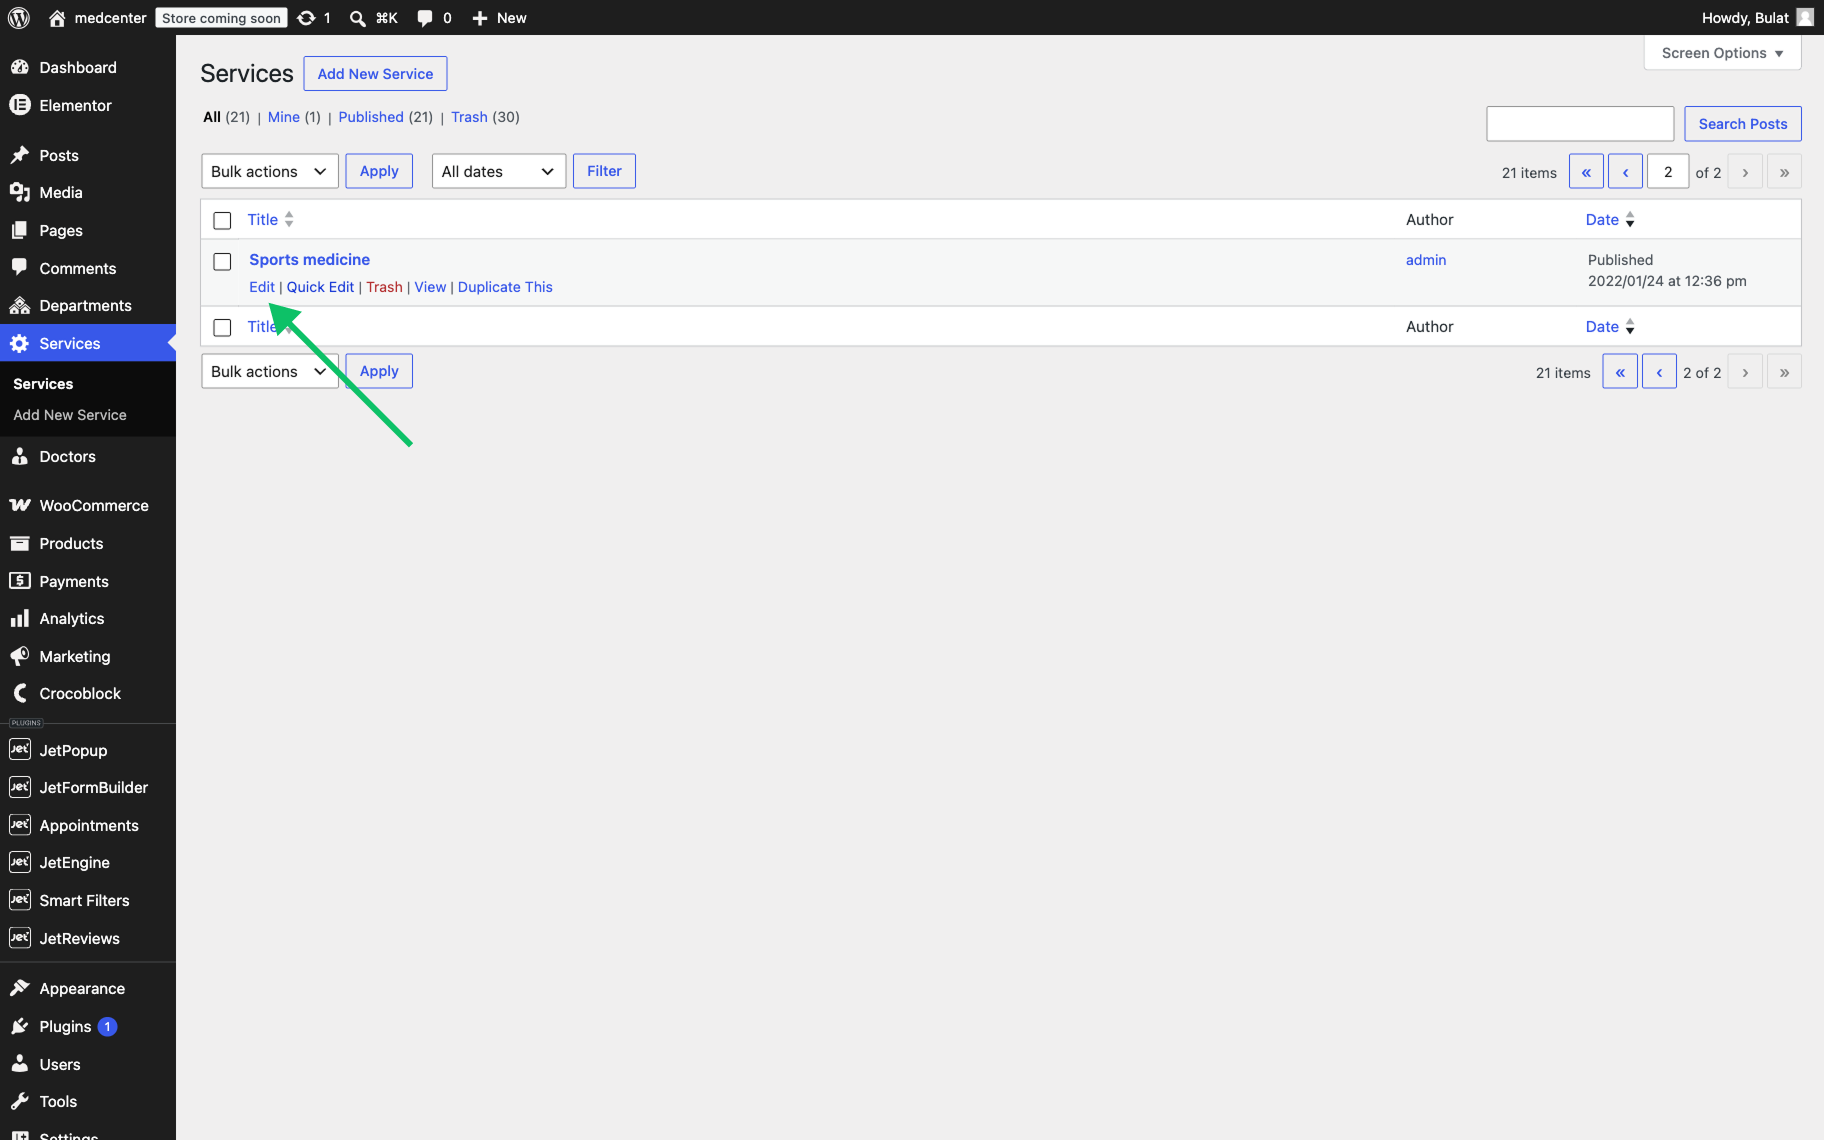
Scroll to the bottom of the service page and, within the Appointment Settings section, alter the value in the Capacity field. In our case, it’s set to “3.”
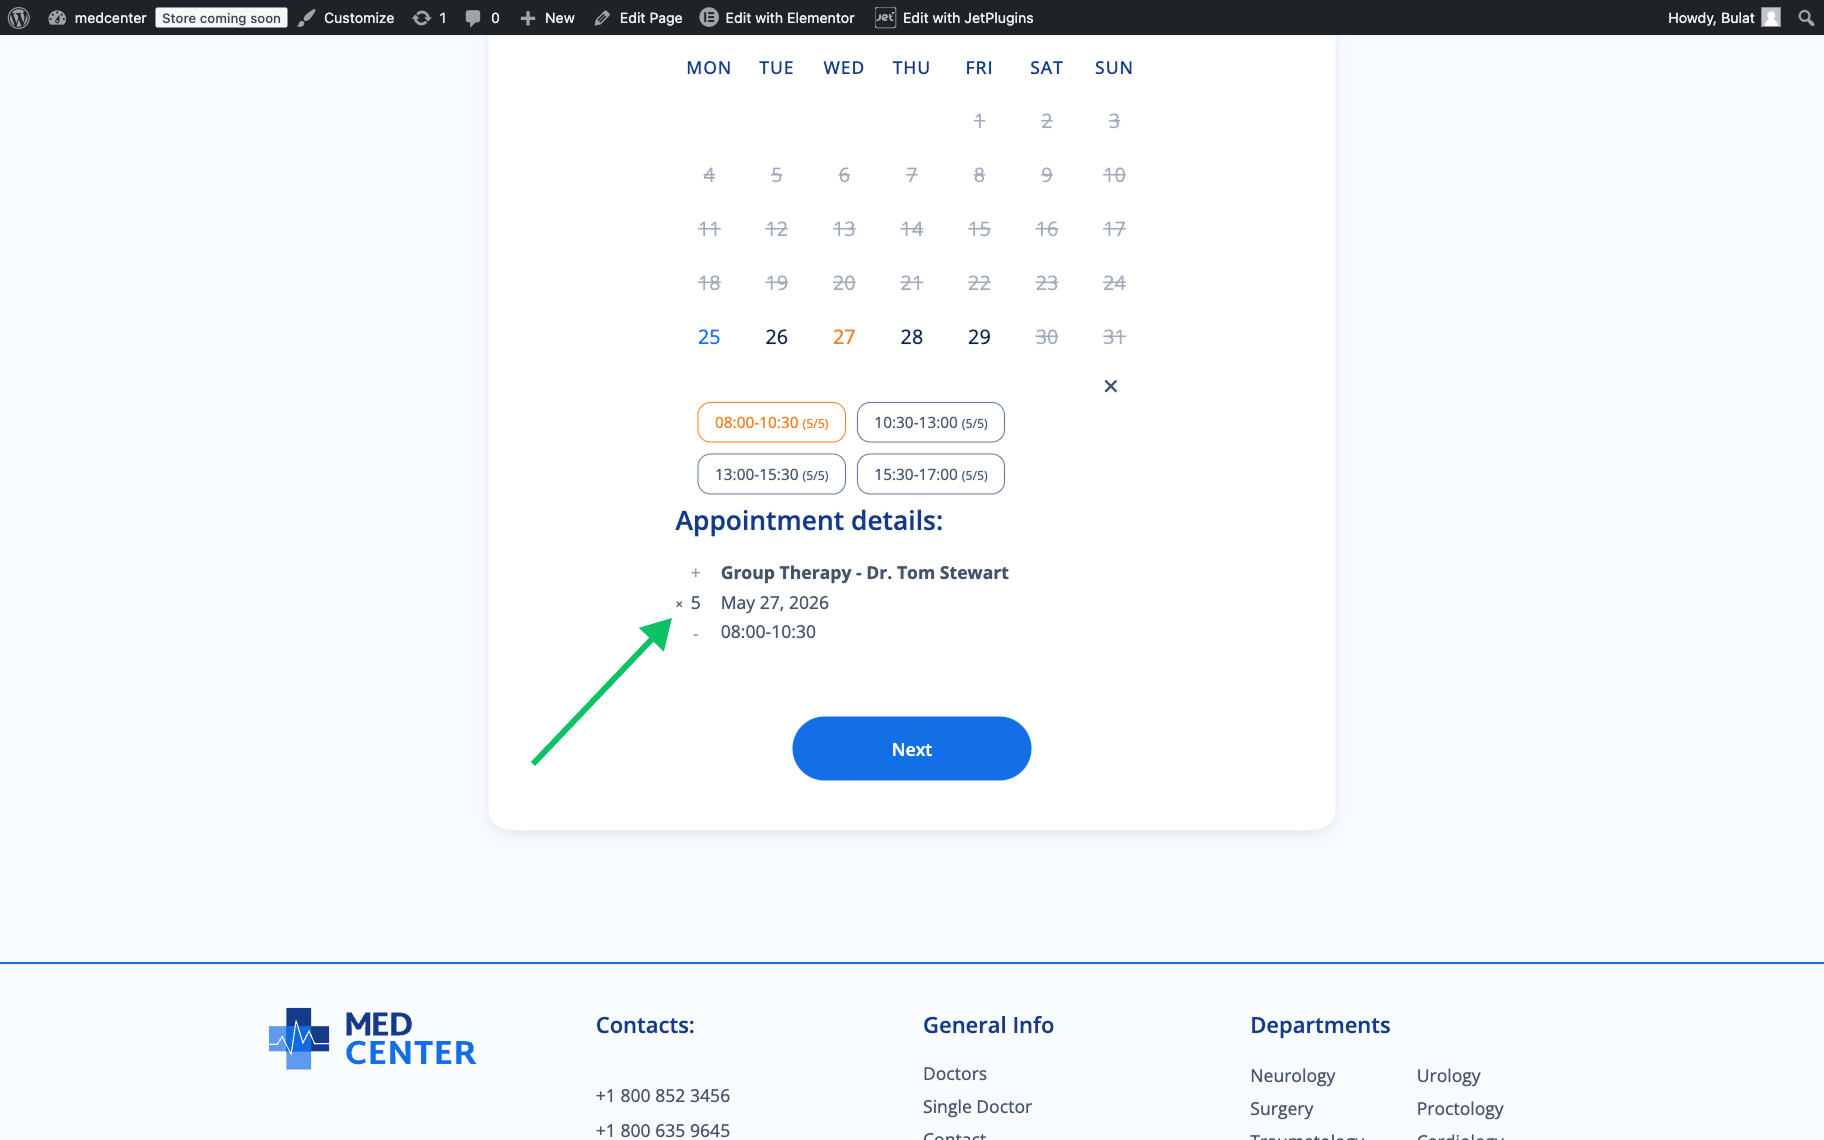
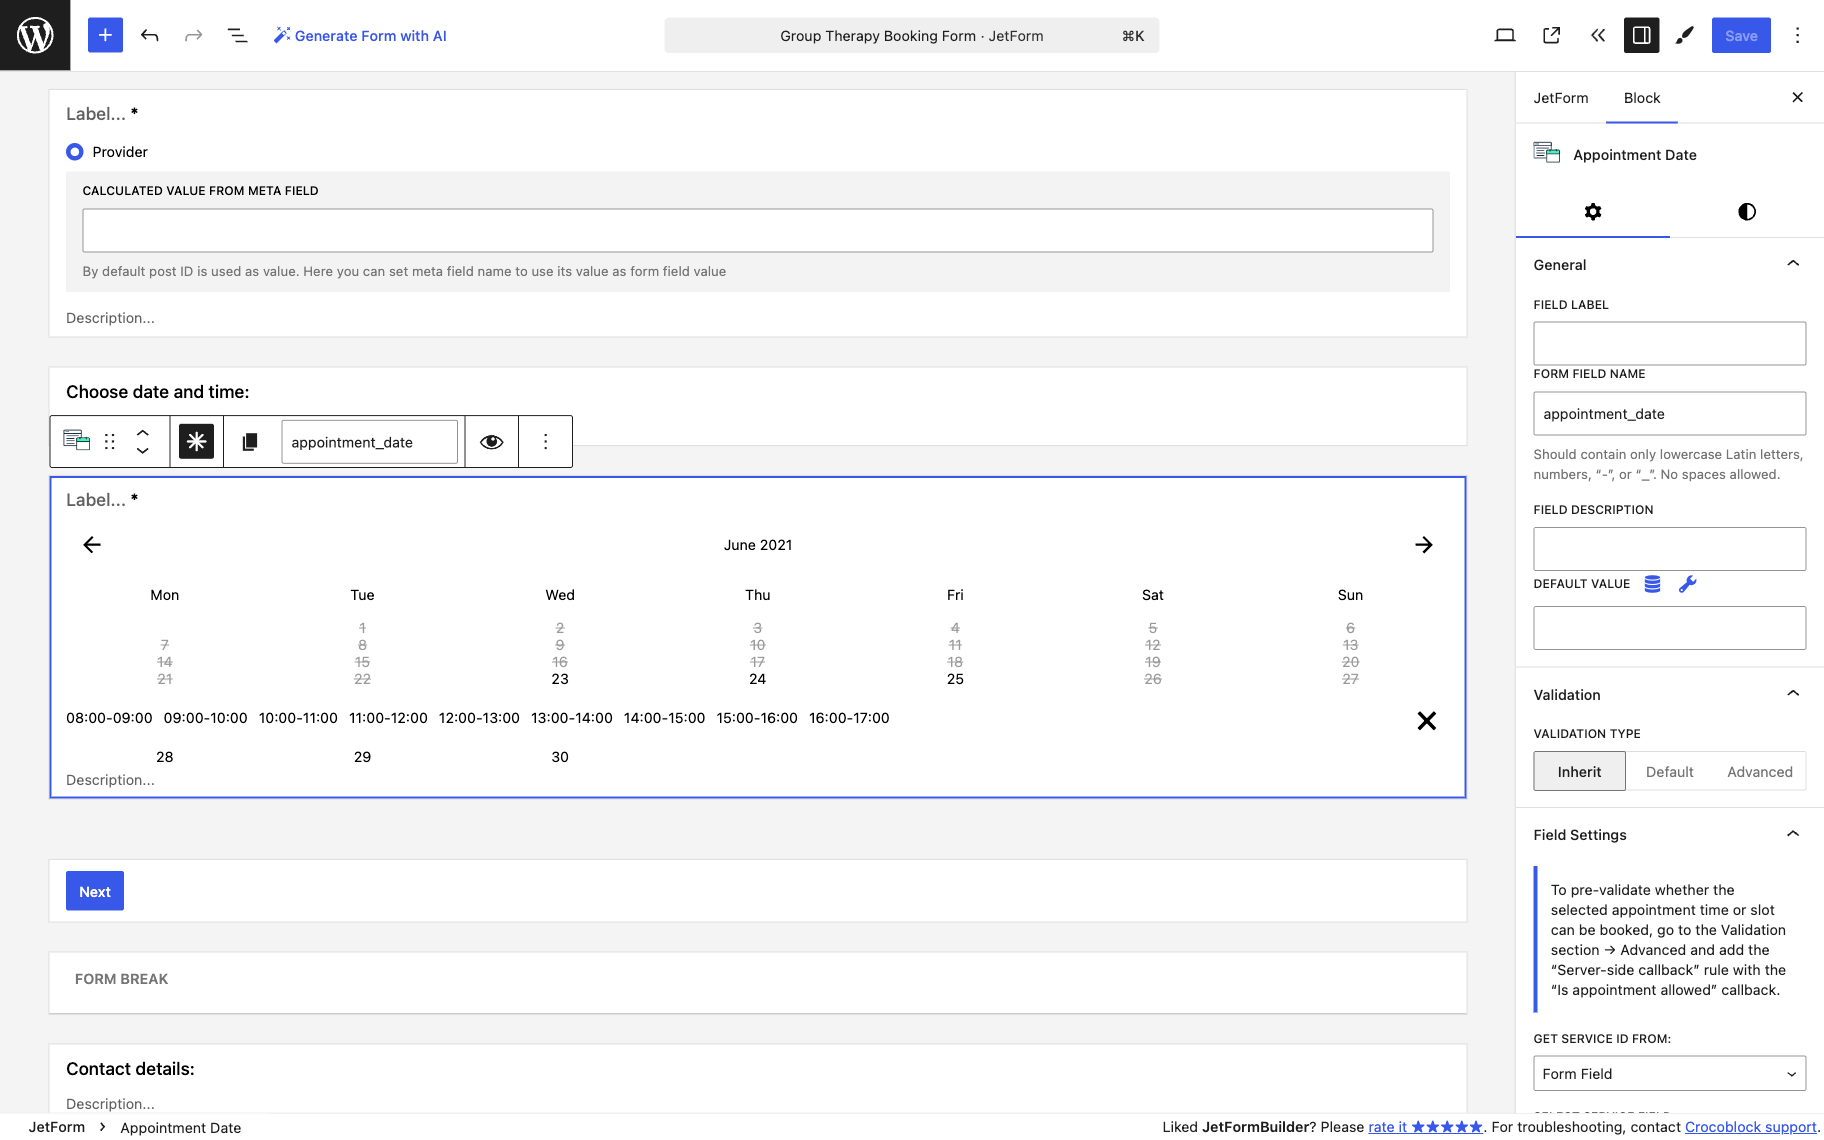
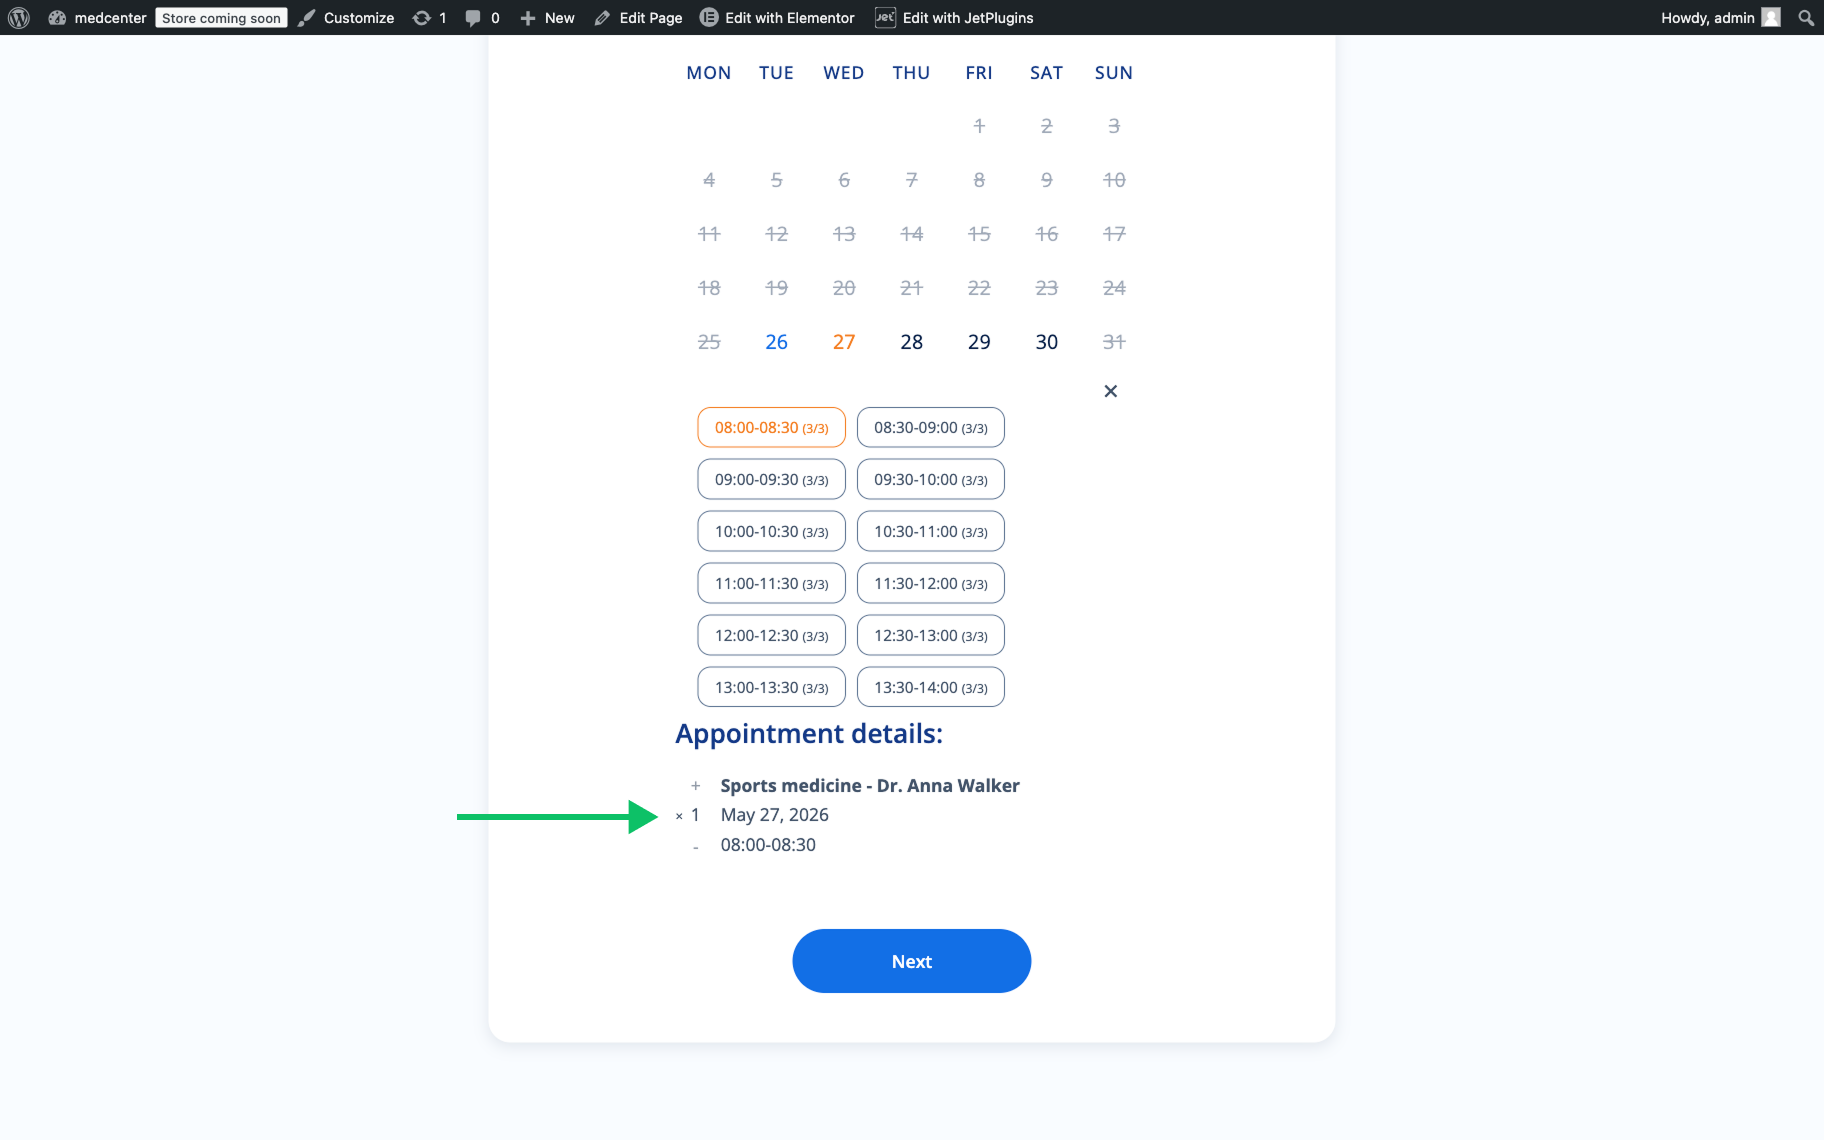
Now, when a client books a specific appointment through the booking form, each time slot displays a capacity counter next to it as a fraction, such as “3/3.”
This counter is shown through the Appointment Date block in the form editor and reflects both the total slot capacity and the remaining capacity available for booking.
The second number represents the total capacity configured for the service, while the first number shows the currently available capacity. For example:
- “3/3” — all capacity items are available;
- “2/3″ — one capacity item has already been booked;
- “1/3″ — only one booking item remains.
The “+” and “−” (“plus” and “minus”) controls in the Appointment details section allow users to adjust how many capacity items they want to reserve, as long as the requested amount does not exceed the remaining available capacity.
In general, the Manage Capacity could be set up to allow flexibility for users. For example:
- for group services, like a fitness class or a seminar, a user may book the needed amount of slots depending on the number of people that they want to invite;
- for exclusive services, like a private consultation or a one-on-one session, the user might be able to book all available slots for that period.
This feature allows the booking system to adapt to different needs, offering more flexibility for services with varied requirements.
FAQ
Payments will stop working entirely. The sample product is required for the WooCommerce checkout to function; do not delete it. If you don’t want it visible in your shop, simply hide it from the catalog.
No, this is not currently supported. The Capacity value is set at the service level and applies equally to all slots. As a workaround, create separate services for different capacity scenarios; for example, one service for weekdays and another for weekends.
Yes, once the Manage Capacity and Show Capacity Counter options are enabled, the counter is displayed in the Appointment Date block within the booking form. It shows available vs. total capacity as a fraction, such as “2/3.”
No. The “+” control in the booking form will not allow users to select more items than the remaining available capacity. The system enforces the limit automatically.
Capacity rules still apply when Time Picker is enabled. The system continues to track overlapping bookings and limits them according to the configured Capacity value, even though users select a flexible start time instead of a predefined slot.
It depends on the Service Slot Duplicating Across Providers setting. When disabled, the capacity is shared across all providers assigned to a slot, meaning the total number of bookings is limited by the single Capacity value. When enabled, each provider maintains their own availability, so the same slot can be booked separately with each provider.
Not necessarily. The WooCommerce integration enables the checkout flow, but the actual payment behavior depends on how your WooCommerce payment gateways are configured. You can, for example, set up a “free” or “cash on delivery” gateway if you want to use the checkout flow without requiring online payment.
That’s all; now you know how to use the Manage Capacity feature provided by the JetAppointment plugin for WordPress websites.