How to Apply Filters to WooCommerce Archive
This tutorial explains how to create a WooCommerce Products Archive template using the JetThemeCore plugin with the filters from the JetSmartFilters plugin.
Before you start, check the tutorial requirements:
- Elementor (Free version)
- JetSmartFilters plugin installed and activated
- JetWooBuilder plugin installed and activated
- JetThemeCore plugin installed and activated
- WooCommerce plugin installed and activated
Enable Filters for the WooCommerce Archive
Let us start by making sure the filters are activated for the widget that will display the WooСommerce products. To do so, go to the Smart Filters > Settings > General Settings tab and enable the toggle for the WooCommerce Archive (Jet Woo Builder) widget provided by the JetWooBuilder plugin.

Create Filters for Products
To create the filters for the WooCommerce products, go to the Smart Filters > Add New tab.
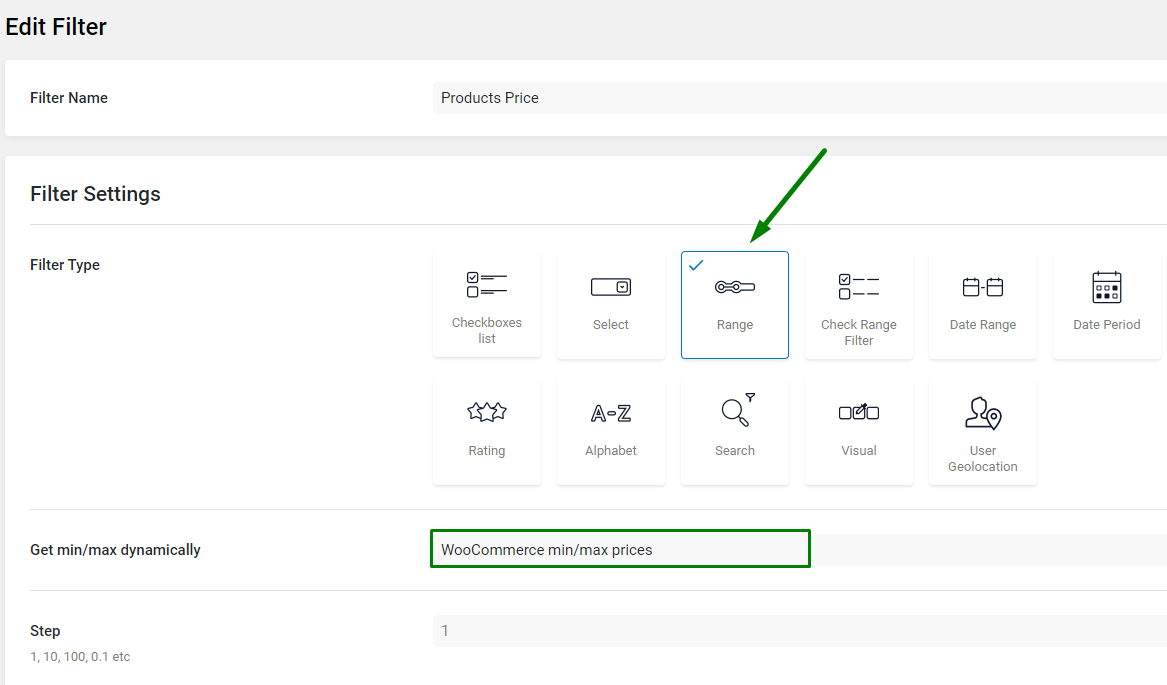
Range filter for the Product Price
Firstly, write the Filter Name. For the range filter based on the product price, pick the “Range” Filter Type. In the Get min/max dynamically drop-down, you may select the “WooCommerce min/max prices” option to pull the highest and lowest prices of products automatically.
In the Step field, we set the default value “1,” but you can change it to the needed one.
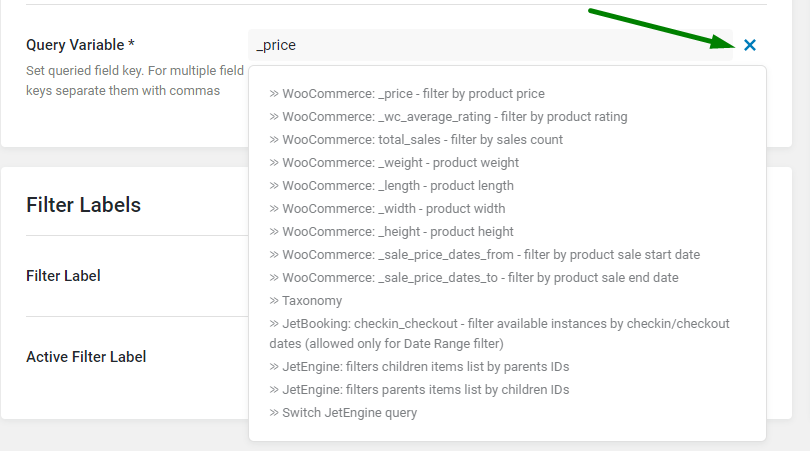
Next, you can set up the Values prefix/suffix, enable the inputs, or edit the Number of decimals, Decimal separator, and Thousands separator according to your needs. But the main thing is to add the ‘_price’ Query Variable, in case the filter is set up by WooCommerce price.

You can see the full list of items by which you can filter by clicking the Dynamic Tag icon on the right side of the Query Variable field.
After adding the Query Variable, the filter can be saved by pressing the “Update” button.
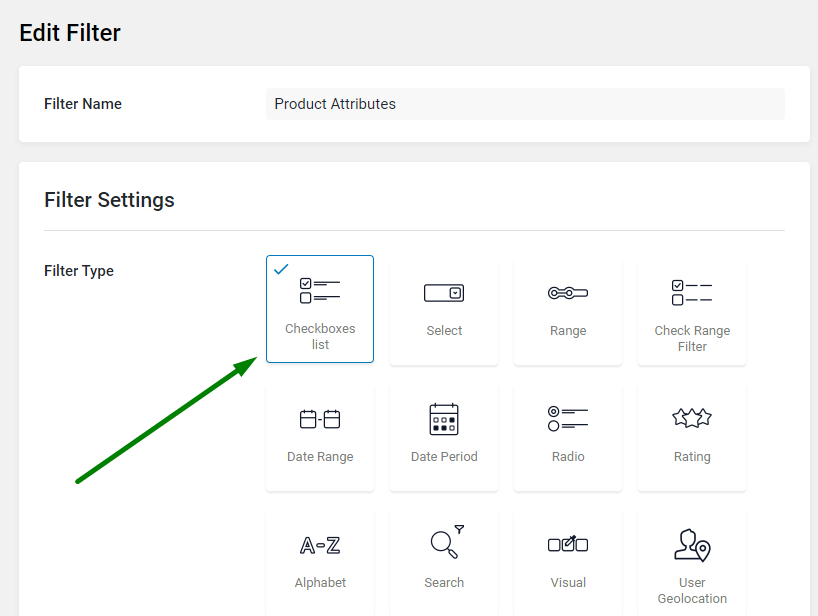
Checkboxes filter for the Product Attributes
Now, we can create another filter based on the product attributes.
Therefore, proceed to the Smart Filters > Add New tab.
Write the Filter Name. Then, select the “Checkboxes list” option as the Filter Type.
Next, pick “Taxonomies” as the Data Source, and choose the needed product attribute from the Taxonomy drop-down. In our case, it is “Product Color.”
In the Relational Operator, you can select the “Union” or “Intersection” option.
With the “Union” operator, the products that have in the attributes at least one option selected in the filter are displayed.
And the “Intersection” operator ensures the products are displayed that have in their attributes only all selected values in the filter simultaneously.
Then, you have toggles to show the empty terms in the filter, child terms of the current term, or group the terms by the parent term.

Next, we have the Is Checkbox Meta Field (JetEngine) toggle. In our case, the toggle must be disabled since the Taxonomy source is not a meta field. It should be enabled only if the checkbox meta field is a source of the filter.
In the Exclude/Include, you can pick specific terms from the selected taxonomy you want to show or hide in the filter.
The Use Custom Query Variable toggle needs to be disabled in this setup since the Taxonomy source applies the query variable automatically.

After configuring the settings, this filter can be saved.
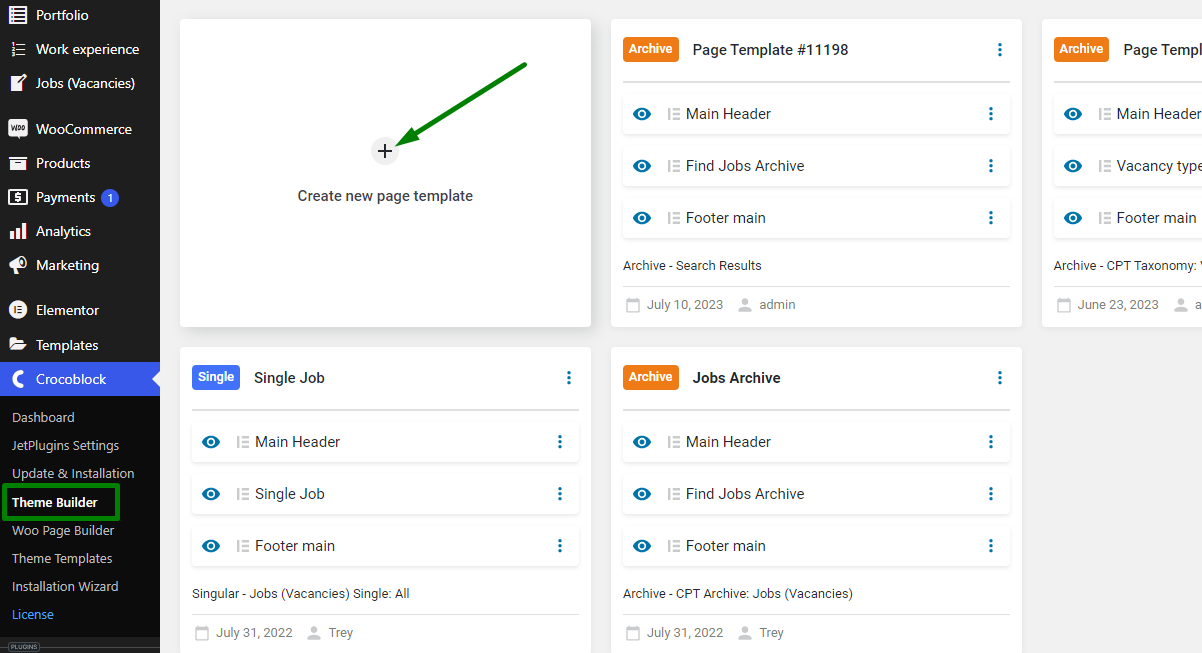
Create an Archive Shop Template
The Archive Shop Page template can be created in Crocoblock > Theme Builder.
Click the plus icon to add a new template.
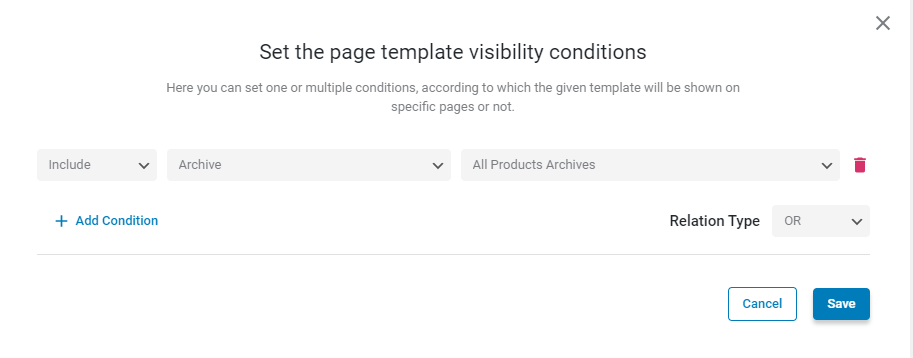
Add conditions to the template
After clicking on the plus icon, a pop-up with the template conditions should be displayed.
Select the “Include,” and “Archive” options. In the last drop-down, choose the “All Products Archives” option or pick a specific taxonomy archive if needed.
Then, push the “Save” button.
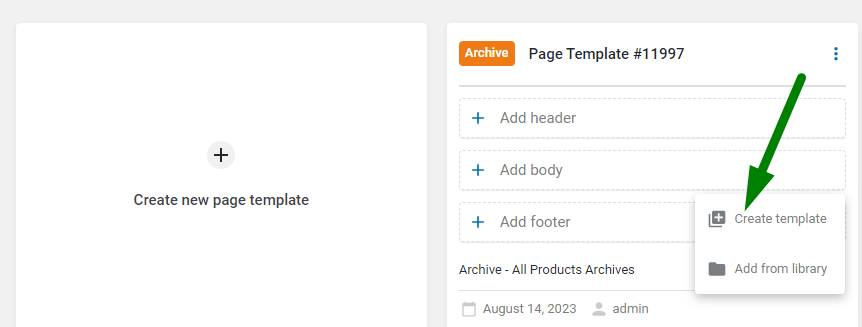
Now, after creating the Page template, we can click the “Add Body” button and select the “Create template” option.
This option triggers the Create a template pop-up with settings, where you can select the “Elementor” Template content type and write the Template name.
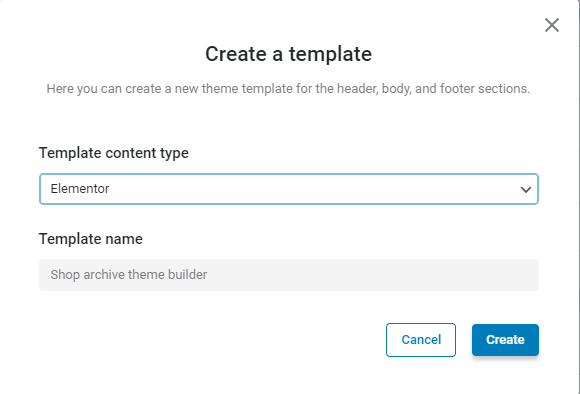
Now, you can hit the “Create” button and proceed to the editing page by clicking the “Go to editor” button.
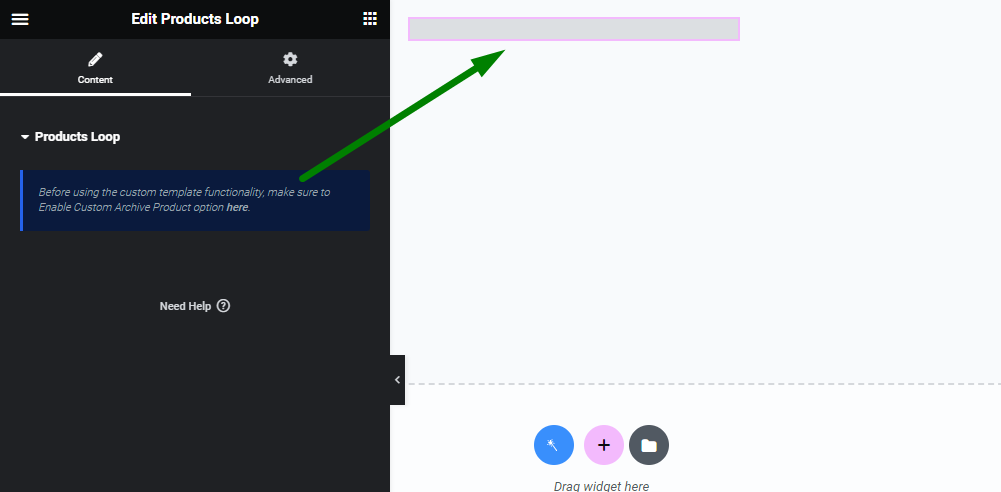
Add the Products Loop widget to show products
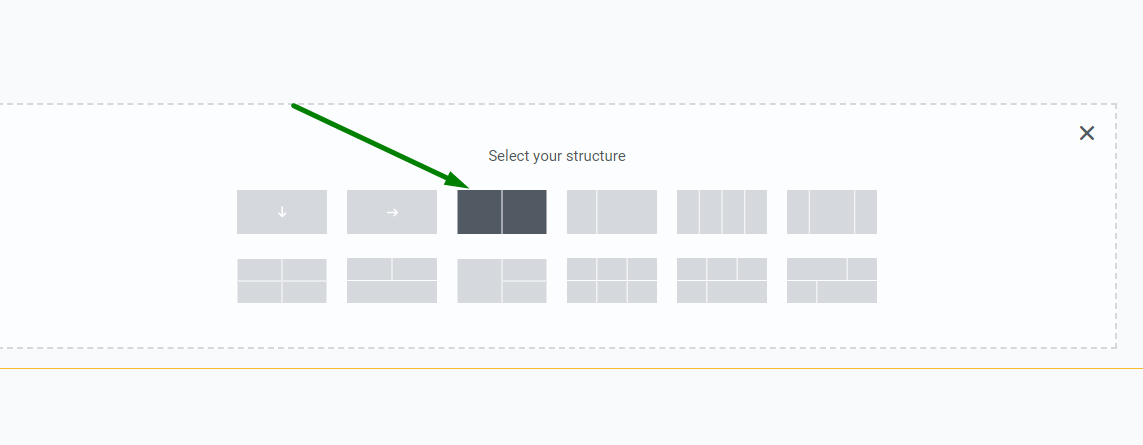
In the editor, we want to add two columns to better structure the widgets.
In the column on the right, we added the Products Loop widget, which displays the WooCommerce Archive. It is normal for the widget to be blank and show nothing in the editor, but you will see the products on the front-end Shop Page. Do not forget that you can control the layout of how a product looks in a grid or list by creating the Product Archive Item template, in which you can build the custom layout.
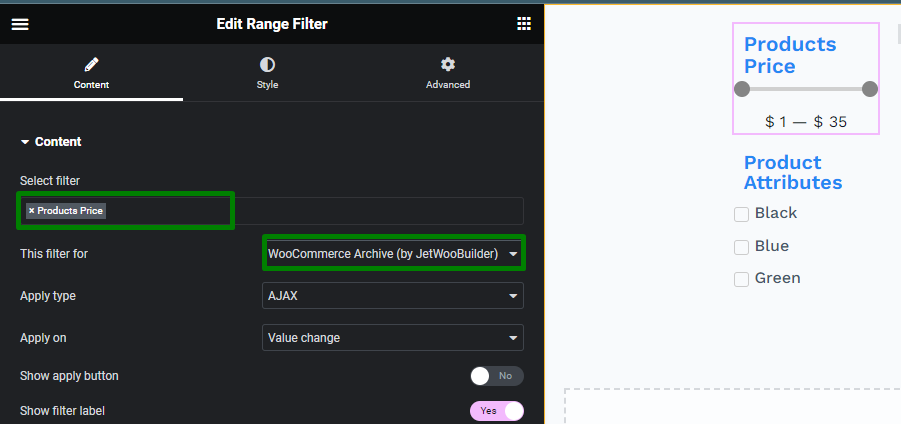
Add the filters and apply them to the WooCommerce Archive (by JetWooBuilder)
In the left column, we added the filters. First, we dropped the Range Filter widget and picked the “Products Price” filter, which was created earlier. In This filter for, we have to select the correct provider, which is the “WooCommerce Archive (by JetWooBuilder).”
Next, we added the Checkboxes Filter widget. We picked the “Product Attributes” filter and selected the “WooCommerce Archive (JetWooBuilder)” as a provider.

At this point, the template is completed and can be saved by pressing the “Update” button.
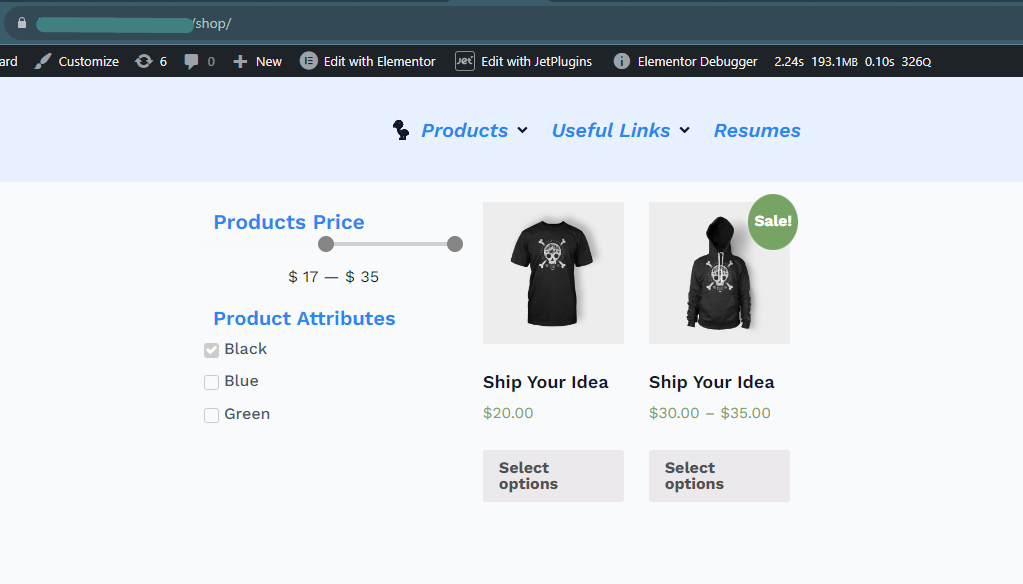
Check Results on the Front End
We can go to the front-end Archive Shop Page and see how the products can be filtered.
Once we pick some options in the filters, we can see the products are filtered accordingly.
That’s all. Now you know how to apply the filters to the WooCommerce Archive provider to allow product filtering.