Contact Form 7, one of the oldest plugins in the WordPress ecosystem, still looks almost identical to the way it looked when it was first published. The good thing about it is, probably, stability and simplicity, which is not bad for a free plugin, but what was always a weak point is styling it.
In this article, I will discuss multi-column layouts for Contact Form 7 (CF7) and how to create them for free.
Creating a CF7 Form for a WordPress Website
The process of creating a Contact Form 7 form hasn’t changed since the beginning, and it’s based on shortcodes. It does involve custom CSS in many cases, and if you don’t want to deal with it, it’s better to look for another form plugin.
But I will tell you how to simplify this task using one of the free Crocoblock instruments.
How to create multi-column responsive CF7 layouts?
By default, Contact Form 7 forms are just a list of HTML and shortcodes that can be later inserted into a page using another shortcode.
You get a vertical stack of fields, and if you want anything else, like two fields in one row, you’re on your own with raw HTML and custom CSS. It is not ideal for beginners, and honestly, it is a pain even for advanced users if you’re working with a lot of forms across a site.
That’s where the Crocoblock Contact Form 7 Layout Builder comes in.
It’s a free online tool that lets you visually design multi-column layouts for Contact Form 7. It works entirely in your browser, so you don’t need to install anything. You drag and drop your fields into a grid layout and then copy-paste the generated code into your site – that’s it.
These are the steps you should take when using the Generator:
- Create a wireframe of the future form layout. Think about all the rows, columns, and form fields. At least, draw it on paper – but you should clearly see the future structure as a result.
- Go to the Crocoblock Contact Form 7 Layout Builder and, using its drag-and-drop interface, add as many rows and columns (that will contain the previously created fields) as you need.
- Copy the HTML generated by the tool and insert it into the Contact Form 7 editor.
- Create the fields using the Contact Form 7 editor. Add them inside the DIV containers you already have there.
- Go back to the Contact Form 7 Layout Builder and copy the CSS generated there.
- Go to Dashboard > Appearance > Customize. You will be transferred to the front end and the Customizer settings. Find the Custom CSS tab there, and open it. Paste the CSS.
- Open the page where you want to insert the form. Copy the form shortcode and insert it there. Save the changes and enjoy the result.
In case you want to modify something, e.g., typography or colors, add the corresponding rules to the CSS you’ve previously inserted.
Let’s go through the main steps and discuss all the details.
Step 1: Creating a wireframe
At this stage, you need a clear idea of the layout. How many rows do you need? Which fields should be in each row and column? Which of them will go next to each other?
For example, maybe the first row has two columns for “First Name” and “Last Name,” the second has “Email” and “Phone” fields, then a full-width Radio field, and the last row holds the “Message” textarea. Whether you sketch it on paper or visualize it in your head, this step will help you avoid trial-and-error later and definitely save you time.

Step 2: Creating rows and columns according to the wireframe
Once you’re on the Layout Builder page, start by selecting the number of rows based on your plan. Each row can be divided into as many columns as you want, but don’t forget about UX and think whether it will be convenient for users.
Click “Add field,” and the new row will appear. If you drag its side borders, it will shrink or grow. You can drag and drop these fields, forming columns and rows. It’s a very intuitive process.
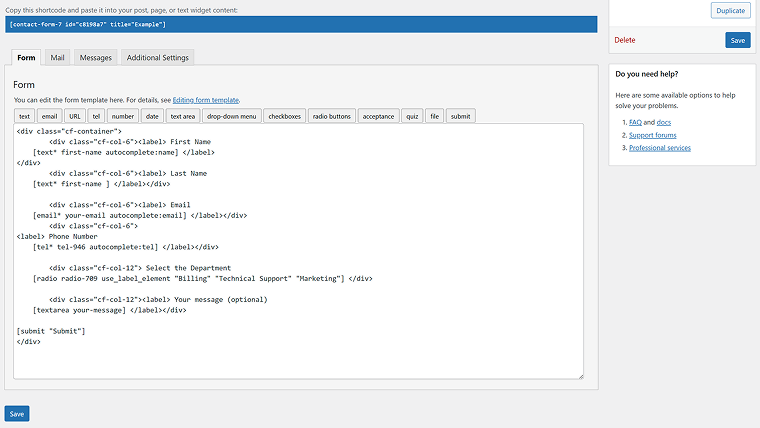
Step 3: Inserting the code and adding the fields
When you are done with the structure generated by the CF7 Layout Builder, copy the generated HTML and paste it into the Contact Form Editor.
By default, when you add a new CF7 form, it comes with a simple pre-made contact form; it looks like this:
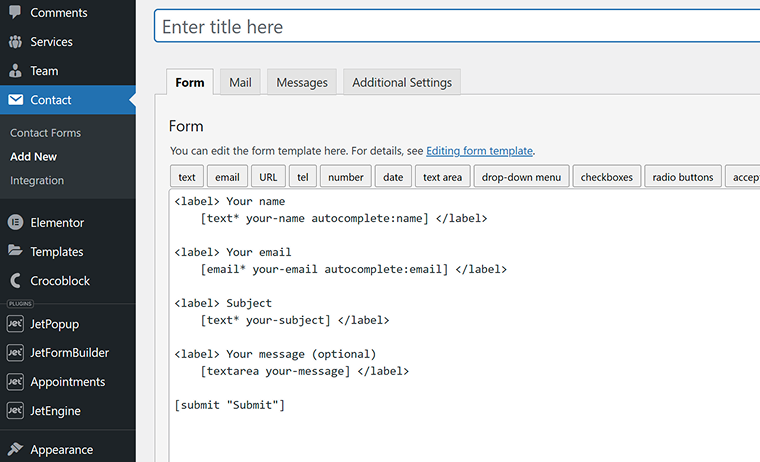
These lines give you an idea of how the field shortcodes look. Using the same pattern, you can insert such fields inside the DIV structures created by the CF7 Layout Builder. Use the buttons on top of the editor to add various types of fields.
This is what my final result looks:
Now, insert the CSS into the Dashboard > Appearance > Customize. You will see the Customizer settings – open the Custom CSS tab there and paste the CSS that the Contact Form 7 Layout Builder generated (if the CSS toggle is activated). You can change the breakpoint there if the default doesn’t work well for you.
After saving the changes, you can insert the Contact Form 7 shortcode into the page where you want to see the form.
As a result, you will see the form with the layout you’ve planned for it, and it’s responsive. The styling of its elements is inherited from your theme’s settings and global styles, particularly CSS styles for form elements.
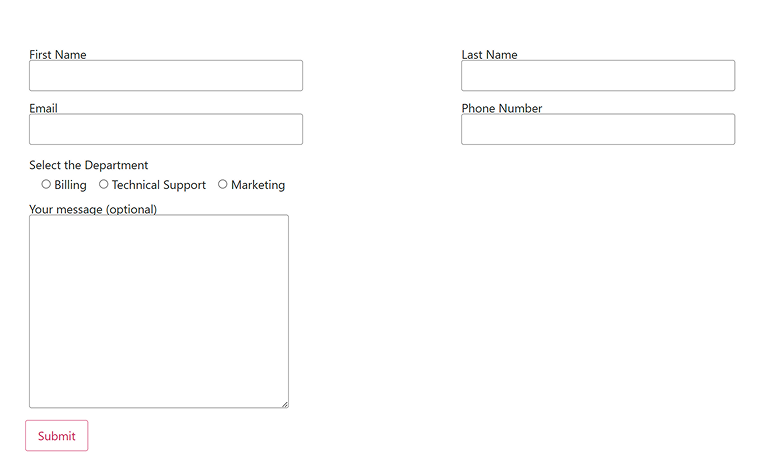
In my case, the spacing between labels and form fields is not enough; the parallel fields are too far away from each other; the Radio field should be a column, not a row, and the Textarea field should be full-sized.
This is the CSS I had to add to fix it:
.cf-container label {
	display: flex;
	flex-direction: column;
	gap: 10px; }

.cf-container label, .cf-container p {
	font-weight: 600;
}

.wpcf7-form-control.wpcf7-radio {
	display: flex;
	flex-direction: column;
	text-align: left;
}

.wpcf7-list-item {
	margin-top: 10px;
}

.wpcf7-list-item label {
	font-weight: normal;
}
.wpcf7-list-item.last {
	margin-bottom: 20px;
}

.wpcf7-list-item label {
	display:flex;
	flex-direction: row;
}

.wpcf7-submit {
	margin-left: 15px;
	background-color: darkgreen;
	color: white;
	font-weight:600;
	border: none;
}
.wpcf7-submit:hover {
	background-color: green;
}
And here is the result after all the manipulations:

Styling Contact Form 7 using JetElements
If you want a multi-column layout for CF7, you do need the Layout Builder and insert its code into the form editor, as the structure of columns and rows should be there anyway.
But you can skip the mundane process of styling the field, which I did with custom CSS above.
In case you think that AI can do it easily for you, well, not really, unfortunately, especially when there are overlapping CSS rules.
As an example, look at the CSS I wrote above. First, I declared the flex-direction: column for labels to make text fields and their labels look good, but then had to re-declare it specifically for Radio labels, as I needed them to have flex-direction: row.
Styling Select and Checkbox fields can be challenging as well.
That’s why it’s a great idea to use a visual CF7 styler, such as JetElements’ Contact Form 7 Widget for Elementor. Using it, you can visually style everything without spending so much time and digging into lines of CSS.
💡 For more information about styling Contact Form 7, read this comprehensive guide.
Also, if you want to have a powerful form builder plugin that doesn’t require any coding skills, check the JetFormBuilder plugin.
FAQ
While Contact Form 7 is suitable for basic forms, creating complex forms with advanced features like conditional logic or multi-step forms can be challenging and requires additional plugins or custom coding. Also, to save the form records, you have to install an extra plugin.
JetFormBuilder is one of the best alternatives for CF7, and you can download it from the WordPress plugin directory for free. It not only has plenty of powerful features but also offers premium add-ons and seamless compatibility with JetEngine, JetBooking, JetAppointment, and other Crocoblock plugins.
Yes, you can add custom CSS to style your Contact Form 7 forms. However, the faster and easier way is to use dedicated tools for styling, e.g., the CF7 widget for Elementor.
Yes, JetFormBuilder is definitely a better alternative, as it not only offers a visual form builder but also has way more powerful functionality.
Takeaway
The Contact Form 7 plugin is still popular for a number of reasons: first of all, because it’s free, lightweight, and has a stable history, but also, thanks to tons of add-ons. However, there are many form plugins that can be a much better option.
However, if you still need to use Contact Form 7, the free Layout Builder by Crocoblock will be really helpful.
Contact Form 7 has stuck around for good reasons: it’s free, lightweight, and pretty reliable. Plus, there are loads of add-ons that can help you extend its functionality. But let’s be real – there are definitely other form plugins out there that might give you a much smoother experience and more advanced features, especially if you need something a bit more complex or user-friendly.
That said, if you’re sticking with Contact Form 7, I would definitely recommend giving the free Layout Builder from Crocoblock a try. It makes building multi-column forms way easier by letting you drag and drop things into place.


