Visualizing content effectively is key to engaging your audience, and Gutenberg tables are an excellent way to structure and present information. They’re not just practical for you—they also provide a clean, eye-catching format that enhances user experience.
Whether you prefer the simplicity of a static Gutenberg table or the flexibility of a WordPress dynamic table powered by plugins, there’s a solution to fit your needs. In this guide, we’ll walk you through the process of creating the perfect table to complement your website and captivate your visitors.
WordPress Tables Types
WordPress tables can be categorized based on how they retrieve and display data. Broadly, there are two main types: static tables and dynamic tables. Let’s see what the difference is:
Static WordPress table
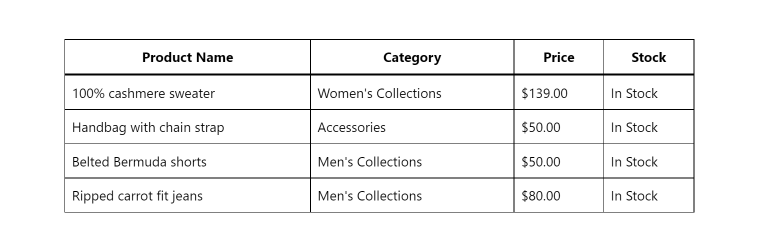
Static tables contain manually entered data that does not update automatically. The content is fixed and does not draw from external sources or databases. This type of table is ideal for displaying information that doesn’t require frequent updates, such as a static price list or contact information.
Dynamic WordPress table
WordPress dynamic tables pull data from predefined sources, such as a database or API. For instance, they can display information from SQL queries, external files, or content dynamically generated in WordPress, like posts or user data. These tables automatically update as the source data changes, making them suitable for dashboards, product inventories, or user directories. Dynamic tables are often powered by plugins or custom integrations to seamlessly retrieve, format, and display data in real time.
By understanding the distinctions between these table types, you can choose the one that best fits your site’s needs.
Why Use Tables in WordPress?
Tables in WordPress are incredibly adaptable tools that improve both the functionality and aesthetics of your website. They allow you to organize and present data in a structured and visually appealing format, making it easier for visitors to interpret information. By using tables, you can improve readability and user experience, especially when dealing with large datasets or intricate comparisons. Tables make complex information more digestible by dividing it into manageable rows and columns, ensuring that your audience can quickly locate the details they need.
WordPress offers various plugins and built-in features that simplify the creation and customization of tables. These tools often include features like sortable columns, pagination, and search functionality, adding interactivity to your tables. This functionality is particularly valuable for eCommerce sites, educational platforms, and any website aiming to deliver a data-rich experience.
Moreover, tables can boost SEO by enabling you to incorporate structured data that search engines recognize, such as product details or event schedules. This structured approach not only improves user engagement but also increases the likelihood of your content being highlighted in search engine results.
In essence, Gutenberg tables in WordPress are a practical solution for enhancing content organization, improving user interaction, and adding a professional touch to your site. Their adaptability and usefulness make them an essential tool for a wide range of website types.
How to Create a Table in WordPress
To create a WordPress static table, head to WordPress > Pages and click on “Add New” to create a new page. Another option is to choose an existing page and place a table there. So when the page has opened, give it a title and click on the “plus” icon to open the blocks list. Find a “Table” block and click to place it.
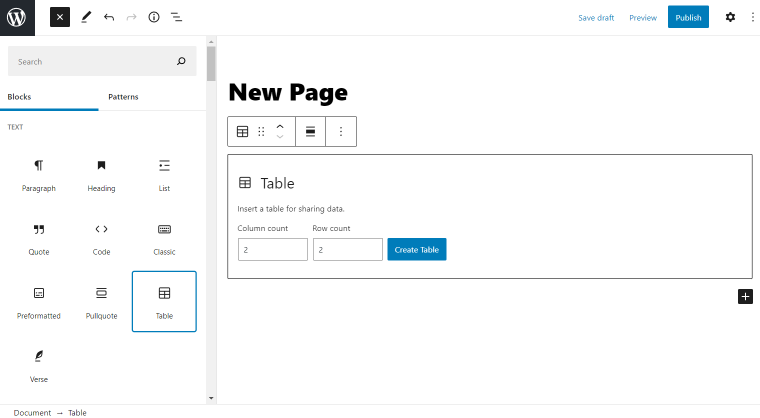
Set how many columns and rows will be displayed using Column count and Row count drop-down menus. Create a table by pushing the button that is similarly named. Click on the gear icon on the top left part of the page editor to open the WordPress Table block settings.

- Styles — define the table appearance type and its default style;
- Color — pick a color of the text and background;
- Table settings — enable three toggles that let you set Fixed-width table cells and adjust Header and Footer sections;
- Advanced Settings — set an HTML anchor and add Additional CSS class(es).
Customize all the needed sections and click on the “Publish” button. Or “Update” if you placed the table on the existing page. Go to the front end to check the new table.
The static table is ready.
Now, let’s learn more about dynamic tables.
Creating Gutenberg Dynamic Tables Using JetPlugins
The next step involves creating a dynamic table. In this tutorial, two JetPlugins will be used: JetEngine for handling more complex dynamic tables and JetProductTables for creating simpler ones with ease. Ensure that the Tables Builder module is activated before proceeding with building the Crocoblock table in WordPress.
Table сreation with JetEngine
Enable the Dynamic Tables Builder module
To verify if it is enabled, go to JetEngine > Modules > External Modules. If Dynamic Tables Builder isn’t activated, toggle it on.

We also have a well-covered Tables Builder overview. Check it to make the work with the module more convenient.
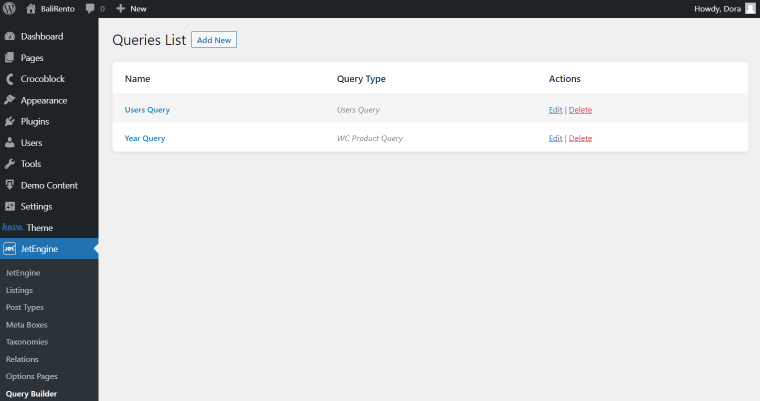
Create a Query
To build a Dynamic Table, start by setting up a query in the Query Builder. To make a query, go to the JetEngine > Query Builder and click on the button to add a new query.
Next, I’ll work with an SQL Query. To proceed, you’ll need an SQL file containing the table data. Open phpMyAdmin, locate your website’s database, and click the “Import” button to upload the file.
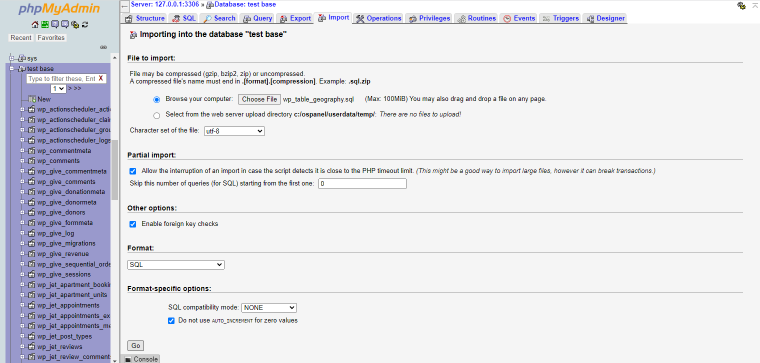
Choose the file and click on the “Go” button. Ensure the table name starts with the correct prefix. By default, it is set to “wp_” unless you’ve customized it earlier. Once the import is successful, a confirmation message will appear.
The SQL file will now be accessible during query editing. Restart your WordPress site, then return to the query settings to configure the SQL table file.
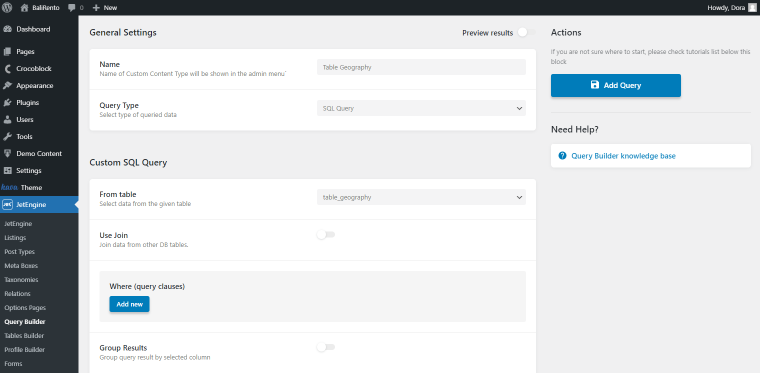
Name the query and select the “SQL Query” option from the Query Type drop-down menu.
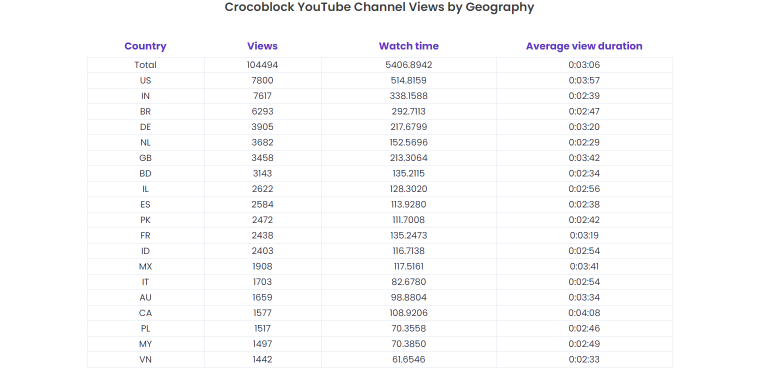
Now, I will use a query based on Crocoblock’s YouTube channel statistics. To sort data in specific columns, go to the Order & Order By section and click “Add new sorting parameter.” For instance, I will set the order based on the number of views.
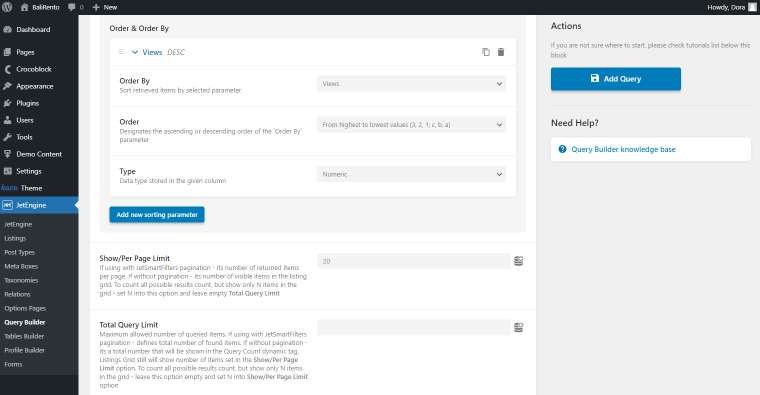
Also, we can set a Show/Per Page Limit to limit the number of items on the page. Complete all the needed fields and publish the query by pushing the “Add Query” button.
Add new table
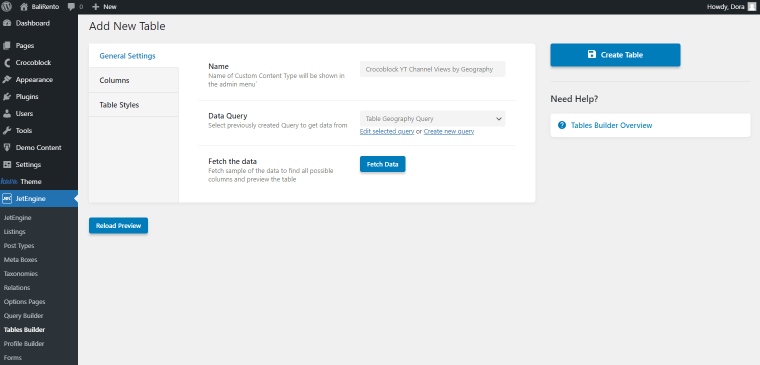
Navigate directly to Tables Builder. Head to JetEngine > Tables Builder and add a new table.

Start with the General Settings. Name the table and select the newly created query as the data source. Don’t forget to click on the “Fetch the data” button to connect the query with the table.
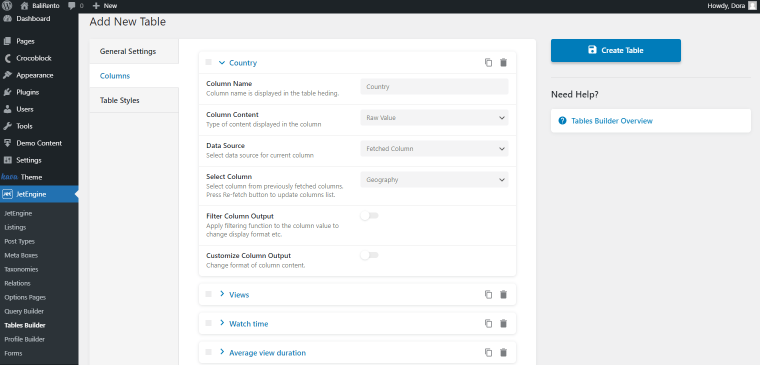
Proceed to the Columns tab and attach all the needed columns. I use “Raw Value” as the Column Content and “Fetched Column” as the Data Source for SQL-based tables.
Style WordPress table
The next tab is Table Styles. Customize the columns accordingly. Further style editing will be available in the Gutenberg editor when JetStyleManager is installed and activated.
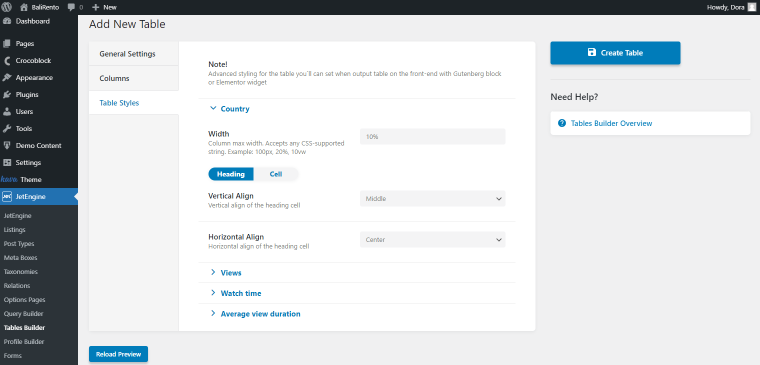
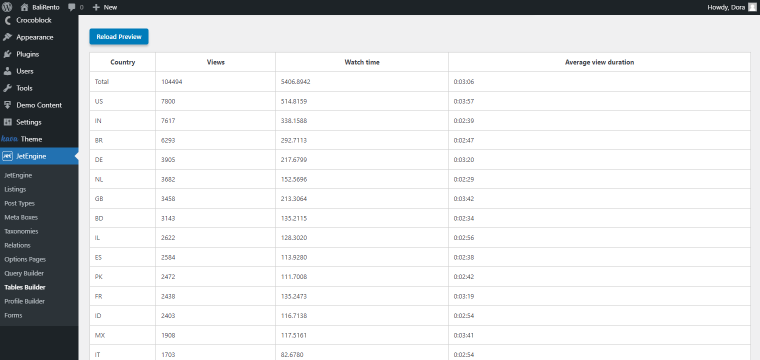
Optionally, you can reload the preview by pushing the same name button.
After finishing the editing, click on the “Create Table” button.
Add a table to the page
The next stage is to add a table to the page. Go to Pages > Add New. Name the page and place the Dynamic Table block on the page editor.
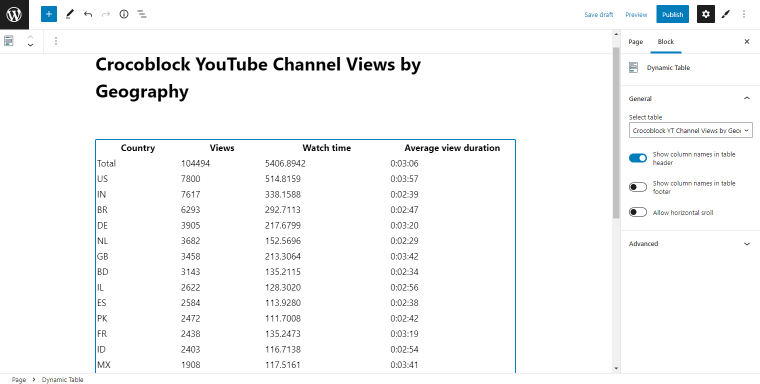
Enable all the needed toggles in the General Settings and work on the Advanced settings if desired. Move on to the JetStyleManager style settings by clicking on the “brush” icon on the top right part of the page editor.

Set the Table width, Table Alignment Inside Container, and Border Type in the General Settings.
The next are Heading and Body Settings. There, you can customize the appearance of the heading and include items accordingly. Publish the page after all the customizations and check it on the front end.
📚 Furthermore, check our blog article about creating a WordPress table for WooCommerce products.
Table сreation with JetProductTables
With JetProductTables, this creation process will be much easier. 😅
For a broader understanding of how custom product tables work in WooCommerce and when to use them, you can also explore this detailed guide.
Let’s start with the basic settings. In the WordPress dashboard, go to WooCommerce > Settings and open the Product Table tab.
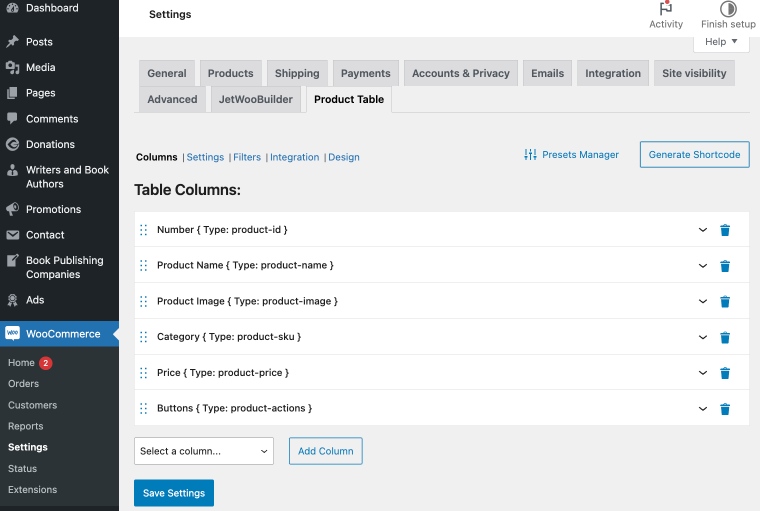
In the Product Table tab, you’ll find sections to customize your table:
- The Columns section allows you to add, delete, or rearrange columns, letting you tailor the table to your needs.
- The Settings section gives you options to enable a Sticky Header, add a footer, and configure the mobile layout, among other features like Lazy Load.
- In the Filters section, you can enable filters by taxonomies, attributes, or text search.
- Lastly, the Design section allows you to customize the table’s appearance, adjusting colors, fonts, and overall style.
Once you’ve made your adjustments, just save your settings.
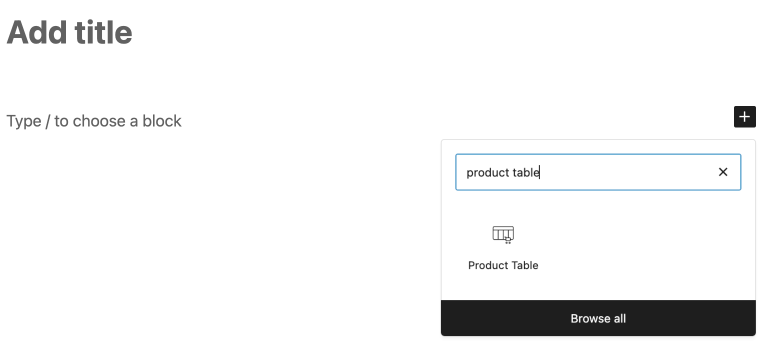
To display your table, use the Product Table block in Gutenberg for easy placement. Alternatively, you can also utilize the shortcode generator or WooCommerce integration for advanced customization.
Save your changes to apply the table to your page or template.
If you’d like to learn more about using JetProductTables, customizing its style, and showcasing your table, we invite you to explore our knowledge base for detailed guides and tips.
How to Insert Data Into a Custom WordPress Table
Data can be added to a custom WordPress table manually or by importing data via SQL files. Here’s a step-by-step guide:
Manually adding data
- Navigate to the page where you want the table to appear and select the Gutenberg table block.
- Choose the number of rows and columns required. Manually input the data into the table fields.
This method works well for simple tables with minimal data.
Using SQL files for bulk data
SQL files are a practical solution if you need to import data from external sources. Follow these steps:
- Ensure the SQL file includes the necessary table prefix. By default, WordPress uses wp_ as the prefix, but this might differ if you’ve customized it during installation. Update the prefix in the SQL file accordingly.
- Use phpMyAdmin or a similar database management tool to upload the SQL file to your WordPress database.
- To set up a query, go to the Query Builder in your WordPress dashboard.
- Create a new query based on the imported table. This will allow you to fetch and manipulate the data as needed.
- After setting up the query, access the Tables Builder to configure and fetch data from the table.
- Then, go to the page where you want the table displayed and use the Dynamic Table block. Select the query you created from the drop-down menu to populate the table dynamically.
Double-check the table prefix in your database settings to avoid errors. Preview your table after adding it to ensure proper formatting and functionality.
How Tables Can Enhance WordPress Websites
Tables are a powerful tool for organizing and presenting information on your website. Here’s how they can elevate your content and user experience:
Improved data organization
Tables allow you to display structured information in a clear, digestible format. Whether it’s product specifications, price comparisons, or schedules, tables make complex data easier to understand.
Enhanced user engagement
Well-designed Gutenberg table enable users to find the information they need quickly, improving navigation and overall satisfaction. Dynamic tables, in particular, let users filter and sort data, creating an interactive experience.
Professional appearance
Tables add a polished look to your website by organizing information systematically. They are especially useful for presenting technical details or large datasets in a visually appealing manner.
Boosted SEO performance
By structuring your content in tables, you make it more accessible to search engines. Tables can help search engines better understand your data, improving your chances of appearing in rich snippets.
Dynamic content capabilities
Using tools like JetEngine or JetProductTables, you can create a table in WordPress that pull data dynamically from your database. This ensures the information is always up-to-date without manual updates.
By integrating tables effectively, you can deliver information more efficiently, boost engagement, and make your website more user-friendly.
FAQ
A WordPress table is a structured way to display information in rows and columns. They are useful for presenting data in a clear and organized manner, such as pricing plans, comparison charts, or event schedules.
To insert a table in WordPress, open the Gutenberg Editor and click the “plus” icon to access the block list. Select the Table block, choose the number of columns and rows, then fill in your data and customize using block settings for a static table. For a dynamic table, use the JetEngine or JetProductTables plugins. In the block list, search for “Dynamic Table,” select the block, choose the created table, and customize it further for more advanced settings.
Minimize the number of rows and columns in your tables. Use lightweight plugins and optimize your images. Consider using lazy loading for tables that are below the fold.
When working with an SQL-based table in WordPress, the table prefix is essential. By default, it’s set to “wp_” (e.g., “wp_comparison_table”). This prefix must be included for the table to display on your WordPress site. You can also change the default prefix to enhance security and reduce vulnerability to hackers and spammers.
Bottom Line
Creating tables can ease content systematization. Not only does it arrange the information, but it also makes the website more attractive for users. It goes without saying that the information will be acquired more effectively than the standard plain text.
And now you know about the WordPress Gutenberg table creation process. The ways to build a table are so many-sided that you can pick whichever you prefer.

