Query Builder SQL Query Type
This overview describes the settings of Query Builder’s SQL/AI Query type, which is a part of the JetEngine plugin.
By default, data stored in SQL database tables is only accessible through tools like phpMyAdmin and cannot be displayed on the frontend using standard WordPress functionality. However, JetEngine’s “SQL/AI Query” feature in the Query Builder allows retrieving data directly from database tables, creating a Listing template based on that data, and displaying it on the frontend using the Listing Grid widget/block/element.
SQL queries can be built using the available Query Builder options, such as query clauses, ordering, joins, and other settings.
In Advanced/AI mode, the SQL query can be written manually or generated automatically using AI.
General Settings
In the WordPress Dashboard > JetEngine > JetEngine > Query Builder directory, the query adjusting starts from the following settings:

- Name — a field where the name of the query should be put;
- Description — a short description of the query features that helps with navigating the list of built queries;
- Query Type — in the given case, a “SQL/AI Query” should be picked;
- Custom Query ID — an optional field to connect a query to JetSmartFilters. The value set here should be identical to the one used in the filter;
- Cache Query — a toggle activated by default. It caches the current query and can be deactivated if the query results are incorrect;
- Cache Expires — a field where the object cache expiration time can be entered (in seconds). The default is “0”, meaning no expiration. Note: this option is relevant only when an external object cache (e.g., Redis, Memcached) is used. Otherwise, the cache remains valid only for a single request;
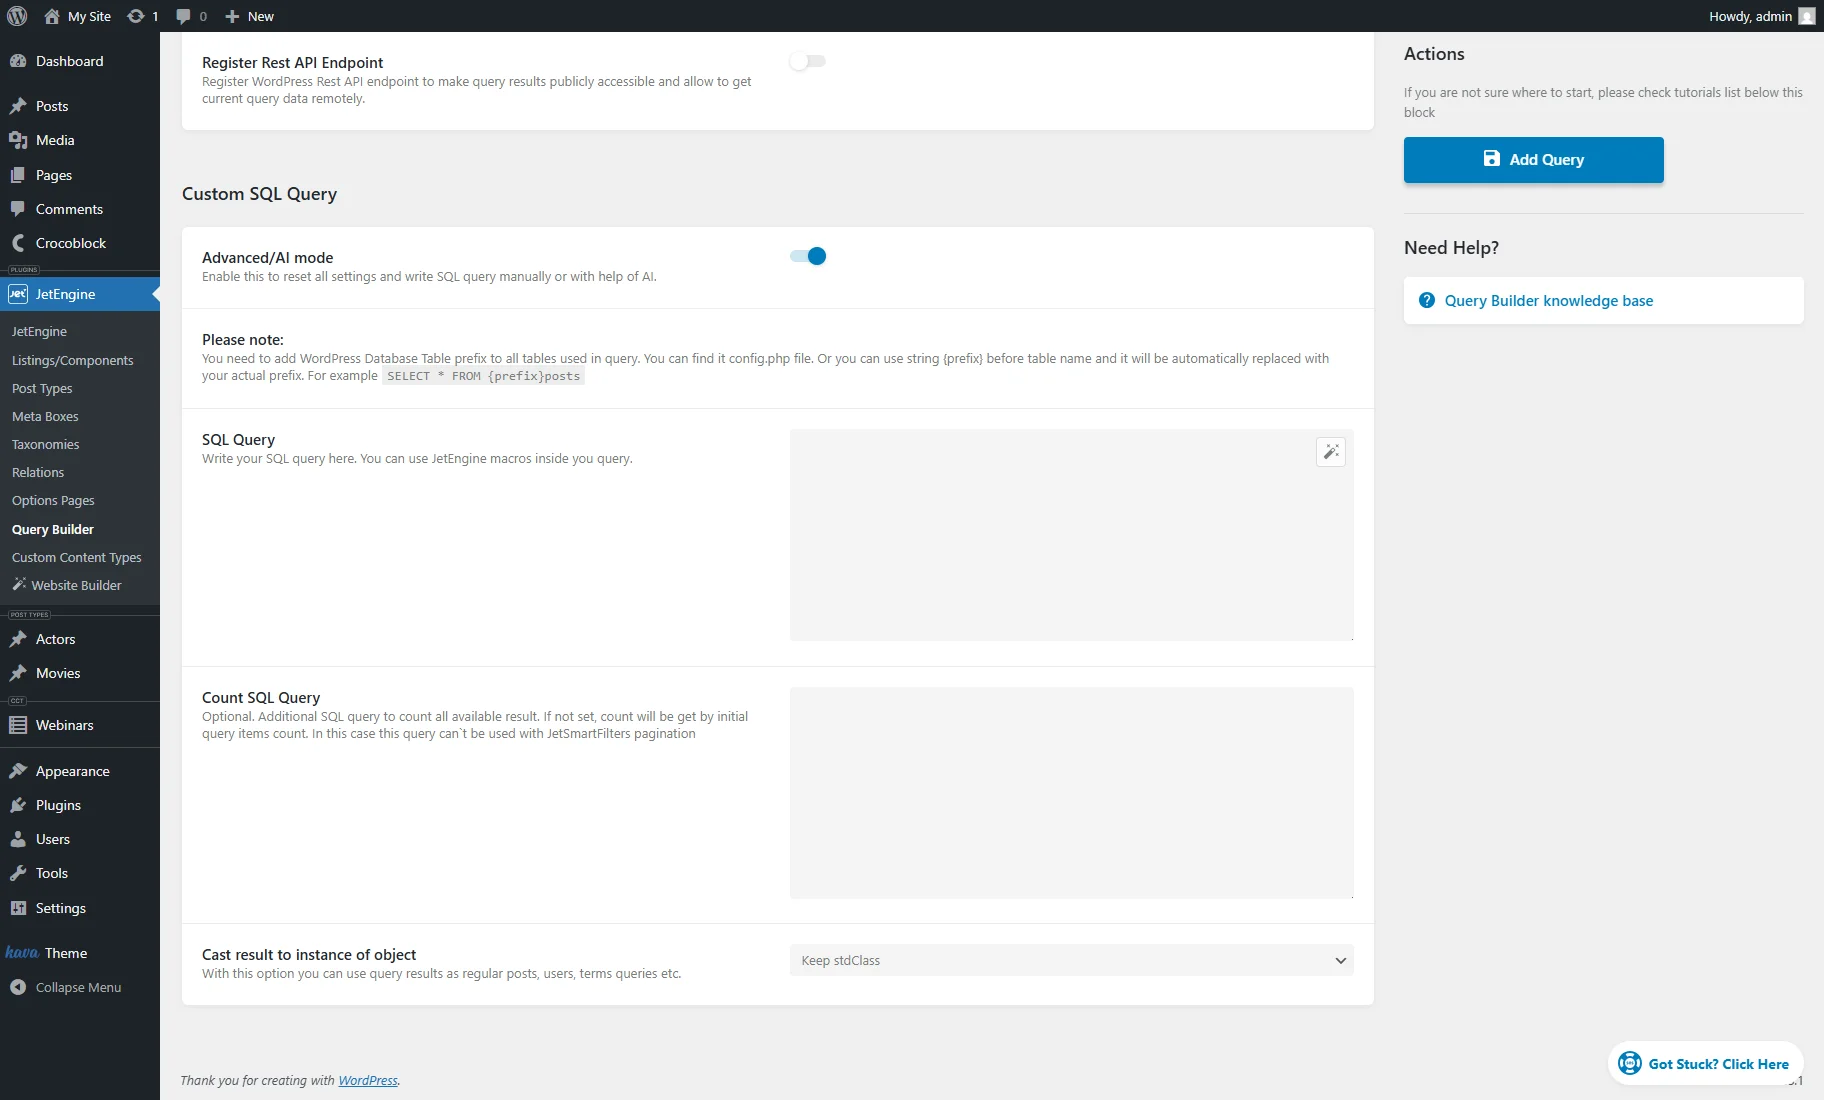
- Register Rest API Endpoint – if enabled, this toggle activates settings with which you can register a WordPress Rest API endpoint to grant public access to query results and allow remote retrieval of current query data. For example, you can use the endpoint in the Make.com scenarios or as the backend for mobile applications. More about these settings can be found in the Register Rest API Endpoint chapter of the Query Builder Overview.
Custom SQL Query Settings
If the Advanced/AI mode toggle is turned off, it shows the options that help set the SQL query. If activated, it resets settings and allows writing the SQL query manually or with the help of AI.
Advanced/AI mode turned off
Such default settings are available for the SQL query:

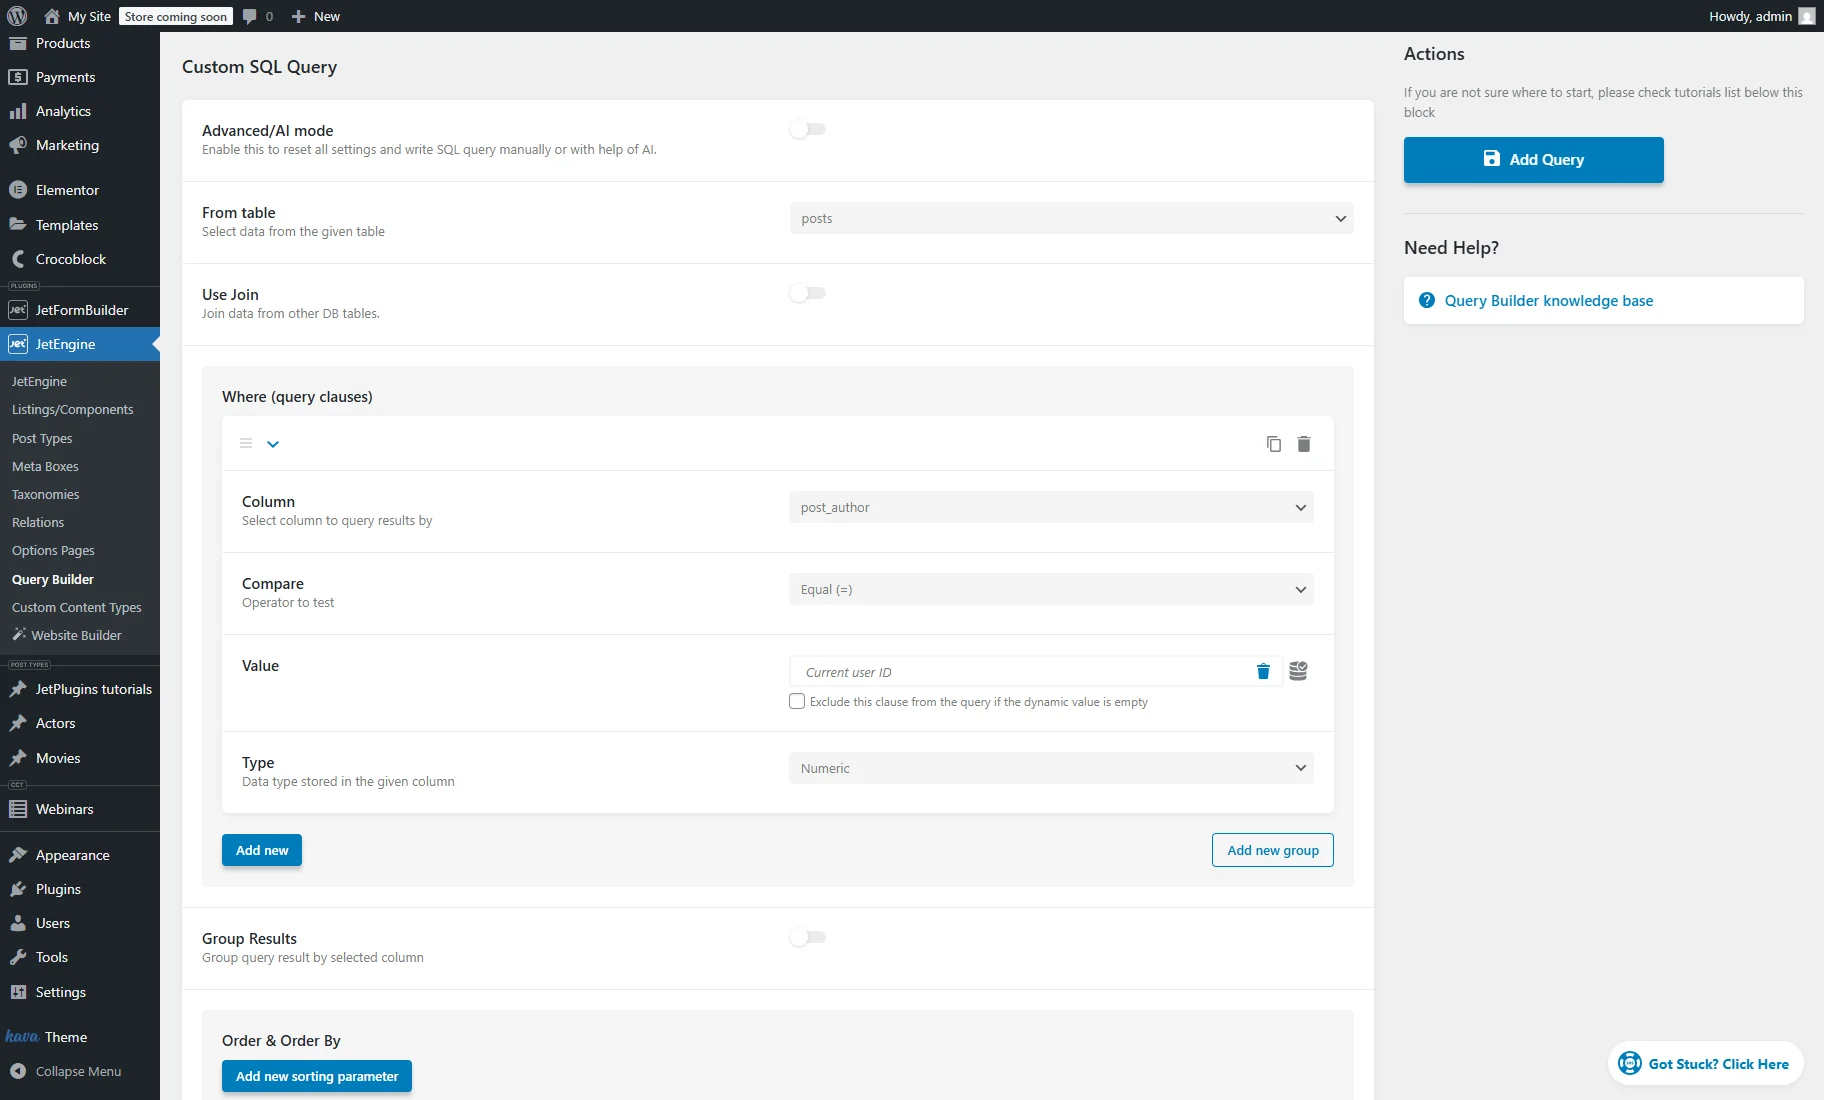
- From Table — a dropdown menu where a SQL table can be chosen from which the data will be taken;
- Show/Per Page Limit — a field to define how many items will be shown at the same time (e.g., in the Listing Grid). If one adds the JetSmartFilters Pagination, this feature will define the number of items on one page;
- Total Query Limit — a field to insert the maximum number of items that can be taken in the query. This is also a number that will be shown if the “Query Result Count” dynamic tag is used. If one plans to add a Pagination widget or block to the Listing Grid, this feature will define the maximum number of items in the query;
- Offset — a field to type the number of first items to skip from the start;
- Include columns — a dropdown to select what columns should be included in the query results. It should be left empty to return all possible columns;
- Columns for filters — shows the columns list to filter with the JetSmartFilters plugin. To filter query results by selected column, the column name should be copied and pasted into the Query Variable bar of the selected filter;

Use Join
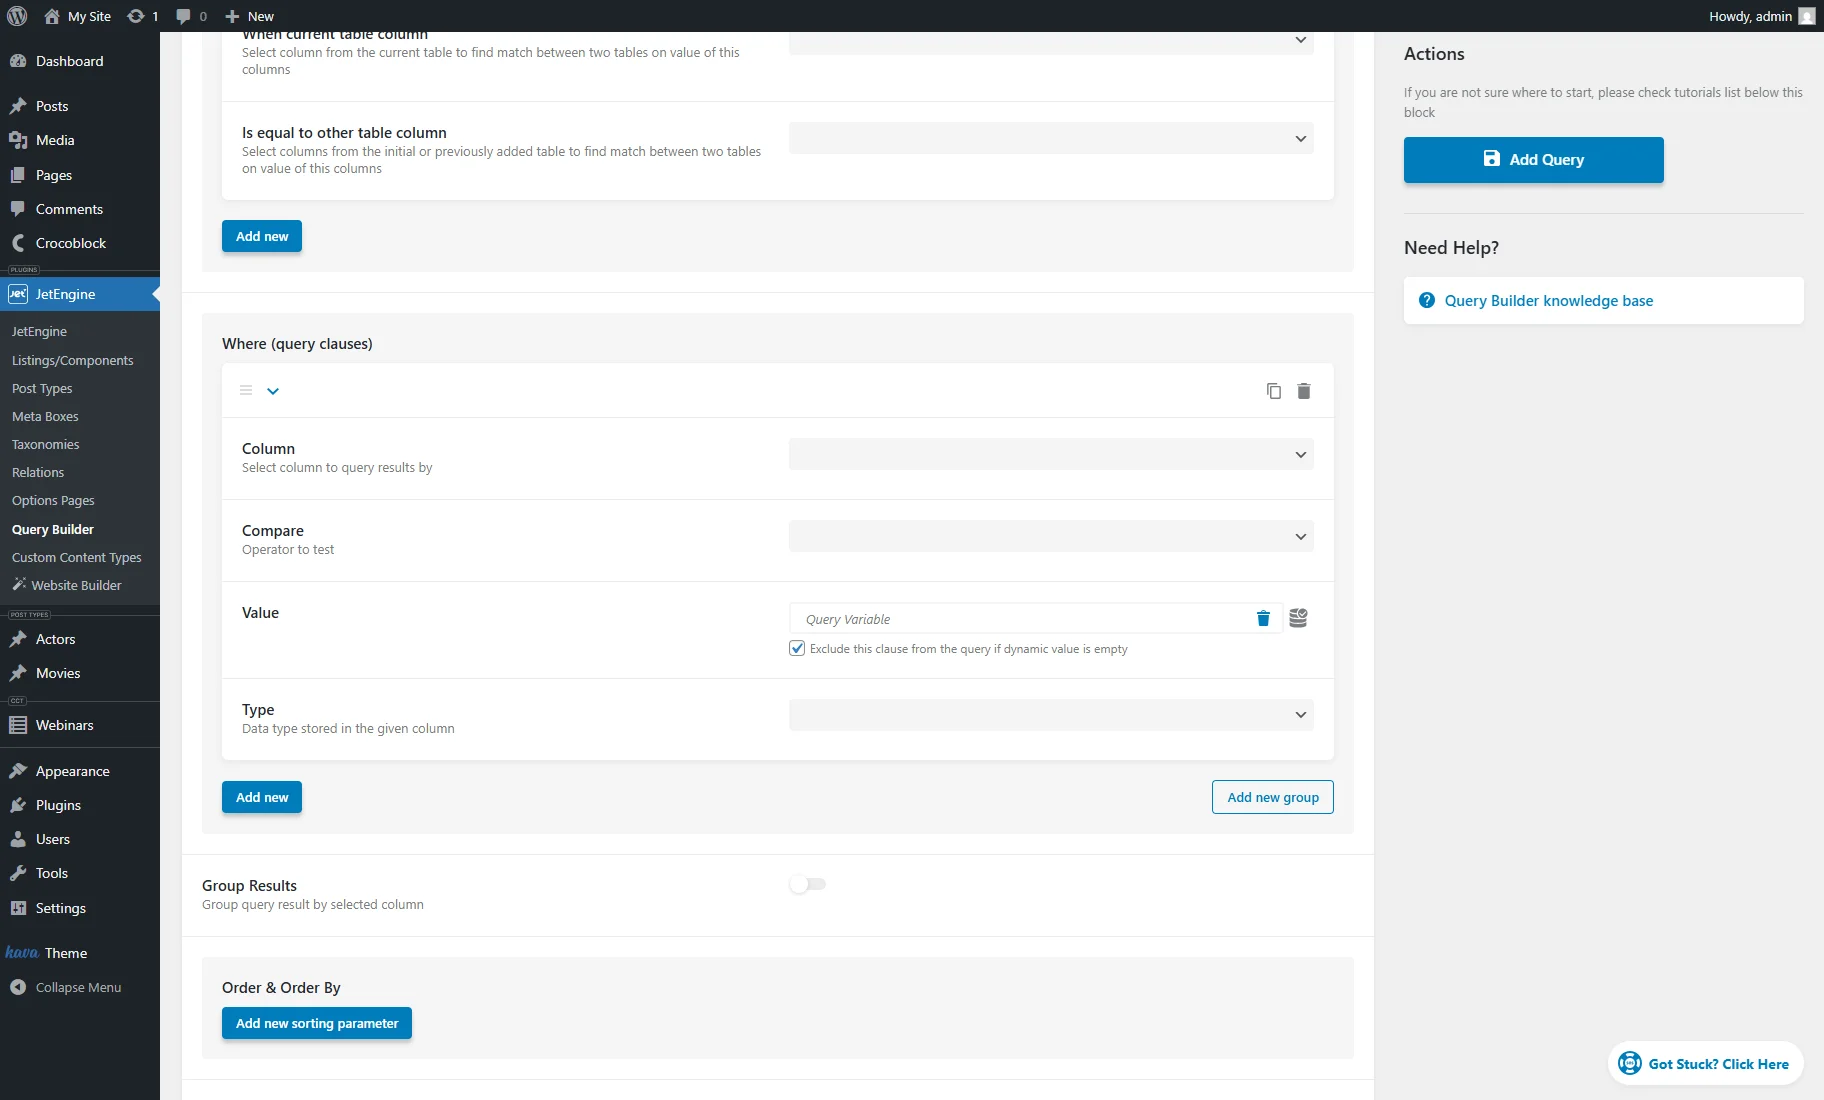
- Use Join — a toggle that enables the use of SQL joins. When enabled, such options can be defined in the repeater item:

- Join Type — specifies the type of SQL join to use. Options include: “Inner Join” (default if not selected), “Left Join”, “Right Join”, “Outer Join”. More information can be found in the SQL Joins article;
- Join Table — selects the database table from which additional data will be joined;
- When current table column — chooses a column from the main (current) table that will be used to match data with the join table;
- Is equal to other table column — selects the corresponding column in the joined table. This column must contain values that match those in the column selected above to successfully relate the two tables.
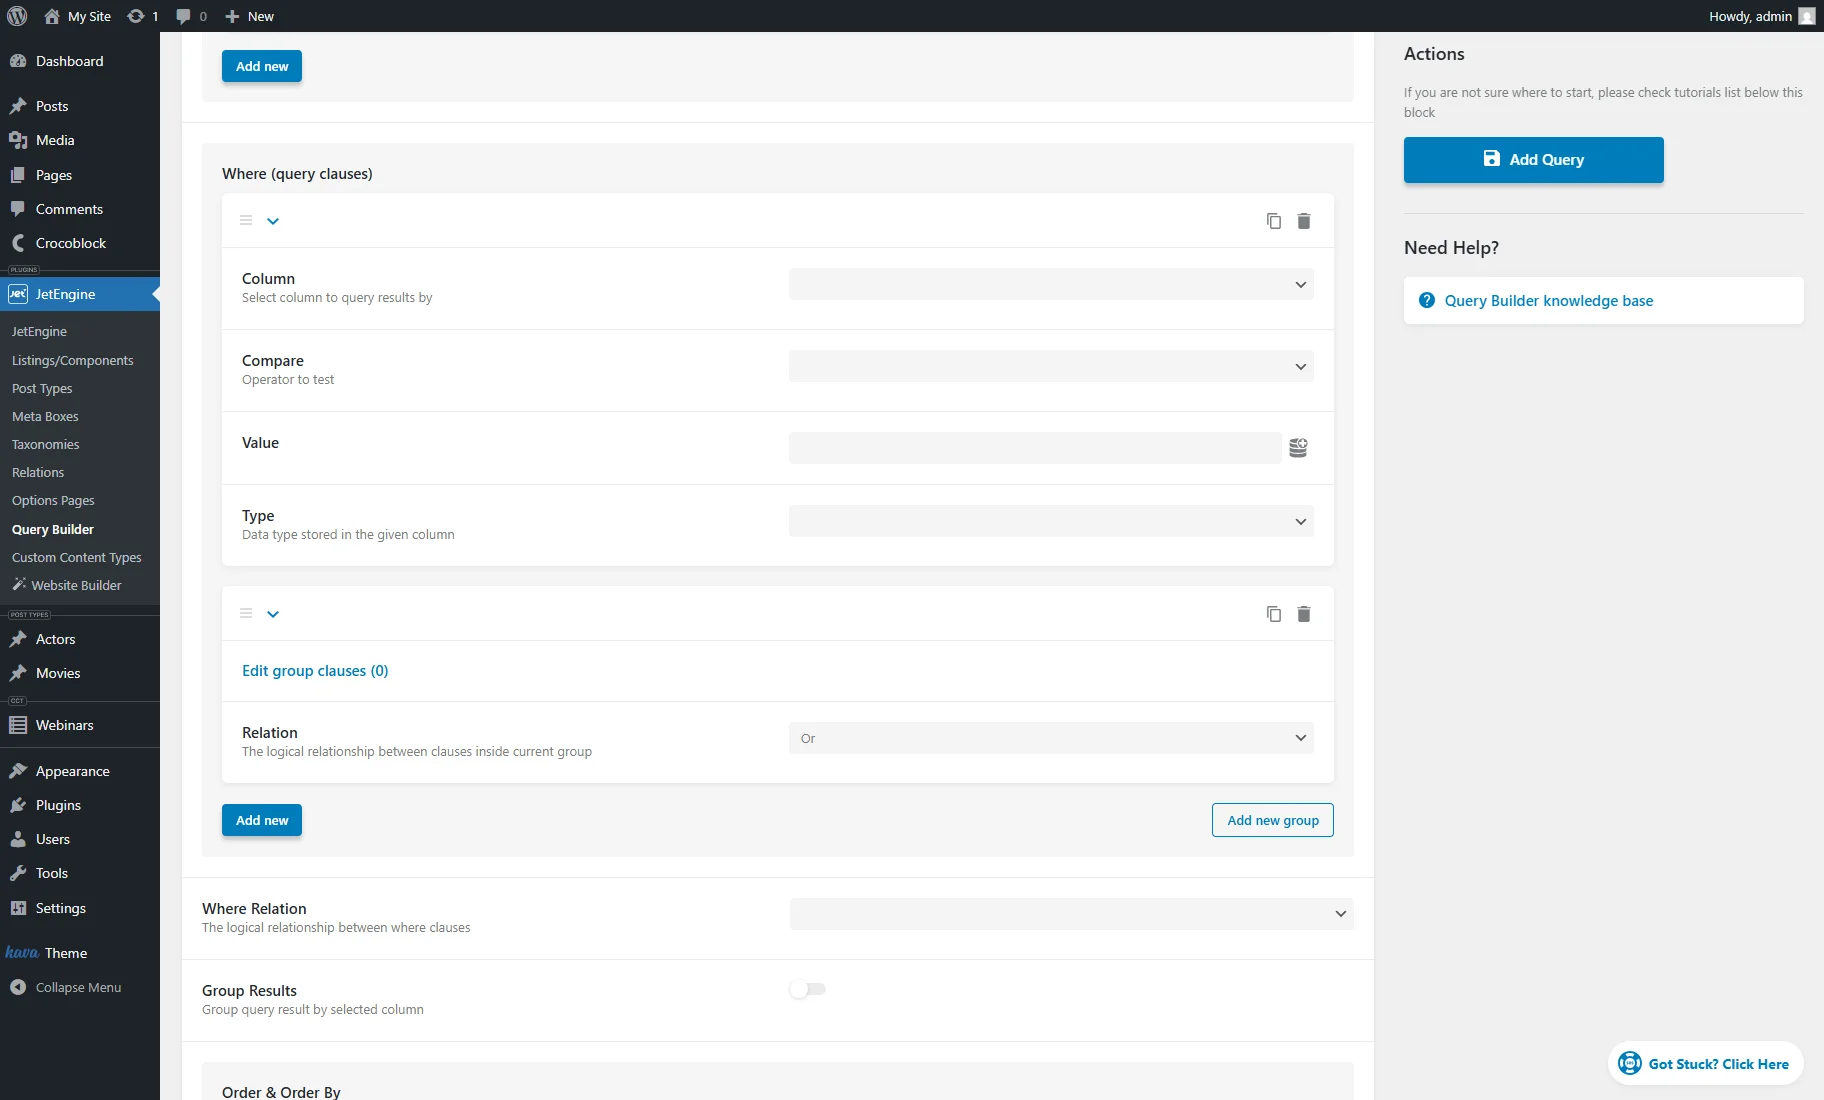
Where (query clauses)
Where (query clauses) section allows adding items to the list based on the values of specific columns. One can enter the desired value in the Value field, and the system will compare it to the data in the database column selected in the Column dropdown. If the values match, the item is included in the list. Multiple conditions can be added by clicking the “Add New” button. Every query clause has additional settings:

- Column — here, one of the database table columns can be chosen. The items will be queried according to the values in that column;
- Compare — here, one can select how the values will be compared:
- Equal — displays items having an equal value;
- Not Equal — shows items that don’t have an equal value;
- Greater than — shows items that have a greater value. It works with numeric values only;
- Greater or equal — displays items that have a greater or equal value. It also works only for numeric values;
- Less than — shows items that have a lesser value. For numeric values only;
- Less or equal — displays items that have a lesser or equal numeric value;
- Like — shows items that have the value set in the Value field mentioned in the content;
- Not like — displays only the items that don’t have the value put in the Value field mentioned in the content;
- In the list — after one adds several values to the Value field, it shows the items that have at least one of them in their content;
- Not in the list — displays items that have any values except the ones typed into the Value field;
- Between — displays items that contain the value between two, which are set in the Value field;
- Not between — shows all the items except the ones that have a value that matches the set interval;
- Exist — shows all the items that contain the Field key/name of the selected meta field. There is no need to set the Value in this case;
- Not exist — displays all the items that don’t have the Field key/name of the meta field. There is no need to set the Value either;
- Regexp — queries items according to “Checkbox” and “Radio” meta field values;
- Not regexp — excludes mentioned “Checkbox” and “Radio” meta field values from the query;
- Value — the value set here will be compared to the value of the chosen Column. The “database” icon opens the macros list that can be used in this field;
- Exclude this clause from the query if dynamic value is empty — allows skipping a query condition if the dynamic value linked to the field is empty. It only becomes available when a dynamic source (like a query variable or URL parameter) is selected for the Value field. It helps prevent unexpected results when no value is passed — for example, showing no posts or only those with empty meta fields. Enabling this ensures the query behaves as expected, such as displaying all posts when no filter is applied;
- Type — this dropdown allows specifying what kind of data is stored in the chosen parameter:
- Char — alphabetic data;
- Numeric – whole numbers only;
- Date — date values;
- Datetime — date and time values ;
- Timestamp — date and time values stored as a timestamp. This format is particularly useful for tracking local events while accounting for time zones, as well as for use in analytics and statistical analysis;
- Decimal — fraction number data;
- Time — time values;
- Binary — data compared in a case-sensitive manner by treating it as raw binary;
- Signed — whole numbers, both positive and negative;
- Unsigned — whole numbers, only positive.
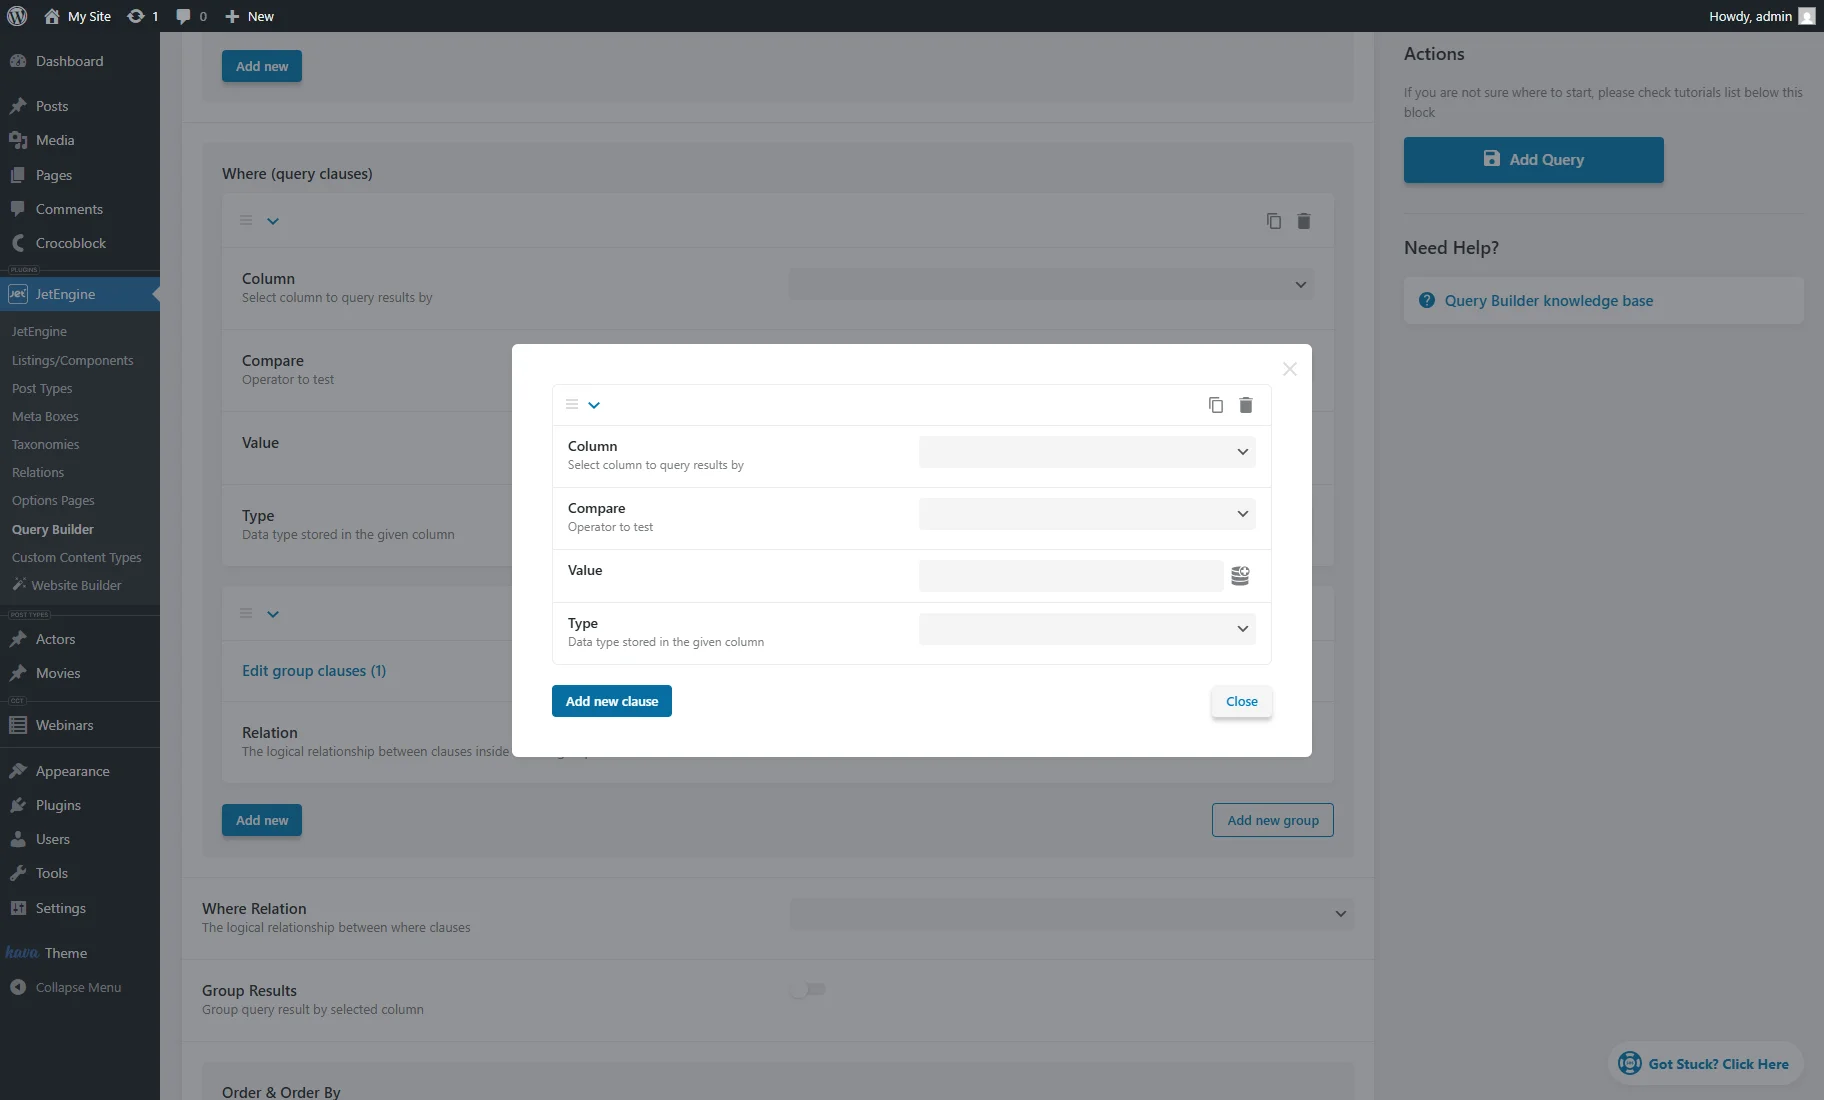
The Where (query clauses) section also contains the “Add new group” button. When it’s clicked, a group of clauses is added where the OR/AND Relation can be selected.
The group of clauses can be configured by pressing the “Edit group clauses” link, which opens a pop-up, where clauses will be added by pushing the “Add new clause” button.
More details can be learned from the How to Create Group Clauses for Query Arguments tutorial.
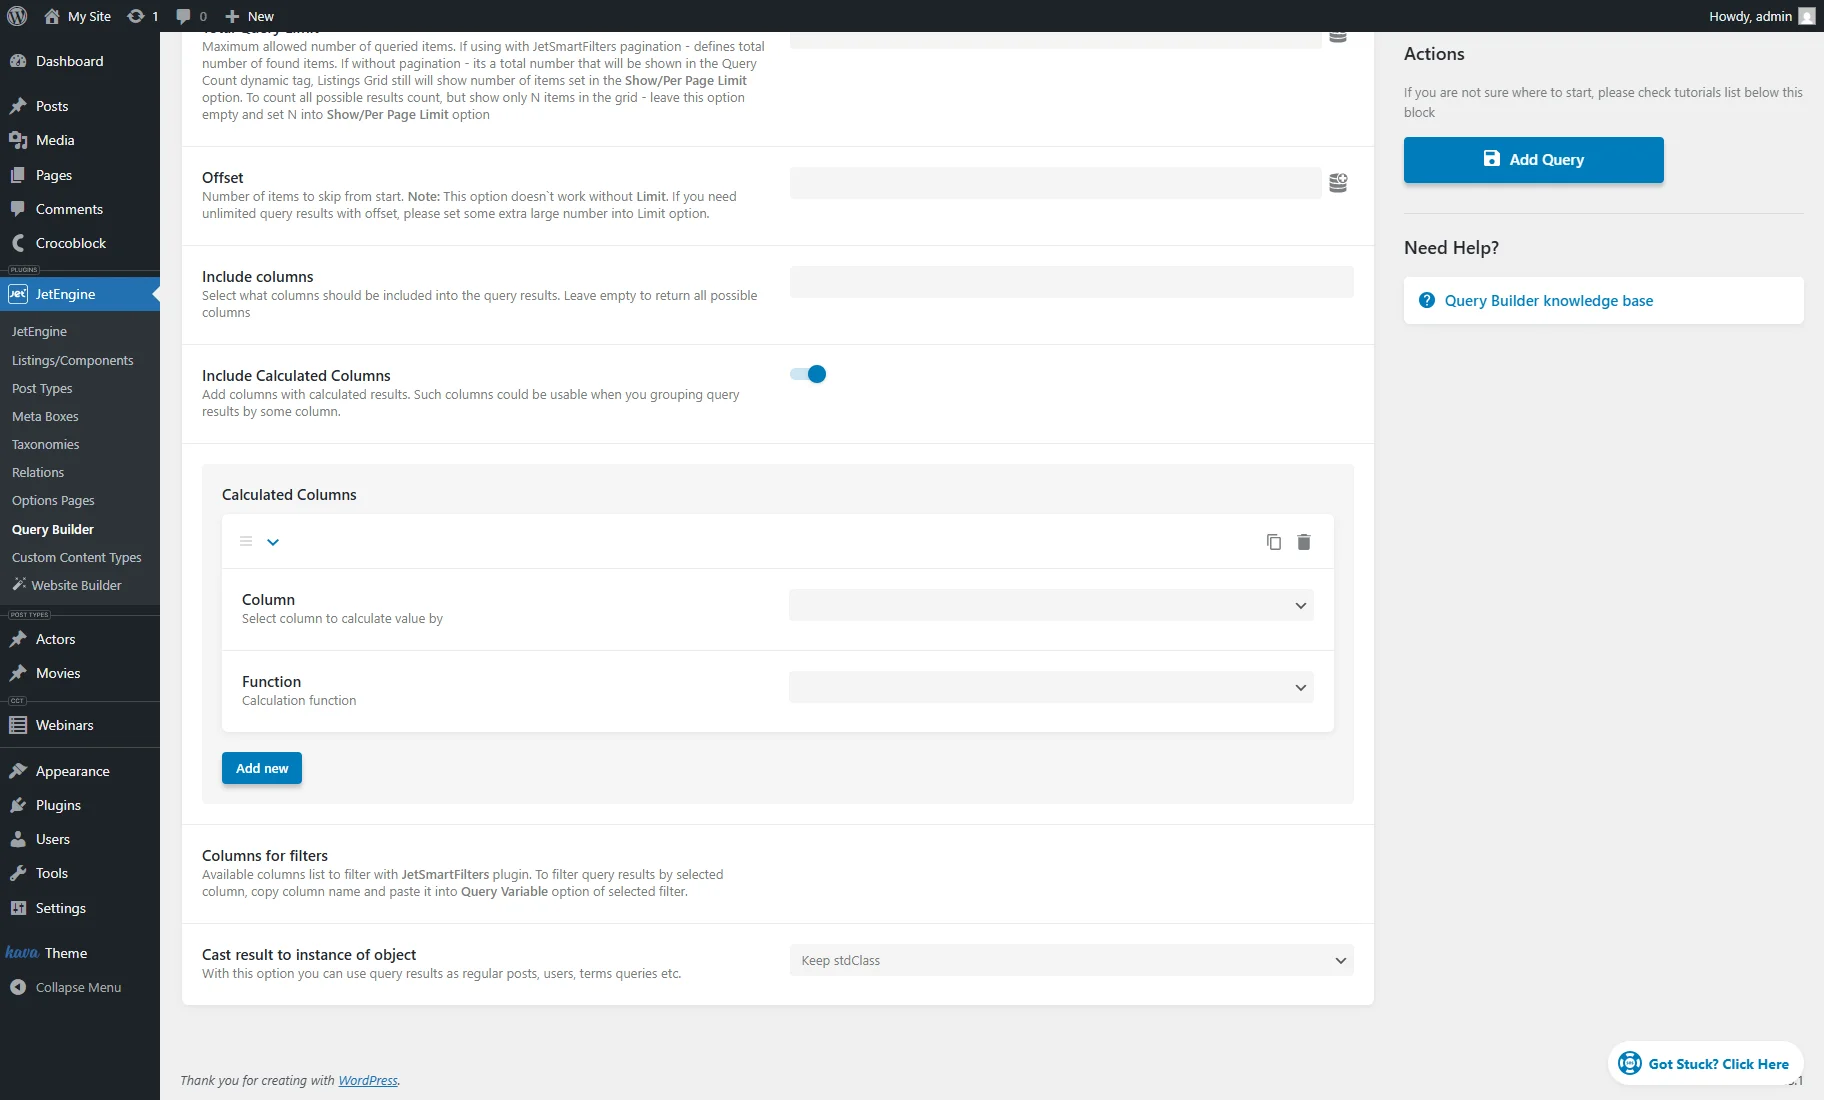
Group Results and Calculated Columns
The Group Results feature allows combining query results by duplicate values in one of the columns. If this toggle is enabled, it activates the Group By dropdown, which allows choosing a column by which the results would be grouped.

The Include Calculated Columns toggle adds the Calculated Columns section. The “Add new” button adds a repeater item with such settings:
- Column — a dropdown to select the column to group the results;
- Function — a dropdown to pick the function that will be applied to the values of the chosen column:
- COUNT – counts the values of the column;
- MAX – checks the values and shows the maximum one;
- MIN – checks the values and shows the minimum one;
- SUM – counts the sum of values;
- AVG – counts the average value.
More information can be found in the How to Set Calculated Columns and Grouping Results for SQL Query tutorial.
Order & Order By
In the Order & Order By section, one or more sorting conditions can be added by pressing the “Add new sorting parameter” button. Every repeater item contains such settings:

- Order By — in this dropdown menu, the parameter by which the items will be sorted can be set;
- Order — here, one can select ascending “From lowest to highest values (1, 2, 3; a, b, c)” or descending “From highest to lowest values (3, 2, 1; c, b, a)” order;
- Type — the same options as for the Where (query clauses) section.
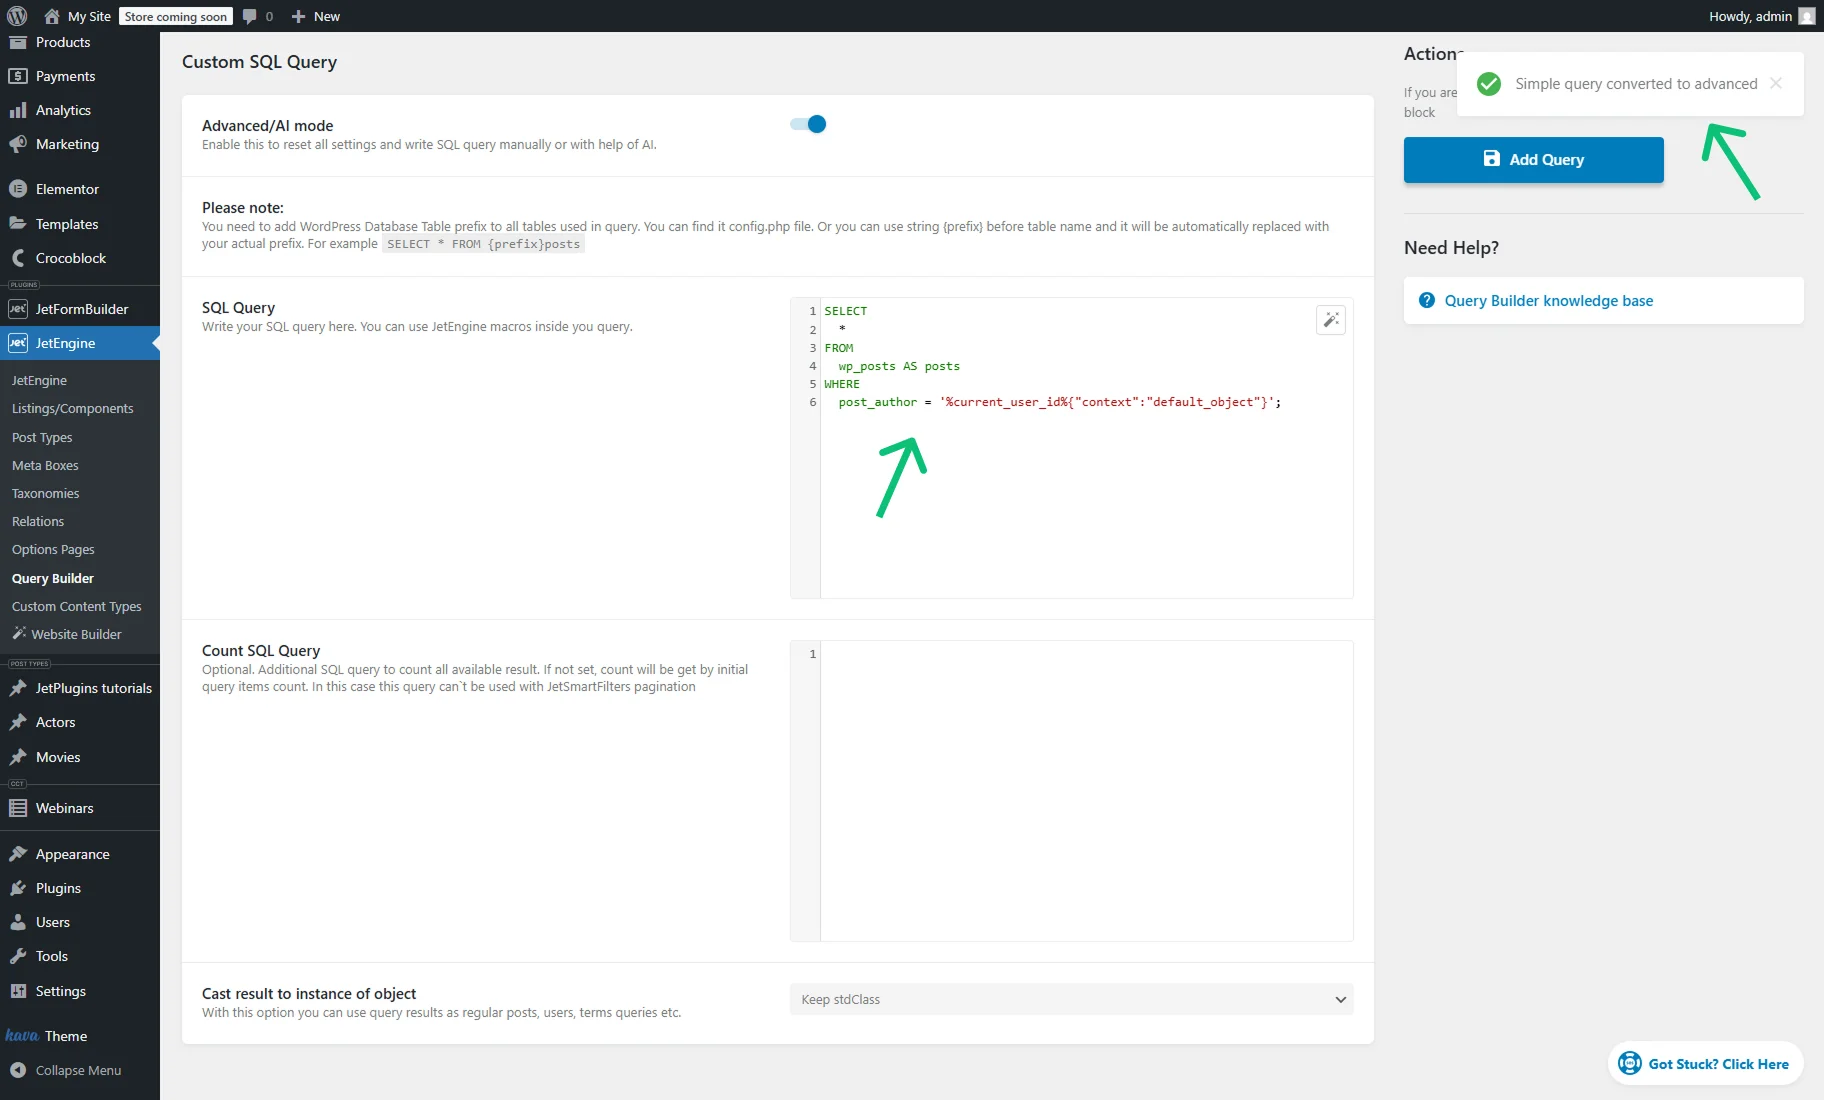
Advanced/AI mode turned on
The Advanced/AI mode toggle activates such additional options:
- SQL Query — a textarea where the SQL query can be written manually. The JetEngine macros can be used here.
To use AI, the “magic stick” icon should be pressed, and the pop-up for the SQL query generation will appear.
The pop-up contains a textarea for prompts, prompt tips, and prompt examples.

The prompt examples are clickable; after pressing on one of them, the generated query can be inserted into the SQL Query textarea.
- Count SQL Query — an optional query textarea to calculate the total number of results. Required for correct pagination with JetSmartFilters when using complex queries. If not set, the total count is based on the main query result.

There are such tutorials about SQL queries generated with AI:
- How to Create Dynamic Sale Notifications for WooCommerce SQL Query with Open AI;
- How to Display WooCommerce Product Categories with Products in Stock Using Open AI Query;
- How to Generate SQL Query with Open AI: Displaying Users’ Birthdays;
- How to Create Visual Filter Based on SQL Query with Open AI.
The Cast result to instance of object is a dropdown that is available for both modes. It defines how the query results will be returned and handled:
- Keep stdClass — returns results as standard PHP objects (stdClass), with no transformation;
- Keep stdClass, unserialize properties — returns results as stdClass objects and automatically unserializes any serialized properties, converting them into usable PHP arrays or objects;
- Post — casts each result to a WP_Post object;
- User — casts results to WP_User objects;
- Taxonomy Term — casts results to WP_Term objects;
- Comment — casts results to WP_Comment objects;
- Booking — (available if the JetBooking plugin is installed and activated) casts results into booking objects, which are useful for booking-related templates and filters;
- WC Product — (requires WooCommerce) treats each result as a WooCommerce product object for displaying prices, SKUs, etc.
Converting Simple SQL Query Settings to Advanced
Suppose some SQL settings are set in the default mode (the Advanced/AI mode is turned off), for example, the Where (query clauses).
After switching to the Advanced/AI mode, the SQL query settings will be inserted into the SQL Query textarea if it is empty. If the textarea already contains content, it will remain unchanged.
That’s all about JetEngine Query Builder’s SQL/AI Query type, which retrieves data from database tables for use on WordPress websites. To narrow down the displayed results, the Listing can be created as described in the How to Create Query Builder Listing Template tutorial.