The WooCommerce plugin provides powerful functionality for building a fully-fledged eCommerce website with a lot of advanced features, such as variable products or dynamic pricing, if required.
In many cases, a traditional online shop with prices and Cart functionality is not exactly what the business needs; take, for example, B2B businesses or international manufacturers – they only need to give full information about the products and then redirect the customer to the resellers.
There’s no “magic button” in the default functionality of the WooCommerce plugin to turn a default WooCommerce website into a product catalog. But, by removing what we don’t need and replacing it with what will work for your particular catalog, e.g., a contact form button, we can actually do it.
In this article, I will demonstrate a method that even beginners can follow. Additionally, I will show a more advanced routine that involves some coding for experienced users.
Table of Contents
- How to Enable Woo Catalog Mode Using Elementor and JetWooBuilder
- How to Enable Woo Catalog Mode Using Custom Code
- FAQ
- Bottom Line
How to Enable Woo Catalog Mode Using Elementor and JetWooBuilder
First, let’s figure out what exactly we should do to turn a default WooCommerce website into a catalog:
- Remove the “Add to Cart” button from the product template.
- Add there a “Contact Us” / “Request a Price” button and form instead.
- Remove the Cart icon from the header.
- We also don’t need a Checkout functionality, but since there will be no cart and no “Add to Cart” button, users will not be able to get there. However, we should also deactivate the corresponding pages so users can’t access them by typing them manually.
This method is great for both beginners and seasoned developers. Beginners can enjoy the visual editor for WooCommerce templates that JetWooBuilder offers, which is enough for many projects.
Experienced developers can combine it with some custom code and tweak the templates if projects require it. Still, visual editing of Woo templates is much faster and easier than dealing with a lot of hooks and CSS, finding template parts, and all of that.
The only thing to consider here is that JetWooBuilder is a plugin for Elementor (free or Pro). If you use Gutenberg or other builders, skip to the next section, where I will explain how to do it with custom code.
Editing the Single Product template
Removing the “Add to Cart” button and replacing it with “Request the price” one
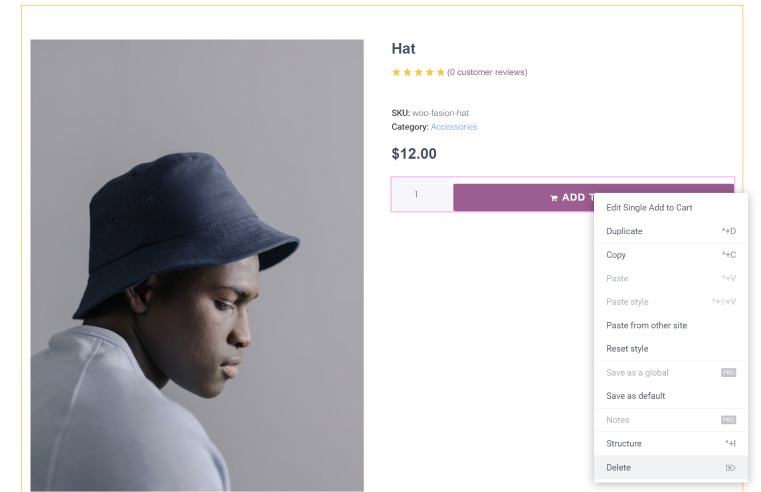
If hiding an “Add to Cart” button can probably be done faster with a couple of lines of CSS, we have to replace it with the contact button. That’s why we definitely need a custom Product template.
To create a custom Product template, go to Crocoblock > Woo Page Builder, choose the Page tab, and tap the “Create New Template” button. To save time, you can use one of the ready presets and then modify them.
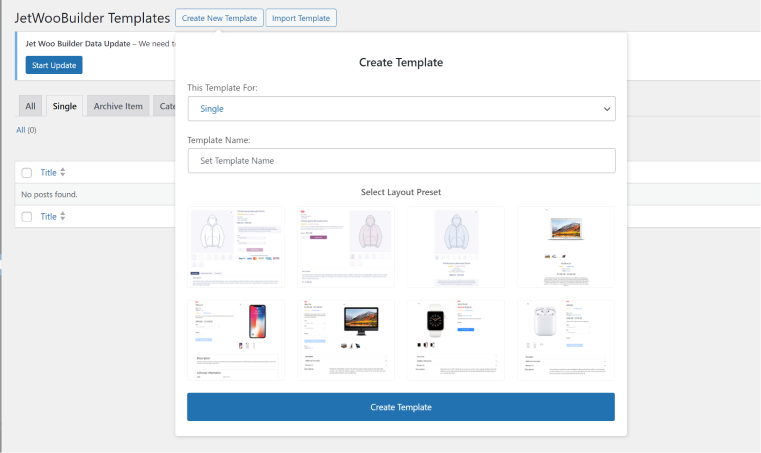
The “Add to Cart” button is just one of the widgets here, so you can delete it in one click.
Now, you can add a button that shows a pop-up with a contact form instead. You can use JetPopup and a JetFormBuilder form. Note that it’s important that the form, by default, sends you information about the page on which it was submitted. In JetFormBuilder, you can use the Hidden field to pass page name, ID, or even any query string parameters.
Another use case for the form on the catalog product page is to place the full form there instead of a button triggering a pop-up so the customer can fill in the information and even be redirected to the corresponding retailer. To implement it, read this guide about creating multi-step forms with conditional logic.
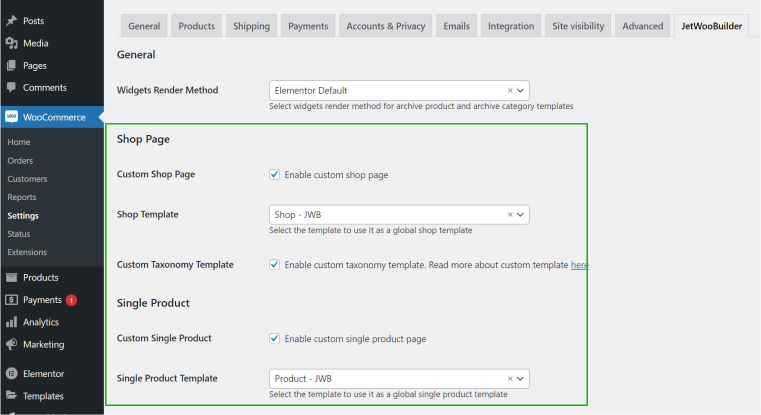
❗ To make this template replace the default one, it’s required to go to WooCommerce > Settings > JetWooBuilder tab, check the “Enable custom shop page” checkboxes, and choose the templates you’ve created with JetWooBuilder. After that, click “Save Changes.”
Further, we will modify not only the Single template but also the Archive and the Shop. Make sure to assign them here as well (after creating them).
Removing the price
Finally, let’s delete a price – it’s also just a widget called “Single Price” if the template is made with JetWooBuilder. So, delete it in one click.
💡Read how to create a custom order form for a catalog website.
NOTE
JetWooBuilder offers over 50 widgets but doesn’t display them all at once. Instead, the Elementor sidebar shows only the widgets that are relevant to the current template type. For example, when editing a Single Product template, you will see only the Single Product widgets along with four global widgets. Similarly, when editing an Archive template, only the Archive widgets will be displayed.
Other templates
Except for the Single Product template, WooCommerce websites normally have a Shop page and Categories/Archives pages, and they also need modification.
First, go to Crocoblock > Woo Builder and create custom templates for Archive/Category and Shop. There, remove the “Add to Cart” button and prices just like you did for the Single template.
After publishing these templates, don’t forget to go to WooCommerce > Settings > JetWooBuilder tab, check the “Enable custom shop page” checkbox, and choose your custom templates. Then, save the changes.
Hiding the Cart icon in the site header
Depending on the theme you use, there can be multiple ways to edit a website header. For example, if you use the Hello Elementor theme, you can modify the header either with Elementor Pro or with various Elementor add-ons. In this case, just open the editor and delete the Cart widget.
If you have a theme that offers a header editor, e.g., Astra, it’s easy to delete it there.
One more universal way to hide it is by using a line of CSS. Find the ID of the cart icon and then go to Customization > Custom CSS and add this line:
#my-icon-id {

display:none!important;

}
📚 Read more about editing the WordPress header in this article.
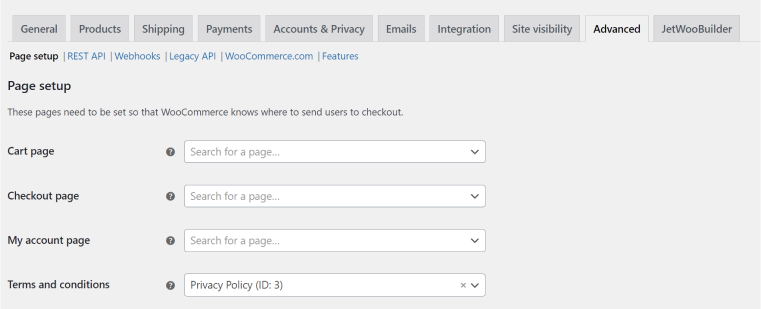
Disabling the Cart and My Account pages
To do it, go to WooCommerce > Settings > Advanced tab, and you will see the pages listed below. There, you can choose which pages are responsible for Cart and My Account. Click the “x” icon in the dropdown list and the existing default pages will be deleted.
Alternatively, you can choose the main page or any other in the dropdown. Save changes.
Now, the main attributes of a default shop are hidden, and you can use your site as a catalog. You can also add additional tabs, custom fields, and other elements to your catalog pages. Crocoblock Suite has everything you need for that, also for a very attractive price.
How to Enable and Customize WooCommerce Product Catalog Mode Using Custom Code
This method will work for any builder, but it’s not as straightforward as a previous method and requires some knowledge of PHP.
The hooks used below should be added to the functions.php file of your theme.
The goal is to remove the “Add to Cart” button and replace it with a form. Let’s do it for the Single Product template:
//Hide the button

remove_action( 'woocommerce_single_product_summary', 'woocommerce_template_single_add_to_cart', 30 );

//Add the JetFormBuilder form instead. Create a form first, and use its shortcode instead of mine

add_action( 'woocommerce_single_product_summary', 'replace_add_to_cart_with_form', 30 ); function replace_add_to_cart_with_form() { echo do_shortcode('[jet_fb_form form_id="61" submit_type="reload" required_mark="*" fields_layout="column" enable_progress="" fields_label_tag="div" load_nonce="render" use_csrf=""]'); }
For the Archive template, it’s enough to remove the “Add to Cart” button:
remove_action( 'woocommerce_after_shop_loop_item', 'woocommerce_template_loop_add_to_cart', 10 );And finally, let’s remove the button on the Shop page template:
function remove_add_to_cart_button_shop_page() {

    if ( is_shop() ) {

        remove_action( 'woocommerce_after_shop_loop_item', 'woocommerce_template_loop_add_to_cart', 10 );

    }

}

add_action( 'wp', 'remove_add_to_cart_button_shop_page' );
What is left is to remove the price from the Single Product, Archive, and Shop templates. Let’s combine it in one code snippet:
// Remove price from Single Product template

function remove_single_product_price() {

    remove_action( 'woocommerce_single_product_summary', 'woocommerce_template_single_price', 10 );

}

add_action( 'wp', 'remove_single_product_price' );

// Remove price from Archive and Shop pages

function remove_archive_product_price() {

    remove_action( 'woocommerce_after_shop_loop_item_title', 'woocommerce_template_loop_price', 10 );

}

add_action( 'wp', 'remove_archive_product_price' );
If you want to modify the way your templates look, find their CSS classes using the browser inspector and modify the corresponding CSS.
If you decide to modify WooCommerce templates (in wp-content/plugins/woocommerce/templates), it’s important to copy them to your theme (just create a folder named WooCommerce in the root of the parent or child theme) so that you will not lose any changes after the WooCommerce plugin updates.
FAQ
Deactivate Cart functionality and hide prices in your templates. Use the JetWooBuilder plugin for Elementor to edit any template quickly and easily.
Yes, it requires a few lines of code and using WordPress hooks. You can find them in this article.
Bottom Line
WooCommerce is a brilliant plugin for eCommerce that allows you to set up not only an online shop but also a custom catalog for your goods. Catalogs are widely used in B2B, particularly by manufacturers and international distributors, or in B2C if the products are complex and require individual customization.
There are many add-ons for Woo, and JetWooBuilder is one of the most powerful tools for visually editing shop and product templates.
In this article, I’ve demonstrated how to turn your default WooCommerce website into a catalog in a few simple steps. If you have questions or want to share your experience, feel free to drop a comment below.

