Cart abandonment is one of the biggest challenges in eCommerce, and a poorly designed checkout is often to blame. If your WooCommerce forms feel slow, clunky, or just plain outdated, you’re likely losing sales. In this guide, we’ll show you how to rebuild your checkout the smart way using Crocoblock – with real UX improvements that actually move the needle.
So, in this article, I will talk about the best UX practice for Checkout and Order form, how to improve it without coding, and show how to create a custom WooCommerce B2B order form in three quite simple steps.
WooCommerce Default Checkout and Order Form Drawbacks
Let’s outline the problem first. The real problem arises when users abandon the checkout process. According to the Baymard Institute’s research, the average cart abandonment rate is 70%. And, as their survey shows, it’s specifically connected to the bad UX and functionality of checkout and order forms.
These are some of the particular reasons:
- 19% – the site wanted me to create an account;
- 18% – too long/complicated checkout process;
- 15% – website had errors/crashed;
- 14% – I couldn’t see/calculate the total order cost up-front;
- 10% – there weren’t enough payment methods.
Other studies I’ve come across show very similar results. When we look at the default WooCommerce checkout and order interface, it’s rigid, bulky, and often does more to repel customers than convert them.
Let’s have a look at the WooCommerce default checkout form:
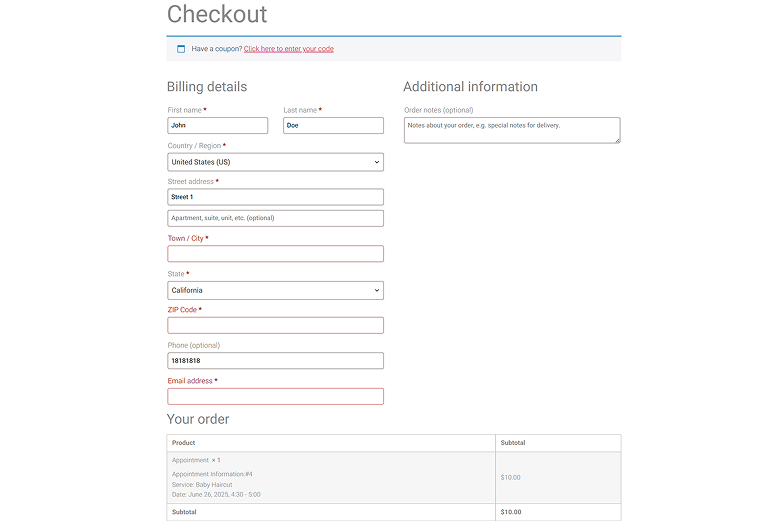
It’s rigid, dull, and, most importantly, very long and bulky – it occupies three screens, both on desktop and mobile. Isn’t it quite distressing?
This kind of layout overwhelms the user right at the final step – the point where clarity, speed, and trust matter most. Every extra field, every awkward layout choice adds friction, and friction leads to drop-offs.
On mobile, where attention spans are shorter and screens are smaller, this becomes an even bigger issue. Users have to scroll multiple times just to complete a basic purchase. No progress indicator. No logical grouping. Just one giant form that feels more like a chore than a checkout.
And while WooCommerce offers some customization, it’s mostly surface-level unless you dive into custom coding or heavy third-party plugins. That’s where Crocoblock eCommerce tools come in – giving you full control over how your checkout and order forms look, feel, and behave.
Let’s see how we can fix this.
Improving the Checkout Experience and How to Do It Without Coding
Before we jump into rebuilding the checkout, let’s quickly break down a useful concept: micro and macro conversions.
- Macro conversion is the main goal – a completed order.
- Micro conversions are the small steps users take along the way – starting checkout, filling in contact info, choosing a payment method, clicking “Place Order,” subscribing to a loyalty program, adding extra services, etc.
Let’s focus a bit on micro conversions here – they can be divided into Process milestones and Secondary actions.
The first one is the steps to complete the most important action – making a purchase.
The second one is about additional actions, such as posting a review, taking part in a loyalty program, etc. – they are not necessary for reaching the main goal. Still, they are desirable because they let you predict future sales better, help grow brand recognition and trust, and other similar, useful but not critical goals.
The map of process milestones and secondary actions should be planned according to the user journey map. So, first, you should have a clear and professional user journey map, based on your market analytics and product, and then visualize process milestones and secondary actions. Only after that, it makes sense to build or customize eCommerce forms.
In the next section, I will point out the main pain points checkout and order forms have, according to the Baymard research I’ve mentioned above, and ways to fix them, based on the best UX practices and how to do it using Crocoblock plugins.
Issue #1. No guest checkout
As 19% of users abandon the checkout process if they have to create an account, it’s worth considering, especially if you sell something that can be bought impulsively.
How to fix
Enabling guest checkout functionality in WooCommerce is a matter of a few clicks: go to WooCommerce > Settings, Accounts & Privacy tab, and check the Enable guest checkout.
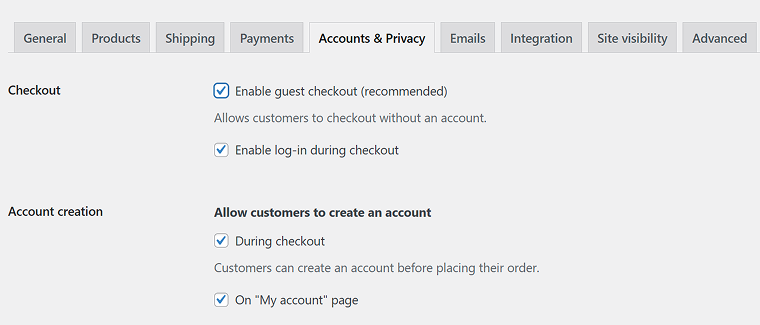
I also recommend activating the Enable log-in during checkout option (to simplify the log-in process for those who have an account) and the Allow customers to create an account: during checkout option to make the registration process more intuitive.
Issue #2. Too many fields in checkout forms
I’ve already mentioned that default WooCommerce checkout forms are intimidating – but how to improve them? Apparently, according to the research, users are more bothered by too many fields rather than the number of form steps.
What can be changed?
- Remove irrelevant fields – e.g., if you sell digital products, you definitely don’t need address fields or phone numbers.
- If you sell physical products, think about your specific delivery options: if most of the customers receive their package in a post office, it’s worth hiding the full address form and making it conditional; instead, make a choice of the city/post office.
- The Coupon field can be replaced with a toggle or a small link and moved to the final payment step.
- Most likely, it’s fine to have just one Name field instead of two, as well as one Address line (by default, there are two).
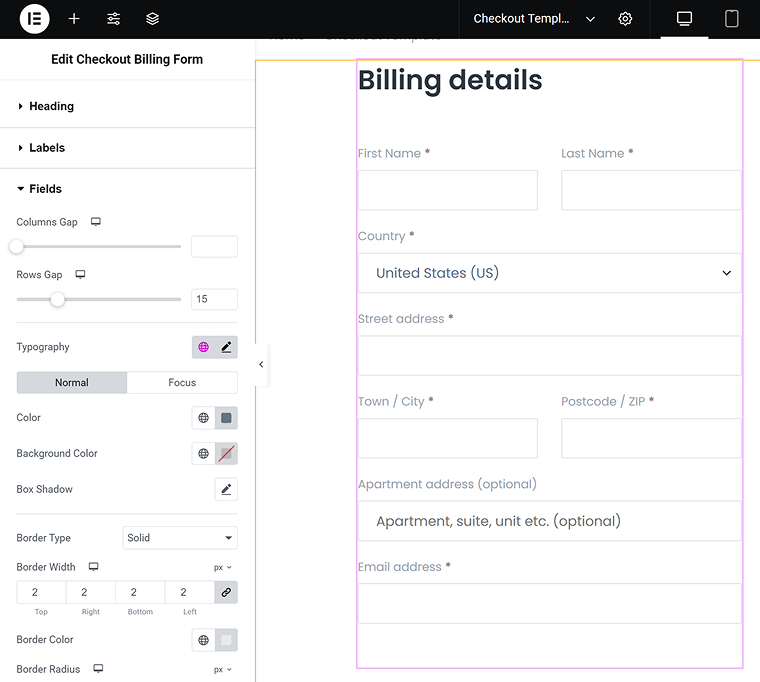
How to fix
If you use Elementor to build your WooCommerce shop, Crocoblock’s JetWooBuilder is what you need to edit checkout fields visually. Using it, you can add or remove fields from the form:
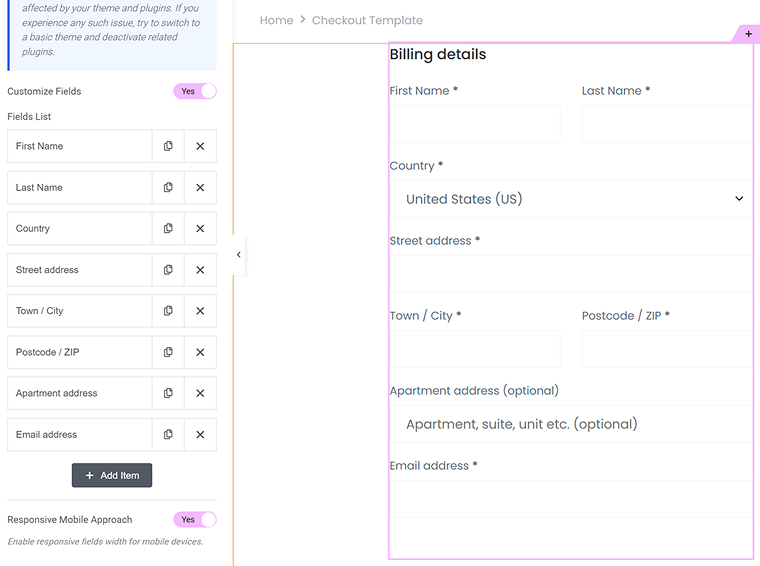
Actually, you can create a completely custom layout for the checkout page, using JetWooBuilder’s widgets.
After the plugin installation, go to Crocoblock > Woo Builder and create a custom template – you can use presets or make it from scratch.
There, you can not only remove fields but also align them into two rows, add placeholders, and perform verification.
Watch the full video tutorial on how to create a custom checkout page using JetWooBuilder:
Issue #3. Too much cognitive effort
Even after removing unnecessary fields, WooCommerce checkout and order forms can be quite overwhelming if they require too much cognitive effort. Here is a great illustration by UX Movement:
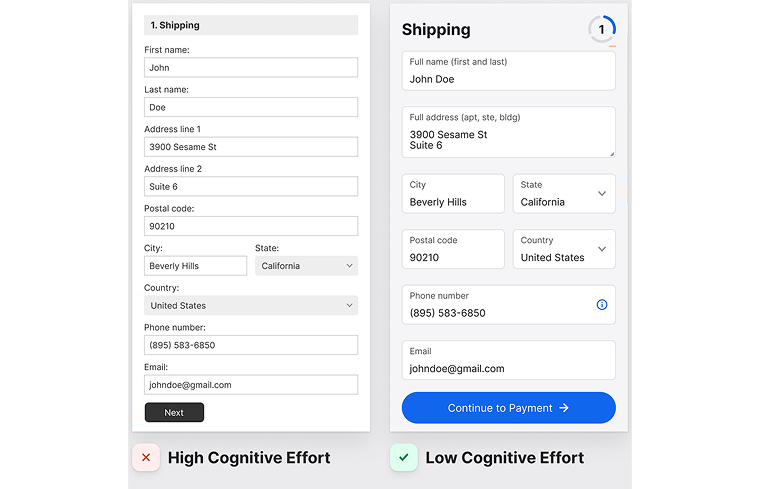
Both forms have the same fields and the same information to collect. But the left one feels as if there are twice as many fields, while the right one feels clear and not overwhelming. So, let’s analyze what can be improved.
What can be changed?
- Vary text size and color intensity – use larger, bolder labels for headings or important instructions, and softer, lighter tones for less critical info. Also, make labels and input text look different.
- Keep form elements consistent – make sure inputs, dropdowns, buttons, and labels share a uniform style and spacing. Predictability in layout reduces mental effort, so the form feels familiar and easy to navigate.
- Group related fields visually and use whitespace or subtle borders to separate logical sections. This breaks the form into bite-sized chunks, so users can focus on one part at a time.
- Use subtle backgrounds to help users focus by giving text fields a soft off-white background, with a clean white input area. It will help the fields stand out without feeling harsh. Plus, reducing the number of visible borders cuts down on visual clutter, so the form feels simpler and less intimidating.
- Increase touch targets on input fields and buttons, as on mobile, bigger clickable areas around text fields prevent frustration from missed taps.
- Use tooltips or descriptions if a field can raise a question about why it’s required.
How to fix
Using JetWooBuilder, you can customize the styling of each field and the whole checkout form and page in general, as well as add additional widgets (such as those for upsell). Click on the form widget and open the styling settings to customize fields visually:
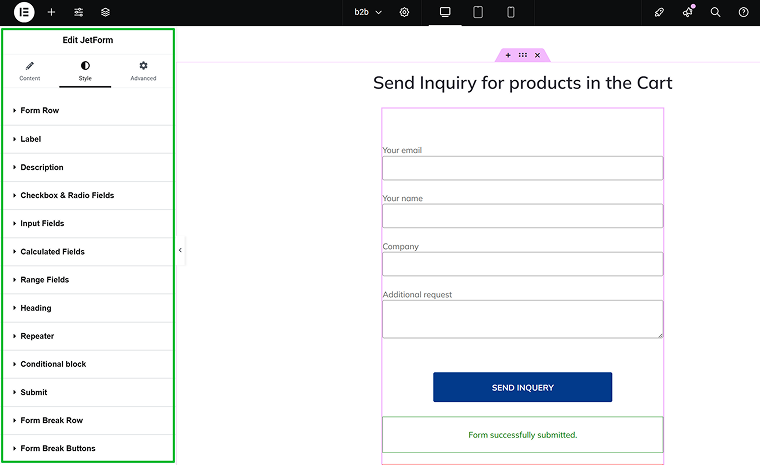
Custom Order Forms for B2B Orders
If you have a catalog website, you can just hide the cart and checkout functionality and replace it with a custom order form instead – create a JetFormBuilder form in the WooCommerce Product template (edit it using JetWooBuilder), just don’t forget to retrieve the page title using hidden field and the “Page Title” from a dropdown – so you will see which product the customer is asking about. You can also add custom fields, using JetEngine – check out the full guide here.
But what if you want to create a B2B request form for the list of products that a customer has already added to the cart?
With JetFormBuilder, this task is seamlessly achievable.
‼️ But first, I should emphasize that the default cart (yoursite.com/cart) and checkout (yoursite.com/checkout) pages are highly controlled by WooCommerce. And even if you try to insert any custom form instead of the order details elements by WooCommerce, you will get nothing.
That’s why the custom inquiry form will be placed on another page.
Step 1. Custom order page and modifying the checkout page
Create a new page, let’s name it B2B. Later, we will insert a form there.
Open the custom Cart page template, created with JetWooBuilder, and edit it: remove the “Proceed to Checkout” button and all the elements and fields with prices. By the way, you can not only remove fields from your Cart table but also add custom fields.
Add a button that will lead to your B2B page. Alternatively, you can create a pop-up with the JetPopup plugin for the inquiry form.
Step 2. Adding custom code
Now, we need to add a little magic – go to Appearance > Theme File Editor and open functions.php file. Insert this code there. It adds a hook for retrieving WooCommerce cart data using the hidden field of the form that we will create.
add_filter( 'jet-form-builder/editor/hidden-field/config', function( $config ) {
	$config['sources'][] = array(
		'value' => 'cart_data',
		'label' => __( 'WooCommerce Cart Data', 'jet-form-builder' ),
	);
	return $config;
});

add_filter( 'jet-form-builder/fields/hidden-field/value-cb', function( $custom_cb, $field_value, $field_instance ) {
	if ( 'cart_data' === $field_value ) {
		return function() {
			if ( ! class_exists( 'WooCommerce' ) || ! WC()->cart ) {
				return '';
			}

			$cart = WC()->cart;
			$lines = [];

			$lines[] = 'Cart total: ' . $cart->get_cart_total();
			$lines[] = 'Items count: ' . $cart->get_cart_contents_count();
			$lines[] = 'Items:';

			foreach ( $cart->get_cart() as $cart_item ) {
				$product = $cart_item['data'];

				$lines[] = sprintf(
					"- %s (SKU: %s), Quantity: %d, Price each: %s, Line total: %s",
					$product->get_name(),
					$product->get_sku() ?: 'N/A',
					$cart_item['quantity'],
					wc_price( $product->get_price() ),
					wc_price( $cart_item['line_total'] )
				);
			}

			return implode( "\n", $lines );
		};
	}

	return $custom_cb;
}, 10, 3 );
And this code is responsible for emptying the cart on form submit:
add_action( 'jet-form-builder/custom-action/empty-cart', function( $request, $action_handler ) {
	if ( ! class_exists( 'WooCommerce' ) || ! WC()->cart ) {
		return;
	}

	WC()->cart->empty_cart();
}, 10, 2 );
The first code snippet will get you the product name, SKU, price, and quantity. If you want to retrieve more information, you can add more fields, using this cheatsheet:
// Get Product general info
$product->get_type();
$product->get_slug();
$product->get_description();
$product->get_short_description();
// Prices
$product->get_price();
$product->get_regular_price();
$product->get_sale_price();
// Other info
$product->get_tax_status();
$product->get_tax_class();
$product->get_manage_stock();
$product->get_stock_quantity();
$product->get_stock_status();
$product->get_upsell_ids();
$product->get_cross_sell_ids();
$product->get_parent_id();
$product->get_children(); // get variations
$product->get_attributes();
$product->get_default_attributes();
Step 3. The B2B order form
Now, let’s create a form. Go to JetFormBuilder > Add New Form, add whatever fields you need – the name, email, company, etc., and let’s proceed to the most important field that will retrieve the cart data.
Add the Hidden field and name it cart_data. You should use this particular field name, not anything else. By default, JetFormBuilder hidden fields have a dropdown with different options that can be retrieved by this field, and there’s no option to pull cart data. But because you’ve added the code above, you will see the “WooCommerce Cart Data” in the dropdown here. Choose it, and your hidden field will now collect and store the cart values.
Now, go to the JetForm tab on the right and add after-submit actions:
- Send Email – choose the email address where the requests will be sent and map the fields – don’t forget to map the cart_data hidden field, with all the cart information.
- Call Hook – we need this action to launch the second code snippet, for emptying the cart on the form submission. Our hook name is empty_cart – write it down in the “Hook name” field.
- Save Records – choose this action, so the records from this form will be saved in JetFormBuilder > Form Records.
Optional actions:
- The Redirect to Page action would be great for redirecting a user to the Thank You page.
- If you want to send requests to CRM or somewhere else, you can use other JetFormBuilder actions, such as MailChimp, GetResponse, and others. You can use one of the premium add-ons to do more advanced things, like generating a PDF.
You can also connect any service with the Call Webhook action by using Make or another integration service.
JetFormBuilder uses the Block Editor UI to create a form, but you don’t have to style the form there. Go to your page (which we’ve created on the first step) – mine is called B2B. Open it with Elementor, drag the JetForm widget where you want to see the form, and select the form we’ve been working on.
In the Style tab, you can find settings for customizing every little detail of the form – fonts, colors, margins and paddings, etc. It’s very convenient for styling your form visually.
That’s it! To test the form, add some products to the cart and fill out the form. Check your email and enjoy your custom product inquiries.
FAQ
The most common reasons include forced account creation, long or confusing forms, unexpected costs, and lack of payment options. Poor mobile experience also contributes heavily to drop-offs.
Yes, with tools like Crocoblock’s JetWooBuilder, you can visually build and customize your checkout and order forms without touching code.
Absolutely. Forcing users to register can create friction, especially for first-time buyers.
Only the essentials. Remove unnecessary fields and logically group the rest.
Use multi-step forms, larger input fields, clear progress indicators, and remove clutter. A responsive, touch-friendly layout is key for mobile success.
Takeaway
Improving your WooCommerce checkout and order forms is all about creating a friendly and inviting experience for your customers. It’s not just about how it looks; it’s about making the shopping process easy and enjoyable. With Crocoblock, you can build clean, fast, and user-friendly designs without needing to be a tech expert. By making a few simple tweaks to the user experience, you can turn those abandoned carts into happy customers placing their orders.
