WordPress loop is one of the most important building blocks of any WordPress website. It’s a crucial part of the implementation of the dynamic site architecture, and having an idea about what it is and how it works is essential.
Table of Contents:
- What Is WordPress Loop?
- Displaying a Loop for a Specific Query
- Displaying Posts in Block Themes
- FAQ
- Bottom Line
What Is WordPress Loop?
In WordPress, the Loop is used to display posts (don’t forget that “post” means not only blog posts). The most obvious example of how the loop works is a standard WordPress archive page with a lot of posts. If the user chooses a certain category, tag, etc., it will show posts of those categories; if not – default settings will be used.
The structure of a basic loop
Non-technical users might think that it takes a lot of code to display sometimes so many posts in the “latest” or any category archive. But in reality, they are being displayed with the help of just a few lines of code. This is the most basic loop:
<?php
if ( have_posts() ) :
   while ( have_posts() ) : the_post();
      // Display post content
   endwhile;
endif;
else: echo ("Your message goes here");
endif;
?>
With other PHP syntax that shows the structure of the code better, it would look like this, and I will add a title and an excerpt there:
<?php
if ( have_posts() ) {
	while ( have_posts() ) {
		the_post();
			the_title();
			the_excerpt();
	} // endwhile
else :
    // When no posts are found, output this text.
    _e( 'Sorry, no posts matched your criteria.' );
} endif;
wp_reset_postdata();
?>
Let’s go through each line to understand what’s going on.
- if
It checks conditions, and if they are matched, the rest of the code will be run.
- while ( have_posts() )
Checks if there are any posts that match the parameters (that can be placed in brackets), and if yes, the loop will go on iterating while there will be no posts left.
- the_post()
It creates a queue of posts inside the while loop. And here, we can add some details about how posts will be displayed.
- the_title() and the_excerpt
Template tags for displaying the post’s title and excerpt.
- endwhile
It closes the while loop.
- else
Opens a block of code with the alternative scenario.
- _e
A function to print the text to be translated.
- endif
Closes the if statement.
- wp_reset_postdata()
This function resets the fetch from the selection defined in this particular query to the global values.
To display the content properly, you will also need some HTML to wrap it:

Also, different functions can be added to the loop code, such as the_permalink, and many conditional tags can be used.
The loop is used as a template constituent (check out template hierarchy) and can actually be used anywhere where posts appear.
WP_Query and WordPress loop
The main job of the loop is to iterate through the data already retrieved from the database. It checks if all the required data is there, gets it from the database, stores it in a variable, and displays it on the front end.
Let’s outline the sequence of events here.
- First, the data is retrieved with the help of the object of WP_Query class based on the URL. When you type the URL in the browser’s address line, it sends a request to the server, where a WordPress core function, in its turn, sends a request to the database and returns some data to the browser.
For example, in the previous code example of the basic loop, the have_posts() is actually calling $wp_query->have_posts() – it checks if there are any posts available to loop over.
It’s like when you come to the Lego shop with all the different Lego sets available to you by default. - Then, it’s time for our while/endwhile loop, which iterates through the query and the data already retrieved in the previous step (with the help of WP_Query) while there’s is something left to work with. Inside this loop is the code that is applicable for each particular post it’s dealing with.
If you set more specific query parameters (to display not all the posts on the website but only specific post types, taxonomies, etc. – we will talk about that later), there will be a list of arguments to define that particular query.
It’s like you have chosen the particular Lego set in that shop and keep playing with it. - $post is a global variable that stores all the information about the current post being processed.
So, only the content that belongs to the particular post will be used. - Template tags, such as the_title(), the_content(), the_excerpt(), etc., are optional, and they display a certain part of the post. Using them, you can display posts exactly the way you want.

Displaying a Loop for a Specific Query
What if I want to make the selection of the displayed posts more specific? For example, show only a certain post type, category, and published date range.
Then, it’s time to use the WP_Query class. It will access the particular data in the database (defined by me) and give the loop some material to iterate through and display on the front end. Also, I can predefine other parameters, such as pagination.
This is an example of the code that will loop only post types “film,” in ASC order, filtered by title and with a pagination of 20 posts per page:
$query_args = array(
	'post_type' => 'film',
	'post_status' => 'publish',
	'order' => 'ASC',
	'orderby' => 'title',
	'posts_per_page' => '20',
);

// The Query
$the_query = new WP_Query( $query_args );

// The Loop
if ( $the_query->have_posts() ) {
	while ( $the_query->have_posts() ) {
		$the_query->the_post();
	}
	/* Restore original Post Data */
	wp_reset_postdata();
} else {
	// no posts found
}
Let’s break down this code:
$query_args sets an array of arguments to specify which posts to retrieve. As you can see, there are several parameters that can be used, and the full list can be found here.
After we have declared the arguments, it’s time to call the $the_query and assign those arguments to it.
Then, if ( $the_query->have_posts() checks if any posts match those arguments that can be found in the query.
If yes, the loop will be executed.
And in the end, it’s important to use wp_reset_postdata(), so the current query arguments would not influence other functions.
Creating custom queries is easier than it seems using a free Crocoblock Query Generator, and we already have a step-by-step guide on how to use it. It’s great that it can output code both in PHP and JSON, and you can find use cases in that guide.
Displaying Posts in Block Themes
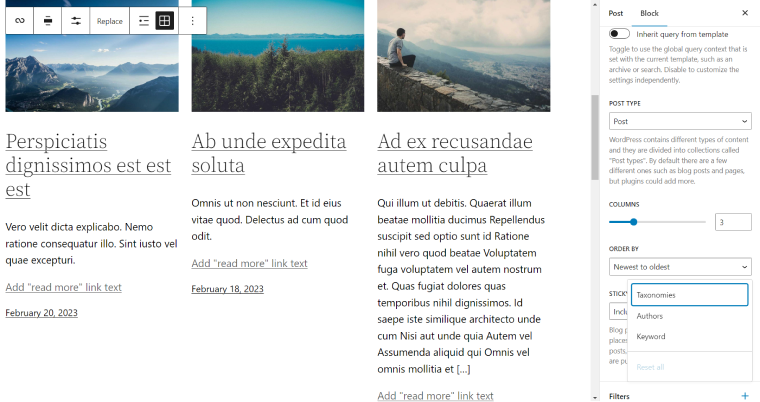
Block themes have a different structure than classic ones. If you edit block templates, the easiest way to display posts is a Loop Query block (or if you simply use Gutenberg editor in a classic theme). If you switch off the “Inherit query from template” toggle, more options will be available to filter your loop. You can choose a post type, category, author, and keywords. Also, inside the loop template, you can add or delete some blocks.

For some projects or archive pages, the functionality of this block is enough, but if you want more control and flexibility, it won’t meet your needs. Let’s say we need to display posts with a particular status, fetch additional meta fields, not include specific posts, etc. In this case, use the JetEngine plugin that works well with Gutenberg and can even extend the functionality of the Query Loop block.
But the best way to fetch posts using JetEngine functionality is to create dynamic listings and make good use of Query Builder, Relationship Builder, and much more.
If you prefer drag-and-drop builders, you probably already know that all the JetPlugins work with Elementor. JetEngine and JetSmartFilters are compatible with Bricks builder.
Using Crocoblock plugins, you will create advanced queries with loops and conditionals without dealing with code at all while having control over every little detail.
FAQ
There are many reasons for it. First, it’s a central “building block” for any website. I guess you don’t want to display your posts by writing an individual block of code with a link to each particular post manually, right?
So loop solves this problem and lets you fetch as many posts as you need just with a few lines of code. Also, there’s a set of requirements as well as styling inside the loop that works for each post that is being displayed. So it makes the process very efficient and straightforward.
It is what the initial loop is called. If you go to Settings > Reading, you will be able to change the number of posts for this loop. And it’s better to use the pre_get_posts hook if you want to modify this loop.
Bottom Line
Understanding the idea of WordPress loop works is essential, even if you don’t plan to become a theme developer but only build a simple site for a small business. I gave just a brief outline linking WordPress Codex a lot because this is where you can find all the technical information.
Also, it’s important to know the useful instruments and plugins to be used while creating a site, query, and loop builders in our case. I’ve already written about Elementor Loop vs. JetEngine before (if you use this builder) and mentioned the Gutenberg Query Loop block there.
If your project doesn’t require a lot of dynamic content, the default WordPress functionality for post fetching might be enough. But if your goal is to have more personalized and targeted content for your users, if you create a marketplace, directory, or membership website, you will need such plugins as JetEngine with all the modules and powerful tools it offers.

