The Loop Builder tool has been introduced in the Elementor 3.8 version, released in autumn 2022. I made the review with first impressions back then, testing it and trying to figure out whether JetEngine Listings are out of business now (spoiler: not at all).
As of now, it’s been 1,5 years, the Loop Builder has finally become a stable feature, and it’s time to have a look at it again.
Table of Contents
Elementor Loop Builder Overview
It seems like Elementor made a statement that it wants to be a full-fledged member of the world of dynamic websites by introducing Loop Builder. This builder was strongly connected with the Flex Container introduction.
If you want to add it to the old site made with columns and sections, go to Elementor > Settings and activate Flexbox Container – the Loop Builder will be activated automatically, and you will see this widget on the edit panel.
If it’s a fresh build, Flexbox will be activated by default.
What does Loop mean?
But first, let’s define the starting point: what is WordPress Loop? In the most general meaning, it’s a WordPress code that outputs posts as long as the specified conditions are met.
But in the context of Elementor Loop, Listings, Gutenberg Query Loop, or even the default WordPress archive, in most cases, we are dealing with the wp_query loop. The Query Loop shows what is being queried from the database under certain conditions. And, as the name suggests, results appear in the loop of the same template.
This is an example of the simplest WordPress query loop:
<?php

// The Query
$the_query = new WP_Query( $args );

// The Loop
if ( $the_query->have_posts() ) {
	echo '<ul>';
	while ( $the_query->have_posts() ) {
		$the_query->the_post();
		echo '<li>' . get_the_title() . '</li>';
	}
	echo '</ul>';
} else {
	// no posts found
}
/* Restore original Post Data */
wp_reset_postdata();
In simple words, such loops are being used to display lists, grids, sliders (or other layouts) populated with posts (including pages, custom posts, media, etc.) and/or their meta fields within a template, common for all of them inside the loop.
JetEngine uses not only the wp_query loop, which gives it a huge advantage.
How does Elementor Loop work?
Before version 3.8, the Loop tool didn’t support custom post types, and since then, it does. It’s great because there are many more cases for its application, not only for displaying blog posts.
I’m testing the 3.19 version of Elementor, which means that a bunch of additional features connected to Loop Builder have appeared here, including the Taxonomy Filter. However, it’s still in Alpha, so don’t use it on the production site.
The “grandfather” of Loop Builder was the Posts widget in Elementor Pro, displaying a grid of posts (default or custom) with just three predesigned templates to choose from. With the Loop Grid, Elementor Pro users get almost full control over every little detail and how it will be displayed.
That’s why Elementor first asks us to create a template after adding the Loop Grid widget. Don’t worry; you can create and edit it without leaving the page you edit. Have a look at the example of how to make the most primitive Loop Grid.
Also, I’ve used the filtering feature (Taxonomy filter widget), which is in Alpha now and requires an activation from the Settings section.
As you can see, it’s very fast and easy. You can customize styling: colors, fonts, paddings, margins, etc. As well as the query – exclude or include posts of certain categories or tags by IDs, select them manually, and so on.
Except for the suggested widgets, you can use different ones. Those that support dynamic tags can be very useful and display content from certain meta fields. For instance, in this example, I’ve used the Icon List and Gallery widgets populated with dynamic data from custom fields. The source for the grid was a custom post type. Also, there are two grid templates on this layout:
Elementor Loop Builder query settings are very straightforward, though. You will not find complex filters here, and if you need really serious customizations, the only way to do it is to add the query ID and then hard code it using that ID in the functions.php file. Knowing PHP is a must for doing it.
Some limitations to consider
Such long-awaited features as a Loop Builder, naturally, raise great expectations. Of course, they might be very subjective; however, let me point out those I had.
No content length limit
Yes, you can easily add the Excerpt widget, and it will display posts’ excerpts. But I guess many of us are used to the fact that all the post grid widgets or plugins just take the specified number of words from the first lines of the post, and we don’t have to fill the Excerpt field unless it’s something specific – a summary, etc.
So, I’ve tried the Post Content widget, but it doesn’t have an option for word limit, nor does the Loop Grid. I know this widget was initially created for making a Single Post template, and it simply inserts the content container. But it seems that it could have to try to get additional properties after the Loop Grid introduction.
Very limited query filtering settings
As I’ve already mentioned, query settings are very simple and basically the same as the Post widget. So, the Elementor team put the bigger priority on the design toolkit expansion, which is quite logical for a visual builder.
However, high hopes of some Elementor fans that the Loop Builder would put many plugins out of business were dashed.
Here are just a few examples: with the Elementor Loop Builder, you still can’t query terms, users, comments, or filter dynamic data displaying via callbacks. It doesn’t replace a proper WooCommerce product grid builder and doesn’t work with third-party data via REST API.
💡 However, if you have the JetSmartFilters plugin, you could use it to apply filters to the Elementor Pro Loop Grid.
When JetEngine Supercharges Elementor
Let’s look at just a few features that make JetEngine such a powerful plugin in the field of rendering dynamic data fields. I will not talk about all of them, but those that can and will definitely expand and enhance Elementor and Elementor Pro functionality.
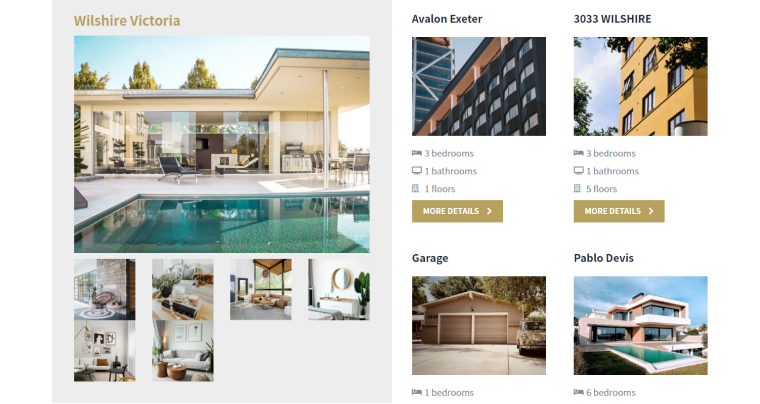
JetEngine Listings
In JetEngine, Listing is a custom WordPress loop where you can modify everything, from query settings to design. They can be reused anywhere on a website, also with additional conditions – so such loops will be even more tailored for the particular page and goal.
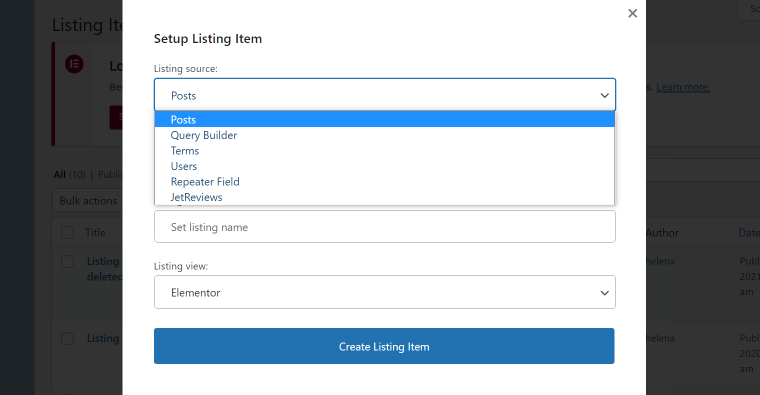
The unique feature of JetEngine Listings is that they can be nested. But it’s important to say that common sense should be applied here, and nesting several big listings will not be good for website performance. Posts, terms, users, repeater fields, or Query Builder can be chosen as the listing source.
Then, you have quite extensive query settings that can be layered. In addition, you can add the Custom Query as a filter.
And finally, you can use macros to refine the query.
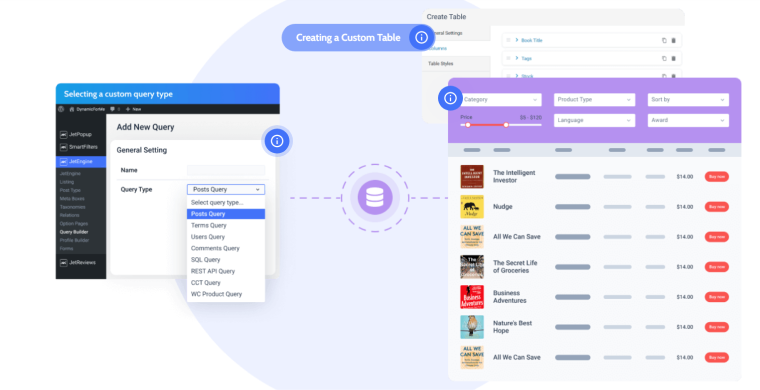
Query Builder
Without any exaggeration, Query Builder (as a part of JetEngine) is an extremely powerful tool with the help of which you can get almost any data: posts, comments, users, WooCommerce products (in the initial form that WooCommerce itself works with them), content from another website received via REST API, data from any database tables or even custom SQL queries. It gives it a huge advantage.
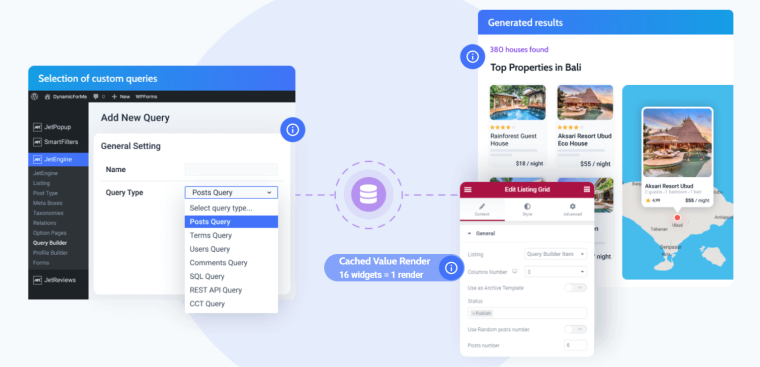
Query Builder works on the back end, so it’s not a visual builder because it offers so many options that it would not be possible to make a drag-and-drop interface for it. But it’s still very user-friendly. You can tweak every little detail in your custom query and use it as complex conditional rules for your future listing.
Custom queries (made in the Query Builder) can be the source for Listings or additional filters for the query. First, go to JetEngine > Query Builder and add a custom query with all the settings.
Then, create a JetEngine Listing (which by itself has many querying options and features), and stack your custom queries previously created in the backend or use it as a listing source.
Overall, the level of flexibility in generating dynamic content is incredible. It has nothing in common with simple widgets, where you can choose only categories, tags, post types, or user roles. Here, you can combine, filter, and overlap results and use all the power of creativity.
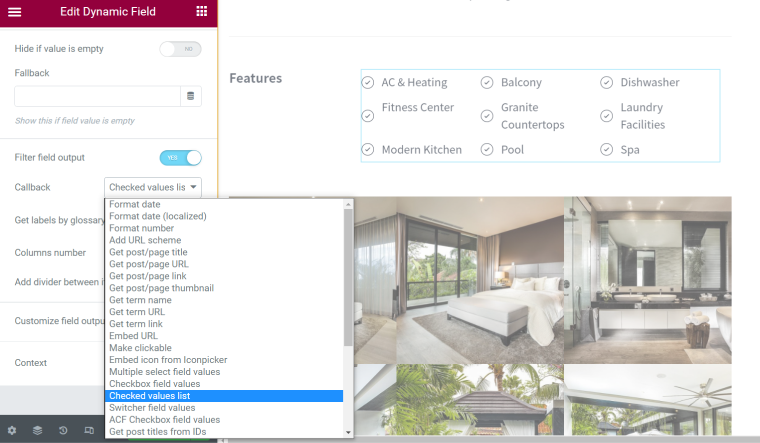
Filter field output
While creating Listings or just making an individual layout, we deal with the Dynamic Field Widget (or Block, in Gutenberg). The powerful feature that allows you to filter and customize data is called Filter field output, and it has a huge list of different callbacks.
Look at the list, and that’s not all:
Dynamic Map Listing module
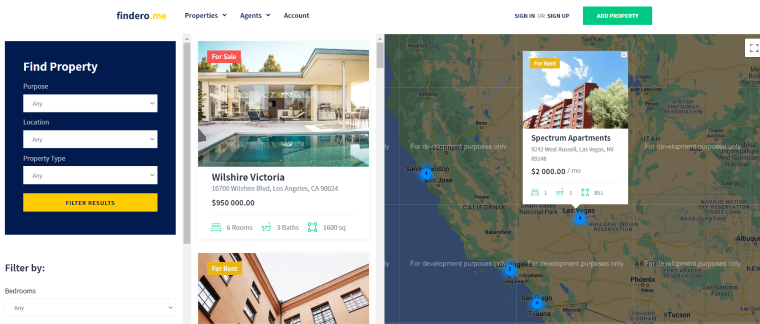
JetEngine has a Map Listing module that must be switched on before using the functionality. Also, the relevant map custom fields should be created and filled to have the data to fetch. But following the instructions, it’s not difficult to do. And voila, you have the map listings just like on Airbnb.
After the recent update, the functionality of this module was extended, and users can even perform a search based on their location.
Dynamic Tables and Charts modules
Dynamic tables populated with data from custom posts and fields can be priceless for many projects. So, JetEngine has a module for this, too. Check out the Dynamic Tables feature and see how it works. And, of course, you can apply the powerful JetSmartFilters plugin to filter and sort their content. Also, create beautiful charts using the website’s data.
Dynamic Listing Calendar
You don’t have to embed Google Calendar with ugly links to display the events because it doesn’t look as beautiful as it should be on the website. Instead, you can form it dynamically using the events already added to the website. Switch on the Calendar module and follow the instructions.
FAQ
Remember that it works only on Elementor Pro. Then, you should go to Elementor > Settings > Experiments and activate Flexbox. At the same tab, activate Loop.
You definitely can have both.
Crocoblock is a set of powerful plugins that work on top of Elementor (Gutenberg and some work with Bricks), so it’s their job to work with complex dynamic layouts. That’s why JetEngine Listings, JetSmartFilters, and other tools will be the best solution in this case.
Summary
I’m not comparing Elementor and JetEngine in any way because the first is a visual builder, and the latter is a tool for dealing with dynamic data using Elementor (Gutenberg or Bricks) builder as a basis. In contrast, JetEngine or the whole Crocoblock plugin collection is not going to become website builders or replace them.
What we are talking about and slightly comparing now is the custom query managing and displaying functionality of both plugins for highly dynamic websites, where the creator wants to have more than just some static pages and a blog.
Elementor Loop Builder is made for creating nice layouts and more flexibility. While JetEngine is all about advanced tasks and juggling dynamic data, placing exactly what you want in a particular place for particular users and under certain conditions.
So, Elementor remains the most popular visual builder on the market, and JetEngine is the most powerful plugin for dealing with dynamic data, bolstered with other JetPlugins for more specific tasks.