This guide will walk you through creating a dynamic invoice system in WordPress using the powerful combination of JetEngine and JetFormBuilder plugins. This setup allows for automatic invoice numbering, dynamic client selection, and PDF generation, among other features.
You can see how these plugins work together and, thus, take what is useful, particularly for your project, as there is a huge variety of cases where similar scenarios can be applied.
If you prefer a video format, this is a full guide for you on YouTube:
Custom Invoice System in WordPress
Before starting to make the invoice system, let’s see the result. You can fill out the fields:

As a result, you get a few things:
- The invoice is saved on your website dashboard, along with all the data, and the relation with the client this invoice is made for will be connected to the invoice.
- A PDF file is generated. You can either redirect to the file to download it, send it by email, or transfer it elsewhere by connecting third-party services via a webhook.

Essential plugins
To build this system, you’ll need the following plugins:
- JetEngine: for creating custom content types (CCTs), relations, and glossaries.
- JetFormBuilder: for building the invoice submission form.
- JetForm Builder PDF Attachment add-on. An add-on for JetForm Builder to generate downloadable PDF invoices.
- Fluent Snippets (optional): to add simple PHP snippets, like the one for date manipulation. You can use another snippet plugin or insert the code into functions.php.
- I used Bricks as a builder for my website, but you can use any builder, as JetFormBuilder is builder-agnostic. It has dedicated widgets for Bricks and Elementor, so you can style everything on the front-end, but you can insert the form anywhere using a shortcode. JetEngine here works on the backend, so it will also be compatible with anything.
Creating and setting up Custom Content Types (CCTs)
We need to create a Custom Content Type (CCT) to store invoices. CCT is a JetEngine-specific content type that, unlike CPT, doesn’t have a front-end template and stores values in a separate database table by default – one post per record. This is great for performance and ideal for things like invoice records that don’t need to be displayed as front-end pages.
First, activate the CCT module in JetEngine > JetEngine.
Then go to JetEngine > Custom Content Types and create two CCTs.
The first one is called Invoice System.
There, add meta fields corresponding to your invoice details, such as:
- Invoice Date;
- Invoice Description;
- Invoice Number;
- Repeater fields for invoice details (hourly and service-based):
- For “hourly”: Description, Hours, Unit Price, Total;
- For “service-based”: Description, Quantity, Unit Price, Total.
The second CCT is called Client Details and has the following meta fields:
- Client’s name;
- Email;
- Phone Number;
- Preferred Currency (USD or Euro). I am using the JetEngine’s Glossary tool for the currencies Select field; it’s especially handy if there are many currencies.
Establishing relations between CCTs
I need relations to connect customers with invoices, so when you open a customer’s record, you will see all the invoices made for them, and vice versa.
Go to JetEngine > Relations and create a relation between Client Details and Invoice System CCTs. Set the relation type to “One to Many” with Client Details as a parent, meaning one client can have multiple invoices, but an invoice can have only one client.
The Option Page
The Option Pages feature is the way to save data in a global database – simply put, the data stored there can be dynamically fetched from anywhere, including forms, on the front end, or any post template.
Set up an options page to keep my data (name, address, etc). If you change the fields there, they will be automatically replaced wherever they are inserted.
To create an option page, go to JetEngine > Option Page. Create a new named Basic Invoicing Details. This is what the page will store:
- The latest invoice number, and while creating the page, make it the Number field and set the minimum value. Later, it will be updated automatically – when the form is submitted, the +1 will be added to the number. I will discuss this in the Post-Submit Actions section.
- You can also store company-related details here, such as your address, email, website, and phone number, which will be dynamically fetched for the PDF.
Building the Invoice Form with JetFormBuilder
After creating the CCT with all the fields, you can click the “Create a form” button on the right – it will create a form for you and map the input fields with the existing CCT fields. Of course, you can edit the form, add fields, etc.
My form is called “Add New Invoice System Item,” and it has the following fields:
- Current Invoice Number (Hidden Field):
- We need it to fetch the number from the option page to use it later in the Calculated field. Leave the Manual input value and open the Block tab on the right panel. There, in the Value section, click on the database icon. You will see the pop-up where you can choose your Latest Invoice Number field from the option page.

- Calculated field for the current Invoice Number:
- This field fetches the value of the Current Invoice Number Hidden field I’ve just created – click on the wrench icon to get the macro for the field and add “+1,” so each new invoice has an incremented number.
- Invoice Currency (Select field):
- Populate options dynamically from a JetEngine Glossary called “Invoice Currency.”
- Client (Select Field):
- This is a dynamically generated select field where you fetch options from a JetEngine Query (e.g., Query ID 6) that retrieves all “Client Details” CCT items. The format is 6|_ID|client_name. To learn more about the way such macros are formed, read this article.
- The value should be the client’s ID, and the display name should be the client’s name.
- Invoice Date (Date field and Hidden field):
- The primary date field should save as a timestamp for easier data manipulation and querying in the backend.
- Add a Hidden field, “dates as regular dates,” to capture the date in a readable format before it’s converted to a timestamp for PDF display.
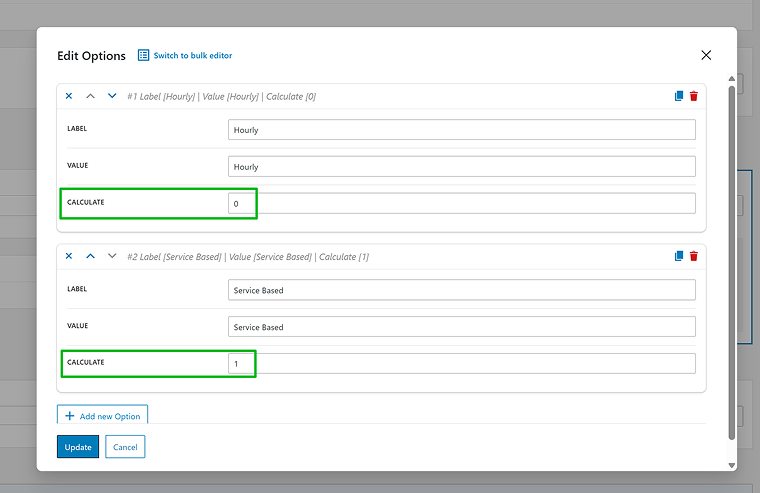
- Work Type (Select field):
- A Select field with manual items: “Hourly” and “Service-based.” When you add these options, you will see a field called Calculate. Add “0” for the first option and “1” for the second – we will use it later for the Total, to easily operate conditional blocks.
- Invoice Name (Text field):
- A simple Text input for the invoice’s name.
- Invoice Status (Select field):
- Contains various statuses like “Unpaid,” “Partly Paid,” etc.
Now, there will be the most interesting part – conditional blocks with repeater fields.
I use two conditional blocks, one for hourly and one for service-based invoice details.
- Hourly Conditional Block with the Condition – Display this block if the Work Type field is equal to “Hourly.”
- Repeater Field:
- Add Description, Hours, Unit Price, and Total (Calculated Field, also with the hours*unit_price formula).
- Repeater fields have settings to handle the value of the particular repeater later in the form. On the right panel, in the Calculate Repeater Row Value, choose “Custom” and use the hours*unit_price formula to determine the total for each line item. This formula will calculate the sum of all the rows.
- Repeater Field:
- Invoice Subtotal Amount Calculated Field – sums the totals from the repeater field.
- Invoice Total Amount – subtracts the Cost Reduction from the Invoice Subtotal Amount.
- Service-Based Conditional Block with the Condition – Display this block if the Work Type field is equal to “Service-based.”
- Repeater Field:
- Add Description, Quantity, Unit Price, and Total fields inside the repeater.
- Calculation formula for the repeater field – set the Calculate Repeater Raw Value to “Custom” and use quantity*unit_price.
- Invoice Subtotal Amount Calculated Field – sums the totals from the repeater field.
- Invoice Amount – subtracts the Cost Reduction from the Invoice Subtotal Amount.
- Repeater Field:
It’s time to get a repeater for a price discount. We use a repeater to calculate different discounts – e.g., seasonal, promo code, etc., not just one.
- Repeater Field named Cost Reduction:
- Add the Name of the Deduction (Text field) and the Value of Deduction (Number field) fields.
- Calculation formula for the repeater field – set the Calculate Repeater Raw Value to “Custom” and simply put the %value_of_reduction% field value to sum all discounts.
Generate a unique hash for PDF names to get unique PDF file names:
- Add a Hidden field named “Unique Hash.” Set its default value to a “Random String” with a specified length (e.g., 21 characters) and choose to generate numbers only. You can add other field values, e.g., client’s name, invoice number, etc.
Totals:
- Invoice Subtotal – a Calculated field with this formula:
%FIELD::work_type% == 0 ? %FIELD::invoice_sub_total_amount_hourly% : %FIELD::invoice_sub_total_amount_service%
Remember, we set the “0” and “1” values for the Work Type Select field. This is where they are used. This formula says, “If the Work Type value equals 0, then calculate the value from the Hourly conditional block; otherwise, calculate the Service block subtotal field.” You will find the tips for these ternary operators in the description for the Calculated field.
- Invoice Total – a Calculated field with this formula:
%FIELD::work_type% == 0 ? %FIELD::invoice_total_hourly% : %FIELD::invoice_amount%
This formula is almost the same as for Subtotal, but it takes data not from subtotals from Conditional fields, but from totals.
Post-Submit actions
Open the JetForm tab on the right, and add post-submit actions:
- Update Options, and in the Settings for this action, choose the option page we’ve created – it will show all the fields the page has. In front of the Invoice number field, insert the form field name that retrieves the current invoice number and add +1. This will update the field every time you submit the form.
- Edit Insert/Update Custom Content Type Item – the form fields should be matched with the corresponding CCT fields.
- Save Form Records.
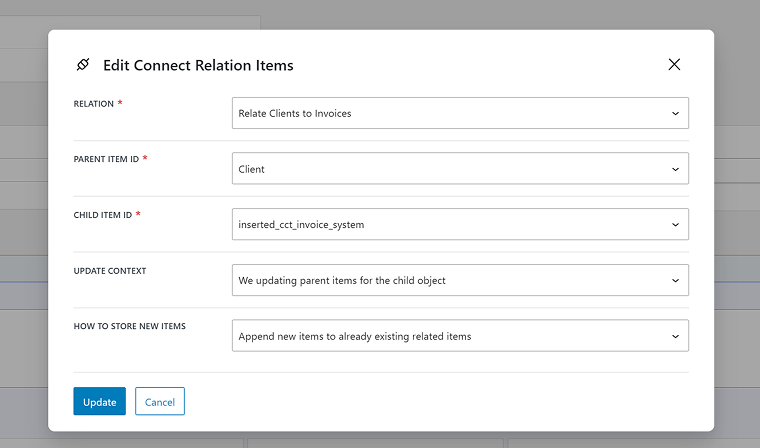
- Connect Relation Items to automatically create a relation between the clients and the invoice once the invoice is generated.
- Generate PDF – you will need the Pro Addon for this action. The JetForm Builder PDF Attachment add-on automatically generates downloadable PDF invoices upon form submission. The system automatically populates the PDF with the details filled in the form, including dynamic elements like invoice number, date, client information, and itemized lists with calculated totals.
- Set up the name – take it from the Unique Hash field.
However, to create a PDF, you must first create a template for it. Click the “Create Template” button and add the desired elements using the Block Editor. The main thing is to add dynamic values from the form, and you can access them by clicking on the [\] icon to get the macros for all the fields.
Just like in the form, I used two conditional blocks here: one for the hourly work type and one for the service-based. Just add a Conditional block and the corresponding settings.
Inside these blocks, I will need the data from repeaters. However, the way Repeater handles its data doesn’t allow for getting individual values. That’s why, to fetch them, use the code from the next section. And, as macros, use this:
%repeater_content(invoice_details_hourly)% for hourly work type and %repeater_content(invoice_details_regular)% for service-based,
then the fields inside the repeater: %description%, %quantity%, %unit_price%, %total%.
There are more details about this macro structure in the next section.
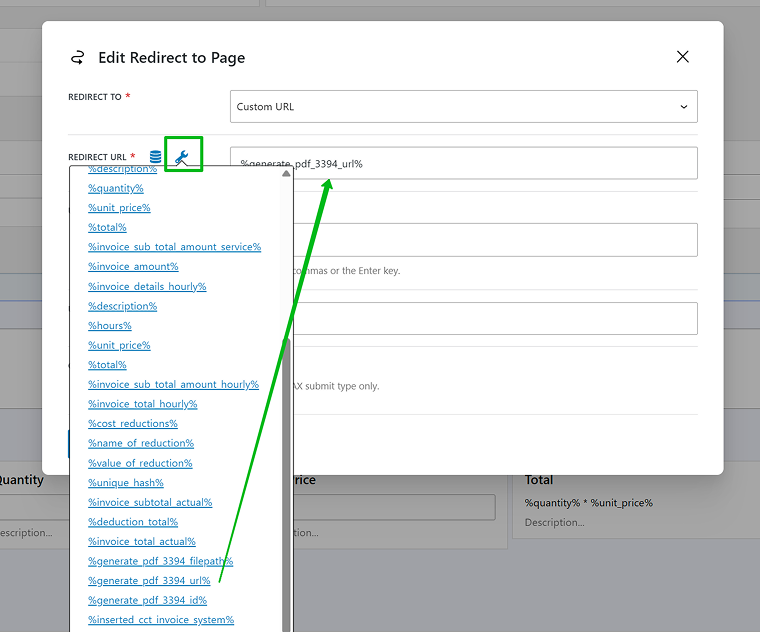
- Redirect to Page. Once you’ve added the Generate PDF action, you will see a new macro when clicking the wrench icon. So, set the URL dynamically by selecting it from the list.
You can add more actions – for example, send an email with the PDF attached, etc.
Additional code
Add this code to your functions.php file or use a code snippet plugin. This code allows you to display JetFormBuilder repeater field data as readable text using a custom macro syntax like %repeater_content(repeater_key|separator)%…%repeater_content%.
It parses each repeater item, replaces placeholders like {item_count} and %field_name%, and joins them with a chosen separator (<br>, \n, etc.). It works in email content and rich text fields, and we need it for PDF.
/*
for example:
%repeater_content(repeater1|br)%
{item_count}: %text1%
%repeater_content%
or
%repeater_content(repeater1|nl)%
or
%repeater_content(repeater1|, )%
etc.
for the first line
you can also use it in Hidden fields (turn Render in HTML off), putting that in Manual input with the prefix mailmacros::
*/

class JFB_Readable_Repeater {

	public function __construct() {
		add_filter( 'jet-form-builder/rich-content', array( $this, 'convert' ), 0 );
		add_action( 'jet-form-builder/form-handler/before-send', array( $this, 'do_macros_in_fields' ) );
	}

	public function is_new() {
		return function_exists( 'jet_fb_context' );
	}

	public function get_form_data() {

		if ( $this->is_new() ) {
			$form_data = jet_fb_context()->resolve_request();
		} else {
			$form_data = jet_fb_action_handler()->request_data;
		}

		return $form_data;

	}

	public function do_macros_in_fields( $form_handler ) {

		$form_data = $this->get_form_data();

		foreach ( $form_data as $key => $value ) {

			if ( ! is_scalar( $value ) || false === strpos( $value, 'mailmacros::' ) ) {
				continue;
			}

			$value = str_replace( 'mailmacros::', '', $value );

			if ( $this->is_new() ) {
				jet_fb_context()->update_request( $this->convert( $value ), $key );
			} else {
				$action_handler->request_data[ $key ] = $this->convert( $value );
			}

		}

	}

	public function convert( $content ) {

		$pattern = '/%repeater_content\((.+?)\)%(.+?)%repeater_content%/ms';

		$form_data = $this->get_form_data();

		if ( class_exists( '\Jet_Form_Builder\Classes\Macros_Parser' ) ) {
			$parser = new \Jet_Form_Builder\Classes\Macros_Parser();
		} else {
			$parser = new \JFB_Modules\Rich_Content\Macros_Parser();
		}

		$content = preg_replace_callback( $pattern, function( $matches ) use ( $form_data, $parser ) {

			$params = explode( '|', $matches[1] );

			$repeater_key = $params[0];
			$delimiter    = $params[1] ?? ', ';

			$delimiter = str_replace( "br", "<br>", $delimiter );
			$delimiter = str_replace( "nl", "\n", $delimiter );
            $delimiter = str_replace( "tr", "</tr><tr>", $delimiter );

			$repeater_value = $form_data[ $repeater_key ];

			if ( empty( $repeater_value ) || ! is_array( $repeater_value ) ) {
				return '';
			}

			$template = $matches[2];

			$repeater_content = array();

			$count = 1;

			foreach ( $repeater_value as $item ) {
				$item_content = str_replace( '{item_count}', $count, $template );
				$repeater_content[] = trim( $parser->parse_macros( $item_content, $item ), "\n\r" );
				$count++;
			}

			return implode( $delimiter, $repeater_content );

		}, $content );

		return $content;

	}

}

new JFB_Readable_Repeater();
FAQ
Yes, with JetEngine and JetFormBuilder, you can create a fully functional invoice system without writing code. Most of the setup uses visual interfaces, though optional PHP snippets can enhance functionality.
Use the JetFormBuilder PDF Attachment add-on to automatically generate and download PDF invoices after form submission. You can also send them via email or to external tools, such as CRMs, using webhooks.
CCT (Custom Content Type) is optimized for backend storage and performance – it doesn’t create front-end pages like CPT (Custom Post Type). It’s ideal for storing structured data, such as invoices.
Yes, JetEngine’s relations feature allows you to link invoices to clients dynamically. This way, each invoice is automatically tied to the correct client record.
Absolutely. JetFormBuilder works with any page builder, including Elementor, Gutenberg, Bricks, and others. The form logic and CCT setup are independent of the page builder you use.
Takeaway
Creating your own invoice system in WordPress doesn’t have to be complicated. With JetEngine and JetFormBuilder, you can set up a smart, flexible solution that fits your workflow, eliminating the need for extra tools or services. From saving invoices in the dashboard to generating PDFs and linking them to customers, everything runs smoothly and stays under your control.


