When you’re managing a growing WooCommerce store, presenting your products in a clear and user-friendly way can make all the difference, especially if it’s a catalog website (B2C or B2B) or a store with a lot of goods that don’t need too much visuals to showcase them.
A filterable product table isn’t just a design choice – it’s a tool to boost conversions. In this guide, I’ll break down two methods to create a powerful filterable product table in WordPress tailored to your store’s unique needs.
Table of Contents
- WordPress Filterable Table With JetProductTables Plugin
- WordPress Dynamic Table With Filters Using JetEngine and JetSmartFilters
- FAQ
- Takeaway
WordPress Filterable Table With JetProductTables Plugin
🏆 This is the best solution if you want to add a filterable product table quickly and easily.
Make sure that you have the JetProductTables plugin installed and activated on your website. Then, go to WooCommerce > Settings and open the Product Table tab.
There, you can set up columns, filters, and designs and then save them as presets. After that, you can generate a shortcode and insert it into pages using any editor.
Also, you can use a Block Editor block and adjust the table right there.
💡 Follow the instructions from these guides.
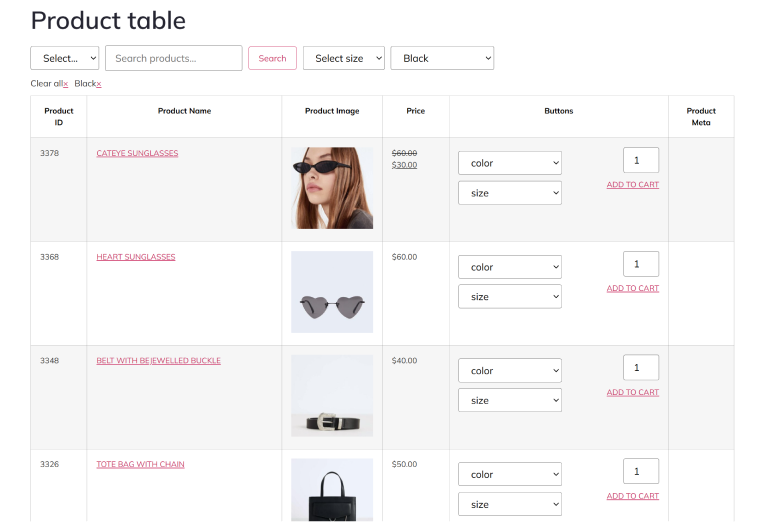
The interface is very intuitive and straightforward: you just select what you want to display and apply all the filters available for WooCommerce (by taxonomy, attributes, search, or custom meta fields) and pagination.
If you have variable products, the options will be automatically displayed next to the “Add to Cart” button so that customers can choose the variation right in the table.
WordPress Dynamic Table With Filters Using JetEngine and JetSmartFilters
🏆 This is the best solution if you want to create a very custom dynamic table based on a Query Builder query and data you have on your website (products or even other post types or meta field values). The granulated selection of content is one of the biggest advantages of JetEngine’s Dynamic Tables Builder. You can even create tables based on an SQL query or REST API endpoints. Also, it supports the JetSmartFilters plugin.
Creating a dynamic table
To create a table, you should have JetEngine and JetSmartFilters installed and activated.
First, add a new query using JetEngine > Query Builder.
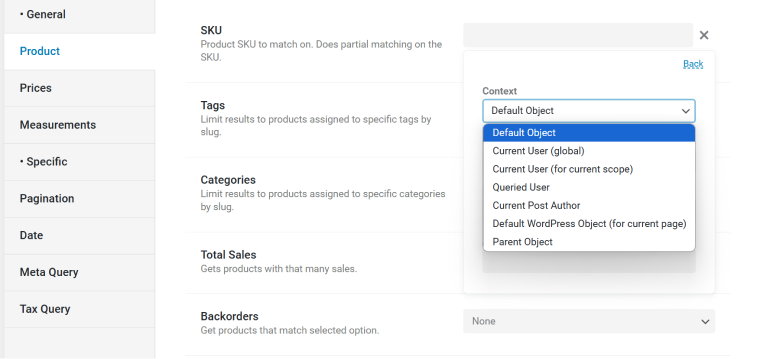
In this case, it should be a WooCommerce Product Query type, the one added specifically for Woo products. Name it and also add a custom ID. It will be used later for filtering.

Then, you will be able to choose from a wide range of options, including macros that are available when you click on the database icon to the right of the input fields. Thus, you can not only choose particular IDs, SKUs, taxonomies, and so on but also use dynamic values – such as “related,” “current,” and many others.
But this is not all. There is the Advanced settings link in the macros window, which gives even more options to layer over the macro settings.
When the query is ready, go to JetEngine > JetEngine and activate the Dynamic Table Builder module. It will become available in the JetEngine dashboard menu.
Create a table, choose the query first, and press the “Fetch Data” button. Then, start adding columns. Use the Raw Value data source and select the fields from the query you want to display. There’s a Template option available as well; it’s useful if you want to add something fancier than text to the columns, for example, an image gallery or some widgets/blocks. To use it, you should first create a Listing template based on the same query.
💡 Read this guide on how to do it.
In my example below, I used only raw values, the Filter field output, and the Customize Column Output tools. The first adds callbacks; for instance, I can choose the “Product URL” field and, using the “Embed URL” callback, turn it into a link. The second one is for adding anything to the value (which is represented by the %s macro), from adding currency signs to HTML tags for applying custom CSS.
To add an “Add to cart” button, I used the Post ID field and a bit of HTML to fire the action that will automatically add the product to the cart:
<a href="?add-to-cart=%1$s&redirect=checkout" class="button quick-buy">Add to cart</a>❗ Pay attention to the fact that this code works only for simple, not variable, products.
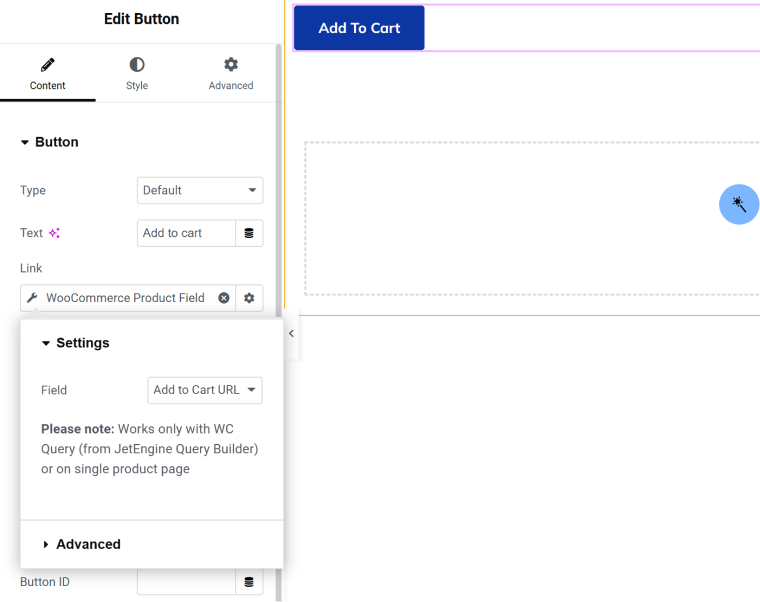
If you want to add a button that will either add to the cart (for simple products) or redirect to the page for choosing options (for variable products), use a template. Create a Listing template for a button based on the same query as the table, add a button widget, and then in the dynamic tags, choose “WooCommerce Product Field” > “Add to Cart URL” field.
Save it, and add this template as a source to the table.
Adding filters
The table is ready, and you can add it to the page using the Dynamic Table widget/block for Elementor, Block Editor, or Bricks.
Let’s add filters to it – make sure the JetSmartFilters plugin is installed and activated.
First, create filters on the dashboard through JetSmartFilters > Add New. Then, using Elementor, Block Editor, or Bricks, add corresponding filter widgets to the page, choose the filter you’ve created, and set up the rest of the elements, which is pretty intuitive.
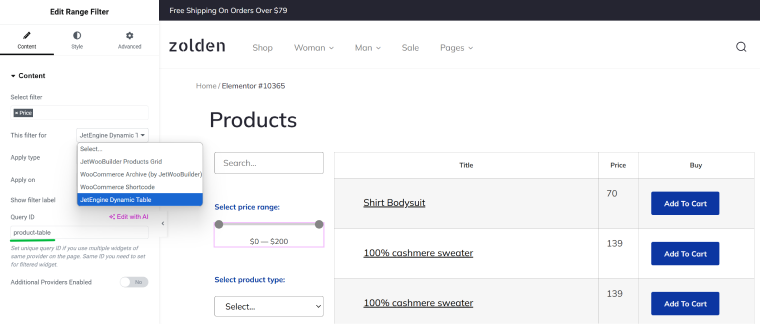
If you use multiple tables or filterable elements on the same page, you should specify a Query ID. In the beginning, when creating a query for the dynamic table, I mentioned that it’s better to add a unique ID for the query for future filtering. So, use this ID in the filter settings and also assign it as a CSS ID for the Dynamic Table widget.
💡 Read more about setting up filters for dynamic tables here.
⚙️ Also, if you want to use pagination for your table, follow this guide.
FAQ
You can create a filterable table in WordPress by using a dedicated WordPress table filter plugin. In this article, I described two ways to implement it.
The easiest way is to use the JetProductTables plugin. This plugin provides user-friendly tools for adding sortable and filterable tables to your WordPress site.
Yes, many plugins support WooCommerce product tables with filtering options. For example, plugins like JetEngine, in combination with JetSmartFilter,s can create filterable product tables with category, price, or custom attribute filters.
Coding isn’t necessary if you use a WordPress table filter plugin. However, custom coding can be useful if you need unique features or layouts that plugins don’t provide.
A WordPress table filter plugin saves time by offering pre-built filtering and sorting features and often integrates seamlessly with your existing theme or WooCommerce store.
Takeaway
Filterable product tables are a must-have for many eCommerce sites, especially those selling many goods without emphasis on stunning visual representation. They allow customers to make quicker choices and purchases, which is very important for good sales.
To create a filterable table for WordPress, particularly for WooCommerce products, use one of the plugins described in this article.
JetProductTables plugin will help you display WooCommerce products as a table with buttons, filters, and pagination. You can select either all the products or those belonging to particular categories or tags or having specific attributes, IDs, or SKUs.
JetEngine combined with JetSmartFilters is useful for creating WordPress tables with filters that are based on a very custom query, SQL query, or data fetched using REST API.
